-
【树莓派不吃灰】命令篇⑥ 了解树莓派Boot分区,学习Linux启动流程

目录
- ❤️ 博客主页 单片机菜鸟哥,一个野生非专业硬件IOT爱好者 ❤️
- ❤️ 本篇创建记录 2022-11-19 ❤️
- ❤️ 本篇更新记录 2022-11-19 ❤️
- 🎉 欢迎关注 🔎点赞 👍收藏 ⭐️留言 📝
- 🙏 此博客均由博主单独编写,不存在任何商业团队运营,如发现错误,请留言轰炸哦!及时修正!感谢支持!
- 🔥 Arduino ESP8266教程累计帮助过超过1W+同学入门学习硬件网络编程,入选过选修课程,刊登过无线电杂志🔥
1. Linux启动过程
学了一段时间树莓派,想想还是要回归到一些linux的基本学习。
对于linux系统的初学者来说,理解并掌握linux系统启动流程能够使你够深入的理解linux系统,还可以通过系统的启动过程来分析问题解决问题。
可以分为5个阶段:
- 内核的引导
- 运行 init初始化进程
- 运行级别
- 系统初始化,加载开机启动程序
- 用户登录系统
- 进入 login shell

1.1 内核引导
当计算机打开电源后,首先是
BIOS开机自检,按照BIOS中设置的启动设备(通常是硬盘)来启动。
操作系统接管硬件以后,首先读入/boot目录下的内核文件。

1.2 运行init初始化进程 —— 初始化系统环境
init 进程是系统所有进程的起点,你可以把它比拟成系统所有进程的老祖宗,没有这个进程,系统中任何进程都不会启动。

系统不同,init程序不一样。init程序的类型:
SysV: init,CentOS 5之前, 配置文件:/etc/inittab。Upstart: init,CentOS 6, 配置文件:/etc/inittab,/etc/init/*.conf。Systemd: systemd,CentOS 7,配置文件:/usr/lib/systemd/system、/etc/systemd/system。目前树莓派就是用这个,所以后面分析init过程,也是重点针对这个。
由于init是
第一个运行的程序,它的进程编号(pid)就是1。其他所有进程都从它衍生,都是它的子进程。注意,Debian Linux环境下,内核文件加载以后,就开始运行第一个程序
/sbin/init。1.3 运行级别 —— runlevel
许多程序需要开机启动。
它们在
Windows叫做"服务"(service),在Linux就叫做"守护进程"(daemon)。init进程的一大任务,就是去运行这些开机启动的程序。
但是,不同的场合需要启动不同的程序,比如用作服务器时,需要启动Apache,用作桌面就不需要。
Linux允许为不同的场合,分配不同的开机启动程序,这就叫做"运行级别"(runlevel)。也就是说,启动时根据"运行级别",确定要运行哪些程序。
Linux预置七种运行级别(0-6)。一般来说,0是关机,1是单用户模式(也就是维护模式),6是重启。运行级别2-5,各个发行版不太一样,对于Debian来说,都是同样的多用户模式(也就是正常模式)。运行级别0:系统停机状态,系统默认运行级别不能设为0,否则不能正常启动运行级别1:单用户工作状态,root权限,用于系统维护,禁止远程登录运行级别2:多用户状态(没有NFS)运行级别3:完全的多用户状态(有NFS),登录后进入控制台命令行模式运行级别4:系统未使用,保留运行级别5:X11控制台,登录后进入图形GUI模式运行级别6:系统正常关闭并重启,默认运行级别不能设为6,否则不能正常启动
那么,运行级别有些什么程序呢,系统怎么知道每个级别应该加载哪些程序呢?…回答是每个运行级别在
/etc目录下面,都有一个对应的子目录,指定要加载的程序。/etc/rc0.d /etc/rc1.d /etc/rc2.d /etc/rc3.d /etc/rc4.d /etc/rc5.d /etc/rc6.d- 1
- 2
- 3
- 4
- 5
- 6
- 7
上面目录名中的"
rc",表示run command(运行程序),最后的d表示directory(目录)。下面让我们看看树莓派 /etc/rc3.d 目录中到底指定了哪些程序。pi@raspberrypi:/etc $ ls -al /etc/rc3.d total 16 drwxr-xr-x 2 root root 4096 Nov 9 15:03 . drwxr-xr-x 134 root root 12288 Nov 18 16:34 .. lrwxrwxrwx 1 root root 13 Sep 22 01:13 K01fio -> ../init.d/fio lrwxrwxrwx 1 root root 22 Sep 22 01:07 S01avahi-daemon -> ../init.d/avahi-daemon lrwxrwxrwx 1 root root 19 Sep 22 01:06 S01bluetooth -> ../init.d/bluetooth lrwxrwxrwx 1 root root 26 Sep 22 01:07 S01console-setup.sh -> ../init.d/console-setup.sh lrwxrwxrwx 1 root root 14 Sep 22 01:03 S01cron -> ../init.d/cron lrwxrwxrwx 1 root root 14 Sep 22 01:13 S01cups -> ../init.d/cups lrwxrwxrwx 1 root root 22 Sep 22 01:13 S01cups-browsed -> ../init.d/cups-browsed lrwxrwxrwx 1 root root 14 Sep 22 01:06 S01dbus -> ../init.d/dbus lrwxrwxrwx 1 root root 16 Sep 22 01:07 S01dhcpcd -> ../init.d/dhcpcd lrwxrwxrwx 1 root root 16 Nov 9 15:03 S01docker -> ../init.d/docker lrwxrwxrwx 1 root root 24 Sep 22 01:07 S01dphys-swapfile -> ../init.d/dphys-swapfile lrwxrwxrwx 1 root root 17 Sep 22 01:09 S01lightdm -> ../init.d/lightdm lrwxrwxrwx 1 root root 17 Sep 22 01:03 S01paxctld -> ../init.d/paxctld lrwxrwxrwx 1 root root 18 Sep 22 01:10 S01plymouth -> ../init.d/plymouth lrwxrwxrwx 1 root root 37 Sep 22 01:13 S01pulseaudio-enable-autospawn -> ../init.d/pulseaudio-enable-autospawn lrwxrwxrwx 1 root root 22 Sep 22 01:05 S01raspi-config -> ../init.d/raspi-config lrwxrwxrwx 1 root root 26 Sep 22 01:06 S01rng-tools-debian -> ../init.d/rng-tools-debian lrwxrwxrwx 1 root root 15 Sep 22 01:06 S01rsync -> ../init.d/rsync lrwxrwxrwx 1 root root 17 Sep 22 01:03 S01rsyslog -> ../init.d/rsyslog lrwxrwxrwx 1 root root 15 Sep 22 01:13 S01saned -> ../init.d/saned lrwxrwxrwx 1 root root 13 Sep 22 01:07 S01ssh -> ../init.d/ssh lrwxrwxrwx 1 root root 14 Sep 22 01:06 S01sudo -> ../init.d/sudo lrwxrwxrwx 1 root root 22 Sep 22 01:05 S01triggerhappy -> ../init.d/triggerhappy pi@raspberrypi:/etc $- 1
- 2
- 3
- 4
- 5
- 6
- 7
- 8
- 9
- 10
- 11
- 12
- 13
- 14
- 15
- 16
- 17
- 18
- 19
- 20
- 21
- 22
- 23
- 24
- 25
- 26
- 27
- 28
可以看到:文件名都是"
字母S/K+两位数字+程序名"的形式。字母S表示Start,也就是启动的意思(启动脚本的运行参数为start)
字母K表示Kill,也就是关闭的意思,即如果从其他运行级别切换过来,需要关闭的程序(启动脚本的运行参数为stop)。保证是当init改变运行级别时,所有相关的守护进程都将重启。
后面的两位数字表示处理顺序,数字越小越早处理。数字相同时,则按照程序名的字母顺序启动,所以avahi-daemon会先于bluetooth启动。这个目录里的所有文件就是启动时要加载的程序。如果想增加或删除某些程序,不建议手动修改
/etc/rcN.d目录,最好是用一些专门命令进行管理。参考下面文档Manage Linux init or startup scripts
Remove Unwanted Startup Files or Services1.4 系统初始化 —— 加载开机启动程序
前面提到,七种预设的"运行级别"各自有一个目录,存放需要开机启动的程序。不难想到,如果多个"运行级别"需要启动同一个程序,那么这个程序的启动脚本,就会在每一个目录里都有一个拷贝。这样会造成管理上的困扰:如果要修改启动脚本,岂不是每个目录都要改一遍?
Linux的解决办法,就是七个 /etc/rcN.d 目录里列出的程序,都设为
链接文件,指向另外一个目录/etc/init.d,真正的启动脚本都统一放在这个目录中。init进程逐一加载开机启动程序,其实就是运行这个目录里的启动脚本。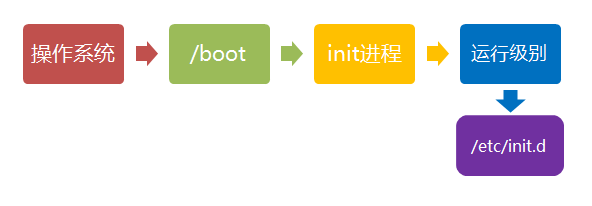
下面就是链接文件真正的指向。pi@raspberrypi:/etc $ ls -l /etc/rc3.d total 0 lrwxrwxrwx 1 root root 13 Sep 22 01:13 K01fio -> ../init.d/fio lrwxrwxrwx 1 root root 22 Sep 22 01:07 S01avahi-daemon -> ../init.d/avahi-daemon lrwxrwxrwx 1 root root 19 Sep 22 01:06 S01bluetooth -> ../init.d/bluetooth lrwxrwxrwx 1 root root 26 Sep 22 01:07 S01console-setup.sh -> ../init.d/console-setup.sh lrwxrwxrwx 1 root root 14 Sep 22 01:03 S01cron -> ../init.d/cron lrwxrwxrwx 1 root root 14 Sep 22 01:13 S01cups -> ../init.d/cups lrwxrwxrwx 1 root root 22 Sep 22 01:13 S01cups-browsed -> ../init.d/cups-browsed lrwxrwxrwx 1 root root 14 Sep 22 01:06 S01dbus -> ../init.d/dbus lrwxrwxrwx 1 root root 16 Sep 22 01:07 S01dhcpcd -> ../init.d/dhcpcd lrwxrwxrwx 1 root root 16 Nov 9 15:03 S01docker -> ../init.d/docker lrwxrwxrwx 1 root root 24 Sep 22 01:07 S01dphys-swapfile -> ../init.d/dphys-swapfile lrwxrwxrwx 1 root root 17 Sep 22 01:09 S01lightdm -> ../init.d/lightdm lrwxrwxrwx 1 root root 17 Sep 22 01:03 S01paxctld -> ../init.d/paxctld lrwxrwxrwx 1 root root 18 Sep 22 01:10 S01plymouth -> ../init.d/plymouth lrwxrwxrwx 1 root root 37 Sep 22 01:13 S01pulseaudio-enable-autospawn -> ../init.d/pulseaudio-enable-autospawn lrwxrwxrwx 1 root root 22 Sep 22 01:05 S01raspi-config -> ../init.d/raspi-config lrwxrwxrwx 1 root root 26 Sep 22 01:06 S01rng-tools-debian -> ../init.d/rng-tools-debian lrwxrwxrwx 1 root root 15 Sep 22 01:06 S01rsync -> ../init.d/rsync lrwxrwxrwx 1 root root 17 Sep 22 01:03 S01rsyslog -> ../init.d/rsyslog lrwxrwxrwx 1 root root 15 Sep 22 01:13 S01saned -> ../init.d/saned lrwxrwxrwx 1 root root 13 Sep 22 01:07 S01ssh -> ../init.d/ssh lrwxrwxrwx 1 root root 14 Sep 22 01:06 S01sudo -> ../init.d/sudo lrwxrwxrwx 1 root root 22 Sep 22 01:05 S01triggerhappy -> ../init.d/triggerhappy pi@raspberrypi:/etc $- 1
- 2
- 3
- 4
- 5
- 6
- 7
- 8
- 9
- 10
- 11
- 12
- 13
- 14
- 15
- 16
- 17
- 18
- 19
- 20
- 21
- 22
- 23
- 24
- 25
- 26
这样做的另一个好处,就是如果你要手动关闭或重启某个进程,直接到目录 /etc/init.d 中寻找启动脚本即可。比如,我要重启ssh,就运行下面的命令:
sudo /etc/init.d/ssh restart
/etc/init.d 这个目录名最后一个字母d,是directory的意思,表示这是一个目录,用来与程序 /etc/init 区分。
1.5 用户登录
开机启动程序加载完毕以后,就要让用户登录了。

一般来说,用户的登录方式有三种:- 命令行登录
- ssh登录
- 图形界面登录
这三种情况,都有自己的方式对用户进行认证。
1.5.1 方式1:命令行登录
init进程调用getty程序(意为get teletype),让用户输入用户名和密码。输入完成后,再调用login程序,核对密码(Debian还会再多运行一个身份核对程序/etc/pam.d/login)。如果密码正确,就从文件 /etc/passwd 读取该用户指定的shell,然后
启动这个shell。1.5.2 方式2:ssh登录(常用)
这时系统调用sshd程序(Debian还会再运行/etc/pam.d/ssh ),取代getty和login,然后
启动shell。1.5.3 方式3:图形界面登录(常用)
init进程调用显示管理器,Gnome图形界面对应的显示管理器为gdm(GNOME Display Manager),然后用户输入用户名和密码。如果密码正确,就读取/etc/gdm3/Xsession,启动用户的会话。
1.6 进入 login shell
所谓shell,简单说就是命令行界面,让用户可以直接与操作系统对话。用户登录时打开的shell,就叫做login shell。
Debian默认的shell是Bash,它会读入一系列的配置文件。上一步的三种情况,在这一步的处理,也存在差异。- (1)命令行登录:首先读入 /etc/profile,这是对所有用户都有效的配置;然后依次寻找下面三个文件,这是针对当前用户的配置。
~/.bash_profile ~/.bash_login ~/.profile- 1
- 2
- 3
需要注意的是,这三个文件只要有一个存在,就不再读入后面的文件了。比如,要是 ~/.bash_profile 存在,就不会再读入后面两个文件了。
- (2)ssh登录:与第一种情况完全相同。
- (3)图形界面登录:只加载 /etc/profile 和 /.profile。也就是说,/.bash_profile 不管有没有,都不会运行。
1.7 打开 non-login shell(选择性了解)
老实说,上一步完成以后,Linux的启动过程就算结束了,用户已经可以看到命令行提示符或者图形界面了。但是,为了内容的完整,必须再介绍一下这一步。
用户进入操作系统以后,常常会再手动开启一个shell。这个shell就叫做 non-login shell,意思是它不同于登录时出现的那个shell,不读取/etc/profile和.profile等配置文件。

non-login shell的重要性,不仅在于它是用户最常接触的那个shell,还在于它会读入用户自己的bash配置文件 ~/.bashrc。大多数时候,我们对于bash的定制,都是写在这个文件里面的。你也许会问,要是不进入 non-login shell,岂不是.bashrc就不会运行了,因此bash 也就不能完成定制了?事实上,Debian已经考虑到这个问题了,请打开文件 ~/.profile,可以看到下面的代码:
if [ -n "$BASH_VERSION" ]; then if [ -f "$HOME/.bashrc" ]; then . "$HOME/.bashrc" fi fi- 1
- 2
- 3
- 4
- 5
上面代码先判断变量 $BASH_VERSION 是否有值,然后判断主目录下是否存在 .bashrc 文件,如果存在就运行该文件。第三行开头的那个点,是source命令的简写形式,表示运行某个文件,写成"source ~/.bashrc"也是可以的。
if [ -f ~/.profile ]; then . ~/.profile fi- 1
- 2
- 3
这样一来,不管是哪种情况,.bashrc都会执行,用户的设置可以放心地都写入这个文件了。
Bash的设置之所以如此繁琐,是由于历史原因造成的。早期的时候,计算机运行速度很慢,载入配置文件需要很长时间,Bash的作者只好把配置文件分成了几个部分,阶段性载入。系统的通用设置放在 /etc/profile,用户个人的、需要被所有子进程继承的设置放在.profile,不需要被继承的设置放在.bashrc。
顺便提一下,除了Linux以外, Mac OS X 使用的shell也是Bash。但是,它只加载.bash_profile,然后在.bash_profile里面调用.bashrc。而且,不管是ssh登录,还是在图形界面里启动shell窗口,都是如此。
2. 树莓派Linux启动流程
参考文档:
- https://thekandyancode.wordpress.com/2013/09/21/how-the-raspberry-pi-boots-up/
- 树莓派官方文档 bcm283x-boot-process


这里以4B为例子,树莓派4B具有一款博通的BCM2711系统芯片, 当启动时,CPU 会处于复位状态,由GPU 核心负责启动系统。注意:树莓派和传统的PC不同之处在于,树莓派是
SoC设备,CPU和GPU等外设集成在一颗芯片内部,树莓派4B是BCM2711,因此,加电后,CPU可以在GPU初始化完成后再进行初始化工作。2.1 BCM2xxx Boot Process
这里以BCM283x为例子:

翻译内容:
BCM283x芯片包含了一个处理视频内核的GPU以及一个ARM CPU 内核。这个GPU包含了一个DSP处理器以及用于图像,视频编解码,3D图形和图像合成的加速器。
在BCM283x设备中,GPU的DSP核实最先启动的。DSP主要负责在启动ARM处理器之前通用的设置和整理。
树莓派和CM板在启动阶段分为3个阶段:
1.GPU的DSP复位并执行芯片内部ROM中一小段代码。这段代码的唯一目的就是通过一个外部的接口启动加载第二阶段的引导加载程序。在树莓派和CM板上,这段代码首先在SD卡或者emmc上寻找第二阶段启动加载程序,这个程序文件名是bootcode.bin,这个文件位于一个FAT32文件系统的第一分区。如果在SD卡或者emmc中没有发现bootcode.bin文件,那么启动ROM代码就会处于USB启动模式,期望通过USB接口获得第二阶段的启动加载程序。
2.第二阶段启动加载程序(SD卡或emmc启动是bootcode.bin,USB启动时usbbootcode.bin)主要负责设置LPDDR2 SDRAM 接口和多种其他关键的系统功能,然后加载和执行GPU固件(start.elf,在SD卡分的初始分区也就是boot分区中)
3. 文件start.elf接管和负责进一步的系统设置以及启动ARM处理器子系统,包含了运行GPU各个部分的固件。start.elf文件首先读取dt-blob.bin(有些会编译进去start.elf文件)文件以便初始化gpio引脚的状态以及GPU特定的接口和时钟,然后就解析文件config.txt。以上这些完成后,在开始arm子系统以及将设备树的数据传递给Linux内核之前,这个文件加载一个ARM设备树文件(如:cm板bcm2708-rpi-cm.dtb )以及其他任何在config.txt文件中指定的设备树覆盖。上面看来启动bootloader分为了三个阶段。
- 当给树莓派加电后,最先执行保存在ROM中的代码,这些代码是芯片出厂的时候就设定的,通常被称为
first-stage bootloader,这些代码固化硬件内部,可以认为是SoC硬件的一部分。 - first-stage bootloader的主要工作是加载位于SD卡上第一个分区的bootloader(称为
second-stage bootloader),第一个分区必须是FAT32格式。second-stage bootloader 主要是bootloader.bin。可以把SD卡取出,放到Windows或Linux系统中,就可以看到bootloader.bin文件。需要说明的是,上电或者重启后,cpu和ram都没有初始化,因此,执行second-stage bootloader 的实体是GPU,bootcode.bin是加载到GPU的128KB大小的L2Cache中,再执行的。bootcode.bin的主要工作是初始化ram,并把start.elf(也位于SD卡的第一分区)加载到内存中。 - start.elf就是
third-stage bootloader,start.efl从第一个分区中加载config.txt,可以把config.txt想象成bios配置信息,内部的配置都可以改变。SoC进入了boot的最后阶段,start.efl把kernel.img,ramdisk,dtb加载到内存的预定地址,然后向cpu发出重启信号,因此cpu就可以从内存的预定地址执行kernel的代码,就进入了软件定义的系统启动流程。
所以整个流程概括为:
- 1 运行GPU中的ROM代码,相当于bootloader第一步。
- 2 运行SD卡中的bootcode.bin文件(在/boot 目录),启动文件(
Raspberry Pi 4上未使用bootcode.bin,因为它已由板载EEPROM中的启动代码替换),相当于bootloader第二步。 - 3 运行SD卡中的
start.elf文件,相当于bootloader最后一步。 - 4.运行SD卡的
kernel.img内核镜像,相当于启动linux内核,这时候交回给cpu。 - 5 挂载文件系统,设备树文件
2.2 树莓派 boot分区
官方参考资料
树莓派 /boot 放置Linux内核以及其他用来启动树莓派的软件包。
树莓派引导文件存储在SD卡的第一个分区中,即
/boot分区,该分区的文件系统是FAT,所以可以在Windows,macOS和Linux设备上读取这个分区。pi@raspberrypi:/boot $ ls -al total 49892 drwxr-xr-x 4 root root 4096 Jan 1 1970 . drwxr-xr-x 18 root root 4096 Nov 11 05:33 .. -rwxr-xr-x 1 root root 28111 Nov 8 14:49 bcm2708-rpi-b.dtb -rwxr-xr-x 1 root root 28418 Nov 8 14:49 bcm2708-rpi-b-plus.dtb -rwxr-xr-x 1 root root 27790 Nov 8 14:49 bcm2708-rpi-b-rev1.dtb -rwxr-xr-x 1 root root 28032 Nov 8 14:49 bcm2708-rpi-cm.dtb -rwxr-xr-x 1 root root 27856 Nov 8 14:49 bcm2708-rpi-zero.dtb -rwxr-xr-x 1 root root 29267 Nov 8 14:49 bcm2708-rpi-zero-w.dtb -rwxr-xr-x 1 root root 29305 Nov 8 14:49 bcm2709-rpi-2-b.dtb -rwxr-xr-x 1 root root 29304 Nov 8 14:49 bcm2709-rpi-cm2.dtb -rwxr-xr-x 1 root root 30170 Nov 8 14:49 bcm2710-rpi-2-b.dtb -rwxr-xr-x 1 root root 31922 Nov 8 14:49 bcm2710-rpi-3-b.dtb -rwxr-xr-x 1 root root 32533 Nov 8 14:49 bcm2710-rpi-3-b-plus.dtb -rwxr-xr-x 1 root root 30157 Nov 8 14:49 bcm2710-rpi-cm3.dtb -rwxr-xr-x 1 root root 31230 Nov 8 14:49 bcm2710-rpi-zero-2.dtb -rwxr-xr-x 1 root root 31230 Nov 8 14:49 bcm2710-rpi-zero-2-w.dtb -rwxr-xr-x 1 root root 52457 Nov 8 14:49 bcm2711-rpi-400.dtb -rwxr-xr-x 1 root root 52325 Nov 8 14:49 bcm2711-rpi-4-b.dtb -rwxr-xr-x 1 root root 52910 Nov 8 14:49 bcm2711-rpi-cm4.dtb -rwxr-xr-x 1 root root 50224 Nov 8 14:49 bcm2711-rpi-cm4s.dtb -rwxr-xr-x 1 root root 52476 Nov 8 14:49 bootcode.bin -rwxr-xr-x 1 root root 147 Sep 22 02:01 cmdline.txt -rwxr-xr-x 1 root root 2075 Sep 22 01:04 config.txt -rwxr-xr-x 1 root root 18693 Nov 8 14:49 COPYING.linux -rwxr-xr-x 1 root root 3170 Nov 8 14:49 fixup4cd.dat -rwxr-xr-x 1 root root 5400 Nov 8 14:49 fixup4.dat -rwxr-xr-x 1 root root 8382 Nov 8 14:49 fixup4db.dat -rwxr-xr-x 1 root root 8386 Nov 8 14:49 fixup4x.dat -rwxr-xr-x 1 root root 3170 Nov 8 14:49 fixup_cd.dat -rwxr-xr-x 1 root root 7265 Nov 8 14:49 fixup.dat -rwxr-xr-x 1 root root 10229 Nov 8 14:49 fixup_db.dat -rwxr-xr-x 1 root root 10227 Nov 8 14:49 fixup_x.dat -rwxr-xr-x 1 root root 145 Sep 22 02:01 issue.txt -rwxr-xr-x 1 root root 6631856 Nov 8 14:48 kernel7.img -rwxr-xr-x 1 root root 7040088 Nov 8 14:48 kernel7l.img -rwxr-xr-x 1 root root 8193871 Nov 8 14:49 kernel8.img -rwxr-xr-x 1 root root 6269568 Nov 8 14:48 kernel.img -rwxr-xr-x 1 root root 1594 Nov 8 14:49 LICENCE.broadcom drwxr-xr-x 2 root root 24576 Nov 8 14:49 overlays -rwxr-xr-x 1 root root 805084 Nov 8 14:49 start4cd.elf -rwxr-xr-x 1 root root 3746856 Nov 8 14:49 start4db.elf -rwxr-xr-x 1 root root 2250656 Nov 8 14:49 start4.elf -rwxr-xr-x 1 root root 2998120 Nov 8 14:49 start4x.elf -rwxr-xr-x 1 root root 805084 Nov 8 14:49 start_cd.elf -rwxr-xr-x 1 root root 4818728 Nov 8 14:49 start_db.elf -rwxr-xr-x 1 root root 2974880 Nov 8 14:49 start.elf -rwxr-xr-x 1 root root 3721800 Nov 8 14:49 start_x.elf drwxr-xr-x 2 root root 2048 Nov 4 22:30 'System Volume Information' pi@raspberrypi:/boot $- 1
- 2
- 3
- 4
- 5
- 6
- 7
- 8
- 9
- 10
- 11
- 12
- 13
- 14
- 15
- 16
- 17
- 18
- 19
- 20
- 21
- 22
- 23
- 24
- 25
- 26
- 27
- 28
- 29
- 30
- 31
- 32
- 33
- 34
- 35
- 36
- 37
- 38
- 39
- 40
- 41
- 42
- 43
- 44
- 45
- 46
- 47
- 48
- 49
- 50
- 51
当树莓派通电时,它将从启动分区(/boot)中加载各种文件以启动各种处理器,然后启动Linux内核。
当Linux启动后,启动分区将挂载为/boot。
SD 卡里的 boot 需要包含如下文件:
- overlays:存放设备树,必须有
- bcm2711-rpi-4-b:设备树文件
- bootcode.bin:第二阶段的bootloader,必须存在(4B除外)
- fixup*.dat :链接器文件,与 start*.elf 文件匹配
- start*.elf :GPU基本固件,第三阶段启动器
- kernel.img :linux内核镜像,也可以为uboot,然后再进一步启动内核
- config.txt :该文件是启动过程第三阶段用来读取参数的。
- cmdline.txt :是树莓派原生系统启动时传给内核的参数
2.2.1 bootcode.bin
这是
引导加载程序,由SoC在引导时加载,它执行一些非常基本的设置,然后加载其中一个start*.elf文件。注意:Raspberry Pi 4上未使用bootcode.bin,因为它已由板载EEPROM中的启动代码替换。
2.2.2 start*.elf
pi@raspberrypi:/boot $ ls -al | grep start -rwxr-xr-x 1 root root 805084 Nov 8 14:49 start4cd.elf -rwxr-xr-x 1 root root 3746856 Nov 8 14:49 start4db.elf -rwxr-xr-x 1 root root 2250656 Nov 8 14:49 start4.elf -rwxr-xr-x 1 root root 2998120 Nov 8 14:49 start4x.elf -rwxr-xr-x 1 root root 805084 Nov 8 14:49 start_cd.elf -rwxr-xr-x 1 root root 4818728 Nov 8 14:49 start_db.elf -rwxr-xr-x 1 root root 2974880 Nov 8 14:49 start.elf -rwxr-xr-x 1 root root 3721800 Nov 8 14:49 start_x.elf pi@raspberrypi:/boot $- 1
- 2
- 3
- 4
- 5
- 6
- 7
- 8
- 9
- 10
这些是二进制 (blob) 固件,加载到SoC中的VideoCore上,然后接管启动过程。
start.elf是基本固件start_x.elf包括相机驱动程序和编解码器start_db.elf是固件的调试版本,start_cd.elf是简化版本,不支持编解码器和3D之类的硬件模块,并且在gpu_mem=16中指定时使用config.txt。
start4.elf,start4x.elf,start4cd.elf和start4db.elf是树莓派4的固件文件。2.2.3 fixup* .dat
pi@raspberrypi:/boot $ ls -al | grep fixup -rwxr-xr-x 1 root root 3170 Nov 8 14:49 fixup4cd.dat -rwxr-xr-x 1 root root 5400 Nov 8 14:49 fixup4.dat -rwxr-xr-x 1 root root 8382 Nov 8 14:49 fixup4db.dat -rwxr-xr-x 1 root root 8386 Nov 8 14:49 fixup4x.dat -rwxr-xr-x 1 root root 3170 Nov 8 14:49 fixup_cd.dat -rwxr-xr-x 1 root root 7265 Nov 8 14:49 fixup.dat -rwxr-xr-x 1 root root 10229 Nov 8 14:49 fixup_db.dat -rwxr-xr-x 1 root root 10227 Nov 8 14:49 fixup_x.dat- 1
- 2
- 3
- 4
- 5
- 6
- 7
- 8
- 9
这些是链接器文件,与 start*.elf 列出的文件配对。
2.2.4 kernel
引导文件夹将包含用于不同树莓派型号的各种内核映像文件:

pi@raspberrypi:/boot $ lscpu Architecture: armv7l Byte Order: Little Endian CPU(s): 4 On-line CPU(s) list: 0-3 Thread(s) per core: 1 Core(s) per socket: 4 Socket(s): 1 Vendor ID: ARM Model: 3 Model name: Cortex-A72 Stepping: r0p3 CPU max MHz: 1500.0000 CPU min MHz: 600.0000 BogoMIPS: 108.00 Vulnerability Itlb multihit: Not affected Vulnerability L1tf: Not affected Vulnerability Mds: Not affected Vulnerability Meltdown: Not affected Vulnerability Mmio stale data: Not affected Vulnerability Retbleed: Not affected Vulnerability Spec store bypass: Not affected Vulnerability Spectre v1: Mitigation; __user pointer sanitization Vulnerability Spectre v2: Vulnerable Vulnerability Srbds: Not affected Vulnerability Tsx async abort: Not affected Flags: half thumb fastmult vfp edsp neon vfpv3 tls vfpv4 idiva idivt vfpd32 lpae evtstrm crc32 pi@raspberrypi:/boot $ ls -al | grep kernel -rwxr-xr-x 1 root root 6631856 Nov 8 14:48 kernel7.img -rwxr-xr-x 1 root root 7040088 Nov 8 14:48 kernel7l.img -rwxr-xr-x 1 root root 8193871 Nov 8 14:49 kernel8.img -rwxr-xr-x 1 root root 6269568 Nov 8 14:48 kernel.img pi@raspberrypi:/boot $- 1
- 2
- 3
- 4
- 5
- 6
- 7
- 8
- 9
- 10
- 11
- 12
- 13
- 14
- 15
- 16
- 17
- 18
- 19
- 20
- 21
- 22
- 23
- 24
- 25
- 26
- 27
- 28
- 29
- 30
- 31
- 32
- 33
- 34
- 35
注:
lscpu命令是 armv7l,表示用于32位系统(即除了kernel8.img一切),以及 aarch64 用于64位系统。2.2.5 cmdline.txt
引导时,内核命令行会传递到kernel内核。
pi@raspberrypi:/boot $ cat cmdline.txt console=serial0,115200 console=tty1 root=PARTUUID=81ab9192-02 rootfstype=ext4 fsck.repair=yes rootwait quiet splash plymouth.ignore-serial-consoles- 1
- 2
2.2.6 config.txt
树莓派因为没有BIOS,所以Raspbian对设备的加载都是依赖在
/boot/config.txt中的配置来加载。当Linux内核加载时,会读取 /boot/config.txt 中的设备配置和设备参数配置来把设备动态加载到Device Tree(DT)中。官方参考资料:
pi@raspberrypi:/boot $ cat config.txt # For more options and information see # http://rpf.io/configtxt # Some settings may impact device functionality. See link above for details # uncomment if you get no picture on HDMI for a default "safe" mode #hdmi_safe=1 # uncomment the following to adjust overscan. Use positive numbers if console # goes off screen, and negative if there is too much border #overscan_left=16 #overscan_right=16 #overscan_top=16 #overscan_bottom=16 # uncomment to force a console size. By default it will be display's size minus # overscan. #framebuffer_width=1280 #framebuffer_height=720 # uncomment if hdmi display is not detected and composite is being output #hdmi_force_hotplug=1 # uncomment to force a specific HDMI mode (this will force VGA) #hdmi_group=1 #hdmi_mode=1 # uncomment to force a HDMI mode rather than DVI. This can make audio work in # DMT (computer monitor) modes #hdmi_drive=2 # uncomment to increase signal to HDMI, if you have interference, blanking, or # no display #config_hdmi_boost=4 # uncomment for composite PAL #sdtv_mode=2 #uncomment to overclock the arm. 700 MHz is the default. #arm_freq=800 # Uncomment some or all of these to enable the optional hardware interfaces #dtparam=i2c_arm=on #dtparam=i2s=on #dtparam=spi=on # Uncomment this to enable infrared communication. #dtoverlay=gpio-ir,gpio_pin=17 #dtoverlay=gpio-ir-tx,gpio_pin=18 # Additional overlays and parameters are documented /boot/overlays/README # Enable audio (loads snd_bcm2835) dtparam=audio=on # Automatically load overlays for detected cameras camera_auto_detect=1 # Automatically load overlays for detected DSI displays display_auto_detect=1 # Enable DRM VC4 V3D driver dtoverlay=vc4-kms-v3d max_framebuffers=2 # Disable compensation for displays with overscan disable_overscan=1 [cm4] # Enable host mode on the 2711 built-in XHCI USB controller. # This line should be removed if the legacy DWC2 controller is required # (e.g. for USB device mode) or if USB support is not required. otg_mode=1 [all] [pi4] # Run as fast as firmware / board allows arm_boost=1 [all] pi@raspberrypi:/boot $- 1
- 2
- 3
- 4
- 5
- 6
- 7
- 8
- 9
- 10
- 11
- 12
- 13
- 14
- 15
- 16
- 17
- 18
- 19
- 20
- 21
- 22
- 23
- 24
- 25
- 26
- 27
- 28
- 29
- 30
- 31
- 32
- 33
- 34
- 35
- 36
- 37
- 38
- 39
- 40
- 41
- 42
- 43
- 44
- 45
- 46
- 47
- 48
- 49
- 50
- 51
- 52
- 53
- 54
- 55
- 56
- 57
- 58
- 59
- 60
- 61
- 62
- 63
- 64
- 65
- 66
- 67
- 68
- 69
- 70
- 71
- 72
- 73
- 74
- 75
- 76
- 77
- 78
- 79
- 80
- 81
- 82
- 83
start.elf读取存放系统配置的文件 config.txt,根据其内容设置 CPU 运行参数及内存分配情况,随后将用户代码加载至内存,启动 CPU;CPU 启动后,加载内核进行启动。
系统会先搜寻 config.txt 中参数
kernel=xxx指定的文件作为接下来接受系统控制权的对象,树莓派默认该文件是 linux 内核,我们可以替换为用 uboot 作为新一个 bootloader 然后之后再去启动 linux 内核。如果 config.txt 里没指定 kernel 参数,则默认是先后搜寻 kernel8.img、kernel8-32.img、kernel7.img、kernel.img,分别对应 ARMv8-aarch64、ARMv8-aarch32、ARMv7 和之前版本的。
2.2.7 dtb
设备树文件,有各种设备树blob文件,其扩展名为.dtb。它们包含树莓派各种模型的硬件定义,并在启动时用于根据检测到的树莓派模型来设置内核。
pi@raspberrypi:/boot $ ls -al | grep dtb -rwxr-xr-x 1 root root 28111 Nov 8 14:49 bcm2708-rpi-b.dtb -rwxr-xr-x 1 root root 28418 Nov 8 14:49 bcm2708-rpi-b-plus.dtb -rwxr-xr-x 1 root root 27790 Nov 8 14:49 bcm2708-rpi-b-rev1.dtb -rwxr-xr-x 1 root root 28032 Nov 8 14:49 bcm2708-rpi-cm.dtb -rwxr-xr-x 1 root root 27856 Nov 8 14:49 bcm2708-rpi-zero.dtb -rwxr-xr-x 1 root root 29267 Nov 8 14:49 bcm2708-rpi-zero-w.dtb -rwxr-xr-x 1 root root 29305 Nov 8 14:49 bcm2709-rpi-2-b.dtb -rwxr-xr-x 1 root root 29304 Nov 8 14:49 bcm2709-rpi-cm2.dtb -rwxr-xr-x 1 root root 30170 Nov 8 14:49 bcm2710-rpi-2-b.dtb -rwxr-xr-x 1 root root 31922 Nov 8 14:49 bcm2710-rpi-3-b.dtb -rwxr-xr-x 1 root root 32533 Nov 8 14:49 bcm2710-rpi-3-b-plus.dtb -rwxr-xr-x 1 root root 30157 Nov 8 14:49 bcm2710-rpi-cm3.dtb -rwxr-xr-x 1 root root 31230 Nov 8 14:49 bcm2710-rpi-zero-2.dtb -rwxr-xr-x 1 root root 31230 Nov 8 14:49 bcm2710-rpi-zero-2-w.dtb -rwxr-xr-x 1 root root 52457 Nov 8 14:49 bcm2711-rpi-400.dtb -rwxr-xr-x 1 root root 52325 Nov 8 14:49 bcm2711-rpi-4-b.dtb -rwxr-xr-x 1 root root 52910 Nov 8 14:49 bcm2711-rpi-cm4.dtb -rwxr-xr-x 1 root root 50224 Nov 8 14:49 bcm2711-rpi-cm4s.dtb pi@raspberrypi:/boot $- 1
- 2
- 3
- 4
- 5
- 6
- 7
- 8
- 9
- 10
- 11
- 12
- 13
- 14
- 15
- 16
- 17
- 18
- 19
- 20
2.2.8 overlays Folder
设备树覆盖。在overlays子文件夹中包含设备树覆盖。这些用于配置可能连接到系统的各种硬件设备,例如Raspberry Pi Touch Display或第三方音板。使用以下条目中的条目来选择这些覆盖层config.txt。
2.3 树莓派的boot启动过程
为了降低成本,树莓派省去了传统计算机用来存储引导加载程序的板载存储器(BIOS), 直接把引导程序放在了SD卡中。
当启动时,ARM Cortex-A7的CPU会处于复位状态,由VideoCore IV GPU核心负责启动系统。(所以大部分boot的启动都是由GPU code来完成,而不是CPU)。
-
- 从系统芯片中加载第一阶段的启动程序,这个启动程序负责挂载在SD卡中的FAT32的文件系统,从而让他可以启动第二阶段的boot(bootcode.bin),这部分程序是写死在在芯片中的,所以不能修改。
-
bootcode.bin则用来从SD卡上检索GPU固件(start.elf),然后运行它,从而启动GPU
-
start.elf启动后,读取存放系统配置的文件config.txt。当config.txt文件被加载解析之后, start.elf 会读取cmdline.txt和kernel.img. cmdline.txt 包含内核运行的参数,而kernel.img将会被加载到处理器分配的共享内存中,当内核加载成功,处理器将结束复位状态,内核开始正式运行,系统启动正式开始。
-
- start.elf 除了上面的,也会传递一些额外的参数给内核,比如:DMA通道,GPU参数,MAC地址,eMMC时钟速度、内核寻址范围等等
树莓派的官网上也提供引导程程序的精简版本(
fixup_cd.dat,start_cd.elf,用于GPU内存只有16MB的时候,会损失部分CPU特性)和测试版本(fixup_x.dat, start_x.elf,这种版本可以使用额外的video codes)由于这种写死的程序加上从SD卡开始引导,这就让树莓派不会因为软件的原因变成砖头的(除非硬件损坏)。
2.4 Systemd进程启动 —— init进程
参考资料
前面花了很多精力讲 /boot分区。终于到内核启动之后的工作了。
我们知道,第一个进程就是 init进程。我们看看树莓派里面的init进程是什么?2.4.1 init真正对象
pi@raspberrypi:/boot $ stat /usr/sbin/init File: /usr/sbin/init -> /lib/systemd/systemd Size: 20 Blocks: 0 IO Block: 4096 symbolic link Device: b302h/45826d Inode: 544716 Links: 1 Access: (0777/lrwxrwxrwx) Uid: ( 0/ root) Gid: ( 0/ root) Access: 2022-09-22 02:00:35.529137001 +0100 Modify: 2022-09-13 02:58:38.000000000 +0100 Change: 2022-09-22 02:00:35.529137001 +0100 Birth: 2022-09-22 02:00:35.529137001 +0100 pi@raspberrypi:/boot $- 1
- 2
- 3
- 4
- 5
- 6
- 7
- 8
- 9
- 10
回顾1.2节,我们也知道后期版本大多数是 /lib/systemd/systemd。
关于systemd参考资料
2.4.2 Systemd应用原理
2.4.2.1 运行级别
在sysvinit中有明确定义的运行级别(如:0、1、3、5、6)与systemd中特定的 目标 存在一一对应的关系。
然而,对于用户自定义运行级别(2、4)却没有。
如需要同样功能,建议你以原有运行级别所对应的systemd目标为基础,新建一个
/etc/systemd/system/<目标名>.target(可参考/usr/lib/systemd/system/graphical.target), 然后创建目录/etc/systemd/system/<目标名>.wants,并向其中加入需启用的服务链接(指向/ur/lib/systemd/system/)。
pi@raspberrypi:/lib/systemd/system $ ls -al | grep runlevel lrwxrwxrwx 1 root root 15 Sep 13 02:58 runlevel0.target -> poweroff.target lrwxrwxrwx 1 root root 13 Sep 13 02:58 runlevel1.target -> rescue.target drwxr-xr-x 2 root root 4096 Sep 13 02:58 runlevel1.target.wants lrwxrwxrwx 1 root root 17 Sep 13 02:58 runlevel2.target -> multi-user.target drwxr-xr-x 2 root root 4096 Sep 13 02:58 runlevel2.target.wants lrwxrwxrwx 1 root root 17 Sep 13 02:58 runlevel3.target -> multi-user.target drwxr-xr-x 2 root root 4096 Sep 13 02:58 runlevel3.target.wants lrwxrwxrwx 1 root root 17 Sep 13 02:58 runlevel4.target -> multi-user.target drwxr-xr-x 2 root root 4096 Sep 13 02:58 runlevel4.target.wants lrwxrwxrwx 1 root root 16 Sep 13 02:58 runlevel5.target -> graphical.target drwxr-xr-x 2 root root 4096 Sep 13 02:58 runlevel5.target.wants lrwxrwxrwx 1 root root 13 Sep 13 02:58 runlevel6.target -> reboot.target -rw-r--r-- 1 root root 805 Sep 13 02:58 systemd-update-utmp-runlevel.service pi@raspberrypi:/lib/systemd/system $- 1
- 2
- 3
- 4
- 5
- 6
- 7
- 8
- 9
- 10
- 11
- 12
- 13
- 14
- 15
- 16
一般我们用到就是3(
multi-user.target)或者5(graphical.target)。graphical.target继承了 multi-user.target,并且启动了图像界面服务。那 multi-user.target 又继承谁呢?官方文档有一张非常清晰的 Target 依赖关系图。
cryptsetup-pre.target veritysetup-pre.target | (various low-level v API VFS mounts: (various cryptsetup/veritysetup devices...) mqueue, configfs, | | debugfs, ...) v | | cryptsetup.target | | (various swap | | remote-fs-pre.target | devices...) | | | | | | | | | v | v local-fs-pre.target | | | (network file systems) | swap.target | | v v | | | v | remote-cryptsetup.target | | | (various low-level (various mounts and | remote-veritysetup.target | | | services: udevd, fsck services...) | | | | | tmpfiles, random | | | remote-fs.target | | seed, sysctl, ...) v | | | | | | local-fs.target | | _____________/ | | | | | |/ \____|______|_______________ ______|___________/ | \ / | v | sysinit.target | | | ______________________/|\_____________________ | / | | | \ | | | | | | | v v | v | | (various (various | (various | | timers...) paths...) | sockets...) | | | | | | | | v v | v | | timers.target paths.target | sockets.target | | | | | | v | v \_______ | _____/ rescue.service | \|/ | | v v | basic.target rescue.target | | | ________v____________________ | / | \ | | | | | v v v | display- (various system (various system | manager.service services services) | | required for | | | graphical UIs) v v | | multi-user.target emergency.service | | | | \_____________ | _____________/ v \|/ emergency.target v graphical.target- 1
- 2
- 3
- 4
- 5
- 6
- 7
- 8
- 9
- 10
- 11
- 12
- 13
- 14
- 15
- 16
- 17
- 18
- 19
- 20
- 21
- 22
- 23
- 24
- 25
- 26
- 27
- 28
- 29
- 30
- 31
- 32
- 33
- 34
- 35
- 36
- 37
- 38
- 39
- 40
- 41
- 42
- 43
- 44
- 45
- 46
- 47
- 48
- 49
- 50
- 51
- 52
- 53
2.4.2.2 树莓派默认允许级别 —— graphical.target
如果想要查看当前的运行级别,可以使用如下命令:
systemctl get-default
如果想设置默认的运行级别为graphical,命令如下:
systemctl set-default graphical.target
我们查看一下树莓派默认的运行级别
pi@raspberrypi:/etc/systemd/system $ systemctl get-default graphical.target- 1
- 2
默认值是graphical.target。
pi@raspberrypi:/etc/systemd/system $ ls -al | grep default.target lrwxrwxrwx 1 root root 36 Sep 22 01:14 default.target -> /lib/systemd/system/graphical.target drwxr-xr-x 2 root root 4096 Sep 22 01:02 default.target.wants pi@raspberrypi:/etc/systemd/system $- 1
- 2
- 3
- 4
也就是重点看看 graphical.target 的启动过程。
pi@raspberrypi:/etc/systemd/system $ cat /lib/systemd/system/graphical.target # SPDX-License-Identifier: LGPL-2.1-or-later # # This file is part of systemd. # # systemd is free software; you can redistribute it and/or modify it # under the terms of the GNU Lesser General Public License as published by # the Free Software Foundation; either version 2.1 of the License, or # (at your option) any later version. [Unit] Description=Graphical Interface Documentation=man:systemd.special(7) Requires=multi-user.target Wants=display-manager.service Conflicts=rescue.service rescue.target After=multi-user.target rescue.service rescue.target display-manager.service AllowIsolate=yes pi@raspberrypi:/etc/systemd/system $- 1
- 2
- 3
- 4
- 5
- 6
- 7
- 8
- 9
- 10
- 11
- 12
- 13
- 14
- 15
- 16
- 17
- 18
- 19
我们先来读懂一下配置文件(
[Unit] 区块:启动顺序与依赖关系)。- Unit区块的
Description字段给出当前服务的简单描述,Documentation字段给出文档位置。 - 使用
Wants字段和Requires字段设置依赖关系,Wants字段表示和 display-manager.service 存在弱依赖(该服务启动失败不影响继续执行)关系,Requires字段则表示multi-user.target和"强依赖"关系,即如果该服务启动失败或异常退出,那么也必须退出。 After字段表示如果multi-user.target rescue.service rescue.target display-manager.service需要启动,那么graphical.target 应该在它们之后启动。Conflicts字段表示冲突字段。如果rescue.service或rescue.target正在运行,graphical.target就不能运行,反之亦然。AllowIsolate允许使用systemctl isolate命令切换到graphical.target。
也就是说这里强烈依赖了
multi-user.target。之后才会执行display-manager.service 服务。我们看看关联 graphical.target 有哪些服务?pi@raspberrypi:/lib/systemd/system $ cd /etc/systemd/system/graphical.target.wants/ pi@raspberrypi:/etc/systemd/system/graphical.target.wants $ ls -al total 8 drwxr-xr-x 2 root root 4096 Sep 22 01:07 . drwxr-xr-x 20 root root 4096 Nov 12 06:35 .. lrwxrwxrwx 1 root root 35 Sep 22 01:07 udisks2.service -> /lib/systemd/system/udisks2.service pi@raspberrypi:/etc/systemd/system/graphical.target.wants $- 1
- 2
- 3
- 4
- 5
- 6
- 7
我们也看看 display-manager.service 是啥?
pi@raspberrypi:/ $ sudo systemctl status display-manager.service ● lightdm.service - Light Display Manager Loaded: loaded (/lib/systemd/system/lightdm.service; enabled; vendor preset: enabled) Active: active (running) since Sun 2022-11-13 01:45:33 GMT; 6 days ago Docs: man:lightdm(1) Main PID: 532 (lightdm) Tasks: 5 (limit: 4915) CPU: 3min 9.435s CGroup: /system.slice/lightdm.service ├─532 /usr/sbin/lightdm └─585 /usr/lib/xorg/Xorg :0 -seat seat0 -auth /var/run/lightdm/root/:0 -nolisten tcp vt7 -nov> Nov 13 01:45:33 raspberrypi systemd[1]: Starting Light Display Manager... Nov 13 01:45:33 raspberrypi lightdm[532]: Error getting user list from org.freedesktop.Accounts: GDBus.Err> Nov 13 01:45:33 raspberrypi systemd[1]: Started Light Display Manager. Nov 13 01:45:38 raspberrypi lightdm[642]: Error getting user list from org.freedesktop.Accounts: GDBus.Err> Nov 13 01:45:38 raspberrypi lightdm[642]: pam_unix(lightdm-autologin:session): session opened for user pi(> lines 1-16/16 (END)- 1
- 2
- 3
- 4
- 5
- 6
- 7
- 8
- 9
- 10
- 11
- 12
- 13
- 14
- 15
- 16
- 17
- 18
- 19
接下来我们重点看看 3(
multi-user.target)到底做了什么启动操作。2.4.2.3 multi-user.target 运行级别
pi@raspberrypi:/etc/systemd/system $ cat /lib/systemd/system/multi-user.target # SPDX-License-Identifier: LGPL-2.1-or-later # # This file is part of systemd. # # systemd is free software; you can redistribute it and/or modify it # under the terms of the GNU Lesser General Public License as published by # the Free Software Foundation; either version 2.1 of the License, or # (at your option) any later version. [Unit] Description=Multi-User System Documentation=man:systemd.special(7) Requires=basic.target Conflicts=rescue.service rescue.target After=basic.target rescue.service rescue.target AllowIsolate=yes pi@raspberrypi:/etc/systemd/system $- 1
- 2
- 3
- 4
- 5
- 6
- 7
- 8
- 9
- 10
- 11
- 12
- 13
- 14
- 15
- 16
- 17
- 18
这里又依赖于了 basic.target。我们看看关联 multi-user.target 有哪些服务?
pi@raspberrypi:/etc/systemd/system/multi-user.target.wants $ ls -al total 8 drwxr-xr-x 2 root root 4096 Nov 12 06:31 . drwxr-xr-x 20 root root 4096 Nov 12 06:35 .. lrwxrwxrwx 1 root root 40 Sep 22 01:07 avahi-daemon.service -> /lib/systemd/system/avahi-daemon.service lrwxrwxrwx 1 root root 41 Sep 22 01:07 console-setup.service -> /lib/systemd/system/console-setup.service lrwxrwxrwx 1 root root 38 Nov 9 15:03 containerd.service -> /lib/systemd/system/containerd.service lrwxrwxrwx 1 root root 32 Sep 22 01:03 cron.service -> /lib/systemd/system/cron.service lrwxrwxrwx 1 root root 40 Sep 22 01:13 cups-browsed.service -> /lib/systemd/system/cups-browsed.service lrwxrwxrwx 1 root root 29 Sep 22 01:13 cups.path -> /lib/systemd/system/cups.path lrwxrwxrwx 1 root root 34 Sep 22 01:07 dhcpcd.service -> /lib/systemd/system/dhcpcd.service lrwxrwxrwx 1 root root 34 Nov 9 15:03 docker.service -> /lib/systemd/system/docker.service lrwxrwxrwx 1 root root 42 Sep 22 01:07 dphys-swapfile.service -> /lib/systemd/system/dphys-swapfile.service lrwxrwxrwx 1 root root 32 Sep 22 01:19 epmd.service -> /lib/systemd/system/epmd.service lrwxrwxrwx 1 root root 32 Nov 8 15:49 frpc.service -> /lib/systemd/system/frpc.service lrwxrwxrwx 1 root root 39 Sep 22 01:10 glamor-test.service -> /lib/systemd/system/glamor-test.service lrwxrwxrwx 1 root root 41 Sep 22 01:10 gldriver-test.service -> /lib/systemd/system/gldriver-test.service lrwxrwxrwx 1 root root 40 Sep 22 01:07 ModemManager.service -> /lib/systemd/system/ModemManager.service lrwxrwxrwx 1 root root 34 Nov 12 06:31 motion.service -> /lib/systemd/system/motion.service lrwxrwxrwx 1 root root 38 Sep 22 01:03 networking.service -> /lib/systemd/system/networking.service lrwxrwxrwx 1 root root 37 Sep 22 01:06 nfs-client.target -> /lib/systemd/system/nfs-client.target lrwxrwxrwx 1 root root 48 Sep 22 01:07 raspberrypi-net-mods.service -> /lib/systemd/system/raspberrypi-net-mods.service lrwxrwxrwx 1 root root 36 Sep 22 01:03 remote-fs.target -> /lib/systemd/system/remote-fs.target lrwxrwxrwx 1 root root 45 Sep 22 01:07 rpi-eeprom-update.service -> /lib/systemd/system/rpi-eeprom-update.service lrwxrwxrwx 1 root root 33 Sep 22 01:06 rsync.service -> /lib/systemd/system/rsync.service lrwxrwxrwx 1 root root 35 Sep 22 01:03 rsyslog.service -> /lib/systemd/system/rsyslog.service lrwxrwxrwx 1 root root 31 Sep 22 02:01 ssh.service -> /lib/systemd/system/ssh.service lrwxrwxrwx 1 root root 37 Sep 22 01:06 sshswitch.service -> /lib/systemd/system/sshswitch.service lrwxrwxrwx 1 root root 40 Sep 22 01:05 triggerhappy.service -> /lib/systemd/system/triggerhappy.service lrwxrwxrwx 1 root root 50 Nov 5 01:10 vncserver-x11-serviced.service -> /lib/systemd/system/vncserver-x11-serviced.service lrwxrwxrwx 1 root root 42 Sep 22 01:07 wpa_supplicant.service -> /lib/systemd/system/wpa_supplicant.service pi@raspberrypi:/etc/systemd/system/multi-user.target.wants $- 1
- 2
- 3
- 4
- 5
- 6
- 7
- 8
- 9
- 10
- 11
- 12
- 13
- 14
- 15
- 16
- 17
- 18
- 19
- 20
- 21
- 22
- 23
- 24
- 25
- 26
- 27
- 28
- 29
- 30
- 31
- 32
这里就看到了我们之前配置的一系列自启动服务。
- docker.service docker镜像
- cron.service 定时器
- frpc.service frpc内网穿透
- ssh.service ssh登录相关
- …
接下来看看 basic.target。
2.4.2.4 basic.target
pi@raspberrypi:/etc/systemd/system $ cat /lib/systemd/system/basic.target # SPDX-License-Identifier: LGPL-2.1-or-later # # This file is part of systemd. # # systemd is free software; you can redistribute it and/or modify it # under the terms of the GNU Lesser General Public License as published by # the Free Software Foundation; either version 2.1 of the License, or # (at your option) any later version. [Unit] Description=Basic System Documentation=man:systemd.special(7) Requires=sysinit.target Wants=sockets.target timers.target paths.target slices.target After=sysinit.target sockets.target paths.target slices.target tmp.mount # We support /var, /tmp, /var/tmp, being on NFS, but we don't pull in # remote-fs.target by default, hence pull them in explicitly here. Note that we # require /var and /var/tmp, but only add a Wants= type dependency on /tmp, as # we support that unit being masked, and this should not be considered an error. RequiresMountsFor=/var /var/tmp Wants=tmp.mount- 1
- 2
- 3
- 4
- 5
- 6
- 7
- 8
- 9
- 10
- 11
- 12
- 13
- 14
- 15
- 16
- 17
- 18
- 19
- 20
- 21
- 22
- 23
它又依赖于 sysinit.target。
2.4.2.5 sysinit.target
pi@raspberrypi:/etc/systemd/system $ cat /lib/systemd/system/sysinit.target # SPDX-License-Identifier: LGPL-2.1-or-later # # This file is part of systemd. # # systemd is free software; you can redistribute it and/or modify it # under the terms of the GNU Lesser General Public License as published by # the Free Software Foundation; either version 2.1 of the License, or # (at your option) any later version. [Unit] Description=System Initialization Documentation=man:systemd.special(7) Conflicts=emergency.service emergency.target Wants=local-fs.target swap.target After=local-fs.target swap.target emergency.service emergency.target- 1
- 2
- 3
- 4
- 5
- 6
- 7
- 8
- 9
- 10
- 11
- 12
- 13
- 14
- 15
- 16
我们看看关联sysinit.target有哪些服务?
pi@raspberrypi:/etc/systemd/system $ cd sysinit.target.wants/ pi@raspberrypi:/etc/systemd/system/sysinit.target.wants $ ls -al total 8 drwxr-xr-x 2 root root 4096 Sep 22 01:22 . drwxr-xr-x 20 root root 4096 Nov 12 06:35 .. lrwxrwxrwx 1 root root 36 Sep 22 01:22 apparmor.service -> /lib/systemd/system/apparmor.service lrwxrwxrwx 1 root root 40 Sep 22 01:06 fake-hwclock.service -> /lib/systemd/system/fake-hwclock.service lrwxrwxrwx 1 root root 42 Sep 22 01:07 keyboard-setup.service -> /lib/systemd/system/keyboard-setup.service lrwxrwxrwx 1 root root 42 Sep 22 01:03 systemd-pstore.service -> /lib/systemd/system/systemd-pstore.service lrwxrwxrwx 1 root root 45 Sep 22 01:05 systemd-timesyncd.service -> /lib/systemd/system/systemd-timesyncd.service pi@raspberrypi:/etc/systemd/system/sysinit.target.wants $- 1
- 2
- 3
- 4
- 5
- 6
- 7
- 8
- 9
- 10
- 11
2.4.2.6 rc-local.service
自从很多Linux发行版采用systemd来管理服务和开机启动程序后,开机速度大大加快。同时老的开机启动脚本/etc/rc.local默认不再被支持。然而很多时候rc.local自启动脚本带来的方便和快捷胜过了速度需求,此时我们希望找回常用的rc.local功能。
rc-local.service会执行 /etc/rc.local树莓派为了兼容这个,还是保留了。
pi@raspberrypi:/usr/lib/systemd/system $ cat rc-local.service # SPDX-License-Identifier: LGPL-2.1-or-later # # This file is part of systemd. # # systemd is free software; you can redistribute it and/or modify it # under the terms of the GNU Lesser General Public License as published by # the Free Software Foundation; either version 2.1 of the License, or # (at your option) any later version. # This unit gets pulled automatically into multi-user.target by # systemd-rc-local-generator if /etc/rc.local is executable. [Unit] Description=/etc/rc.local Compatibility Documentation=man:systemd-rc-local-generator(8) ConditionFileIsExecutable=/etc/rc.local After=network.target [Service] Type=forking ExecStart=/etc/rc.local start TimeoutSec=0 RemainAfterExit=yes GuessMainPID=no pi@raspberrypi:/usr/lib/systemd/system $- 1
- 2
- 3
- 4
- 5
- 6
- 7
- 8
- 9
- 10
- 11
- 12
- 13
- 14
- 15
- 16
- 17
- 18
- 19
- 20
- 21
- 22
- 23
- 24
- 25
- 26
pi@raspberrypi:/etc $ cat rc.local #!/bin/sh -e # # rc.local # # This script is executed at the end of each multiuser runlevel. # Make sure that the script will "exit 0" on success or any other # value on error. # # In order to enable or disable this script just change the execution # bits. # # By default this script does nothing. # Print the IP address _IP=$(hostname -I) || true if [ "$_IP" ]; then printf "My IP address is %s\n" "$_IP" fi exit 0 pi@raspberrypi:/etc $- 1
- 2
- 3
- 4
- 5
- 6
- 7
- 8
- 9
- 10
- 11
- 12
- 13
- 14
- 15
- 16
- 17
- 18
- 19
- 20
- 21
- 22
- 23
我们也可以在这里加一些自启动脚本,当然不是很建议。还是直接用新技术把。
2.4.3 Systemd启动总结

从上到下,一层层执行。到这里,整个树莓派Linux启动流程大概梳理了一遍。还需要慢慢消化。
看完本篇,再回去看看之前篇章关于自启动脚本是否更加清晰。
3. 总结
对于linux系统的初学者来说,理解并掌握linux系统启动流程能够使你够深入的理解linux系统,还可以通过系统的启动过程来分析问题解决问题。
参考资料:
-
相关阅读:
粒子群算法(PSO)优化RBF神经网络实践
Dynamics 365 重写自带按钮
三维展示技术让未来项目更加裸眼3D可视化展示在观众面前
计算机毕设 SpringBoot+Vue校园网新闻系统 新闻推荐系统 新闻发布管理系统Java Vue MySQL数据库 远程调试 代码讲解
2021年数学建模国赛A题优秀论文(Word)
洛谷刷题C语言:Bold、饱食、公平の意、DOM、
01- Java概述
软件设计模式系列之六——单例模式
Cesium:WFS请求两种方式
Java学习笔记之----I/O(输入/输出)二
- 原文地址:https://blog.csdn.net/weixin_44614230/article/details/127876780