-
gdb调试 入门
程序的调试过程主要有:单步执行,跳入函数,跳出函数,设置断点,设置观察点,查看变量。
man gdb
正确的学习方式, 使用
man gdb: 查看官方文档,You can run "gdb" with no arguments or options; but the most usual way to start GDB is with one argument or two, specifying an executable program as the argument: gdb program You can also start with both an executable program and a core file specified: gdb program core You can, instead, specify a process ID as a second argument or use option "-p", if you want to debug a running process: gdb program 1234 gdb -p 1234 would attach GDB to process 1234. With option -p you can omit the program filename.- 1
- 2
- 3
- 4
- 5
- 6
- 7
- 8
- 9
- 10
- 11
- 12
- 13
- 14
- 15
- 16
- 17
- 18
- 19
- 20
本文将主要介绍linux下运行。
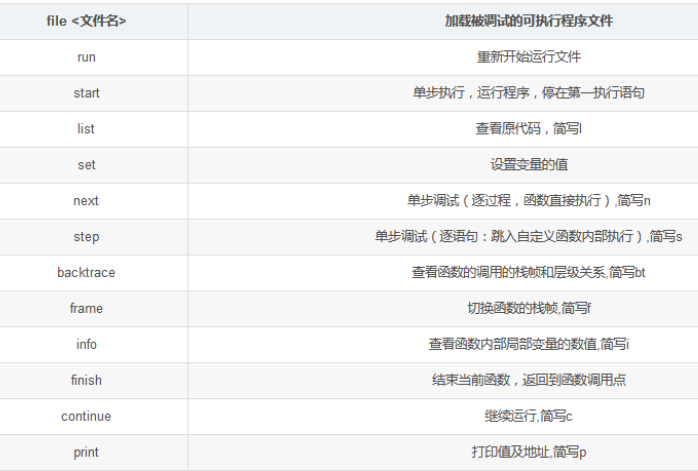
GDB中的命令很多,但我们只需掌握其中十个左右的命令,就大致可以完成日常的基本的程序调试工作。

每一个命令可以使用, 对应的首字母进行简写,编译可供GDB 调试的程序
新建
test.c输入以下内容:#includevoid f(){ printf(" f is called \n"); } int i =1; int main(){ f(); i = 4; printf(" Hello world!\n"); } - 1
- 2
- 3
- 4
- 5
- 6
- 7
- 8
- 9
- 10
- 11
- 12
要调试C/C++的程序,首先在编译时,要使用gdb调试程序,在使用gcc编译源代码时必须加上“-g”参数。
gcc -g test.c- 1
保留调试信息,否则不能使用GDB进行调试.
有一种情况,有一个编译好的二进制文件,你不确定是不是带有-g参数,带有GDB调试,这个时候你可以使用如下的命令验证:
gdb a.out- 1
如果没有调试信息,则会出现:
Reading symbols from a.out…
(No debugging symbols found in a.out如果带有调试功能,下面会提示
Reading symbols from a.out……done.使用命令readelf查看可执行文件是否带有调试功能:
readelf -S main|grep debug- 1
如果有debug说明有调试功能,如果没有debug。说明没有带有调试功能,则不能被调试。
gdb调试 出现value optimized out解决方法 由于gcc在编译过程中默认使用-O2优化选项, 希望进行单步跟踪调试时,应使用-O0选项。- 1
- 2
- 3
> -O0:这个等级(字母“O”后面跟个零)关闭所有优化选项,也是CFLAGS或CXXFLAGS中没有设置-O等级时的默认等级。这样就不会优化代码,这通常不是我们想要的。 -O1:这是最基本的优化等级。编译器会在不花费太多编译时间的同时试图生成更快更小的代码。这些优化是非常基础的,但一般这些任务肯定能顺利完成。 -O2:-O1的进阶。这是推荐的优化等级,除非你有特殊的需求。-O2会比-O1启用多一些标记。设置了-O2后,编译器会试图提高代码性能而不会增大体积和大量占用的编译时间。 -O3:这是最高最危险的优化等级。用这个选项会延长编译代码的时间,并且在使用gcc4.x的系统里不应全局启用。自从3.x版本以来gcc的行为已经有了极大地改变。在3.x,-O3生成的代码也只是比-O2快一点点而已,而gcc4.x中还未必更快。用-O3来编译所有的软件包将产生更大体积更耗内存的二进制文件,大大增加编译失败的机会或不可预知的程序行为(包括错误)。这样做将得不偿失,记住过犹不及。在gcc 4.x.中使用-O3是不推荐的。 -Os:这个等级用来优化代码尺寸。其中启用了-O2中不会增加磁盘空间占用的代码生成选项。这对于磁盘空间极其紧张或者CPU缓存较小的机器非常有用。但也可能产生些许问题,因此软件树中的大部分ebuild都过滤掉这个等级的优化。使用-Os是不推荐的。 正如前面所提到的,-O2是推荐的优化等级。如果编译软件出现错误,请先检查是否启用了-O3。再试试把CFLAGS和CXXFLAGS倒回到较低的等级,如-O1甚或-O0 -g2 -ggdb(用来报告错误和检查可能存在的问题),再重新编译。 -O0 不进行优化处理。 -O 或 -O1 优化生成代码。 -O2 进一步优化。 -O3 比 -O2 更进一步优化,包括 inline 函数。- 1
- 2
- 3
- 4
- 5
- 6
- 7
- 8
- 9
- 10
- 11
- 12
- 13
- 14
1. 基本用法
1. 1 gdb 中运行程序
通过
gdb + 可执行文件, 开始调试需要的文件。gdb a.out- 1
输入,
run:将运行整个程序,
list: 显示原始的代码, 可以输入多次, 直到显示完整的代码。
quit: 退出gdb 模式。(gdb) run Starting program: /home/respecting-life/Desktop/os_上交/lab1/a.out f is called Hello world! [Inferior 1 (process 5403) exited normally] (gdb) list 1 #include2 3 void f(){ 4 printf(" f is called \n"); 5 } 6 7 8 int i =1; 9 10 int main(){ (gdb) list 11 f(); 12 i = 4; 13 printf(" Hello world!\n"); 14 } - 1
- 2
- 3
- 4
- 5
- 6
- 7
- 8
- 9
- 10
- 11
- 12
- 13
- 14
- 15
- 16
- 17
- 18
- 19
- 20
- 21
- 22
- 23
1.2 打断点
gdb 中打断点的方式, 有两种
- 对某个函数打断点。 ``
(gdb) break main Breakpoint 1 at 0x555555555160: file test.c, line 10.- 1
- 2
- 指定在某一行处打断点。
(gdb) b 11 Breakpoint 2 at 0x555555555168: file test.c, line 11- 1
- 2
- 查看断点的信息
info b
(gdb) info b Num Type Disp Enb Address What 1 breakpoint keep y 0x0000555555555160 in main at test.c:10 2 breakpoint keep y 0x0000555555555168 in main at test.c:11- 1
- 2
- 3
- 4
此时,继续运行
run时,将会停在断点处,-
移除某个断点,
d 1 -
单步调试
next,n, -
c: 从一个断点跳到下一个断点处,
1.3 打印变量的值
p:print的简写,(gdb) p i $2 = 4- 1
- 2
打印变量的地址,
p &i加上取地址符,(gdb) p &i $3 = (int *) 0x555555558010 <i>- 1
- 2
1.4 进入某一个具体的函数
step: 进入该函数中, 按s,1.5 查看函数的调用栈
bt: backtrace ,
查看函数调用栈, 即最先调用的函数,是在最下面。1.5 设置观察变量
使用
print输出带观察变量的地址,printp:
p/x: 使用十六进制 显示出来。(gdb) p &i $2 = (int *) 0x201010 <i>- 1
- 2
使用
watch该地址的数值,(gdb) watch *0x201010 Hardware watchpoint 1: *0x201010- 1
- 2
或者直接watch 该变量:
(gdb) watch num Hardware watchpoint 2: num (gdb) n Hardware watchpoint 2: num Old value = 0 New value = 1 main (argc=1, argv=0x7fffffffdbc8) at 12.c:5 5 while (num <= 100){ (gdb) 6 num *= 2; (gdb) Hardware watchpoint 2: num Old value = 1 New value = 2 main (argc=1, argv=0x7fffffffdbc8) at 12.c:5 5 while (num <= 100){ (gdb)- 1
- 2
- 3
- 4
- 5
- 6
- 7
- 8
- 9
- 10
- 11
- 12
- 13
- 14
- 15
- 16
- 17
- 18
- 19
- 20
- 21
1.6 记录调试的 日志功能;
set logging on: 将每一次的输出保存到另外一个文件中去,(gdb) set logging on Copying output to gdb.txt. (gdb) list- 1
- 2
- 3
- 4
2. 调试 core 文件 ,与正在运行的程序
上述介绍的是已经生成可执行的二进制文件,
现实情况中,往往需要调试的是出错的文件,
2.1 core 文件的生成
通过
man ulimit查看, 是对shell 终端 可以获得资源的一种限制,
需要使用ulimit -a查看,ulimit -a core file size (blocks, -c) 0 data seg size (kbytes, -d) unlimited scheduling priority (-e) 0 file size (blocks, -f) unlimited pending signals (-i) 63296 max locked memory (kbytes, -l) 65536 max memory size (kbytes, -m) unlimited open files (-n) 1024 pipe size (512 bytes, -p) 8 POSIX message queues (bytes, -q) 819200 real-time priority (-r) 0 stack size (kbytes, -s) 8192 cpu time (seconds, -t) unlimited max user processes (-u) 63296 virtual memory (kbytes, -v) unlimited file locks (-x) unlimited- 1
- 2
- 3
- 4
- 5
- 6
- 7
- 8
- 9
- 10
- 11
- 12
- 13
- 14
- 15
- 16
- 17
使用
unlimite -c unlimited解除 生成 core 文件大小的限制,ulimit -a core file size (blocks, -c) unlimited data seg size (kbytes, -d) unlimited scheduling priority (-e) 0 file size (blocks, -f) unlimited pending signals (-i) 63296 max locked memory (kbytes, -l) 65536 max memory size (kbytes, -m) unlimited open files (-n) 1024 pipe size (512 bytes, -p) 8 POSIX message queues (bytes, -q) 819200 real-time priority (-r) 0 stack size (kbytes, -s) 8192 cpu time (seconds, -t) unlimited max user processes (-u) 63296 virtual memory (kbytes, -v) unlimited file locks (-x) unlimited- 1
- 2
- 3
- 4
- 5
- 6
- 7
- 8
- 9
- 10
- 11
- 12
- 13
- 14
- 15
- 16
- 17
调试时, 使用
gdb ./a.out core.1234;gdb + 二进制文件 + core 文件2.2 源代码的调试图形界面
layout src: 开启调试源代码的模式,
此后, 退出 和开启 该图形界面 按ctrl + x, 然后 a,接着按
n进行 单步调试,2.3 开启原程序的汇编
layout asm:汇编的单步:
si2.4 查看所有寄存器的数值
info r: register; -
相关阅读:
uniapp——列表图片加载太多且空间占用太大的处理方法(降低清晰度)
三更Blog项目总结(p1~p40)
打造未来:AI产品经理的魔法之旅
【PCBA方案设计】蓝牙跳绳方案
【附源码】计算机毕业设计JAVA衡师社团管理系统
【吴恩达机器学习笔记】十四、推荐系统
java毕业设计校园商铺mybatis+源码+调试部署+系统+数据库+lw
Postman —— postman实现参数化
mysql的行列互转
(JAVA)P5705 【深基2.例7】数字反转
- 原文地址:https://blog.csdn.net/chumingqian/article/details/127886444
