-
Tomcat 源码解析一请求处理的整体过程-黄泉天怒(上)
本博客的很多的理论知识都来源于 《Tomcat内核设计剖析》这本书,大家的兴趣去读这本书,对于想了解Tomcat源码的小伙伴,肯定对你有所帮助 ,但是想自己有亲身体会的话,还是要深入源码。 不然知道这些理论的知识,过一段时间就会忘记。我们先看这本书的第4章节的理论知识 ,而后再深入源码,看作者是如何实现。
整体结构及组件介绍
Tomcat 发展到了今天已经变成了一个比较宠大的项目,想深入每个细节是相当的耗时耗力的,但不管Tomcat怎样升级,它的主体骨架是不变的,良好的模块划分让它拥有很好的可扩展性,想深入研究Tomcat 之前,先从整体上了解它的各个主要模块将会非常有帮助,本章就从整体上预览Tomcat 的内部架构 。介绍其中包含的各个模块的作用,从整体上认识Tomcat 内部的架构层次 。
如图4.1 所示 ,它包含了Tomcat 内部的主要组件,每个组件之间的层次关系能够很清晰的看到,这里就不再赘述,如果将Tomcat 内核调试抽象,则它可以看成是由连接器(Connnector ) 组件和容器(Container ) 组件组成 , 其中 Connector 组件负责在服务端处理客户端连接,包括接收客户端连接,接收客户端消息报文以及报文的解析等工作,而Container 组件则负责对客户端的请求进行逻辑处理,并把结构返回给客户端,图4.1中Connector 正是这里讨论的Connector 组件,它的结构包括4 个级别的容器,Engine 组件,Host 组件,Context 组件和Wrapper 组件,容器也是整个Tomcat 的核心,这将会在第7章到第10章中进行深入的讲解。从Tomcat 服务器配置文件server.xml 的内容格式看, 它所描述的Tomcat 也符合图4.1的层级结构,以下是server.xml 简洁的配置节点,所以从server.xml 文件也能看到Tomcat 的大体结构如下 。

Server 是最顶级的组件,它代表Tomcat 运行实例,在一个JVM 中只包含一个Server ,在Server 的整个生命周期中,不同的阶段会有不同的事情要完成 , 为了方便扩展,它引入了监听器方式,所以它包含了Listener 组件,另外,为了方便在Tomcat 中集成 JNDI ,引入了GlobalNamingResources组件,同时,还包含了Service核心组件 。
2. Service 组件
Service 是服务的抽象 , 它代表从请求从接收到处理的所有组件的集合,如图 4.2 所示 , 在设计上Server 组件可以包含多个Service 组件,每个Service 组件都包含了若干个用于接收客户端消息Connector 组件和处理请求Engine 组件,其中,不同的Connector 组件使用不同的通信协议,如HTTP协议 和AJP 协议,当然还可以有其他的协议A 和协议 B ,若干Connector 组件和一个客户端请求处理组件Engine 组成的集合即为Service ,此外,Service 组件还包含了若干Executor 组件,每个Executor 都是一个线程池,它可以为Service 内所有组件提供线程池执行任务 。

- Connector 组件。
Connector 主要 职责就是接收客户端连接并接收消息报文,消息报文经过它的解析后送往容器中处理, 如图4.3 所示 。 因为存在不同的通信协议,例如 HTTP 协议 ,AJP 协议等。 所以,我们不需要不同Connector 组件,每种协议对应一个Connector 组件,目前Tomcat 包含HTTP 和AJP 两种协议的Connector, AJP 协议等, 所以 我们需要不同的Connector 。
上面的协议角度介绍不同的Connector 组件,而Connector 组件的内部实现也会根据网络I/O 的不同方式而不同分为阻塞I/O的不同方式而不同分为阻塞I/O 和非阻塞I/O ,下面以HTTP 协议为例子,看看阻塞I/O 和非阻塞I/O 的Connector 内部实现模块有什么不同。
在阻塞I/O 方式下,Connector 的结构如图4.4 所示 。

- Http11Protocol 组件,是以HTTP 协议1.1 版本抽象 ,它包含接收客户端连接,接收客户端消息报文,报文解析处理,对客户端响应的整个过程 , 它主要包含JIOEndpoint组件和Http11Processor 组件,启动时,JIOEndpoint 组件内部的Acceptor 组件将启动某个商品的监听,一个请求到来后被扔进线程池Executor ,线程池进行处理,处理过程中通过Http11Processor 组件对Http协议解析并传递到Engine 容器继续处理。
- Mapper 组件,客户端请求的路由导航组件,通过它能对一个完整的请求地址进行路由,通俗的说,就是它能通过请求地址找到对应的Servlet 。
- CoyoteAdaptor 组件,将一个Connector 和一个Container 适配起来的适配器。
如图 4.5 所示 ,在非阻塞的I/O 方式下, Connector 的结构类似阻塞模式,Http11Protocol 组件改成Http11NioProtocol 组件,JIoEndpoint 组件改成了NioEndpoint ,Http11Processor 组件改成Http11NioProcessor 组件,这些类似的组件的功能也都类似,唯独多了一个Poller 组件,它的职责是在非阻塞I/O 方式下轮询多个客户端连接,不断检测,处理各种事件,例如不断的检测各个连接是否有可读,对于可读的客户端连接则尝试进行读取并解析消息报文 。

Engine 组件
Tomcat内部有4个级别的容器,分别是Engine ,Host,Context 和Wrapper ,Engine 代表全局Servlet引擎,每个Service 组件只能包含一个Engine 容器组件,但是Engine组件可以包含若干个Host容器组件,除了Host 之外 , 它还包含了如下组件。
- Listener 组件 : 可以在Tomcat 生命周期中完成某些Engine 容器相关的工作的监听器。
- AccessLog 组件: 客户端的访问日志,所有的客户端访问都会被记录。
- Cluster 组件 : 它提供了集群功能,可以将Engine 容器需要共享的数据同步到集群中的其他Tomcat 实例上。
- Pipeline 组件 : Engine 容器对请求进行处理的管道 。
- Realm 组件 : 提供了Engine 容器级别的用户-密码-权限的数据对象,配合资源谁模块的使用。
Host 组件
Tomcat 中Host组件代表虚拟主机可以存放若干Web 应用的抽象 (Context 容器),除了Context 组件之外,它还包含如下组件 。
- Listener 组件 :可以在Tomcat 生命周期中完成某些Host 容器相关的工作监听器。
- AccessLog 组件:客户端的访问日志 ,对该虚拟机上所有的Web应用访问都被记录。
- Cluster 组件,它提供了集群功能,可以将Host 容器需要共享的数据同步到集群中的其他Tomcat 实例上。
- Pipeline 组件 : Host 容器对请求进行处理的管道 。
- Realm 组件 :提供了Host 容器级别的用户-密码-权限的数据对象,配合资源谁模块的使用。
Context 组件
Context组件是Web 应用的抽象 , 我们开发Web 应用部署到Tomcat 后运行时就会转化成Context 对象,它包含了各种静态资源,若干 Servlet (Wrapper 容器) 以及各种其他的动态资源 , 它主要包括如下组件 。
- Listener 组件 : 可以在Tomcat 生命周期中完成某些Context 容器相关的工作的监听器。
- AccessLog 组件 :客户端访问日志,对该Web 应用访问都会被记录。
- Pipeline 组件 : Context 容器对请求进行处理管道 。
- Realm 组件 : 提供了Context 容器级别的用户-密码-权限的数据对象,配合资源谁模块的使用。
- Loader组件 :Web应用加载器,用于加载Web 应用的资源 ,它要保证不同的Web 应用之间的资源隔离 。
- Manager 组件 :化零为整管理器,用于管理对应的Web 容器的会话,包括维护会话的生成 ,更新和销毁 。
- NamingResource 组件 :命名资源 ,它负责将Tomcat 配置文件 的server.xml 和Web 应用 的context.xml 资源和属性映射到内存中。
- Mapper组件 ,Servlet映射,它属于Context 内部的路由映射器,只负责该Context 容器的路由导航 。
- Wrapper 组件 :Context 的子容器。
Wrapper 组件
Wrapper 容器是Tomcat 中的4个级别的容器中最小的,与它相对就的是Servlet 一个Wrapper 对应一个Servlet ,它包含如下的组件 。
- Servlet 组件 :Servelt 即Web 应用开发常用的Servlet ,我们会在Servlet中编写好请求的逻辑处理。
- ServletPool 组件 :Servlet对象池。当Web 应用的Servlet实现了SingleThreadModel 接口时则会在Wrapper 中产生一个Servlet对象池,ServletPool 组件能保证Servlet对象的线程安全。
- Pipeline组件 : Wrapper 容器对请求进行处理的管道 。
请求处理的整体流程
上一节已经介绍了Tomcat 内部的整体结构,对每个组件的定义及作用也进行了大致讨论,接下来,从整体来看一个客户端发起请求到响应的整个过程在Tomcat 内部如何流转,我们从图4.6开始讲起 。

4.6 是Tomcat 请求流程的过程 ,为了更简洁明了的,去掉了请求过程一些非主线的组件,它里假定Tomcat 作为专心的处理HTTP 的Web 服务器 , 而使用了阻塞I/O 方式接收客户端的连接 , 下面介绍请求流转的具体过程 。
- 当Tomcat 启动后,Connector 组件的接收器(Acceptor)将会监听是否有客户端套接字连接并接收Socket 。
- 一旦监听到客户端连接 , 则将连接交由线程池Executor处理, 开始执行请求响应的任务 。
- Http11Processor 组件负责从客户端连接中读取消息报文,然后开始解析HTTP的请求行,请求头部,请求体,将解析后的报文 封装成Request 对象 , 方便后面处理时通过Request 对象获取HTTP 协议相关的值 。
- Mapper 组件根据HTTP 协议请求行的URL 属性值和请求头部的Host 属性值匹配由哪个Host 容器,哪个 Context容器,哪个 Wrapper 容器处理请求,这个过程其实就是根据请求从Tomcat 中找到对应的Servlet,然后将路由的结果封装到Request 对象中,方便后面处理时通过Request对象选择容器。
- CoyoteAdaptor 组件负责将Connector 组件和Engine 容器连接起来 ,把前面的处理过程生成的请求对象Request 和响应对象Response传递到Engine 容器,调用它的管道 。
- Engine 容器的管道开始处理请求,管道里包含若干阀门(Value ),每个阀门负责某些处理逻辑,这里用xxxValue 表示某个阀门,我们根据自己的需要往这个管道中添加多个阀门,首先执行这个xxxValue ,然后才执行基础的阀门EngineValue ,经会负责调用Host 容器的管道 。
- Host 容器的管道开始处理请求,它同样也包含了若干阀门,首先执行它些阀门,然后执行基础阀门ContextValue , 它负责调用Wrapper 容器的管道 、
- Context 容器的管道开始处理请求,首先执行若干阀门,然后执行基础阀门ContextValue ,它负责调用Wrapper 容器的管道。
- Wrapper 容器的管道开始处理请求,首先执行若干阀门,然后执行基础阀门WrapperValue ,它它执行该Wrapper 容器对应的Servlet 对象的处理方法,对请求进行逻辑处理,并将结果输出到客户端。
以上便是客户端请求达到Tomcat 后处理的整体流程,这里先对其有个整体的印象 。接下来我们就深入理解这一块。
org.apache.coyote.http11.Http11Protocol
Connector 组件
Connector (连接器)组件是Tomcat 核心的两个组件之一,主要的职责负责接收客户端连接和客户端请求处理加工,每个Connector 都将指定一个端口进行监听 , 分别对请求报文解析和对响应报文组装 , 解析过程中生成 Request 对象,而组装过程则涉及Response 对象, 如果将Tomcat 整体比作一个巨大的城堡 , 那么Connector 组件就是城堡的城门, 每个人要进入城堡就必须通过城门, 它为人们进出城堡提供了通道,同时,一个城堡还可能有两个或多个城门, 每个城门代表了不同的通道 。
典型的Connctor 组件会有如图6.1所示的结构,其中包含Protocol 组件,Mapper 组件和CoyoteAdaptor 组件 。
Protocol 组件是协议的抽象,它将不同的通信协议的处理进行了封装,比如 HTTP 协议和AJP 协议 , Endpoint 是接收端的抽象,由于使用了不同的I/O模式,因此存在多种类型的Endpoint ,如BIO模式的JIoEndpoint ,NIO模式的NioEndpoint 和本地库I/O 模式的AprEndpoint 。 Acceptor 是专门用于接收 客户端连接的接收器组件。Executor则是处理客户端请求的线程池,Connector可能是使用了Service 组件的共享线程池,也可能是Connector 自己的私有线程池,Processor 组件是处理客户端请求的处理器,不同的协议和不同的I/O 模式都有不同的处理方式,所以存在不同的类型的Processor 。
Mapper 组件可以称为路由器,它提供了对客户端请求URL 的映射功能,即可以通过它将请求转发到对应的Host组件,Context 组件,Wrapper 组件以进行处理并响应客户端,也就是说,我们常常说将某客户端请求发送到某虚拟主机上的某个Web 应用的某个Servlet 。
CoyoteAdaptor 组件是一个适配器,它负责将Connector 组件和Engine容器适配连接起来 ,把接收到的客户端请求报文解析生成的请求对象和响应对象的Response 传递到Engine 容器,交给容器处理。
目前Tomcat 支持两种Connector ,分别是支持HTTP 协议与AJP的Connector ,用于接收和发送HTTP,AJP 协议请求,Connector 组件的不同体现在其协议及I/O 模式的不同 ,所以Connector 包含了Protocol 组件类型为:HTTP11Protocol,Http11NioProtocol ,Http11AprProtocol,AjpProtocol ,AjpNioProtocol和AjpAprProtocol 。
HTTPConnector 所支持的协议版本为HTTP/1.1 和HTTP 1.0 无须显式的配置HTTP 的版本,Connector 会自动适配版本,每个Connector 实例对应一个端口,在同个Service 实例内可以配置若干个Connector 实例,端口必须不同,但协议可以相同,HTTP Connector 包含的协议处理组件有Http11Protocol(Java BIO模式 ),Http11NioProtocol(Java NIO 模式 ) 和Http11AprProtocol(APR/native模式),Tomcat 启动时根据server.xml 的
节点配置的I/O 模式,BIO 模式为org.apache.coyote.http11.Http11Protocol,NIO 模式为org.apache.coyote.http11.Http11NioProtocol.APR/native模式为org.apache.coyote.http11.Http11AprProtocol 。 AJP Connector 组件用于支持AJP 协议通信,当我们想将Web 应用中包含的静态内容交给Apache 处理时,Apache 与Tomcat 之间的通信则使用AJP 协议 , 目前标准的协议是AJP/1.3 ,AJP Connector 包含的协议处理组件有AJPProtocol (Java BIO 模式 ),AjpNioProtocol(Java Nio 模式 )和 AjpAprProtocol( APR/native模式),Tomcat 启动时根据server.xml 的
节点的配置 I/O 的模式,BIO 模式为org.apache.coyote.ajp.AjpProtocol,NIO 模式为org.apache.coyote.ajp.AjpNioProtocol ,APR/native 模式为org.apache.coyote.ajp.AjpAprProtocol 。
Connector 也在服务器端提供了SSL 安全通道的支持,用于客户端以HTTPS 的方式访问,可以通过配置server.xml的节点的SSLEnabled 属性开启。
在BIO模式下,对于每个客户端的请求连接都将消耗线程池里面的一条连接,直到整个请求响应完毕,此时,如果有很多的请求几乎同时到过Connector ,当线程池中的空闲线程用完后,则会创建新的线程,直到彀线程池的最大线程数,但如果此时还有更多的请求到来,虽然线程池已经处理不过来,但操作系统还会将客户端接收起来放到一个队列里,这个队列的大小通过SocketServer 设置backlog 而来,如果还是有再多的请求过来,队列已经超过了SocketServer 的backlog大小,那么连接将直接被拒绝掉,客户端将收到 connection refused 报错。在NIO栻上,则所有的客户端的请求连接先由一个接收线程接收,然后由若干(一般的CPU 个数)线程轮询读写事件,最后将具体的读写操作交给线程池处理,可以看到,以这种方式,客户端连接不会在整个请求响应过程中占用连接池内的连接,它可以同时处理BIO 模式多得多的客户端连接数,此种模式能承受更大的并发,机器资源使用效率会高很多,另外 APR/Native 模式也是NIO 模式,它直接用本地代码实现NIO 模式 。
6.1 HTTP 阻塞模式协议 -Http11Protocol
Http11Protocol表示阻塞式的HTTP 协议的通信 , 它包含从套接字连接接收,处理,响应客户端的整个过程 , 它主要包含JIoEndpoint组件和Http11Processor 组件,启动时,JIoEndpoint 组件将启动某个端口的监听,一个请求到来后将被扔进线程池, 线程池进行任务处理,处理过程中将通过协议解析器Http11Processor组件对HTTP协议解析,并且通过通过适配器Adapter 匹配到指定的容器进行处理以及响应客户端,当然,整个过程相对比较复杂,涉及很多组件,下面会对此更加深入的分析,HTTP 阻塞模式的协议整体结构如图6.2所示 。

首先,我们来分析server.xml中标鉴 。 我们在Tomcat 源码解析一初识博客中分析过Tomcat 启动的整体结构,虽然没有具体去分析一些细节的组件,但是至少有一个大体的认识,在Tomcat初识博客中,我们分析了ConnectorCreateRule这个类的用途,在解析到
时会进入begin方法,在解析到 标识时,会进入end 方法,我们先进入其begin方法中,看他做了哪些事情。public void begin(String namespace, String name, Attributes attributes) throws Exception { // 先获取上层父节点Service // 判断Connector节点是否配置了executor属性,如果配置了,则根据executor名字从父节点service中获取到Executor对象。 // 根据Connector节点上配置的protocol协议名来初始化Connector // Connector初始化完成之后,获取对应的ProtocolHandler对象,将executor对象设置进去 // 从这里可以看出来,如果有多个Connector节点,每个节点可以使用不同的executor,也就是线程池,也可以公用,根据名字来。 Service svc = (Service)digester.peek(); Executor ex = null; if ( attributes.getValue("executor")!=null ) { ex = svc.getExecutor(attributes.getValue("executor")); } Connector con = new Connector(attributes.getValue("protocol")); if ( ex != null ) _setExecutor(con,ex); digester.push(con); }在
标签中我们可以设置executor属性,如下。
tomcatThreadPool” namePrefix=“catalina-exec-” maxThreads=“150” minSpareThreads=“4”/>
executor=“tomcatThreadPool” port=“8080” protocol=“HTTP/1.1” connectionTimeout=“20000” redirect=“8443” /> 我们进入Connector的构造函数中,看其做了哪些事情 。
public Connector(String protocol) {
    setProtocol(protocol);
    // Instantiate protocol handler
    try {
        Class clazz = Class.forName(protocolHandlerClassName);
        this.protocolHandler = (ProtocolHandler) clazz.getDeclaredConstructor().newInstance();
    } catch (Exception e) {
        log.error(sm.getString(
                "coyoteConnector.protocolHandlerInstantiationFailed"), e);
    }
}
在org.apache.coyote.http11.Http11Protocol创建过程中需要注意 。
public Http11Protocol() {
    endpoint = new JIoEndpoint();
    cHandler = new Http11ConnectionHandler(this);
    ((JIoEndpoint) endpoint).setHandler(cHandler);
    setSoLinger( -1);
    setSoTimeout(60000);
    setTcpNoDelay(true);
}
上面加粗代码需要注意 ,Http11Protocol的Endpoint为JIoEndpoint,这个在后面经常用到,而JIoEndpoint的handler为Http11ConnectionHandler,后面需要用到,先记录在这里。
public void setProtocol(String protocol) {

    if (AprLifecycleListener.isAprAvailable()) {
        if ("HTTP/1.1".equals(protocol)) {
            setProtocolHandlerClassName
            ("org.apache.coyote.http11.Http11AprProtocol");
        } else if ("AJP/1.3".equals(protocol)) {
            setProtocolHandlerClassName
            ("org.apache.coyote.ajp.AjpAprProtocol");
        } else if (protocol != null) {
            setProtocolHandlerClassName(protocol);
        } else {
            setProtocolHandlerClassName
            ("org.apache.coyote.http11.Http11AprProtocol");
        }
    } else {
        if ("HTTP/1.1".equals(protocol)) {
            setProtocolHandlerClassName
            ("org.apache.coyote.http11.Http11Protocol");  // BIO
        } else if ("AJP/1.3".equals(protocol)) {
            setProtocolHandlerClassName
            ("org.apache.coyote.ajp.AjpProtocol");
        } else if (protocol != null) {
            setProtocolHandlerClassName(protocol); // org.apache.coyote.http11NIOProxot
        }
    }

}
isAprAvailable()这个方法里的init()方法会去调用new Library()方法,这个方法中会调用System.loadLibrary({“tcnative-1”, “libtcnative-1”} ) 方法加载tcnative-1和libtcnative-1文件,但是遗憾的是抛出了异常,因此isAprAvailable()方法false,如果协议配置的是HTTP/1.1,默认情况下会走加粗代码,protocolHandlerClassName将等于org.apache.coyote.http11.Http11Protocol,而在Connector构造函数中,会通过反射初始化protocolHandler为org.apache.coyote.http11.Http11Protocol对象 。 我们在Tomcat 初识博客中分析过,只要StandardServer调用init()方法,其子标签也会调用init()方法,接下来,我们看看Connector的init()方法,其init()方法依然是调用父类的LifecycleBase的init()方法 ,而init()方法调用前会发送before_init事件,接着调用initInternal()方法 。
public final synchronized void init() throws LifecycleException {
    if (!state.equals(LifecycleState.NEW)) {
        invalidTransition(Lifecycle.BEFORE_INIT_EVENT);
    }

    try {
        setStateInternal(LifecycleState.INITIALIZING, null, false);
        initInternal();
        setStateInternal(LifecycleState.INITIALIZED, null, false);
    } catch (Throwable t) {
        ExceptionUtils.handleThrowable(t);
        setStateInternal(LifecycleState.FAILED, null, false);
        throw new LifecycleException(
                sm.getString("lifecycleBase.initFail",toString()), t);
    }
}
initInternal()方法由Connector自己实现,接下来,我们看他做了哪些事情 。
protected void initInternal() throws LifecycleException {

    super.initInternal();

    // Initialize adapter
    adapter = new CoyoteAdapter(this);
    protocolHandler.setAdapter(adapter);

    // Make sure parseBodyMethodsSet has a default
    if (null == parseBodyMethodsSet) {
        setParseBodyMethods(getParseBodyMethods());
    }

    if (protocolHandler.isAprRequired() &&
            !AprLifecycleListener.isAprAvailable()) {
        throw new LifecycleException(
                sm.getString("coyoteConnector.protocolHandlerNoApr",
                        getProtocolHandlerClassName()));
    }

    try {
    	// Http11Protocol 初始化
        protocolHandler.init();
    } catch (Exception e) {
        throw new LifecycleException(
                sm.getString("coyoteConnector.protocolHandlerInitializationFailed"), e);
    }

    // Initialize mapper listener
    mapperListener.init();
}
protocolHandler为Http11Protocol,而Http11Protocol的结构如下 。
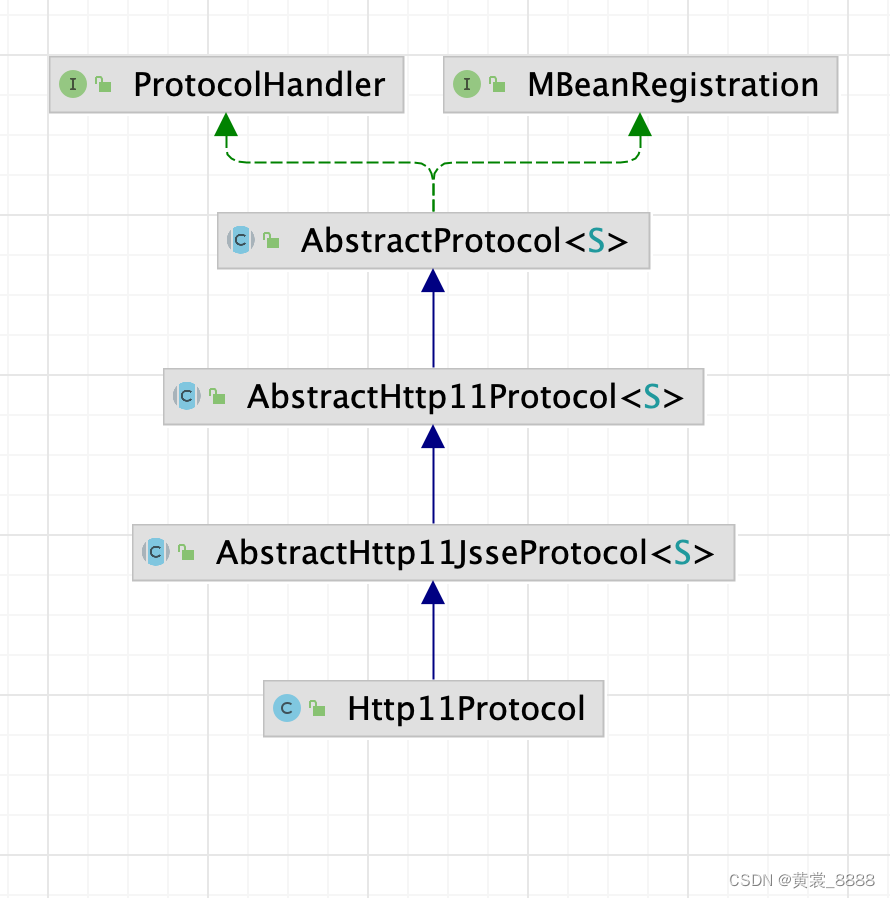
Http11Protocol并没有实现init()访求,因此我们进入AbstractHttp11JsseProtocol的init()方法,而public void init() throws Exception { // SSL implementation needs to be in place before end point is // initialized // 如果没有指定sslImplementationName,默认为org.apache.tomcat.util.net.jsse.JSSEImplementation sslImplementation = SSLImplementation.getInstance(sslImplementationName); super.init(); }而AbstractHttp11JsseProtocol的init()方法并没有做其他事情,而是调用了父类的init()方法 ,我们进入AbstractProtocol的init()方法 。
public void init() throws Exception {
        if (getLog().isInfoEnabled()) {
        getLog().info(sm.getString("abstractProtocolHandler.init", getName()));
    }

    if (oname == null) {
        // Component not pre-registered so register it
        oname = createObjectName();
        if (oname != null) {
            Registry.getRegistry(null, null).registerComponent(this, oname, null);
        }
    }

    if (this.domain != null) {
        try {
            tpOname = new ObjectName(domain + ":" +
                    "type=ThreadPool,name=" + getName());
            Registry.getRegistry(null, null).registerComponent(endpoint,
                    tpOname, null);
        } catch (Exception e) {
            getLog().error(sm.getString(
                    "abstractProtocolHandler.mbeanRegistrationFailed",
                    tpOname, getName()), e);
        }
        rgOname=new ObjectName(domain +
                ":type=GlobalRequestProcessor,name=" + getName());
        Registry.getRegistry(null, null).registerComponent(
                getHandler().getGlobal(), rgOname, null );
    }
    String endpointName = getName();
    endpoint.setName(endpointName.substring(1, endpointName.length()-1));
    try {
        endpoint.init();
    } catch (Exception ex) {
        getLog().error(sm.getString("abstractProtocolHandler.initError",
                getName()), ex);
        throw ex;
    }
}
上述过程中比较重要的一行代码是endpoint.init();,而之前我们知道endpoint即为JIoEndpoint类,接下来,我们进入该类的init()方法 。public final void init() throws Exception { testServerCipherSuitesOrderSupport(); if (bindOnInit) { bind(); bindState = BindState.BOUND_ON_INIT; } } public void bind() throws Exception { // Initialize thread count defaults for acceptor if (acceptorThreadCount == 0) { acceptorThreadCount = 1; } // Initialize maxConnections if (getMaxConnections() == 0) { // User hasn't set a value - use the default // 本来maxConnections默认值是10000的,但是因为是bio,所以需要取线程池最大线程数,默认为200 setMaxConnections(getMaxThreadsWithExecutor()); } if (serverSocketFactory == null) { if (isSSLEnabled()) { serverSocketFactory = handler.getSslImplementation().getServerSocketFactory(this); } else { serverSocketFactory = new DefaultServerSocketFactory(this); } } if (serverSocket == null) { try { if (getAddress() == null) { serverSocket = serverSocketFactory.createSocket(getPort(), getBacklog()); } else { // serverSocket会不停的接收客户端连接,getBacklog() serverSocket = serverSocketFactory.createSocket(getPort(), getBacklog(), getAddress()); } } catch (BindException orig) { String msg; if (getAddress() == null) msg = orig.getMessage() + ":" + getPort(); else msg = orig.getMessage() + " " + getAddress().toString() + ":" + getPort(); BindException be = new BindException(msg); be.initCause(orig); throw be; } } } 这里设置了最大连接数, 本来maxConnections默认值是10000的,但是因为是bio,所以需要取线程池最大线程数,默认为200 。
public void setMaxConnections(int maxCon) {
    this.maxConnections = maxCon;
    LimitLatch latch = this.connectionLimitLatch;
    if (latch != null) {
        // Update the latch that enforces this
        if (maxCon == -1) {
            releaseConnectionLatch();
        } else {
            latch.setLimit(maxCon);
        }
    } else if (maxCon > 0) {
        initializeConnectionLatch();
    }
}


protected LimitLatch initializeConnectionLatch() {
    if (maxConnections==-1) return null;
    if (connectionLimitLatch==null) {
        connectionLimitLatch = new LimitLatch(getMaxConnections());
    }
    return connectionLimitLatch;
}
6.1.1 套接字接收终端-JIoEndpoint
需要一个组件负责启动某个客户端的请求, 负责接收套接字的连接,负责提供一个线程池供系统处理接收的套接字的连接,负责对连接数的控制,负责安全与非安全套接字连接的实现等, 这个组件就是JioEndpoint ,它所包含的组件可以用图6.3 表示,其中包含连接数控制器LimitLatch,Socket 接收器Aceeptor ,套接字工厂ServerSocketFactory ,任务执行器Executor , 任务定义器SocketProcessor , 下面将对每个组件的结构与作用进行解析 。
1. 连接数控制器-LimitLatch
作为Web 服务器,Tomcat 对于每个客户端的请求将给予处理响应, 但对于一台机器而言,访问请求的总流量有高峰期且服务器有物理极限,为了保证Web 服务器不被冲垮,我们需要采取一些保护措施,其中一种有效的方法就是采取流量控制 , 需要稍微说明的是,此处的流量更多的是指套接字的连接数, 通过控制套接字的连接数来控制流量,如图6.4 所示 。 它就像在流量的入口增加了一道闸门,闸门的大小决定了流量的大小 , 一旦达到了最大流量, 将关闭闸门, 停止接收,直到有空闲的通道 。

Tomcat 的流量控制器是通过AQS 并发框架来实现的,通过AQS 实现起来更具有灵活性和定制性, 思路是先初始化同步器的最大限制值,然后每接收一个套接字就将计数器的变量累加1 , 每关闭一个套接字将计数变量减1 , 如此一来, 一旦计数器变量值大于最大限制值。 则AQS 机制将会将接收线程阻塞,而停止对套接字的接收 , 直到某个套接字处理完关闭后,重新唤起接收线程往下接收套接字,我们把思路拆成两部分, 一是使用AQS 创建一个支持计数的控制器,另外一个是将此控制器嵌入处理流程中。public class LimitLatch { private static final Log log = LogFactory.getLog(LimitLatch.class); private class Sync extends AbstractQueuedSynchronizer { private static final long serialVersionUID = 1L; public Sync() { } @Override protected int tryAcquireShared(int ignored) { long newCount = count.incrementAndGet(); if (!released && newCount > limit) { // Limit exceeded count.decrementAndGet(); return -1; } else { return 1; } } @Override protected boolean tryReleaseShared(int arg) { count.decrementAndGet(); return true; } } private final Sync sync; private final AtomicLong count; private volatile long limit; private volatile boolean released = false; public LimitLatch(long limit) { this.limit = limit; this.count = new AtomicLong(0); this.sync = new Sync(); public void countUpOrAwait() throws InterruptedException { if (log.isDebugEnabled()) { log.debug("Counting up["+Thread.currentThread().getName()+"] latch="+getCount()); } sync.acquireSharedInterruptibly(1); } public long countDown() { sync.releaseShared(0); long result = getCount(); if (log.isDebugEnabled()) { log.debug("Counting down["+Thread.currentThread().getName()+"] latch="+result); } return result; } }LimitLatch控制同步器, 整个过程根据AQS 推荐的自定义同步器做法进行,但并没有使用AQS 自带的状态变量,而是另外一个AtomicLong 类型的count 变量用于计数,具体代码如下 , 控制器主要 是通过countUpOrAwait和countDown两个方法实现计数器加减操作,countUpOrAwait方法中,当计数器超过最大的限制值则会阻塞线程, countDown方法则负责递减数字或唤醒线程。
接下来,我们来看Connector的start方法 。protected void startInternal() throws LifecycleException { // Validate settings before starting if (getPort() < 0) { throw new LifecycleException(sm.getString( "coyoteConnector.invalidPort", Integer.valueOf(getPort()))); } // 设置Connector 的state为start状态 setState(LifecycleState.STARTING); try { protocolHandler.start(); } catch (Exception e) { String errPrefix = ""; if(this.service != null) { errPrefix += "service.getName(): \"" + this.service.getName() + "\"; "; } throw new LifecycleException (errPrefix + " " + sm.getString ("coyoteConnector.protocolHandlerStartFailed"), e); } mapperListener.start(); }上面最重要的代码就是加粗代码,而HTTP 1.1协议的protocolHandler为org.apache.coyote.http11.Http11Protocol,我们进入其start()方法 。
public void start() throws Exception {
    if (getLog().isInfoEnabled())
        getLog().info(sm.getString("abstractProtocolHandler.start",
                getName()));
    try {
        endpoint.start();
    } catch (Exception ex) {
        getLog().error(sm.getString("abstractProtocolHandler.startError",
                getName()), ex);
        throw ex;
    }
}
我们知道Http11Protocol为endpoint为JIoEndpoint ,因此进入JIoEndpoint的start()方法 。
public final void start() throws Exception {
    if (bindState == BindState.UNBOUND) {
        bind();
        bindState = BindState.BOUND_ON_START;
    }
    startInternal();
}
因为在JIoEndpoint的init()方法中,bind()方法已经调用过,直接进入startInternal()方法 。
public void startInternal() throws Exception {

    if (!running) {
        running = true;
        paused = false;

        // Create worker collection
        // 如果配置文件里没有配置线程池,那么将创建一个默认的
        if (getExecutor() == null) {
        	// 创建线程池
            createExecutor();
        }
		// 在JIoEndpoint的init()方法中已经初始化过
        initializeConnectionLatch();


        startAcceptorThreads();

        // Start async timeout thread
        Thread timeoutThread = new Thread(new AsyncTimeout(),
                getName() + "-AsyncTimeout");
        timeoutThread.setPriority(threadPriority);
        timeoutThread.setDaemon(true);
        timeoutThread.start();
    }
}
接着我们看创建线程池的代码 。
public void createExecutor() {
    // 是否使用的是内部默认的线程池
    internalExecutor = true;
    // 创建任务队列
    TaskQueue taskqueue = new TaskQueue();
    TaskThreadFactory tf = new TaskThreadFactory(getName() + "-exec-", daemon, getThreadPriority());
    // 默认的线程数量为10, max200
    executor = new ThreadPoolExecutor(getMinSpareThreads(), getMaxThreads(), 60, TimeUnit.SECONDS,taskqueue, tf);
    taskqueue.setParent( (ThreadPoolExecutor) executor);
}
关于线程池的源码这一块,感兴趣的话,可以去看我之前的博客 ThreadPoolExecutor&ScheduledThreadPoolExecutor 源码解析 ,线程池这一块的原理也是博客精深,有兴趣可以去研究一下。 在Tomcat 中,默认创建一个最小线程数为10 , 最大线程数为200的一个线程池,当任务处理不过来时,将任务加入到TaskQueue任务队列中,当任务队列已满,此时会增加线程数,直到达到最大值,仍然有任务增加,此时会采用RejectHandler拒绝策略来处理新增加的任务,当任务空闲时,而当前线程池中的线程数大于核心线程数10 ,此时等待60秒后仍然没有新任务加入到任务队列中,线程将销毁,直到核心线程数为10 。
接下来,我们进入startAcceptorThreads()方法 。protected final void startAcceptorThreads() { // 在JIoEndpoint的 bind()方法口中 ,初始化acceptorThreadCount=1 int count = getAcceptorThreadCount(); acceptors = new Acceptor[count]; for (int i = 0; i < count; i++) { acceptors[i] = createAcceptor(); String threadName = getName() + "-Acceptor-" + i; acceptors[i].setThreadName(threadName); Thread t = new Thread(acceptors[i], threadName); t.setPriority(getAcceptorThreadPriority()); t.setDaemon(getDaemon()); t.start(); } } protected AbstractEndpoint.Acceptor createAcceptor() { return new Acceptor(); }
在上面代码中,创建了一个Acceptor,并调用start()方法启动它。 而Acceptor根据Endpoint的不同而不同, 我们还是进入BIO模式的Acceptor 。 先看看Acceptor的结构,发现它实现了Runnable接口,调用Acceptor的start方法,其实是启动了一个线程。
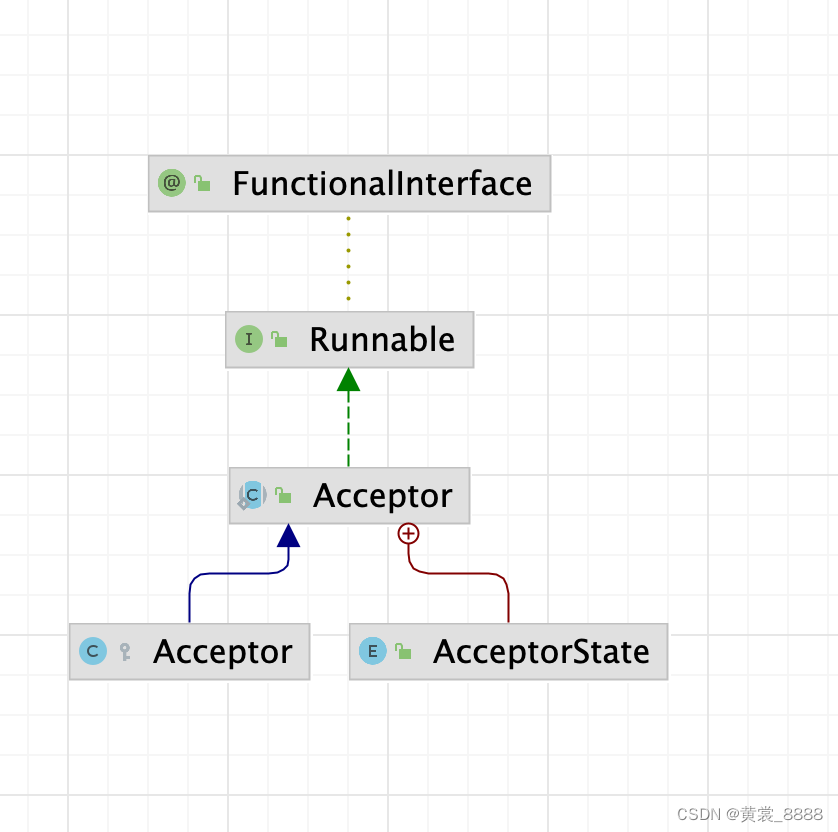
既然Acceptor实现了Runnable接口,并调用了start方法,将启动一下线程,接下来,我们进入Acceptor的run方法 。
 protected class Acceptor extends AbstractEndpoint.Acceptor {

    @Override
    public void run() {

        int errorDelay = 0;

        // Loop until we receive a shutdown command
        while (running) {

            // Loop if endpoint is paused
            // 如果Endpoint仍然在运行,但是被暂停了,那么就无限循环,从而不能接受请求
            while (paused && running) {
                state = AcceptorState.PAUSED;
                try {
                    Thread.sleep(50);
                } catch (InterruptedException e) {
                    // Ignore
                }
            }

            if (!running) {
                break;
            }
            state = AcceptorState.RUNNING;

            try {
                //if we have reached max connections, wait
                //达到了最大连接数限制则等待
                countUpOrAwaitConnection();

                Socket socket = null;  // bio,nio
                try {
                    // Accept the next incoming connection from the server
                    // bio socket
                    // 此处是阻塞的,那么running属性就算已经被改成false,那么怎么进入到下一次循环呢?
                    socket = serverSocketFactory.acceptSocket(serverSocket);//
                    System.out.println("接收到了一个socket连接");

                } catch (IOException ioe) {
                    countDownConnection();
                    // Introduce delay if necessary
                    errorDelay = handleExceptionWithDelay(errorDelay);
                    // re-throw
                    throw ioe;
                }
                // Successful accept, reset the error delay
                errorDelay = 0;

                // Configure the socket
                // 如果Endpoint正在运行并且没有被暂停,那么就处理该socket
                if (running && !paused && setSocketOptions(socket)) {
                    // Hand this socket off to an appropriate processor
                    // socket被正常的交给了线程池,processSocket就会返回true
                    // 如果没有被交给线程池或者中途Endpoint被停止了,则返回false
                    // 返回false则关闭该socket
                    if (!processSocket(socket)) {
                    	// socket数减少1
                        countDownConnection();
                        // Close socket right away
                        closeSocket(socket);
                    }
                } else {
                    countDownConnection();
                    // Close socket right away
                    closeSocket(socket);
                }
            } catch (IOException x) {
                if (running) {
                    log.error(sm.getString("endpoint.accept.fail"), x);
                }
            } catch (NullPointerException npe) {
                if (running) {
                    log.error(sm.getString("endpoint.accept.fail"), npe);
                }
            } catch (Throwable t) {
                ExceptionUtils.handleThrowable(t);
                log.error(sm.getString("endpoint.accept.fail"), t);
            }
        }
        state = AcceptorState.ENDED;
    }
}
上面这段代码,看上去写了那么多,其实原理还是很简单的。
- 如果被暂停了,将进入while()循环, 每次睡眠50秒,将不再接收连接 。
- 如果Tomcat 被stop了, running = false ,退出循环。
- 调用countUpOrAwaitConnection()方法 ,如果达到了最大链接数,则等待。
- 如果running==true ,并且没有被暂停,则处理本次请求。
上面当前连接数达到最大值是,进入等待,是怎样实现了呢?
protected void countUpOrAwaitConnection() throws InterruptedException {
    if (maxConnections==-1) return;
    LimitLatch latch = connectionLimitLatch;
    if (latch!=null) latch.countUpOrAwait();
}

public void countUpOrAwait() throws InterruptedException {
    if (log.isDebugEnabled()) {
        log.debug("Counting up["+Thread.currentThread().getName()+"] latch="+getCount());
    }
    sync.acquireSharedInterruptibly(1);
}
对于流程嵌入控制器,伪代码如下 ,其中,首先初始化一个最大限制数为200的连接控制器(LimitLatch),然后在接收套接字前尝试累加计数器或进入阻塞状态,接着接收套接字,对套接字的数据处理则交由线程池中的线程,它处理需要一段时间,假如这段时间内又有200个请求套接字,则第200个请求会导致线程进入阻塞状态,而不再执行接收动作,唤醒的条件是线程池中的工作线程处理完其中一个套接字并执行countDown()操作,需要说明的是,当到达最大连接数时, 操作系统底层还是会继续接收客户端连接,但用户层已经不再接收,操作系统的接收队列长度默认为100,可以通过server.xml 的
节点的acceptCount属性配置,Tomcat 同时接收客户端连接数的默认大小为200,但是可以通过server.xml 的 节点的maxConnections属性进行调节,Tomcat BIO 模式下LimitLatch的限制数与线程池的最大线程数密切相关,它们之间的比例是1 : 1
LimitLatch limitLatch = new LimitLatch(200)
// 创建ServerSocket 实例
while(true){
limitLatch.countUpOrAwait();
Socket socket = serverSocket.accept();
socket交由线程池处理,处理完执行LimitLatch.countDown();
}Socket接口器-Acceptor
Acceptor的主要职责就是监听是否有客户端套接字连接并接收套接字,再将套接字交由任务执行器 (Executor)执行,它不断的从系统底层读取套接字,接着做尽可能少的处理, 最后扔进线程池, 由于接收线程默认只有一条, 因此这里强调要做尽可能少的处理, 它对每次接收处理的时间长短可能对整体性能产生影响 。
于是接口器的工作都是非常少且简单的, 仅仅维护了几个状态变量,负责流量的控制闸门的细加操作和ServerSocket的接收操作,设置接收到套接字的一些属性,将接收到的套接字放入线程池以及一些异常处理,其他需要较长的时间处理的逻辑就交给了线程池,例如,对套接字底层数据的读取,对HTTP 协议报文的解析及响应客户端的一些操作等, 这样处理有助于提升系统的处理响应性能,此过程如图6.5所示 。
套接字工厂,ServerSocketFactory 接收器Acceptor在接收连接的过程中,根据不同的使用场合可能需要不同的安全级别,例如安全性较高的场景需要对消息加密后传输, 而另外一些安全性要求较低的场合则无须对消息加密,反映到应用层则是使用HTTP 与HTTPS 的问题。
图6.6为HTTPS 的组成层次图,它在应用层添加了一个SSL/TLS协议,于是组成了HTTPS 简单来说,SSL/TLS协议为通信提供了以下服务 。
- 提供了验证服务,验证会话内实体的身份的合法性。
- 提供了加密服务,强加密机制能保证通信过程中消息不会被破译 。
- 提供防篡改服务,利用Hash算法对消息进行签名, 通往验证签名保证通信内空不被篡改。

Java为开发提供了方便的手段实现了SSL/TLS协议,即安全套接字,它是套接字的安全版本,Tomcat 作为Web服务器必须满足不同的安全级别的通道 ,HTTP 使用了套接字,而HTTPS 则使用了SSLSocket ,由于接收终端根据不同的安全配置需要产生不同的类别的套接字,于是引入了工厂模式处理套接字,即ServerSocketFactory工厂类,另外不同的厂商自己定制的SSL 的实现。
ServerSocketFactory 是Tomcat 接收端的重要组件,先看看它的运行逻辑,Tomcat 中有两个工厂类DefaultServerSocketFactory 和JSSESocketFactory,它们都实现了ServerSocketFactory 接口,分别对应HTTP 套接字通道与HTTPS 套接字通道,假如机器的某个端口使用了加密通道 , 则由JSSESocketFactory 作为套接字工厂反之,则使用DefaultServerSocketFactory 作为套接字工厂,于是 Tomcat 中存在一个变量 SSLEnabled用于标识是否使用加密通道 , 通过对此变量的定义就可以决定使用哪个工厂类,Tomcat 提供了外部配置文件供用户自定义。
实际上,我们通过对Server.xm 进行配置就可以定义某个端口开放并指出是否使用安全通道 ,例如 。- HTTP 协议对应的非安全通道配置如下
- HTTPS 协议对应的安全通道的配置如下 。
第一种配置告诉Tomcat 开放的8080端口并使用HTTP1.1 协议进行非安全通信 , 第二种配置告诉Tomcat 开放8443 端口并使用HTTP1.1 协议进行安全通信 ,其中使用的安全协议是TLS 协议 ,需要注意的是加粗字体SSLEnabled=“true”,此变量值会在Tomcat 启动初始化时读入到自身的程序中,运行时也正是通过此变量判断使用哪个套接字工厂,DefaultServerSocketFactory 还是JSSESocketFactory 。
接下来,我们进入Socket处理方法。protected boolean processSocket(Socket socket) { // Process the request from this socket try { SocketWrapper
wrapper = new SocketWrapper (socket); // 设置 keepAlive的最大限制,默认值为100 wrapper.setKeepAliveLeft(getMaxKeepAliveRequests()); wrapper.setSecure(isSSLEnabled()); // During shutdown, executor may be null - avoid NPE if (!running) { return false; } // bio, 一个socket连接对应一个线程 // 一个http请求对应一个线程? getExecutor().execute(new SocketProcessor(wrapper)); } catch (RejectedExecutionException x) { log.warn("Socket processing request was rejected for:"+socket,x); return false; } catch (Throwable t) { ExceptionUtils.handleThrowable(t); // This means we got an OOM or similar creating a thread, or that // the pool and its queue are full log.error(sm.getString("endpoint.process.fail"), t); return false; } return true; } 把ServerSocketFactory 工厂引入后,整个结构如图6.7所示 。

任务执行器Executor
上一节提到的接收器Acceptor在接收到套接字后会有一系列的简单的处理,其中将套接字放入到线程池是重要的一步 ,这里重要讲Tomcat 中用于处理客户端请求的线程-Executor 。
为了确保整个Web 服务器的性能,应该在接收到请求后以最快的速度把它转交到其他线程上去处理,在接收 到客户端的请求后这些请求被交给任务执行器Executor ,这是一个拥有最大最小线程限制数的线程池,之所以称为任务执行器,是因为可以认为线程池启动了若干线程不断的检测某个任务队列,一旦发现有需要执行的任务则执行,如图6.8 所示 ,每个线程不断的循环检测任务队列,线程数量不会少于最小线程数也不能大于最大线程数。
任务执行器实现使用JUC 工具包的ThreadPoolExecutor 类,它提供了线程池的多种机制,例如有最大最小线程数的限制,多余线程的回收时间,超出最大线程数时线程池做出的拒绝动作等,继承此类并重写了一些方法基本就能满足Tomcat 的个性化需求 。
Connector 组件的Executor 分为两种类型,共享Executor 和私有Executor 。
所谓共享Executor 则指直接使用Service组件的线程池,多个Connector 可以共用这些线程池,可以在Server.xml 文件中通过如下配置进行配置,先在节点下配置一下 ,它表示该任务执行器的最大线程数为150 ,最小线程数为4,线程名前缀为catalina-exec- ,并且命名为tomcatThreadPool, 节点中指定以tomcatThreadPool 作为任务执行器,对于多个Connector ,如图6.9 所示 ,可以同时指向同一个Executor ,以达到共享的目的 。 
所谓私有的Executor 是指
未使用共享的线程池,而是自己创建的线程池,如下的配置所示 ,第一个Connector配置未引用的共享线程池,所以它会为该Connector 创建一个默认的Executor,它是最小线程数为10,最大线程数为200,线程名字前缀为TP-exec-,线程池里面的线程全部为守护线程,线程数超过100时等待60秒,如果还没有任务执行交销毁此线程,第二个Connector 配置未引用的共享线程池,但是它声明了maxThreads 和minSpareThreads 属性,表示私有线程池的最小线程数为minSpareThreads,而最大线程数为maxThreads,第一个Connector 和第二个Connector 各自使用自己的线程池,这便 是私有Executor 。 说了那么多,那代码在哪里呢?请看createExecutor()方法 ,这个方法中默认minSpareThreads为10 ,最大线程池为200 。 而线程池的原理,请看我之前的博客 ,这里就不再赘述了。
定义任务器-SocketProcessor
将套接字放进线程前需要定义好任务 ,而需要进行哪些逻辑处理则由SocketProcessor 定义,根据线程池的约定,作为任务必须扩展Runnable,具体操作如下代码表示
protected class SocketProcessor implements Runnable { protected SocketWrappersocket = null; protected SocketStatus status = null; public SocketProcessor(SocketWrapper socket) { if (socket==null) throw new NullPointerException(); this.socket = socket; } public SocketProcessor(SocketWrapper socket, SocketStatus status) { this(socket); this.status = status; } @Override public void run() { boolean launch = false; synchronized (socket) { // 开始处理socket // Socket默认状态为OPEN try { SocketState state = SocketState.OPEN; try { // SSL handshake serverSocketFactory.handshake(socket.getSocket()); } catch (Throwable t) { ExceptionUtils.handleThrowable(t); if (log.isDebugEnabled()) { log.debug(sm.getString("endpoint.err.handshake"), t); } // Tell to close the socket state = SocketState.CLOSED; } // 当前socket没有关闭则处理socket if ((state != SocketState.CLOSED)) { // SocketState是Tomcat定义的一个状态,这个状态需要处理一下socket才能确定,因为跟客户端,跟具体的请求信息有关系 if (status == null) { state = handler.process(socket, SocketStatus.OPEN_READ); } else { // status表示应该读数据还是应该写数据 // state表示处理完socket后socket的状态 state = handler.process(socket,status); } } // 如果Socket的状态是被关闭,那么就减掉连接数并关闭socket // 那么Socket的状态是在什么时候被关闭的? if (state == SocketState.CLOSED) { // Close socket if (log.isTraceEnabled()) { log.trace("Closing socket:"+socket); } countDownConnection(); try { socket.getSocket().close(); } catch (IOException e) { // Ignore } } else if (state == SocketState.OPEN || state == SocketState.UPGRADING || state == SocketState.UPGRADING_TOMCAT || state == SocketState.UPGRADED){ socket.setKeptAlive(true); socket.access(); launch = true; } else if (state == SocketState.LONG) { // socket不会关闭,但是当前线程会执行结束 socket.access(); waitingRequests.add(socket); } } finally { if (launch) { try { getExecutor().execute(new SocketProcessor(socket, SocketStatus.OPEN_READ)); } catch (RejectedExecutionException x) { log.warn("Socket reprocessing request was rejected for:"+socket,x); try { //unable to handle connection at this time handler.process(socket, SocketStatus.DISCONNECT); } finally { // 连接计数器减1 countDownConnection(); } } catch (NullPointerException npe) { if (running) { log.error(sm.getString("endpoint.launch.fail"), npe); } } } } } socket = null; // Finish up this request } } SocketProcessor 的任务主要分为三个,处理套接字并响应客户端,连接数计数器减1 ,关闭套接字,其中对套接字的处理是最重要也是最复杂的,它包括对底层套接字字节流的读取,HTTP 协议请求报文的解析(请求行,请求头,请求体等信息解析),根据请求行解析得到的路径去寻找相应的虚拟机上的Web 项目资源,根据处理的结果组装好HTTP 协议响应报文输出到客户端,此部分是Web 容器处理客户端请求的核心,接下来将一一的剖析,引入任务定义器后,整个模块如图6.10所示 。

我们在Http11Protocol创建时,指定了handler为Http11ConnectionHandler。接下来,进入process方法 。
HTTP 阻塞处理器-Http11Processor
Http11Processor 组件提供了对HTTP协议通信的处理,包括对套接字的读写和过滤,对HTTP 协议的解析以及封装成请求对象,HTTP 协议响应对象的生成等操作,其整体结构如图6.11 所示 ,其中涉及到更多的细节在下面展开介绍 。

public SocketState process(SocketWrapper
wrapper, SocketStatus status) { if (wrapper == null) { // Nothing to do. Socket has been closed. return SocketState.CLOSED; } S socket = wrapper.getSocket(); if (socket == null) { // Nothing to do. Socket has been closed. return SocketState.CLOSED; } Processorprocessor = connections.get(socket); if (status == SocketStatus.DISCONNECT && processor == null) { // Nothing to do. Endpoint requested a close and there is no // longer a processor associated with this socket. return SocketState.CLOSED; } // 设置为非异步,就是同步 wrapper.setAsync(false); ContainerThreadMarker.markAsContainerThread(); try { if (processor == null) { // 从被回收的processor中获取processor processor = recycledProcessors.poll(); } if (processor == null) { // 创建处理器 processor = createProcessor(); // HTTP11NIOProce } initSsl(wrapper, processor); SocketState state = SocketState.CLOSED; do { if (status == SocketStatus.DISCONNECT && !processor.isComet()) { // Do nothing here, just wait for it to get recycled // Don't do this for Comet we need to generate an end // event (see BZ 54022) } else if (processor.isAsync() || state == SocketState.ASYNC_END) { // 要么Tomcat线程还没结束,业务线程就已经调用过complete方法了,然后利用while走到这个分支 // 要么Tomcat线程结束后,在超时时间内业务线程调用complete方法,然后构造一个新的SocketProcessor对象扔到线程池里走到这个分支 // 要么Tomcat线程结束后,超过超时时间了,由AsyncTimeout线程来构造一个SocketProcessor对象扔到线程池里走到这个分支 // 不管怎么样,在整个调用异步servlet的流程中,此分支只经历一次,用来将output缓冲区中的内容发送出去 state = processor.asyncDispatch(status); if (state == SocketState.OPEN) { // release() won't get called so in case this request // takes a long time to process, remove the socket from // the waiting requests now else the async timeout will // fire getProtocol().endpoint.removeWaitingRequest(wrapper); // There may be pipe-lined data to read. If the data // isn't processed now, execution will exit this // loop and call release() which will recycle the // processor (and input buffer) deleting any // pipe-lined data. To avoid this, process it now. state = processor.process(wrapper); } } else if (processor.isComet()) { state = processor.event(status); } else if (processor.getUpgradeInbound() != null) { state = processor.upgradeDispatch(); } else if (processor.isUpgrade()) { state = processor.upgradeDispatch(status); } else { // 大多数情况下走这个分支 state = processor.process(wrapper); } if (state != SocketState.CLOSED && processor.isAsync()) { // 代码执行到这里,就去判断一下之前有没有调用过complete方法 // 如果调用,那么当前的AsyncState就会从COMPLETE_PENDING-->调用doComplete方法改为COMPLETING,SocketState为ASYNC_END // 如果没有调用,那么当前的AsyncState就会从STARTING-->STARTED,SocketState为LONG // // 状态转换,有三种情况 // 1. COMPLETE_PENDING--->COMPLETING,COMPLETE_PENDING是在调用complete方法时候由STARTING改变过来的 // 2. STARTING---->STARTED,STARTED的下一个状态需要有complete方法来改变,会改成COMPLETING // 3. COMPLETING---->DISPATCHED state = processor.asyncPostProcess(); } if (state == SocketState.UPGRADING) { // Get the HTTP upgrade handler HttpUpgradeHandler httpUpgradeHandler = processor.getHttpUpgradeHandler(); // Release the Http11 processor to be re-used release(wrapper, processor, false, false); // Create the upgrade processor processor = createUpgradeProcessor( wrapper, httpUpgradeHandler); // Mark the connection as upgraded wrapper.setUpgraded(true); // Associate with the processor with the connection connections.put(socket, processor); // Initialise the upgrade handler (which may trigger // some IO using the new protocol which is why the lines // above are necessary) // This cast should be safe. If it fails the error // handling for the surrounding try/catch will deal with // it. httpUpgradeHandler.init((WebConnection) processor); } else if (state == SocketState.UPGRADING_TOMCAT) { // Get the UpgradeInbound handler org.apache.coyote.http11.upgrade.UpgradeInbound inbound = processor.getUpgradeInbound(); // Release the Http11 processor to be re-used release(wrapper, processor, false, false); // Create the light-weight upgrade processor processor = createUpgradeProcessor(wrapper, inbound); inbound.onUpgradeComplete(); } if (getLog().isDebugEnabled()) { getLog().debug("Socket: [" + wrapper + "], Status in: [" + status + "], State out: [" + state + "]"); } // 如果在访问异步servlet时,代码执行到这里,已经调用过complete方法了,那么状态就是SocketState.ASYNC_END } while (state == SocketState.ASYNC_END || state == SocketState.UPGRADING || state == SocketState.UPGRADING_TOMCAT); if (state == SocketState.LONG) { // In the middle of processing a request/response. Keep the // socket associated with the processor. Exact requirements // depend on type of long poll connections.put(socket, processor); longPoll(wrapper, processor); } else if (state == SocketState.OPEN) { // In keep-alive but between requests. OK to recycle // processor. Continue to poll for the next request. connections.remove(socket); release(wrapper, processor, false, true); } else if (state == SocketState.SENDFILE) { // Sendfile in progress. If it fails, the socket will be // closed. If it works, the socket either be added to the // poller (or equivalent) to await more data or processed // if there are any pipe-lined requests remaining. connections.put(socket, processor); } else if (state == SocketState.UPGRADED) { // Need to keep the connection associated with the processor connections.put(socket, processor); // Don't add sockets back to the poller if this was a // non-blocking write otherwise the poller may trigger // multiple read events which may lead to thread starvation // in the connector. The write() method will add this socket // to the poller if necessary. if (status != SocketStatus.OPEN_WRITE) { longPoll(wrapper, processor); } } else { // Connection closed. OK to recycle the processor. Upgrade // processors are not recycled. connections.remove(socket); if (processor.isUpgrade()) { processor.getHttpUpgradeHandler().destroy(); } else if (processor instanceof org.apache.coyote.http11.upgrade.UpgradeProcessor) { // NO-OP } else { release(wrapper, processor, true, false); } } return state; } catch(java.net.SocketException e) { // SocketExceptions are normal getLog().debug(sm.getString( "abstractConnectionHandler.socketexception.debug"), e); } catch (java.io.IOException e) { // IOExceptions are normal getLog().debug(sm.getString( "abstractConnectionHandler.ioexception.debug"), e); } // Future developers: if you discover any other // rare-but-nonfatal exceptions, catch them here, and log as // above. catch (Throwable e) { ExceptionUtils.handleThrowable(e); // any other exception or error is odd. Here we log it // with "ERROR" level, so it will show up even on // less-than-verbose logs. getLog().error( sm.getString("abstractConnectionHandler.error"), e); } // Make sure socket/processor is removed from the list of current // connections connections.remove(socket); // Don't try to add upgrade processors back into the pool if (!(processor instanceof org.apache.coyote.http11.upgrade.UpgradeProcessor) && !processor.isUpgrade()) { release(wrapper, processor, true, false); } return SocketState.CLOSED; }先来看看处理器的创建
protected Http11Processor createProcessor() {
    Http11Processor processor = new Http11Processor(
            proto.getMaxHttpHeaderSize(), proto.getRejectIllegalHeaderName(),
            (JIoEndpoint)proto.endpoint, proto.getMaxTrailerSize(),
            proto.getAllowedTrailerHeadersAsSet(), proto.getMaxExtensionSize(),
            proto.getMaxSwallowSize(), proto.getRelaxedPathChars(),
            proto.getRelaxedQueryChars());
    processor.setAdapter(proto.adapter);
    processor.setMaxKeepAliveRequests(proto.getMaxKeepAliveRequests());
    processor.setKeepAliveTimeout(proto.getKeepAliveTimeout());
    processor.setConnectionUploadTimeout(
            proto.getConnectionUploadTimeout());
    processor.setDisableUploadTimeout(proto.getDisableUploadTimeout());
    processor.setCompressionMinSize(proto.getCompressionMinSize());
    processor.setCompression(proto.getCompression());
    processor.setNoCompressionUserAgents(proto.getNoCompressionUserAgents());
    processor.setCompressableMimeTypes(proto.getCompressableMimeTypes());
    processor.setRestrictedUserAgents(proto.getRestrictedUserAgents());
    processor.setSocketBuffer(proto.getSocketBuffer());
    processor.setMaxSavePostSize(proto.getMaxSavePostSize());
    processor.setServer(proto.getServer());
    processor.setDisableKeepAlivePercentage(
            proto.getDisableKeepAlivePercentage());
    processor.setMaxCookieCount(proto.getMaxCookieCount());
    register(processor);
    return processor;
}
接下来,我们来看看Http11Processor的结构 。

我们进入process方法 。
public SocketState process(SocketWrapper socketWrapper)
    throws IOException {
    RequestInfo rp = request.getRequestProcessor();
    rp.setStage(org.apache.coyote.Constants.STAGE_PARSE);   // 设置请求状态为解析状态
    // Setting up the I/O
    setSocketWrapper(socketWrapper);

    getInputBuffer().init(socketWrapper, endpoint);     // 将socket的InputStream与InternalInputBuffer进行绑定
    getOutputBuffer().init(socketWrapper, endpoint);    // 将socket的OutputStream与InternalOutputBuffer进行绑定

    // Flags
    keepAlive = true;
    comet = false;
    openSocket = false;
    sendfileInProgress = false;
    readComplete = true;
    // NioEndpoint返回true, Bio返回false
    if (endpoint.getUsePolling()) {
        keptAlive = false;
    } else {
        keptAlive = socketWrapper.isKeptAlive();
    }

    // 如果当前活跃的线程数占线程池最大线程数的比例大于75%,那么则关闭KeepAlive,不再支持长连接
    if (disableKeepAlive()) {
        socketWrapper.setKeepAliveLeft(0);
    }

    // keepAlive默认为true,它的值会从请求中读取
    while (!getErrorState().isError() && keepAlive && !comet && !isAsync() &&
            upgradeInbound == null &&
            httpUpgradeHandler == null && !endpoint.isPaused()) {
        // keepAlive如果为true,接下来需要从socket中不停的获取http请求

        // Parsing the request header
        try {
            // 第一次从socket中读取数据,并设置socket的读取数据的超时时间
            // 对于BIO,一个socket连接建立好后,不一定马上就被Tomcat处理了,其中需要线程池的调度,所以这段等待的时间要算在socket读取数据的时间内
            // 而对于NIO而言,没有阻塞
            setRequestLineReadTimeout();

            // 解析请求行
            if (!getInputBuffer().parseRequestLine(keptAlive)) {
                // 下面这个方法在NIO时有用,比如在解析请求行时,如果没有从操作系统读到数据,则上面的方法会返回false
                // 而下面这个方法会返回true,从而退出while,表示此处read事件处理结束
                // 到下一次read事件发生了,就会从小进入到while中
                if (handleIncompleteRequestLineRead()) {
                    break;
                }
            }

            if (endpoint.isPaused()) {
                // 503 - Service unavailable
                // 如果Endpoint被暂停了,则返回503
                response.setStatus(503);
                setErrorState(ErrorState.CLOSE_CLEAN, null);
            } else {
                keptAlive = true;
                // Set this every time in case limit has been changed via JMX
                // 每次处理一个请求就重新获取一下请求头和cookies的最大限制
                request.getMimeHeaders().setLimit(endpoint.getMaxHeaderCount());
                request.getCookies().setLimit(getMaxCookieCount());
                // Currently only NIO will ever return false here
                // 解析请求头
                if (!getInputBuffer().parseHeaders()) {
                    // We've read part of the request, don't recycle it
                    // instead associate it with the socket
                    openSocket = true;
                    readComplete = false;
                    break;
                }
                if (!disableUploadTimeout) {
                    setSocketTimeout(connectionUploadTimeout);
                }
            }
        } catch (IOException e) {
            if (getLog().isDebugEnabled()) {
                getLog().debug(
                        sm.getString("http11processor.header.parse"), e);
            }
            setErrorState(ErrorState.CLOSE_NOW, e);
            break;
        } catch (Throwable t) {
            ExceptionUtils.handleThrowable(t);
            UserDataHelper.Mode logMode = userDataHelper.getNextMode();
            if (logMode != null) {
                String message = sm.getString(
                        "http11processor.header.parse");
                switch (logMode) {
                    case INFO_THEN_DEBUG:
                        message += sm.getString(
                                "http11processor.fallToDebug");
                        //$FALL-THROUGH$
                    case INFO:
                        getLog().info(message, t);
                        break;
                    case DEBUG:
                        getLog().debug(message, t);
                }
            }
            // 400 - Bad Request
            response.setStatus(400);
            setErrorState(ErrorState.CLOSE_CLEAN, t);
            getAdapter().log(request, response, 0);
        }

        if (!getErrorState().isError()) {
            // Setting up filters, and parse some request headers
            rp.setStage(org.apache.coyote.Constants.STAGE_PREPARE);  // 设置请求状态为预处理状态
            try {
               prepareRequest();   // 预处理, 主要从请求中处理处keepAlive属性,以及进行一些验证,以及根据请求分析得到ActiveInputFilter
            } catch (Throwable t) {
                ExceptionUtils.handleThrowable(t);
                if (getLog().isDebugEnabled()) {
                    getLog().debug(sm.getString(
                            "http11processor.request.prepare"), t);
                }
                // 500 - Internal Server Error
                response.setStatus(500);
                setErrorState(ErrorState.CLOSE_CLEAN, t);
                getAdapter().log(request, response, 0);
            }
        }

        if (maxKeepAliveRequests == 1) {
            // 如果最大的活跃http请求数量仅仅只能为1的话,那么设置keepAlive为false,则不会继续从socket中获取Http请求了
            keepAlive = false;
        } else if (maxKeepAliveRequests > 0 &&
                socketWrapper.decrementKeepAlive() <= 0) {
            // 如果已经达到了keepAlive的最大限制,也设置为false,则不会继续从socket中获取Http请求了
            keepAlive = false;
        }
        // Process the request in the adapter
        if (!getErrorState().isError()) {
            try {
                rp.setStage(org.apache.coyote.Constants.STAGE_SERVICE); // 设置请求的状态为服务状态,表示正在处理请求
                adapter.service(request, response); // 交给容器处理请求
                // Handle when the response was committed before a serious
                // error occurred.  Throwing a ServletException should both
                // set the status to 500 and set the errorException.
                // If we fail here, then the response is likely already
                // committed, so we can't try and set headers.
                if(keepAlive && !getErrorState().isError() && (
                        response.getErrorException() != null ||
                                (!isAsync() &&
                                statusDropsConnection(response.getStatus())))) {
                    setErrorState(ErrorState.CLOSE_CLEAN, null);
                }
                setCometTimeouts(socketWrapper);
            } catch (InterruptedIOException e) {
                setErrorState(ErrorState.CLOSE_NOW, e);
            } catch (HeadersTooLargeException e) {
                getLog().error(sm.getString("http11processor.request.process"), e);
                // The response should not have been committed but check it
                // anyway to be safe
                if (response.isCommitted()) {
                    setErrorState(ErrorState.CLOSE_NOW, e);
                } else {
                    response.reset();
                    response.setStatus(500);
                    setErrorState(ErrorState.CLOSE_CLEAN, e);
                    response.setHeader("Connection", "close"); // TODO: Remove
                }
            } catch (Throwable t) {
                ExceptionUtils.handleThrowable(t);
                getLog().error(sm.getString("http11processor.request.process"), t);
                // 500 - Internal Server Error
                response.setStatus(500);
                setErrorState(ErrorState.CLOSE_CLEAN, t);
                getAdapter().log(request, response, 0);
            }
        }

        // Finish the handling of the request
        rp.setStage(org.apache.coyote.Constants.STAGE_ENDINPUT);  // 设置请求的状态为处理请求结束

        if (!isAsync() && !comet) {
            if (getErrorState().isError()) {
                // If we know we are closing the connection, don't drain
                // input. This way uploading a 100GB file doesn't tie up the
                // thread if the servlet has rejected it.
                getInputBuffer().setSwallowInput(false);
            } else {
                // Need to check this again here in case the response was
                // committed before the error that requires the connection
                // to be closed occurred.
                checkExpectationAndResponseStatus();
            }
            // 当前http请求已经处理完了,做一些收尾工作
            endRequest();
        }

        rp.setStage(org.apache.coyote.Constants.STAGE_ENDOUTPUT); // 请求状态为输出结束

        // If there was an error, make sure the request is counted as
        // and error, and update the statistics counter
        if (getErrorState().isError()) {
            response.setStatus(500);
        }
        request.updateCounters();

        if (!isAsync() && !comet || getErrorState().isError()) {
            if (getErrorState().isIoAllowed()) {
                // 准备处理下一个请求
                getInputBuffer().nextRequest();
                getOutputBuffer().nextRequest();
            }
        }

        if (!disableUploadTimeout) {
            if(endpoint.getSoTimeout() > 0) {
                setSocketTimeout(endpoint.getSoTimeout());
            } else {
                setSocketTimeout(0);
            }
        }

        rp.setStage(org.apache.coyote.Constants.STAGE_KEEPALIVE);

        // 如果处理完当前这个Http请求之后,发现socket里没有下一个请求了,那么就退出当前循环
        // 如果是keepalive,就不会关闭socket, 如果是close就会关闭socket
        // 对于keepalive的情况,因为是一个线程处理一个socket,当退出这个while后,当前线程就会介绍,
        // 当时对于socket来说,它仍然要继续介绍连接,所以又会新开一个线程继续来处理这个socket
        if (breakKeepAliveLoop(socketWrapper)) {
            break;
        }
    }
    // 至此,循环结束

    rp.setStage(org.apache.coyote.Constants.STAGE_ENDED);

    // 主要流程就是将socket的状态设置为CLOSED
    if (getErrorState().isError() || endpoint.isPaused()) {
        return SocketState.CLOSED;
    } else if (isAsync() || comet) {
        // 异步servlet
        return SocketState.LONG;
    } else if (isUpgrade()) {
        return SocketState.UPGRADING;
    } else if (getUpgradeInbound() != null) {
        return SocketState.UPGRADING_TOMCAT;
    } else {
        if (sendfileInProgress) {
            return SocketState.SENDFILE;
        } else {
            // openSocket为true,表示不要关闭socket
            if (openSocket) {
                // readComplete表示本次读数据是否完成,比如nio中可能就没有读完数据,还需要从socket中读数据
                if (readComplete) {
                    return SocketState.OPEN;
                } else {
                    // nio可能会走到这里
                    return SocketState.LONG;
                }
            } else {
                return SocketState.CLOSED;
            }
        }
    }
}
上面getInputBuffer().init(socketWrapper, endpoint); 这一行代码中用到了InternalInputBuffer 。
1. 套接字输入缓冲装置-InternalInputBuffer
互联网中的信息从一端向另外一端的过程相当的复杂,中间可能通过若干个硬件,为了提高发送和接收的效率,在发送端及接收端都将引入缓冲区,所以两端的套接字都拥有各自的缓冲区, 当然,这种缓冲区的引入也带来了不确定的延时,在发送端一般先将消息写入缓冲区,直到缓冲区填满才发送, 而接收端则一次只读取最多不超过缓冲区大小的消息。
Tomcat 在处理客户端的请求时需要读取客户端的请求数据,它同样需要一个缓冲区,用于接收字节流,在Tomcat 中称为套接字输出缓冲装置 , 它主要的责任是提供了种缓冲模式,以从Socket 中读取字节流,提供填充缓冲区的方法,提供解析HTTP 协议请求行的方法 ,提供解析HTTP协议请求头方法,以及按照解析的结果组装请求对象的Request 。
套接字输入缓冲装置的工作原理并不会复杂,如图6.2 所示 。 InternalInputBuffer 包含以下几个变量 , 字节数组buf ,整形pos,整形lastValid ,整形end ,其中buf 用于存放缓冲的字节流,字的大小由程序设定,Tomcat 中默认设置为8 * 1024 ,即 8KB ,pos 表示读取指针,读取到哪个位置的值即为多少 , latValid 表示从操作系统底层读取的数据填充到buf 中最后的位置 , end 表示缓冲区buf 中的HTTP协议请求报文头部的位置,同时也表示报文体的开始位置,在图6.12 中,从上往下看,最开始缓冲区buf 是空的,接着读取套接字操作系统底层的若干字节流读取到buf中,于是状态如2 所示 , 读取到字节流将buf 从头往后进行填充,同时pos为0,lastValid 为此次读取后最后的位置值,然后第二次读取操作系统底层若干字节流,每次读取多少并不确定,字节流应该接在2中,lastValid 指定的位置后面而非从头开始,此时pos及lastValid根据实际情况被赋予新值,假如再读取一次则最终状态为5,多出一个end变量 , 它的含义是HTTP 请求报文的请求行及请求头的位置 。

为了更好的理解如何从底层读取字节流并进行解析,下面给出简化的处理过程 , 首先需要一个方法提供读取字节流,如下所示 , 其中inputStream 代表套接字的输入流,通过socket.getInputStream() 获取,而read方法用于读取字节流, 它表示从底层读取最多(buf.length-lastValid)长度的字节流, 且把这些字节流填入buf 数组中,填充的位置从buf[pos] 开始,nRead 表示实际读取的字节数, 通过对上面的这些变量的操作,则可以确保作缓冲装置,成功填充并返回true 。
public class InternalInputBuffer {
byte [] buf = new byte[8 * 1024];
int pos = 0 ;
int lastValid = 0 ;
public boolean fill(){
int nRead = inputStream.read(buf ,pos , buf.length -lastValid);
if(nRead > 0 ){
lastValid = pos + nRead;
}
return (nRead > 0);
}
}有了填充的方法,接下来需要一个解析报文的操作过程,下面以解析请求行的方法及路径为例子进行说明,其他解析也按照类似的操作,HTTP 协议请求报文的格式如图6.13 所示,请求行一共有3个值需要解析出来,请求方法 , 请求URL 及协议版本,以空格间隔并及回车换行符结尾 ,解析方法如下。

我们在分析代码之前,先来看一个简单的servlet的例子。
- 创建servlet-test项目 ,在项目中写一个简单的Servlet

servlet-test 项目的github地址是https://github.com/quyixiao/servelet-test
- 运行mvn clean install 命令,将项目打包,将war 放到tomcat 的webapps 目录下。

- 启动tomcat ,在浏览器中输入http://localhost:8080/servelet-test-1.0/MyServlet

- 看buf的内容如下

buf 的字符串内容如下:
GET /servelet-test-1.0/MyServlet HTTP/1.1
Host: localhost:8080
Connection: keep-alive
Cache-Control: max-age=0
sec-ch-ua: " Not A;Brand";v=“99”, “Chromium”;v=“99”, “Google Chrome”;v=“99”
sec-ch-ua-mobile: ?0
sec-ch-ua-platform: “macOS”
Upgrade-Insecure-Requests: 1
User-Agent: Mozilla/5.0 (Macintosh; Intel Mac OS X 10_15_2) AppleWebKit/537.36 (KHTML, like Gecko) Chrome/99.0.4844.51 Safari/537.36
Accept: text/html,application/xhtml+xml,application/xml;q=0.9,image/avif,image/webp,image/apng,/;q=0.8,application/signed-exchange;v=b3;q=0.9
Sec-Fetch-Site: none
Sec-Fetch-Mode: navigate
Sec-Fetch-User: ?1
Sec-Fetch-Dest: document
Accept-Encoding: gzip, deflate, br
Accept-Language: zh-CN,zh;q=0.9,en;q=0.8
Cookie: lubansession=40109891C988AB35867E7839F9783D2B; Idea-4ef2be4a=30b92c0d-ce7e-46f8-a7c0-d17876aec8f0
接下来,我们进入parseRequestLine()方法中分析 ,而parseRequestLine()方法主要解析的就是 GET /servelet-test-1.0/MyServlet HTTP/1.1 这一行请求头。
public boolean parseRequestLine(boolean useAvailableDataOnly)

    throws IOException {

    int start = 0;

    //
    // Skipping blank lines
    //

    byte chr = 0;
    do {
        // 把buf里面的字符一个个取出来进行判断,遇到非回车换行符则会退出

        // Read new bytes if needed
        // 如果一直读到的回车换行符则再次调用fill,从inputStream里面读取数据填充到buf中
        if (pos >= lastValid) {
            if (!fill())
                throw new EOFException(sm.getString("iib.eof.error"));
        }
        // Set the start time once we start reading data (even if it is
        // just skipping blank lines)
        if (request.getStartTime() < 0) {
            request.setStartTime(System.currentTimeMillis());
        }
        chr = buf[pos++];
    // 如果chr 是 \r 或 \n ,则继续移动pos指针的位置 ,直到chr 不为 \r  或 \n 为止
    } while ((chr == Constants.CR) || (chr == Constants.LF));

	// 跳出上面while()循环的条件是chr 不是\r 或 \n ,因此chr是有效字符,而在while循环中pos ++ 了,因此这里需要pos = pos - 1
    pos--;

    // Mark the current buffer position
    start = pos;

    //
    // Reading the method name
    // Method name is a token
    //
    boolean space = false;

    while (!space) {

        // Read new bytes if needed
        if (pos >= lastValid) {
            if (!fill())
                throw new EOFException(sm.getString("iib.eof.error"));
        }

        // Spec says method name is a token followed by a single SP but
        // also be tolerant of multiple SP and/or HT.
        // 如果(GET /servelet-test-1.0/MyServlet HTTP/1.1)遇到空格或\t  则方法已经读取完了,则退出while循环
        // 并截取buf的内容设置到method中
        if (buf[pos] == Constants.SP || buf[pos] == Constants.HT) {
            space = true;
            // 下面代码其实是调用了ByteChunk 的setBytes 方法,把字节流及末坐标设置好, 后面的request.method.toString() 同样
            // 调用了ByteChunk 的toString 方法,根据指定的编码进行转码,这里是ISO_8859_1,这样一来就达到了延迟处理模式效果 。
            // 在需要时才根据指定的编码转码并获取字符串,如果不需要,则无须转码,处理性能得到提高 。

            // Tomcat 对于套接字的信息都用消息字节表示,好处是实现一种延迟处理模式,提高性能,实际上,Tomcat 还引入字符串缓存。
            // 在转码之前会先从缓存中查找是否有对应的编码的字符串, 如果存在 ,则不必再执行转码动作,而是直接返回对应的字符串,
            // 性能进一步得到优化,为了提高性能,我们必须要多做一些额外的工作,这也是Tomcat 接收到信息不直接用字符串保存的原因 。
            request.method().setBytes(buf, start, pos - start);
        // 如果buf[pos] 大于128,则抛出异常
        // ASC码在 0 1 2 3 4 5 6 7 8 9 10 11 12 13 14 15 16 17 18 19 20 21 22 23 24 25 26 27 28 29 30 31 32 34 40 41 44
        // 47 58 59 60 61 62 63 64 91 92 93 123 125 ,则抛出异常,如/servelet-test-1.0/MyServlet@ ,则会抛出异常,因为@的ASC码为64
        } else if (!HttpParser.isToken(buf[pos])) {
            throw new IllegalArgumentException(sm.getString("iib.invalidmethod"));
        }
        pos++;
    }

    // Spec says single SP but also be tolerant of multiple SP and/or HT
    while (space) {
        // Read new bytes if needed
        if (pos >= lastValid) {
            if (!fill())
                throw new EOFException(sm.getString("iib.eof.error"));
        }
        // 跳过method 和 uri 之间的所有空格
        if (buf[pos] == Constants.SP || buf[pos] == Constants.HT) {
            pos++;
        } else {
            space = false;
        }
    }

    // 上面这个while()循环的主要作用就是跳过method 和uri 之间的所有空格
    // Mark the current buffer position
    start = pos;
    int end = 0;
    int questionPos = -1;

    //
    // Reading the URI
    //

    boolean eol = false;

    while (!space) {

        // Read new bytes if needed
        if (pos >= lastValid) {
            if (!fill())
                throw new EOFException(sm.getString("iib.eof.error"));
        }

        // Spec says single SP but it also says be tolerant of HT ,如果遇到空格或\t ,则结束循环
        if (buf[pos] == Constants.SP || buf[pos] == Constants.HT) {
            space = true;
            end = pos;
        } else if ((buf[pos] == Constants.CR)
                   || (buf[pos] == Constants.LF)) {
            // HTTP/0.9 style request ,在HTTP/0.9 中uri 和协议之间是以\r 或回车隔开的
            eol = true;
            space = true;
            end = pos;
        // 如果遇到问号,则记录问号的位置 ,因为我们的uri可能是servelet-test-1.0/MyServlet?username=zhangsan
        } else if ((buf[pos] == Constants.QUESTION) && (questionPos == -1)) {
            questionPos = pos;
        // 如果uri中有?,并且含有ASC码为 0 1 2 3 4 5 6 7 8 9 10 11 12 13 14 15 16 17 18 19 20 21 22 23 24 25
        // 26 27 28 29 30 31 32 34 35 60 62 91 92 93 94 96 123 124 125 ,则抛出异常,如
        // uri 中有 servelet-test-1.0/MyServlet?username=zhangsan{ ,{ 的ASC码为 123 ,则会抛出异常
        } else if (questionPos != -1 && !httpParser.isQueryRelaxed(buf[pos])) {
            // %nn decoding will be checked at the point of decoding
            throw new IllegalArgumentException(sm.getString("iib.invalidRequestTarget"));
        // 只要uri中包含0 1 2 3 4 5 6 7 8 9 10 11 12 13 14 15 16 17 18 19 20 21 22 23 24 25 26 27 28 29 30 31 32
        // 34 35 60 62 92 94 96 123 124 125 ,则会抛出异常。如
        // uri = servelet-test-1.0/MyServlet^,而 ^的ASC码为94
        } else if (httpParser.isNotRequestTargetRelaxed(buf[pos])) {
            // This is a general check that aims to catch problems early
            // Detailed checking of each part of the request target will
            // happen in AbstractHttp11Processor#prepareRequest()
            throw new IllegalArgumentException(sm.getString("iib.invalidRequestTarget"));
        }

        pos++;

    }

	// 设置包含问号的uri
    request.unparsedURI().setBytes(buf, start, end - start);
    // 如果包含问号
    if (questionPos >= 0) {
    	// 截取问号后面的字符串为queryString
        request.queryString().setBytes(buf, questionPos + 1,
                                       end - questionPos - 1);
		// 问号前面的内容为uri
        request.requestURI().setBytes(buf, start, questionPos - start);
    } else {
    	// 如果没有问号?则 start 到 end 之间的byte 即为uri
        request.requestURI().setBytes(buf, start, end - start);
    }

    // Spec says single SP but also says be tolerant of multiple SP and/or HT
    while (space) {
        // Read new bytes if needed
        if (pos >= lastValid) {
            if (!fill())
                throw new EOFException(sm.getString("iib.eof.error"));
        }
        // 跳过所有的空格或\t
        if (buf[pos] == Constants.SP || buf[pos] == Constants.HT) {
            pos++;
        } else {
            space = false;
        }
    }

    // Mark the current buffer position
    start = pos;
    end = 0;

    //
    // Reading the protocol
    // Protocol is always "HTTP/" DIGIT "." DIGIT
    //
    while (!eol) {

        // Read new bytes if needed
        if (pos >= lastValid) {
            if (!fill())
                throw new EOFException(sm.getString("iib.eof.error"));
        }

        if (buf[pos] == Constants.CR) {
            end = pos;
        // 如果遇到\n,则退出循环
        } else if (buf[pos] == Constants.LF) {
            if (end == 0)
                end = pos;
            eol = true;
        // 如果buf[pos] 不是 H,T,P,/,.,0~9 ,则抛出异常
        } else if (!HttpParser.isHttpProtocol(buf[pos])) {
            throw new IllegalArgumentException(sm.getString("iib.invalidHttpProtocol"));
        }
        pos++;

    }


    if ((end - start) > 0) {
    	// 如果end - start 大于0,则截取start ~ end 之间的byte 为协议内容
        request.protocol().setBytes(buf, start, end - start);
    } else {
        request.protocol().setString("");
    }

    return true;

}
protected boolean fill() throws IOException {
    return fill(true);
}

@Override
protected boolean fill(boolean block) throws IOException {

    int nRead = 0;
	// 如果是在解析请求头
    if (parsingHeader) {
        // 如果还在解析请求头,lastValid表示当前解析数据的下标位置,如果该位置等于buf的长度了,表示请求头的数据超过buf了。
        if (lastValid == buf.length) {
            throw new IllegalArgumentException
                (sm.getString("iib.requestheadertoolarge.error"));
        }

        // 从inputStream中读取数据,len表示要读取的数据长度,pos表示把从inputStream读到的数据放在buf的pos位置
        // nRead表示真实读取到的数据
        nRead = inputStream.read(buf, pos, buf.length - lastValid);
        if (nRead > 0) {
            lastValid = pos + nRead; // 移动lastValid
        }

    } else {
        // 当读取请求体的数据时
        // buf.length - end表示还能存放多少请求体数据,如果小于4500,那么就新生成一个byte数组,这个新的数组专门用来盛放请求体
        if (buf.length - end < 4500) {
            // In this case, the request header was really large, so we allocate a
            // brand new one; the old one will get GCed when subsequent requests
            // clear all references
            buf = new byte[buf.length];
            end = 0;
        }
        pos = end;
        lastValid = pos;
        nRead = inputStream.read(buf, pos, buf.length - lastValid);
        if (nRead > 0) {
            lastValid = pos + nRead;
        }

    }

    return (nRead > 0);

}
第一个while循环用于解析方法名,每次操作前必须判断是否需要从底层读取字节流,当pos 大于等于lastValid 时,即需要调用fill方法读取,当字节等于ASCII 编码的空格时,就截取start 到pos 之间的字节数组 。 转成String 对象后设置到request 对象中,第二个while循环用于跳过方法名与URI 之间所有的空格,第三个while循环用于解析URI ,它的逻辑与前面方法名解析逻辑着不多, 解析到URI 最终也设置到request对象里中。
接下来,我们来看看parseHeaders()方法的实现。public boolean parseHeaders() throws IOException { if (!parsingHeader) { throw new IllegalStateException( sm.getString("iib.parseheaders.ise.error")); } while (parseHeader()) { // Loop until we run out of headers } parsingHeader = false; end = pos; return true; }
上面代码中重点关注while循环, 也就是请求头中,每一行请求头的解析
Host: localhost:8080
Connection: keep-alive
Cache-Control: max-age=0
…
都会进入到 parseHeader()方法中,也就是parseHeader()方法只会解析一行请求头。private boolean parseHeader() throws IOException { // // Check for blank line // byte chr = 0; while (true) { // Read new bytes if needed if (pos >= lastValid) { if (!fill()) throw new EOFException(sm.getString("iib.eof.error")); } chr = buf[pos]; if (chr == Constants.CR) { // 回车 // Skip } else if (chr == Constants.LF) { // 换行 pos++; return false; // 在解析某一行时遇到一个回车换行了,则表示请求头的数据结束了 } else { break; } pos++; } // Mark the current buffer position int start = pos; // // Reading the header name // Header name is always US-ASCII // boolean colon = false; MessageBytes headerValue = null; while (!colon) { // Read new bytes if needed if (pos >= lastValid) { if (!fill()) throw new EOFException(sm.getString("iib.eof.error")); } // 如果 buf[pos] 是分号 if (buf[pos] == Constants.COLON) { colon = true; // 创建 MimeHeaderField 放入到headers中 ,并且设置MimeHeaderField 的name 为 buf[start] ~ buf[pos] 字符 headerValue = headers.addValue(buf, start, pos - start); } else if (!HttpParser.isToken(buf[pos])) { // Non-token characters are illegal in header names // Parsing continues so the error can be reported in context // skipLine() will handle the error // 如果buf[pos] 在 0 1 2 3 4 5 6 7 8 9 10 11 12 13 14 15 16 17 18 19 20 21 22 23 24 25 26 27 28 29 30 31 32 34 40 41 44 47 58 // 59 60 61 62 63 64 91 92 93 123 125 中,则跳过该行,如请求头中有{,则跳过该行 skipLine(start); return true; } chr = buf[pos]; if ((chr >= Constants.A) && (chr <= Constants.Z)) { buf[pos] = (byte) (chr - Constants.LC_OFFSET); } pos++; } // Mark the current buffer position start = pos; int realPos = pos; // // Reading the header value (which can be spanned over multiple lines) // boolean eol = false; boolean validLine = true; while (validLine) { boolean space = true; // Skipping spaces ,下面while 循环主要是跳过 空格 或 \t while (space) { // Read new bytes if needed if (pos >= lastValid) { if (!fill()) throw new EOFException(sm.getString("iib.eof.error")); } if ((buf[pos] == Constants.SP) || (buf[pos] == Constants.HT)) { pos++; } else { space = false; } } int lastSignificantChar = realPos; // Reading bytes until the end of the line while (!eol) { // Read new bytes if needed if (pos >= lastValid) { if (!fill()) throw new EOFException(sm.getString("iib.eof.error")); } // 如果buf[pos] 等于 \r ,则跳过 if (buf[pos] == Constants.CR) { // Skip // 如果遇到回车换行,则跳出当前while循环 } else if (buf[pos] == Constants.LF) { eol = true; // 如果buf[pos] 是空格,则将buf[realPos] 赋值为buf[pos]; } else if (buf[pos] == Constants.SP) { buf[realPos] = buf[pos]; realPos++; } else { buf[realPos] = buf[pos]; realPos++; // 记录最后一个非空格有效字符 lastSignificantChar = realPos; } pos++; } // 我相信分析到这里,大家对lastSignificantChar的用途还是比较模糊的,lastSignificantChar主要是记录最后一个非空格字符 // 如 application/x-www-form-urlencoded; charset=UTF-8 ,后面有很多空格,而 // lastSignificantChar记录的是8的位置,因此在截取时,后面的空格会被忽略掉 realPos = lastSignificantChar; // Checking the first character of the new line. If the character // is a LWS, then it's a multiline header // Read new bytes if needed if (pos >= lastValid) { if (!fill()) throw new EOFException(sm.getString("iib.eof.error")); } chr = buf[pos]; // 如果换行之后,chr 不是空格或\t ,则请求头读取完毕,退出循环 if ((chr != Constants.SP) && (chr != Constants.HT)) { validLine = false; } else { // 如果换行后的第一个字符是空格或 \t ,则表明没有读取完,继续while循环 eol = false; // Copying one extra space in the buffer (since there must // be at least one space inserted between the lines) buf[realPos] = chr; realPos++; } } // Set the header value headerValue.setBytes(buf, start, realPos - start); return true; }

上面headers 的封装分三种情况
- content-type:application/x-www-form-urlencoded; charset=UTF-8 ,正常情况 。
- content-type:application/x-www-form-urlencoded; charset=UTF-8 ,后面有很多空格的情况
- content-type:application/x-www-form-urlencoded; \n charset=UTF-8 ;有回车换行,并且回车换行后是空格 。
上述三种情况最终都读取成application/x-www-form-urlencoded; charset=UTF-8
public MessageBytes addValue(byte b[], int startN, int len)
{
    MimeHeaderField mhf=createHeader();
    mhf.getName().setBytes(b, startN, len);
    return mhf.getValue();
}

private MimeHeaderField createHeader() {
    if (limit > -1 && count >= limit) {
        throw new IllegalStateException(sm.getString(
                "headers.maxCountFail", Integer.valueOf(limit)));
    }
    MimeHeaderField mh;
    int len = headers.length;
    if (count >= len) {
        // 每一次数组的长度变为原来的两倍
        int newLength = count * 2;
        if (limit > 0 && newLength > limit) {
            newLength = limit;
        }
        //创建新数组,并且将旧数组中的元素拷贝到新数组中
        MimeHeaderField tmp[] = new MimeHeaderField[newLength];
        System.arraycopy(headers, 0, tmp, 0, len);
        headers = tmp;
    }
    // 如果headers[count] == null ,则初始化headers[count]
    if ((mh = headers[count]) == null) {
        headers[count] = mh = new MimeHeaderField();
    }
    count++;
    return mh;
}
到此,整个缓冲装置的工作原理基本搞清楚了,一个完全的过程是从底层字节流的读取到这些字节流的解析并组装成一个请求对象request,方便程序后面使用,由于每次从底层读取字节流的大小都不确定,因此通过对pos ,lastValid 变量进行控制,以完成对字节流的准确读取接收,除此之外,输入缓冲装置还提供了对解析请求头部方法,处理逻辑是按照HTTP 协议的规定对头部解析,然后依次放入request对象中, 需要额外说明的是,Tomcat 实际运行中并不会在将请求行,请求头部等参数解析后直接 转化为String类型设置到request中,而是继续使用ASCII 码存放这些值,因为这些ASCII 码转码会导致性能问题, 其中的思想是只有到需要使用的时候才进行转码,很多参数没有使用就不进行转码,以此提高处理性能,这方面的详细内容在6.1.2 节请求Request 会涉及,最后附上套接字输入缓冲装置的结构图 ,如图6.1.4 所示 。

我们存储在headers中的并不是name和对应的值,而是MimeHeaderField数组对象,而MimeHeaderField结构如下,其中用到了MessageBytes对象存储byte数据,而MessageBytes有什么用呢?
class MimeHeaderField {
    // multiple headers with same name - a linked list will
    // speed up name enumerations and search ( both cpu and
    // GC)
    MimeHeaderField next;
    MimeHeaderField prev;

    protected final MessageBytes nameB = MessageBytes.newInstance();
    protected final MessageBytes valueB = MessageBytes.newInstance();

    /**
     * Creates a new, uninitialized header field.
     */
    public MimeHeaderField() {
        // NO-OP
    }

    public void recycle() {
        nameB.recycle();
        valueB.recycle();
        next=null;
    }

    public MessageBytes getName() {
        return nameB;
    }

    public MessageBytes getValue() {
        return valueB;
    }
}
消息字节-MessageBytes
之前提到过,Tomcat 并不会直接将解析出来的HTTP 协议直接转成String 类保存到request中,而是保留字节流的形式,在需要的时候才进行转码工作,以此提高处理性能,MessageBytes 正是为了解决这个问题而提出来的一个类。
消息字节封装了不同的类型用于表示信息,它包含了4种类型,T_BYTES,T_CHARS,T_STR,T_NULL ,分别表示字节类型,字符类型,字符器类型,空, 由于Web 服务器使用ASCII码通信,对应的字节,因此这里选取T_BYTES 类型作为案例进行说明,其他类型与之类似,消息字节的使用方法很简单,假如有一个字节数组byte[] buffer , 该数组从第3 ~ 20 下标之间的字节数组组成的字符表示Request对象中方法变量的值,那么就用以下代码简单表示 。-
请求对象类的代码如下 。
public class Request{
MessageBytes methodMB = new MessageBytes();
public MessageBytes method(){
return methodMB;
}
} -
设置请求对象属性的代码如下。
Request request = new Request();
request.method().setBytes(buffer , 3, 18 );
执行上面的操作就完成了对字节数组某段的标记操作,方便以后获取指定的一段字节数组,参照图6.15 ,你可以用多个消息字节对buffer标记,例如 ,对请求变量,协议版本等变量进行标记,每个消息字节实例标识了一段字节数组,可以通过如下代码获取并转为字符串类型。
request.method().toString();

使用起来很简单, 接着介绍实际的实现原理 , 为了化繁为简,由于Tomcat 底层接收的是字节流, 因此只考虑T_BYTES的情况,可以看到消息字节里面其实由字节块(ByteChunk)实现, 这里只体现了本节相关的操作方法,所以例子中的ByteChunk 并不包含缓冲相关的操作方法 。public final class MessageBytes implements Cloneable, Serializable { public static final int T_BYTES = 2; private final ByteChunk byteC=new ByteChunk(); private String strValue; public void setBytes(byte[] b, int off, int len) { byteC.setBytes( b, off, len ); type=T_BYTES; hasStrValue=false; hasHashCode=false; hasIntValue=false; hasLongValue=false; } @Override public String toString() { if( hasStrValue ) { return strValue; } switch (type) { case T_CHARS: strValue=charC.toString(); hasStrValue=true; return strValue; case T_BYTES: strValue=byteC.toString(); hasStrValue=true; return strValue; } return null; } }ByteChunk 类的代码如下
public final class ByteChunk extends AbstractChunk {

    public static interface ByteInputChannel {
        public int realReadBytes(byte cbuf[], int off, int len) throws IOException;
    }

    public static interface ByteOutputChannel {
        public void realWriteBytes(byte buf[], int off, int len) throws IOException;
    }

    private byte[] buff;
    private int limit = -1;
    protected int start;
    protected int end;
    // transient as serialization is primarily for values via, e.g. JMX
    private transient ByteInputChannel in = null;
    private transient ByteOutputChannel out = null;

    public void setBytes(byte[] b, int off, int len) {
        buff = b;
        start = off;
        end = start + len;
        isSet = true;
        hasHashCode = false;
    }

    // 缓冲区字节添加方法
    public void append(byte b) throws IOException {
        makeSpace(1);
        int limit = getLimitInternal();

        // couldn't make space
        if (end >= limit) {
            flushBuffer();
        }
        buff[end++] = b;
    }

    public void append(byte src[], int off, int len) throws IOException {
        // will grow, up to limit
        // 向缓冲区中添加数据,需要开辟缓存区空间,缓存区初始大小为256,最大大小可以设置,默认为8192
        // 意思是现在要想缓冲区存放数据,首先得去开辟空间,但是空间是有一个最大限制的,所以要存放的数据可能小于限制,也可能大于限制
        makeSpace(len);
        int limit = getLimitInternal(); // 缓冲区大小的最大限制

        // Optimize on a common case.
        // If the buffer is empty and the source is going to fill up all the
        // space in buffer, may as well write it directly to the output,
        // and avoid an extra copy
        // 如果要添加到缓冲区中的数据大小正好等于最大限制,并且缓冲区是空的,那么则直接把数据发送给out,不要存在缓冲区中了
        if (optimizedWrite && len == limit && end == start && out != null) {
            out.realWriteBytes(src, off, len);
            return;
        }

        // if we are below the limit
        // 如果要发送的数据长度小于缓冲区中剩余空间,则把数据填充到剩余空间
        if (len <= limit - end) {
            System.arraycopy(src, off, buff, end, len);
            end += len;
            return;
        }

        // 如果要发送的数据长度大于缓冲区中剩余空间,
        // Need more space than we can afford, need to flush buffer.
        // The buffer is already at (or bigger than) limit.
        // We chunk the data into slices fitting in the buffer limit, although
        // if the data is written directly if it doesn't fit.
        // 缓冲区中还能容纳avail个字节的数据
        int avail = limit - end;
        // 先将一部分数据复制到buff,填满缓冲区
        System.arraycopy(src, off, buff, end, avail);
        end += avail;

        // 将缓冲区的数据发送出去
        flushBuffer();

        // 还剩下一部分数据没有放到缓冲区中的
        int remain = len - avail;
        // 如果剩下的数据 超过 缓冲区剩余大小,那么就把数据直接发送出去
        while (remain > (limit - end)) {
            out.realWriteBytes(src, (off + len) - remain, limit - end);
            remain = remain - (limit - end);
        }

        // 知道最后剩下的数据能放入缓冲区,那么就放入到缓冲区
        System.arraycopy(src, (off + len) - remain, buff, end, remain);
        end += remain;
    }

    public int substract(byte dest[], int off, int len) throws IOException {
        // 这里会对当前ByteChunk初始化
        if (checkEof()) {
            return -1;
        }
        int n = len;
        // 如果需要的数据超过buff中标记的数据长度
        if (len > getLength()) {
            n = getLength();
        }
        // 将buff数组中从start位置开始的数据,复制到dest中,长度为n,desc数组中就有值了
        System.arraycopy(buff, start, dest, off, n);
        start += n;
        return n;
    }

    private boolean checkEof() throws IOException {
        if ((end - start) == 0) {
            // 如果bytechunk没有标记数据了,则开始比较
            if (in == null) {
                return true;
            }
            // 从in中读取buff长度大小的数据,读到buff中,真实读到的数据为n
            int n = in.realReadBytes(buff, 0, buff.length);
            if (n < 0) {
                return true;
            }
        }
        return false;
    }

    /**
     *  缓冲区刷新方法
     */
    public void flushBuffer() throws IOException {
        // assert out!=null
        if (out == null) {
            throw new IOException("Buffer overflow, no sink " + getLimit() + " " + buff.length);
        }
        out.realWriteBytes(buff, start, end - start);
        end = start;
    }

    /**
     * 缓冲区扩容方法
     */
    public void makeSpace(int count) {
        byte[] tmp = null;

        // 缓冲区的最大大小,可以设置,默认为8192
        int limit = getLimitInternal();

        long newSize;
        // end表示缓冲区中已有数据的最后一个位置,desiredSize表示新数据+已有数据共多大
        long desiredSize = end + count;

        // Can't grow above the limit
        // 如果超过限制了,那就只能开辟limit大小的缓冲区了
        if (desiredSize > limit) {
            desiredSize = limit;
        }

        if (buff == null) {
            // 初始化字节数组
            if (desiredSize < 256) {
                desiredSize = 256; // take a minimum
            }
            buff = new byte[(int) desiredSize];
        }

        // limit < buf.length (the buffer is already big)
        // or we already have space XXX
        // 如果需要的大小小于buff长度,那么不需要增大缓冲区
        if (desiredSize <= buff.length) {
            return;
        }

        // 下面代码的前提条件是,需要的大小超过了buff的长度

        // grow in larger chunks
        // 如果需要的大小大于buff.length, 小于2*buff.length,则缓冲区的新大小为2*buff.length,
        if (desiredSize < 2L * buff.length) {
            newSize = buff.length * 2L;
        } else {
            // 否则为buff.length * 2L + count
            newSize = buff.length * 2L + count;
        }

        // 扩容前没有超过限制,扩容后可能超过限制
        if (newSize > limit) {
            newSize = limit;
        }
        tmp = new byte[(int) newSize];

        // Compacts buffer
        // 把当前buff中的内容复制到tmp中
        System.arraycopy(buff, start, tmp, 0, end - start);
        buff = tmp;
        tmp = null;
        end = end - start;
        start = 0;
    }

    @Override
    public String toString() {
        if (null == buff) {
            return null;
        } else if (end - start == 0) {
            return "";
        }
        return StringCache.toString(this);
    }

    public String toStringInternal() {
        if (charset == null) {
            charset = DEFAULT_CHARSET;
        }
        // new String(byte[], int, int, Charset) takes a defensive copy of the
        // entire byte array. This is expensive if only a small subset of the
        // bytes will be used. The code below is from Apache Harmony.
        CharBuffer cb = charset.decode(ByteBuffer.wrap(buff, start, end - start));
        return new String(cb.array(), cb.arrayOffset(), cb.length());
    }
}
前面的示例中,request.method.setBytes(buffer, 3, 18 ) 其实调用了ByteChunk的setBytes方法,把字节流及始未坐标设置好,后面的request.method.toString()同样调用了ByteChunk的toString()方法,根据指定的编码进行转码,这里是ISO_8859_1 ,这样一来就达成了延迟处理的模式的效果,在需要时才根据指定的编码转码并获取字符串,如果不需要,则无须转码,处理性能得到提高 。
Tomcat 对于套接字接收的信息都用消息字节表示,好处是实现一种延迟处理的模式,提高性能,实际上Tomcat还引入了字符串缓存,在转码之前会先从缓存中查找是否有对应的编码字符串,如果存在,则不必再执行转码动作,而直接返回对应的字符串,性能进一步得到优化,为了提高性能,我们必须要做一些额外的工作,这就是Tomcat 接收信息不直接用字符串的原因 。
字节块-ByteChunk
上一节在模拟消息字节的实现时使用了一个没有缓冲的ByteChunk ,本小节将讲解Tomcat 真正的使用ByteChunk ,它是一个很重要的字节数组处理缓冲工具,它封装了字节缓冲器及字节缓冲区的操作,包括对缓冲区的写入,读取,扩展缓冲区大小等,另外,它还提供了相应的字符编码的转码操作,使缓冲操作变得更加方便,除了缓冲区之外,它还有两个通道,ByteInputChannel 和ByteOutputChannel ,一个用于输入读取数据,一个用于输出读取数据,并且会自动判断缓冲区是否超出规定的缓冲大小,一旦超出,则把缓冲数据全部输出 。
如图6.16所示 ,缓冲区buf 负责存放输出的字节数组,此区域有初始值及最大值,在运行时会根据实际情况进行扩充,一旦达到最大值则马上输出到指定目标,此外,还定义了两个内部接口,ByteInputChannel 和ByteOutputChannel ,一般可以认为,一个用于读取数据,一个用于输出数据,另外,还包含ChartSet对象,借助它,可以方便转码工作 。
下面用一个简化的例子说明字节块的工作机制,为了使例子简洁,这里省去了很多的方法和ChartSet对象,只展示了缓冲的工作机制。
字节块ByteChunk 的简化实现如下所示 , 其中包含了数据读取输出的接口,内存分配方法allocate,缓冲区字节添加方法append ,缓冲区扩容方法makeSpace及缓冲区刷新方法flushBuffer 。输出测试类TestOutputBuffer 的实现如下所示 , 此类用字节块提供缓冲机制对hello.txt文件进行写入操作,为了更好的说明缓冲区的工作原理,把字节块的缓冲区初始化大小设置为3,最大值设置为7,我们要把8个字节码写到hello.txt文件中,注意加粗三行代码,执行dowrite 方法时因为字节长度为8,已经超过了缓冲区最大值,所以进行了一次真实的写入操作,接着让程序睡眠10秒,期间你打开hello.txt 时只看到7个字节数组,它们为1 - 7 (以内十六进制形式打开),10秒后, 由于执行了flush()操作,才把剩下的一个字节写入到文件中。
public class TestOutputBuffer implements ByteChunk.ByteOutputChannel {
    private ByteChunk fileBuffer;
    private FileOutputStream fileOutputStream;

    public TestOutputBuffer() {
        this.fileBuffer = new ByteChunk();
        fileBuffer.setByteOutputChannel(this);
        fileBuffer.allocate(3, 7);
        try {
            fileOutputStream = new FileOutputStream("/Users/quyixiao/gitlab/tomcat/conf/hello.txt");
        } catch (FileNotFoundException e) {
            e.printStackTrace();
        }
    }

    @Override
    public void realWriteBytes(byte[] buf, int off, int len) throws IOException {
        fileOutputStream.write(buf, off, len);
    }

    public void flush() throws IOException {
        fileBuffer.flushBuffer();
    }

    public int dowrite(byte[] bytes) throws IOException {
        for (int i = 0; i < bytes.length; i++) {
            fileBuffer.append(bytes[i]);
        }
        return bytes.length;
    }

    public static void main(String[] args) throws Exception {
        TestOutputBuffer testOutputBuffer = new TestOutputBuffer();
        byte[] bytes = {1, 2, 3, 4, 5, 6, 7, 8};
        testOutputBuffer.dowrite(bytes);
        Thread.sleep(10 * 1000);
        testOutputBuffer.flush();
    }

}
我觉得在之前的注释中已经写得很清楚了,而对着测试代码,自己去用心阅读源码,我相信,你对缓冲的思想有进一步的了解 。字节块是一个很有用的工具类,它提供了缓冲工具,从而方便我们为其些流添加缓冲区,类似的工具还有字节块CharChunk ,顾名思义,它专门用于为字符类型的数据提供缓冲 。
套接字输入流-InputStream
输入缓冲装置里面必须要包含读取字符的通道,否则就谈不上缓冲了,这个通道就是InputStream ,它属于JDK 的java.io 包的类,有了它,我们就可以从源源读取字符,它的来源可以有多种多样 ,这里主要探讨的套接字连接中的读取字符 。
如图6.17所示 。 InputStream 充当从操作系统底层读取套接字字节的通道,当客户端与服务器端建立起连接后,就可以认为存在一条通道供双方传递信息,客户端写入字符串通过通道传递到服务器,应用层则通过InputStream 读取字节流。

应用层接收到每个消息的最小单位是8位,为了方便后续转码处理, 我们希望获取到原生的字节流,用以下简化的代码说明客户端传输字节到服务端的过程,服务器端的创建服务后,开始等待客户端发起连接,客户端与服务端建立起连接后,通过OutputStream 向服务端写入字节数组,而服务端通过InputStream 将客户端传过来的字节数组读取到buffer中,接着就可以往下对buffer 进行其他处理,比如解码操作,套接字输入缓冲装置就是通过InputStream 将字节读取到缓冲装置,并且提供对HTTP 协议的请求行,请求头等解析方法,其中HTTP 协议请求行及请求头规定的ASCII编码,字节与对应 。
- 服务器端代码如下
public class SocketServer { public static void main(String[] args) throws Exception { ServerSocket serverSocket = null; serverSocket = new ServerSocket(8888); Socket socket = serverSocket.accept(); DataOutputStream dos = new DataOutputStream(socket.getOutputStream()); DataInputStream dis = new DataInputStream(socket.getInputStream()); System.out.println("服务器接收到客户端请求:" + dis.readUTF()); dos.writeUTF("接受连接请求:,连接成功"); socket.close(); serverSocket.close(); } }- 客户端代码如下
public class SocketClient {
    public static void main(String[] args)  throws Exception{
        Socket socket  = null;
        socket = new Socket("localhost",8888);
        DataOutputStream dos = new DataOutputStream(socket.getOutputStream());
        DataInputStream dis = new DataInputStream(socket.getInputStream());
        dos.writeUTF("我是客户端,请求链接");
        System.out.println(dis.readUTF());
        socket.close();
    }
}
请求体读取器-InputStreamInputBuffer
前面提到,套接字缓冲装置InternalInputBuffer 用于向操作系统底层读取来自客户端的消息并提供缓冲机制,把报文以字节数组的形式存放到buf中,同时它提供了HTTP 协议的请求行和请求头解析的方法。 当它被解析完后,buf 数组中的指针指向的位置就是请求体的起始位, Web 容器后期可能需要处理HTTP 报文的请求体,所以必须提供一个获取通道,这个通道就是请求体读取器InputStreamInputBuffer ,它其实是套接字缓冲装置的内部类,它仅有一个doRead方法用于读取请求体报文,此方法会自行判断缓冲数组buf 的读取指针是否已经达到尾部,则重新读取操作系统底层的字节,最终读取到目标缓冲区desBuf 上。
如图6.18 所示 , InputStreamInputBuffer 包含在套接字缓冲装置中,通过它可以将请求体读取到目标缓冲区desBuf上。

一般情况下,我们通过请求体读取器InputStreamInputBuffer 获取的仅仅是源数据,即未经过任何处理的发送方发送过来的字节,但有些时候在这个读取的过程中希望做一些额外的处理,而且这些额外的处理还可能是根据不同的条件做不同的处理,考虑到程序解耦与扩展,于是引用过滤器(过滤器模式 ),输出过滤器InputFilter , 在读取数据过程中,对于额外的操作,只需要通过添加不同的过滤器即可实现,例如 添加对HTTP 1.1 协议分块传输的相关操作过滤器。
如图6.19 所示 ,在套接字输入缓冲装置中,从操作系统底层读取到的字节会缓冲到buf 中,请求行和请求头部被解析后,缓冲区buf 的指针指向请求体的起始位置,通过请求体读取器InputStreamInputBuffer 可进行读取操作,它会自动判定buf 是否已经读完, 读完则重新从操作系统底层读取字节到buf中,当其他组件从套接字输入缓冲装置读取请求到请求体,装置将判定其中是否包含过滤器,假设包含,则通过一层层的过滤器完成过滤操作后才能读取到desBuf ,这个过程就像被到一道道处理关卡,经过每一道关卡都会执行相应的操作,最终完成源数据到目标数据的操作。
过滤器是一种设计模式,在Java 的各种框架及容器中都频繁的使用以实现更好的扩展性和逻辑解耦,下面用一个例子看看过滤器如何工作 。- 输出缓冲接口InputBuffer ,提供读取操作
public interface TestInputBuffer { public int doRead(byte [] chunk ) throws IOException; }- 输入过滤器接口InputFilter继承InputBuffer类,额外提供了setBufferyyyifc设置前一个缓冲 。
public interface TestInputFilter extends TestInputBuffer { public void setBuffer(TestInputBuffer buffer); }- 输入缓冲装置,模拟通过请求体读取器InternalInputBuffer从操作底层获取请求体字节数组,并且打包若干个过滤器,缓冲装置在执行读取操作时会自动判断是否有过滤器,如果存在则将读取后的字节再经过层层过滤,得到最终的目的数据 。
public class TestInternalInputBuffer implements TestInputBuffer { boolean isEnd = false; byte[] buf = new byte[4]; protected int lastAciveFilter = -1; protected TestInputFilter[] activeFilters = new TestInputFilter[2]; TestInputBuffer inputBuffer = new TestInputStreamInputBuffer(); public void addActiveFilter(TestInputFilter filter) { if (lastAciveFilter == -1) { filter.setBuffer(inputBuffer); } else { for (int i = 0; i <= lastAciveFilter; i++) { if (activeFilters[i] == filter) { return; } } filter.setBuffer(activeFilters[lastAciveFilter]); } activeFilters[++lastAciveFilter] = filter; } @Override public int doRead(byte[] chunk) throws IOException { if (lastAciveFilter == -1) { return inputBuffer.doRead(chunk); } else { return activeFilters[lastAciveFilter].doRead(chunk); } } protected class TestInputStreamInputBuffer implements TestInputBuffer { public int doRead(byte[] chunk) throws IOException { if (isEnd == false) { buf[0] = 'a'; buf[1] = 'b'; buf[2] = 'a'; buf[3] = 'd'; System.arraycopy(buf, 0, chunk, 0, 4); isEnd = true; return chunk.length; } else { return -1; } } } }- 清理过滤器ClearFilter ,负责将读取的字节数组中的字符a 换成 f 。
public class TestClearFilter implements TestInputFilter { protected TestInputBuffer buffer; @Override public int doRead(byte[] chunk) throws IOException { int i = buffer.doRead(chunk); if (i == -1) { return -1; } for (int j = 0; j < chunk.length; j++) { if (chunk[j] == 'a') { chunk[j] = 'f'; } } return i; } public TestInputBuffer getBuffer() { return buffer; } @Override public void setBuffer(TestInputBuffer buffer) { this.buffer = buffer; } }- 大写过滤器UpperFilter ,负责将读取的字节数组全部变成大写的形式。
public class TestUpperFilter implements TestInputFilter{ protected TestInputBuffer buffer; @Override public int doRead(byte[] chunk) throws IOException { int i= buffer.doRead(chunk); if (i == -1 ){ return -1 ; } for (int j = 0 ;j < chunk.length ;j ++){ chunk[j] = (byte) (chunk[j] - 'a' + 'A'); } return i; } public TestInputBuffer getBuffer() { return buffer; } @Override public void setBuffer(TestInputBuffer buffer) { this.buffer = buffer; } }- 测试类,创建输入缓冲装置,接着创建清理过滤器和大写过滤器,把它们添加到输入缓冲装置中,执行读取操作,读取出来的就是经过两个过滤器处理后的数据了,结果为 “FBFD”,如果有其他的处理需求 , 通过实现InputFilter 接口编写过滤器添加即可 。
public class TestMain {
    public static void main(String[] args) throws Exception {
        TestInternalInputBuffer inputBuffer = new TestInternalInputBuffer();

        TestClearFilter clearFilter = new TestClearFilter();
        TestUpperFilter upperFilter = new TestUpperFilter();
        inputBuffer.addActiveFilter(clearFilter);
        inputBuffer.addActiveFilter(upperFilter);

        byte[] chunk = new byte[4];
        int i = 0;
        while (i != -1) {
            i = inputBuffer.doRead(chunk);
            if (i == -1) {
                break;
            }
        }
        System.out.println(new String(chunk));
    }
}
上面过程中基本模拟了Tomcat 输入缓冲的工作流程及原理,但实际使用过滤器并非上面模拟过程中使用的过滤器,Tomcat 主要包括4个过滤器,IdentityInputFilter ,VoidInputFilter , BufferedInpuFilter , ChunkedInputFilter 。
- IdentityInputFilter 过滤器在HTTP 包含content-length 头部并且指定的长度大于 0 时使用, 它将根据指定的长度从底层读取响应长度的字节数组,当读取足够数据后,将直接返回-1 ,避免再次执行底层操作。
- VoidInputFilter 过滤器用于拦截读取底层数据的操作,当HTTP 不包含content-length 头部时,说明没有请求体,没有必须根据读取套接字的底层操作,所以用这个过滤器拦截 。
- BufferedInputFilter 过滤器负责读取请求体并将共缓存起来 , 后面读取请求体时直接从缓冲区读取 。
- ChunkedInputFilter 过滤器专门用于处理分块传输,分块传输是一种数据传输机制,当没有指定content-length 时可以通过分场传输完成通信 。
以上就是Tomcat 的套接字缓冲装置中过滤器的机制及其实现方法 , 同时也介绍了Tomcat 输出装置中不同的过滤器的功能,过滤器模式能让Tomcat 在后期升级,扩展时更加方便 。
接下来,我们继续跟着主流程走,看prepareRequest()帮我们做了哪些事情 。
protected void prepareRequest() {
	// 默认是HTTP/1.1 协议,而不是0.9的协议
    http11 = true;
    http09 = false;
    contentDelimitation = false;
    expectation = false;

    prepareRequestInternal();
	//  SSLEnabled="true" scheme="https" secure="true"
               clientAuth="false" sslProtocol="TLS" />
    // 如果Connector标签配置了SSLEnabled = true
    if (endpoint.isSSLEnabled()) {
        request.scheme().setString("https");
    }

    MessageBytes protocolMB = request.protocol();
    if (protocolMB.equals(Constants.HTTP_11)) {
        http11 = true;
        protocolMB.setString(Constants.HTTP_11);
    } else if (protocolMB.equals(Constants.HTTP_10)) {
        // http1.0不支持keepAlive
        http11 = false;
        keepAlive = false;
        protocolMB.setString(Constants.HTTP_10);
    } else if (protocolMB.equals("")) {
        // HTTP/0.9
        // http0.9不支持keepAlive
        http09 = true;
        http11 = false;
        keepAlive = false;
    } else {
        // Unsupported protocol
        http11 = false;
        // Send 505; Unsupported HTTP version
        response.setStatus(505);
        setErrorState(ErrorState.CLOSE_CLEAN, null);
        if (getLog().isDebugEnabled()) {
            getLog().debug(sm.getString("http11processor.request.prepare")+
                      " Unsupported HTTP version \""+protocolMB+"\"");
        }
    }

    MessageBytes methodMB = request.method();
    if (methodMB.equals(Constants.GET)) {
    	// 为什么要去setString()呢?如果设置过,再getString()时,就不需要转码操作,直接获得了String,提升了性能
        methodMB.setString(Constants.GET);
    } else if (methodMB.equals(Constants.POST)) {
        methodMB.setString(Constants.POST);
    }

    MimeHeaders headers = request.getMimeHeaders();

    // Check connection header
    MessageBytes connectionValueMB = headers.getValue(Constants.CONNECTION);
    if (connectionValueMB != null && !connectionValueMB.isNull()) {
        ByteChunk connectionValueBC = connectionValueMB.getByteChunk();
        if (findBytes(connectionValueBC, Constants.CLOSE_BYTES) != -1) {
            // 如果请求头中connection=close,表示不是长连接
            keepAlive = false;
        } else if (findBytes(connectionValueBC,
                             Constants.KEEPALIVE_BYTES) != -1) {
            // 如果请求头中connection=keep-alive,表示长连接
            keepAlive = true;
        }
    }
	// 上面主要通过 connection=close ,表示不是长链接 ,而connection=keep-alive 则是长链接,
	// 而长链接通过keepAlive 为true或false来记录

    if (http11) {
    	// Expect 请求头部域,用于指出客户端要求的特殊服务器行为,若服务器不能理解或满足Exepect域中的任何期望值,则必须返回
    	// 417 (Expectation Failed ) 状态,或者说,如果请求有其他问题,返回4XX 状态
    	// 这个头部域使用可扩展语法定义,以方便将来扩展,如果服务器收到包含Exepect头部域的请求且包含一个它不支持的期望值扩展
    	// 则必须返回417 (Expectation Failed )状态 , 对于非引用符号 (包括100-continue) 是大小写无关的,对于引用字符串的期望值扩展
    	// 则是大小写敏感的,
    	// Exepect 域的机制是逐跳进行的,也就是说,如果一个代理服务器收到包含不能满足期望的请求时, 必须返回417 (Expectation Failed )
    	// 状态,而Expect请求头域自身,很多的旧的HTTP/1.0 和HTTP/1.1 应用不支持Expect 头部
    	// Expected:100-Continue 握手的目的,是为了允许客户端发送请求内容之前,判断源服务器是否愿意接受请求(基于请求头)
    	// Expect:100-Continue 握手谨慎使用,因为遇到不支持HTTP/1.1 协议的服务器或代理时会引起问题
        MessageBytes expectMB = headers.getValue("expect");
        if (expectMB != null && !expectMB.isNull()) {
            if (expectMB.indexOfIgnoreCase("100-continue", 0) != -1) {
                getInputBuffer().setSwallowInput(false);
                expectation = true;
            } else {
                response.setStatus(HttpServletResponse.SC_EXPECTATION_FAILED);
                setErrorState(ErrorState.CLOSE_CLEAN, null);
            }
        }
    }

    // Check user-agent header
    // 请求本来是http1.1或keepAlive的,如果请求中所指定的user-agent被限制了,不支持长连接
    // restrictedUserAgents的值,我们可以手动配置
    if ((restrictedUserAgents != null) && ((http11) || (keepAlive))) {
        MessageBytes userAgentValueMB = headers.getValue("user-agent");
        // Check in the restricted list, and adjust the http11
        // and keepAlive flags accordingly
        if(userAgentValueMB != null && !userAgentValueMB.isNull()) {
            String userAgentValue = userAgentValueMB.toString();
            if (restrictedUserAgents.matcher(userAgentValue).matches()) {
                http11 = false;
                keepAlive = false;
            }
        }
    }


    // Check host header
    MessageBytes hostValueMB = null;
    try {
        // 获取唯一的host,请求头中不能有多个key为host
        hostValueMB = headers.getUniqueValue("host");
    } catch (IllegalArgumentException iae) {
        // Multiple Host headers are not permitted
        badRequest("http11processor.request.multipleHosts");
    }
    if (http11 && hostValueMB == null) {
        badRequest("http11processor.request.noHostHeader");
    }

    // Check for an absolute-URI less the query string which has already
    // been removed during the parsing of the request line
    // URI格式:[协议名]://[用户名]:[密码]@[服务器地址]:[服务器端口号]/[路径]?[查询字符串]#[片段ID]
    ByteChunk uriBC = request.requestURI().getByteChunk();
    byte[] uriB = uriBC.getBytes();
    if (uriBC.startsWithIgnoreCase("http", 0)) {
        int pos = 4;
        // 如果以https开头
        if (uriBC.startsWithIgnoreCase("s", pos)) {
            pos++;
        }
        // http 或 https 之后一定是  "://"
        if (uriBC.startsWith("://", pos)) {
            pos += 3;
            int uriBCStart = uriBC.getStart();

            // 从 pos 位置向后找,定位到第一个 '/' 的位置
            int slashPos = uriBC.indexOf('/', pos);
            // 从pos 开始向后找,定位到第一个  '@' 的位置
            int atPos = uriBC.indexOf('@', pos);
            // 如果  '/' 存在,且 @ 字符在第一个 / 的后面 ,证明没有用户名信息
            if (slashPos > -1 && atPos > slashPos) {
                // url 中没有用户信息,设置 atPos 为 -1
                atPos = -1;
            }

			// 如果从 http://  或 https:// 向后找,找不到 '/' 字符了
            if (slashPos == -1) {
                slashPos = uriBC.getLength();
                // Set URI as "/". Use 6 as it will always be a '/'.
                // 01234567
                // http://
                // https://
                // 无论是http:// 开头还是https:// 开头,第6位 永远是 '/'
                request.requestURI().setBytes(uriB, uriBCStart + 6, 1);
            } else {
            	// 如果http:// 或 https:// 之后,还有 '/',则从'/' 向后的所有字符都是uri
                request.requestURI().setBytes(uriB, uriBCStart + slashPos, uriBC.getLength() - slashPos);
            }

            // Skip any user info
            // 检验用户信息格式是否正确
            if (atPos != -1) {
                // Validate the userinfo
                for (; pos < atPos; pos++) {
                    byte c = uriB[uriBCStart + pos];
                    // 如果用户名中有ASCII为0 1 2 3 4 5 6 7 8 9 10 11 12 13 14 15 16 17 18 19 20 21 22 23 24 25 26 27 28 29 30 31
                    // 32 34 35 47 60 62 63 64 91 92 93 94 96 123 124 125 ,则抛出异常,如用户名中有},? , ] 等
                    if (!HttpParser.isUserInfo(c)) {
                        // Strictly there needs to be a check for valid %nn
                        // encoding here but skip it since it will never be
                        // decoded because the userinfo is ignored
                        badRequest("http11processor.request.invalidUserInfo");
                        break;
                    }
                }
                // Skip the '@' ,用户名已经截取并较验完了, 越过'@'
                pos = atPos + 1;
            }

            if (http11) {
                // Missing host header is illegal but handled above
                if (hostValueMB != null) {
                    // Any host in the request line must be consistent with
                    // the Host header
                    // uri中的主机名是不是和header中的一致,如果不一致,看是否tomcat运行不一致,如果允许则修改header中的为uri中的
                    // URI格式:[协议名]://[用户名]:[密码]@[服务器地址]:[服务器端口号]/[路径]?[查询字符串]#[片段ID]
                    // 下面实际截取到的是  [服务器地址]:[服务器端口号]
                    if (!hostValueMB.getByteChunk().equals(
                            uriB, uriBCStart + pos, slashPos - pos)) {
                        if (allowHostHeaderMismatch) {
                            // The requirements of RFC 2616 are being
                            // applied. If the host header and the request
                            // line do not agree, the request line takes
                            // precedence
                            // 如果不一致, 则用 [服务器地址]:[服务器端口号] 替换掉host
                            hostValueMB = headers.setValue("host");
                            hostValueMB.setBytes(uriB, uriBCStart + pos, slashPos - pos);
                        } else {
                            // The requirements of RFC 7230 are being
                            // applied. If the host header and the request
                            // line do not agree, trigger a 400 response.
                            // 如果不允许替换,且不相等,则是一个坏的请求
                            badRequest("http11processor.request.inconsistentHosts");
                        }
                    }
                }
            } else {
                // Not HTTP/1.1 - no Host header so generate one since
                // Tomcat internals assume it is set
                try {
                	// 如果不是http11 ,则替换掉host即可
                    hostValueMB = headers.setValue("host");
                    hostValueMB.setBytes(uriB, uriBCStart + pos, slashPos - pos);
                } catch (IllegalStateException e) {
                    // Edge case
                    // If the request has too many headers it won't be
                    // possible to create the host header. Ignore this as
                    // processing won't reach the point where the Tomcat
                    // internals expect there to be a host header.
                }
            }
        } else {
            badRequest("http11processor.request.invalidScheme");
        }
    }

    // Validate the characters in the URI. %nn decoding will be checked at
    // the point of decoding.
    // 如果包含有ASCII为 0 1 2 3 4 5 6 7 8 9 10 11 12 13 14 15 16 17 18 19 20 21 22 23 24 25 26 27 28
    // 29 30 31 32 34 35 60 62 63 91 92 93 94 96 123 124 125字符,则抛出异常
    // 如 {,},| 字符等
    for (int i = uriBC.getStart(); i < uriBC.getEnd(); i++) {
        if (!httpParser.isAbsolutePathRelaxed(uriB[i])) {
            badRequest("http11processor.request.invalidUri");
            break;
        }
    }

    // Input filter setup
    // 获取处理请求体的Tomcat默认的InputFilter,默认4个Input的,
    // 之前分析过的IdentityInputFilter,VoidInputFilter,BufferedInputFilter,ChunkedInputFilter
    InputFilter[] inputFilters = getInputBuffer().getFilters();

    // 每个InputFilter都有一个ENCODING_NAME
    // Parse transfer-encoding header
    MessageBytes transferEncodingValueMB = null;
    if (http11) {
        transferEncodingValueMB = headers.getValue("transfer-encoding");
    }
    // 如果请求头中有transfer-encoding,关于transfer-encoding的原理可以用途及来源可以看看https://blog.csdn.net/u014569188/article/details/78912469这篇博客
    // 浏览器可以通过 Content-Length 的长度信息,判断出响应实体已结束。那如果 Content-Length 和实体实际长度不一致会怎样?
    // 有兴趣的同学可以自己试试,通常如果 Content-Length 比实际长度短,会造成内容被截断;
    // 如果比实体内容长,会造成 pending。
    // 由于 Content-Length 字段必须真实反映实体长度,但实际应用中,有些时候实体长度并没那么好获得,例如实体来自于网络文件,
    // 或者由动态语言生成。这时候要想准确获取长度,只能开一个足够大的 buffer,等内容全部生成好再计算。但这样做一方面需要更大的内存开销,
    // 另一方面也会让客户端等更久。
    // 但在 HTTP 报文中,实体一定要在头部之后,顺序不能颠倒,为此我们需要一个新的机制:不依赖头部的长度信息,也能知道实体的边界。
    // Transfer-Encoding: chunked
    // Transfer-Encoding 正是用来解决上面这个问题的。历史上 Transfer-Encoding 可以有多种取值,为此还引入了一个名为
    // TE 的头部用来协商采用何种传输编码。但是最新的 HTTP 规范里,只定义了一种传输编码:分块编码(chunked)。
    // 分块编码相当简单,在头部加入 Transfer-Encoding: chunked 之后,就代表这个报文采用了分块编码。这时,报文中的实体需要改为用一系列分块来传输。
    // 每个分块包含十六进制的长度值和数据,长度值独占一行,长度不包括它结尾的 CRLF(\r\n),也不包括分块数据结尾的 CRLF。
    // 最后一个分块长度值必须为 0,对应的分块数据没有内容,表示实体结束
    if (transferEncodingValueMB != null && !transferEncodingValueMB.isNull()) {
        String transferEncodingValue = transferEncodingValueMB.toString();
        // Parse the comma separated list. "identity" codings are ignored
        int startPos = 0;
        int commaPos = transferEncodingValue.indexOf(',');
        String encodingName = null;
        // 请求中设置了多个ENCODING_NAME,以逗号隔开 ,如 identity,chunked,buffered,void 等
        while (commaPos != -1) {
            encodingName = transferEncodingValue.substring(startPos, commaPos);
            addInputFilter(inputFilters, encodingName);
            startPos = commaPos + 1;
            commaPos = transferEncodingValue.indexOf(',', startPos);
        }
        // 如果没有逗号,则直接截取startPos后面的内容即为过滤器的名称
        encodingName = transferEncodingValue.substring(startPos);
        // 将截取的过滤器的名称,通过addInputFilter方法,加入到过滤器中,而addInputFilter方法会遍历当前所有的Input过滤器,将名称和encodingName
        // 相等的过滤器加入到inputFilters中
        addInputFilter(inputFilters, encodingName);
    }

    // Parse content-length header
    // inputFilters提交跟contextlength相关的IDENTITY_FILTER ,获取请求头中content-length的值
    long contentLength = -1;
    try {
        contentLength = request.getContentLengthLong();
    } catch (NumberFormatException e) {
        // 如果是非数字,抛出下面异常
        badRequest("http11processor.request.nonNumericContentLength");
    } catch (IllegalArgumentException e) {
    	// 如果请求头中有多个content-length时,抛出如下异常
        badRequest("http11processor.request.multipleContentLength");
    }
    if (contentLength >= 0) {
        // transfer-encoding等于chunked的时候,contentDelimitation会设置为true,表示是分块传输,所以contentLength没用
        if (contentDelimitation) {
            // contentDelimitation being true at this point indicates that
            // chunked encoding is being used but chunked encoding should
            // not be used with a content length. RFC 2616, section 4.4,
            // bullet 3 states Content-Length must be ignored in this case -
            // so remove it.
            headers.removeHeader("content-length");
            request.setContentLength(-1);
        } else {
            // 利用IDENTITY_FILTER来处理请求体
            getInputBuffer().addActiveFilter(inputFilters[Constants.IDENTITY_FILTER]);
            contentDelimitation = true;
        }
    }

    // Validate host name and extract port if present
    // 解析hostname和port
    parseHost(hostValueMB);

    // 即没有content-length请求头,也没有transfer-encoding请求头,那么用VOID_FILTER来处理请求体,其实就是不处理请求体
    if (!contentDelimitation) {
        // If there's no content length
        // (broken HTTP/1.0 or HTTP/1.1), assume
        // the client is not broken and didn't send a body
        getInputBuffer().addActiveFilter(inputFilters[Constants.VOID_FILTER]);
        contentDelimitation = true;
    }

    // Advertise sendfile support through a request attribute
    if (endpoint.getUseSendfile()) {
        request.setAttribute(
                org.apache.coyote.Constants.SENDFILE_SUPPORTED_ATTR,
                Boolean.TRUE);
    }

    // Advertise comet support through a request attribute
    if (endpoint.getUseComet()) {
        request.setAttribute(
                org.apache.coyote.Constants.COMET_SUPPORTED_ATTR,
                Boolean.TRUE);
    }
    // Advertise comet timeout support
    if (endpoint.getUseCometTimeout()) {
        request.setAttribute(
                org.apache.coyote.Constants.COMET_TIMEOUT_SUPPORTED_ATTR,
                Boolean.TRUE);
    }
    if (getErrorState().isError()) {
        adapter.log(request, response, 0);
    }
}
如果transfer-encoding=chunked,则会将contentDelimitation = true设置为true 。
private void addInputFilter(InputFilter[] inputFilters, String encodingName) {

    // Trim provided encoding name and convert to lower case since transfer
    // encoding names are case insensitive. (RFC2616, section 3.6)
    encodingName = encodingName.trim().toLowerCase(Locale.ENGLISH);

    if (encodingName.equals("identity")) {
        // Skip
    } else if (encodingName.equals("chunked")) {
        getInputBuffer().addActiveFilter
            (inputFilters[Constants.CHUNKED_FILTER]);
        contentDelimitation = true;
    } else {
    	// 方便程序的可扩展,我们可以自己写一个inputFilter,然后通过transfer-encoding=xxx 来指定自己的inputFilter
        for (int i = pluggableFilterIndex; i < inputFilters.length; i++) {
            if (inputFilters[i].getEncodingName().toString().equals(encodingName)) {
                getInputBuffer().addActiveFilter(inputFilters[i]);
                return;
            }
        }
        // Unsupported transfer encoding
        // 501 - Unimplemented
        response.setStatus(501);
        setErrorState(ErrorState.CLOSE_CLEAN, null);
        if (getLog().isDebugEnabled()) {
            getLog().debug(sm.getString("http11processor.request.prepare") +
                      " Unsupported transfer encoding [" + encodingName + "]");
        }
    }
}
解析Host和port代码 。
protected void parseHost(MessageBytes valueMB) {
    if (valueMB == null || valueMB.isNull()) {
        populateHost();
        // 用localPort填充port属性
        populatePort();
        return;
    } else if (valueMB.getLength() == 0) {
        // Empty Host header so set sever name to empty string
        // 用空串填充serverName
        request.serverName().setString("");
        populatePort();
        return;
    }

    ByteChunk valueBC = valueMB.getByteChunk();
    byte[] valueB = valueBC.getBytes();
    int valueL = valueBC.getLength();
    int valueS = valueBC.getStart();
    // 重新初始化hostNameC
    if (hostNameC.length < valueL) {
        hostNameC = new char[valueL];
    }

    try {
        // 获取到host中分号的位置
        int colonPos = Host.parse(valueMB);
        if (colonPos != -1) {
            int port = 0;
            for (int i = colonPos + 1; i < valueL; i++) {
                char c = (char) valueB[i + valueS];
                //如果port不是0-9之间的数字,则抛出400异常
                if (c < '0' || c > '9') {
                    response.setStatus(400);
                    setErrorState(ErrorState.CLOSE_CLEAN, null);
                    return;
                }
                port = port * 10 + c - '0';
            }
            // 设置服务器端口
            request.setServerPort(port);
            // 用valueL 记录分号的位置
            valueL = colonPos;
        }
		// 0 ~ colonPos之间的byte即为hostName
        for (int i = 0; i < valueL; i++) {
            hostNameC[i] = (char) valueB[i + valueS];
        }
        // 设置serverName
        request.serverName().setChars(hostNameC, 0, valueL);
    } catch (IllegalArgumentException e) {
        // IllegalArgumentException indicates that the host name is invalid
        UserDataHelper.Mode logMode = userDataHelper.getNextMode();
        if (logMode != null) {
            String message = sm.getString("abstractProcessor.hostInvalid", valueMB.toString());
            switch (logMode) {
                case INFO_THEN_DEBUG:
                    message += sm.getString("abstractProcessor.fallToDebug");
                    //$FALL-THROUGH$
                case INFO:
                    getLog().info(message, e);
                    break;
                case DEBUG:
                    getLog().debug(message, e);
            }
        }

        response.setStatus(400);
        setErrorState(ErrorState.CLOSE_CLEAN, e);
    }
}
上面的代码,看上去那么多,其实仔细看原理还是很简单的,主要对http11,keepAlive,method, expect,user-agent,host,port , uri ,content-length 赋值,如果请求头中传递了transfer-encoding,则添加不同的inputFilter过滤器 。
public void service(org.apache.coyote.Request req, org.apache.coyote.Response res)
        throws Exception {
    Request request = (Request) req.getNote(1); // Request-->Request
    Response response = (Response) res.getNote(1);

    if (request == null) {
        // Create objects
        request = connector.createRequest(); // 创建原始请求的包装类,我们叫规范请求
        request.setCoyoteRequest(req); // 设置对应关系,这两个请求中间又出现了另外一个缓冲区InputBuffer,这个buffer是用来缓存字节所所对应的字符的。
        response = connector.createResponse();
        response.setCoyoteResponse(res);

        // Link objects
        request.setResponse(response);
        response.setRequest(request);

        // Set as notes
        // notes是一个数组,是用来进行线程传递数据的,类似ThreadLocal,数组比ThreadLocal快
        req.setNote(1, request);
        res.setNote(1, response);

        // Set query string encoding
        req.getParameters().setQueryStringEncoding(connector.getURIEncoding());
    }

    if (connector.getXpoweredBy()) {
        response.addHeader("X-Powered-By", POWERED_BY);
    }

    boolean comet = false;
    boolean async = false;
    boolean postParseSuccess = false;

    req.getRequestProcessor().setWorkerThreadName(THREAD_NAME.get());

    try {
        // Parse and set Catalina and configuration specific
        // request parameters
        // 在真正把request和response交给容器处理之前,在进行一些操作
        postParseSuccess = postParseRequest(req, request, res, response);
        if (postParseSuccess) {
            //check valves if we support async
            request.setAsyncSupported(
                    connector.getService().getContainer().getPipeline().isAsyncSupported());
            // Calling the container
            // 调用容器进行处理, 直接调用的StandardEngineValve,在StandardWrapperValue中(由于Wrapper为最低一级的Container
            // 且该Value处于职责链的未端,因此它始终最后执行),Tomcat 构造FilterChain实例完成javax.servlet.Filte责任链执行,并且
            // 执行Servlet.service()方法将请求交由应用程序进行分发处理(如果采用了如Spring MVC 等WEB 框架的话,Servlet会进一步
            // 根据应用程序内部的配置将请求交由对应的控制器处理)
            connector.getService().getContainer().getPipeline().getFirst().invoke(
                    request, response);

            if (request.isComet()) {
                if (!response.isClosed() && !response.isError()) {
                    if (request.getAvailable() || (request.getContentLength() > 0 && (!request.isParametersParsed()))) {
                        // Invoke a read event right away if there are available bytes
                        if (event(req, res, SocketStatus.OPEN_READ)) {
                            comet = true;
                            res.action(ActionCode.COMET_BEGIN, null);
                        } else {
                            return;
                        }
                    } else {
                        comet = true;
                        res.action(ActionCode.COMET_BEGIN, null);
                    }
                } else {
                    // Clear the filter chain, as otherwise it will not be reset elsewhere
                    // since this is a Comet request
                    request.setFilterChain(null);
                }
            }
        }

        if (request.isAsync()) {
            async = true;
            Throwable throwable =
                    (Throwable) request.getAttribute(RequestDispatcher.ERROR_EXCEPTION);

            // If an async request was started, is not going to end once
            // this container thread finishes and an error occurred, trigger
            // the async error process
            if (!request.isAsyncCompleting() && throwable != null) {
                request.getAsyncContextInternal().setErrorState(throwable, true);
            }
        } else if (!comet) {
            try {
                request.finishRequest();
                // 在这里会上层缓冲区
                response.finishResponse();
            } finally {
                if (postParseSuccess) {
                    // Log only if processing was invoked.
                    // If postParseRequest() failed, it has already logged it.
                    // If context is null this was the start of a comet request
                    // that failed and has already been logged.
                    ((Context) request.getMappingData().context).logAccess(
                            request, response,
                            System.currentTimeMillis() - req.getStartTime(),
                            false);
                }
                req.action(ActionCode.POST_REQUEST , null);
            }
        }

    } catch (IOException e) {
        // Ignore
    } finally {
        AtomicBoolean error = new AtomicBoolean(false);
        res.action(ActionCode.IS_ERROR, error);

        if (request.isAsyncCompleting() && error.get()) {
            // Connection will be forcibly closed which will prevent
            // completion happening at the usual point. Need to trigger
            // call to onComplete() here.
            res.action(ActionCode.ASYNC_POST_PROCESS,  null);
            async = false;
        }

        req.getRequestProcessor().setWorkerThreadName(null);

        // Recycle the wrapper request and response
        if (!comet && !async) {
            request.recycle();
            response.recycle();
        } else {
            // Clear converters so that the minimum amount of memory
            // is used by this processor
            request.clearEncoders();
            response.clearEncoders();
        }
    }
}
protected boolean postParseRequest(org.apache.coyote.Request req, Request request, org.apache.coyote.Response res, Response response) throws Exception { // If the processor has set the scheme (AJP does this, HTTP does this if // SSL is enabled) use this to set the secure flag as well. If the // processor hasn't set it, use the settings from the connector if (req.scheme().isNull()) { // Use connector scheme and secure configuration, (defaults to // "http" and false respectively) req.scheme().setString(connector.getScheme()); //http request.setSecure(connector.getSecure()); // 是否是https,默认为false } else { // Use processor specified scheme to determine secure state request.setSecure(req.scheme().equals("https")); } // At this point the Host header has been processed. // Override if the proxyPort/proxyHost are set // 在这个阶段,请求中的hostname和port已经被解析出来了,如果connector设置了proxyName和proxyPort,那么就进行覆盖 String proxyName = connector.getProxyName(); int proxyPort = connector.getProxyPort(); if (proxyPort != 0) { req.setServerPort(proxyPort); } else if (req.getServerPort() == -1) { // Not explicitly set. Use default ports based on the scheme // 如果请求中没有端口,比如http://www.baidu.com,那么默认的就为80,如果是https则默认为443 if (req.scheme().equals("https")) { req.setServerPort(443); } else { req.setServerPort(80); } } if (proxyName != null) { req.serverName().setString(proxyName); } // Copy the raw URI to the decodedURI MessageBytes decodedURI = req.decodedURI(); decodedURI.duplicate(req.requestURI()); // 将requestURI设置成编码之后的格式 // Parse the path parameters. This will: // - strip out the path parameters // - convert the decodedURI to bytes // 如果路径中有请求参数 /servelet-test-1.0/MyServlet;username=zhangsan;pwd=lisi // 则解析出 username=zhangsan;pwd=lisi 加入到请求参数中 parsePathParameters(req, request); // URI decoding // %xx decoding of the URL // 有些符号在URL中是不能直接传递的,如果要在URL中传递这些特殊符号,那么要使用他们的编码了。 // 编码的格式为:%加字符的ASCII码,即一个百分号%,后面跟对应字符的ASCII(16进制)码值。例如 空格的编码值是"%20"。 // 如果不使用转义字符,这些编码就会当URL中定义的特殊字符处理。 // 下表中列出了一些URL特殊符号及编码 十六进制值 // 1.+ URL 中+号表示空格 %2B // 2.空格 URL中的空格可以用+号或者编码 %20 // 3./ 分隔目录和子目录 %2F // 4.? 分隔实际的 URL 和参数 %3F // 5.% 指定特殊字符 %25 // 6.# 表示书签 %23 // 7.& URL 中指定的参数间的分隔符 %26 // 8.= URL 中指定参数的值 %3D try { // 如果uri 为 /servelet-test-1.0/MyServlet%23 // 最终被解析为 /servelet-test-1.0/MyServlet# req.getURLDecoder().convert(decodedURI, false); } catch (IOException ioe) { // 如果 uri 为 /servelet-test-1.0/MyServlet%2f // 则会抛出异常,因为uri 的编码中不允许出现 %2f ,因为% 2f对应的就是 '/' res.setStatus(400); res.setMessage("Invalid URI: " + ioe.getMessage()); connector.getService().getContainer().logAccess( request, response, 0, true); return false; } // Normalization if (!normalize(req.decodedURI())) { res.setStatus(400); res.setMessage("Invalid URI"); connector.getService().getContainer().logAccess( request, response, 0, true); return false; } // Character decoding,将字节转换为字符; convertURI(decodedURI, request); // Check that the URI is still normalized // 如果此时uri 中有 "\",字符ASCII为0, "//", "/./" and "/../".,则返回400错误码 if (!checkNormalize(req.decodedURI())) { res.setStatus(400); res.setMessage("Invalid URI character encoding"); connector.getService().getContainer().logAccess( request, response, 0, true); return false; } // Request mapping. //
useIPVHosts="true" // redirectPort="8443"/> // 可以在Connector中设置useIPVHosts的值 MessageBytes serverName; // 将该属性设置为true会导致Tomcat使用收到请求的IP地址,来确定将请求发送到哪个主机。默认值是假的。 if (connector.getUseIPVHosts()) { serverName = req.localName(); // 如果serverName为空,则设置serverName 为localhost if (serverName.isNull()) { // well, they did ask for it res.action(ActionCode.REQ_LOCAL_NAME_ATTRIBUTE, null); } } else { serverName = req.serverName(); } if (request.isAsyncStarted()) { //TODO SERVLET3 - async //reset mapping data, should prolly be done elsewhere request.getMappingData().recycle(); } // Version for the second mapping loop and // Context that we expect to get for that version String version = null; Context versionContext = null; boolean mapRequired = true; while (mapRequired) { // This will map the the latest version by default // 根据serverName和uri来设置mappingData connector.getMapper().map(serverName, decodedURI, version, request.getMappingData()); request.setContext((Context) request.getMappingData().context); request.setWrapper((Wrapper) request.getMappingData().wrapper); // If there is no context at this point, either this is a 404 // because no ROOT context has been deployed or the URI was invalid // so no context could be mapped. if (request.getContext() == null) { res.setStatus(404); res.setMessage("Not found"); // No context, so use host Host host = request.getHost(); // Make sure there is a host (might not be during shutdown) if (host != null) { host.logAccess(request, response, 0, true); } return false; } // Now we have the context, we can parse the session ID from the URL // (if any). Need to do this before we redirect in case we need to // include the session id in the redirect String sessionID; // 当前Context启用的Session跟踪模式 if (request.getServletContext().getEffectiveSessionTrackingModes() .contains(SessionTrackingMode.URL)) { // 如果session是根据url来跟踪的,那么则从url中获取cookieName对应的sessionId // Get the session ID if there was one // 当然可以通过 http://localhost:8080/servelet-test-1.0/MyServlet;jsession=zhangsan 指定jsessionId // 记得以;分隔开uri sessionID = request.getPathParameter( // 默认名字是jsessionid // 当然可以catalina.base/conf/server.xml中声明StandardContext时指定 // 如sessionCookieName="xxxSessionId" > // 也可以通过catalina.base/conf/web.xml中 //// SessionConfig.getSessionUriParamName( request.getContext())); if (sessionID != null) { request.setRequestedSessionId(sessionID); request.setRequestedSessionURL(true); } } // Look for session ID in cookies and SSL session try { // 从Cookie中获取sessionId parseSessionCookiesId(req, request); } catch (IllegalArgumentException e) { // Too many cookies if (!response.isError()) { response.setError(); response.sendError(400); } return false; } // https的情况获取sessionId,则从request中获取javax.servlet.request.ssl_session_id属性值 parseSessionSslId(request); sessionID = request.getRequestedSessionId(); mapRequired = false; if (version != null && request.getContext() == versionContext) { // We got the version that we asked for. That is it. } else { version = null; versionContext = null; Object[] contexts = request.getMappingData().contexts; // Single contextVersion means no need to remap // No session ID means no possibility of remap if (contexts != null && sessionID != null) { // Find the context associated with the session for (int i = contexts.length; i > 0; i--) { Context ctxt = (Context) contexts[i - 1]; if (ctxt.getManager().findSession(sessionID) != null) { // We found a context. Is it the one that has // already been mapped? if (!ctxt.equals(request.getMappingData().context)) { // Set version so second time through mapping // the correct context is found version = ctxt.getWebappVersion(); versionContext = ctxt; // Reset mapping request.getMappingData().recycle(); mapRequired = true; // Recycle session info in case the correct // context is configured with different settings request.recycleSessionInfo(); } break; } } } } // 当Tomcat监听的文件发生修改时,此时会触发热布署,而相应的StandardContext的paused状态也被设置为true if (!mapRequired && request.getContext().getPaused()) { // Found a matching context but it is paused. Mapping data will // be wrong since some Wrappers may not be registered at this // point. try { Thread.sleep(1000); } catch (InterruptedException e) { // Should never happen } // Reset mapping request.getMappingData().recycle(); mapRequired = true; } } // Possible redirect MessageBytes redirectPathMB = request.getMappingData().redirectPath; if (!redirectPathMB.isNull()) { String redirectPath = urlEncoder.encode(redirectPathMB.toString(), "UTF-8"); String query = request.getQueryString(); if (request.isRequestedSessionIdFromURL()) { // This is not optimal, but as this is not very common, it // shouldn't matter // 如果requestedSessionId为true // 则将当前session追加到重定向的uri中。 // 如 http://localhost:8080/servelet-test-1.0/js?username=zhangsan 重定向到 // /servelet-test-1.0/js/,则最终生成的重定向uri为/servelet-test-1.0/js/;jsessionid=xxx?username=zhangsan redirectPath = redirectPath + ";" + SessionConfig.getSessionUriParamName( request.getContext()) + "=" + request.getRequestedSessionId(); } if (query != null) { // This is not optimal, but as this is not very common, it // shouldn't matter ,如果uri中有查询参数,重定向时带上 redirectPath = redirectPath + "?" + query; } response.sendRedirect(redirectPath); request.getContext().logAccess(request, response, 0, true); return false; } // Filter trace method if (!connector.getAllowTrace() && req.method().equalsIgnoreCase("TRACE")) { Wrapper wrapper = request.getWrapper(); String header = null; if (wrapper != null) { String[] methods = wrapper.getServletMethods(); if (methods != null) { for (int i=0; i < methods.length; i++) { if ("TRACE".equals(methods[i])) { continue; } if (header == null) { header = methods[i]; } else { header += ", " + methods[i]; } } } } res.setStatus(405); if (header != null) { res.addHeader("Allow", header); } res.setMessage("TRACE method is not allowed"); request.getContext().logAccess(request, response, 0, true); return false; } doConnectorAuthenticationAuthorization(req, request); return true; }30 //// //lubansession //- 定义3个局部变量
version:需要匹配的版本号,初始化为空, 也就是匹配所有的版本
versionContext:用于暂存按照会话ID匹配的Context,初始化为空。
map。
mapRequired:是否需要映射,用于控制映射匹配循环,初始化为true - 通过一个循环(mapRequired==true)来处理映射匹配,因为只通过一次处理并不能确保得到正确的结果(第3步到第8步均为循环内处理)
- 在循环第1步,调用Mapper.map()方法按照请求路径进行匹配,参数为serverName,url,version,因为version初始化时为空, 所以第一次执行时,所有匹配该请求路径的Context均会返回,此时MappingData.contexts存放了所有的结果,而MappingData.context中存放了最新版本。
- 如果没有任何匹配结果,那么返回404响应码, 匹配结束 。
- 尝试从请求的URL,Cookie,SSL会话获取请求的会话ID,并将mapRequired设置为false(当第3步执行成功后,默认不再执行循环,是否需要重新执行由后续步骤确定)
- 如果version不为空,且MappingData.context与versionContext相等, 即表明当前匹配结果是会话查询结果,此时不再执行第7步,当前步骤仅用于重复匹配,第一次执行时,version和versionContext均为空,所以需要继续执行第7步, 而重复执行时,已经指定了版本,可得到唯一的匹配结果。

- 如果不存在会话ID , 那么第3步的匹配结果即为最终的结果(即使用匹配的最新版本),否则,从MappingData.contexts中查找包含请求的会话ID的最新版本,查询结果分如下情况 。
没有查询结果(即表明会话ID过期),或者查询结果与第3步匹配的结果相等,这时同样使用的是第3步匹配的结果
有查询结果且与第3步匹配的结果不相等(表明当前会话使用的不是最新版本)将version设置为查询结果的版本,versionContext设置为查询结果,将mapRequired设置为true,重置MappingData ,此种情况下,需要重复执行第3步, 之所以将需要重复执行,是因为虽然通过会话ID查询到了合适的Context,但是MappingData中记录的Wrapper以及相关的路径信息仍属于最新版本Context是错误的, 并明确指定匹配版本,指定版本后,第3步应只存在唯一的匹配结果 。 - 如果mapRequired为false(即已经找到唯一的匹配结果),但匹配的Context状态为暂停(如正在重新加载),此时等待1 秒钟,并将mapRequired设置为true,重置MappingData,此种情况下需要重新进行匹配,直到匹配到一个有效的Context或无任何匹配结果为止。
通过上面的处理, Tomcat确保得到Context符合如下要求 。
a) 匹配请求路径
b) 如果有效会话,则为包含会话的最新版本
c) 如果没有有效会话,则为所有匹配请求的最新版本
d) Context必须有效的(非暂停状态)
getEffectiveSessionTrackingModes()方法的值是从哪里来的呢? 请看getEffectiveSessionTrackingModes()方法的实现。
public Set getEffectiveSessionTrackingModes() {
    if (sessionTrackingModes != null) {
        return sessionTrackingModes;
    }
    return defaultSessionTrackingModes;
}
如果没有为设置sessionTrackingModes,则使用默认的defaultSessionTrackingModes,那defaultSessionTrackingModes什么时候初始化呢?

来源于populateSessionTrackingModes()方法,而populateSessionTrackingModes()方法何时调用呢?请看StandardContext的startInternal()方法,在这个方法中有一个创建工作目录的方法postWorkDirectory()。 在postWorkDirectory()方法调用时,如果ApplicationContext没有创建,则调用getServletContext() 方法创建ApplicationContext。

在创建ApplicationContext,也就是创建ServletContext时, 会初始化defaultSessionTrackingModes。 当然也可以自己指定sessionTrackingModes。请看下例。import java.util.HashSet; import java.util.Set; import javax.servlet.ServletContextEvent; import javax.servlet.ServletContextListener; import javax.servlet.SessionTrackingMode; import javax.servlet.annotation.WebListener; @WebListener public class SetSessionTrackingModeListener implements ServletContextListener { public void contextInitialized(ServletContextEvent sce) { Setmodes = new HashSet (); modes.add(SessionTrackingMode.URL); // thats the default behaviour! modes.add(SessionTrackingMode.COOKIE); sce.getServletContext().setSessionTrackingModes(modes); } public void contextDestroyed(ServletContextEvent sce) { } } 接下来看从Cookie中获取sessionId
protected void parseSessionCookiesId(org.apache.coyote.Request req, Request request) {
    // If session tracking via cookies has been disabled for the current
    // context, don't go looking for a session ID in a cookie as a cookie
    // from a parent context with a session ID may be present which would
    // overwrite the valid session ID encoded in the URL
    Context context = (Context) request.getMappingData().context;

    // 如果Context不支持Session
    if (context != null && !context.getServletContext()
            .getEffectiveSessionTrackingModes().contains(
                    SessionTrackingMode.COOKIE)) {
        return;
    }

    // Parse session id from cookies
    // 请求中携带的cookie
    Cookies serverCookies = req.getCookies();
    int count = serverCookies.getCookieCount();
    if (count <= 0) {
        return;
    }

    // 当前Context所指定的sessionCookie的名字,表示cookie中的这个名字对应的就是sessionID
    String sessionCookieName = SessionConfig.getSessionCookieName(context);
    for (int i = 0; i < count; i++) {
        ServerCookie scookie = serverCookies.getCookie(i);
        if (scookie.getName().equals(sessionCookieName)) {
            // Override anything requested in the URL
            if (!request.isRequestedSessionIdFromCookie()) {
                // 如果当前request中还没有设置SessionId,那么就从cookie中获取并设置
                // Accept only the first session id cookie
                convertMB(scookie.getValue());
                request.setRequestedSessionId
                    (scookie.getValue().toString());
                request.setRequestedSessionCookie(true);
                request.setRequestedSessionURL(false);
                if (log.isDebugEnabled()) {
                    log.debug(" Requested cookie session id is " +
                        request.getRequestedSessionId());
                }
            } else {
                if (!request.isRequestedSessionIdValid()) {
                    // 如果request中已经有sessionId了,那么就去Manager中寻找是否存在对应的Session对象,如果不存在则表示不合法
                    // 那么直接将cookie中的值更新到request中
                    // Replace the session id until one is valid
                    convertMB(scookie.getValue());
                    request.setRequestedSessionId
                        (scookie.getValue().toString());
                }
            }
        }
    }
}
从Cookie中获取session的逻辑也很简单,如果StandardContext支持多Cookie中获取,则遍历Cookie,如果名字和SESSIONID的名字一样。则将找到的sessionId设置到request中。
protected void parsePathParameters(org.apache.coyote.Request req,
        Request request) {

    // Process in bytes (this is default format so this is normally a NO-OP
    req.decodedURI().toBytes();

    ByteChunk uriBC = req.decodedURI().getByteChunk();
    // 找到uri中的第一个';'
    int semicolon = uriBC.indexOf(';', 0);
	// 如果uri 中并没有 ';' ,直接返回
    if (semicolon == -1) {
        return;
    }

    // 获取 uri 的字符编码 , 这个字符编码,我们可以在
    //     URIEncoding="UTF-8"
    //           redirectPort="8443"/> Connector标签中配置,当然只允许配置ISO-8859-1 或UTF-8
    String enc = connector.getURIEncoding();
    if (enc == null) {
        enc = "ISO-8859-1";
    }
    Charset charset = null;
    try {
    	// 获取UTF-8或ISO-8859-1的字符
        charset = B2CConverter.getCharset(enc);
    } catch (UnsupportedEncodingException e1) {
        log.warn(sm.getString("coyoteAdapter.parsePathParam",
                enc));
    }

    if (log.isDebugEnabled()) {
        log.debug(sm.getString("coyoteAdapter.debug", "uriBC",
                uriBC.toString()));
        log.debug(sm.getString("coyoteAdapter.debug", "semicolon",
                String.valueOf(semicolon)));
        log.debug(sm.getString("coyoteAdapter.debug", "enc", enc));
    }

	// 如果uri 中存在 ‘;’, 解析uri 中的参数加入到PathParameter中
    while (semicolon > -1) {
        int start = uriBC.getStart();
        int end = uriBC.getEnd();

        int pathParamStart = semicolon + 1;
        // 从刚刚查找到的的';' 之后,查找是否还有 ';' 或 '/' ,如果有,找到第一个出现的位置
        int pathParamEnd = ByteChunk.findBytes(uriBC.getBuffer(),
                start + pathParamStart, end,
                new byte[] {';', '/'});

        String pv = null;

		// 如果从刚刚查找到的的';' 之后还有 ‘;’ , '/'
        if (pathParamEnd >= 0) {
            if (charset != null) {
            	// 如果uri 为 /servelet-test-1.0/MyServlet;username=zhangsan;pwd=lisi
            	// 第一次截取  pv = username=zhangsan
                pv = new String(uriBC.getBuffer(), start + pathParamStart,
                            pathParamEnd - pathParamStart, charset);
            }
            // Extract path param from decoded request URI
            byte[] buf = uriBC.getBuffer();
            // 将uri /servelet-test-1.0/MyServlet;username=zhangsan;pwd=lisi 转换成
            // /servelet-test-1.0/MyServlet;pwd=lisi
            for (int i = 0; i < end - start - pathParamEnd; i++) {
                buf[start + semicolon + i]
                    = buf[start + i + pathParamEnd];
            }
            // 设置此时的uri 为/servelet-test-1.0/MyServlet;pwd=lisi
            uriBC.setBytes(buf, start,
                    end - start - pathParamEnd + semicolon);
        } else {
            if (charset != null) {
            	// 截取出 pv = pwd=lisi
                pv = new String(uriBC.getBuffer(), start + pathParamStart,
                            (end - start) - pathParamStart, charset);
            }
            // 设置uri为 /servelet-test-1.0/MyServlet
            uriBC.setEnd(start + semicolon);
        }

        if (log.isDebugEnabled()) {
            log.debug(sm.getString("coyoteAdapter.debug", "pathParamStart",
                    String.valueOf(pathParamStart)));
            log.debug(sm.getString("coyoteAdapter.debug", "pathParamEnd",
                    String.valueOf(pathParamEnd)));
            log.debug(sm.getString("coyoteAdapter.debug", "pv", pv));
        }

        if (pv != null) {
            int equals = pv.indexOf('=');
            if (equals > -1) {
            	// 将得到的 username=zhangsan
            	// 和 pwd=lisi 分别加入到 pathParameters 中
                String name = pv.substring(0, equals);
                String value = pv.substring(equals + 1);
                request.addPathParameter(name, value);
                if (log.isDebugEnabled()) {
                    log.debug(sm.getString("coyoteAdapter.debug", "equals",
                            String.valueOf(equals)));
                    log.debug(sm.getString("coyoteAdapter.debug", "name",
                            name));
                    log.debug(sm.getString("coyoteAdapter.debug", "value",
                            value));
                }
            }
        }

        semicolon = uriBC.indexOf(';', semicolon);
    }
}
parsePathParameters方法看上去很多代码,其实原理很简单,就是将uri/servelet-test-1.0/MyServlet;username=zhangsan;pwd=lisi中的;username=zhangsan;pwd=lisi截取出来 ,放到到pathParameters属性中,并且重新设置uri为uri/servelet-test-1.0/MyServlet 。
接下来,我们看他对uri中包含 “”, 0, “//”, “/./” and “/…/” 时的处理
public static boolean normalize(MessageBytes uriMB) {
    ByteChunk uriBC = uriMB.getByteChunk();
    final byte[] b = uriBC.getBytes();
    final int start = uriBC.getStart();
    int end = uriBC.getEnd();

    // An empty URL is not acceptable
    if (start == end) {
        return false;
    }

    int pos = 0;
    int index = 0;

    // Replace '\' with '/'
    // Check for null byte
    for (pos = start; pos < end; pos++) {
        if (b[pos] == (byte) '\\') {
            if (ALLOW_BACKSLASH) {
                b[pos] = (byte) '/';
            } else {
                return false;
            }
        }
        if (b[pos] == (byte) 0) {
            return false;
        }
    }

    // The URL must start with '/'
    if (b[start] != (byte) '/') {
        return false;
    }

    // Replace "//" with "/"
    for (pos = start; pos < (end - 1); pos++) {
        if (b[pos] == (byte) '/') {
            while ((pos + 1 < end) && (b[pos + 1] == (byte) '/')) {
                copyBytes(b, pos, pos + 1, end - pos - 1);
                end--;
            }
        }
    }

    // If the URI ends with "/." or "/..", then we append an extra "/"
    // Note: It is possible to extend the URI by 1 without any side effect
    // as the next character is a non-significant WS.
    if (((end - start) >= 2) && (b[end - 1] == (byte) '.')) {
        if ((b[end - 2] == (byte) '/')
            || ((b[end - 2] == (byte) '.')
                && (b[end - 3] == (byte) '/'))) {
            b[end] = (byte) '/';
            end++;
        }
    }

    uriBC.setEnd(end);

    index = 0;

    // Resolve occurrences of "/./" in the normalized path
    while (true) {
        index = uriBC.indexOf("/./", 0, 3, index);
        if (index < 0) {
            break;
        }
        copyBytes(b, start + index, start + index + 2,
                  end - start - index - 2);
        end = end - 2;
        uriBC.setEnd(end);
    }

    index = 0;
    // Resolve occurrences of "/../" in the normalized path
    while (true) {
        index = uriBC.indexOf("/../", 0, 4, index);
        if (index < 0) {
            break;
        }
        // Prevent from going outside our context
        if (index == 0) {
            return false;
        }
        int index2 = -1;
        for (pos = start + index - 1; (pos >= 0) && (index2 < 0); pos --) {
            if (b[pos] == (byte) '/') {
                index2 = pos;
            }
        }
        copyBytes(b, start + index2, start + index + 3,
                  end - start - index - 3);
        end = end + index2 - index - 3;
        uriBC.setEnd(end);
        index = index2;
    }
    return true;
}
其实normalize()方法的原理也很简单 。对uri中包含 ‘/.’,‘/…’, “//”, “/./” and “/…/” 字符处理
- /servelet-test-1.0/MyServlet// 转化为/servelet-test-1.0/MyServlet/
- /servelet-test-1.0/MyServlet/. 转化为/servelet-test-1.0/MyServlet/
- /servelet-test-1.0/MyServlet/… 转化为 /servelet-test-1.0/
- /servelet-test-1.0/MyServlet/…/ 转化为 /servelet-test-1.0/
- 如果uri 中有ASCII为0的字符,抛出异常。
- 如果uri中包含\ 字符,则抛出异常
请求URI映射器Mapper
public Mapper getMapper() {
    return (mapper);
}
Mapper组件主要的职责是负责Tomcat请求的路由,每个客户端的请求到达Tomcat后, Mapper路由到对应的处理逻辑(Servlet)上,如图14.1 所示 ,在Tomcat的结构中有两个部分包含Mapper组件,一个是Connector组件,称为全局路由Mapper,另外一个是Context组件,称为局部路由Mapper 。

请求的映射模型
对于Web容器来说,根据请求的客户端路由到对应的资源属于其核心功能,假设用户在自己的电脑上使用浏览器输入网址http://www.test.com/test/index.jsp ,报文通过互联网到达该主机服务器,服务器应该将其转到test应用的index.jsp页面中进行处理,然后再返回 。
如图14.2 所示 , 当客户端浏览器的地址栏中输入http://tomcat.apache.org/tomcat-7.0-doc/index.html ,当浏览器产生的HTTP报文大致如下 。
注意加粗的报文,Host:tomcat.apache.org 表明访问的主机是tomcat.apache.org,而/tomcat-7.0-doc/index.html则表示请求的资源是“tomcat-7.0-doc” Web应用的index.html页面,Tomcat通过解析这些报文就可以知道这个请求对应的资源 , 因为Tomcat根据请求路径对处理进行了容器级别的分层,所以请求URL与Tomcat内部组件的对应关系如图14.3 所示 ,tomcat.apche.org对应的Host容器,tomcat-7.0-doc对应的是Context容器,index.html对应的是Wrapper容器。

对应上面的请求,该Web项目对应的配置文件主要如下
当Tomcat启动好以后,首先http://tomcat.apache.org/tomcat-7.0-doc/index.html,请求就会被Tomcat的路径器通过匹配算法路由到名为tomcat.apache.org的Host容器上, 然后在该容器中继续匹配名为tomcat-7.0-doc的Context容器的Web应用 , 最后该Context容器中匹配index.html资源,并返回给客户端 。
以上大致介绍了Web请求从客户端到服务器的Tomcat的资源匹配过程 , 每个完整的请求都有如上的层次结构,Tomcat内部会有Host,Context, Wrapper层次与之对应 , 而具体的路由工作则由Mapper组件负责,下面介绍Mapper的实现。Mapper组件的核心功能就是提供请求路径的路由器, 根据某个请求路径,通过计算得到相应的Servlet(Wrapper),下面介绍Mapper的实现细节,包括Host容器的,Context容器, Wrapper容器等映射关系以及映射算法。
如果要将整个Tomcat容器中所有的Web项目以Servlet级别组织起来 , 需要一个多层级的类似Map的结构的存储空间,如图14.4所示,以Mapper作为映射的入口,按照容器等级,首先Mapper组件会包含了N个Host容器的引用,然后每个Host会有N个Context容器的引用,最后每个 Context容器包含N个Wrapper容器的引用,例如,如果使用了Mapper组件查找tomcat.apache.org/tomcat-7.0-doc/search,它首先会匹配名为tomcat.apahce.org的Host,然后从继续匹配名为tomcat-7.0-doc 的Context,最后匹配名为search的Wrapper(Servlet)。
protected abstract static class MapElement {

    public final String name;
    public final Object object;

}


protected static final class Host extends MapElement {
    public volatile ContextList contextList;
}


protected static final class Context extends MapElement {
    public volatile ContextVersion[] versions;

    public Context(String name, ContextVersion firstVersion) {
        super(name, null);
        versions = new ContextVersion[] { firstVersion };
    }
}


protected static final class ContextVersion extends MapElement {
    public String path = null;
    public int slashCount;
    public String[] welcomeResources = new String[0];
    public javax.naming.Context resources = null;
    public Wrapper defaultWrapper = null;               // urlPattern等于("/"),如果一个请求没有匹配其他映射关系,那么就会走这个
    public Wrapper[] exactWrappers = new Wrapper[0];    // 精确匹配,urlPattern不符合其他情况
    public Wrapper[] wildcardWrappers = new Wrapper[0];  // urlPattern是以("/*")结尾的
    public Wrapper[] extensionWrappers = new Wrapper[0]; // urlPattern是以("*.")开始的
    public int nesting = 0;
    public boolean mapperContextRootRedirectEnabled = false;
    public boolean mapperDirectoryRedirectEnabled = false;
    private volatile boolean paused;

    public ContextVersion() {
        super(null, null);
    }

    public ContextVersion(String version, Object context) {
        super(version, context);
    }

    public boolean isPaused() {
        return paused;
    }

    public void markPaused() {
        paused = true;
    }
}


 protected static class Wrapper extends MapElement {

    public final boolean jspWildCard;
    public final boolean resourceOnly;

    public Wrapper(String name, /* Wrapper */Object wrapper,
            boolean jspWildCard, boolean resourceOnly) {
        super(name, wrapper);
        this.jspWildCard = jspWildCard;
        this.resourceOnly = resourceOnly;
    }
}
public final class Mapper { Host[] hosts = new Host[0]; }Mapper只要包含一个Host数组即可完成所有的组件关系映射,在Tomcat启动时将所有的Host容器和它的名字组成的Host添加到Mapper对象中,把每个Host下的Context容器和它的名字组成Context映射模型添加到对应的Host下,把每个Context下的Wrapper容器和它的名字组成的Wrapper映射模型添加到对应的Host下, Mapper组件提供了对Host映射,Context映射,Wrapper映射的添加和移除方法,在Tomcat容器中添加或移除相应的容器时,都要调用相应的方法维护这些映射关系,为了提高查找速度和效率,Mapper组件使用了二分法搜索查找,所以在添加时按照字典的顺序把Host,Context,Wrapper等映射排好序。
当Tomcat启动稳定后,意味着这些映射都已经组织好,那么具体是如何查找对应的容器的呢?- 关于Host的匹配,直接对Mapper中的Host映射数组进行忽略大小写的十分搜索查找 。
- 关于Context匹配,对于上面的查找的Host映射中的Context映射数组进行忽略大小写的二分搜索查找,这里有个比较特殊的情况就是请求地址可以直接以Context名结束,例如http://tomcat.apache.org/tomcat-7.0-doc,另外一些则类似于http://tomcat.apache.org/tomcat-7.0-doc/index.html,另外,Context映射中的name对应Context容器的path属性。
- 关于Wrapper的匹配,涉及几个步骤,首先,尝试使用精确匹配法匹配精确的类型Servlet的路径,然后,尝试使用前缀匹配通配符类型Servlet,接着,尝试使用扩展名匹配通配符类型Servlet,最后,匹配默认的Servlet。
Tomcat在处理请求时对请求的路径由分发全由Mapper组件负责,请求通过Mapper找到了最终的Servlet资源, 而在Tomcat 中会有两种类型的Mapper,根据它们的作用范围, 分别称为全局路由Mapper和局部路由Mapper 。
局部路由Mapper 是指提供了Context容器内部路由导航的功能的组件,它只存在于Context容器中,用于记录访问资源与Wrapper之间的映射,每个Web应用都存在自己的局部路由Mapper组件 。
在做Web应用开发时,我们有时会用到类似于request.getRequestDispatcher(“/servlet/jump?action=do”).forward(request,response) 这样的代码,这里其实使用的就是Context容器的内部Mapper的功能,用它匹配/servlet/jump?action=do对应的Servlet,然后调用该Servlet具体的处理逻辑,从这点来看, 它只是一个路由的一部分的地址路径,而不是由一个完全的请求地址 。
所以局部路由的Mapper只能在同一个Web应用内进行转发路由, 而不能实现跨Web应用,需要用到生定向功能,让客户端重定向到其他的主机或其他的Web应用上, 对于从客户端到服务端的请求,则需要全局的路由Mapper的参与 。
除了局部路由Mapper之外,另外一种Mapper就是全局的Mapper, 它是提供了完全的路由导航功能的组件,它位于 Tomcat 的Connector组件中,通过它能对Host, Context ,Wrapper 等路由,对于 一个完整的请求地址,它能定位到指定的Host容器,Context容器以及Wrapper容器。
所以全局的路由Wrapper拥有Tomcat容器完整的路由映射,负责完整个路由映射,负责完整个请求地址的路由功能 。接下来,根据serverName和uri来设置mappingData 。
public void map(MessageBytes host, MessageBytes uri, String version,
                MappingData mappingData)
    throws Exception {

    if (host.isNull()) {
        host.getCharChunk().append(defaultHostName);
    }
    // 将host 中的 byte 转化为char
    host.toChars();
    uri.toChars();
    internalMap(host.getCharChunk(), uri.getCharChunk(), version,
            mappingData);

}
以上我们讲解了Tomcat对请求匹配结果的处理,接下来再看一下请求路径的具体匹配算法(即图3-5中加粗部分)。
在讲解算法之前,有必要先了解一下Mapper静态结构,这有助于加深算法的理解,Mapper的静态结构如图3-6所示 。
第一,Mapper对于Host,Context,Wrapper 均提供了对应的封装类,因此描述算法时,我们用MappedHost,MappedContext,MappedWrapper 表示其封装的对象,而用Host,Context,Wrapper表示Catalina中的组件 。
MappedHost支持封装的Host缩写,当封装的是一个Host缩写时,realHost即为其指向的真实Host墙头对象,当封装的是一个Host且存在缩写时,aliases即为其对应的缩写的封装的对象。
第三,为了支持Context 的多版本,Mapper提供了MappedContext,ContextVersion 两个封装类,当注册一个Context时,MappedContext名称为Context路径,并且通过一个ContextVersion列表保存所有的版本的Context,ContextVersion保存了单个版本的Context, 名称为具体的版本号。
第四,ContextVersion保存了一个具体的Context及包含了Wrapper封装的对象,包括默认的Wrapper , 精确匹配的Wrapper , 通配符匹配的Wrapper,通过扩展名匹配的Wrapper。
第五,MappedWrapper保存了具体的Wrapper。
第六,所有注册组件按层级封装为一个MappedHost列表,并保存到Mapper 。
在Mapper中,每一个类Container按照名称的ASCII正序排序(注意排序规则,这会影响一些特殊情况下的匹配结果),以Context为例子,下列名称均合法(参见3.4.6节):/abbb/a,/abbb, /abb,/Abbb/,/Abbb/a,而在Mapper中的,它们的顺序为/Abbb,/Abbb/a,/Abbb/ab,/abb,/abbb,/abbb/a ,无论以何种顺序添加 。
Mapper.map()方法的请求映射结果为org.apache.tomcat.util.http.mapper.MappingData对象,保存在请求的mappingData属性中。
org.apache.tomcat.util.http.mapper.MappingData的结构如下 ,具体含义参见注释。public class MappingData { public Object host = null; // 匹配Host public Object context = null; // 匹配的Context public int contextSlashCount = 0; // Context 路径中的"/"数量 // 对于contexts 属性,主要使用于多版本Web应用同时部署的情况,此时,可以匹配请求路径的Context存在多个,需要进一步的处理,而 // Context属性始终存放的匹配请求路径的最新版本(注意),匹配请求的最新版本并不代表的是最后匹配结果,具体参见算法讲解 public Object[] contexts = null; // 匹配的Context列表,只用于匹配过程,并非最终使用结果 , public Object wrapper = null; // 匹配的wrapper public boolean jspWildCard = false; // 对于JspServlet,其对应的匹配pattern是否包含通配符 public MessageBytes contextPath = MessageBytes.newInstance(); //Context 路径 public MessageBytes requestPath = MessageBytes.newInstance(); // 相对于Context 的请求路径 public MessageBytes wrapperPath = MessageBytes.newInstance(); // Servlet路径 public MessageBytes pathInfo = MessageBytes.newInstance(); // 相对于Servlet 的请求路径 public MessageBytes redirectPath = MessageBytes.newInstance(); // 重定向路径 public void recycle() { host = null; context = null; contextSlashCount = 0; contexts = null; wrapper = null; jspWildCard = false; contextPath.recycle(); requestPath.recycle(); wrapperPath.recycle(); pathInfo.recycle(); redirectPath.recycle(); } }对于contexts的属性,主要使用于多版本Web应用同时部署的情况,此时可以匹配请求路径的Context存在多个,需要进行进一步的处理, 而context属性始终存放的是匹配请求路径的最新版本(注意,匹配请求的最新版本并不代表是最后的匹配结果)
Mapper.map的具体算法如图3-7所示 。
为了简化流程图, 部分处理细节并未展开描述(如查找Wrapper),因此我们仍对每一步做一个详细的讲解。-
一般情况下,需要查找Host名称为请求的serverName,但是如果没有指定Host名称,则使用默认的Host名称 。
-
按照host名称查询Mapper.Host(忽略大小写),如果没有找到匹配结果,且默认的Host名称不为空,则按照默认的Host名称精确查询,如果存在匹配结果,将其保存到MappingData的host属性。
【注意】 此处有时候会让人产生疑惑,第1步在没有指定host名称时,已经将host名称设置为默认的Host名称,为什么在第2步仍然需要按照默认的Host名称查找,这主要满足如下场景:当host不为空时,且为无效的名称时,Tomcat将会尝试返回默认的Host,而非空值。

-
按照url查找MapperdContext最大可能匹配的位置 pos(只限于查找)MappedHost下的MappedContext,这所以这样描述,与Tomcat查找算法有关。
【注意】在Mapper中的所有Container是有序的, (按照名称的ASCII正序排列),因此Tomcat采用了二分法进行查找,其返回的结果存在如下两种情况 。
a) -1 :表明url比当前MappedHost下所有的MappedContext名称都小,也就是没有匹配的MappedContext
b) >=0 可能是精确匹配的位置,也可能是列表比url小的最大值位置,即使没有精确匹配,也不代码最终没有匹配项,这里需要进一步处理。
如果比较难以理解,我们下面看一个例子,例如我们配置了两个Context,路径分别为:/myapp和/myapp/app1,在Tomcat中,这两个是允许同时存在的,然后我们尝试输入请求路径,http://localhost:8080/myapp/app1/index.jsp,此时url为/myapp/app1/index.jsp,很显然,url不可能和Context路径精确匹配,此时返回比其小的最大值的位置(即/myapp/app1),当Tomcat发现其非精确匹配时,会将url进行截取(截取为/myapp/app1)再进行匹配,此时将会精确匹配到/myapp/app1,当然,如果我们输入的是http://localhost:8080/myapp/app2/index.jsp时,Tomcat会继续截取,直到匹配到/myapp,由此可见, Tomcat总是试图查找一个最精确的MappedContext(如上例使用/myapp/app1,而非/myapp,尽管这两个都是可以匹配的)。 -
当第3步查找的pos>=0时,得到对应的MappedContext,如果url与MappedContext路径相等或者url以MappedContext路径+"/"开头,均视为找到了匹配的MappedContext,否则循环执行第4步, 逐渐降低精确度以查找合适的MappedContext。
-
如果循环结束后仍然没有找到合适的MappedContext,那么会判断第0个MappedContext的名称是澡为空字符串,如果是,则将其作为匹配结果(即使用默认的MappedContext)
-
前面曾讲到了MappedContext存放了路径 相同的所有版本的Context(ContextVersion),因此在第5步结束后,还需要对MappedContext版本进行处理, 如果指定了版本号,则返回版本号相等的ContextVersion, 否则返回版本号最大的,最后,将ContextVersion中维护的Context保存到MappingData中。
-
如果Context当前状态为有效(由图3-6可知,当Context处于暂停状态,将会重新按照url映射,此时MappedWrapper的映射无意义),则映射对应的MappedWrapper。
private final void internalMap(CharChunk host, CharChunk uri,
        String version, MappingData mappingData) throws Exception {

    if (mappingData.host != null) {
        // The legacy code (dating down at least to Tomcat 4.1) just
        // skipped all mapping work in this case. That behaviour has a risk
        // of returning an inconsistent result.
        // I do not see a valid use case for it.
        throw new AssertionError();
    }

    uri.setLimit(-1);

    // Virtual host mapping
    // 从当前Engine中包含的虚拟主机中进行筛选
    // 1. 一般情况下,需要查找Host名称为请求的serverName,但是,如果没有指定Host名称,那么将使用默认的Host名称
	// 【注意】:默认的Host名称通过按照Engine的defaultHost属性查找其Host子节点获取,查找规则:Host名称与defaultHost相等
	// 或Host缩写名与defaultHost相等(忽略大小写),此处需要注意一个问题,由于Container在维护子节点时,使用的是HashMap 。
	// 因此得到其子节点列表时 ,顺序与名称的哈希码相关,例如 ,如果Engine 中配置的defaultHost为"Server001",而Tomcat 中配置了
	// "SERVER001" 和 "Server001" 两个,两个Host ,此时默认Host名称为"SERVER001",而如果我们将"Sever001"换成了"server001", 则
	// 结果就变成了"server001",当然,实际配置过程中,应彻底避免这种命名
	// 2. 按照Host名称查找Mapper.Host(忽略大小写),如果没有找到匹配结果,且默认的Host名称不为空,则按默认的Host名称精确查找
	// ,如果存在匹配结果,将其保存到MappingData的Host属性
	// 【注意】此处有时候会让人产生疑惑(第1步在没有指定host名称时),已经将host名称设置为默认的Host名称,为什么第2步仍然压根按照
	// 默认的Host名称查找,这主要满足如下场景,当host不为空,且为无效名称时 , Tomcat将会尝试返回默认的Host ,而非空值 。
    Host[] hosts = this.hosts;
    Host mappedHost = exactFindIgnoreCase(hosts, host);
    if (mappedHost == null) {
        if (defaultHostName == null) {
            return;
        }
        mappedHost = exactFind(hosts, defaultHostName);
        if (mappedHost == null) {
            return;
        }
    }
    mappingData.host = mappedHost.object;       // 找到了对应的Standerhost

    // Context mapping
    ContextList contextList = mappedHost.contextList;
    Context[] contexts = contextList.contexts;  // 找到的host中对应的context
    int nesting = contextList.nesting;
     //折半查找法
    // 3. 按照url查找MapperdContext最大可能匹配的位置pos(只限于第2步查找的MappedHost下的MappedContext),之所以如此描述。
	// 与Tomcat的查找算法相关
	// 【注意】:在Mapperd中所有的Container是有序的,按照名称的ASCII正序排列,因此Tomcat采用十分法进行查找,其返回的结果存在如下两种情况
	// 3.1  -1:表明url比当前的MappedHost下所有的MappedContext的名称都小,也就是说,没有匹配到MappedContext
	// 3.2 >=0 可能是精确匹配的位置,也可能是表中比url小的最大值位置,即使没有精确匹配,也不代表最终没有匹配项,这需要进一步的处理。
	// 如果比较难以理解,我们下面试举一个例子,例如我们配置了两个Context,路径分别为/myapp/和/myapp/app1 ,在Tomcat中,这两个是
	// 允许同时存在的,然后我们尝试输入请求路径http://127.0.0.1:8080/myapp/app1/index.jsp, 此时url为/myapp/app1/index.jsp
	// 很显然,url 可能和Context路径精确匹配,此时返回比其最小的最大值位置(即/myapp/app1),当Tomcat发现其非精确匹配时,会将url
	// 进行截取(截取为/myapp/app1),再进行匹配,此时将会精确匹配到/myapp/app1, 当然,如果我们输入的是http://127.0.0.1:8080/myapp/app2/index.jsp
	// Tomcat将会继续截取,直到匹配到/myapp
	// 由此可见,Tomcat 总是试图查找一个最精确的MappedContext(如上例使用/myapp/app1),而非/myapp, 尽管这两个都是可以匹配的。
    int pos = find(contexts, uri);
    if (pos == -1) {
        return;
    }

    int lastSlash = -1;
    int uriEnd = uri.getEnd();
    int length = -1;
    boolean found = false;
    Context context = null;
    while (pos >= 0) {
        context = contexts[pos];
        if (uri.startsWith(context.name)) {
            length = context.name.length();
            if (uri.getLength() == length) {
                found = true;
                break;
            } else if (uri.startsWithIgnoreCase("/", length)) {
                // 这个方法判断在length位置是不是"/",所以如果uri中是ServletDemo123,Context是ServletDemo那么将不会匹配
                found = true;
                break;
            }
        }
        if (lastSlash == -1) {
            lastSlash = nthSlash(uri, nesting + 1);
        } else {
            lastSlash = lastSlash(uri);
        }
        uri.setEnd(lastSlash);
        pos = find(contexts, uri);
    }
    uri.setEnd(uriEnd);

    if (!found) {
        // 就算没有找到,那么也将当前这个请求交给context[0]来进行处理,就是ROOT应用
        if (contexts[0].name.equals("")) {
            context = contexts[0];
        } else {
            context = null;
        }
    }
    if (context == null) {
        return;
    }

    mappingData.contextPath.setString(context.name); // 设置最终映射到的contextPath
    ContextVersion contextVersion = null;
    ContextVersion[] contextVersions = context.versions;
    final int versionCount = contextVersions.length;
    if (versionCount > 1) { // 如果context有多个版本
        Object[] contextObjects = new Object[contextVersions.length];
        for (int i = 0; i < contextObjects.length; i++) {
            contextObjects[i] = contextVersions[i].object;
        }
        mappingData.contexts = contextObjects; // 匹配的所有版本
        if (version != null) {
            contextVersion = exactFind(contextVersions, version); // 找出对应版本
        }
    }
    if (contextVersion == null) {
        // Return the latest version
        // The versions array is known to contain at least one element
        contextVersion = contextVersions[versionCount - 1]; // 如果没找到对应版本,则返回最新版本
    }

    mappingData.context = contextVersion.object;
    mappingData.contextSlashCount = contextVersion.slashCount;
    // Wrapper mapping
    if (!contextVersion.isPaused()) {
        // 根据uri寻找wrapper
        internalMapWrapper(contextVersion, uri, mappingData);
    }
}
上面代码,已经根据url找到了对应的Host,再根据Host精确找到StandardContext,但同一个应用可能有不同的版本,因此需要根据version信息找到Context中的版本,大家可能对Context中还会有不同的版本感到好奇,那如何才会出现相同的Context不同的版本呢?请看例子。
- 在catalina.base/conf/Catalina/localhost目录下创建两个文件,servelet-test-1.0##1.xml和servelet-test-1.0##2.xml

- 内容分别是
- 访问http://localhost:8080/servelet-test-1.0

既然找到了StandardContext,接下来,从StandardContext中找到StandardWrapper/** * Wrapper mapping. * MapperWrapper映射 * 我们知道ContextVersion中将MappedWrapper分为:默认Wrapper(defaultWrapper),精确Wrapper(exactWrappers) ,前缀加通配符匹配 * Wrapper(wildcardWrappers)和扩展名匹配Wrapper(extensionWrappers), 之所以分为这几类是因为他们之间存在匹配的优先级。 * 此外,在ContextVersion中,并非每一个Wrapper对应一个MappedWrapper对象,而是每一个url-pattern对应一个,如果web.xml中的 * servlet-mapping配置如下 : *
* * 那么,在ContextVersion中将存在两个MappedWrapper封装对象,分别指向同一个Wrapper实例。 * Mapper按照如下规则将Wrapper添加到ContextVersion对应的MappedWrapper分类中去。。。。 * 1. 如果url-pattern以/* 结尾,则为wildcardWrappers,此时MappedWrapper的名称为url-pattern去除结尾的"/*" * 2. 如果url-pattern 以 *. 结尾,则为extensionWrappers,此时,MappedWrapper的名称为url-pattern去除开头的 "*." * 3. 如果url-pattern 以 "/" 结尾,则为defaultWrapper,此时MappedWrapper的名称为空字符串 * 4. 其他情况均为exactWrappers , 如果url-pattern为空字符串,MappedWrapper的名称为"/" ,否则为url-pattern的值 。 */ private final void internalMapWrapper(ContextVersion contextVersion, CharChunk path, MappingData mappingData) throws Exception { int pathOffset = path.getOffset(); int pathEnd = path.getEnd(); boolean noServletPath = false; int length = contextVersion.path.length(); if (length == (pathEnd - pathOffset)) { noServletPath = true; } int servletPath = pathOffset + length; path.setOffset(servletPath); // 接下来看一下MappedWrapper的详细匹配过程 // 1. 依据url和Context路径来计算 MappedWrapper匹配路径,例如,如果Context路径为"/myapp",url为"/myapp/app1/index.jsp" // 那么MappedWrapper的匹配路径为"/app1/index.jsp", 如果url 为"/myapp",那么MappedWrapper的匹配路径为"/" // 2. 先精确查找exactWrappers 。 // Rule 1 -- Exact Match 精准匹配 Wrapper[] exactWrappers = contextVersion.exactWrappers; internalMapExactWrapper(exactWrappers, path, mappingData); // Rule 2 -- Prefix Match 前缀匹配 *.jar // 如果未找到,然后再按照前缀查找wildcardWrappers ,算法与MappedContext查找类似,逐步降低精度 boolean checkJspWelcomeFiles = false; Wrapper[] wildcardWrappers = contextVersion.wildcardWrappers; if (mappingData.wrapper == null) { internalMapWildcardWrapper(wildcardWrappers, contextVersion.nesting, path, mappingData); //example **.do **.action *// // // 而访问的url为http://localhost:8080/servelet-test-1.0/my/a/b 或 // http://localhost:8080/servelet-test-1.0/my/a/b/ 【后缀是反斜线】时,mappingData.jspWildCard为true,则会使用欢迎页 if (mappingData.wrapper != null && mappingData.jspWildCard) { char[] buf = path.getBuffer(); // 如果访问的url是http://localhost:8080/servelet-test-1.0/my/a/b/ if (buf[pathEnd - 1] == '/') { /* * Path ending in '/' was mapped to JSP servlet based on * wildcard match (e.g., as specified in url-pattern of a * jsp-property-group. * Force the context's welcome files, which are interpreted * as JSP files (since they match the url-pattern), to be * considered. See Bugzilla 27664. */ mappingData.wrapper = null; checkJspWelcomeFiles = true; } else { // See Bugzilla 27704,如果 访问的url为 // http://localhost:8080/servelet-test-1.0/my/a/b // 则设置wrapperPath为/my/a/b mappingData.wrapperPath.setChars(buf, path.getStart(), path.getLength()); mappingData.pathInfo.recycle(); } } } // 当直接访问http://localhost:8080/servelet-test-1.0时,则进入下面代码处理 if(mappingData.wrapper == null && noServletPath && contextVersion.mapperContextRootRedirectEnabled) { // The path is empty, redirect to "/" path.append('/'); pathEnd = path.getEnd(); mappingData.redirectPath.setChars (path.getBuffer(), pathOffset, pathEnd - pathOffset); path.setEnd(pathEnd - 1); return; } // Rule 3 -- Extension Match /123123/* // 如果未找到,然后按照扩展名查找extensionWrappers 。 Wrapper[] extensionWrappers = contextVersion.extensionWrappers; if (mappingData.wrapper == null && !checkJspWelcomeFiles) { internalMapExtensionWrapper(extensionWrappers, path, mappingData, true); } // Rule 4 -- Welcome resources processing for servlets // 如果未找到,则尝试匹配欢迎文件列表(web.xml的welcome-file-list配置),主要用于我们输入的请求路径是一个目录而非文件的情况 // 如:http://127.0.0.1:8080/myapp/app1 ,此时使用匹配路径为"原匹配路径+welcome-file-list中的文件名称" ,欢迎文件匹配分为如下两步 // 4.1 对于每个欢迎文件生成的新的匹配路径,先查找exactWrappers,再查找wildcardWrappers,如果该文件的物理路径不存在 ,则查找 // extensionWrappers,如果extensionWrappers未找到,则使用defaultWrapper // 4.2 对于每个欢迎文件生成的新的匹配路径,查找extensionWrappers // 【注意】在第1步中,只有当存在物理路径时,才会查找extensionWrappers,并在找不到时使用defaultWrapper,而在第2步则不判断物理路径 // 直到通过extensionWrappers查找,按照这种方式处理,如果我们配置如下 。 // 4.2.1 url-pattern 配置为"*.do" // 4.2.2 welcome-file-list 包括index.do ,index.html // 当我们输入的请求路径为http://127.0.0.1:8080/myapp/app1/ , 且在app1目录下存在index.html文件时,打开的是index.html,而 // 非index.do ,即便它位于前面(因为它不是个具体文件,而是由Web 应用动态生成 ) if (mappingData.wrapper == null) { boolean checkWelcomeFiles = checkJspWelcomeFiles; if (!checkWelcomeFiles) { char[] buf = path.getBuffer(); // 如果请求路径的最后一个字符为'/' ,依然查找欢迎页 checkWelcomeFiles = (buf[pathEnd - 1] == '/'); } if (checkWelcomeFiles) { // 欢迎页面,默认为index.html,index.htm,index.jsp for (int i = 0; (i < contextVersion.welcomeResources.length) && (mappingData.wrapper == null); i++) { path.setOffset(pathOffset); path.setEnd(pathEnd); path.append(contextVersion.welcomeResources[i], 0, contextVersion.welcomeResources[i].length()); path.setOffset(servletPath); // Rule 4a -- Welcome resources processing for exact macth // 欢迎页的精确查找 internalMapExactWrapper(exactWrappers, path, mappingData); // Rule 4b -- Welcome resources processing for prefix match // 欢迎页的能配符查找 if (mappingData.wrapper == null) { internalMapWildcardWrapper (wildcardWrappers, contextVersion.nesting, path, mappingData); } // Rule 4c -- Welcome resources processing // for physical folder if (mappingData.wrapper == null && contextVersion.resources != null) { Object file = null; String pathStr = path.toString(); try { // 如在/servelet-test-1.0/js下创建index.html文件 // 此时访问http://localhost:8080/servelet-test-1.0/js/ // pathStr =/servelet-test-1.0/js/index.html file = contextVersion.resources.lookup(pathStr); } catch(NamingException nex) { // Swallow not found, since this is normal } if (file != null && !(file instanceof DirContext) ) { internalMapExtensionWrapper(extensionWrappers, path, mappingData, true); // 如果没有配置*.html的扩展名配置,类似于没有配置如下这种配置 //// // //// Special property group for JSP Configuration JSP // example. // //JSPConfiguration ///my/a/b/*</url-pattern> // true // //UTF-8 //false //// // // // wrapper则会指向默认的org.apache.catalina.servlets.DefaultServlet if (mappingData.wrapper == null && contextVersion.defaultWrapper != null) { mappingData.wrapper = contextVersion.defaultWrapper.object; mappingData.requestPath.setChars (path.getBuffer(), path.getStart(), path.getLength()); mappingData.wrapperPath.setChars (path.getBuffer(), path.getStart(), path.getLength()); mappingData.requestPath.setString(pathStr); mappingData.wrapperPath.setString(pathStr); } } } } path.setOffset(servletPath); path.setEnd(pathEnd); } } /* welcome file processing - take 2 * Now that we have looked for welcome files with a physical * backing, now look for an extension mapping listed * but may not have a physical backing to it. This is for * the case of index.jsf, index.do, etc. * A watered down version of rule 4 * 如果未找到,则使用默认的MappedWrapper(通过conf/web.xml,即使Web应用不显式的进行配置,也一定会存在一个默认的Wrapper) * 因此,无论请求链接是什么,只要匹配到合适的Context,那么肯定会存在一个匹配的Wrapper */ if (mappingData.wrapper == null) { boolean checkWelcomeFiles = checkJspWelcomeFiles; if (!checkWelcomeFiles) { char[] buf = path.getBuffer(); checkWelcomeFiles = (buf[pathEnd - 1] == '/'); } if (checkWelcomeFiles) { // 这里考虑到另外一种情况 // 当/servelet-test-1.0/js/index.jsp 目录存在,index.jsp是一个目录,并不是一个文件 // 当访问http://localhost:8080/servelet-test-1.0/js/时 // 会找到/servelet-test-1.0/js/index.jsp是一个目录,但并不是一个文件 // 因此需要用/index.jsp去匹配,url-pattern 为*.jsp的 // Wrapper,如果匹配上,则指定其Wrapper for (int i = 0; (i < contextVersion.welcomeResources.length) && (mappingData.wrapper == null); i++) { path.setOffset(pathOffset); path.setEnd(pathEnd); path.append(contextVersion.welcomeResources[i], 0, contextVersion.welcomeResources[i].length()); path.setOffset(servletPath); internalMapExtensionWrapper(extensionWrappers, path, mappingData, false); } path.setOffset(servletPath); path.setEnd(pathEnd); } } // Rule 7 -- Default servlet if (mappingData.wrapper == null && !checkJspWelcomeFiles) { if (contextVersion.defaultWrapper != null) { // 一定有一个默认的Wrapper与它对应 mappingData.wrapper = contextVersion.defaultWrapper.object; mappingData.requestPath.setChars (path.getBuffer(), path.getStart(), path.getLength()); mappingData.wrapperPath.setChars (path.getBuffer(), path.getStart(), path.getLength()); } // Redirection to a folder char[] buf = path.getBuffer(); if (contextVersion.resources != null && buf[pathEnd -1 ] != '/') { Object file = null; String pathStr = path.toString(); try { if (pathStr.length() == 0) { file = contextVersion.resources.lookup("/"); } else { // JNDI查找文件 file = contextVersion.resources.lookup(pathStr); } } catch(NamingException nex) { // Swallow, since someone else handles the 404 } // mapperDirectoryRedirectEnabled的配置// Special property group for JSP Configuration JSP // example. // //JSPConfiguration //*.html //true //UTF-8 //false //// // mapperDirectoryRedirectEnabled="true" 程序运行到这里,我们极容器被大量的代码弄晕掉,但大体步骤还是很简单的。
- 精确匹配
- 前缀匹配
- 后缀匹配,也可以称扩展名匹配
- 欢迎文件匹配
- 如果未找到,则使用默认的MappedWrapper(通过conf/web.xml,即使Web应用不显式的进行配置,也一定会存在一个默认的Wrapper)因此,无论请求链接是什么,只要匹配到合适的Context,那么肯定会存在一个匹配的Wrapper。
我们知道ContextVersion中将MappedWrapper分为默认的Wrapper(defaultWrapper),精确Wrapper(exactWrappers),前缀加通配符匹配Wrapper(wildcardWrappers)和扩展名匹配Wrapper(extensionWrappers) ,这所以分为这几个类是因为它们之间存在匹配优先级。
此外,在ContextVersion中,并非每一个Wrapper对应一个MappedWrapper对象,而是每个url-pattern对应一个,如果web.xml中的servlet-mapping 配置如下。
example
*.do
\*.action
那么,在ContextVersion中将存在两个MappedWrapper封装对象,分别指向同一个Wrapper实例。
那么在ContextVersion中将存在两个MappedWrapper封装对象,分别指向同一个Wrapper实例。- 如果url-pattern 以“/*”结尾,则为wildcardWrappers,此时,MappedWrapper的名称为url-pattern去除结尾的"/*"
- 如果url-pattern以“*.”结尾 ,则为extensionWrappers,此时MappedWrapper的名称为url-pattern去除开头的"*."
- 如果url-pattern等于"/",则为defaultWrapper,此时MappedWrapper的名称为空字符串。
- 其他情况均为exactWrappers,如果url-pattern为空字符串,MappedWrapper的名称为"/",否则为url-pattern值。
接下来看一下MappedWrapper的详细匹配过程
- 依据url和Context路径计算 MappedWrapper匹配路径,例如。 如果Context路径为/my/app,url为myapp/app1/index.jsp,那么MapedWrapper的匹配路径为/app1/index.jsp,如果url为"/myapp",那么MappedWrapper的匹配路径为"/"。
- 先精确查找exactWrappers。
- 如果未找到,则按照前缀查找wildcardWrappers,算法与MappedContext查找类似,逐步降低精度。
- 如果未找到,然后再按照扩展名查找extensionWrappers。
- 如果未找到,则尝试匹配欢迎文件列表(web.xml中的welcome-file-list配置),主要用于我们输入的请求路径是一个目录而非文件的情况下, 如:http://127.0.0.1:8080/myapp/app1/,此时使用的匹配路径为"原匹配路径+welcome-file-list中的文件名称",欢迎文件匹配分为如下两步。
a) 对于每个欢迎文件生成的新的匹配路径,先查找exactWrappers,再查找wildcardWrappers, 如果该文件在物理路径中存在,则查找extensionWrappers,如果extensionWrappers未找到,则使用defaultWrapper。
b) 对于每个欢迎文件生成新的匹配路径,查找extensionWrappers 。
【注意】在第1步中,只在当存在物理路径时, 才会查找extensionWrappers,并在找不到时使用defaultWrapper,而第2步则不判断物理路径,直接通过extensionWrappers查找,按照这种yyathgj,如果我们配置如下 。
url-pattern 配置为*.do
welcome-file-list包括index.do ,index.html
当我们输入请求路径为http://localhost:8080/myapp/app1/,且在app1目录下存在index.html文件,打印的是index.html文件,而非index.do,即便它位于前面(因为它不是具体文件,而是由Web应用动态生成的) - 如果找不到,则使用默认的MappedWrapper(通过conf/web.xml,即使Web应用不显式的进行配置,也一定会存在一个默认的Wrapper),因此无论链接是什么,只要匹配合适的Context,那肯定会存在一个Wrapper。
无论是查找Engine, Host,Context, 还是Wrapper都用到了一个算法,find()方法 。 我已经抽取出来,大家感兴趣可以研究一下 。
public class TestFound {

    public static void main(String[] args) {
        Wrapper wrapper = new Wrapper("aa", null);
        Wrapper wrapper1 = new Wrapper("ab", null);
        Wrapper wrapper2 = new Wrapper("bc", null);
        Wrapper[] wrappers = new Wrapper[]{wrapper, wrapper1, wrapper2};

        CharChunk charChunk = new CharChunk();
        charChunk.setChars(new char[]{'b', 'c'}, 0, 2);
        System.out.println(charChunk.getBuffer());
        System.out.println(find(wrappers, charChunk, 0, 2));

    }


    protected abstract static class MapElement {

        public final String name;
        public final Object object;

        public MapElement(String name, Object object) {
            this.name = name;
            this.object = object;
        }
    }


    protected static class Wrapper extends MapElement {


        public Wrapper(String name, /* Wrapper */Object wrapper) {
            super(name, wrapper);
        }
    }

    private static final int find(MapElement[] map, CharChunk name,
                                  int start, int end) {

        int a = 0;     // 开始位置
        int b = map.length - 1; // 结束位置

        // Special cases: -1 and 0
        if (b == -1) {
            return -1;
        }

        // 因为map是一个排好序了的数组,所以先比较name是不是小于map[0].name,如果小于那么肯定在map中不存在name了
        if (compare(name, start, end, map[0].name) < 0) {
            return -1;
        }
        // 如果map的长度为0,则默认取map[0]
        if (b == 0) {
            return 0;
        }

        int i = 0;
        while (true) {
            i = (b + a) / 2; // 折半
            int result = compare(name, start, end, map[i].name);
            if (result == 1) { // 如果那么大于map[i].name,则表示name应该在右侧,将a变大为i
                a = i;
            } else if (result == 0) { // 相等
                return i;
            } else {
                b = i; // 将b缩小为i
            }
            if ((b - a) == 1) { // 表示缩小到两个元素了,那么取b进行比较
                int result2 = compare(name, start, end, map[b].name);
                if (result2 < 0) { // name小于b,则返回a
                    return a;
                } else {
                    return b;  // 否则返回b
                }
            }
        }

    }


    /**
     * Compare given char chunk with String.
     * Return -1, 0 or +1 if inferior, equal, or superior to the String.
     */
    private static final int compare(CharChunk name, int start, int end,
                                     String compareTo) {
        int result = 0;
        char[] c = name.getBuffer();
        int len = compareTo.length();
        if ((end - start) < len) {
            len = end - start;
        }
        for (int i = 0; (i < len) && (result == 0); i++) {
            if (c[i + start] > compareTo.charAt(i)) {
                result = 1;
            } else if (c[i + start] < compareTo.charAt(i)) {
                result = -1;
            }
        }
        if (result == 0) {
            if (compareTo.length() > (end - start)) {
                result = -1;
            } else if (compareTo.length() < (end - start)) {
                result = 1;
            }
        }
        return result;
    }
}
在分析具体的匹配模式之前,先来看一个ContextVersion的数据及结构。

- 精确匹配的实现
private final void internalMapExactWrapper (Wrapper[] wrappers, CharChunk path, MappingData mappingData) { Wrapper wrapper = exactFind(wrappers, path); if (wrapper != null) { mappingData.requestPath.setString(wrapper.name); // 精确查找,如果查找到后设置mappingData.wrapper为查找到的StandardWrapper mappingData.wrapper = wrapper.object; if (path.equals("/")) { // Special handling for Context Root mapped servlet mappingData.pathInfo.setString("/"); mappingData.wrapperPath.setString(""); // This seems wrong but it is what the spec says... mappingData.contextPath.setString(""); } else { mappingData.wrapperPath.setString(wrapper.name); } } } private static final
E exactFind(E[] map, CharChunk name) { int pos = find(map, name); if (pos >= 0) { E result = map[pos]; // 如果名称相等 if (name.equals(result.name)) { return result; } } return null; } - 通配符匹配,也就是前缀匹配
先来看个例子


private final void internalMapWildcardWrapper
    (Wrapper[] wrappers, int nesting, CharChunk path,
     MappingData mappingData) {

    int pathEnd = path.getEnd();

    int lastSlash = -1;
    int length = -1;
    int pos = find(wrappers, path);
    if (pos != -1) {
        boolean found = false;
        while (pos >= 0) {
            if (path.startsWith(wrappers[pos].name)) {
                length = wrappers[pos].name.length();
                // path = /my
                // wrappers[pos].name  = /my 的情况
                if (path.getLength() == length) {
                    found = true;
                    break;
                // path = /my/MyServlet
                // wrappers[pos].name  = /my 的情况
                } else if (path.startsWithIgnoreCase("/", length)) {
                    found = true;
                    break;
                }
            }

            if (lastSlash == -1) {
                lastSlash = nthSlash(path, nesting + 1);
            } else {
                lastSlash = lastSlash(path);
            }
            path.setEnd(lastSlash);
            pos = find(wrappers, path);
        }
        path.setEnd(pathEnd);
        if (found) {
            mappingData.wrapperPath.setString(wrappers[pos].name);
            if (path.getLength() > length) {
                mappingData.pathInfo.setChars
                    (path.getBuffer(),
                     path.getOffset() + length,
                     path.getLength() - length);
            }
            mappingData.requestPath.setChars
                (path.getBuffer(), path.getOffset(), path.getLength());
            mappingData.wrapper = wrappers[pos].object;
            mappingData.jspWildCard = wrappers[pos].jspWildCard;
        }
    }
}
大家知道什么场景下,才会运行到加粗这一块代码。

假如配置两个url-pattern,分别为/my/*,和/my/a/*,此时访问/my/b ,而上面代码,大家可能觉得nesting这个变量默名其妙, 其实这个变量就是所有Servlet的url-pattern中,反斜杠最多的url-pattern的反斜杠值,如所有Servlet反斜杠最多的url-pattern为/my/a/b/c/*,那么nesting为4。 而这个方法的用意是什么呢?如Servlet的url-pattern为/my/*, /my/a/*,此时访问/my/b/d/e/f,经过第一轮查找后,没有找到合适的url-pattern, 而此时只需要截取出url为/my/b和两个url-pattern匹配,【为什么只截取出/my/b呢, 这也是为了提升性能的表现,因为你截取的url的反斜杠个数大于最大反斜杠,肯定匹配不上,所以从url截取到比nesting个数更多的反斜杠内容将变得没有意义,反而浪费性能】, 发现此时依然没有找到匹配的,再截取出/my和 两个url-pattern进行匹配,此时刚好和/my/*,匹配上,因此就找到了最适合的url-pattern。在看后缀名匹配时,先来看一个例子,在WEB应用的web.xml中配置如下。所有的.jsp都指向/aservlet.jsp
    AServlet
    /aservlet.jsp


    AServlet
    *.jsp
当访问http://localhost:8080/servelet-test-1.0/aaaaa.jsp时。得到extensionWrapper的内容如下。

我们知道*.jsp是我们自定义的,但.html和 .jspx又是哪来的呢?*.html来源于 ,web.xml中配置的jsp-property-group,如下所示

而*.jspx 来源于catalina.base/conf/web.xml中servlet-mapping。

当然啦,本来jsp也是指向默认的 jsp,但在启动StandardContext时,Tomcat默认配置catalina.base/conf/web.xml 被WEB下的/servelet-test-1.0/WEB-INF/web.xml配置覆盖。因此看到jsp指向我们自定义的/aservlet.jsp。
接下来看,基于后缀名查找源码实现。private final void internalMapExtensionWrapper(Wrapper[] wrappers, CharChunk path, MappingData mappingData, boolean resourceExpected) { char[] buf = path.getBuffer(); int pathEnd = path.getEnd(); int servletPath = path.getOffset(); int slash = -1; // 从后向前找第一个 '/' for (int i = pathEnd - 1; i >= servletPath; i--) { if (buf[i] == '/') { slash = i; break; } } // 从后向前,如果path中存在'/',则再从生向前找,找到第一个.逗号 // 如/aaa.jsp,是可行的 // 如果是./aaajsp,则不可行 if (slash >= 0) { int period = -1; for (int i = pathEnd - 1; i > slash; i--) { if (buf[i] == '.') { period = i; break; } } if (period >= 0) { // 设置path 路径的查找范围,如path=/aaa.jsp //而查找范围为0~4,则path的查找范围为/aaa path.setOffset(period + 1); path.setEnd(pathEnd); // 根据路径精确查找wrappers Wrapper wrapper = exactFind(wrappers, path); if (wrapper != null && (resourceExpected || !wrapper.resourceOnly)) { mappingData.wrapperPath.setChars(buf, servletPath, pathEnd - servletPath); mappingData.requestPath.setChars(buf, servletPath, pathEnd - servletPath); mappingData.wrapper = wrapper.object; } path.setOffset(servletPath); path.setEnd(pathEnd); } } }
Context容器是管道负责对请求进行Context 级别的处理,管道中包含了若干个不同的逻辑处理的阀门,其中一个基础阀门,它的主要处理逻辑是找到对应的Servlet 并将请求传递给它进行处理。
如图9.6所示 , Tomcat 中4种容器级别都包含了各自的管道对象,而Context 容器的管道即为图9.6中的StandardContext包含的管道 , Context 容器的管道默认以StandardContextValue 作为基础阀门,这个阀门主要的处理逻辑是判断请求是否访问了禁止目录,如WEB-INF 或META-INF目录 ,并向客户端发送通知报文 “HTTP/1.1 100-continue” ,最后调用了子容器wrapper 管道,请求就在这些不同的管道中流转,直到最后完成整个请求处理,每个容器的管道完成的工作都不一样,每个管道都要搭配阀门才能工作 。

Tomcat中按照包含关系一共有4个级别的容器,它们的标准实现分别为StandardEngine,StandardHost,StandardContext和StandardWrapper,请求对象及响应对象将分别被4个容器处理。 请求响应对象在4个容器之间通过官道机制进行传递,如图18.3所示,请求响应对象先通过StandardEngine的管道,期间经过若干个阀门处理,基础阀门StandardEngineValve,住下流转到StandardHost的管道,基础阀门为StandardHostValve,类似的,通过StandardContext最后,到StandardWrapper完成整个处理流程。
这种设计为每个容器带来了灵活的机制,可以按照需要对不同的容器添加自定义的阀门时行不同的的逻辑处理, 并且Tomcat将管道投机设置成可配置的形式,对于存在的阀门也只需要配置文件即可,还可以自定义并且配置阀门就可以在相应的作用域内生效,4个容器中,每个容器包含自己的管道对象,管道对象用于存放若干阀门对象,它们都有自己的基础阀门,且基础阀门是Tomcat默认设置的,一般不可更改,以免对运行产生影响 。Tomcat中定制阀门
管道机制给我们带来了更好的扩展性,Tomcat中, 在扩展性能方面具有如何体现便是本节的讨论的内容,从上一节了解到基础阀门是必须执行的,假如你需要一个额外的逻辑处理阀门,就可以添加一个非基础的阀门,。
例如,需求是对每个请求访问进行IP记录,输出到日志里面, 详细操作如下 。- 创建阀门
public class PrintIpValve extends ValveBase { @Override public void invoke(Request request, Response response) throws IOException, ServletException { System.out.println(request.getRemoteAddr()); getNext().invoke(request,response); } }-
在catalina.base/conf/server.xml的Host标签下添加阀门。

-
请求测试,打印出远程IP

上面只是基础的测试,如果想应用于生产,可以将PrintIPValue类编译成.class文件,可以导出一个jar包放入Tomcat安装目录的lib文件夹下,也可以直接将.class文件放入到Tomcat官方包catalina.jar中。
经过上面三个步骤配置阀门, 启动Tomcat后对其进行的任何请求访问的客户端的IP都将记录到日志中,除了自定义阀门以外, Tomcat 的开发者也十分友好,为我们提供了很长常用的阀门,对于这些阀门,我们就无法再自定义阀门类, 要做的仅仅是在server.xml中进行配置,常用的阀门包括下面这些。
-
AccessLogValve,请求访问日志的阀门,通过此阀门可以记录所有的客户端的访问日志,包括远程主机IP, 远程主机名,请求访问,请求协议,会话ID , 请求时间,处理时间,数据包大小,它提供了任意参数化的配置,可以通过任意组合来定制访问日志格式 。
-
JDBCAccessLogValve : 同样是记录访问日志的阀门, 但它有助于将访问日志通过JDBC持久化到数据库中。
-
ErrorReportValve,这是一个将错误的HTML格式输出到阀门。
-
PersistentValve : 这是对每个请求的会话实现持久化阀门。
-
RemoteAddrValve : 这是一个访问控制阀门, 通过配置可以决定哪些IP可以访问Web应用 。
-
RemoteHostValve . 这也是一个访问控制阀门,与RemoteAddrValve不同的是,它通过主机名限制访问者。
-
RemoteIPValve :这是一个针对代理或负载均衡处理的一个阀门, 一般经过代理或负载均衡转发的请求都将自己的IP 添加到请求头部“X-Forwarded-For” 中,此时,通过阀门可以获取访问者的真实IP .
-
SemaphoreValve : 这是一个控制容器上并发访问的阀门, 可以作用到不同的容器上,例如,如果放在Context中则整个上下文只允许若干个线程同时访问,并发访问数量可以自己配置。
Tomcat采用职责链模式来处理客户端请求,以提高Servlet容器的灵活性和可扩展性, Tomcat 定义了Pipeline(管道)和Valve(阀)两个接口,前者用于构造职责链,后者代表职责链上的每个处理器,由于Tomcat每一层Container均维护了一个Pipeline实现,因此我们可以在任何层添加Valve配置,以拦截客户端请求进行定制处理(如打印请求日志)与javax.servlet.Filter相比,Valve更靠近Servlet容器,而非Web应用,因此可以获得更多的信息,而且Valve可以添加到任意一级Container(如Host),便于针对服务器进行统一的处理,不像java.servlet.Filter仅限于单独的Web应用 。
Tomcat的每一级容器均提供了基础的Valve实现以完成当前容器的请求处理过程(如StandardHost对应的基础Valve实现为StandardHostValve),而且基础的Valve实现始终位于职责链的末尾,以确保最后执行。

从图中我们可以知道,每一级Container的基础Valve在完成自身的处理的情况下,同时还要确保下一级Container的Valve链的执行,而且由于“请求映射”过程已经将映射结果保存于请求的对象中, 因此Valve直接从请求中获取下级的Container即可。
在StandardWrapperValve中(由于Wrapper为最低一级的Contaier,且该Valve处于职责链末端,因此它始终最后执行),Tomcat构造FilterChain实例完成javax.servlet.Filter责任链执行,并执行Servlet.service()方法将请求交给应用程序进行分发处理(如果采用了如Spring MVC 等Web 框架的话,Servlet会进一步根据应用程序内部配置将请求交由给对应的控制器处理)先来分析StandardEngine,StandardHost,StandardContext,StandardWrapper的StandardXXXValve何时初始化 。
-
StandardEngine

-
StandardHost

-
StandardContext

-
StandardWrapper

在StandardEngine,StandardHost,StandardContext,StandardWrapper的构造函数中设置了basic 的Valve,分别为StandardEngineValve, StandardHostValve, StandardContextValve, StandardWrapperValve 。 我们又要想另外一个问题, 从9.6图中,为什么XXXValve排在了管道的最未端呢?请看StandardPipeline的AddValve()方法 。
public void addValve(Valve valve) {

    // Validate that we can add this Valve
    if (valve instanceof Contained)
        ((Contained) valve).setContainer(this.container);

    // Start the new component if necessary
    if (getState().isAvailable()) {
        if (valve instanceof Lifecycle) {
            try {
                ((Lifecycle) valve).start();
            } catch (LifecycleException e) {
                log.error("StandardPipeline.addValve: start: ", e);
            }
        }
    }

    // Add this Valve to the set associated with this Pipeline
    if (first == null) {
        first = valve;
        valve.setNext(basic);
    } else {
        Valve current = first;
        while (current != null) {
            if (current.getNext() == basic) {
                current.setNext(valve);
                valve.setNext(basic);
                break;
            }
            current = current.getNext();
        }
    }

    container.fireContainerEvent(Container.ADD_VALVE_EVENT, valve);
}
从上面加粗代码可以得知,每添加一个Valve,则会将Valve添加到basic前面,因此basic只能在管道的最末端。 接下来看connector.getService().getContainer().getPipeline().getFirst().invoke(
request, response);这行代码 。 获取到connector的Service,不就是StandardService,StandardService的container不就是StandardEngine不? 这里其实是获取StandardEngine的Pipeline的first,再调用其invoke()方法 。 而默认情况下,StandardEngine的Pipeline的first为StandardEngineValve。

进入StandardEngineValve的invoke()方法 。StandardEngineValve
public final void invoke(Request request, Response response)
    throws IOException, ServletException {

    // Select the Host to be used for this Request
    Host host = request.getHost();
    if (host == null) {
        response.sendError
            (HttpServletResponse.SC_BAD_REQUEST,
             sm.getString("standardEngine.noHost",
                          request.getServerName()));
        return;
    }

    if (request.isAsyncSupported()) {
        request.setAsyncSupported(host.getPipeline().isAsyncSupported());
    }

    // Ask this Host to process this request
    host.getPipeline().getFirst().invoke(request, response);

}
如果StandardEngine的Pipeline支持异步,那需要判断Host的Pipeline是否支持异步,如果不支持,则request的asyncSupported字段依然为false,因此如果想支持异步,那么StandardEngine,StandardHost,StandardContext,StandardWrapper的Pipeline都要支持异步才行。
接下来进入host的Pipeline的First的Valve 中。ErrorReportValve
请先看catalina.base/conf/server.xml的Host配置文件。
因此默认情况下,根据之前的addValve()方法规则,因此StandardHost中的第一个Valve为ErrorReportValve,第二个Valve为AccessLogValve,第三个才是StandardHostValve。 先来看ErrorReportValve的实现。
public void invoke(Request request, Response response) throws IOException, ServletException {

    // Perform the request
    getNext().invoke(request, response);

    if (response.isCommitted()) {
        if (response.setErrorReported()) {
            // Error wasn't previously reported but we can't write an error
            // page because the response has already been committed. Attempt
            // to flush any data that is still to be written to the client.
            try {
                response.flushBuffer();
            } catch (Throwable t) {
                ExceptionUtils.handleThrowable(t);
            }
            // Close immediately to signal to the client that something went
            // wrong

            response.getCoyoteResponse().action(ActionCode.CLOSE_NOW,
                    request.getAttribute(RequestDispatcher.ERROR_EXCEPTION));
        }
        return;
    }

    Throwable throwable = (Throwable) request.getAttribute(RequestDispatcher.ERROR_EXCEPTION);

    // If an async request is in progress and is not going to end once this
    // container thread finishes, do not process any error page here.

    if (request.isAsync() && !request.isAsyncCompleting()) {
        return;
    }

    if (throwable != null && !response.isError()) {
        // Make sure that the necessary methods have been called on the
        // response. (It is possible a component may just have set the
        // Throwable. Tomcat won't do that but other components might.)
        // These are safe to call at this point as we know that the response
        // has not been committed.
        response.reset();
        response.sendError(HttpServletResponse.SC_INTERNAL_SERVER_ERROR);
    }

    // One way or another, response.sendError() will have been called before
    // execution reaches this point and suspended the response. Need to
    // reverse that so this valve can write to the response.
    response.setSuspended(false);

    try {
        report(request, response, throwable);
    } catch (Throwable tt) {
        ExceptionUtils.handleThrowable(tt);
    }
}
可以看到,ErrorReportValve并不急着立即处理,而是等所有的管道执行完后再来处理,如果response已经提交,并且没有错误报告,则直接返回,如果有错误报告,但response已经提交,则尝试刷新仍要写入客户端的任何数据,如果非异步,并且response也没有提交,则将错误信息封装成错误页面返回给前端,在之前的博客已经分析过report()方法,这里不深入,也就知道ErrorReportValve调用了 getNext().invoke(request, response);方法,等其他所有的管道处理完之后,再来执行ErrorReportValve后面的业务逻辑。
AccessLogValve
AccessLogValve好像什么业务逻辑也没有实现。 只是调用了下一个Valve的invoke()方法
public void invoke(Request request, Response response) throws IOException,
        ServletException {
    getNext().invoke(request, response);
}
StandardHostValve
接下来看StandardHostValve的invoke()方法
public final void invoke(Request request, Response response) throws IOException, ServletException { // Select the Context to be used for this Request Context context = request.getContext(); if (context == null) { response.sendError (HttpServletResponse.SC_INTERNAL_SERVER_ERROR, sm.getString("standardHost.noContext")); return; } // Bind the context CL to the current thread if( context.getLoader() != null ) { // Not started - it should check for availability first // This should eventually move to Engine, it's generic. if (Globals.IS_SECURITY_ENABLED) { PrivilegedActionpa = new PrivilegedSetTccl( context.getLoader().getClassLoader()); AccessController.doPrivileged(pa); } else { // 设置当前线程的类加载器为StandardContext的类加载器 // WebappClassLoader,例如 用于JNDI Thread.currentThread().setContextClassLoader (context.getLoader().getClassLoader()); } } if (request.isAsyncSupported()) { request.setAsyncSupported(context.getPipeline().isAsyncSupported()); } boolean asyncAtStart = request.isAsync(); boolean asyncDispatching = request.isAsyncDispatching(); // 如果配置了ServletRequestListener监听器,则调用其requestInitialized方法, // 一般只要不抛出异常,fireRequestInitEvent()方法的返回结果都为true if (asyncAtStart || context.fireRequestInitEvent(request.getRequest())) { // Ask this Context to process this request. Requests that are in // async mode and are not being dispatched to this resource must be // in error and have been routed here to check for application // defined error pages. try { if (!asyncAtStart || asyncDispatching) { context.getPipeline().getFirst().invoke(request, response); } else { // Make sure this request/response is here because an error // report is required. if (!response.isErrorReportRequired()) { throw new IllegalStateException(sm.getString("standardHost.asyncStateError")); } } } catch (Throwable t) { ExceptionUtils.handleThrowable(t); container.getLogger().error("Exception Processing " + request.getRequestURI(), t); // If a new error occurred while trying to report a previous // error allow the original error to be reported. if (!response.isErrorReportRequired()) { request.setAttribute(RequestDispatcher.ERROR_EXCEPTION, t); throwable(request, response, t); } } // Now that the request/response pair is back under container // control lift the suspension so that the error handling can // complete and/or the container can flush any remaining data response.setSuspended(false); Throwable t = (Throwable) request.getAttribute(RequestDispatcher.ERROR_EXCEPTION); // Protect against NPEs if the context was destroyed during a // long running request. if (!context.getState().isAvailable()) { return; } // Look for (and render if found) an application level error page if (response.isErrorReportRequired()) { if (t != null) { throwable(request, response, t); } else { status(request, response); } } if (!request.isAsync() && !asyncAtStart) { // 如果配置了ServletRequestListener方法,则调用其requestDestroyed方法 context.fireRequestDestroyEvent(request.getRequest()); } } // Access a session (if present) to update last accessed time, based on a // strict interpretation of the specification if (ACCESS_SESSION) { request.getSession(false); } // Restore the context classloader if (Globals.IS_SECURITY_ENABLED) { PrivilegedAction pa = new PrivilegedSetTccl( StandardHostValve.class.getClassLoader()); AccessController.doPrivileged(pa); } else { // 恢复当前线程的类加载器为common类加载器 Thread.currentThread().setContextClassLoader (StandardHostValve.class.getClassLoader()); } } 接着进入StandardContext的管道,而StandardContext默认的第一个Valve为NonLoginAuthenticator。
-
相关阅读:
LCR 026. 重排链表
centos 6使用yum安装软件
深度学习参数初始化(一)Xavier初始化 含代码
【MySQL】21-MySQL之增删改
Spring Data JPA - Web 支持、使用Pageable 参数Thymeleaf 视图进行搜索/过滤、排序和分页
C++面向对象编程题 第12题
PCL入门(一):ubuntu20使用apt安装pcl
DAY9-深度学习100例-循环神经网络(RNN)实现股票预测
Bumptop——3D桌面一键get
【C++ 番外】【指针】数组类型的指针,指向数组的指针,数组的元素是指针,这个视频说明白。数组和指针
- 原文地址:https://blog.csdn.net/quyixiao/article/details/125623524