-
深入解读Java SPI,还有谁不会?
一、SPI 简介&示例
1.1 SPI简介
SPI是Java提供的支持第三方实现或扩展接口的机制,全称Service Provider Loader。传统的API调用方无权选择接口的实现,只能按照接口提供方的实现进行调用,有了SPI提供方就可以将实现外放给调用方,大大增加了模块的扩展性,可插拔性。
1.2 Java SPI 实现要素:
SPI 接口: 定义标准接口,这也是Java的厉害之处,定义好了各种标准
SPI实现: 实现标准接口,不同厂商可以有不同实现
SPI配置: 在META-INF/services目录下,创建文件名为接口全限定类名的文件,内容为各个实现类的全限定类名
SPI加载: 使用ServiceLoader加载SPI配置服务,这是SPI的核心所在,本质就是类加载。
1.3 SPI接口定义
我们先来搞一套自己的SPI看看,按照上面的步骤,首先定义一个标准的接口
package com.star.spi.hello; public interface IHelloService { String sayHi(String name); }- 1
- 2
- 3
- 4
1.4 SPI接口实现
下面我们模拟两个实现,一个用来模拟Java语言,一个用来模拟Python
package com.star.spi.hello; public class JavaHelloService implements IHelloService { @Override public String sayHi(String name) { return String.format("hello %s from java !", name); } } package com.star.spi.hello; public class Py3HelloService implements IHelloService { @Override public String sayHi(String name) { return String.format("hello %s from python3 !", name); } }- 1
- 2
- 3
- 4
- 5
- 6
- 7
- 8
- 9
- 10
- 11
- 12
- 13
- 14
1.5 SPI配置
要想使用Java SPI,就要遵循相应的规则。在项目中创建META-INF/services目录,文件名为接口的全限定类名: com.star.spi.hello.IHelloService,内容为实现类的全限定类名
com.star.spi.hello.Py3HelloService com.star.spi.hello.JavaHelloService- 1
- 2
1.6 SPI加载
用起来就比较简单了,ServiceLoader默默实现了一切
package com.star.spi.hello; import java.util.ServiceLoader; public class HelloSpi { public static void main(String[] args) { ServiceLoader<IHelloService> serviceLoader = ServiceLoader.load(IHelloService.class); serviceLoader.forEach(item -> System.out.println(item.sayHi("spi"))); } }- 1
- 2
- 3
- 4
- 5
- 6
- 7
- 8
- 9
- 10
- 11
控制台输出
hello spi from python3 ! hello spi from java !- 1
- 2
二、SPI 源码解读
上面我们已经将SPI跑起来了,可以看到SPI的使用关键在于ServiceLoader,本质上还是个类加载器,根据外部配置加载目标实现类。下面一起看下它的内部工作机制,是如何解析加载的。
2.1 ServiceLoader一览
package java.util; public final class ServiceLoader<S> implements Iterable<S> private static final String PREFIX = "META-INF/services/"; // The class or interface representing the service being loaded private final Class<S> service; // The class loader used to locate, load, and instantiate providers private final ClassLoader loader; // The access control context taken when the ServiceLoader is created private final AccessControlContext acc; // Cached providers, in instantiation order private LinkedHashMap<String,S> providers = new LinkedHashMap<>(); // The current lazy-lookup iterator private LazyIterator lookupIterator;- 1
- 2
- 3
- 4
- 5
- 6
- 7
- 8
- 9
- 10
- 11
- 12
- 13
- 14
- 15
- 16
- 17
- 18
- 19
- 20
- 21
2.2 ServiceLoader加载SPI
2.2.1 静态load方法
先来看下入口load函数,使用当前线程类加载器,加载限定的接口或抽象类
public static <S> ServiceLoader<S> load(Class<S> service) { ClassLoader cl = Thread.currentThread().getContextClassLoader(); return ServiceLoader.load(service, cl); } public static <S> ServiceLoader<S> load(Class<S> service, ClassLoader loader){ return new ServiceLoader<>(service, loader); }- 1
- 2
- 3
- 4
- 5
- 6
- 7
- 8
2.2.2 构造方法
可以看到上面代码最后一步创建了新的ServiceLoader对象,接下来进入该构造方法,可以看到关键一步reload方法,首先清空了缓存,接着进行懒加载
private ServiceLoader(Class<S> svc, ClassLoader cl) { service = Objects.requireNonNull(svc, "Service interface cannot be null"); loader = (cl == null) ? ClassLoader.getSystemClassLoader() : cl; acc = (System.getSecurityManager() != null) ? AccessController.getContext() : null; reload(); } public void reload() { providers.clear(); lookupIterator = new LazyIterator(service, loader); }- 1
- 2
- 3
- 4
- 5
- 6
- 7
- 8
- 9
- 10
2.2.3 迭代器
ServiceLoader本身实现了Iterator接口,在iterator函数里,如果provider中已经有缓存,则直接返回该对象(LinkedHashMap)的迭代器,否则使用上面创建的懒加载迭代器进行迭代。
public Iterator<S> iterator() { return new Iterator<S>() { Iterator<Map.Entry<String,S>> knownProviders = providers.entrySet().iterator(); public boolean hasNext() { if (knownProviders.hasNext()) return true; return lookupIterator.hasNext(); } public S next() { if (knownProviders.hasNext()) return knownProviders.next().getValue(); return lookupIterator.next(); } public void remove() { throw new UnsupportedOperationException(); } }; }- 1
- 2
- 3
- 4
- 5
- 6
- 7
- 8
- 9
- 10
- 11
- 12
- 13
- 14
- 15
- 16
- 17
- 18
- 19
- 20
2.2.4 LazyIterator
LazyIterator自身也是一个迭代器,用于真正去加载实现类,使用类加载器去指定目录加载全限定类名,然后通过反射创建实例,创建完成后放入缓存之中
private boolean hasNextService() { if (nextName != null) { return true; } if (configs == null) { try { // 目标实现类 String fullName = PREFIX + service.getName(); if (loader == null) configs = ClassLoader.getSystemResources(fullName); else configs = loader.getResources(fullName); } catch (IOException x) { fail(service, "Error locating configuration files", x); } } while ((pending == null) || !pending.hasNext()) { if (!configs.hasMoreElements()) { return false; } // 解析实现类名 pending = parse(service, configs.nextElement()); } nextName = pending.next(); return true; } private S nextService() { if (!hasNextService()) throw new NoSuchElementException(); String cn = nextName; nextName = null; Class<?> c = null; try { // 返回目标类 c = Class.forName(cn, false, loader); } catch (ClassNotFoundException x) { fail(service, "Provider " + cn + " not found"); } if (!service.isAssignableFrom(c)) { fail(service, "Provider " + cn + " not a subtype"); } try { // 实例化实现类 S p = service.cast(c.newInstance()); // 放入缓存 providers.put(cn, p); return p; } catch (Throwable x) { fail(service, "Provider " + cn + " could not be instantiated", x); } throw new Error(); // This cannot happen }- 1
- 2
- 3
- 4
- 5
- 6
- 7
- 8
- 9
- 10
- 11
- 12
- 13
- 14
- 15
- 16
- 17
- 18
- 19
- 20
- 21
- 22
- 23
- 24
- 25
- 26
- 27
- 28
- 29
- 30
- 31
- 32
- 33
- 34
- 35
- 36
- 37
- 38
- 39
- 40
- 41
- 42
- 43
- 44
- 45
- 46
- 47
- 48
- 49
- 50
- 51
- 52
- 53
- 54
- 55
- 56
2.3 类加载器说明
细心的朋友应该已经发现了,上面的类加载过程中,使用的是当前线程的类加载器。这里说明下,因为双亲委派机制,SPI位于核心库,由Bootstrap类加载器负责加载,Bootstrap无法加载SPI实现类,实现类只能由App类加载器加载。
三、SPI 常见应用
3.1 SPI之数据库驱动
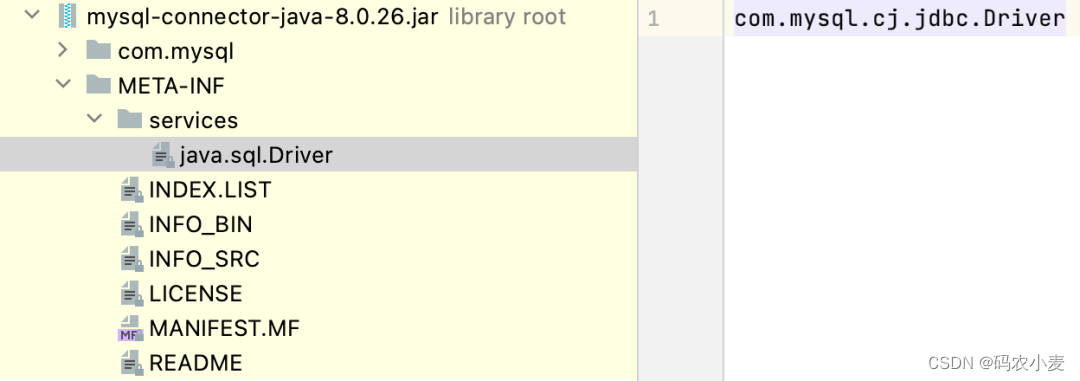
Java只提供了标准的数据驱动接口,实现是由不同的数据库厂商完成的,标准的驱动器接口是: java.sql.Driver,可以看下mysql的驱动包

可以看到使用的就是标准的Java SPI,所以我们获取数据库连接只需要简单的一行代码
DriverManager.getConnection("", "", ""); 可以看到DriverManager一上来就执行了静态代码块,进行驱动初始化 static { loadInitialDrivers(); println("JDBC DriverManager initialized"); }- 1
- 2
- 3
- 4
- 5
- 6
- 7
接着使用SPI技术加载了Driver.class,这样Mysql就被扫描上了
ServiceLoader<Driver> loadedDrivers = ServiceLoader.load(Driver.class); Iterator<Driver> driversIterator = loadedDrivers.iterator(); 所以在getConnection方法时,已经拿到了已注册的驱动 for(DriverInfo aDriver : registeredDrivers) {...}- 1
- 2
- 3
- 4
- 5
registeredDrivers在Mysql Driver被SPI加载时,便自己注册进来了,完美配合将厂商的实现类,注册到了Java的标准中
package com.mysql.cj.jdbc; import java.sql.DriverManager; import java.sql.SQLException; public class Driver extends NonRegisteringDriver implements java.sql.Driver { public Driver() throws SQLException { } static { try { DriverManager.registerDriver(new Driver()); } catch (SQLException var1) { throw new RuntimeException("Can't register driver!"); } } }- 1
- 2
- 3
- 4
- 5
- 6
- 7
- 8
- 9
- 10
- 11
- 12
- 13
- 14
- 15
- 16
以上就是数据库驱动使用SPI加载的过程,简洁明了,干净利落
3.2 SPI之SpringBoot
下面继续看下SpringBoot中SPI的应用,SpringBoot之所以简便,就是因为它帮我们做了很多自动化装配的事情。我们先从启动类入手
@SpringBootApplication public class App {...} 一个注解就能搞定一切?这只是表面,继续进入该注解看下 @SpringBootConfiguration @EnableAutoConfiguration EnableAutoConfiguration中又包含了新的注解 @AutoConfigurationPackage @Import(AutoConfigurationImportSelector.class) public @interface EnableAutoConfiguration {}- 1
- 2
- 3
- 4
- 5
- 6
- 7
- 8
- 9
- 10
- 11
其中@AutoConfigurationPackage会把它修饰的类所在包作为跟路径,这就是为什么启动类通常置于根路径下的原因。
接着进入AutoConfigurationImportSelector,因为这里直接Import了该类
protected List<String> getCandidateConfigurations(AnnotationMetadata metadata, AnnotationAttributes attributes) { List<String> configurations = SpringFactoriesLoader.loadFactoryNames(getSpringFactoriesLoaderFactoryClass(), getBeanClassLoader()); Assert.notEmpty(configurations, "No auto configuration classes found in META-INF/spring.factories. If you " + "are using a custom packaging, make sure that file is correct."); return configurations; } private static Map<String, List<String>> loadSpringFactories(ClassLoader classLoader) { Map<String, List<String>> result = (Map)cache.get(classLoader); if (result != null) { return result; } else { HashMap result = new HashMap(); try { Enumeration urls = classLoader.getResources("META-INF/spring.factories"); ... }- 1
- 2
- 3
- 4
- 5
- 6
- 7
- 8
- 9
- 10
- 11
- 12
- 13
- 14
- 15
- 16
- 17
- 18
- 19
- 20
可以看到关键的加载方法,加载路径META-INF/spring.factories,在该文件中使用key,value的形式保存,通过加载该文件下的全限定类名就可以实现自动化装配了,那具体是如何串联起来工作的呢?
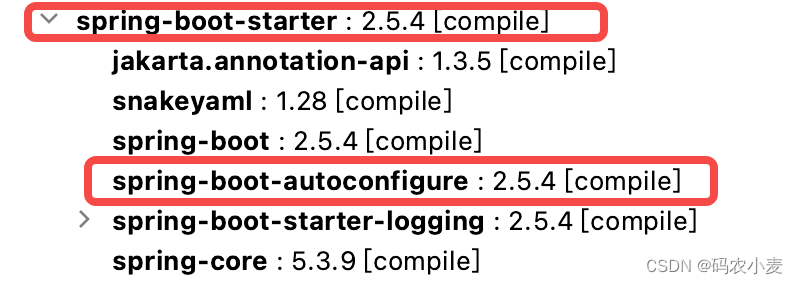
所有SpringBoot的依赖starter都会依赖spring-boot-starter包,这个包又会依赖spring-boot-autoconfigure包

在加载实例化过程中再根据各种配置条件@ConditionalXXX就可以智能化的完成自动装配任务了。
不知不觉写多了,有关Dubbo的SPI介绍下一篇搞起吧,算是Java SPI的扩展吧,但SPI的思想并没有改变。
-
相关阅读:
Spring简介
智云通CRM:CRM数据库在经营客户中有什么作用?
期货开户需要具备⼀定的条件
.Net Core 如何数据导出 Excel?(EPPlus->OfficeOpenXml 实现固定列和动态列导出)
GeneralUpdate20220323里程碑版本发布
基础 | 并发编程 - [导论 & volatile]
Spring容器&Bean生命周期常见接口
基于Matlab创建跟踪场景、模拟目标运动和模拟雷达检测仿真(附源码)
ffmpeg 开发笔记
1686. 石子游戏 VI
- 原文地址:https://blog.csdn.net/weixin_43275277/article/details/127860132
