-
【笑小枫的SpringBoot系列】【十四】SpringBoot发送邮件
本文简介
本文主要介绍了使用SpringBoot发送邮件,主要包含如何获取发送邮件的授权码,这里以QQ邮箱为例,然后介绍了功能如何实现,包括通过模板发送邮件,发送带图片的邮件,发送带附件的邮件,发送带有多个附件的邮件。
获取SMTP授权码
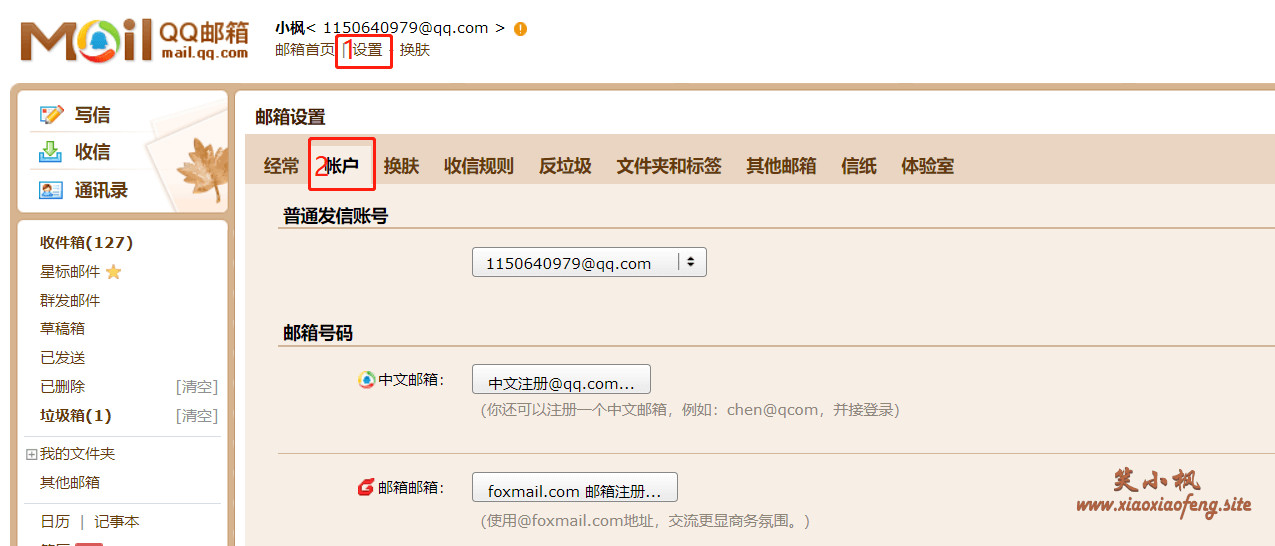
使用SPringBoot发送邮件呢,首先需要发送邮件的地址开通SMTP服务,并获取到对应的授权码,接下来就以QQ邮箱为例,简单的介绍一下怎么可通SMTP,并且获取到授权码值。具体操作如下图所示:
- 首先登录QQ邮箱网页版,然后在设置里面找到账户
- 可以看到下图中的一堆服务,我们只要开通SMTP服务即可。
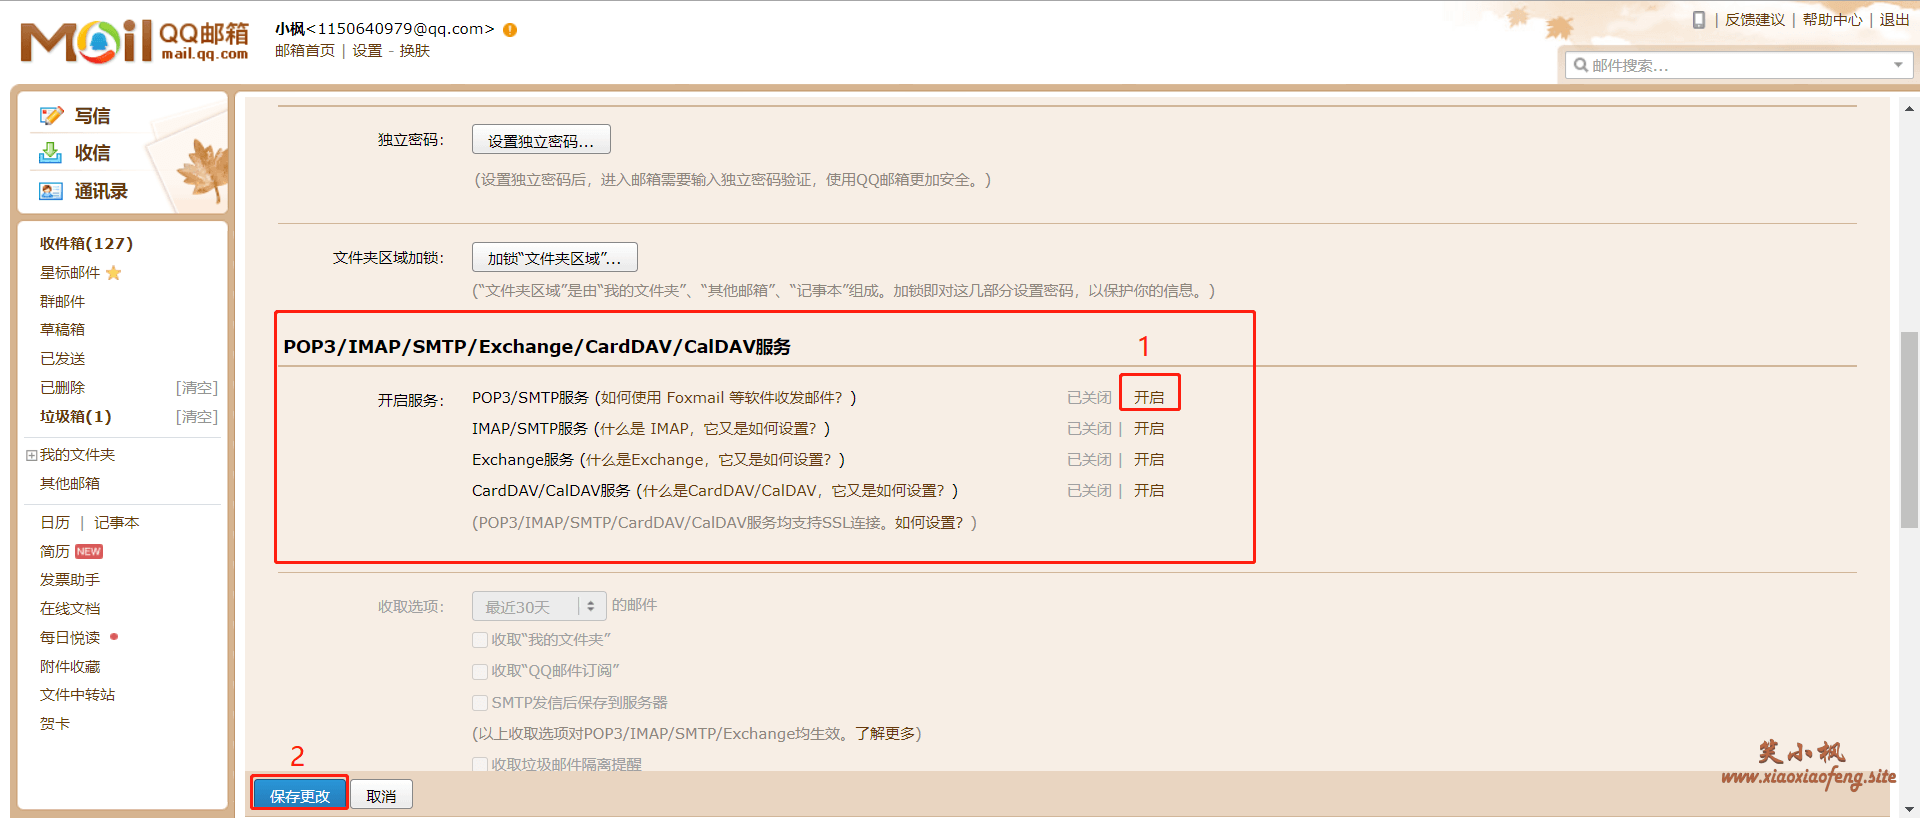
- QQ邮箱开通SMTP服务需要使用密保手机发送短信码验证,我在发送的时候,提示
1069070069这个号码已关闭服务,可以发送下面的10690329021269。

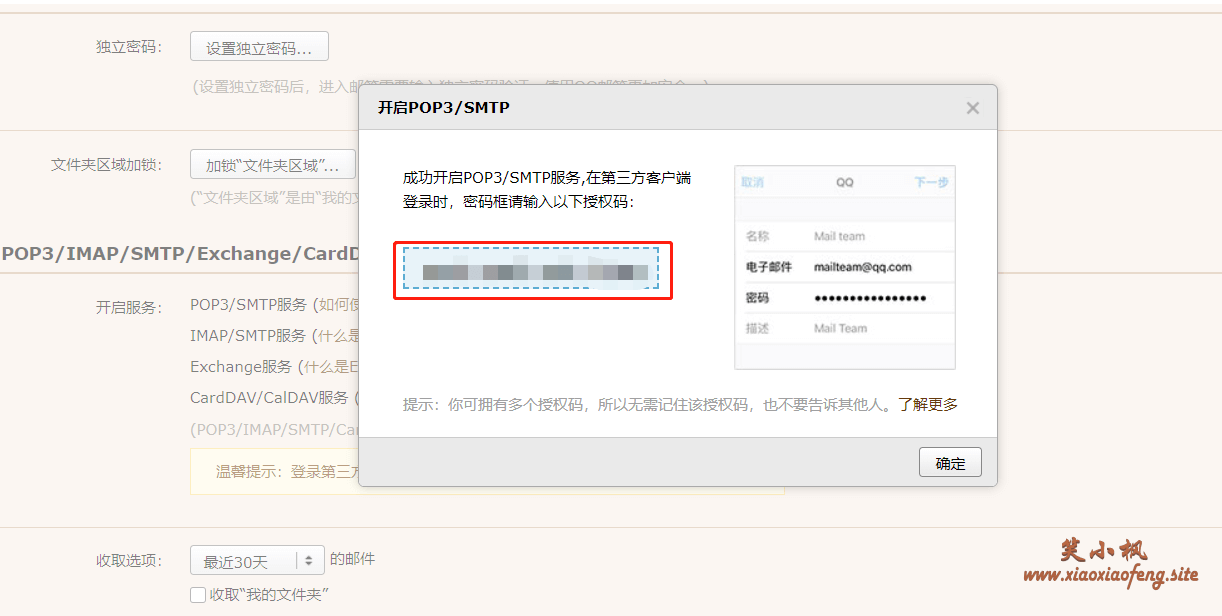
- 验证成功后,可以看到对应的授权码,我们复制出来,留着备用。😺
发送邮件功能实现
上面我们已经获取到QQ邮箱的STMP服务的授权码,接下来我们看看怎么实现功能。
- pom.xml添加引用
<dependency> <groupId>org.springframework.bootgroupId> <artifactId>spring-boot-starter-thymeleafartifactId> dependency> <dependency> <groupId>org.springframework.bootgroupId> <artifactId>spring-boot-starter-mailartifactId> dependency>- 1
- 2
- 3
- 4
- 5
- 6
- 7
- 8
- 9
- 10
- 11
- 配置发送邮件的application
spring mail: default-encoding: UTF-8 host: smtp.qq.com username: 你的邮箱地址 password: 你的授权码 port: 22 protocol: smtp properties: mail: smtp: ssl: enable: true socketFactory: port: 465 class: javax.net.ssl.SSLSocketFactory- 1
- 2
- 3
- 4
- 5
- 6
- 7
- 8
- 9
- 10
- 11
- 12
- 13
- 14
- 15
- 16
这里的配置文件是以QQ邮箱的为例,如果是其他的邮箱,可以参考表格里的SMTP服务器地址和对应的端口号。
邮箱类型 SMTP服务器地址 端口号 QQ邮箱 smtp.qq.com 465或587 sina邮箱 smtp.sina.cn 465或587 126邮箱 smtp.126.com 465或994 aliyun邮箱 smtp.aliyun.com 465或994 163邮箱 smtp.163.com 465或994 yeah邮箱 smtp.yeah.net 465或994 - 在
config.bean包下编写发送邮件类EmailBean.java👇
package com.maple.demo.config.bean; import lombok.AllArgsConstructor; import lombok.Builder; import lombok.Data; import lombok.RequiredArgsConstructor; import org.thymeleaf.context.Context; import java.util.List; /** * @author 笑小枫 * @date 2022/7/22 */ @Data @Builder @AllArgsConstructor @RequiredArgsConstructor public class EmailBean { /** * 填充内容 */ private Context context; /** * 使用模板,和text互斥,优先使用模板,模板不存在发送text内容 */ private String templateName; /** * 发送给谁 */ private String toUser; /** * 抄送给谁 */ private String[] ccUser; /** * 邮件主体 */ private String subject; /** * 邮件内容,和templateName互斥,优先使用模板,模板不存在发送text内容 */ private String text; /** * 附件列表 */ private List<String> attachmentList; }- 1
- 2
- 3
- 4
- 5
- 6
- 7
- 8
- 9
- 10
- 11
- 12
- 13
- 14
- 15
- 16
- 17
- 18
- 19
- 20
- 21
- 22
- 23
- 24
- 25
- 26
- 27
- 28
- 29
- 30
- 31
- 32
- 33
- 34
- 35
- 36
- 37
- 38
- 39
- 40
- 41
- 42
- 43
- 44
- 45
- 46
- 47
- 48
- 49
- 50
- 51
- 52
- 53
- 54
- 在
util包下编写邮件的工具类EmailUtil.java👇
package com.maple.demo.util; import com.maple.demo.config.bean.EmailBean; import lombok.RequiredArgsConstructor; import org.apache.commons.lang3.StringUtils; import org.springframework.beans.factory.annotation.Value; import org.springframework.core.io.FileSystemResource; import org.springframework.mail.javamail.JavaMailSender; import org.springframework.mail.javamail.MimeMessageHelper; import org.springframework.scheduling.annotation.Async; import org.springframework.stereotype.Service; import org.thymeleaf.TemplateEngine; import javax.mail.MessagingException; import javax.mail.internet.MimeMessage; /** * @author 笑小枫 * @date 2022/7/22 */ @Service @RequiredArgsConstructor public class EmailUtil { private final JavaMailSender mailSender; private final TemplateEngine templateEngine; @Value("${spring.mail.username}") private String from; @Async public void sendEmail(EmailBean emailBean) { try { // 解决附件名称过长导致的附件名称乱码问题 System.setProperty("mail.mime.splitlongparameters", "false"); // 定义邮件信息 MimeMessage message = mailSender.createMimeMessage(); MimeMessageHelper helper; helper = new MimeMessageHelper(message, true); helper.setFrom(from); helper.setTo(emailBean.getToUser()); helper.setSubject(emailBean.getSubject()); if (emailBean.getCcUser() != null && emailBean.getCcUser().length > 0) { helper.setCc(emailBean.getCcUser()); } // 如果存在模板,定义邮件模板中的内容,context的内容对应email.html的${project}占位的内容 if (emailBean.getContext() != null && StringUtils.isNotBlank(emailBean.getTemplateName())) { String emailContent = templateEngine.process(emailBean.getTemplateName(), emailBean.getContext()); helper.setText(emailContent, true); } else { helper.setText(emailBean.getText()); } // 如果存在附件,定义邮件的附件 if (emailBean.getAttachmentList() != null && !emailBean.getAttachmentList().isEmpty()) { for (String attachment : emailBean.getAttachmentList()) { FileSystemResource file = new FileSystemResource(attachment); if (StringUtils.isNotBlank(file.getFilename())) { helper.addAttachment(file.getFilename(), file); } } } mailSender.send(message); } catch (MessagingException e) { e.printStackTrace(); } } }- 1
- 2
- 3
- 4
- 5
- 6
- 7
- 8
- 9
- 10
- 11
- 12
- 13
- 14
- 15
- 16
- 17
- 18
- 19
- 20
- 21
- 22
- 23
- 24
- 25
- 26
- 27
- 28
- 29
- 30
- 31
- 32
- 33
- 34
- 35
- 36
- 37
- 38
- 39
- 40
- 41
- 42
- 43
- 44
- 45
- 46
- 47
- 48
- 49
- 50
- 51
- 52
- 53
- 54
- 55
- 56
- 57
- 58
- 59
- 60
- 61
- 62
- 63
- 64
- 65
- 66
- 67
- 68
- 69
- 70
- 71
- 72
-
配置发送邮件的模板
在resources目录下创建templates目录。创建email.html模板。这里可以根据自己的需求配置html页面,这种方式是通过配置thymeleaf模板的形式进行发送,如果直接可以发送文本内容即可,则不用配置。
如果配置的模版比较多,且经常变动或者由业务人员配置,可以直接添加一张邮件模版配置表,前端通过富文本的形式进行页面配置,然后取邮件模版的配置表内容即可。相对复杂一些,这里只说一下思路,不再进行演示,有什么疑问可以留言或者联系我。
DOCTYPE html> <html lang="en" xmlns:th="http://www.thymeleaf.org"> <head> <title>xiaoxiaofengtitle> <style> body { text-align: center; margin-left: auto; margin-right: auto; } #main { text-align: center; } style> head> <body> <div id="main"> <h3>欢迎使用 <span th:text="${project}">span>h3> 您的验证码是:<h2><span th:text="${code}">span>h2> <span>本站由<a href="https://www.xiaoxiaofeng.com" target="_blank">笑小枫(https://www.xiaoxiaofeng.com)a>提供技术支持span> div> body> html>- 1
- 2
- 3
- 4
- 5
- 6
- 7
- 8
- 9
- 10
- 11
- 12
- 13
- 14
- 15
- 16
- 17
- 18
- 19
- 20
- 21
- 22
- 23
功能测试
编写一个发送邮件的掩饰controller,主要演示两种模式发送邮件
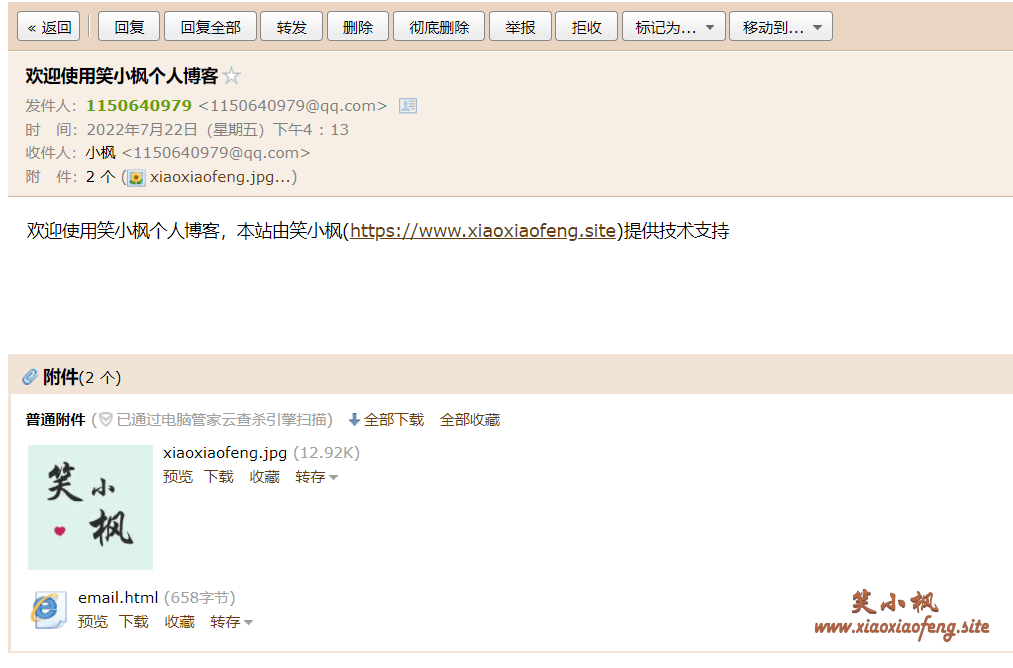
- 通过纯文本发送邮件,包含附件
- 通过html模版发送邮件
package com.maple.demo.controller; import com.maple.demo.config.bean.EmailBean; import com.maple.demo.util.EmailUtil; import io.swagger.annotations.Api; import io.swagger.annotations.ApiOperation; import lombok.AllArgsConstructor; import org.springframework.web.bind.annotation.PostMapping; import org.springframework.web.bind.annotation.RequestMapping; import org.springframework.web.bind.annotation.RestController; import org.thymeleaf.context.Context; import java.util.ArrayList; import java.util.List; /** * @author 笑小枫 * @date 2022/7/22 */ @RestController @AllArgsConstructor @RequestMapping("/example") @Api(tags = "实例演示-发送邮件") public class TestSendEmailController { private final EmailUtil emailUtil; @PostMapping("/sendEmailText") @ApiOperation(value = "发送纯文本带附件的邮件") public void sendEmailText(String text) { List<String> attachmentList = new ArrayList<>(); // 定义绝对路径 attachmentList.add("D:\\xiaoxiaofeng.jpg"); // 定义相对路径 attachmentList.add("src/main/resources/templates/email.html"); EmailBean emailBean = EmailBean.builder() .text(text) .subject("欢迎使用笑小枫个人博客") .toUser("1150640979@qq.com") .attachmentList(attachmentList) .build(); emailUtil.sendEmail(emailBean); } @PostMapping("/sendEmailTemplate") @ApiOperation(value = "根据html模板发送验证码邮件") public void sendEmailTemplate() { Context context = new Context(); context.setVariable("project", "笑小枫个人博客"); // 生成6位数字验证码 String code = String.valueOf((int) (Math.random() * 900000 + 100000)); context.setVariable("code", code); EmailBean emailBean = EmailBean.builder() .context(context) .templateName("email") .subject("笑小枫发送验证码") .toUser("1150640979@qq.com") .build(); emailUtil.sendEmail(emailBean); } }- 1
- 2
- 3
- 4
- 5
- 6
- 7
- 8
- 9
- 10
- 11
- 12
- 13
- 14
- 15
- 16
- 17
- 18
- 19
- 20
- 21
- 22
- 23
- 24
- 25
- 26
- 27
- 28
- 29
- 30
- 31
- 32
- 33
- 34
- 35
- 36
- 37
- 38
- 39
- 40
- 41
- 42
- 43
- 44
- 45
- 46
- 47
- 48
- 49
- 50
- 51
- 52
- 53
- 54
- 55
- 56
- 57
- 58
- 59
- 60
- 61
- 62
- 63
- 64
使用我们的接口服务平台进行调用
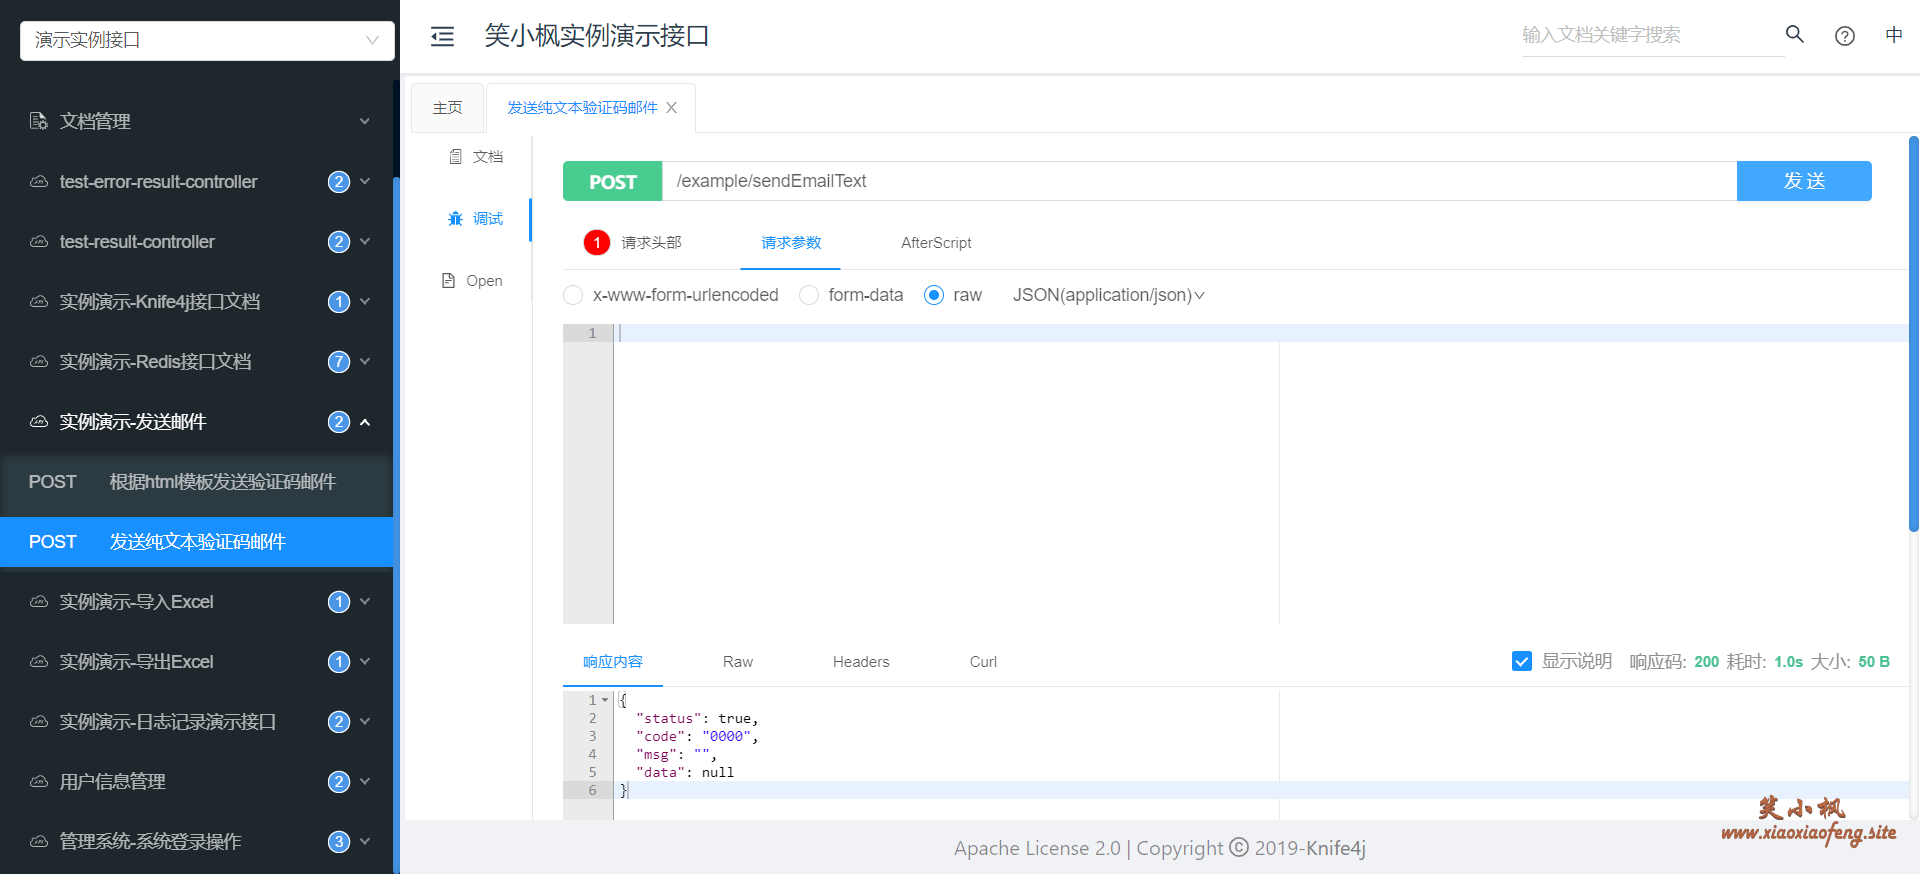
纯文本的邮件的测试结果👇,可以看到添加的两个附件。
通过html模版发送邮件的测试结果👇

关于笑小枫💕
本章到这里结束了,喜欢的朋友关注一下我呦😘😘,大伙的支持,就是我坚持写下去的动力。
笑小枫个人博客:https://www.xiaoxiaofeng.com
本文源码:https://github.com/hack-feng/maple-demo本系列其它文章
本系列的源码已同步在Github:https://github.com/hack-feng/maple-demo
-
相关阅读:
货币系统类的题(计数型DP)
linux之vim编辑器
算法70-解析算式并返回结果
记一次redis批量删除千万量级key的实操与思考
【游戏引擎Easy2D】一篇打通引擎基础类型,Point+Size+String+Color(RGBA),可适用于普通题目和引擎详解
Fiddler(七) - Composer(组合器)克隆或者修改请求
纯CSS实现禁止网页文本被选中
Greenplum 实用工具-gpaddmirrors
CSS的作用与各种样式
golang http客户端常用API:GET POST HEAD及自定义http客户端代码示例
- 原文地址:https://blog.csdn.net/qq_34988304/article/details/127843070