-
【PyTorch】TensorBoard基本使用
一、Tensorboard基本使用
Tensorboard为是Google TensorFlow的可视化工具,可以用于记录训练数据、评估数据、网络结构、图像等,并且可以在web上展示,对于观察神经网络的过程非常有帮助。
PyTorch也推出了自己的可视化工具,叫做
torch.utils.tensorboard。学习本节内容必须提前准备好PyTorch(推荐GPU版)环境,后续也会推出PyTorch安装(Conda环境)。

1、SummaryWriter类使用
from torch.utils.tensorboard import SummaryWriter # 导入- 1

按下
Ctrl键,点击蓝色字体,可以查看该类所在函数描述。
还有具体方法、例子的描述,不做过多赘述!
2、安装TensorBoard
conda环境:# 1.激活conda环境 conda activate torch # torch为自己的虚拟环境 # 2.下载并安装 conda install tensorboard- 1
- 2
- 3
- 4
pip环境:pip install tensorboard # 嫌慢,可以加国内源 pip install tensorboard -i https://pypi.tuna.tsinghua.edu.cn/simple- 1
- 2
- 3
3、add_scalar()方法
函数原型:
def add_scalar(self, tag: str, scalar_value: Any, global_step: int = None, walltime: float = None, new_style: bool = False, double_precision: bool = False) -> None- 1
- 2
- 3
- 4
- 5
- 6
- 7

参数说明:
- tag:类似于图标的title
- scalar_value:数值,即Y轴
- global_step:多少步,即X轴
实例1:绘制
y = xfrom torch.utils.tensorboard import SummaryWriter writer = SummaryWriter("logs") for i in range(100): writer.add_scalar("y = x", i, i) writer.close()- 1
- 2
- 3
- 4
- 5
- 6
- 7
- 8

打开事件文件:

成功运行后,即可打开http://localhost:6006/;当然也可以更换端口:添加
--port=6007
实例2:绘制
y = 2xfrom torch.utils.tensorboard import SummaryWriter writer = SummaryWriter("logs") for i in range(100): writer.add_scalar("y = 2x", 2*i, i) writer.close()- 1
- 2
- 3
- 4
- 5
- 6
- 7
- 8

实例2:绘制
y = 3x(当我们未修改title时)from torch.utils.tensorboard import SummaryWriter writer = SummaryWriter("logs") for i in range(100): writer.add_scalar("y = 2x", 3*i, i) # tille未作修改 writer.close()- 1
- 2
- 3
- 4
- 5
- 6
- 7
- 8

会出现拟合,我们可以通过删除事件文件之后,重新打开Tensorboard。
4、add_image()方法
函数原型:
def add_image(self, tag: str, img_tensor: Any, global_step: int = None, walltime: float = None, dataformats: str = "CHW") -> None- 1
- 2
- 3
- 4
- 5
- 6

参数说明:
- tag:图像title
- img_tensor:图像的数据类型(
torch.Tensor,numpy.array,orstring/blobname) - global_step:训练的步骤
4.1 img_tensor的说明
参数
img_tensor为图像的数据类型,指定了三种数据类型,但在实际情况中,往往并不是理想的这三种,以下介绍如何转换:数据集请评论或直接私信我,后续也会贴出链接!!!
利用numpy.array(),对PIL图像进行转换:

4.2 dataformats的说明
当我们准备好实例执行时,会报出如下错误:
from torch.utils.tensorboard import SummaryWriter import numpy as np from PIL import Image writer = SummaryWriter("logs") image_path = "../data/tensorboard_data/train/ants_image/0013035.jpg" img_PIL = Image.open(image_path) img_array = np.array(img_PIL) writer.add_image("test", img_array, 1) writer.close()- 1
- 2
- 3
- 4
- 5
- 6
- 7
- 8
- 9
- 10
- 11
- 12
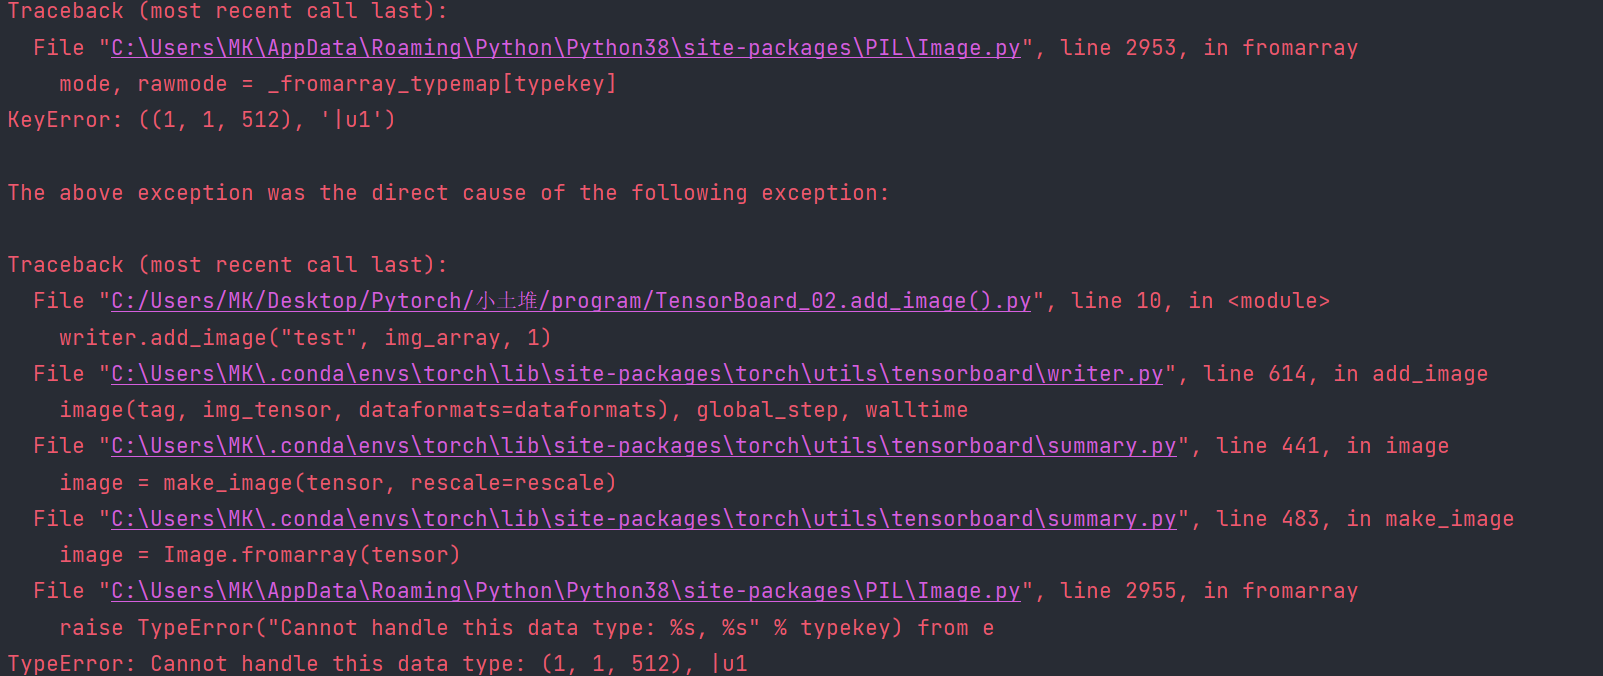
说明问题出在如下代码中:
writer.add_image("test", img_array, 1)- 1
查看函数介绍发现:默认为(通道,高度,宽度),如果为 (高度,宽度,通道),需要添加参数
dataformats='HWC'

查看实例中图像的shape:
print(img_array.shape) # (512, 768, 3)- 1
则需要添加参数:
writer.add_image("test", img_array, 1, dataformats='HWC') # 即可成功运行- 1

4.3 滑动显示
from torch.utils.tensorboard import SummaryWriter import numpy as np from PIL import Image writer = SummaryWriter("logs") # image_path = "../data/tensorboard_data/train/ants_image/0013035.jpg" # 1 image_path = "../data/tensorboard_data/train/bees_image/16838648_415acd9e3f.jpg" # 2 img_PIL = Image.open(image_path) img_array = np.array(img_PIL) print(img_array.shape) # writer.add_image("test", img_array, 1, dataformats='HWC') #1 writer.add_image("test", img_array, 1, dataformats='HWC') # 2 writer.close()- 1
- 2
- 3
- 4
- 5
- 6
- 7
- 8
- 9
- 10
- 11
- 12
- 13
- 14
- 15

-
相关阅读:
【毕业设计】大数据房价数据分析可视化 - python
ubuntu设置脚本开机自启动
怎样为Apache配置文件索引页?
Ansible的命令及常用模块详解
AI伦理:科技发展中的人性之声
代理IP与Socks5代理在多领域的卓越应用
Linux 新建 python 文件
01.java课复习
28线性空间02—— 坐标变换
JAVA经典百题之判断星期几
- 原文地址:https://blog.csdn.net/m0_70885101/article/details/127842320