-
SpringBoot+PageHelper+Vue+Element从零开始实现分页功能(包含前后端源码)
提示:这是一个前后端分离的练习项目!!!!!
技术要点:
1、SpringBoot
如果你还没有搭建项目,可以参考我上一篇文章:从零开始搭建SpringBoot项目,并且用Mybatis进行数据查询(包含所用数据库):https://blog.csdn.net/weixin_43388691/article/details/127800723?spm=1001.2014.3001.5502。
2、PageHelper插件
用于实现简单的分页,在这里我也会自定义一个实体类用于专门给前端的分页数据。
3、Vue项目
在这里我是用VueCli3脚手架搭建的一个简单的vue项目。
4、Element
主要用到了element的el-table实现表格显示,并且模仿Ruoyi框架自定义分页组件(我会附上源码)
一、后端配置:
1、引入PageHelper插件的依赖,在pom.xml文件中添加:
<!--pagehelper mybatis的分页插件依赖--> <dependency> <groupId>com.github.pagehelper</groupId> <artifactId>pagehelper-spring-boot-starter</artifactId> <version>1.4.3</version> </dependency>- 1
- 2
- 3
- 4
- 5
- 6
2、封装用于返回分页数据的实体类:
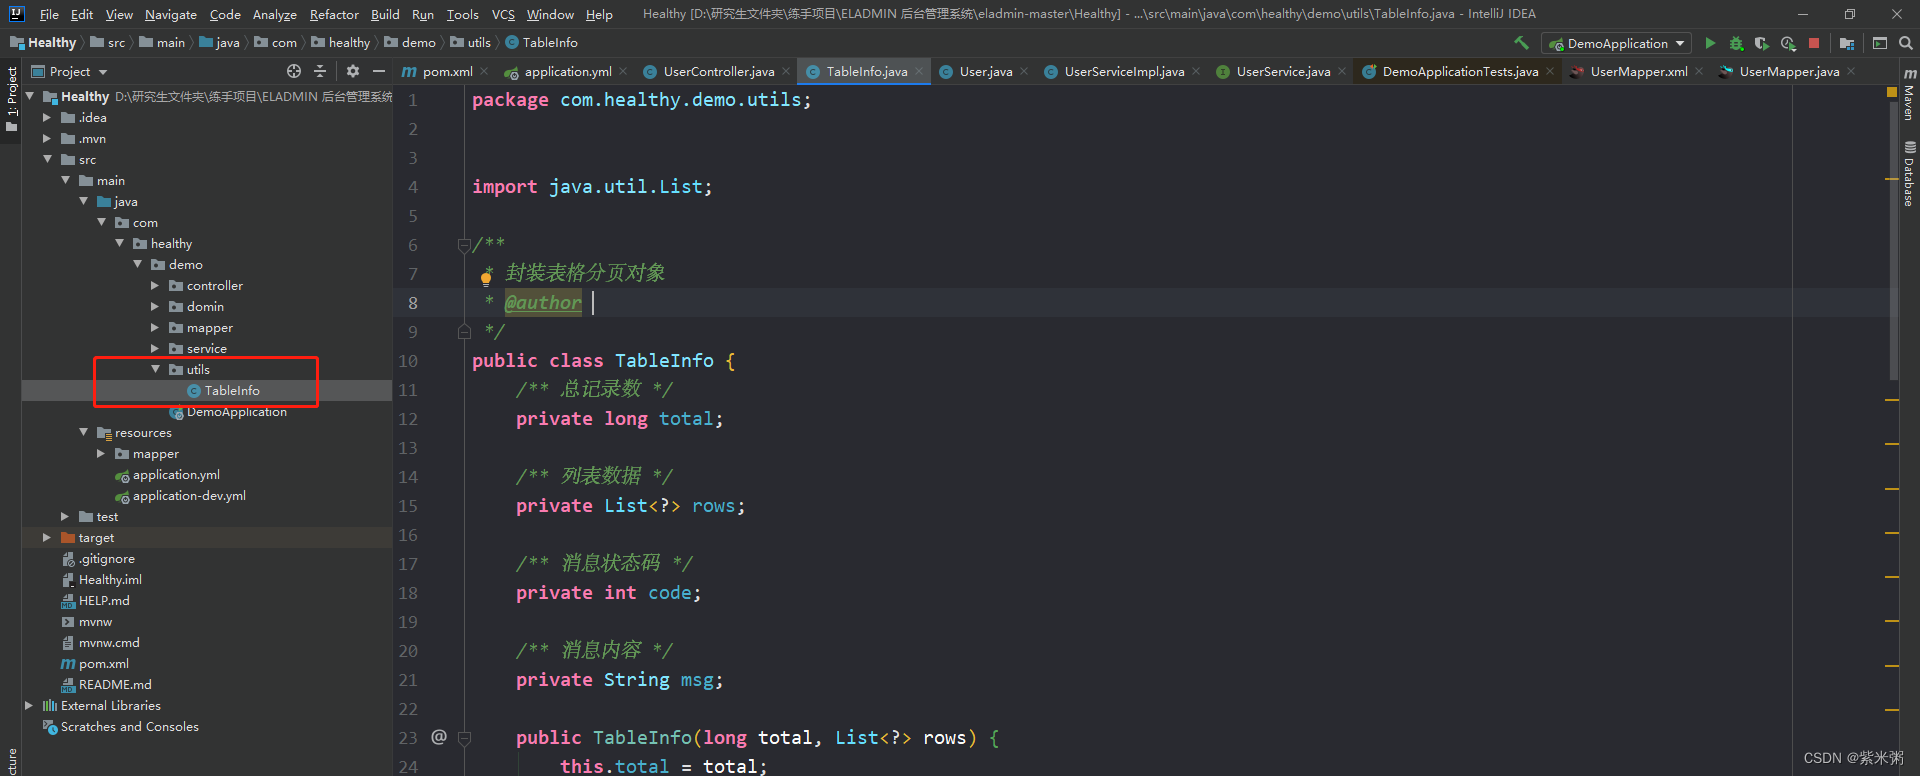
package com.healthy.demo.utils; import java.util.List; /** * 封装表格分页对象 * @author */ public class TableInfo { /** 总记录数 */ private long total; /** 列表数据 */ private List<?> rows; /** 消息状态码 */ private int code; /** 消息内容 */ private String msg; public TableInfo(long total, List<?> rows) { this.total = total; this.rows = rows; } public long getTotal() { return total; } public void setTotal(long total) { this.total = total; } public List<?> getRows() { return rows; } public void setRows(List<?> rows) { this.rows = rows; } public int getCode() { return code; } public void setCode(int code) { this.code = code; } public String getMsg() { return msg; } public void setMsg(String msg) { this.msg = msg; } }- 1
- 2
- 3
- 4
- 5
- 6
- 7
- 8
- 9
- 10
- 11
- 12
- 13
- 14
- 15
- 16
- 17
- 18
- 19
- 20
- 21
- 22
- 23
- 24
- 25
- 26
- 27
- 28
- 29
- 30
- 31
- 32
- 33
- 34
- 35
- 36
- 37
- 38
- 39
- 40
- 41
- 42
- 43
- 44
- 45
- 46
- 47
- 48
- 49
- 50
- 51
- 52
- 53
- 54
- 55
- 56
- 57
- 58
- 59
- 60
3、依次编写controller、service接口、service接口实现类、mapper、xml配置文件。
在这里贴一下后端的整体项目结构,还有一些小提示:
(1)大家需要注意在Controller里的@RestController注解,用于返回将数据转换成json格式返回给前端,大家不要忘记添加这个注解!
(2)还有一些其他的问题,大家还是可以参考我的上一篇那个从零开始搭建SpringBoot项目。
(3)本次所查询的数据与上一篇博客的所用的数据库一致,大家可以用自己的数据库或者用我的数据库。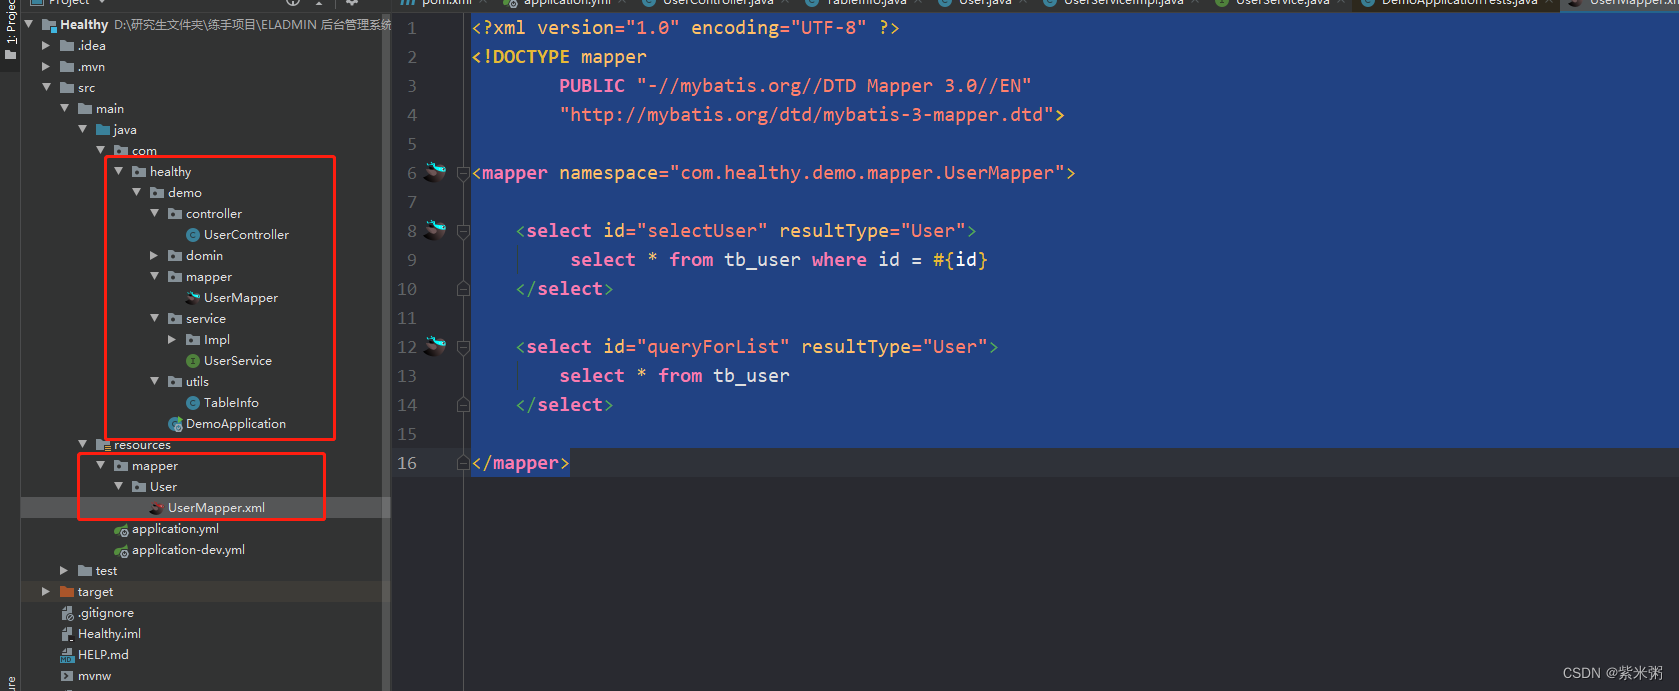
(1)controller层:
package com.healthy.demo.controller; import com.github.pagehelper.PageHelper; import com.github.pagehelper.PageInfo; import com.healthy.demo.domin.User; import com.healthy.demo.service.UserService; import com.healthy.demo.utils.TableInfo; import org.springframework.beans.factory.annotation.Autowired; import org.springframework.web.bind.annotation.*; import java.util.List; /** * @author */ @RestController @RequestMapping("/user") public class UserController { @Autowired private UserService userService; @GetMapping("/list") public TableInfo queryForList(@RequestParam(value = "pageNum",required = true) Integer pageNum, @RequestParam(value = "pageSize",required = true) Integer pageSize){ //开始分页 PageHelper.startPage(pageNum,pageSize); List<User> users = userService.queryForList(); //获得查询数据总条数 long total = new PageInfo(users).getTotal(); return new TableInfo(total,users); } }- 1
- 2
- 3
- 4
- 5
- 6
- 7
- 8
- 9
- 10
- 11
- 12
- 13
- 14
- 15
- 16
- 17
- 18
- 19
- 20
- 21
- 22
- 23
- 24
- 25
- 26
- 27
- 28
- 29
- 30
- 31
(2)service接口层:
/** * 查询所有用户 * @return */ public List<User> queryForList();- 1
- 2
- 3
- 4
- 5
(3)serviceImpl实现层:
package com.healthy.demo.service.Impl; import com.healthy.demo.domin.User; import com.healthy.demo.mapper.UserMapper; import com.healthy.demo.service.UserService; import org.springframework.beans.factory.annotation.Autowired; import org.springframework.stereotype.Service; import java.util.List; /** * @author */ @Service public class UserServiceImpl implements UserService { @Autowired private UserMapper userMapper; @Override public List<User> queryForList() { return userMapper.queryForList(); } }- 1
- 2
- 3
- 4
- 5
- 6
- 7
- 8
- 9
- 10
- 11
- 12
- 13
- 14
- 15
- 16
- 17
- 18
- 19
- 20
- 21
- 22
- 23
- 24
- 25
(4)mapper层:
package com.healthy.demo.mapper; import com.healthy.demo.domin.User; import org.apache.ibatis.annotations.Mapper; import org.springframework.jmx.export.annotation.ManagedOperation; import org.springframework.stereotype.Repository; import java.util.List; /** * @author */ @Repository @Mapper public interface UserMapper { /** * 查询所有用户 * @return */ public List<User> queryForList(); }- 1
- 2
- 3
- 4
- 5
- 6
- 7
- 8
- 9
- 10
- 11
- 12
- 13
- 14
- 15
- 16
- 17
- 18
- 19
- 20
- 21
- 22
- 23
- 24
(5)xml配置层:
<?xml version="1.0" encoding="UTF-8" ?> <!DOCTYPE mapper PUBLIC "-//mybatis.org//DTD Mapper 3.0//EN" "http://mybatis.org/dtd/mybatis-3-mapper.dtd"> <mapper namespace="com.healthy.demo.mapper.UserMapper"> <select id="queryForList" resultType="User"> select * from tb_user </select> </mapper>- 1
- 2
- 3
- 4
- 5
- 6
- 7
- 8
- 9
- 10
二、前端配置:
先贴一下前端的项目结构:
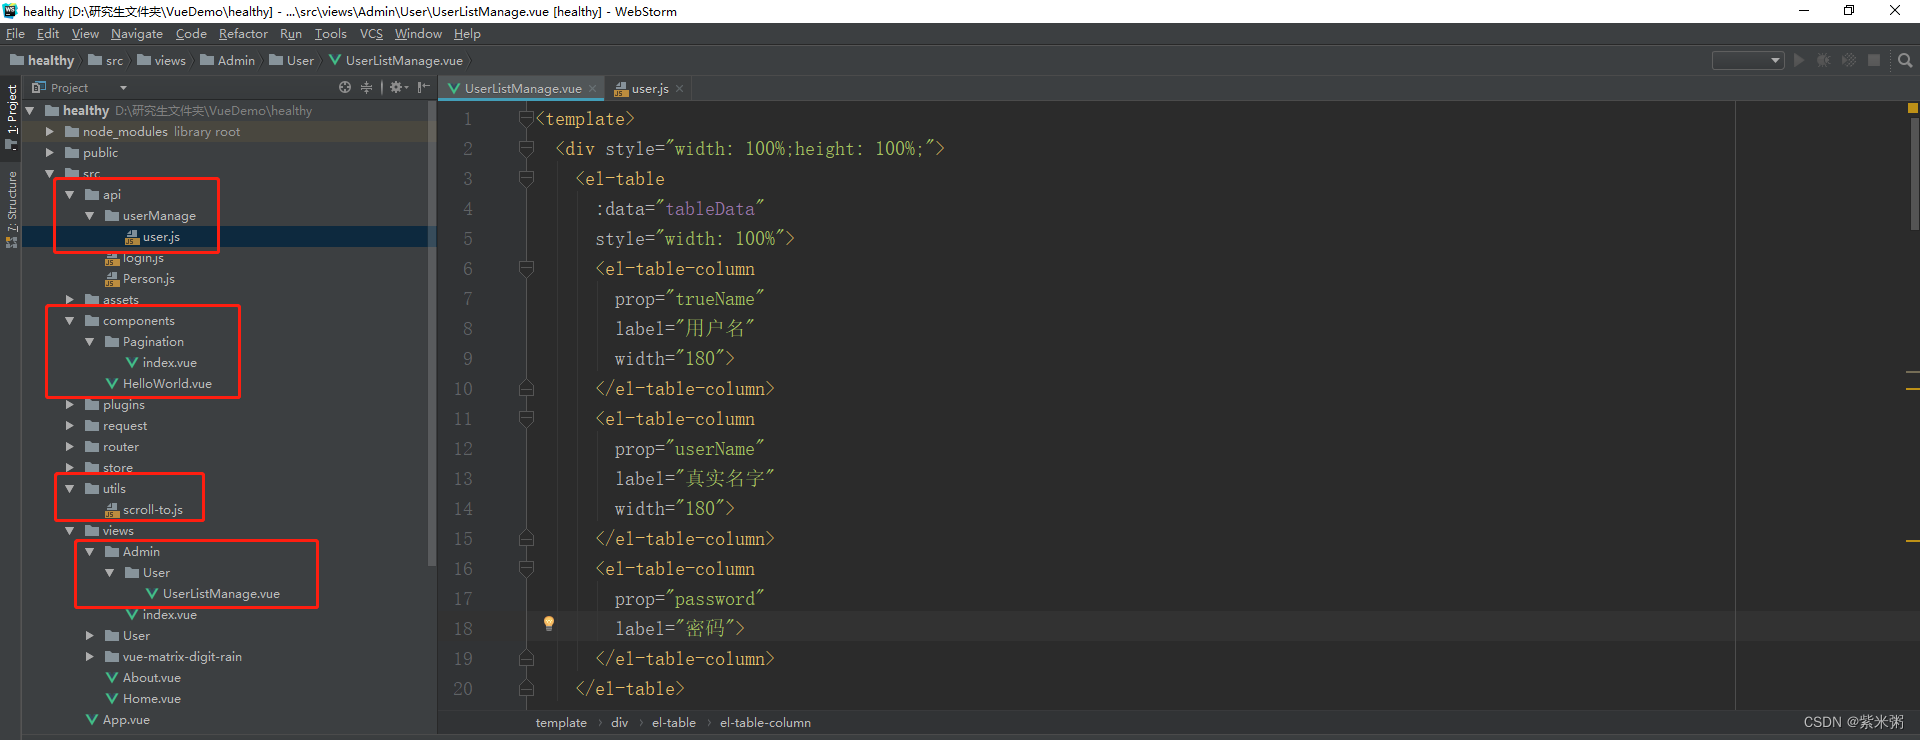
1、重新封装分页组件:
(1)在components新建一个Pagination文件夹,然后在Pagination在建立一个index.vue文件,然后把下列代码复制进去。
<template> <div :class="{'hidden':hidden}" class="pagination-container"> <el-pagination :background="background" :current-page.sync="currentPage" :page-size.sync="pageSize" :layout="layout" :page-sizes="pageSizes" :pager-count="pagerCount" :total="total" v-bind="$attrs" @size-change="handleSizeChange" @current-change="handleCurrentChange" /> </div> </template> <script> import { scrollTo } from '@/utils/scroll-to' export default { name: 'Pagination', props: { total: { required: true, type: Number }, page: { type: Number, default: 1 }, limit: { type: Number, default: 20 }, pageSizes: { type: Array, default() { return [10, 20, 30, 50] } }, // 移动端页码按钮的数量端默认值5 pagerCount: { type: Number, default: document.body.clientWidth < 992 ? 5 : 7 }, layout: { type: String, default: 'total, sizes, prev, pager, next, jumper' }, background: { type: Boolean, default: true }, autoScroll: { type: Boolean, default: true }, hidden: { type: Boolean, default: false } }, computed: { currentPage: { get() { return this.page }, set(val) { this.$emit('update:page', val) } }, pageSize: { get() { return this.limit }, set(val) { this.$emit('update:limit', val) } } }, methods: { handleSizeChange(val) { this.$emit('pagination', { page: this.currentPage, limit: val }) if (this.autoScroll) { scrollTo(0, 800) } }, handleCurrentChange(val) { this.$emit('pagination', { page: val, limit: this.pageSize }) if (this.autoScroll) { scrollTo(0, 800) } } } } </script> <style scoped> .pagination-container { background: #fff; padding: 32px 16px; } /*.pagination-container.hidden {*/ /*display: none;*/ /*}*/ </style>- 1
- 2
- 3
- 4
- 5
- 6
- 7
- 8
- 9
- 10
- 11
- 12
- 13
- 14
- 15
- 16
- 17
- 18
- 19
- 20
- 21
- 22
- 23
- 24
- 25
- 26
- 27
- 28
- 29
- 30
- 31
- 32
- 33
- 34
- 35
- 36
- 37
- 38
- 39
- 40
- 41
- 42
- 43
- 44
- 45
- 46
- 47
- 48
- 49
- 50
- 51
- 52
- 53
- 54
- 55
- 56
- 57
- 58
- 59
- 60
- 61
- 62
- 63
- 64
- 65
- 66
- 67
- 68
- 69
- 70
- 71
- 72
- 73
- 74
- 75
- 76
- 77
- 78
- 79
- 80
- 81
- 82
- 83
- 84
- 85
- 86
- 87
- 88
- 89
- 90
- 91
- 92
- 93
- 94
- 95
- 96
- 97
- 98
- 99
- 100
- 101
- 102
- 103
- 104
- 105
- 106
- 107
- 108
(2)在src文件夹下面重新建立一个utils文件夹,在utils里面新建一个scroll-to.js,在js里面添加如下代码:
Math.easeInOutQuad = function(t, b, c, d) { t /= d / 2 if (t < 1) { return c / 2 * t * t + b } t-- return -c / 2 * (t * (t - 2) - 1) + b } // requestAnimationFrame for Smart Animating http://goo.gl/sx5sts var requestAnimFrame = (function() { return window.requestAnimationFrame || window.webkitRequestAnimationFrame || window.mozRequestAnimationFrame || function(callback) { window.setTimeout(callback, 1000 / 60) } })() /** * Because it's so fucking difficult to detect the scrolling element, just move them all * @param {number} amount */ function move(amount) { document.documentElement.scrollTop = amount document.body.parentNode.scrollTop = amount document.body.scrollTop = amount } function position() { return document.documentElement.scrollTop || document.body.parentNode.scrollTop || document.body.scrollTop } /** * @param {number} to * @param {number} duration * @param {Function} callback */ export function scrollTo(to, duration, callback) { const start = position() const change = to - start const increment = 20 let currentTime = 0 duration = (typeof (duration) === 'undefined') ? 500 : duration var animateScroll = function() { // increment the time currentTime += increment // find the value with the quadratic in-out easing function var val = Math.easeInOutQuad(currentTime, start, change, duration) // move the document.body move(val) // do the animation unless its over if (currentTime < duration) { requestAnimFrame(animateScroll) } else { if (callback && typeof (callback) === 'function') { // the animation is done so lets callback callback() } } } animateScroll() }- 1
- 2
- 3
- 4
- 5
- 6
- 7
- 8
- 9
- 10
- 11
- 12
- 13
- 14
- 15
- 16
- 17
- 18
- 19
- 20
- 21
- 22
- 23
- 24
- 25
- 26
- 27
- 28
- 29
- 30
- 31
- 32
- 33
- 34
- 35
- 36
- 37
- 38
- 39
- 40
- 41
- 42
- 43
- 44
- 45
- 46
- 47
- 48
- 49
- 50
- 51
- 52
- 53
- 54
- 55
- 56
- 57
- 58
- 59
(3)在main.js文件里面进行组件的注册:
// 分页组件 import Pagination from "@/components/Pagination"; Vue.component('Pagination', Pagination)- 1
- 2
- 3
- 4
2、利用Element中的el-table和我们刚定义的分页组件进行分页功能实现:
== Tips:在这里一开始定义的分页组件不显示,仔细查询了一下,也没有发现哪里的问题,最终通过添加css样式进行解决,具体就是通过 display: block !important;在style标签里解决的,大家可以看一下这部分代码的最后!!==
<template> <div style="width: 100%;height: 100%;"> <el-table :data="tableData" style="width: 100%"> <el-table-column prop="trueName" label="用户名" width="180"> </el-table-column> <el-table-column prop="userName" label="真实名字" width="180"> </el-table-column> <el-table-column prop="password" label="密码"> </el-table-column> </el-table> <pagination v-show="total>0" :total="total" id="test" :page.sync="queryParams.pageNum" :limit.sync="queryParams.pageSize" @pagination="queryForList" /> </div> </template> <script> import { queryForList } from '@/api/userManage/user'; export default { name: "user-list-manage", //用于存放数据 data(){ return{ tableData: [], //查询数据总数 total:0, // 查询参数 queryParams: { pageNum: 1, pageSize: 10, }, } }, created(){ this.queryForList(); }, //存放各种方法 methods:{ queryForList(){ queryForList(this.queryParams).then(response =>{ //rows对应后端封装的分页数据的名字。 this.tableData = response.data.rows; this.total = response.data.total; console.log(this.tableData) }) }, } } </script> <style scoped> #test{ display: block !important; } </style>- 1
- 2
- 3
- 4
- 5
- 6
- 7
- 8
- 9
- 10
- 11
- 12
- 13
- 14
- 15
- 16
- 17
- 18
- 19
- 20
- 21
- 22
- 23
- 24
- 25
- 26
- 27
- 28
- 29
- 30
- 31
- 32
- 33
- 34
- 35
- 36
- 37
- 38
- 39
- 40
- 41
- 42
- 43
- 44
- 45
- 46
- 47
- 48
- 49
- 50
- 51
- 52
- 53
- 54
- 55
- 56
- 57
- 58
- 59
- 60
- 61
- 62
- 63
- 64
- 65
- 66
- 67
- 68
- 69
- 70
- 71
3、user.js代码:
import request from '@/request/request' export function queryForList (query) { return request({ url: '/user/list', method: 'get', params:query }) }- 1
- 2
- 3
- 4
- 5
- 6
- 7
- 8
(1)在这里我给大家上传了前端的源码文件,大家如果遇到了什么问题可以自己对着看一下。
https://download.csdn.net/download/weixin_43388691/86988655。
(2)导入项目之后,依次运行npm install 然后运行npm run serve即可 。三、功能实现:
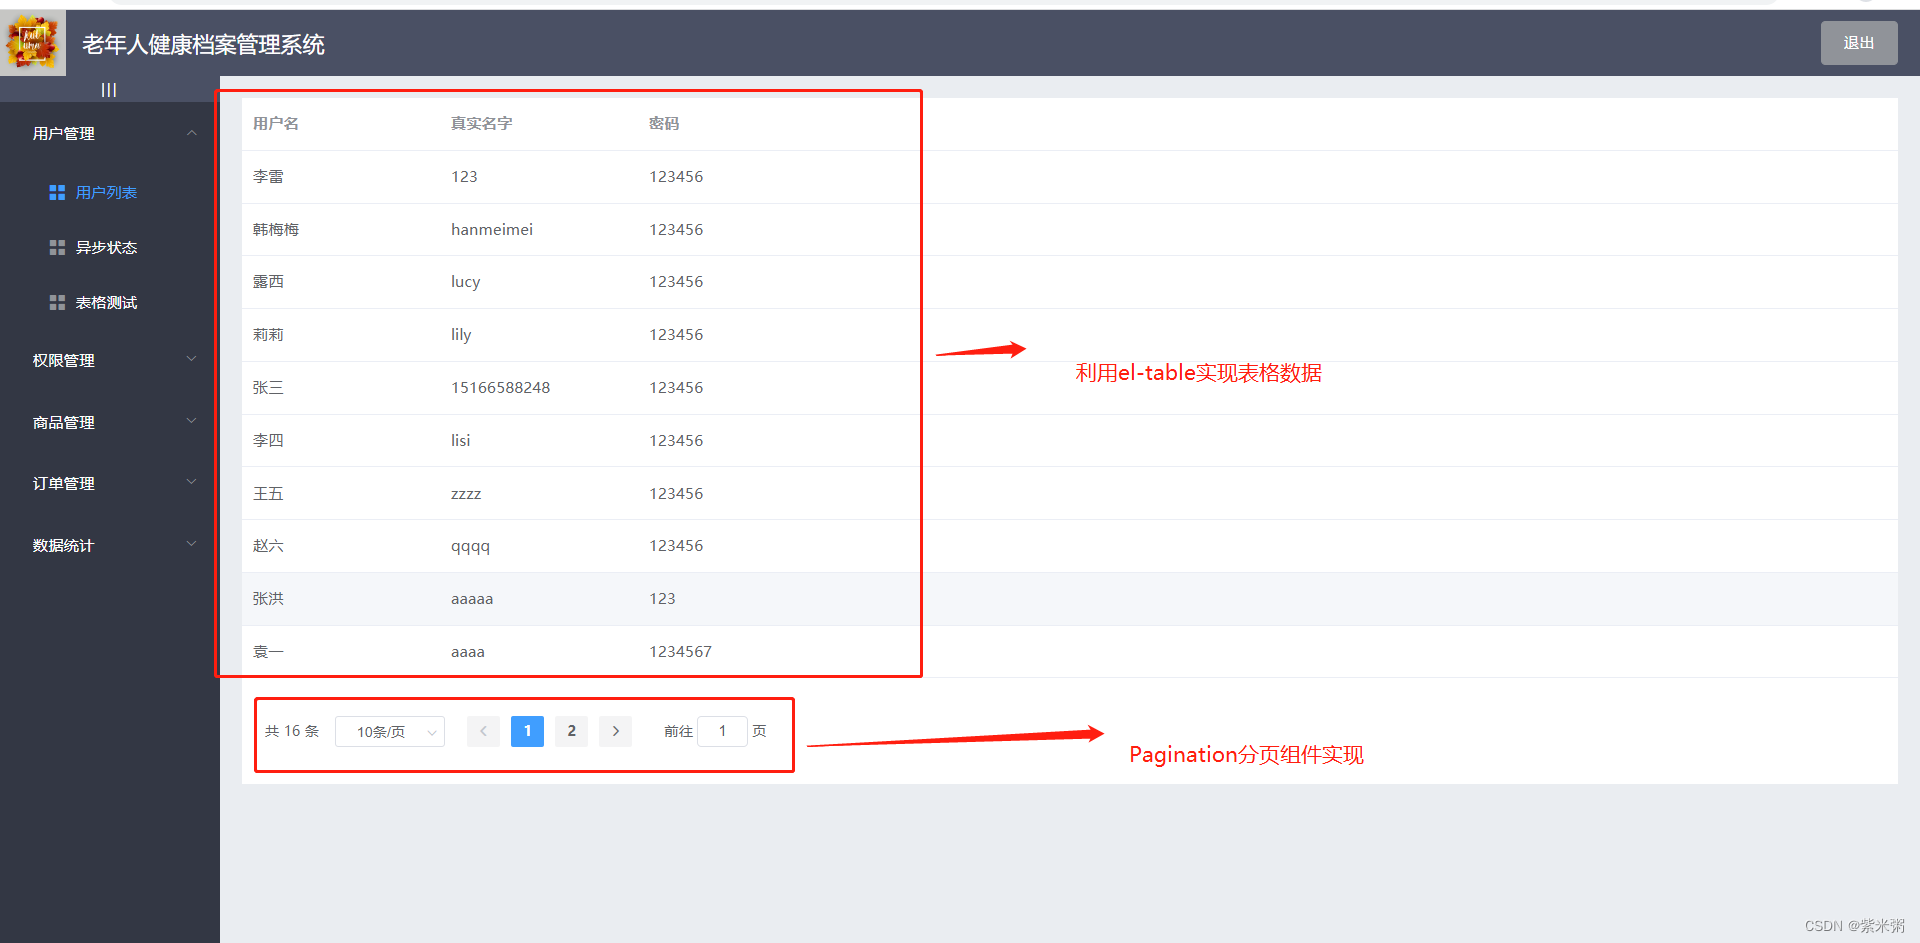
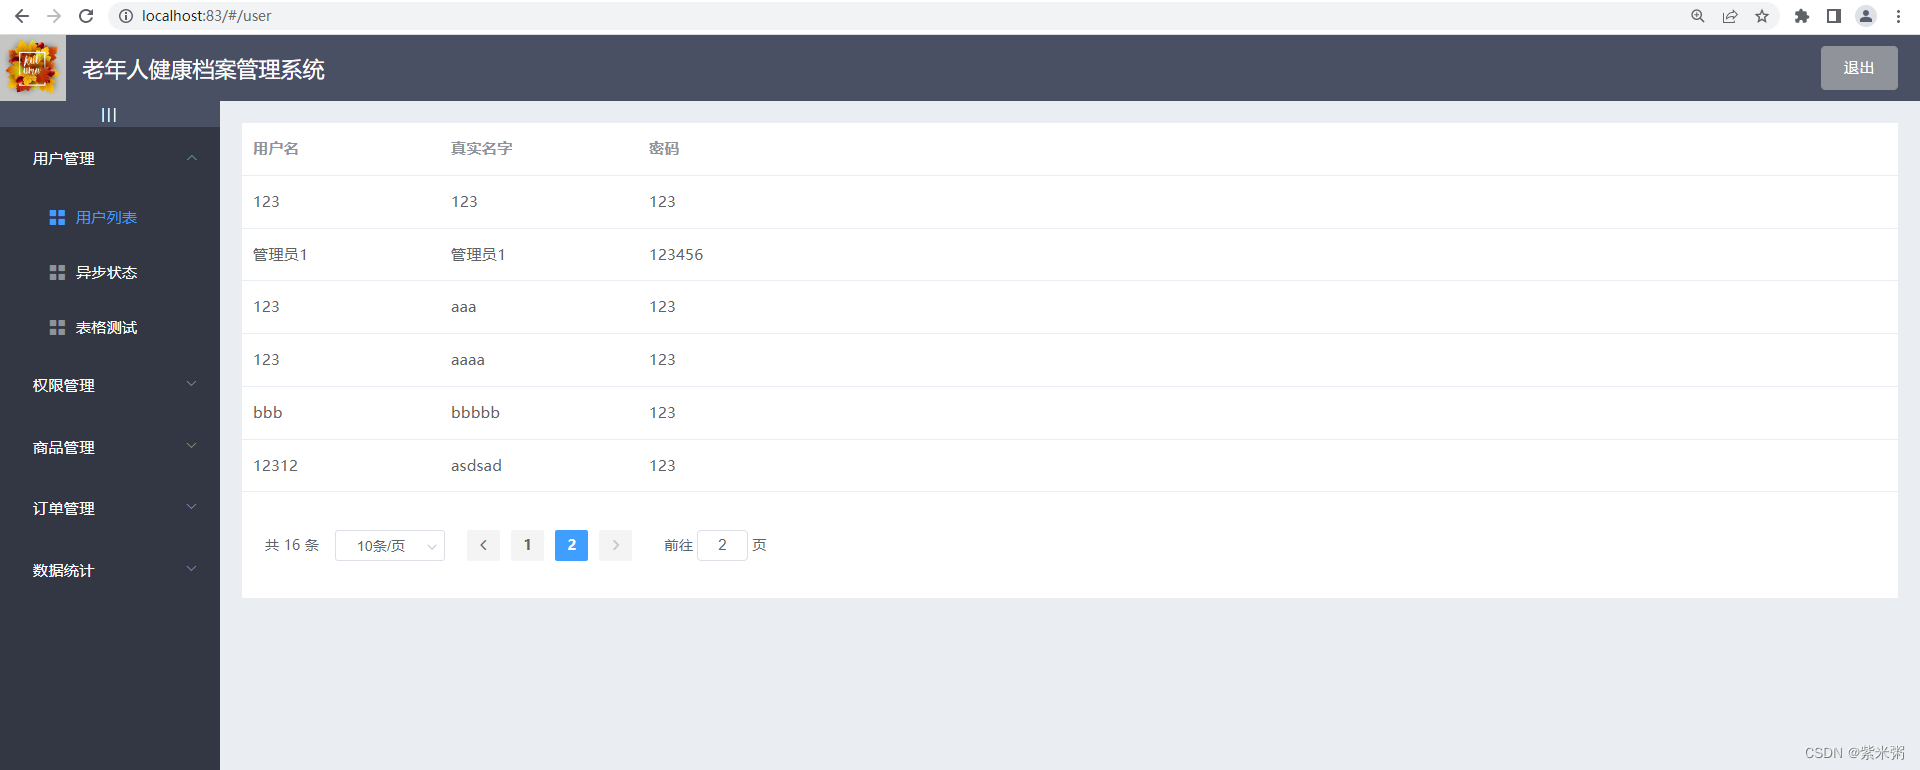
在这里每一步我认为都说的特别详细了,如果大家在做的时候遇到什么问题,欢迎大家留言,我会给大家一一解惑的!!!看到这里了,点个关注再走呗!!!

-
相关阅读:
JavaScript 字符串(String) 对象
IPV4地址、VLSM以及CIDR
[DownUnderCTF 2022] crypto部分复现
Mybatis动态SQL解析
webpack:关于处理html文件的插件html-webpack-plugin、add-asset-html-webpack-plugin
Unity Lighting Mode
【BLE】蓝牙技术的应用
Unity --- 音频组件与脚本控制方法
Java遍历目录下的所有文件
2023 年最新最全的 React 面试题
- 原文地址:https://blog.csdn.net/weixin_43388691/article/details/127828922
