-
Vuex④(多组件共享数据、Vuex模块化+namespace)
多组件共享数据
我们现在想实现这种情况:
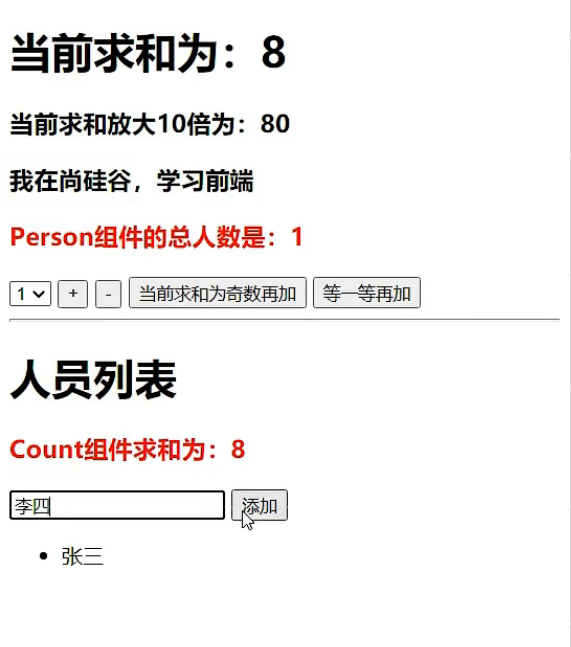
Person组件的总人数就是Person中列表的长度
br上的是Count组件,br下的是Person组件。
我们通过vuex中的state实现一些数据的多组件共享:
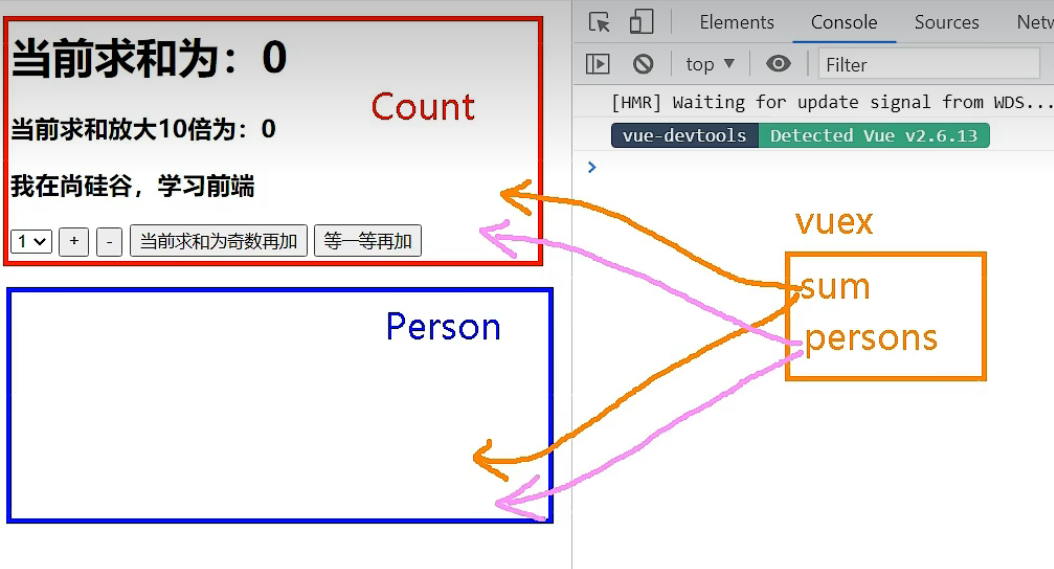
代码实现
Person.vue
<template> <div> <h1>人员列表h1> <h3 style="color:red">Count组件求和为:{{sum}}h3> <input type="text" placeholder="请输入名字" v-model="name"> <button @click="add">添加button> <ul> <li v-for="p in personList" :key="p.id">{{p.name}}li> ul> div> template> <script> import {nanoid} from 'nanoid' export default { name:'Person', data() { return { name:'' } }, computed:{ personList(){ return this.$store.state.personList }, sum(){ return this.$store.state.sum } }, methods: { add(){ const personObj = {id:nanoid(),name:this.name} this.$store.commit('ADD_PERSON',personObj) this.name = '' } }, } script>- 1
- 2
- 3
- 4
- 5
- 6
- 7
- 8
- 9
- 10
- 11
- 12
- 13
- 14
- 15
- 16
- 17
- 18
- 19
- 20
- 21
- 22
- 23
- 24
- 25
- 26
- 27
- 28
- 29
- 30
- 31
- 32
- 33
- 34
- 35
- 36
- 37
- 38
注意点:
这里使用了id生成类nanoid,如果要使用先安装包
yarn add nanoid 或者 npm install nanoid- 1
- 2
- 3
使用方法:
import { nanoid } from 'nanoid' const person = {name:'张三', age:18} // 最后用nanoid给它添加一个id person.id = nanoid() //=> "V1StGXR8_Z5jdHi6B-myT"- 1
- 2
- 3
- 4
Count.vue
<template> <div> <h1>当前求和为:{{sum}}h1> <h3>当前求和放大10倍为:{{bigSum}}h3> <h3>我在{{school}},学习{{subject}}h3> <h3 style="color:red">Person组件的总人数是:{{personList.length}}h3> <select v-model.number="n"> <option value="1">1option> <option value="2">2option> <option value="3">3option> select> <button @click="increment(n)">+button> <button @click="decrement(n)">-button> <button @click="incrementOdd(n)">当前求和为奇数再加button> <button @click="incrementWait(n)">等一等再加button> div> template> <script> import {mapState,mapGetters,mapMutations,mapActions} from 'vuex' export default { name:'Count', data() { return { n:1, //用户选择的数字 } }, computed:{ //借助mapState生成计算属性,从state中读取数据。(数组写法) ...mapState(['sum','school','subject','personList']), //借助mapGetters生成计算属性,从getters中读取数据。(数组写法) ...mapGetters(['bigSum']) }, methods: { //借助mapMutations生成对应的方法,方法中会调用commit去联系mutations(对象写法) ...mapMutations({increment:'JIA',decrement:'JIAN'}), //借助mapActions生成对应的方法,方法中会调用dispatch去联系actions(对象写法) ...mapActions({incrementOdd:'jiaOdd',incrementWait:'jiaWait'}) }, mounted() { // const x = mapState({he:'sum',xuexiao:'school',xueke:'subject'}) // console.log(x) }, } script> <style lang="css"> button{ margin-left: 5px; } style>- 1
- 2
- 3
- 4
- 5
- 6
- 7
- 8
- 9
- 10
- 11
- 12
- 13
- 14
- 15
- 16
- 17
- 18
- 19
- 20
- 21
- 22
- 23
- 24
- 25
- 26
- 27
- 28
- 29
- 30
- 31
- 32
- 33
- 34
- 35
- 36
- 37
- 38
- 39
- 40
- 41
- 42
- 43
- 44
- 45
- 46
- 47
- 48
- 49
- 50
- 51
store
//该文件用于创建Vuex中最为核心的store import Vue from 'vue' //引入Vuex import Vuex from 'vuex' //应用Vuex插件 Vue.use(Vuex) //准备actions——用于响应组件中的动作 const actions = { /* jia(context,value){ console.log('actions中的jia被调用了') context.commit('JIA',value) }, jian(context,value){ console.log('actions中的jian被调用了') context.commit('JIAN',value) }, */ jiaOdd(context,value){ console.log('actions中的jiaOdd被调用了') if(context.state.sum % 2){ context.commit('JIA',value) } }, jiaWait(context,value){ console.log('actions中的jiaWait被调用了') setTimeout(()=>{ context.commit('JIA',value) },500) } } //准备mutations——用于操作数据(state) const mutations = { JIA(state,value){ console.log('mutations中的JIA被调用了') state.sum += value }, JIAN(state,value){ console.log('mutations中的JIAN被调用了') state.sum -= value }, ADD_PERSON(state,value){ console.log('mutations中的ADD_PERSON被调用了') state.personList.unshift(value) } } //准备state——用于存储数据 const state = { sum:0, //当前的和 school:'尚硅谷', subject:'前端', personList:[ {id:'001',name:'张三'} ] } //准备getters——用于将state中的数据进行加工 const getters = { bigSum(state){ return state.sum*10 } } //创建并暴露store export default new Vuex.Store({ actions, mutations, state, getters })- 1
- 2
- 3
- 4
- 5
- 6
- 7
- 8
- 9
- 10
- 11
- 12
- 13
- 14
- 15
- 16
- 17
- 18
- 19
- 20
- 21
- 22
- 23
- 24
- 25
- 26
- 27
- 28
- 29
- 30
- 31
- 32
- 33
- 34
- 35
- 36
- 37
- 38
- 39
- 40
- 41
- 42
- 43
- 44
- 45
- 46
- 47
- 48
- 49
- 50
- 51
- 52
- 53
- 54
- 55
- 56
- 57
- 58
- 59
- 60
- 61
- 62
- 63
- 64
- 65
- 66
- 67
- 68
Vuex模块化
我们查看我们前面的代码不难发现一个问题:那就是多个组件的代码都放在了唯一的actions、mutations、state、getters中,我们前面的案例中只涉及到了两个组件,但是如果我们有几百个几千个组件,这些代码全部堆积到一起,会非常的繁杂。所以我们想对他进行一个分类,将各组件的代码分离开来。
原来我们是这样:

现在我们变成这样:
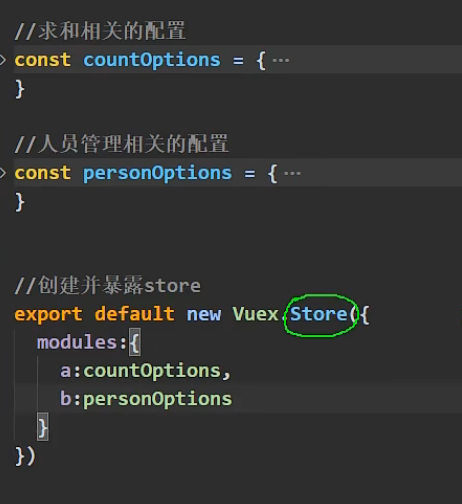
每个配置里面都有其各自的actions、mutations、state、getters。也就是说现在的store结构发生了变化:

当然这个a,b起的有点随便,我们稍微语义化一下:
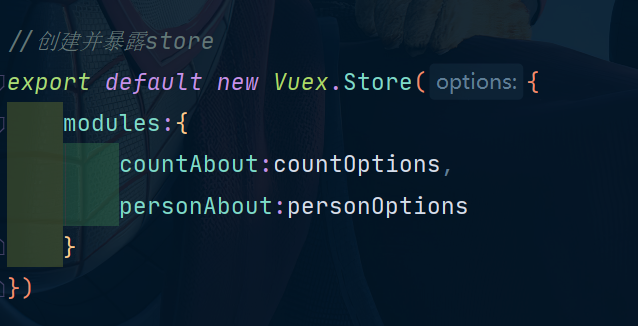
因为接口暴露的形式发生了变化,接下来我们的组件里面就要发生一些变化。
先来看看Count.vue:
原来是这样:

现在变成了这样:

还有一种方法:

最后我们还有最重要的一步:给配置的命名空间打开。
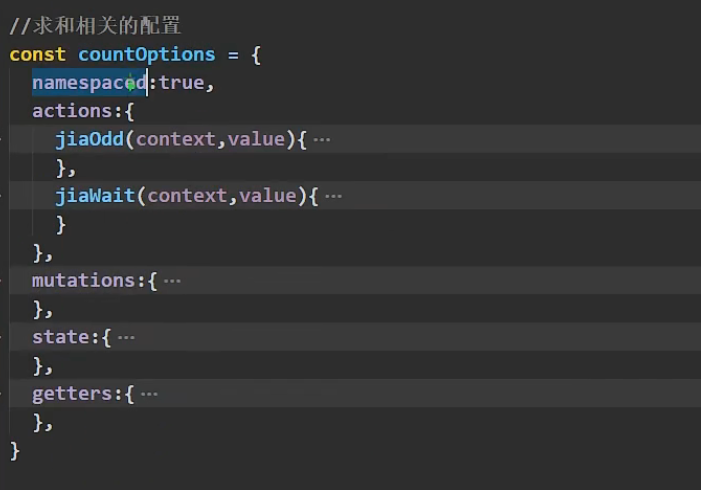
如果我们缺失了这一步,这些map的第一个参数,countAbout、personAbout这些是识别不出来的!computed:{ //借助mapState生成计算属性,从state中读取数据。(数组写法) ...mapState('countAbout',['sum','school','subject']), ...mapState('personAbout',['personList']), //借助mapGetters生成计算属性,从getters中读取数据。(数组写法) ...mapGetters('countAbout',['bigSum']) }, methods: { //借助mapMutations生成对应的方法,方法中会调用commit去联系mutations(对象写法) ...mapMutations('countAbout',{increment:'JIA',decrement:'JIAN'}), //借助mapActions生成对应的方法,方法中会调用dispatch去联系actions(对象写法) ...mapActions('countAbout',{incrementOdd:'jiaOdd',incrementWait:'jiaWait'}) },- 1
- 2
- 3
- 4
- 5
- 6
- 7
- 8
- 9
- 10
- 11
- 12
- 13
接下来我们修改Person.vue,这里我们不使用map方法,而是使用原生的方法看看怎么修改:
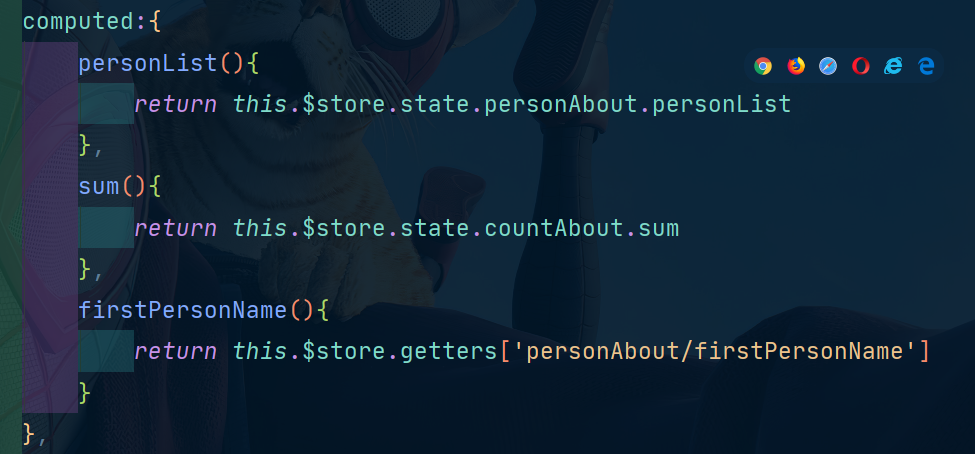
我们上面的firstPersonName这样写是因为:
我们原来store里的state是长这样的:

但是现在我们store里的getters是长这样的:
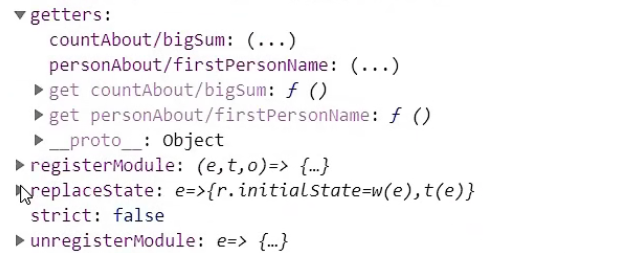
也就是他的key变成了这种形式,但是我们在使用的对象的属性的时候如果使用的是.这种语法那么这个/是不能使用的,凭借js语法的特性我们可以使用[]语法去访问它的属性。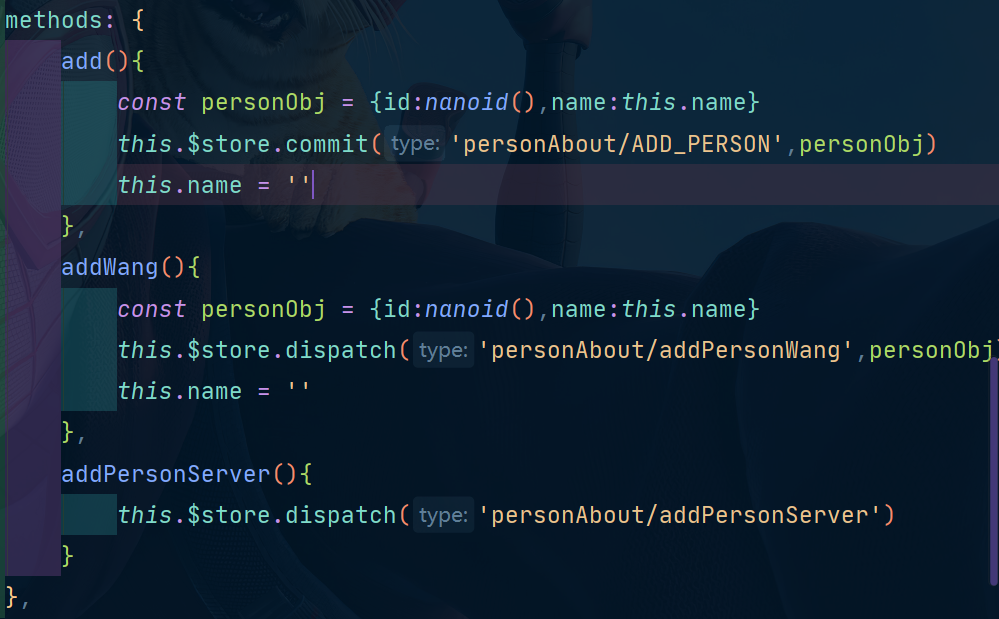
最后我们还可以对最后一次优化,那就是把分类后的代码分文件放置:

我们来看看这几个文件:
count.js
//求和相关的配置 export default { namespaced:true, actions:{ jiaOdd(context,value){ console.log('actions中的jiaOdd被调用了') if(context.state.sum % 2){ context.commit('JIA',value) } }, jiaWait(context,value){ console.log('actions中的jiaWait被调用了') setTimeout(()=>{ context.commit('JIA',value) },500) } }, mutations:{ JIA(state,value){ console.log('mutations中的JIA被调用了') state.sum += value }, JIAN(state,value){ console.log('mutations中的JIAN被调用了') state.sum -= value }, }, state:{ sum:0, //当前的和 school:'尚硅谷', subject:'前端', }, getters:{ bigSum(state){ return state.sum*10 } }, }- 1
- 2
- 3
- 4
- 5
- 6
- 7
- 8
- 9
- 10
- 11
- 12
- 13
- 14
- 15
- 16
- 17
- 18
- 19
- 20
- 21
- 22
- 23
- 24
- 25
- 26
- 27
- 28
- 29
- 30
- 31
- 32
- 33
- 34
- 35
- 36
- 37
- 38
person.js
//人员管理相关的配置 import axios from 'axios' import { nanoid } from 'nanoid' export default { namespaced:true, actions:{ addPersonWang(context,value){ if(value.name.indexOf('王') === 0){ context.commit('ADD_PERSON',value) }else{ alert('添加的人必须姓王!') } }, addPersonServer(context){ axios.get('https://api.uixsj.cn/hitokoto/get?type=social').then( response => { context.commit('ADD_PERSON',{id:nanoid(),name:response.data}) }, error => { alert(error.message) } ) } }, mutations:{ ADD_PERSON(state,value){ console.log('mutations中的ADD_PERSON被调用了') state.personList.unshift(value) } }, state:{ personList:[ {id:'001',name:'张三'} ] }, getters:{ firstPersonName(state){ return state.personList[0].name } }, }- 1
- 2
- 3
- 4
- 5
- 6
- 7
- 8
- 9
- 10
- 11
- 12
- 13
- 14
- 15
- 16
- 17
- 18
- 19
- 20
- 21
- 22
- 23
- 24
- 25
- 26
- 27
- 28
- 29
- 30
- 31
- 32
- 33
- 34
- 35
- 36
- 37
- 38
- 39
- 40
- 41
index.js
//该文件用于创建Vuex中最为核心的store import Vue from 'vue' //引入Vuex import Vuex from 'vuex' import countOptions from './count' import personOptions from './person' //应用Vuex插件 Vue.use(Vuex) //创建并暴露store export default new Vuex.Store({ modules:{ countAbout:countOptions, personAbout:personOptions } })- 1
- 2
- 3
- 4
- 5
- 6
- 7
- 8
- 9
- 10
- 11
- 12
- 13
- 14
- 15
- 16
总结
模块化+命名空间-
目的:让代码更好维护,让多种数据分类更加明确。
-
修改
store.jsconst countAbout = { namespaced:true,//开启命名空间 state:{x:1}, mutations: { ... }, actions: { ... }, getters: { bigSum(state){ return state.sum * 10 } } } const personAbout = { namespaced:true,//开启命名空间 state:{ ... }, mutations: { ... }, actions: { ... } } const store = new Vuex.Store({ modules: { countAbout, personAbout } })- 1
- 2
- 3
- 4
- 5
- 6
- 7
- 8
- 9
- 10
- 11
- 12
- 13
- 14
- 15
- 16
- 17
- 18
- 19
- 20
- 21
- 22
- 23
- 24
- 25
-
开启命名空间后,组件中读取state数据:
//方式一:自己直接读取 this.$store.state.personAbout.list //方式二:借助mapState读取: ...mapState('countAbout',['sum','school','subject']),- 1
- 2
- 3
- 4
-
开启命名空间后,组件中读取getters数据:
//方式一:自己直接读取 this.$store.getters['personAbout/firstPersonName'] //方式二:借助mapGetters读取: ...mapGetters('countAbout',['bigSum'])- 1
- 2
- 3
- 4
-
开启命名空间后,组件中调用dispatch
//方式一:自己直接dispatch this.$store.dispatch('personAbout/addPersonWang',person) //方式二:借助mapActions: ...mapActions('countAbout',{incrementOdd:'jiaOdd',incrementWait:'jiaWait'})- 1
- 2
- 3
- 4
-
开启命名空间后,组件中调用commit
//方式一:自己直接commit this.$store.commit('personAbout/ADD_PERSON',person) //方式二:借助mapMutations: ...mapMutations('countAbout',{increment:'JIA',decrement:'JIAN'}),- 1
- 2
- 3
- 4
-
相关阅读:
代码随想录算法训练营第60天|739. 每日温度、496.下一个更大元素 I
小黑腰酸背痛腿抽筋的日常积累:多线程单例模式
Redis——Jedis的使用
通达信和同花顺能否实现程序化自动交易股票,量化交易如何实现?
Redis 学习笔记
Java - 位运算的基本原理和用途
HTTP与HTTPS的区别及HTTPS如何安全的传输数据
jmeter如何压测和存储
麒麟信安组织开展国产操作系统技术赋能专题培训
21.4 Python 使用GeoIP2地图定位
- 原文地址:https://blog.csdn.net/zyb18507175502/article/details/127309724