-
【云原生】Minio on k8s 讲解与实战操作
一、概述
MinIO 是在 GNU Affero 通用公共许可证 v3.0 下发布的高性能对象存储。它与 Amazon S3 云存储服务 API 兼容。使用 MinIO 为机器学习、分析和应用程序数据工作负载构建高性能基础架构。
官方文档:https://docs.min.io/
中文文档:http://docs.minio.org.cn/docs/
GitHub地址:https://github.com/minio/minio/
想了解更多关于minio也可以参考我以下几篇文章: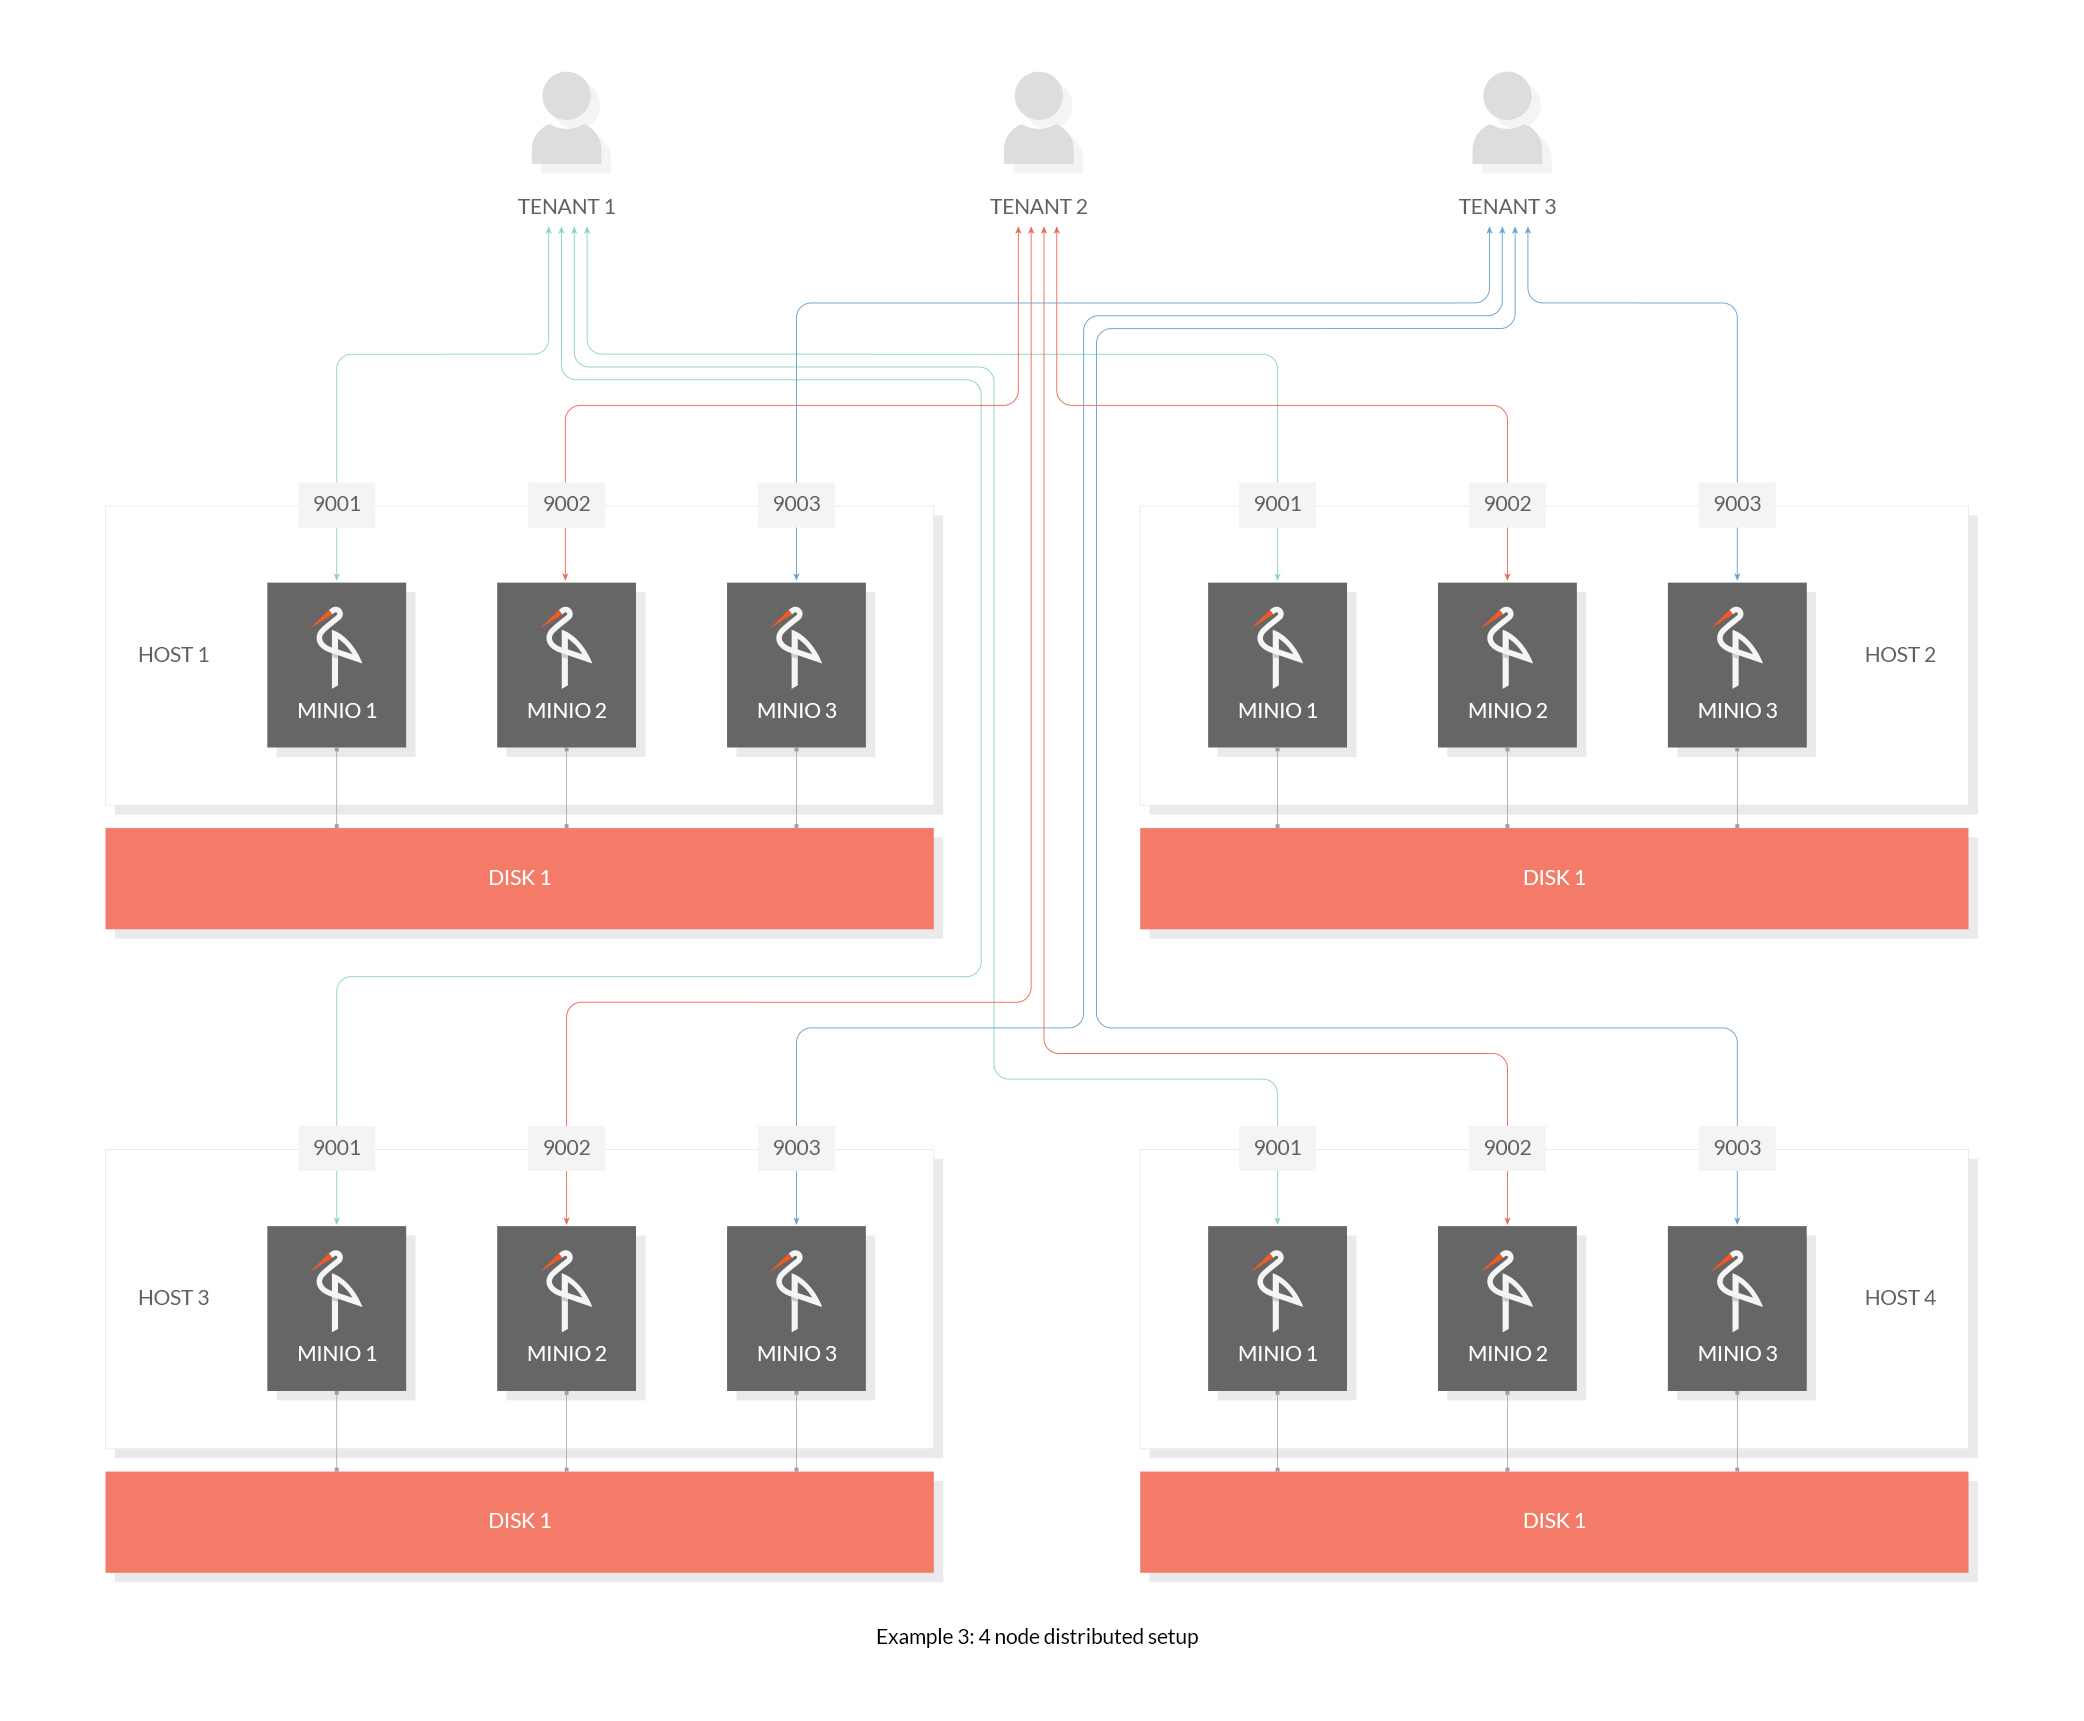
二、开始编排部署
因为minio是有chart包,所以这里就基于现有的chart包进行改造。
1)下载chart 包
helm repo add bitnami https://charts.bitnami.com/bitnami helm pull bitnami/minio --version 11.10.16 tar -xf minio-11.10.16.tgz- 1
- 2
- 3
2)构建镜像
这里就不重新构建镜像了,只是把远程的包推送到本地harbor仓库,如有不知道怎么构建镜像的小伙伴,欢迎留言或私信。
docker pull docker.io/bitnami/minio:2022.11.11-debian-11-r0 docker tag docker.io/bitnami/minio:2022.11.11-debian-11-r0 myharbor.com/bigdata/minio:2022.11.11-debian-11-r0 docker push myharbor.com/bigdata/minio:2022.11.11-debian-11-r0 docker pull docker.io/bitnami/minio-client:2022.11.7-debian-11-r0 docker tag docker.io/bitnami/minio-client:2022.11.7-debian-11-r0 myharbor.com/bigdata/minio-client:2022.11.7-debian-11-r0 docker push myharbor.com/bigdata/minio-client:2022.11.7-debian-11-r0- 1
- 2
- 3
- 4
- 5
- 6
- 7
3)修改yaml编排
minio/values.yaml
image: registry: myharbor.com repository: bigdata/minio tag: 2022.11.11-debian-11-r0 clientImage: registry: myharbor.com repository: bigdata/minio-client tag: 2022.11.7-debian-11-r0 # `standalone` or `distributed` mode: distributed # 登录账号,密码 auth: rootUser: admin rootPassword: "admin12345" statefulset: ## @param statefulset.replicaCount Number of pods per zone (only for MinIO® distributed mode). Should be even and `>= 4` ## replicaCount: 4 service: ## @param service.type MinIO® service type ## type: NodePort nodePorts: api: "31900" console: "31901" persistence: enabled: true storageClass: "local-minio-stroage" size: 10Gi local: - name: minio-0 host: "local-168-182-110" path: "/opt/bigdata/servers/minio/data/data1" - name: minio-1 host: "local-168-182-111" path: "/opt/bigdata/servers/minio/data/data1" - name: minio-2 host: "local-168-182-112" path: "/opt/bigdata/servers/minio/data/data1" - name: minio-3 host: "local-168-182-110" path: "/opt/bigdata/servers/minio/data/data2"- 1
- 2
- 3
- 4
- 5
- 6
- 7
- 8
- 9
- 10
- 11
- 12
- 13
- 14
- 15
- 16
- 17
- 18
- 19
- 20
- 21
- 22
- 23
- 24
- 25
- 26
- 27
- 28
- 29
- 30
- 31
- 32
- 33
- 34
- 35
- 36
- 37
- 38
- 39
- 40
- 41
- 42
- 43
- 44
- 45
- 46
- 47
- 48
minio/templates/pv.yaml
{{- range .Values.persistence.local }} --- apiVersion: v1 kind: PersistentVolume metadata: name: {{ .name }} labels: name: {{ .name }} spec: storageClassName: {{ $.Values.persistence.storageClass }} capacity: storage: {{ $.Values.persistence.size }} accessModes: - ReadWriteOnce local: path: {{ .path }} nodeAffinity: required: nodeSelectorTerms: - matchExpressions: - key: kubernetes.io/hostname operator: In values: - {{ .host }} --- {{- end }}- 1
- 2
- 3
- 4
- 5
- 6
- 7
- 8
- 9
- 10
- 11
- 12
- 13
- 14
- 15
- 16
- 17
- 18
- 19
- 20
- 21
- 22
- 23
- 24
- 25
- 26
4)开始部署
ssh local-168-182-110 mkdir -p /opt/bigdata/servers/minio/data/data{1..2} ssh local-168-182-111 mkdir -p /opt/bigdata/servers/minio/data/data{1..2} ssh local-168-182-112 mkdir -p /opt/bigdata/servers/minio/data/data{1..2} # --dry-run 模拟安装 # --debug 开启debug # helm install --dry-run --debug minio ./minio -n minio --create-namespace helm install --debug minio ./minio -n minio --create-namespace- 1
- 2
- 3
- 4
- 5
- 6
- 7
- 8
- 9
NOTES
CHART NAME: minio CHART VERSION: 11.10.16 APP VERSION: 2022.11.11 ** Please be patient while the chart is being deployed ** MinIO® can be accessed via port on the following DNS name from within your cluster: minio.minio.svc.cluster.local To get your credentials run: export ROOT_USER=$(kubectl get secret --namespace minio minio -o jsonpath="{.data.root-user}" | base64 -d) export ROOT_PASSWORD=$(kubectl get secret --namespace minio minio -o jsonpath="{.data.root-password}" | base64 -d) To connect to your MinIO® server using a client: - Run a MinIO® Client pod and append the desired command (e.g. 'admin info'): kubectl run --namespace minio minio-client \ --rm --tty -i --restart='Never' \ --env MINIO_SERVER_ROOT_USER=$ROOT_USER \ --env MINIO_SERVER_ROOT_PASSWORD=$ROOT_PASSWORD \ --env MINIO_SERVER_HOST=minio \ --image myharbor.com/bigdata/minio-client:2022.11.7-debian-11-r0 -- admin info minio To access the MinIO® web UI: - Get the MinIO® URL: export NODE_PORT=$(kubectl get --namespace minio -o jsonpath="{.spec.ports[0].nodePort}" services minio) export NODE_IP=$(kubectl get nodes --namespace minio -o jsonpath="{.items[0].status.addresses[0].address}") echo "MinIO® web URL: http://$NODE_IP:$NODE_PORT/minio"- 1
- 2
- 3
- 4
- 5
- 6
- 7
- 8
- 9
- 10
- 11
- 12
- 13
- 14
- 15
- 16
- 17
- 18
- 19
- 20
- 21
- 22
- 23
- 24
- 25
- 26
- 27
- 28
- 29
- 30
- 31
- 32
- 33
- 34

查看kubectl get pods,svc -n minio -owide- 1

5)测试验证
web登录:添加链接描述http://local-168-182-110:31901/
账号/密码:admin/admin12345


创建桶并上传文件

mc客户端# 查看notes helm get notes minio -n minio # 启动客户端 export ROOT_USER=$(kubectl get secret --namespace minio minio -o jsonpath="{.data.root-user}" | base64 -d) export ROOT_PASSWORD=$(kubectl get secret --namespace minio minio -o jsonpath="{.data.root-password}" | base64 -d) kubectl run --namespace minio minio-client \ --rm --tty -i --restart='Never' \ --env MINIO_SERVER_ROOT_USER=$ROOT_USER \ --env MINIO_SERVER_ROOT_PASSWORD=$ROOT_PASSWORD \ --env MINIO_SERVER_HOST=minio \ --image myharbor.com/bigdata/minio-client:2022.11.7-debian-11-r0 -- admin info minio- 1
- 2
- 3
- 4
- 5
- 6
- 7
- 8
- 9
- 10
- 11
- 12
- 13

6)卸载
helm uninstall minio -n minio ssh local-168-182-110 rm -fr /opt/bigdata/servers/minio/data/data{1..2}/* ssh local-168-182-111 rm -fr /opt/bigdata/servers/minio/data/data{1..2}/* ssh local-168-182-112 rm -fr /opt/bigdata/servers/minio/data/data{1..2}/*- 1
- 2
- 3
- 4
- 5
git 地址:https://gitee.com/hadoop-bigdata/minio-on-k8s
Minio on k8s 讲解与实战操作就先到这里了,就疑问的小伙伴欢迎给我留言,后续会持续更【云原生+大数据】相关的文章,请小伙伴耐心等待~
-
相关阅读:
Node.js躬行记(24)——低代码
05-jQuery的ajax
MYSQL史上最全学习分享
P8554 心跳
工作手机安全管理平台建设方案
ChatGPT - 在ChatGPT中设置通用提示模板
Java面试题18-tomcat为什么要使用自定义的类加载器
图上简单路径问题——转化为圆方树问题:abc318_g
win环境安装SuperMap iserver和配置许可
自动化测试框架Pytest(三)——自定义allure测试报告
- 原文地址:https://blog.csdn.net/qq_35745940/article/details/127820628