-
深入剖析SpringIOC和AOP的原理,收藏夹中的不二之选!!!
面试过程中会经常问到SpringAOP和IOC的实现原理,那么今天就来仔细讲讲这两大概念的原理。
1、IOC介绍
1.1 IOC概念
IOC:控制反转(Inversion of Control),指的是对象的创建和生命周期的管理,全部托管给Spring容器,而传统对象的创建都是通过业务方使用关键字new或反射来创建的;控制反转是把控制权从业务方交给了Spring容器,这样做的最大好处就是实现解耦和面向接口编程。
DI:依赖注入(dependcy Injection),指的是获得依赖对象的过程由自身管理变为由IOC容器主动注入,就是由IOC容器在运行期间,动态的将某种依赖关系注入到对象中。1.2 IOC底层原理
xml解析、工厂模式、反射
1.3 IOC过程
原始解耦和工厂模式解耦
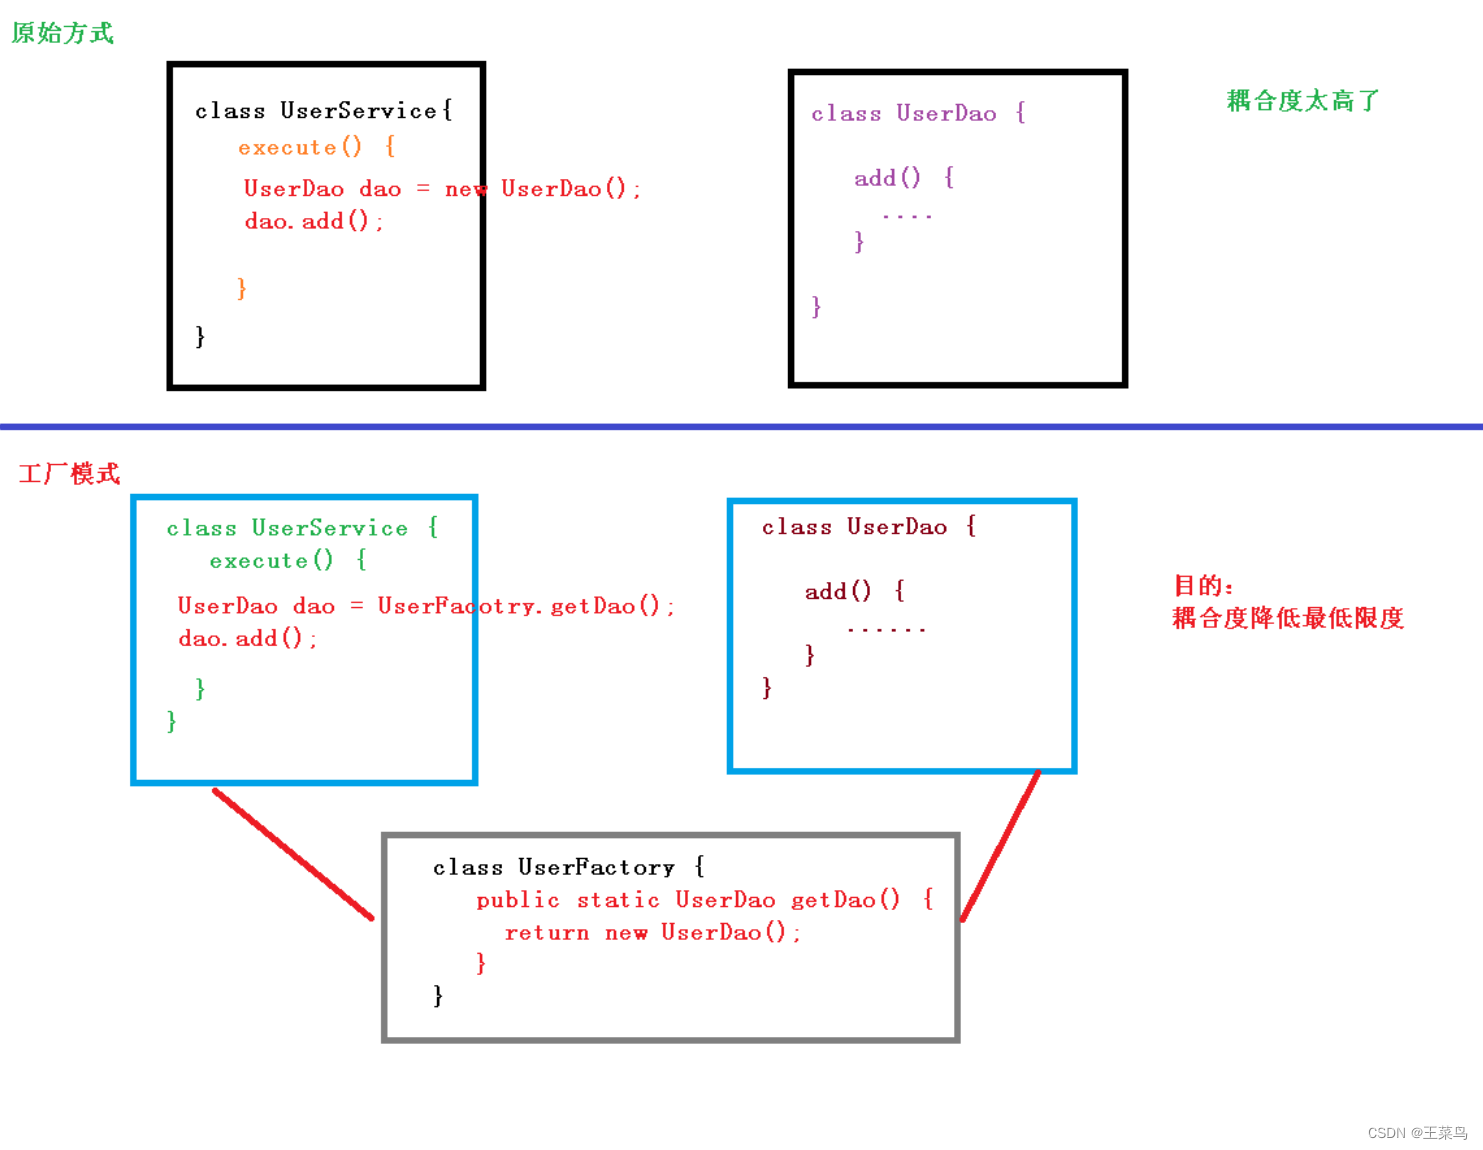
IOC过程:
第一步,配置xml文件,需要创建的对象;<bean id="dao" class="com.xxxx.UserDao">- 1
第二步:有service类和dao类,创建工厂类;
class UserFactory{ public static UserDao getDao(){ //xml解析出 "com.xxxx.UserDao" String classValue = class属性值; //通过反射创建对象 Class clazz = Class.forName(classValue); return (UserDao)clazz.newInstance; } }- 1
- 2
- 3
- 4
- 5
- 6
- 7
- 8
- 9
1.4 IOC接口
- IOC思想基于IOC容器完成,IOC容器底层就是对象工厂。
- Spring提供IOC两种实现方式:BeanFactory和ApplicationContext接口
BeanFactory:IOC容器基本实现,是Spring里面一个内部使用的接口,不提供给开发人员使用。
(加载配置文件的时候不会去创建对象,在获取对象(使用)的时候才会创建对象)。
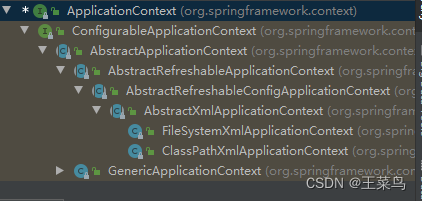
ApplicationContext:BeanFactory接口的子接口,提供更多更强大的功能,一般是由开发人员使用的。(在加载配置文件时就会创建对象)ApplicationContext接口实现类:
- FileSystemXmlApplicationContext
- ClassPathXmlApplicationContext
1.5 DI介绍
DI:依赖注入(dependcy Injection):bean对象中需要依赖一些其他组件或者对象,依赖关系由容器在运行时决定。两种方式处理依赖注入:
- 基于配置形式(如xml文件)
- 基于注解形式(如@Resource)
基于注解形式:
- @Value() 注入普通类型属性
- @Autowired 注入对象类型
- @Resource 注入对象类型
Autowired注解与Resource注解的区别
这两个注解的作用都一样,都是在做bean的注入,在使用过程中,两个注解有时候可以替换使用。
相同点:
1.@Resource注解和@Autowired注解都可以用作bean的注入;
2.在接口只有一个实现类的时候,两个注解可以互相替换,效果相同
不同点:- @Resource注解是Java自身的注解;@Autowired注解是Spring的注解;
- @Resource注解有两个重要的属性,分别是name和type,如果name属性有值,则使用byName的自动注入策略,将值作为需要注入bean的名字;如果type有值,则使用byType自动注入策略,将值作为需要注入bean的类型。如果既不指定name也不指定type属性,这时将通过反射机制使用byName自动注入策略,即@Resource注解默认按照名称进行匹配,名称可以通过name属性进行指定,如果没有指定name属性,当注解写在字段上时,默认取字段名,按照名称查找,当找不到与名称匹配的bean时才按照类型进行装配。但是需要注意的是,如果name属性一旦指定,就只会按照名称进行装配。
- @Autowired注解是spring的注解,此注解只根据type进行注入,不会去匹配name。但是如果只根据type无法辨别注入对象时,就需要配合使用@Qualifier注解或者@Primary注解使用。
举个栗子:若有一个UserService接口,同时创建了两个此接口的实现类userServiceImpl01和userServiceImpl02,然后用UserController类来测试两个注解的不同用法。那么此时,需要@Autowired注解与@Qualifier注解一起使用,以@Qualifier(“userServiceImpl01”)指定注入的bean的名称;而Resource有name属性(@Resource(name = “userServiceImpl01”)),可以区分要注入哪一个实现类。
以上部分内容参考:Autowired注解与Resource注解的区别(https://blog.csdn.net/NoviceZ/article/details/120208241)
2、AOP介绍
2.1 AOP概念
AOP:面向切面编程(Aspect Oriented Programming),是把业务代码和通用代码相分离,利用拦截的思想把它们组装在一起,所谓通用代码指的是与业务无关的代码,比如日志操作、安全控制、事务处理和异常处理等。这样做便于减少系统重复的代码,降低模块之间的耦合度。Spring AOP就是基于动态代理实现的, 分为两种代理:
JDK动态代理(基于接口):它是通过在运行期间创建一个接口的实现类来完成对目标对象的代理,其核心的两个类是InvocationHandler和Proxy。- proxy:生成动态代理实例的
- invocationHandler:调用程序处理结果,并返回结果的
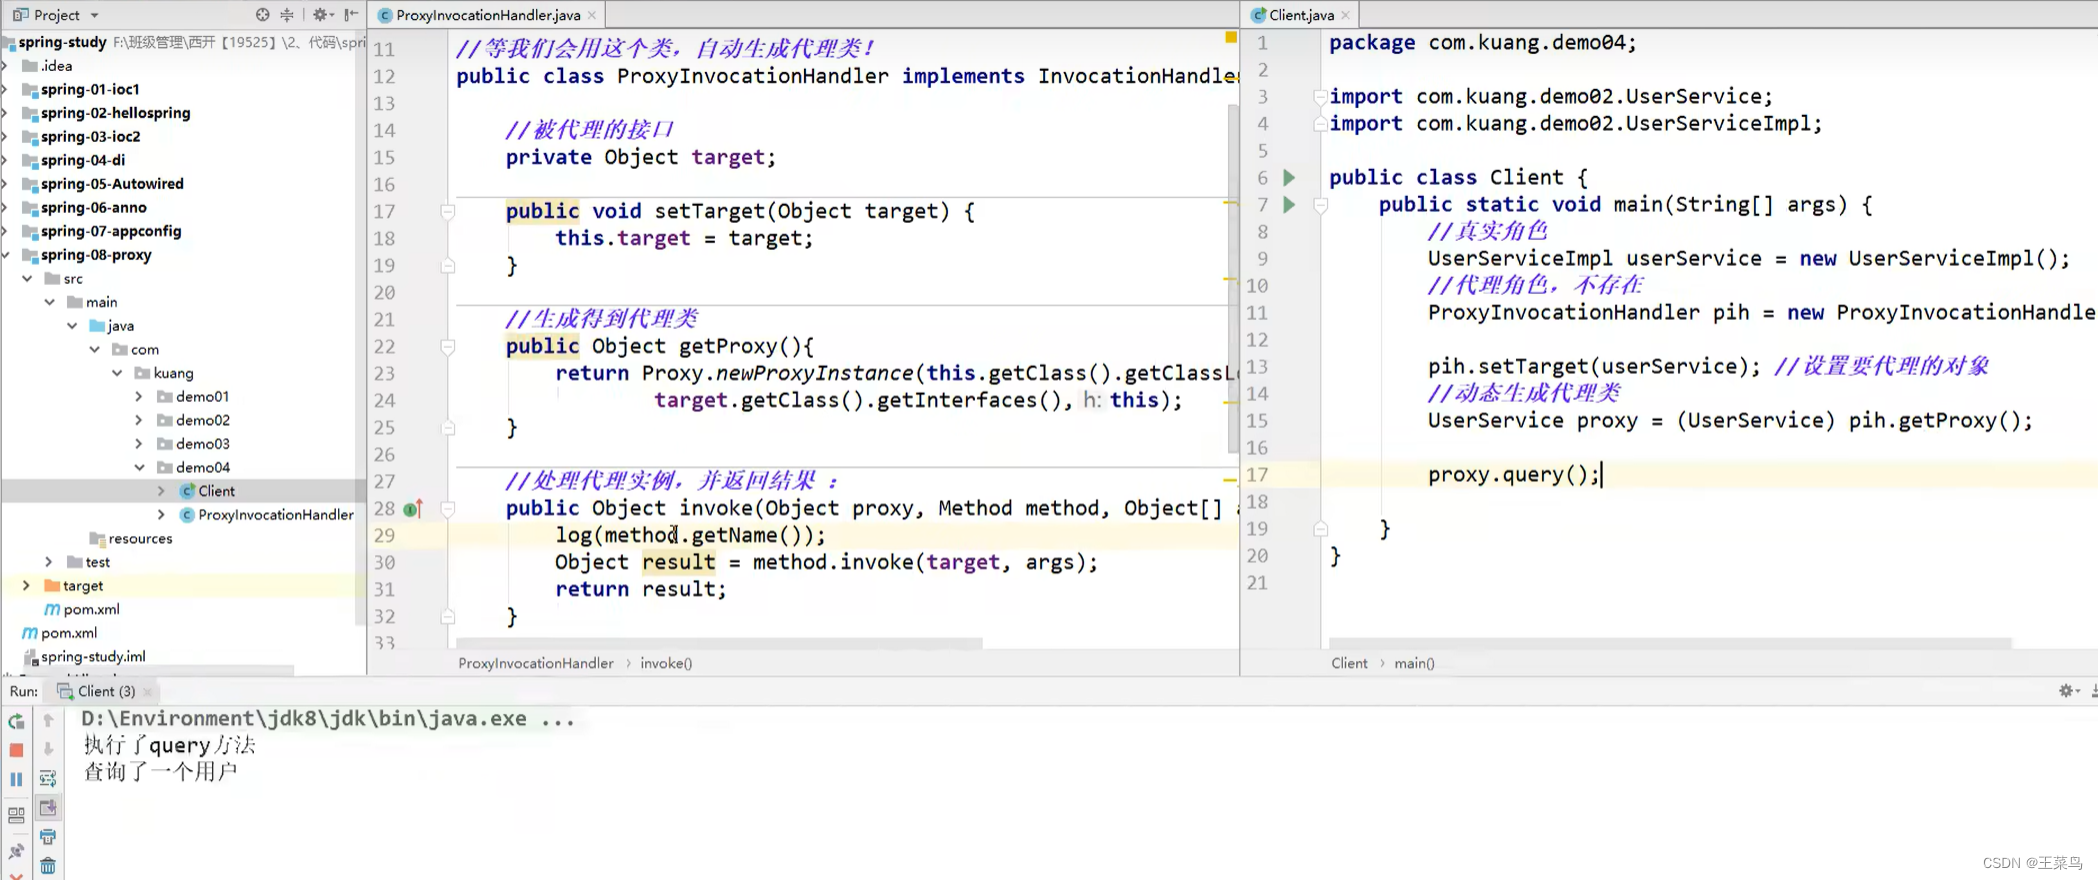
CGLIB动态代理(基于类的):在运行期间生成的代理对象是针对目标类扩展的子类。(CGLIB是高效的代码生成包,底层是依靠ASM(开源的java字节码编辑类库)操作字节码实现的,性能比JDK强;需要引入包asm.jar和cglib.jar。)
如果目标对象实现了接口,就用JDK动态代理,如果未实现接口,就用cglib动态代理。关于动态代理详细的讲解,传送门:【狂神说Java】Spring5最新完整教程IDEA版通俗易懂
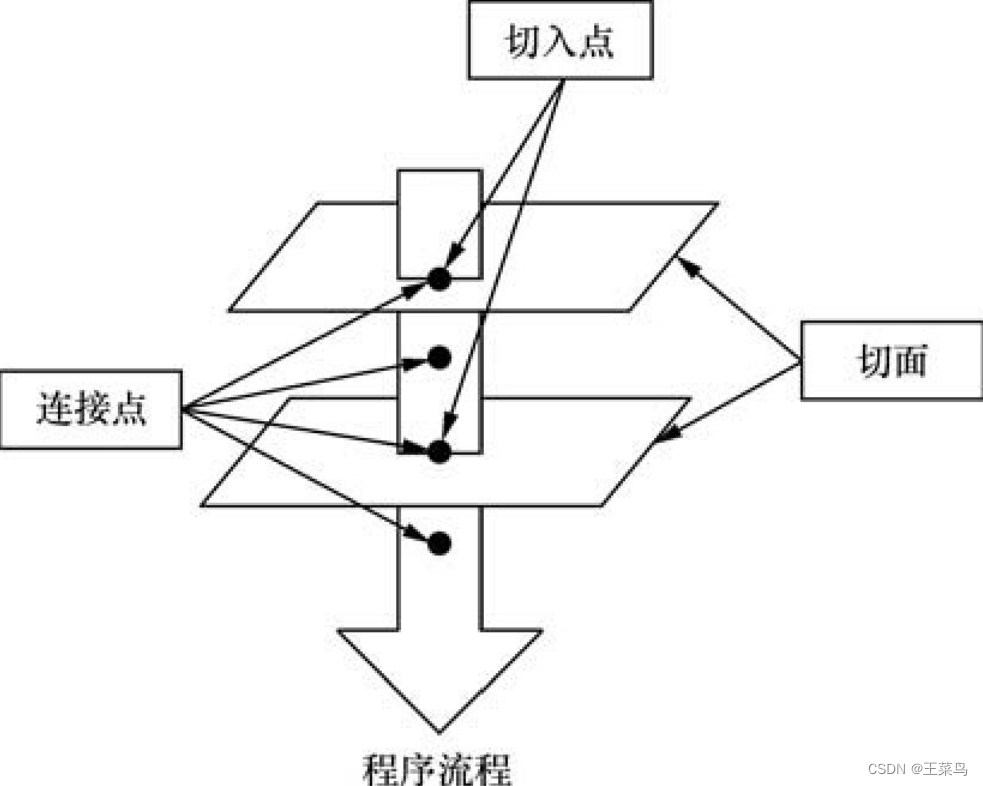
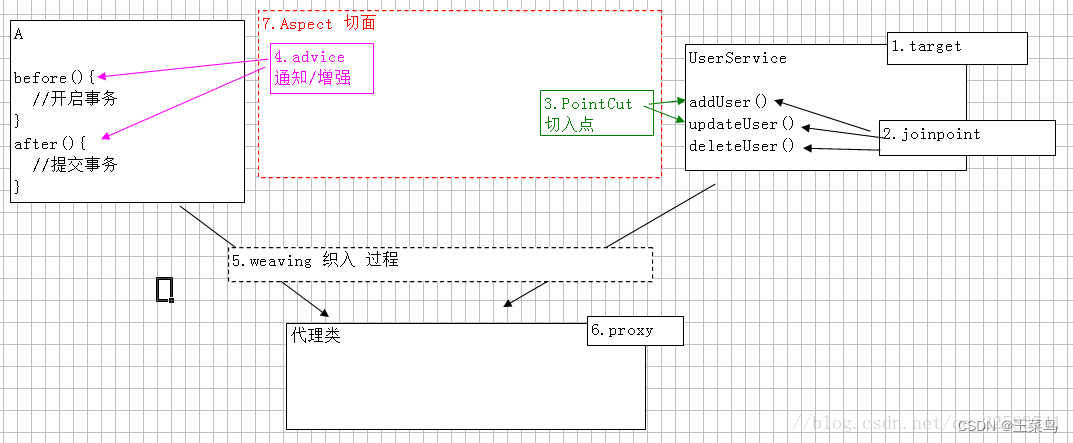
2.2 AOP相关术语
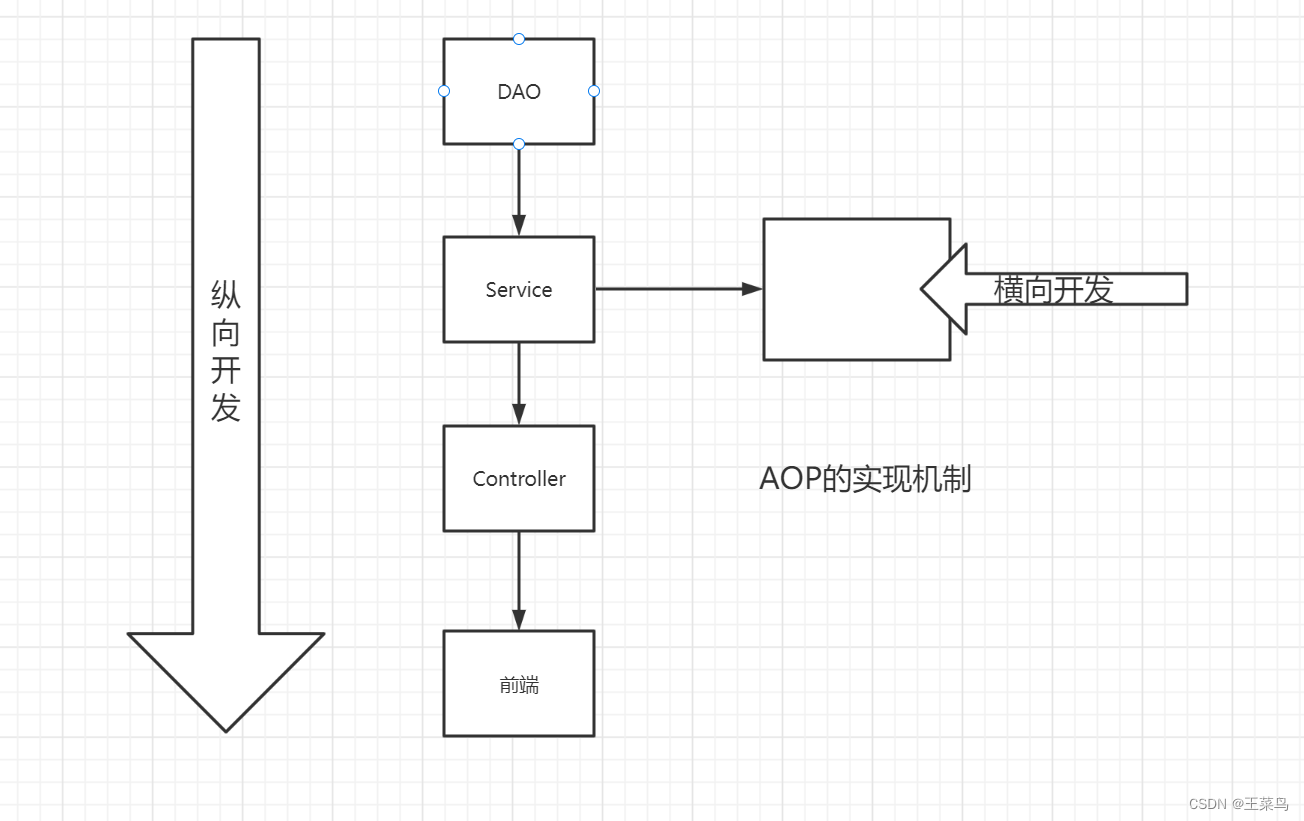
- Aspect(切面):通常是指封装的用于横向插入系统功能(如事务、日志等)的类;
- Joinpoint(连接点):是指某个方法调用的前后;
- Pointcut(切入点):是指切面与程序流程的交叉点,即那些需要处理的连接点;(通常在程序中,切入点指的是类或者方法名,如某个通知要应用到所有以add开头的方法中,那么所有满足这一规则的方法都是切入点。)
- Advice(通知/增强处理):是指在定义好的切入点处所要执行的程序代码。可以将其理解为切面类中的方法,它是切面的具体实现;
- Target(目标类):需要被代理的对象;
- Proxy(代理类):将通知应用到目标类之后,被动态创建的对象;
- Weaving(织入):将切面代码插入到目标类上,从而生成代理对象proxy的过程。
2.2 AOP的五种通知
Before(前置通知):在目标方法调用之前执行,可以获得切入点信息;
After(后置通知):在目标方法执行后执行,目标方法有异常不执行;
Ater-throwing(异常通知):在目标方法抛出异常时执行,可以获取异常信息;
After-returning(最终通知):在目标方法执行后执行,无论是否有异常都执行;
Around(环绕通知):最强大的通知类型,在目标方法执行前后操作,可以阻止目标方法执行。2.3 实现AOP的四种方式
2.3.1 基于经典代理来实现
People睡觉前脱掉衣服,起床后穿上衣服,这里就可以使用AOP进行切入。
Maven依赖<dependencies> <dependency> <groupId>org.aspectjgroupId> <artifactId>aspectjweaverartifactId> <version>1.9.1version> dependency> <dependency> <groupId>org.springframeworkgroupId> <artifactId>spring-contextartifactId> <version>5.3.6version> <scope>testscope> dependency> <dependency> <groupId>org.springframeworkgroupId> <artifactId>spring-aopartifactId> <version>5.3.6version> <scope>compilescope> dependency> <dependency> <groupId>junitgroupId> <artifactId>junitartifactId> <version>4.12version> <scope>testscope> dependency> dependencies>- 1
- 2
- 3
- 4
- 5
- 6
- 7
- 8
- 9
- 10
- 11
- 12
- 13
- 14
- 15
- 16
- 17
- 18
- 19
- 20
- 21
- 22
- 23
- 24
- 25
- 26
- 27
- 28
首先我们要先写一个IPeopleService接口,为
连接点(JoinPoint)public interface IPeopleService { void sleep(); // 睡觉 }- 1
- 2
- 3
IPeopleServiceImpl 实现类为
切入点(PointCut)public class IPeopleService implements IPeopleServiceImpl { @Override public void sleep() { System.out.println("坤坤该睡觉了。。。"); } }- 1
- 2
- 3
- 4
- 5
- 6
对睡觉前后进行
增强通知(Advice),含前置通知和正常返回通知。import org.springframework.aop.AfterReturningAdvice; import org.springframework.aop.MethodBeforeAdvice; import java.lang.reflect.Method; public class PeopleHelper implements MethodBeforeAdvice, AfterReturningAdvice { @Override public void before(Method method, Object[] objects, Object o) throws Throwable { System.out.println("睡觉前脱衣服!!!"); } @Override public void afterReturning(Object o, Method method, Object[] objects, Object o1) throws Throwable { System.out.println("起床后穿衣服!!!"); } }- 1
- 2
- 3
- 4
- 5
- 6
- 7
- 8
- 9
- 10
- 11
- 12
- 13
- 14
- 15
- 16
以上连接点、切入点、增强通知共同组成了切面,接下来定义最核心的配置文件来配置切面。
切面 = 增强通知 + 连接点 + 切入点<beans xmlns="http://www.springframework.org/schema/beans" xmlns:xsi="http://www.w3.org/2001/XMLSchema-instance" xmlns:context="http://www.springframework.org/schema/context" xmlns:aop="http://www.springframework.org/schema/aop" xsi:schemaLocation="http://www.springframework.org/schema/beans http://www.springframework.org/schema/beans/spring-beans.xsd http://www.springframework.org/schema/context http://www.springframework.org/schema/context/spring-context.xsd http://www.springframework.org/schema/aop http://www.springframework.org/schema/aop/spring-aop.xsd"> <!-- 定义被代理者 --> <bean id="baby" class="com.xxxx.bean.People"></bean> <!-- 定义通知内容,也就是切入点执行前后需要做的事情 --> <bean id="sleepHelper" class="com.xxxx.bean.PeopleHelper"></bean> <!-- 定义切入点位置 sleep方法前后--> <bean id="sleepPointcut" class="org.springframework.aop.support.JdkRegexpMethodPointcut"> <property name="pattern" value=".*sleep"></property> </bean> <!-- 使切入点与通知相关联,完成切面配置--> <bean id="sleepHelperAdvisor" class="org.springframework.aop.support.DefaultPointcutAdvisor"> <!--通知,前置通知before,返回通知afterReturning--> <!--连接点可以认为方法调用就是一个连接点,通知就是把控切入哪个位置,切点就是具体要做的行为 通知可以告诉这些行为在哪个位置做,连接点把这些行为连接起来--> <property name="advice" ref="sleepHelper"></property> <!--切点--> <property name="pointcut" ref="sleepPointcut"></property> </bean> <!-- 设置代理 --> <bean id="proxy" class="org.springframework.aop.framework.ProxyFactoryBean"> <!-- 代理的对象,有睡觉能力 --> <property name="target" ref="people"></property> <!-- 代理接口,睡觉接口 --> <property name="proxyInterfaces" value="com.xxxx.bean.Sleep"></property> <!-- 使用切面 即向代理对象切入--> <property name="interceptorNames" value="sleepHelperAdvisor"></property> </bean> </beans>- 1
- 2
- 3
- 4
- 5
- 6
- 7
- 8
- 9
- 10
- 11
- 12
- 13
- 14
- 15
- 16
- 17
- 18
- 19
- 20
- 21
- 22
- 23
- 24
- 25
- 26
- 27
- 28
- 29
- 30
- 31
- 32
- 33
- 34
- 35
- 36
- 37
测试类
public class test { //通过AOP代理的方式执行Baby的sleep()方法,会在执行前、执行后切入,实现了AOP的效果 @Test public void aoptest() { @SuppressWarnings("resource") ApplicationContext appCtx = new FileSystemXmlApplicationContext("application.xml"); //获取代理对象,application.xml定义了id="proxy"的bean对象 Sleep people= (Sleep) appCtx.getBean("proxy"); people.sleep(); } }- 1
- 2
- 3
- 4
- 5
- 6
- 7
- 8
- 9
- 10
- 11
- 12
运行结果
睡觉前脱衣服!!! 坤坤该睡觉了。。。 起床后穿衣服!!!- 1
- 2
- 3
以上小节对AOP的实现有了初步理解,这是最接近原理的配置,也是最经典的。先配置切点、通知,然后组成切面。
2.3.2 使用SpringAOP的API接口
新建一个Maven项目,pom文件还是用上面的,创建service包,并在其中写一个业务UserService,用户可以进行增删改查。
UserSerivce接口,,代码如下:public interface UserService { void add(); void del(); void update(); void select(); }- 1
- 2
- 3
- 4
- 5
- 6
UserServiceImpl实现类,代码如下:
public class UserServiceImpl implements UserService { @Override public void add() { System.out.println("增加用户"); } @Override public void delete() { System.out.println("删除用户"); } @Override public void update() { System.out.println("更新用户"); } @Override public void select() { System.out.println("查询用户"); } }- 1
- 2
- 3
- 4
- 5
- 6
- 7
- 8
- 9
- 10
- 11
- 12
- 13
- 14
- 15
- 16
- 17
- 18
- 19
- 20
- 21
再创建一个Log包,里面写日志,就是需要新增的功能,实际开发中常常也需要切入安全校验,日志操作和事务操作,写一个前置一个后置。
BeforeLog实现类,代码如下:import org.springframework.aop.MethodBeforeAdvice; import java.lang.reflect.Method; public class BeforeLog implements MethodBeforeAdvice { //Method:要执行目标对象的方法 //args:参数 //target:目标对象 @Override public void before(Method method, Object[] args, Object target) throws Throwable { System.out.println(target.getClass().getName()+"->方法:"+method.getName()+"被执行"); } }- 1
- 2
- 3
- 4
- 5
- 6
- 7
- 8
- 9
- 10
- 11
- 12
- 13
AfterLog实现类,代码如下:
import org.springframework.aop.AfterReturningAdvice; import java.lang.reflect.Method; public class AfterLog implements AfterReturningAdvice { @Override public void afterReturning(Object returnValue, Method method, Object[] args, Object target) throws Throwable { System.out.println("执行了"+method.getName()+",返回结果为:"+returnValue); } }- 1
- 2
- 3
- 4
- 5
- 6
- 7
- 8
- 9
- 10
resources包下面applicationContext.xml进行相关配置,包括注册bean,配置切面。配置文件如下:
<beans xmlns="http://www.springframework.org/schema/beans" xmlns:xsi="http://www.w3.org/2001/XMLSchema-instance" xmlns:aop="http://www.springframework.org/schema/aop" xsi:schemaLocation="http://www.springframework.org/schema/beans http://www.springframework.org/schema/beans/spring-beans.xsd http://www.springframework.org/schema/aop http://www.springframework.org/schema/aop/spring-aop.xsd"> <bean id="userService" class="com.xxxx.service.UserServiceImpl">bean> <bean id="beforeLog" class="com.xxxx.log.BeforeLog">bean> <bean id="afterLog" class="com.xxxx.log.AfterLog">bean> <aop:config> <aop:pointcut id="pointcut" expression="execution(* com.xxxx.service.UserServiceImpl.*(..))"/> <aop:advisor advice-ref="beforeLog" pointcut-ref="pointcut"/> <aop:advisor advice-ref="afterLog" pointcut-ref="pointcut"/> aop:config> beans>- 1
- 2
- 3
- 4
- 5
- 6
- 7
- 8
- 9
- 10
- 11
- 12
- 13
- 14
- 15
- 16
- 17
- 18
- 19
- 20
- 21
- 22
- 23
- 24
用Spring AOP的API接口进行切入的好处就是,它会自动帮你创建和管理类,不用亲自new对象,这样可以实现解耦。只要设置目标类路径即可,无论类怎么变都无需进行改动,上面就可以把beforeLog和afterLog切入到UserServiceImpl所有方法中。
测试类,代码如下:
import com.yx.service.UserService; import org.springframework.context.ApplicationContext; import org.springframework.context.support.ClassPathXmlApplicationContext; public class MyTest { public static void main(String[] args) { //加载配置文件 ApplicationContext context = new ClassPathXmlApplicationContext("applicationContext.xml"); //通过目标的bean id,获得代理对象 UserService proxy = (UserService)context.getBean("userService"); //获取注册的bean对象,实例对象变成bean对象,就是代理对象 proxy.add(); } }- 1
- 2
- 3
- 4
- 5
- 6
- 7
- 8
- 9
- 10
- 11
- 12
- 13
- 14
测试结果:
// 前置 com.xxxx.service.UserServiceImpl->方法:add被执行 // add()方法 增加用户 // 后置 执行了add,返回结果为null- 1
- 2
- 3
- 4
- 5
- 6
2.3.3 自定义类来实现AOP
创建一个diy的包,定义一个类MyPointCut,类中定义要切入的方法
MyPointCut类,代码如下:public class diyPointCut { public void before(){ System.out.println("=========方法执行前=========="); } public void after(){ System.out.println("=========方法执行后=========="); } }- 1
- 2
- 3
- 4
- 5
- 6
- 7
- 8
- 9
- 10
applicationContext1.xml配置文件,和方式1(基于经典代理实现)类似,但稍微有不同,不同就是自定义注册,配置文件如下:
<beans xmlns="http://www.springframework.org/schema/beans" xmlns:xsi="http://www.w3.org/2001/XMLSchema-instance" xmlns:aop="http://www.springframework.org/schema/aop" xsi:schemaLocation="http://www.springframework.org/schema/beans http://www.springframework.org/schema/beans/spring-beans.xsd http://www.springframework.org/schema/aop http://www.springframework.org/schema/aop/spring-aop.xsd"> <bean id="userService" class="com.xxxx.service.UserServiceImpl">bean> <bean id="diy" class="com.xxxx.Diy.MyPointCut">bean> <aop:config> <aop:aspect ref="diy"> <aop:pointcut id="point" expression="execution(* com.xxxx.service.UserServiceImpl.*(..))"/> <aop:before method="before" pointcut-ref="point">aop:before> <aop:after method="after" pointcut-ref="point">aop:after> aop:aspect> aop:config> beans>- 1
- 2
- 3
- 4
- 5
- 6
- 7
- 8
- 9
- 10
- 11
- 12
- 13
- 14
- 15
- 16
- 17
- 18
- 19
- 20
- 21
- 22
- 23
- 24
测试类,代码如下:
import com.yx.service.UserService; import org.springframework.context.ApplicationContext; import org.springframework.context.support.ClassPathXmlApplicationContext; public class MyTest { public static void main(String[] args) { //加载配置文件 ApplicationContext context = new ClassPathXmlApplicationContext("applicationContext1.xml"); //通过目标的bean id,获得代理对象 UserService proxy = (UserService)context.getBean("userService"); //获取注册的bean对象,实例对象变成bean对象,就是代理对象 proxy.add(); } }- 1
- 2
- 3
- 4
- 5
- 6
- 7
- 8
- 9
- 10
- 11
- 12
- 13
- 14
测试结果:
=========方法执行前========== 增加用户 =========方法执行后==========- 1
- 2
- 3
自定义好处:
直接在一个自定义类中定义切入的多个方法,并且不用实现对应接口,比如之前的用API接口的实现方式,还要去写用了什么通知,前置通知还是后置通知,但这里不用了,如下图implements MethodBeforeAdvice和implements AfterReturningAdvice这里自定义就不用去实现了,直接用aop:before或者aop:after就可以表示用了什么通知,只要在自定义类中定义需要切入的方法即可,如此处diyPointCut自定义类就定义了before和after这两个普通方法。

2.3.4 基于注解实现
新建一个注解类,@Aspect表示切面,@Before表示前置通知,@After表示后置通知,通知结合
execution(* com.yx.service.UserServiceImpl.*(..))表示对类中哪些方法有通知,这里指的是UserServiceImpl类中的全部方法。
在diy包下新建AnnotationPointCut类,代码如下:import org.aspectj.lang.annotation.After; import org.aspectj.lang.annotation.Aspect; import org.aspectj.lang.annotation.Before; @Aspect public class AnnotationPointCut { @Before("execution(* com.xxxx.service.UserServiceImpl.*(..))") public void before(){ System.out.println("==========方法执行前(注解)=========="); } @After("execution(* com.xxxx.service.UserServiceImpl.*(..))") public void after(){ System.out.println("==========方法执行后(注解)=========="); } }- 1
- 2
- 3
- 4
- 5
- 6
- 7
- 8
- 9
- 10
- 11
- 12
- 13
- 14
- 15
- 16
- 17
本质还是扫描到注解以后,就会转成类似方式3(自定义类来实现AOP)的配置文件,@Before(切点)
applicationContext2.xml只需要注册bean,开启注解即可,配置文件如下:<beans xmlns="http://www.springframework.org/schema/beans" xmlns:xsi="http://www.w3.org/2001/XMLSchema-instance" xmlns:aop="http://www.springframework.org/schema/aop" xsi:schemaLocation="http://www.springframework.org/schema/beans http://www.springframework.org/schema/beans/spring-beans.xsd http://www.springframework.org/schema/aop http://www.springframework.org/schema/aop/spring-aop.xsd"> <bean id="userService" class="com.xxxx.service.UserServiceImpl">bean> <bean id="annotationPointCut" class="com.xxxx.Diy.AnnotationPointCut">bean> <aop:aspectj-autoproxy/> beans>- 1
- 2
- 3
- 4
- 5
- 6
- 7
- 8
- 9
- 10
- 11
- 12
- 13
- 14
- 15
- 16
MyTest修改加载的配置文件,改成applicationContext2.xml
//加载配置文件 ApplicationContext context = new ClassPathXmlApplicationContext("applicationContext2.xml");- 1
- 2
测试结果:
==========方法执行前(注解)========== 增加用户 ==========方法执行后(注解)==========- 1
- 2
- 3
-
相关阅读:
最详细的Xshell连接Linux
鸿鹄工程项目管理系统em Spring Cloud+Spring Boot+前后端分离构建工程项目管理系统
【C转C++之路】带你弄懂输入输出(初步)、缺省参数和函数重载
达梦数据库指定索引
antd——使用a-tree组件实现 检索+自动展开+自定义增删改查功能——技能提升
finetune一个GPT3模型
使用 Guava Retry 优雅的实现重试机制
C++课堂整理--第二章内容
免费分享一套基于Springboot+Vue的医院管理系统,挺漂亮的
Visual Studio Code 中编译和调试 CMake 项目(Milvus Knowhere为例)
- 原文地址:https://blog.csdn.net/qq_44723773/article/details/127813987
