-
linux基本指令(上)
1.whomai指令
[root@VM-8-8-centos ~]# whoami root- 1
- 2
- 3
用于查询当前用户名
若此时只有root现,说明当前只有一个超级权限用户root2. pwd指令
显示当前所处的目录
[root@VM-8-8-centos 9.9]# pwd /root/9.9- 1
- 2
- 3
此时说明 我在 root下的9.9目录
3. ls 指令
1. ls指令
用来显示当前命令下的所有文件(只会显示一般文件的文件名/目录)
[root@VM-8-8-centos 9.9]# ls 666.txt lesson2- 1
- 2
在 根目录root下的9.9目录中,有一个666.txt的文件 ,一个 lesson2的目录
2. ls -l指令
除文件名之外的更详细的属性信息
[root@VM-8-8-centos 9.9]# ls -l total 4 -rw-r--r-- 1 root root 0 Sep 27 09:48 666.txt drwxr-xr-x 2 root root 4096 Sep 26 19:03 lesson2- 1
- 2
- 3
- 4
- 5
这里需要注意的是,以r开头 的就为一般文件,以d开头的就为目录
sep为日期
显示 666.txt的文件在 27日的9点48分被创建 ,
显示lesson2的目录在26日的 19点3分被创建3.ls -la指令
这里是在 ls-l指令的基础上 ,会显示出隐藏文件
[root@VM-8-8-centos 9.9]# ls -la total 12 drwxr-xr-x 3 root root 4096 Sep 27 09:48 . dr-xr-x---. 8 root root 4096 Sep 26 17:52 .. -rw-r--r-- 1 root root 0 Sep 27 09:48 666.txt drwxr-xr-x 2 root root 4096 Sep 26 19:03 lesson2- 1
- 2
- 3
- 4
- 5
- 6
- 7
相比于ls-l指令的显示,我们不难发现 多出了二行 .和 . .
这两个东西 很多时候跟cd指令一起使用1. cd .
[root@VM-8-8-centos 9.9]# pwd /root/9.9 [root@VM-8-8-centos 9.9]# cd . [root@VM-8-8-centos 9.9]# pwd /root/9.9- 1
- 2
- 3
- 4
- 5
cd .前后目录没有变化,依旧在root下的9.9目录上
所以 cd .的作用是 进入当前目录2. cd . .
[root@VM-8-8-centos 9.9]# pwd /root/9.9 [root@VM-8-8-centos 9.9]# cd .. [root@VM-8-8-centos ~]# pwd /root- 1
- 2
- 3
- 4
- 5
此时我们发现,使用cd … 后 从根目录下的9.9目录 返回到了 root
所以 cd . .的作用是 返回上一级目录4. ls -ld指令
不进入当前目录内部,而是将当前目录本身打印
[root@VM-8-8-centos lesson2]# pwd /root/9.9/lesson2 [root@VM-8-8-centos lesson2]# ls -la total 12 drwxr-xr-x 3 root root 4096 Sep 27 14:56 . drwxr-xr-x 3 root root 4096 Sep 27 09:48 .. drwxr-xr-x 2 root root 4096 Sep 27 14:55 dir [root@VM-8-8-centos lesson2]# ls -ld dir drwxr-xr-x 2 root root 4096 Sep 27 14:55 dir [root@VM-8-8-centos lesson2]# pwd /root/9.9/lesson2- 1
- 2
- 3
- 4
- 5
- 6
- 7
- 8
- 9
- 10
- 11
首先 ,处于 root下的 9.9目录下的 lesson2目录
通过 ls - la指令, 了解到 lesson2目录下有一个 dir目录
再通过 ls -ld指令 ,找到dir目录本身,当再次pwd时,发现目录依旧处于lesson2
说明使用 ls -ld指令不是真正进入5. ls -i指令
该指令主要能够寻找到文件所对应的inode编号
[root@VM-8-8-centos lesson2]# pwd /root/9.9/lesson2 [root@VM-8-8-centos lesson2]# ls -la -i total 12 657683 drwxr-xr-x 3 root root 4096 Sep 27 14:56 . 657678 drwxr-xr-x 3 root root 4096 Sep 27 09:48 .. 657694 drwxr-xr- 2 root root 4096 Sep 27 14:55 dir- 1
- 2
- 3
- 4
- 5
- 6
- 7
此时在 前面显的 数字 如 657683、657678、657694 都是文件的inode编号
linux一切皆文件1. windows 与linux标识文件之间的区别
windows: 用文件名 +后缀来标识文件
linux :使用inode编号来标识文件6. ls -R指令
当前目录所处下的子目录与文件 以及子目录下包含的文件
[root@VM-8-8-centos 9.9]# pwd /root/9.9 [root@VM-8-8-centos 9.9]# ls -R .: 666.txt lesson2 touch ./lesson2: dir test.c- 1
- 2
- 3
- 4
- 5
- 6
- 7
- 8
- 9
- 10
当前目录在 /root/9.9
在当前目录中 有 文件 test.c与 touch ,目录 lesson2
在lesson2 目录下 有 目录dir 与 文件test.c4. cd指令
1.cd 指令
一般的cd指令+想要进入的目录内容
[root@VM-8-8-centos lesson2]# pwd /root/9.9/lesson2[root@VM-8-8-centos lesson2]# ls -l total 12 drwxr-xr-x 2 root root 4096 Sep 27 14:55 dir -rw-r--r-- 1 root root 13 Sep 27 15:29 test.c -rw-r--r-- 1 root root 15 Sep 27 15:29 touch [root@VM-8-8-centos lesson2]# cd dir [root@VM-8-8-centos dir]# pwd /root/9.9/lesson2/dir- 1
- 2
- 3
- 4
- 5
- 6
- 7
- 8
- 9
刚开始在 /root/9.9/lesson2的目录下
通过 cd dir ,目录变成 /root/9.9/lesson2/dir中2. cd ~ 指令
进入当前目录的主工作目录
[root@VM-8-8-centos dir]# pwd /root/9.9/lesson2/dir [root@VM-8-8-centos dir]# cd ~ [root@VM-8-8-centos ~]# pwd /root- 1
- 2
- 3
- 4
- 5
- 6
使用 cd ~ 后 ,使目录 从 /root/9.9/lesson2/dir 到 /root目录中
3.cd -指令
cd 到当前所处的路径的上一次所处的路径
[root@VM-8-8-centos lesson2]# pwd /root/9.9/lesson2 [root@VM-8-8-centos lesson2]# cd ~ [root@VM-8-8-centos ~]# pwd /root [root@VM-8-8-centos ~]# cd - /root/9.9/lesson2- 1
- 2
- 3
- 4
- 5
- 6
- 7
原目录处于 /root/9.9/lesson2中
通过 cd ~ 处于 /root目录中
在 通过 cd - 回到 /root/9.9/lesson2 中5. 根目录
[root@VM-8-8-centos 9.9]# pwd /root/9.9 [root@VM-8-8-centos 9.9]# ls -la total 16 drwxr-xr-x 3 root root 4096 Sep 27 16:38 . dr-xr-x---. 8 root root 4096 Sep 27 17:58 .. -rw-r--r-- 1 root root 0 Sep 27 09:48 666.txt drwxr-xr-x 3 root root 4096 Sep 28 07:24 lesson2 -rw-r--r-- 1 root root 13 Sep 27 16:36 touch [root@VM-8-8-centos 9.9]# cd .. [root@VM-8-8-centos ~]# pwd /root [root@VM-8-8-centos ~]# cd .. [root@VM-8-8-centos /]# pwd / [root@VM-8-8-centos /]# cd .. [root@VM-8-8-centos /]# pwd /- 1
- 2
- 3
- 4
- 5
- 6
- 7
- 8
- 9
- 10
- 11
- 12
- 13
- 14
- 15
- 16
- 17
- 18
在 /root/9.9目录下,通过 cd . . 不停的返回上一级目录 ,发现当返回到 / 时,再次cd . .依旧在/位置处,
在linux中 /有两种身份
1.** 一串路径的分隔符,linux为 /,在windows中为\ **
2. /作为根目录的标识1.绝对路径
操作系统 组织文件的方式,都是树形结构,即多叉树
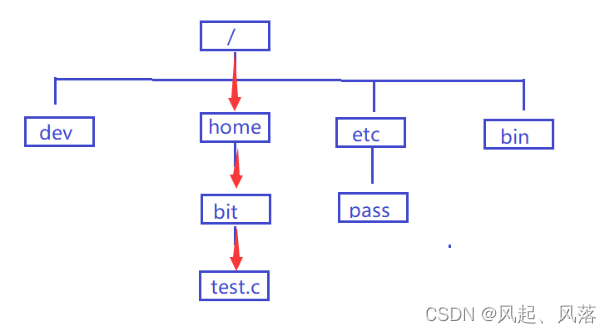
此时 /home/bit/test.c 可以称之为路径
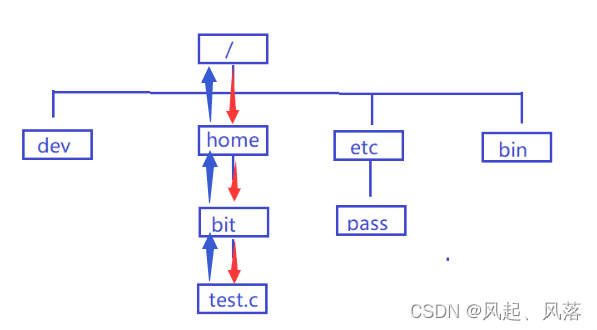
此时 test.c想上找 ,有且仅有一条路可以出去 ,即有唯一性
就可以称作绝对路径[root@VM-8-8-centos dir]# pwd /root/9.9/lesson1/dir [root@VM-8-8-centos dir]# ls -ld /root/9.9/lesson2 drwxr-xr-x 2 root root 4096 Sep 28 08:13 /root/9.9/lesson2- 1
- 2
- 3
- 4
- 5
2.相对路径
相对路径是相对于自己当前所处的目录的
例
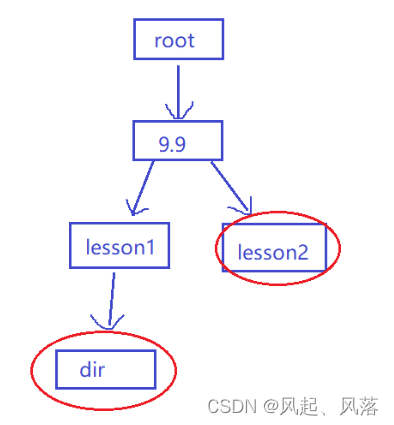
此时在dir目录位置,找到 lesson2目录位置
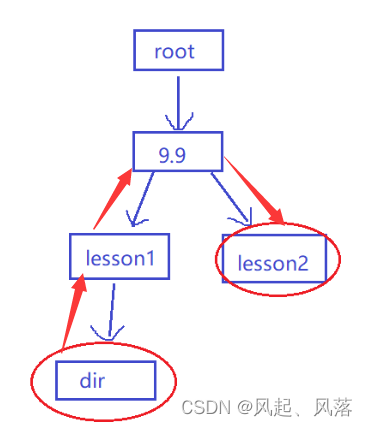
[root@VM-8-8-centos dir]# pwd /root/9.9/lesson1/dir [root@VM-8-8-centos dir]# ls -ld ../../lesson2 drwxr-xr-x 2 root root 4096 Sep 28 08:13 ../../lesson2- 1
- 2
- 3
- 4
…/ 回到 lesson1
…/…/回到9.9
…/…/lesson2 来到9.9目录下的lesson2判断相对路径是否唯一
当想从lesson进入dir目录中时
1.从当前的 lesson1进入dir
[root@VM-8-8-centos lesson1]# pwd /root/9.9/lesson1 [root@VM-8-8-centos lesson1]# cd ./dir [root@VM-8-8-centos dir]# pwd /root/9.9/lesson1/dir- 1
- 2
- 3
- 4
- 5
2.返回上一级 9.9 ,再进入lesson1,再进入dir
[root@VM-8-8-centos lesson1]# pwd /root/9.9/lesson1 [root@VM-8-8-centos lesson1]# cd ../lesson1/dir [root@VM-8-8-centos dir]# pwd /root/9.9/lesson1/dir- 1
- 2
- 3
- 4
- 5
- 6
3.返回到root ,然后再进入dir
[root@VM-8-8-centos dir]# pwd /root/9.9/lesson1/dir [root@VM-8-8-centos dir]# cd ../../../9.9/lesson1/dir [root@VM-8-8-centos dir]# pwd /root/9.9/lesson1/dir- 1
- 2
- 3
- 4
- 5
- 6
说明相对路径不唯一,即不具有唯一性
6. touch 指令
1.创建文件
touch +文件名 即可创建一个文件
[root@VM-8-8-centos 9.9]# ls -l total 4 -rw-r--r-- 1 root root 0 Sep 27 09:48 666.txt drwxr-xr-x 3 root root 4096 Sep 27 15:31 lesson2 [root@VM-8-8-centos 9.9]# touch bin.c [root@VM-8-8-centos 9.9]# ls -l total 4 -rw-r--r-- 1 root root 0 Sep 27 09:48 666.txt -rw-r--r-- 1 root root 0 Sep 27 15:50 bin.c drwxr-xr-x 3 root root 4096 Sep 27 15:31 lesson2- 1
- 2
- 3
- 4
- 5
- 6
- 7
- 8
- 9
- 10
- 11
观察即可发现 使用touch bin.c后,下面多了个 bin.c的文件
2. 修改文件的时间信息
[root@VM-8-8-centos 9.9]# stat bin.c File: ‘bin.c’ Size: 0 Blocks: 0 IO Block: 4096 regular empty file Device: fd01h/64769d Inode: 657954 Links: 1 Access: (0644/-rw-r--r--) Uid: ( 0/ root) Gid: ( 0/ root) Access: 2022-09-27 15:50:13.648196751 +0800 Modify: 2022-09-27 15:50:13.648196751 +0800 Change: 2022-09-27 15:50:13.648196751 +0800 Birth: -- 1
- 2
- 3
- 4
- 5
- 6
- 7
- 8
- 9
- 10
使用 stat 打开 bin.c文件时,发现 共有三个
即 Access (读取) 、Modify((对内容的修改时间) 、Change(对属性的修改时间)在解答这三个 之前 想几个问题
1.创建一个大小为0的文件时,会在硬盘中占据空间么?
会的

虽然此时文件中没有内容,但是此时文件的名字 、大小 、日期会占据空间2.文件的名字 、大小、 修改日期等属于文件的内容?
不是
文件的名字 、大小、日期属于 属性
所以 文件 =内容 +属性3.属性(名字 、大小、日期)是数据么?
是的4.文件(内容+属性)会被保留么?
是的[root@VM-8-8-centos 9.9]# stat file.txt File: ‘file.txt’ Size: 0 Blocks: 0 IO Block: 4096 regular empty file Device: fd01h/64769d Inode: 657693 Links: 1 Access: (0644/-rw-r--r--) Uid: ( 0/ root) Gid: ( 0/ root) Access: 2022-09-27 16:16:54.301985090 +0800 Modify: 2022-09-27 16:16:54.301985090 +0800 Change: 2022-09-27 16:16:54.301985090 +0800 Birth: - [root@VM-8-8-centos 9.9]# [root@VM-8-8-centos 9.9]# nano touch file.txt [root@VM-8-8-centos 9.9]# stat file.txt File: ‘file.txt’ Size: 0 Blocks: 0 IO Block: 4096 regular empty file Device: fd01h/64769d Inode: 657693 Links: 1 Access: (0644/-rw-r--r--) Uid: ( 0/ root) Gid: ( 0/ root) Access: 2022-09-27 16:17:12.902075733 +0800 Modify: 2022-09-27 16:17:31.310165425 +0800 Change: 2022-09-27 16:17:31.310165425 +0800 Birth: -- 1
- 2
- 3
- 4
- 5
- 6
- 7
- 8
- 9
- 10
- 11
- 12
- 13
- 14
- 15
- 16
- 17
- 18
- 19
- 20
- 21
我们不难发现 ,上面为空的file.txt文件 与 下面有内容的file.txt文件三个的时间发生改变
读取了两次,所以时间不相同
此时因为内容改变 ,并且字节大小改变,所以内容和属性都改变,所以后两者时间都改变了。7.mkidr 指令
1.创建目录
[root@VM-8-8-centos lesson1]# mkdir lesson1 [root@VM-8-8-centos lesson1]# ls -la total 16 drwxr-xr-x 3 root root 4096 Sep 30 15:39 . drwxr-xr-x 6 root root 4096 Sep 30 14:49 .. -rw-r--r-- 1 root root 12 Sep 30 13:49 file.c drwxr-xr-x 2 root root 4096 Sep 30 15:39 lesson1- 1
- 2
- 3
- 4
- 5
- 6
- 7
- 8
创建 lesson1目录
2.创建一串路径
[root@VM-8-8-centos lesson1]# mkdir -p dir1/dir2/dir3/dir4- 1
[root@VM-8-8-centos lesson1]# ls dir1 file.c [root@VM-8-8-centos lesson1]# ls dir1 dir2 [root@VM-8-8-centos lesson1]# ls dir1/dir2 dir3 [root@VM-8-8-centos lesson1]# ls dir1/dir2/dir3 dir4- 1
- 2
- 3
- 4
- 5
- 6
- 7
- 8
- 9
dir1目录下面有dir2目录
dir2目录下面有dir3目录
dir3目录下面有dir4目录3. tree
1. 安装
使用之前要先安装
[root@VM-8-8-centos lesson1]# yum -y install tree- 1
此时输入dir1,就会输出 dir1下面的子目录
[root@VM-8-8-centos lesson1]# tree dir1 dir1 `-- dir2 `-- dir3 `-- dir4 3 directories, 0 files- 1
- 2
- 3
- 4
- 5
- 6
- 7
- 8
以树状形式展现当前结构,将 dir1的子目录全部打印出来
2. tree .
查看当前路径
[root@VM-8-8-centos lesson1]# ls dir1 file.c [root@VM-8-8-centos lesson1]# tree . . |-- dir1 | `-- dir2 | `-- dir3 | `-- dir4 `-- file.c 4 directories, 1 file- 1
- 2
- 3
- 4
- 5
- 6
- 7
- 8
- 9
- 10
- 11
- 12
打印出 dir的子目录,以及 file.c文件
8.rm指令
1.rmdir指令
rmdir 只能删除空目录
此时dir目录内部无任何文件与子目录[root@VM-8-8-centos lesson1]# ls dir1 file.c touch [root@VM-8-8-centos lesson1]# rmdir touch [root@VM-8-8-centos lesson1]# ls dir1 file.c- 1
- 2
- 3
- 4
- 5
- 6
2. rm指令
删除文件
[root@VM-8-8-centos lesson1]# ls file.c [root@VM-8-8-centos lesson1]# rm file.c- 1
- 2
- 3
3. rm-r指令
递归方式进行删除—— rm-r
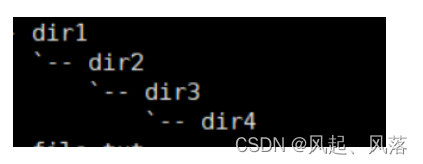
[root@VM-8-8-centos lesson1]# rm -r dir1 rm: descend into directory ‘dir1’? y rm: descend into directory ‘dir1/dir2’? y rm: descend into directory ‘dir1/dir2/dir3’? y rm: remove directory ‘dir1/dir2/dir3/dir4’? y rm: remove directory ‘dir1/dir2/dir3’? y rm: remove directory ‘dir1/dir2’? y rm: remove directory ‘dir1’? y- 1
- 2
- 3
- 4
- 5
- 6
- 7
- 8
- 9
我们想要输出dir1, 就必须删除dir2
我们想要删除dir2,就必须删除dir3
我们想要删除dir3,就必须删除dir4
删除dir4后,就可以删除dir3
删除dir3后,就可以删除dir2
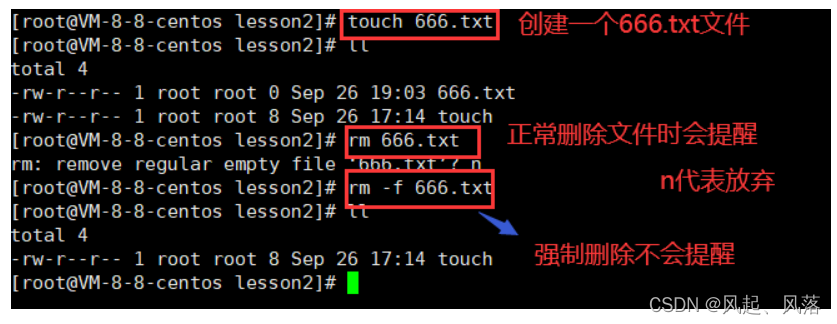
删除dir2后,才可以删除dir14. rm -rf指令
-
相关阅读:
Multi-Grade Deep Learning for Partial Differential Equations
努力前行,平凡的我们也能画出一条星光闪耀的轨迹——人大女王金融硕士项目
redis的应用
python从小到大排序 青少年编程电子学会python编程等级考试三级真题解析2020年12月
鸿蒙Harmony应用开发—ArkTS声明式开发(拖拽事件)
JavaScript核心Web APIs
解决JSON 序列化 LocalDateTime 的问题
正则-贪婪模式/非贪婪模式
抽象工厂模式
java八股文面试[设计模式]——结构型模式
- 原文地址:https://blog.csdn.net/qq_62939852/article/details/127065667
