-
【Redis入门笔记 05】Jedis 简介 & SpringBoot 集成

🍉使用 Jedis 操作 redis
Jedis 是 redis 官方推荐的 Java 链接链接开发工具,使用 Java 操作 redis 的中间件。
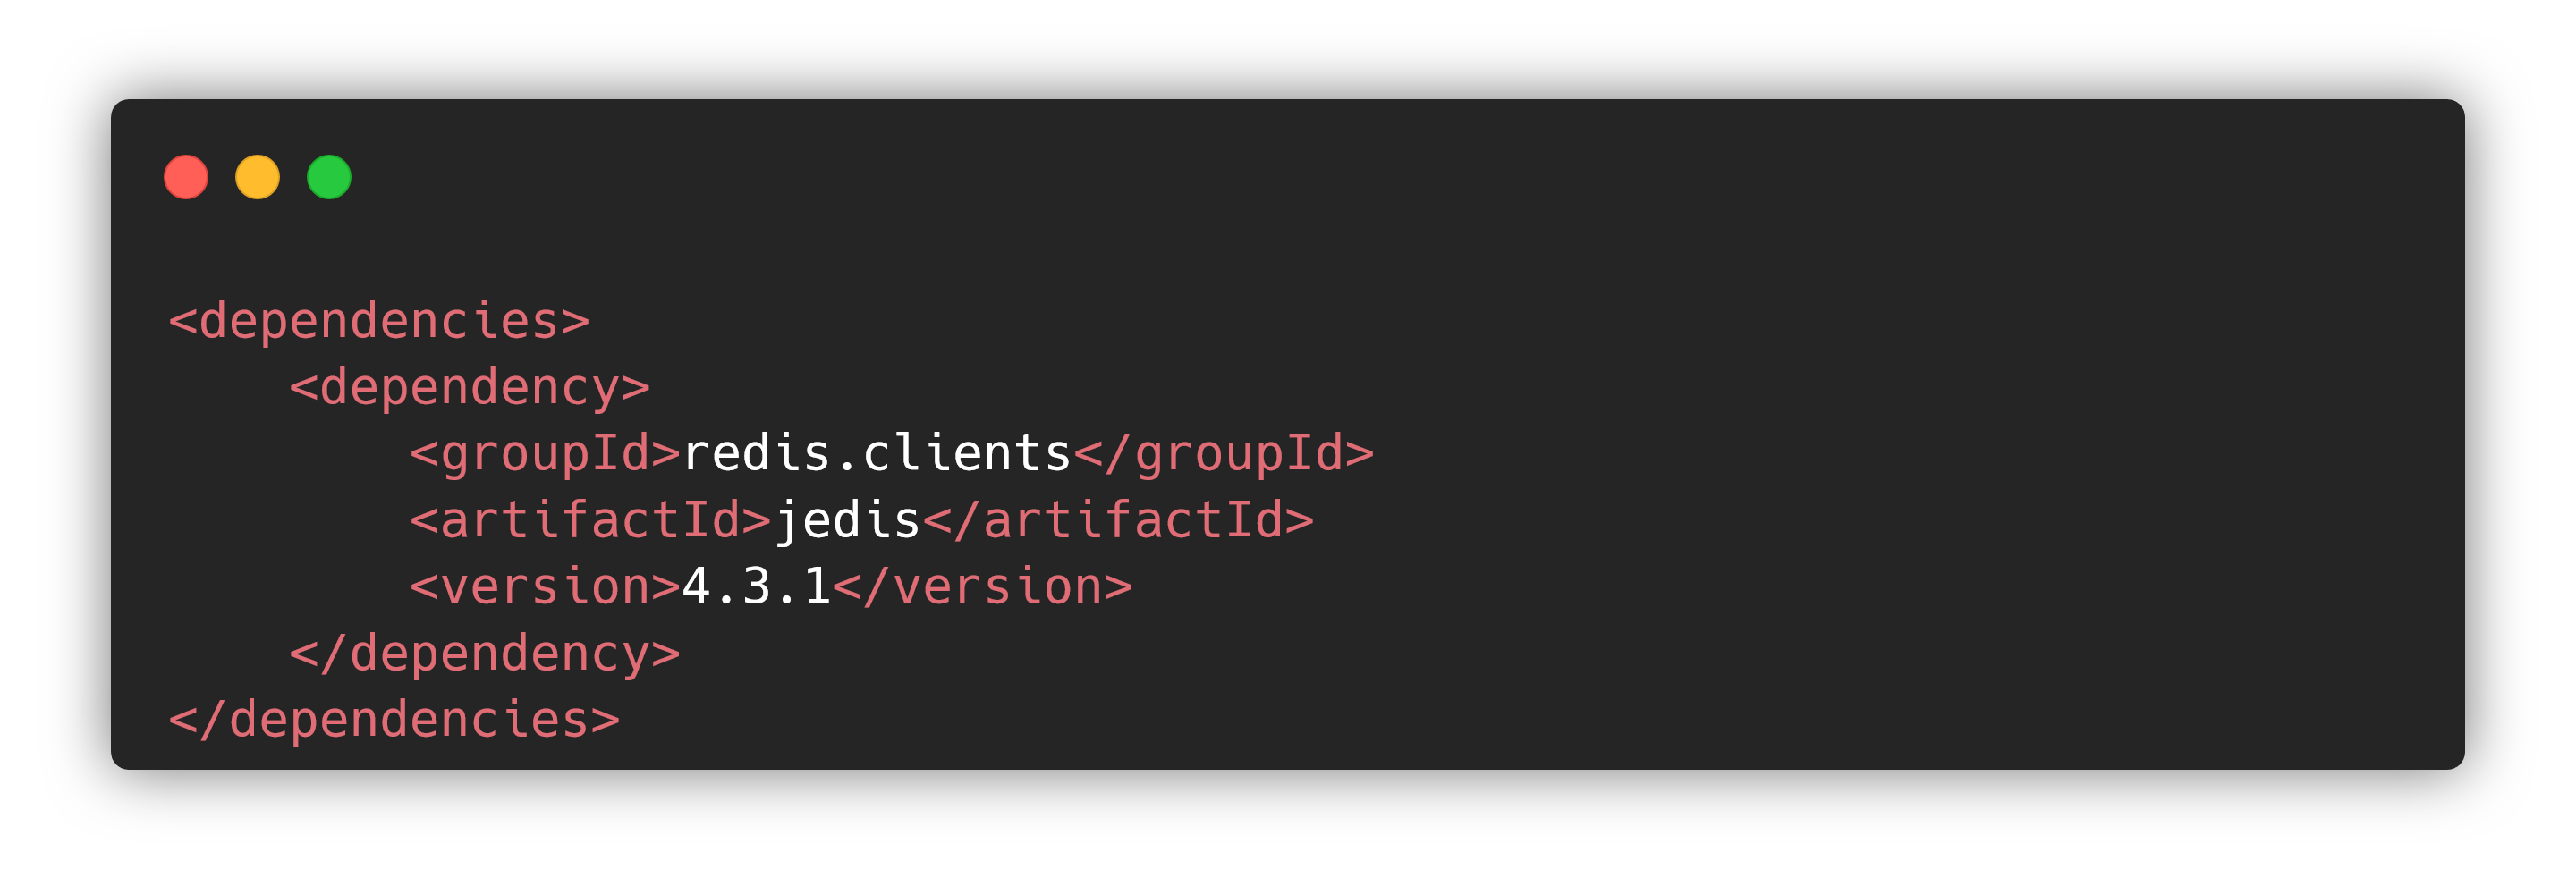
使用 Maven 将 Jedis 依赖添加至 Java 项目中:
需要使用 Jedis 时,只需要
new Jedis对象即可:import org.junit.Test; import redis.clients.jedis.Jedis; public class JedisTest { @Test public void test() { // 构造方法传入主机地址与端口号 Jedis jedis = new Jedis("127.0.0.1", 6379); // 如果 redis 设置了密码,需要先登录才能用 jedis 操作 // jedis.auth("redis@xxx"); // 测试链接 System.out.println(jedis.ping()); } } // ****************输出*************** // PONG // // Process finished with exit code 0 // ***********************************- 1
- 2
- 3
- 4
- 5
- 6
- 7
- 8
- 9
- 10
- 11
- 12
- 13
- 14
- 15
- 16
- 17
- 18
- 19
- 20
- 21
- 22
- 23
Jedis 的所有命令和 redis 中的命令是一致的,基本上没有学习成本~
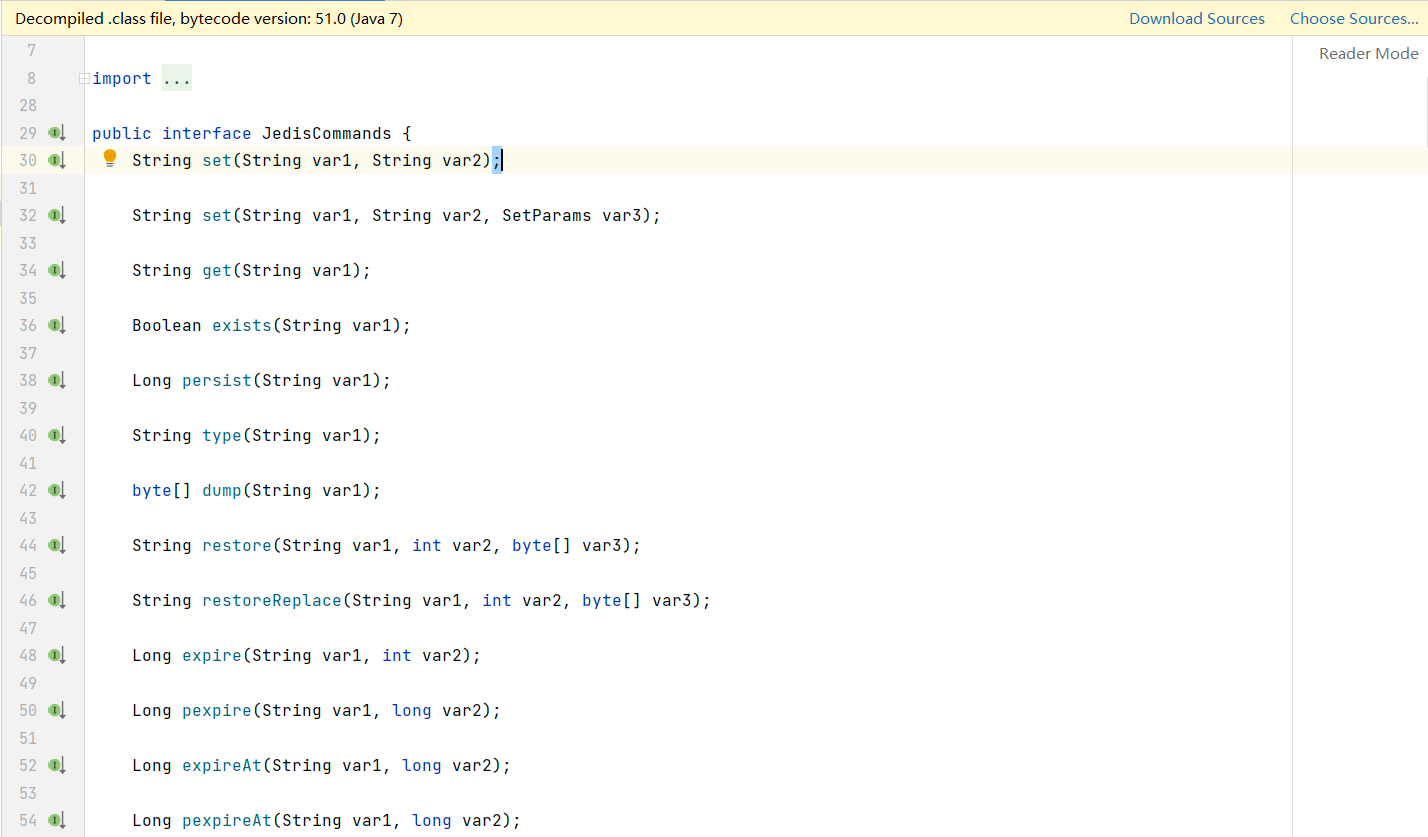
上图是
JedisCommands接口中的方法,可以发现这里面的方法名和 redis 中的各种命令都是对应的,掌握了 redis 的命令就可以轻松使用 Jedis。🍍使用 Jedis 创建事务
Jedis 中同样支持事务操作,并且可以使用
watch()方法实现乐观锁~import org.junit.Test; import redis.clients.jedis.Jedis; import redis.clients.jedis.Transaction; public class JedisTest { @Test public void test() { Jedis jedis = new Jedis("127.0.0.1", 6379); // 设置收入与支出数据 jedis.mset("income", "100", "outcome", "0"); // 开启对收入数据的监控 jedis.watch("income"); // 开启事务 Transaction multi = jedis.multi(); try { multi.decrBy("income", 20); multi.incrBy("outcome", 20); multi.exec(); // 执行事务 } catch (Exception e) { multi.discard(); // 放弃事务 } finally { jedis.close(); // 关闭链接 } } }- 1
- 2
- 3
- 4
- 5
- 6
- 7
- 8
- 9
- 10
- 11
- 12
- 13
- 14
- 15
- 16
- 17
- 18
- 19
- 20
- 21
- 22
- 23
- 24
- 25
- 26
🍓Jedis 实例 - 模拟手机验证码
用 Jedis 实现一个手机验证码模块,功能如下:
- 输入手机号,点击发送后随机生成 6 位数字码, 2 分钟有效。
- 输入验证码,点击发送,返回成功或失败。
- 每个手机号每天只能输入 3 次。
设计思路:
- 生成随机的 6 位数字码可以借助 Java 中自带的随机数实现。
- 将验证码放到 redis 中,设置 120 秒的过期时间。
- 用户输入验证码以后和 redis 中获取的验证码进行比较。
- 记录每个手机号每天的发送次数,发送一次用
incr命令 +1,大于 2 的时候提交不能发送。
代码实现:
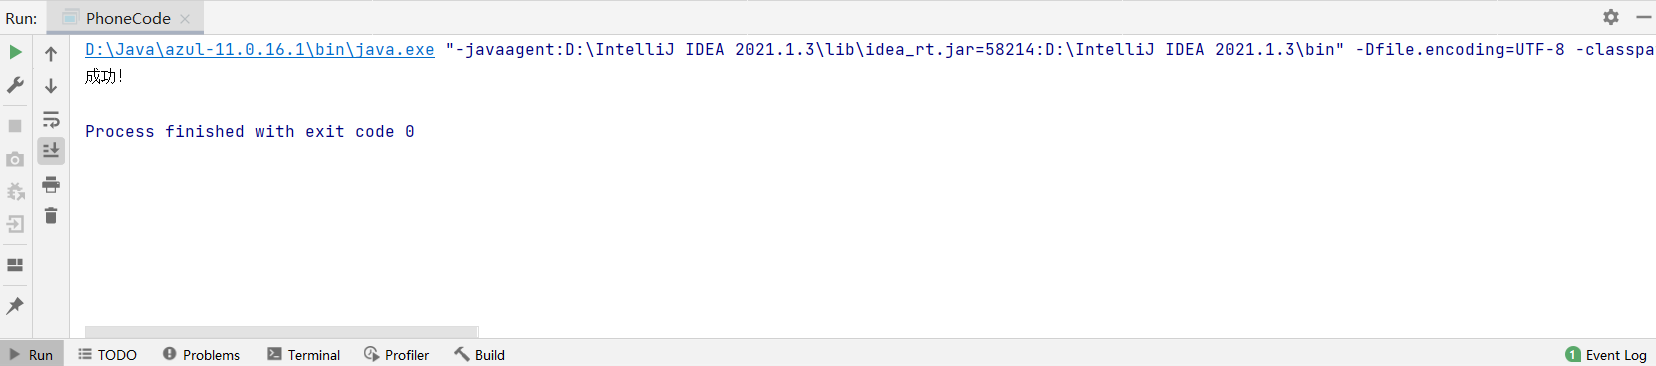
package com.jedis.demo; import redis.clients.jedis.Jedis; public class PhoneCode { public static void main(String[] args) { // 先执行验证码发送,查看 redis 中的验证码是 177959 // verifyCode("13675765423"); getRedisCode("13675765423","177959"); } // 1.生成 6 位的验证码 public static String getCode() { return String.valueOf((int) (Math.random() * 1e6)); } // 2.每个手机每天只能发送 3 次,验证码放入 redis 并设置过期时间 public static void verifyCode(String phone) { // 链接 redis Jedis jedis = new Jedis("127.0.0.1", 6379); // 拼接 key:手机发送次数,验证码 String countKey = "VerifyCode" + phone + ":count"; String codeKey = "VerifyCode" + phone + ":code"; // 存入验证码,限制发送次数 String count = jedis.get(codeKey); if (count == null) { jedis.setex(countKey, 24 * 60 * 60, "1"); jedis.setex(codeKey, 120, getCode()); } else if (Integer.parseInt(count) <= 2) { jedis.incr(countKey); jedis.setex(codeKey, 120, getCode()); } else { System.out.println("今天发送次数已经超过三次!"); jedis.close(); } } // 验证码校验 public static void getRedisCode (String phone, String code) { Jedis jedis = new Jedis("127.0.0.1", 6379); String codeKey = "VerifyCode" + phone + ":code"; String redisCode = jedis.get(codeKey); if (code.equals(redisCode)) { System.out.println("成功!"); } else { System.out.println("失败!"); } } }- 1
- 2
- 3
- 4
- 5
- 6
- 7
- 8
- 9
- 10
- 11
- 12
- 13
- 14
- 15
- 16
- 17
- 18
- 19
- 20
- 21
- 22
- 23
- 24
- 25
- 26
- 27
- 28
- 29
- 30
- 31
- 32
- 33
- 34
- 35
- 36
- 37
- 38
- 39
- 40
- 41
- 42
- 43
- 44
- 45
- 46
- 47
- 48
- 49
- 50
- 51
🍈redis 与 SpringBoot 整合
目前 SpringBoot 中整合 redis 已经不需要借助上面的 Jedis 了,原因是在 SpringBoot 2.x 版本之后,原来使用的 Jedis 被替换为了 Lettuce。Lettuce 使用 Netty 作为通信层组件,使用上更加方便快捷,抽象度高,并且通过线程安全的连接降低了系统中的连接数量,提升了系统的稳定性。
SpringBoot 整合 redis 非常简单,只需要以下几个步骤:
-
在 SpringBoot 项目的
pom.xml文件中引入 redis 相关依赖。<dependency> <groupId>org.springframework.bootgroupId> <artifactId>spring-boot-starter-data-redisartifactId> dependency>- 1
- 2
- 3
- 4
- 5
如果使用的是 SpringBoot 2.x 的版本,集成 redis 还需要多引入一个
commons-pool2依赖。<dependency> <groupId>org.apache.commonsgroupId> <artifactId>commons-pool2artifactId> <version>2.6.0version> dependency>- 1
- 2
- 3
- 4
- 5
-
application.properties 设置 redis 配置。
#Redis服务器地址 spring.redis.host=127.0.0.1 #Redis服务器连接端口 spring.redis.port=6379 #Redis登录密码 spring.redis.password=redis@xxx #Redis数据库索引(默认为0) spring.redis.database=0 #连接超时时间(毫秒) spring.redis.timeout=1800000- 1
- 2
- 3
- 4
- 5
- 6
- 7
- 8
- 9
- 10
注: \color{red}{注:} 注:以下关于连接池的配置在版本较低的 SpringBoot 项目中必须引入 commons-pool2 依赖才能使用!
#连接池最大连接数(使用负值表示没有限制) spring.redis.lettuce.pool.max-active=20 #最大阻塞等待时间(负数表示没限制) spring.redis.lettuce.pool.max-wait=-1 #连接池中的最大空闲连接 spring.redis.lettuce.pool.max-idle=5 #连接池中的最小空闲连接 spring.redis.lettuce.pool.min-idle=0- 1
- 2
- 3
- 4
- 5
- 6
- 7
- 8
-
注入
RedisTemplate,使用redisTemplate对象操作 redis。package com.example.redisspringboot; import org.junit.jupiter.api.Test; import org.springframework.beans.factory.annotation.Autowired; import org.springframework.boot.test.context.SpringBootTest; import org.springframework.data.redis.core.RedisTemplate; @SpringBootTest class RedisSpringbootApplicationTests { @Autowired private RedisTemplate redisTemplate; @Test void contextLoads() { // 操作字符串 opsForValue() redisTemplate.opsForValue().set("name", "jack"); // 操作列表 redisTemplate.opsForList().leftPushAll("list1", "v1", "v2", "v3"); // 获取 redis 中的数据 System.out.println(redisTemplate.opsForValue().get("name")); System.out.println(redisTemplate.opsForList().range("list1", 0, -1)); } }- 1
- 2
- 3
- 4
- 5
- 6
- 7
- 8
- 9
- 10
- 11
- 12
- 13
- 14
- 15
- 16
- 17
- 18
- 19
- 20
- 21
- 22
- 23
- 24
- 25
💭关于对象的序列化:
使用 SpringBoot 和 redis 时,经常会遇到要把一个对象存入 redis 的场景,我们可以用两种方法解决。一种是将对象转换成 json 格式的字符串,然后再放入到 redis 中;另一种方法是在
redisTemplate的方法中直接传入对象,但是对象类必须序列化!比如我们先在 SpringBoot 项目中创建一个 pojo,
User类,让他实现序列化接口:package com.example.redisspringboot.pojo; import lombok.AllArgsConstructor; import lombok.Data; import lombok.NoArgsConstructor; import org.springframework.stereotype.Component; import java.io.Serializable; @Component @AllArgsConstructor @NoArgsConstructor @Data public class User implements Serializable { private String name; private int age; }- 1
- 2
- 3
- 4
- 5
- 6
- 7
- 8
- 9
- 10
- 11
- 12
- 13
- 14
- 15
- 16
- 17
- 18
- 19
序列化的对象可以直接作为 redisTemplate 的参数,存入 redis 数据库。
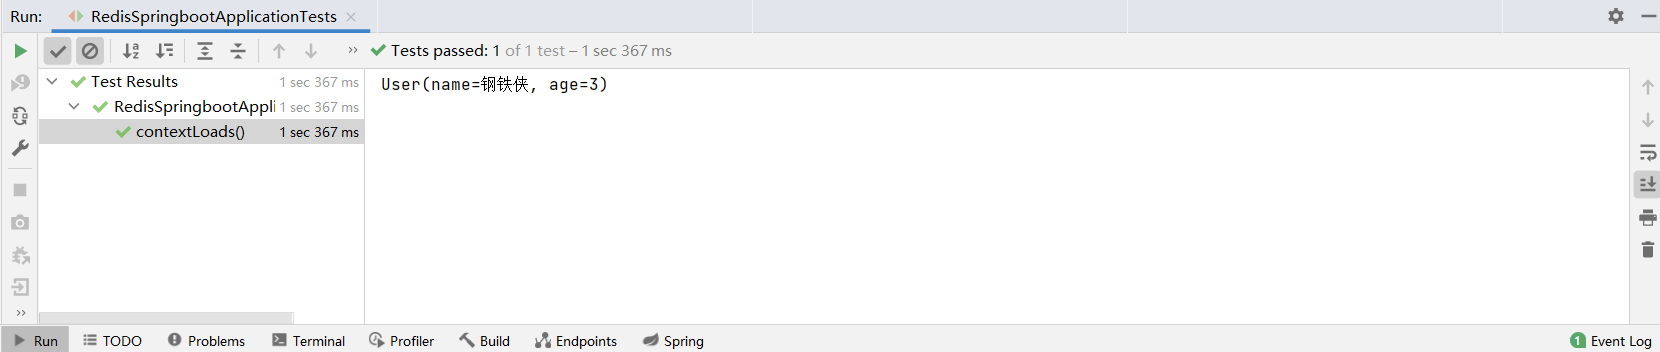
package com.example.redisspringboot; import com.example.redisspringboot.pojo.User; import org.junit.jupiter.api.Test; import org.springframework.beans.factory.annotation.Autowired; import org.springframework.boot.test.context.SpringBootTest; import org.springframework.data.redis.core.RedisTemplate; @SpringBootTest class RedisSpringbootApplicationTests { @Autowired private RedisTemplate redisTemplate; @Test void contextLoads(){ // 使用序列化的对象可以直接保存到redis User user = new User("钢铁侠", 3); // 在 redis 中保存 user 对象 redisTemplate.opsForValue().set("user", user); // 输出 user System.out.println(redisTemplate.opsForValue().get("user")); } }- 1
- 2
- 3
- 4
- 5
- 6
- 7
- 8
- 9
- 10
- 11
- 12
- 13
- 14
- 15
- 16
- 17
- 18
- 19
- 20
- 21
- 22
- 23
- 24
- 25
- 26
如果我们要保存的对象没有序列化,也可以使用 json 工具手动将对象转换为字符串再存入 redis。
package com.example.redisspringboot; import com.example.redisspringboot.pojo.User; import com.fasterxml.jackson.core.JsonProcessingException; import com.fasterxml.jackson.databind.ObjectMapper; import org.junit.jupiter.api.Test; import org.springframework.beans.factory.annotation.Autowired; import org.springframework.boot.test.context.SpringBootTest; import org.springframework.data.redis.core.RedisTemplate; @SpringBootTest class RedisSpringbootApplicationTests { @Autowired private RedisTemplate redisTemplate; @Test void contextLoads() throws JsonProcessingException { // 使用Json格式来传递对象 User user = new User("钢铁侠", 3); String jsonUser = new ObjectMapper().writeValueAsString(user); // 在 redis 中保存 user 对象 redisTemplate.opsForValue().set("user", jsonUser); // 输出 user System.out.println(redisTemplate.opsForValue().get("user")); } }- 1
- 2
- 3
- 4
- 5
- 6
- 7
- 8
- 9
- 10
- 11
- 12
- 13
- 14
- 15
- 16
- 17
- 18
- 19
- 20
- 21
- 22
- 23
- 24
- 25
- 26
- 27
- 28
- 29
🥝RedisTemplate 与 StringRedisTemplate
SpringBoot 中,除了使用
RedisTemplate操作 redis 数据库,还可以使用StringRedisTemplate,使用方式和RedisTemplate相同,添加注解@Autowired即可。@Autowired private StringRedisTemplate stringRedisTemplate;- 1
- 2
StringRedisTemplate与RedisTemplate的方法基本相同,两者的区别在于:- 两者的关系是
StringRedisTemplate继承RedisTemplate。 - 两者之间的区别主要在于他们的序列化不同:
RedisTemplate使用的是JdkSerializationRedisSerializer,存入数据会将数据先序列化成字节数组然后在存入redis 数据库;StringRedisTemplate使用的是StringRedisSerializer。 - 当你的 redis 数据库里面本来存的是字符串数据或者你要存取的数据就是字符串类型数据的时候,那么你就使用
StringRedisTemplate即可。 - 但是如果你的数据是复杂的对象类型,而取出的时候又不想做任何的数据转换,直接从 redis 里面取出一个对象,那么使用
RedisTemplate是更好的选择。
🍑自定义 redisTemplate
虽然我们可以将对象转为 json 字符串或者直接将序列化的对象作为
redisTemplate的参数,但是默认的序列化方式是 jdk 自带的序列化,保存进 redis 中的数据会存在转义字符,虽然在 Java 的输出中可以拿到正确的结果,但是如果我们直接进入 redis 客户端来查看上面的代码保存进数据库的数据会发现如下结果: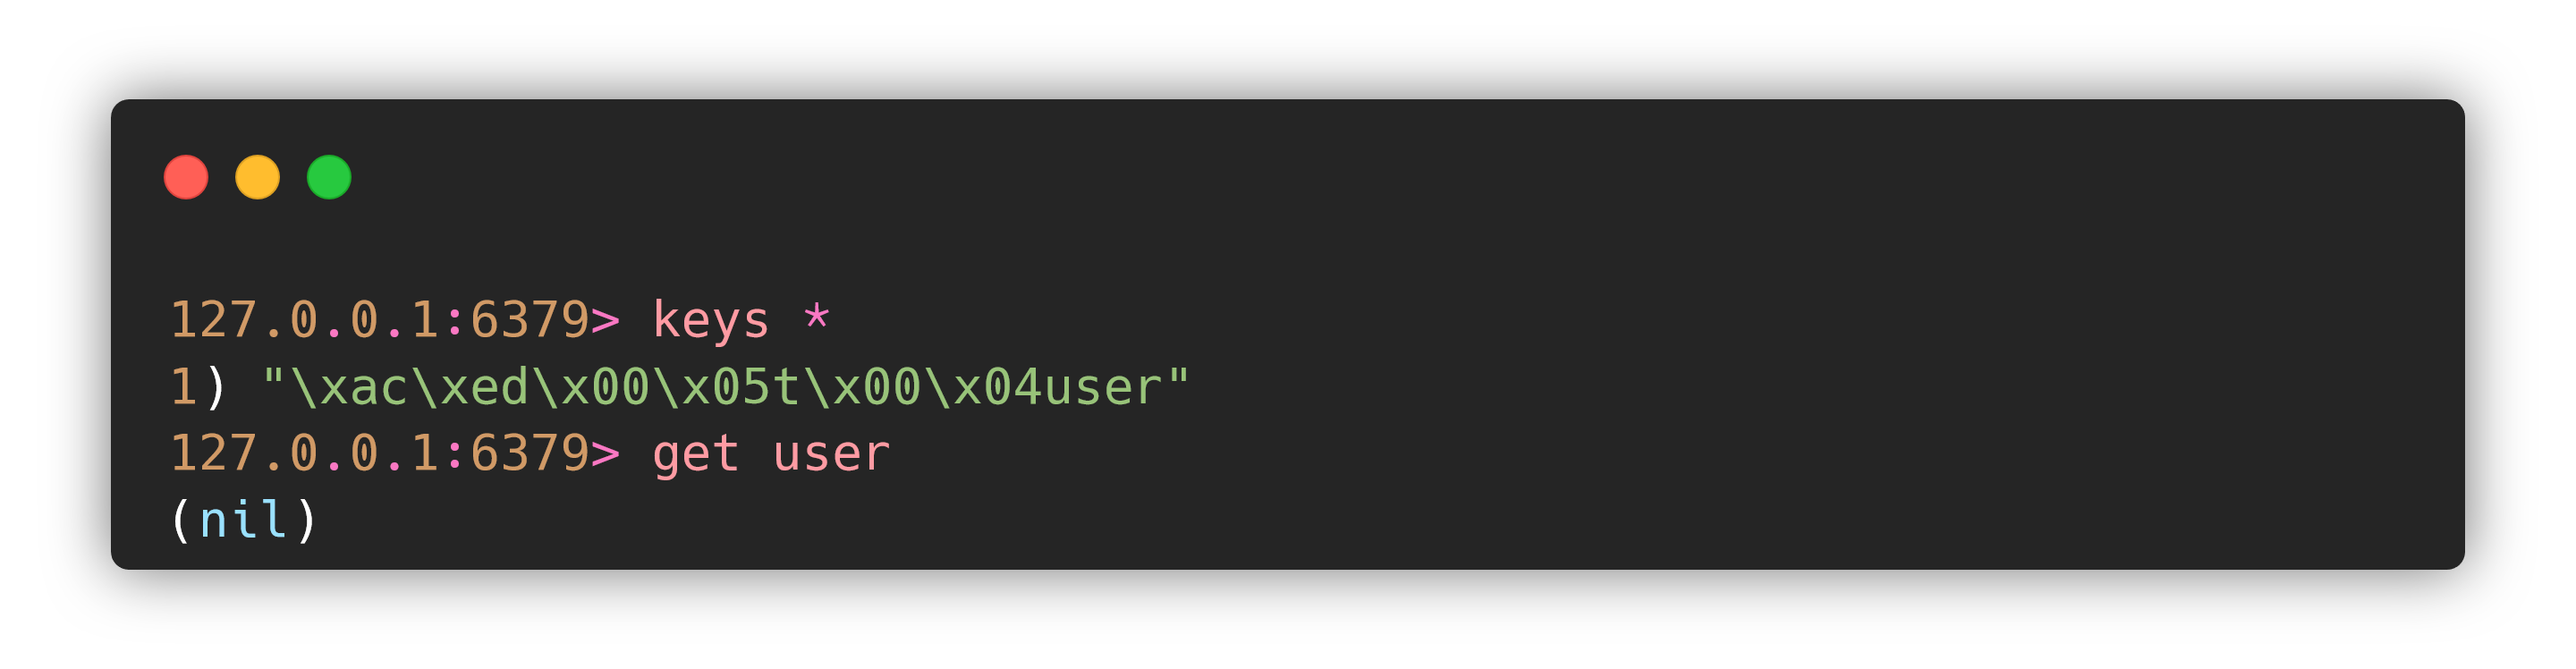
刚刚存入的 key 前面多出来了一堆字符,用 key 取数据也取不到~
SpringBoot 整合
RedisTemplate操作 redis 进行序列化/反序列化存储,redis 拥有多种数据类型,在序列化/反序列化过程中,需要保持算法一致,否则会出现 get 不到、set 乱码的问题。既然使用原生的
RedisTemplate有乱码的问题,一个完美的解决办法就是自定义RedisTemplate的序列化方式。创建一个
RedisConfig类,定义自己的RedisTemplate:package com.example.redisspringboot.config; import com.fasterxml.jackson.annotation.JsonAutoDetect; import com.fasterxml.jackson.annotation.PropertyAccessor; import com.fasterxml.jackson.databind.ObjectMapper; import org.springframework.context.annotation.Bean; import org.springframework.context.annotation.Configuration; import org.springframework.data.redis.connection.RedisConnectionFactory; import org.springframework.data.redis.core.RedisTemplate; import org.springframework.data.redis.serializer.Jackson2JsonRedisSerializer; import org.springframework.data.redis.serializer.StringRedisSerializer; @Configuration public class RedisConfig { // 编写自己的 RedisTemplate @Bean @SuppressWarnings("all") public RedisTemplate<Object, Object> redisTemplate(RedisConnectionFactory redisConnectionFactory) { RedisTemplate<Object, Object> template = new RedisTemplate(); template.setConnectionFactory(redisConnectionFactory); Jackson2JsonRedisSerializer jackson2JsonRedisSerializer = new Jackson2JsonRedisSerializer(Object.class); ObjectMapper om = new ObjectMapper(); om.setVisibility(PropertyAccessor.ALL, JsonAutoDetect.Visibility.ANY); om.enableDefaultTyping(ObjectMapper.DefaultTyping.NON_FINAL); jackson2JsonRedisSerializer.setObjectMapper(om); // String 的序列化 StringRedisSerializer stringRedisSerializer = new StringRedisSerializer(); // key 采用 String 的序列化方式 template.setKeySerializer(stringRedisSerializer); // hash 的 key 也采用 string 的序列化方式 template.setHashKeySerializer(stringRedisSerializer); // value 序列化方式采用jackson template.setValueSerializer(jackson2JsonRedisSerializer); // hash 的 value 序列化方式采用 jackson template.setHashKeySerializer(jackson2JsonRedisSerializer); template.afterPropertiesSet(); return template; } }- 1
- 2
- 3
- 4
- 5
- 6
- 7
- 8
- 9
- 10
- 11
- 12
- 13
- 14
- 15
- 16
- 17
- 18
- 19
- 20
- 21
- 22
- 23
- 24
- 25
- 26
- 27
- 28
- 29
- 30
- 31
- 32
- 33
- 34
- 35
- 36
- 37
- 38
- 39
- 40
- 41
- 42
- 43
- 44
- 45
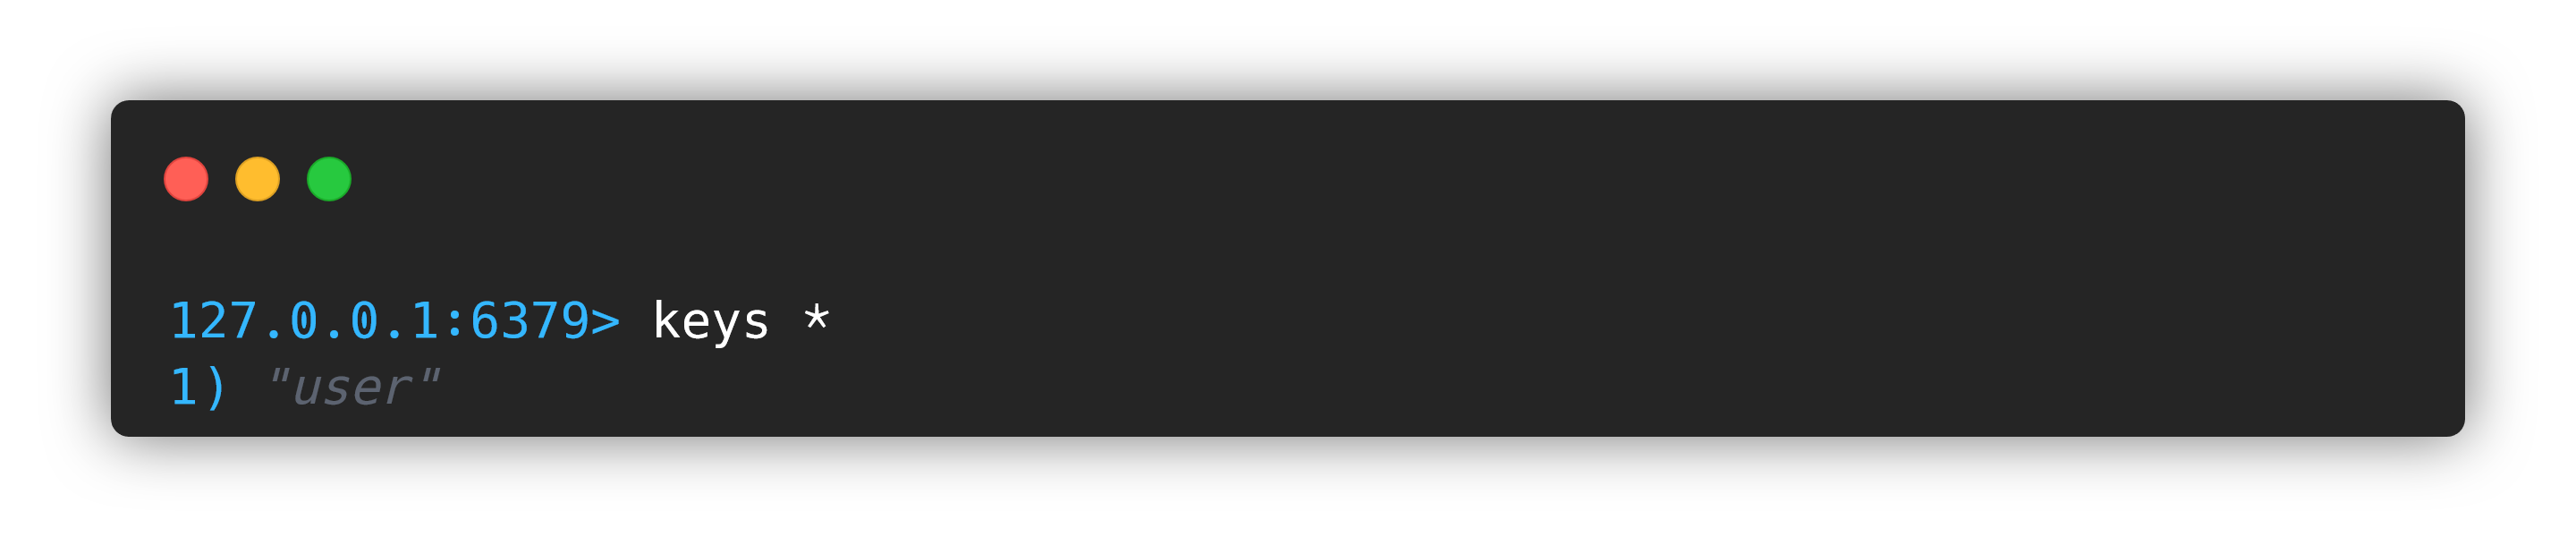
然后操作 redis 时使用我们自定义的
RedisTemplate就不会有乱码的问题了。@Autowired @Qualifier("redisTemplate") private RedisTemplate redisTemplate;- 1
- 2
- 3
🚀redis 系列专栏:Redis 快速入门
❤整理不易❤ 还请各位读者老爷们三连支持一下╰( ̄ω ̄o)
-
相关阅读:
ant design vue 循环渲染复选框以及获取复选框获的值
MySQL安装_win10(超详细)
06_多表查询
ZPLPrinter Emulator SDK v4.0.22.722 Crack
DS 顺序表--类实现(C++数据结构题)
简单而复杂的Python
信奥基本功:打字练习(盲打)
事件研究法及其应用(1)
在 C# CLR 中学习 C++ 之了解 namespace
Vue3种常用插槽的使用
- 原文地址:https://blog.csdn.net/m0_51338272/article/details/127697498
