-
Netty入门——ByteBuf
目录
一、ByteBuf的概述
- ByteBuf是对字节数据的封装。
二、ByteBuf的创建
2.1、创建一个带有初始容量的ByteBuf代码示例
-
代码示例
import io.netty.buffer.ByteBuf; import io.netty.buffer.ByteBufAllocator; import static io.netty.buffer.ByteBufUtil.appendPrettyHexDump; import static io.netty.util.internal.StringUtil.NEWLINE; /** * @description: ByteBuf(创建) * @author: xz */ public class ByteBufTest { public static void main(String[] args) { //createByteBuf1(); } /** * 创建了一个初始容量是 10 的ByteBuf * */ public static void createByteBuf1(){ //创建了一个默认的 ByteBuf(池化基于直接内存的 ByteBuf),初始容量是 10 ByteBuf buf = ByteBufAllocator.DEFAULT.buffer(10); System.out.println("查看设置的ByteBuf初始容量:"+buf); } /** * 输出ByteBuf的工具类 * */ public static void log(ByteBuf buffer) { int length = buffer.readableBytes(); int rows = length / 16 + (length % 15 == 0 ? 0 : 1) + 4; StringBuilder buf = new StringBuilder(rows * 80 * 2) .append("read index:").append(buffer.readerIndex()) .append(" write index:").append(buffer.writerIndex()) .append(" capacity:").append(buffer.capacity()) .append(NEWLINE); appendPrettyHexDump(buf, buffer); System.out.println(buf.toString()); } }- 1
- 2
- 3
- 4
- 5
- 6
- 7
- 8
- 9
- 10
- 11
- 12
- 13
- 14
- 15
- 16
- 17
- 18
- 19
- 20
- 21
- 22
- 23
- 24
- 25
- 26
- 27
- 28
- 29
- 30
- 31
- 32
- 33
- 34
- 35
- 36
-
输出结果

2.2、查看ByteBuf最大容量的代码示例
-
代码示例
import io.netty.buffer.ByteBuf; import io.netty.buffer.ByteBufAllocator; import static io.netty.buffer.ByteBufUtil.appendPrettyHexDump; import static io.netty.util.internal.StringUtil.NEWLINE; /** * @description: ByteBuf(创建) * @author: xz */ public class ByteBufTest { public static void main(String[] args) { createByteBuf2(); } /** * 查看ByteBuf最大容量 * */ public static void createByteBuf2(){ //创建了一个默认的 ByteBuf(池化基于直接内存的 ByteBuf) ByteBuf buf = ByteBufAllocator.DEFAULT.buffer(); //查看ByteBuf最大容量 System.out.println("ByteBuf最大容量:"+buf.maxCapacity()); } /** * 输出ByteBuf的工具类 * */ public static void log(ByteBuf buffer) { int length = buffer.readableBytes(); int rows = length / 16 + (length % 15 == 0 ? 0 : 1) + 4; StringBuilder buf = new StringBuilder(rows * 80 * 2) .append("read index:").append(buffer.readerIndex()) .append(" write index:").append(buffer.writerIndex()) .append(" capacity:").append(buffer.capacity()) .append(NEWLINE); appendPrettyHexDump(buf, buffer); System.out.println(buf.toString()); } }- 1
- 2
- 3
- 4
- 5
- 6
- 7
- 8
- 9
- 10
- 11
- 12
- 13
- 14
- 15
- 16
- 17
- 18
- 19
- 20
- 21
- 22
- 23
- 24
- 25
- 26
- 27
- 28
- 29
- 30
- 31
- 32
- 33
- 34
- 35
- 36
-
输出结果

2.3、查看ByteBuf最大容量及扩容后最大容量的代码示例
-
代码示例
import io.netty.buffer.ByteBuf; import io.netty.buffer.ByteBufAllocator; import static io.netty.buffer.ByteBufUtil.appendPrettyHexDump; import static io.netty.util.internal.StringUtil.NEWLINE; /** * @description: ByteBuf(创建) * @author: xz */ public class ByteBufTest { public static void main(String[] args) { createByteBuf3(); } /** * 查看ByteBuf最大容量及扩容后的最大容量 * */ public static void createByteBuf3(){ //1、创建了一个默认的 ByteBuf(池化基于直接内存的 ByteBuf),最大容量256 ByteBuf buf = ByteBufAllocator.DEFAULT.buffer(); //调用输出ByteBuf的工具类 log(buf); //2、创建长度为300的字符串写入ByteBuf,查看扩容后的最大容量 StringBuilder sb = new StringBuilder(); for (int i = 0; i < 300; i++) { sb.append("a"); } buf.writeBytes(sb.toString().getBytes()); //调用输出ByteBuf的工具类 log(buf); } /** * 输出ByteBuf的工具类 * */ public static void log(ByteBuf buffer) { int length = buffer.readableBytes(); int rows = length / 16 + (length % 15 == 0 ? 0 : 1) + 4; StringBuilder buf = new StringBuilder(rows * 80 * 2) .append("read index:").append(buffer.readerIndex()) .append(" write index:").append(buffer.writerIndex()) .append(" capacity:").append(buffer.capacity()) .append(NEWLINE); appendPrettyHexDump(buf, buffer); System.out.println(buf.toString()); } }- 1
- 2
- 3
- 4
- 5
- 6
- 7
- 8
- 9
- 10
- 11
- 12
- 13
- 14
- 15
- 16
- 17
- 18
- 19
- 20
- 21
- 22
- 23
- 24
- 25
- 26
- 27
- 28
- 29
- 30
- 31
- 32
- 33
- 34
- 35
- 36
- 37
- 38
- 39
- 40
- 41
- 42
- 43
- 44
- 45
- 46
-
输出结果

三、ByteBuf (直接内存 vs 堆内存)
3.1、创建池化基于堆的ByteBuf 代码示例
-
代码示例
import io.netty.buffer.ByteBuf; import io.netty.buffer.ByteBufAllocator; import static io.netty.buffer.ByteBufUtil.appendPrettyHexDump; import static io.netty.util.internal.StringUtil.NEWLINE; /** * @description: ByteBuf (直接内存 vs 堆内存) * @author: xz */ public class ByteBufTest2 { public static void main(String[] args) { //创建了一个默认的 ByteBuf(创建池化基于堆的 ByteBuf),初始容量是 10 ByteBuf buf1 = ByteBufAllocator.DEFAULT.heapBuffer(10); //通过输出类信息PooledUnsafeHeapByteBuf可知,采用的是池化基于堆内存 System.out.println(buf1.getClass());//输出class io.netty.buffer.PooledUnsafeHeapByteBuf //输出容量 log(buf1); } /** * 输出ByteBuf的工具类 * */ public static void log(ByteBuf buffer) { int length = buffer.readableBytes(); int rows = length / 16 + (length % 15 == 0 ? 0 : 1) + 4; StringBuilder buf = new StringBuilder(rows * 80 * 2) .append("read index:").append(buffer.readerIndex()) .append(" write index:").append(buffer.writerIndex()) .append(" capacity:").append(buffer.capacity()) .append(NEWLINE); appendPrettyHexDump(buf, buffer); System.out.println(buf.toString()); } }- 1
- 2
- 3
- 4
- 5
- 6
- 7
- 8
- 9
- 10
- 11
- 12
- 13
- 14
- 15
- 16
- 17
- 18
- 19
- 20
- 21
- 22
- 23
- 24
- 25
- 26
- 27
- 28
- 29
- 30
- 31
- 32
- 33
-
输出结果

3.2、创建池化基于直接内存的ByteBuf 代码示例
-
代码示例
import io.netty.buffer.ByteBuf; import io.netty.buffer.ByteBufAllocator; import static io.netty.buffer.ByteBufUtil.appendPrettyHexDump; import static io.netty.util.internal.StringUtil.NEWLINE; /** * @description: ByteBuf (直接内存 vs 堆内存) * @author: xz */ public class ByteBufTest2 { public static void main(String[] args) { //创建了一个默认的 ByteBuf(创建池化基于直接内存的 ByteBuf),初始容量是 10 ByteBuf buf2 = ByteBufAllocator.DEFAULT.directBuffer(10); //通过输出类信息PooledUnsafeDirectByteBuf可知,采用的是池化基于直接内存 System.out.println(buf2.getClass());//输出class io.netty.buffer.PooledUnsafeDirectByteBuf //输出容量 log(buf2); } /** * 输出ByteBuf的工具类 * */ public static void log(ByteBuf buffer) { int length = buffer.readableBytes(); int rows = length / 16 + (length % 15 == 0 ? 0 : 1) + 4; StringBuilder buf = new StringBuilder(rows * 80 * 2) .append("read index:").append(buffer.readerIndex()) .append(" write index:").append(buffer.writerIndex()) .append(" capacity:").append(buffer.capacity()) .append(NEWLINE); appendPrettyHexDump(buf, buffer); System.out.println(buf.toString()); } }- 1
- 2
- 3
- 4
- 5
- 6
- 7
- 8
- 9
- 10
- 11
- 12
- 13
- 14
- 15
- 16
- 17
- 18
- 19
- 20
- 21
- 22
- 23
- 24
- 25
- 26
- 27
- 28
- 29
- 30
- 31
- 32
- 33
-
输出结果

四、ByteBuf (池化 vs 非池化)
4.1、默认采用的是池化基于直接内存的 代码示例
-
代码示例
import io.netty.buffer.ByteBuf; import io.netty.buffer.ByteBufAllocator; /** * @description: ByteBuf (池化 vs 非池化) * @author: xz */ public class ByteBufTest3 { public static void main(String[] args) { getPooledByteBuf(); } /** * 默认采用的是池化基于直接内存 * */ public static void getPooledByteBuf(){ //创建了一个默认的 ByteBuf(创建池化基于直接内存的 ByteBuf) ByteBuf buf1 = ByteBufAllocator.DEFAULT.buffer(); //通过输出类信息PooledUnsafeDirectByteBuf可知,采用的是池化基于直接内存 System.out.println(buf1.getClass());//输出class io.netty.buffer.PooledUnsafeDirectByteBuf } }- 1
- 2
- 3
- 4
- 5
- 6
- 7
- 8
- 9
- 10
- 11
- 12
- 13
- 14
- 15
- 16
- 17
- 18
- 19
- 20
-
输出结果

4.1、设置vm参数采用非池化基于直接内存的 代码示例
-
代码示例
import io.netty.buffer.ByteBuf; import io.netty.buffer.ByteBufAllocator; /** * @description: ByteBuf (池化 vs 非池化) * @author: xz */ public class ByteBufTest3 { public static void main(String[] args) { getUnPooledByteBuf(); } /** * 通过设置vm参数 -Dio.netty.allocator.type=unpooled之后, * 采用的是非池化基于直接内存 * */ public static void getUnPooledByteBuf(){ //创建了一个默认的 ByteBuf(创建非池化基于直接内存的 ByteBuf) ByteBuf buf1 = ByteBufAllocator.DEFAULT.buffer(); //通过输出类信息UnpooledByteBufAllocator可知,采用的是非池化基于直接内存 System.out.println(buf1.getClass());//输出class io.netty.buffer.UnpooledByteBufAllocator$InstrumentedUnpooledUnsafeNoCleanerDirectByteBuf } }- 1
- 2
- 3
- 4
- 5
- 6
- 7
- 8
- 9
- 10
- 11
- 12
- 13
- 14
- 15
- 16
- 17
- 18
- 19
- 20
- 21
- 22
-
通过设置vm参数 -Dio.netty.allocator.type=unpooled之后,采用非池化基于直接内存。

-
输出结果

五、ByteBuf 组成
- ByteBuf 由四部分组成,最开始读写指针都在 0 位置。

六、ByteBuf 写入
6.1、ByteBuf 写入方法
-
ByteBuf 写入方法列表,省略一些不重要的方法
方法签名 含义 备注 writeBoolean(boolean value) 写入 boolean 值 用一字节 01|00 代表 true|false writeByte(int value) 写入 byte 值 writeShort(int value) 写入 short 值 writeInt(int value) 写入 int 值 Big Endian,即 0x250,写入后 00 00 02 50,先写高位在写低位 writeIntLE(int value) 写入 int 值 Little Endian,即 0x250,写入后 50 02 00 00,先写低位在写高位 writeLong(long value) 写入 long 值 writeChar(int value) 写入 char 值 writeFloat(float value) 写入 float 值 writeDouble(double value) 写入 double 值 writeBytes(ByteBuf src) 写入 netty 的 ByteBuf writeBytes(byte[] src) 写入 byte[] writeBytes(ByteBuffer src) 写入 nio 的 ByteBuffer int writeCharSequence(CharSequence sequence, Charset charset) 写入字符串
6.2、ByteBuf 写入的 代码示例
-
代码示例
import io.netty.buffer.ByteBuf; import io.netty.buffer.ByteBufAllocator; import static io.netty.buffer.ByteBufUtil.appendPrettyHexDump; import static io.netty.util.internal.StringUtil.NEWLINE; /** * @description: ByteBuf (写入) * @author: xz */ public class ByteBufTest4 { public static void main(String[] args) { getWriteBytes(); } public static void getWriteBytes(){ //创建了一个默认的 ByteBuf(池化基于直接内存的 ByteBuf),初始容量是 10 ByteBuf buf1 = ByteBufAllocator.DEFAULT.buffer(10); //1、先写入 4 个字节 buf1.writeBytes(new byte[]{1, 2, 3, 4}); log(buf1); //2、再写入一个 int 整数,也是 4 个字节 buf1.writeInt(5); log(buf1); } /** * 输出ByteBuf的工具类 * */ public static void log(ByteBuf buffer) { int length = buffer.readableBytes(); int rows = length / 16 + (length % 15 == 0 ? 0 : 1) + 4; StringBuilder buf = new StringBuilder(rows * 80 * 2) .append("read index:").append(buffer.readerIndex()) .append(" write index:").append(buffer.writerIndex()) .append(" capacity:").append(buffer.capacity()) .append(NEWLINE); appendPrettyHexDump(buf, buffer); System.out.println(buf.toString()); } }- 1
- 2
- 3
- 4
- 5
- 6
- 7
- 8
- 9
- 10
- 11
- 12
- 13
- 14
- 15
- 16
- 17
- 18
- 19
- 20
- 21
- 22
- 23
- 24
- 25
- 26
- 27
- 28
- 29
- 30
- 31
- 32
- 33
- 34
- 35
- 36
- 37
- 38
-
输出结果

七、ByteBuf 扩容
7.1、扩容规则
- 如何写入后数据大小未超过 512,则选择下一个 16 的整数倍,例如写入后大小为 12 ,则扩容后 capacity 是 16
- 如果写入后数据大小超过 512,则选择下一个 2^n,例如写入后大小为 513,则扩容后 capacity 是 210=1024(29=512 已经不够了)
- 扩容不能超过 max capacity 会报错
7.2、扩容代码示例
-
代码示例
import io.netty.buffer.ByteBuf; import io.netty.buffer.ByteBufAllocator; import static io.netty.buffer.ByteBufUtil.appendPrettyHexDump; import static io.netty.util.internal.StringUtil.NEWLINE; /** * @description: ByteBuf (扩容) * @author: xz */ public class ByteBufTest5 { public static void main(String[] args) { getWriteBytes(); } public static void getWriteBytes(){ //创建了一个默认的 ByteBuf(池化基于直接内存的 ByteBuf),初始容量是 10 ByteBuf buf1 = ByteBufAllocator.DEFAULT.buffer(10); //1、先写入 8 个字节 buf1.writeBytes(new byte[]{1, 2, 3, 4, 5, 6, 7, 8}); log(buf1); //2、再写入一个 int 整数,也是 4 个字节 ; //容量不够了(初始容量是 10),这时会引发扩容 写入后数据大小未超过 512,则扩容后 capacity 是 16 buf1.writeInt(5); log(buf1); //3、创建长度为500的字符串写入ByteBuf, // 容量不够了(初始容量是 10),这时会引发扩容写 入后数据大小超过 512,则扩容后 capacity 是 2^10=1024(2^9=512 已经不够了) StringBuilder sb = new StringBuilder(); for (int i = 0; i < 510; i++) { sb.append("a"); } buf1.writeBytes(sb.toString().getBytes()); log(buf1); } /** * 输出ByteBuf的工具类 * */ public static void log(ByteBuf buffer) { int length = buffer.readableBytes(); int rows = length / 16 + (length % 15 == 0 ? 0 : 1) + 4; StringBuilder buf = new StringBuilder(rows * 80 * 2) .append("read index:").append(buffer.readerIndex()) .append(" write index:").append(buffer.writerIndex()) .append(" capacity:").append(buffer.capacity()) .append(NEWLINE); appendPrettyHexDump(buf, buffer); System.out.println(buf.toString()); } }- 1
- 2
- 3
- 4
- 5
- 6
- 7
- 8
- 9
- 10
- 11
- 12
- 13
- 14
- 15
- 16
- 17
- 18
- 19
- 20
- 21
- 22
- 23
- 24
- 25
- 26
- 27
- 28
- 29
- 30
- 31
- 32
- 33
- 34
- 35
- 36
- 37
- 38
- 39
- 40
- 41
- 42
- 43
- 44
- 45
- 46
- 47
- 48
-
输出结果

八、 ByteBuf 读取
8.1、每次读一个字节的代码示例
-
代码示例
import io.netty.buffer.ByteBuf; import io.netty.buffer.ByteBufAllocator; import static io.netty.buffer.ByteBufUtil.appendPrettyHexDump; import static io.netty.util.internal.StringUtil.NEWLINE; /** * @description: ByteBuf (读取) * @author: xz */ public class ByteBufTest6 { public static void main(String[] args) { getReadBytes1(); } /** * 每次读一个字节 * */ public static void getReadBytes1(){ //创建了一个默认的 ByteBuf(池化基于直接内存的 ByteBuf),初始容量是 10 ByteBuf buf1 = ByteBufAllocator.DEFAULT.buffer(10); //1、先写入 8 个字节 buf1.writeBytes(new byte[]{1, 2, 3, 4, 5, 6, 7, 8}); log(buf1); //2、读了 2 次,每次一个字节 System.out.println(buf1.readByte()); System.out.println(buf1.readByte()); //3、读过的内容,就属于废弃部分了,再读只能读那些尚未读取的部分 log(buf1); } /** * 输出ByteBuf的工具类 * */ public static void log(ByteBuf buffer) { int length = buffer.readableBytes(); int rows = length / 16 + (length % 15 == 0 ? 0 : 1) + 4; StringBuilder buf = new StringBuilder(rows * 80 * 2) .append("read index:").append(buffer.readerIndex()) .append(" write index:").append(buffer.writerIndex()) .append(" capacity:").append(buffer.capacity()) .append(NEWLINE); appendPrettyHexDump(buf, buffer); System.out.println(buf.toString()); } }- 1
- 2
- 3
- 4
- 5
- 6
- 7
- 8
- 9
- 10
- 11
- 12
- 13
- 14
- 15
- 16
- 17
- 18
- 19
- 20
- 21
- 22
- 23
- 24
- 25
- 26
- 27
- 28
- 29
- 30
- 31
- 32
- 33
- 34
- 35
- 36
- 37
- 38
- 39
- 40
- 41
- 42
-
输出结果

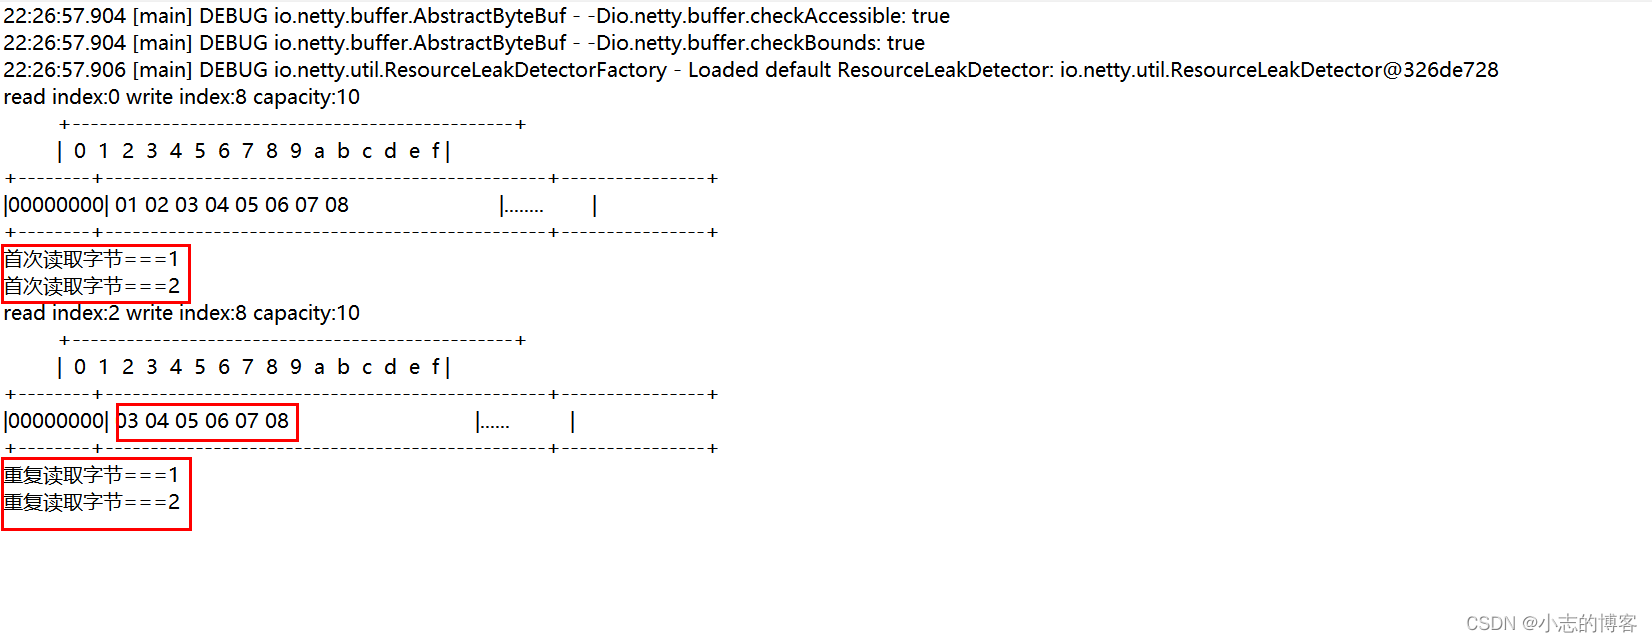
8.2、重复读取字节的代码示例
-
代码示例
import io.netty.buffer.ByteBuf; import io.netty.buffer.ByteBufAllocator; import static io.netty.buffer.ByteBufUtil.appendPrettyHexDump; import static io.netty.util.internal.StringUtil.NEWLINE; /** * @description: ByteBuf (读取) * @author: xz */ public class ByteBufTest6 { public static void main(String[] args) { getReadBytes2(); } /** * 重复读取字节 * */ public static void getReadBytes2(){ //创建了一个默认的 ByteBuf(池化基于直接内存的 ByteBuf),初始容量是 10 ByteBuf buf1 = ByteBufAllocator.DEFAULT.buffer(10); //1、先写入 8 个字节 buf1.writeBytes(new byte[]{1, 2, 3, 4, 5, 6, 7, 8}); log(buf1); //2、重复读取字节,在 read 前先做个标记 mark buf1.markReaderIndex(); System.out.println("首次读取字节==="+buf1.readByte()); System.out.println("首次读取字节==="+buf1.readByte()); //3、读过的内容,就属于废弃部分了,再读只能读那些尚未读取的部分 log(buf1); //4、重复读取字节,重置到标记位置 reset buf1.resetReaderIndex(); System.out.println("重复读取字节==="+buf1.readByte()); System.out.println("重复读取字节==="+buf1.readByte()); } /** * 输出ByteBuf的工具类 * */ public static void log(ByteBuf buffer) { int length = buffer.readableBytes(); int rows = length / 16 + (length % 15 == 0 ? 0 : 1) + 4; StringBuilder buf = new StringBuilder(rows * 80 * 2) .append("read index:").append(buffer.readerIndex()) .append(" write index:").append(buffer.writerIndex()) .append(" capacity:").append(buffer.capacity()) .append(NEWLINE); appendPrettyHexDump(buf, buffer); System.out.println(buf.toString()); } }- 1
- 2
- 3
- 4
- 5
- 6
- 7
- 8
- 9
- 10
- 11
- 12
- 13
- 14
- 15
- 16
- 17
- 18
- 19
- 20
- 21
- 22
- 23
- 24
- 25
- 26
- 27
- 28
- 29
- 30
- 31
- 32
- 33
- 34
- 35
- 36
- 37
- 38
- 39
- 40
- 41
- 42
- 43
- 44
- 45
- 46
- 47
- 48
- 49
- 50
- 51
-
输出结果
九、 ByteBuf 内存释放(retain & release)
9.1、ByteBuf 内存释放的概述
-
由于 Netty 中有堆外内存的 ByteBuf 实现,堆外内存最好是手动来释放,而不是等 GC 垃圾回收。
(1)、UnpooledHeapByteBuf 使用的是 JVM 内存,只需等 GC 回收内存即可;
(2)、UnpooledDirectByteBuf 使用的就是直接内存了,需要特殊的方法来回收内存;
(3)、PooledByteBuf 和它的子类使用了池化机制,需要更复杂的规则来回收内存; -
Netty 这里采用了引用计数法来控制回收内存,每个 ByteBuf 都实现了 ReferenceCounted 接口
(1)、每个 ByteBuf 对象的初始计数为 1;
(2)、调用 release 方法计数减 1,如果计数为 0,ByteBuf 内存被回收;
(3)、调用 retain 方法计数加 1,表示调用者没用完之前,其它 handler 即使调用了 release 也不会造成回收;
(4)、当计数为 0 时,底层内存会被回收,这时即使 ByteBuf 对象还在,其各个方法均无法正常使用; -
谁来负责 release
(1)、因为 pipeline 的存在,一般需要将 ByteBuf 传递给下一个 ChannelHandler,如果在 finally 中 release 了,就失去了传递性(当然,如果在这个 ChannelHandler 内这个 ByteBuf 已完成了它的使命,那么便无须再传递);
(2)、基本规则是,谁是最后使用者,谁负责 release;
十、ByteBuf 零拷贝(slice 切片)
10.1、零拷贝(slice)的概述
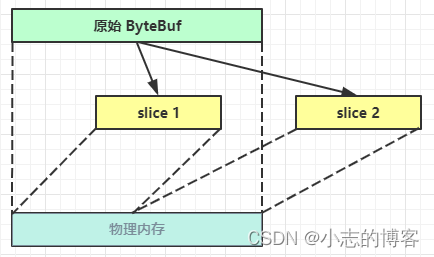
- 零拷贝slice,对原始 ByteBuf 进行切片成多个 ByteBuf,切片后的 ByteBuf 并没有发生内存复制,还是使用原始 ByteBuf 的内存,切片后的 ByteBuf 维护独立的 read,write 指针。
10.2、无参数 slice 的示例代码
-
无参 slice 是从原始 ByteBuf 的 read index 到 write index 之间的内容进行切片
-
代码示例
import io.netty.buffer.ByteBuf; import io.netty.buffer.ByteBufAllocator; import static io.netty.buffer.ByteBufUtil.appendPrettyHexDump; import static io.netty.util.internal.StringUtil.NEWLINE; /** * @description: ByteBuf (零拷贝slice----对原始 ByteBuf 进行切片成多个 ByteBuf,切片后的 ByteBuf 并没有发生内存复制) * @author: xz */ public class ByteBufTest7 { public static void main(String[] args) { getSlice1(); } /** * 无参 slice 是从原始 ByteBuf 的 read index 到 write index 之间的内容进行切片, * */ public static void getSlice1(){ //创建了一个默认的 ByteBuf(池化基于直接内存的 ByteBuf),初始容量是 10 ByteBuf buf = ByteBufAllocator.DEFAULT.buffer(10); //1、原始 ByteBuf 进行一些初始操作 buf.writeBytes(new byte[]{1, 2, 3, 4}); log(buf); //2、调用 slice 进行切片,再切片过程中,没有发生数据复制 ByteBuf slice = buf.slice(); log(slice); } /** * 输出ByteBuf的工具类 * */ public static void log(ByteBuf buffer) { int length = buffer.readableBytes(); int rows = length / 16 + (length % 15 == 0 ? 0 : 1) + 4; StringBuilder buf = new StringBuilder(rows * 80 * 2) .append("read index:").append(buffer.readerIndex()) .append(" write index:").append(buffer.writerIndex()) .append(" capacity:").append(buffer.capacity()) .append(NEWLINE); appendPrettyHexDump(buf, buffer); System.out.println(buf.toString()); } }- 1
- 2
- 3
- 4
- 5
- 6
- 7
- 8
- 9
- 10
- 11
- 12
- 13
- 14
- 15
- 16
- 17
- 18
- 19
- 20
- 21
- 22
- 23
- 24
- 25
- 26
- 27
- 28
- 29
- 30
- 31
- 32
- 33
- 34
- 35
- 36
- 37
- 38
- 39
- 40
-
输出结果

10.3、有参数 slice 的示例代码
-
有参 slice 是从原始 数组下标的位置到指定的数组长度之间的内容进行切片
-
代码示例
import io.netty.buffer.ByteBuf; import io.netty.buffer.ByteBufAllocator; import static io.netty.buffer.ByteBufUtil.appendPrettyHexDump; import static io.netty.util.internal.StringUtil.NEWLINE; /** * @description: ByteBuf (零拷贝slice----对原始 ByteBuf 进行切片成多个 ByteBuf,切片后的 ByteBuf 并没有发生内存复制) * @author: xz */ public class ByteBufTest7 { public static void main(String[] args) { getSlice2(); } /** * 有参 slice 是从原始 数组下标的位置到指定的数组长度之间的内容进行切片 * */ public static void getSlice2(){ //创建了一个默认的 ByteBuf(池化基于直接内存的 ByteBuf),初始容量是 10 ByteBuf buf = ByteBufAllocator.DEFAULT.buffer(10); //1、原始 ByteBuf 进行一些初始操作 buf.writeBytes(new byte[]{1, 2, 3, 4}); log(buf); //2、调用 slice 进行切片,再切片过程中,没有发生数据复制 ByteBuf slice1 = buf.slice(0, 2); ByteBuf slice2 = buf.slice(2, 2); log(slice1); log(slice2); } /** * 输出ByteBuf的工具类 * */ public static void log(ByteBuf buffer) { int length = buffer.readableBytes(); int rows = length / 16 + (length % 15 == 0 ? 0 : 1) + 4; StringBuilder buf = new StringBuilder(rows * 80 * 2) .append("read index:").append(buffer.readerIndex()) .append(" write index:").append(buffer.writerIndex()) .append(" capacity:").append(buffer.capacity()) .append(NEWLINE); appendPrettyHexDump(buf, buffer); System.out.println(buf.toString()); } }- 1
- 2
- 3
- 4
- 5
- 6
- 7
- 8
- 9
- 10
- 11
- 12
- 13
- 14
- 15
- 16
- 17
- 18
- 19
- 20
- 21
- 22
- 23
- 24
- 25
- 26
- 27
- 28
- 29
- 30
- 31
- 32
- 33
- 34
- 35
- 36
- 37
- 38
- 39
- 40
- 41
- 42
-
输出结果

10.4、slice 切片后的 max capacity 被固定为这个区间的大小的示例代码
-
切片后的 max capacity 被固定为这个区间的大小,因此不能追加 write;如果执行,会报 IndexOutOfBoundsException 异常。
-
代码示例
import io.netty.buffer.ByteBuf; import io.netty.buffer.ByteBufAllocator; import static io.netty.buffer.ByteBufUtil.appendPrettyHexDump; import static io.netty.util.internal.StringUtil.NEWLINE; /** * @description: ByteBuf (零拷贝slice----对原始 ByteBuf 进行切片成多个 ByteBuf,切片后的 ByteBuf 并没有发生内存复制) * @author: xz */ public class ByteBufTest7 { public static void main(String[] args) { getSliceMaxCapacity(); } /** * 切片后的 max capacity 被固定为这个区间的大小,因此不能追加 write * 如果执行,会报 IndexOutOfBoundsException 异常 * */ public static void getSliceMaxCapacity(){ //创建了一个默认的 ByteBuf(池化基于直接内存的 ByteBuf),初始容量是 10 ByteBuf buf = ByteBufAllocator.DEFAULT.buffer(10); //1、原始 ByteBuf 进行一些初始操作 buf.writeBytes(new byte[]{1, 2, 3, 4}); log(buf); //2、调用 slice 进行切片,再切片过程中,没有发生数据复制 ByteBuf slice = buf.slice(0, 2); log(slice); //切片后的 max capacity 被固定为这个区间的大小,因此不能追加 write slice.writeByte(5); } /** * 输出ByteBuf的工具类 * */ public static void log(ByteBuf buffer) { int length = buffer.readableBytes(); int rows = length / 16 + (length % 15 == 0 ? 0 : 1) + 4; StringBuilder buf = new StringBuilder(rows * 80 * 2) .append("read index:").append(buffer.readerIndex()) .append(" write index:").append(buffer.writerIndex()) .append(" capacity:").append(buffer.capacity()) .append(NEWLINE); appendPrettyHexDump(buf, buffer); System.out.println(buf.toString()); } }- 1
- 2
- 3
- 4
- 5
- 6
- 7
- 8
- 9
- 10
- 11
- 12
- 13
- 14
- 15
- 16
- 17
- 18
- 19
- 20
- 21
- 22
- 23
- 24
- 25
- 26
- 27
- 28
- 29
- 30
- 31
- 32
- 33
- 34
- 35
- 36
- 37
- 38
- 39
- 40
- 41
- 42
- 43
-
输出结果

10.5、slice 切片后slice 的内容发生了更改,原始 ByteBuf 也会受影响的示例代码
-
切片后slice 的内容发生了更改,同时原始 ByteBuf 也会受影响,因为底层都是同一块内存。
-
代码示例
import io.netty.buffer.ByteBuf; import io.netty.buffer.ByteBufAllocator; import static io.netty.buffer.ByteBufUtil.appendPrettyHexDump; import static io.netty.util.internal.StringUtil.NEWLINE; /** * @description: ByteBuf (零拷贝slice----对原始 ByteBuf 进行切片成多个 ByteBuf,切片后的 ByteBuf 并没有发生内存复制) * @author: xz */ public class ByteBufTest7 { public static void main(String[] args) { getSliceContent(); } /** * 切片后slice 的内容发生了更改,同时原始 ByteBuf 也会受影响,因为底层都是同一块内存 * */ public static void getSliceContent(){ //创建了一个默认的 ByteBuf(池化基于直接内存的 ByteBuf),初始容量是 10 ByteBuf buf = ByteBufAllocator.DEFAULT.buffer(10); //1、原始 ByteBuf 进行一些初始操作 buf.writeBytes(new byte[]{1, 2, 3, 4}); log(buf); //2、调用 slice 进行切片,再切片过程中,没有发生数据复制 ByteBuf slice1 = buf.slice(0, 2); log(slice1); //3、slice 的内容发生了更改 slice1.setByte(0,'a'); //切片后的 ByteBuf 会受影响,因为底层都是同一块内存 log(slice1); //同时原始 ByteBuf 也会受影响,因为底层都是同一块内存 log(buf); } /** * 输出ByteBuf的工具类 * */ public static void log(ByteBuf buffer) { int length = buffer.readableBytes(); int rows = length / 16 + (length % 15 == 0 ? 0 : 1) + 4; StringBuilder buf = new StringBuilder(rows * 80 * 2) .append("read index:").append(buffer.readerIndex()) .append(" write index:").append(buffer.writerIndex()) .append(" capacity:").append(buffer.capacity()) .append(NEWLINE); appendPrettyHexDump(buf, buffer); System.out.println(buf.toString()); } }- 1
- 2
- 3
- 4
- 5
- 6
- 7
- 8
- 9
- 10
- 11
- 12
- 13
- 14
- 15
- 16
- 17
- 18
- 19
- 20
- 21
- 22
- 23
- 24
- 25
- 26
- 27
- 28
- 29
- 30
- 31
- 32
- 33
- 34
- 35
- 36
- 37
- 38
- 39
- 40
- 41
- 42
- 43
- 44
- 45
- 46
- 47
- 48
- 49
-
输出结果

十一、ByteBuf 零拷贝(duplicate)
11.1、零拷贝(duplicate)的概述
- 截取了原始 ByteBuf 所有内容,并且没有 max capacity 的限制,也是与原始 ByteBuf 使用同一块底层内存,只是读写指针是独立的。

十二、ByteBuf 零拷贝(CompositeByteBuf 合并)
12.1、多个 ByteBuf 合并为一个逻辑上的 ByteBuf ,进行了数据的内存复制的示例代码
-
代码示例
import io.netty.buffer.ByteBuf; import io.netty.buffer.ByteBufAllocator; import io.netty.buffer.CompositeByteBuf; import static io.netty.buffer.ByteBufUtil.appendPrettyHexDump; import static io.netty.util.internal.StringUtil.NEWLINE; /** * @description: ByteBuf (零拷贝CompositeByteBuf----将多个 ByteBuf 合并为一个逻辑上的 ByteBuf,避免拷贝) * @author: xz */ public class ByteBufTest8 { public static void main(String[] args) { getAdd1(); } /** * 将多个 ByteBuf 合并为一个逻辑上的 ByteBuf 这种方法不太好,进行了数据的内存复制操作 * */ public static void getAdd1(){ //1、创建第1个默认的 ByteBuf(池化基于直接内存的 ByteBuf),初始容量是 5 ByteBuf buf1 = ByteBufAllocator.DEFAULT.buffer(5); buf1.writeBytes(new byte[]{1, 2, 3, 4, 5}); log(buf1); //2、创建第2个默认的 ByteBuf(池化基于直接内存的 ByteBuf),初始容量是 5 ByteBuf buf2 = ByteBufAllocator.DEFAULT.buffer(5); buf2.writeBytes(new byte[]{6, 7, 8, 9, 10}); log(buf2); //3、将多个 ByteBuf 合并为一个逻辑上的 ByteBuf ByteBuf buf3 = ByteBufAllocator.DEFAULT.buffer(); buf3.writeBytes(buf1).writeBytes(buf2); log(buf3); } /** * 输出ByteBuf的工具类 * */ public static void log(ByteBuf buffer) { int length = buffer.readableBytes(); int rows = length / 16 + (length % 15 == 0 ? 0 : 1) + 4; StringBuilder buf = new StringBuilder(rows * 80 * 2) .append("read index:").append(buffer.readerIndex()) .append(" write index:").append(buffer.writerIndex()) .append(" capacity:").append(buffer.capacity()) .append(NEWLINE); appendPrettyHexDump(buf, buffer); System.out.println(buf.toString()); } }- 1
- 2
- 3
- 4
- 5
- 6
- 7
- 8
- 9
- 10
- 11
- 12
- 13
- 14
- 15
- 16
- 17
- 18
- 19
- 20
- 21
- 22
- 23
- 24
- 25
- 26
- 27
- 28
- 29
- 30
- 31
- 32
- 33
- 34
- 35
- 36
- 37
- 38
- 39
- 40
- 41
- 42
- 43
- 44
- 45
- 46
-
输出结果

12.2、多个 ByteBuf 合并为一个逻辑上的 ByteBuf ,使用compositeBuffer的方式,避免拷贝的示例代码
-
代码示例
import io.netty.buffer.ByteBuf; import io.netty.buffer.ByteBufAllocator; import io.netty.buffer.CompositeByteBuf; import static io.netty.buffer.ByteBufUtil.appendPrettyHexDump; import static io.netty.util.internal.StringUtil.NEWLINE; /** * @description: ByteBuf (零拷贝CompositeByteBuf----将多个 ByteBuf 合并为一个逻辑上的 ByteBuf,避免拷贝) * @author: xz */ public class ByteBufTest8 { public static void main(String[] args) { getAdd2(); } /** * 将多个 ByteBuf 合并为一个逻辑上的 ByteBuf 使用compositeBuffer的方式,避免拷贝 * */ public static void getAdd2(){ //1、创建第1个默认的 ByteBuf(池化基于直接内存的 ByteBuf),初始容量是 5 ByteBuf buf1 = ByteBufAllocator.DEFAULT.buffer(5); buf1.writeBytes(new byte[]{1, 2, 3, 4, 5}); log(buf1); //2、创建第2个默认的 ByteBuf(池化基于直接内存的 ByteBuf),初始容量是 5 ByteBuf buf2 = ByteBufAllocator.DEFAULT.buffer(5); buf2.writeBytes(new byte[]{6, 7, 8, 9, 10}); log(buf2); //3、将多个 ByteBuf 合并为一个逻辑上的 ByteBuf CompositeByteBuf buf3 = ByteBufAllocator.DEFAULT.compositeBuffer(); // true 表示增加新的 ByteBuf 自动递增 write index, 否则 write index 会始终为 0 buf3.addComponents(true, buf1, buf2); log(buf3); } /** * 输出ByteBuf的工具类 * */ public static void log(ByteBuf buffer) { int length = buffer.readableBytes(); int rows = length / 16 + (length % 15 == 0 ? 0 : 1) + 4; StringBuilder buf = new StringBuilder(rows * 80 * 2) .append("read index:").append(buffer.readerIndex()) .append(" write index:").append(buffer.writerIndex()) .append(" capacity:").append(buffer.capacity()) .append(NEWLINE); appendPrettyHexDump(buf, buffer); System.out.println(buf.toString()); } }- 1
- 2
- 3
- 4
- 5
- 6
- 7
- 8
- 9
- 10
- 11
- 12
- 13
- 14
- 15
- 16
- 17
- 18
- 19
- 20
- 21
- 22
- 23
- 24
- 25
- 26
- 27
- 28
- 29
- 30
- 31
- 32
- 33
- 34
- 35
- 36
- 37
- 38
- 39
- 40
- 41
- 42
- 43
- 44
- 45
- 46
- 47
- 48
-
输出结果

十三、ByteBuf 零拷贝(Unpooled 创建、组合、复制)
13.1、ByteBuf 零拷贝(Unpooled)的概述
- Unpooled 是一个工具类,类如其名,提供了非池化的 ByteBuf 创建、组合、复制等操作。
13.2、多个 ByteBuf 合并为一个逻辑上的 ByteBuf ,使用Unpooled,包装ByteBuf的示例代码
-
代码示例
import io.netty.buffer.ByteBuf; import io.netty.buffer.ByteBufAllocator; import io.netty.buffer.Unpooled; import static io.netty.buffer.ByteBufUtil.appendPrettyHexDump; import static io.netty.util.internal.StringUtil.NEWLINE; /** * @description: ByteBuf (零拷贝Unpooled ----是一个工具类,类如其名,提供了非池化的 ByteBuf 创建、组合、复制等操作) * 这里仅介绍其跟【零拷贝】相关的 wrappedBuffer 方法,可以用来包装 ByteBuf * @author: xz */ public class ByteBufTest9 { public static void main(String[] args) { getAdd1(); } /** * 将多个 ByteBuf 合并为一个逻辑上的 ByteBuf 使用Unpooled,包装ByteBuf * */ public static void getAdd1(){ //1、创建第1个默认的 ByteBuf(池化基于直接内存的 ByteBuf),初始容量是 5 ByteBuf buf1 = ByteBufAllocator.DEFAULT.buffer(5); buf1.writeBytes(new byte[]{1, 2, 3, 4, 5}); log(buf1); //2、创建第2个默认的 ByteBuf(池化基于直接内存的 ByteBuf),初始容量是 5 ByteBuf buf2 = ByteBufAllocator.DEFAULT.buffer(5); buf2.writeBytes(new byte[]{6, 7, 8, 9, 10}); log(buf2); // 当包装 ByteBuf 个数超过一个时, 底层使用了 CompositeByteBuf ByteBuf buf3 = Unpooled.wrappedBuffer(buf1, buf2); log(buf3); } /** * 输出ByteBuf的工具类 * */ public static void log(ByteBuf buffer) { int length = buffer.readableBytes(); int rows = length / 16 + (length % 15 == 0 ? 0 : 1) + 4; StringBuilder buf = new StringBuilder(rows * 80 * 2) .append("read index:").append(buffer.readerIndex()) .append(" write index:").append(buffer.writerIndex()) .append(" capacity:").append(buffer.capacity()) .append(NEWLINE); appendPrettyHexDump(buf, buffer); System.out.println(buf.toString()); } }- 1
- 2
- 3
- 4
- 5
- 6
- 7
- 8
- 9
- 10
- 11
- 12
- 13
- 14
- 15
- 16
- 17
- 18
- 19
- 20
- 21
- 22
- 23
- 24
- 25
- 26
- 27
- 28
- 29
- 30
- 31
- 32
- 33
- 34
- 35
- 36
- 37
- 38
- 39
- 40
- 41
- 42
- 43
- 44
- 45
- 46
-
输出结果

13.3、多个 ByteBuf 合并为一个逻辑上的 ByteBuf ,使用Unpooled,包装普通字节数组的示例代码
-
代码示例
import io.netty.buffer.ByteBuf; import io.netty.buffer.ByteBufAllocator; import io.netty.buffer.Unpooled; import static io.netty.buffer.ByteBufUtil.appendPrettyHexDump; import static io.netty.util.internal.StringUtil.NEWLINE; /** * @description: ByteBuf (零拷贝Unpooled ----是一个工具类,类如其名,提供了非池化的 ByteBuf 创建、组合、复制等操作) * 这里仅介绍其跟【零拷贝】相关的 wrappedBuffer 方法,可以用来包装 ByteBuf * @author: xz */ public class ByteBufTest9 { public static void main(String[] args) { getAdd2(); } /** * 将多个 ByteBuf 合并为一个逻辑上的 ByteBuf 使用Unpooled,包装普通字节数组 * */ public static void getAdd2(){ ByteBuf buf1 = Unpooled.wrappedBuffer(new byte[]{1, 2, 3, 4, 5}, new byte[]{6, 7, 8, 9, 10}); log(buf1); } /** * 输出ByteBuf的工具类 * */ public static void log(ByteBuf buffer) { int length = buffer.readableBytes(); int rows = length / 16 + (length % 15 == 0 ? 0 : 1) + 4; StringBuilder buf = new StringBuilder(rows * 80 * 2) .append("read index:").append(buffer.readerIndex()) .append(" write index:").append(buffer.writerIndex()) .append(" capacity:").append(buffer.capacity()) .append(NEWLINE); appendPrettyHexDump(buf, buffer); System.out.println(buf.toString()); } }- 1
- 2
- 3
- 4
- 5
- 6
- 7
- 8
- 9
- 10
- 11
- 12
- 13
- 14
- 15
- 16
- 17
- 18
- 19
- 20
- 21
- 22
- 23
- 24
- 25
- 26
- 27
- 28
- 29
- 30
- 31
- 32
- 33
- 34
- 35
- 36
- 37
-
输出结果

-
相关阅读:
618快到了送上自制前端小项目(html css js)
matlab 将三角剖分结果保存为STL文件
如何解决selenium的dragAndDrop失效的问题
阿里云国际版CDN的优势
【指针数组】【数组指针】【函数指针】【函数指针数组】【回调函数】你都会吗
step5 lasso 回归 实战
【Leetcode】204. 计数质数
NPM 常用命令(八)
化妆品行业分销渠道管理系统加强企业渠道管控能力,赋能化妆品渠道数字化升级
kong安装与配置
- 原文地址:https://blog.csdn.net/li1325169021/article/details/127733333