-
[数据结构] 顺序表 + 多种链表

线性表
首先来谈一下什么叫做线性表
线性表(linear list)是n个具有相同特性的数据元素的有限序列。 线性表是一种在实际中广泛使
用的数据结构,常见的线性表:顺序表、链表、栈、队列、字符串…线性表就是指逻辑结构是一条直线的数据结构, 而非线性结构比如 二叉树,图;
逻辑结构
逻辑结构是指人们想象的结构,比如说链表, 人们总是想着有个箭头指向, 指针, 但其实本来并不存在这样的箭头,
逻辑结构是方便人们理解,将抽象的概念图形化, 本质并不存在的结构
物理结构
物理结构是指本质在内存中是如何存储的,比如指针, 指针变量存储了其他变量的地址,在我们理解就是指向的关系,
这就是两种在数据结构学习中很重要的结构,逻辑结构和物理结构,很多同学分不清楚两种结构的关系
顺序表
顺序表是用一段物理地址连续的存储单元依次存储数据元素的线性结构,一般情况下采用数组存储。在数组上完成数据的增删查改。
顺序表一般分为两种,静态顺序表和动态顺序表,在日常的使用中,都是以动态顺序表为主的,基本很少用到静态顺序表
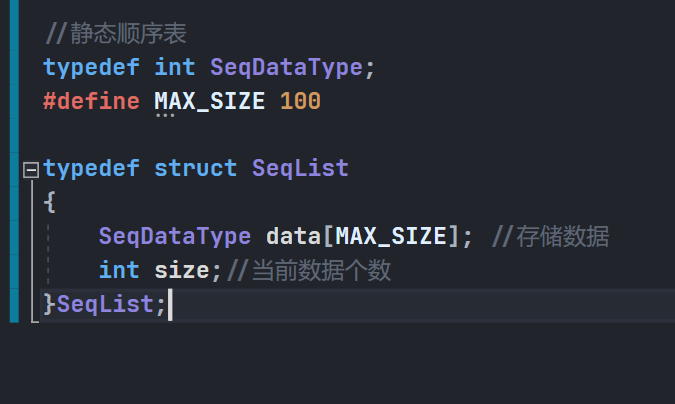
使用静态顺序表的缺陷很明显存储的数据只能是 <=MAX_SIZE , 限制太多了,如果 MAX_SIZE开辟的过大,而用了很少的空间,那么会有很多的空间浪费
静态顺序表只适用于确定知道要存多少数据的场景. 所以我们一般都使用动态顺序表
动态顺序表结构定义
动态开辟空间, 大家肯定就想到了malloc calloc realloc free 这几个库函数
//动态顺序表 typedef int SLDataType; typedef struct SeqList { SLDataType * data;//数据开头的指针 int size; //代表当前有效数据个数 int capacity; //代表顺序表当前的容量 }SeqList;- 1
- 2
- 3
- 4
- 5
- 6
- 7
- 8
- 9
新增了一个容量成员,我们就可以判断 当前存储的有效数据和 已有空间的关系,进行动态增容
下面我们来实现一些操作顺序表的接口
顺序表初始化
void SeqListInit(SeqList* psl);
在这里初始化的时候, 把结构体中的 size capacity 置成0,把data 指向NULL
可以在初始化的时候给data进行开辟空间, 但是我在这里选择插入的时候进行开辟空间,大家可以自行选择
void SeqListInit(SeqList* psl) { //因为此处psl一定不能为空,所以此处断言 assert(psl); //置空 psl->size = psl->capacity = 0; psl->data = NULL; }- 1
- 2
- 3
- 4
- 5
- 6
- 7
- 8
- 9
- 10
顺序表尾插
这个接口声明是这样定义的,
void SeqListPushBack(SeqList* psl, SLDataType x);
表示向顺序表的尾部 插入一个 x我们来分析一下

我们首先要写一个扩容函数
// 检查空间,如果满了,进行增容void CheckCapacity(SeqList* psl);
// 检查空间,如果满了,进行增容 void CheckCapacity(SeqList* psl) { //此处psl也一定不能为空,所以需要断言 assert(psl); //如果size 和 capacity 相等了,说明就满了,需要扩容 if (psl->size == psl->capacity) { //定义一个新的容量,一般增容方式都是当前2倍, //这里还有一个问题就是,默认初始容量是0,所以使用三目运算符判断 int newCapacity = psl->capacity == 0 ? 4 : psl->capacity * 2; //使用realloc进行扩容--需要注意的是,此处sizeof中应该写待存储数据类型,而不是顺序表自身 SLDataType* ptr = (SLDataType*)realloc(psl->data, sizeof(SLDataType) * newCapacity); //判断开辟空间失败情况 if (NULL == ptr) { perror("realloc fail"); exit(-1); } //把新的容量赋值给旧的容量,把新的指针同样赋值过去 psl->capacity = newCapacity; psl->data = ptr; } //如果空间不满,则啥也不需要做. pass }- 1
- 2
- 3
- 4
- 5
- 6
- 7
- 8
- 9
- 10
- 11
- 12
- 13
- 14
- 15
- 16
- 17
- 18
- 19
- 20
- 21
- 22
- 23
- 24
- 25
- 26
- 27
在插入的时候首先要判断空间是否足够,我们来实现一下
// 顺序表尾插
void SeqListPushBack(SeqList* psl, SLDataType x);// 顺序表尾插 void SeqListPushBack(SeqList* psl, SLDataType x) { //此处psl依旧不能为空 assert(psl); //首先检查是否需要扩容 CheckCapacity(psl); //因为size指向的是最后一个元素的下一个位置 psl->data[psl->size] = x; //添加了一个元素,有效元素个数要 + 1 psl->size++; }- 1
- 2
- 3
- 4
- 5
- 6
- 7
- 8
- 9
- 10
- 11
- 12
- 13
- 14
- 15
顺序表遍历
遍历是一个最简单的操作, 和遍历数组类似
// 顺序表打印 void SeqListPrint(SeqList* psl) { assert(psl); for (int i = 0; i < psl->size; i++) { printf("%d ", psl->data[i]); } printf("\n"); }- 1
- 2
- 3
- 4
- 5
- 6
- 7
- 8
- 9
- 10
- 11
- 12
顺序表头插
尾插的时间复杂度是0(1)
我们来分析一下头插,因为顺序表是连续存储的

我们来看一下代码实现
// 顺序表头插 void SeqListPushFront(SeqList* psl, SLDataType x) { assert(psl); //首先检查是否需要扩容 CheckCapacity(psl); //向后移动元素 for (int i = psl->size - 1; i >= 0; i--) { psl->data[i + 1] = psl->data[i]; } //在起始位置插入x psl->data[0] = x; psl->size++; }- 1
- 2
- 3
- 4
- 5
- 6
- 7
- 8
- 9
- 10
- 11
- 12
- 13
- 14
- 15
- 16
- 17
- 18
- 19
顺序表的头删
顺序表的头删,是指删除顺序表的第一个位置的元素
分析一下,如果顺序表为空, 那肯定不能删,如果顺序表不为空,
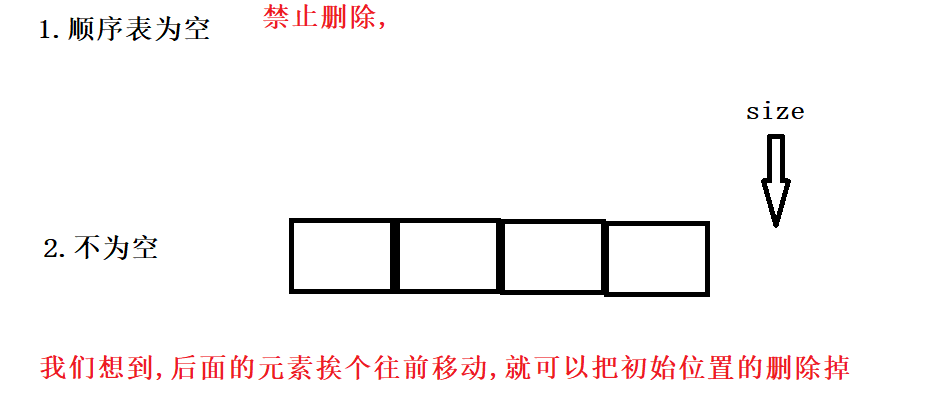
// 顺序表头删 void SeqListPopFront(SeqList* psl) { assert(psl); //顺序表一定不能为空 assert(psl->size > 0); //移动 int begin = 0; while (begin < psl->size - 1) { psl->data[begin] = psl->data[begin + 1]; begin++; } psl->size--; }- 1
- 2
- 3
- 4
- 5
- 6
- 7
- 8
- 9
- 10
- 11
- 12
- 13
- 14
- 15
- 16
顺序表尾删
顺序表的尾删就容易很多,我们知道最后欧一个位置的下标所以写起来就很容易
// 顺序表尾删 void SeqListPopBack(SeqList* psl) { assert(psl); //顺序表一定不能为空 assert(psl->size > 0); //只需要--,下次增加数据的时候就自动覆盖了, psl->size--; }- 1
- 2
- 3
- 4
- 5
- 6
- 7
- 8
- 9
- 10
写完了这几个接口,大家就可以看出来,顺序表的尾插和尾删还是比较方便,但是头插和头删需要一直挪动,也算是顺序表的一个缺陷
顺序表查找
查找这种一般都是比较好写一点的,挨着遍历找到了返回
// 顺序表查找 int SeqListFind(SeqList* psl, SLDataType x) { assert(psl); for (int i = 0; i < psl->size; i++) { if (psl->data[i] == x) { //找到了返回下标 return i; } } //找不到返回-1 return -1; }- 1
- 2
- 3
- 4
- 5
- 6
- 7
- 8
- 9
- 10
- 11
- 12
- 13
- 14
- 15
- 16
- 17
顺序表指定位置插入
这里的指定位置并不是随机指定的,一般都是通过查找得到的,
实现了这个函数,前面写过的尾插和头插,就可以复用这个函数来实现,大家可以自己尝试一下

// 顺序表在pos位置插入x void SeqListInsert(SeqList* psl, size_t pos, SLDataType x) { assert(psl); //判断pos位置是否合理 assert(pos >= 0 && psl->size > pos); //检查容量 CheckCapacity(psl); //把pos位置之后的向后移动 int end = psl->size - 1; while (end >= pos) { psl->data[end + 1] = psl->data[end]; end--; } //插入到pos位置 psl->data[pos] = x; }- 1
- 2
- 3
- 4
- 5
- 6
- 7
- 8
- 9
- 10
- 11
- 12
- 13
- 14
- 15
- 16
- 17
- 18
- 19
- 20
- 21
- 22
顺序表指定位置删除
顺序表指定位置删除和指定位置插入很相似,只不过是一个向前,一个向后

// 顺序表删除pos位置的值 void SeqListErase(SeqList* psl, size_t pos) { assert(psl); //判断pos位置是否合理 assert(pos >= 0 && psl->size > pos); //这里是否需要判断psl->size //把pos后面的值向前移动,覆盖掉pos位置 int begin = pos; while (begin < psl->size - 1) { psl->data[begin] = psl->data[begin + 1]; begin++; } psl->size--; }- 1
- 2
- 3
- 4
- 5
- 6
- 7
- 8
- 9
- 10
- 11
- 12
- 13
- 14
- 15
- 16
- 17
- 18
顺序表的销毁
因为我们的顺序表是动态开辟的,使用malloc realloc开辟的,所以需要释放
// 顺序表销毁 void SeqListDestroy(SeqList* psl) { assert(psl); //释放空间 free(psl->data); //把其他成员置空, 无关紧要 psl->capacity = psl->size = 0; }- 1
- 2
- 3
- 4
- 5
- 6
- 7
- 8
- 9
- 10
顺序表总结
顺序表实现起来还是比较简单的,和我们之前学过的数组非常的相似,但是写顺序表的时候,还是有很多的注意事项需要注意
- 调用Init () 就应该同时调用 Destroy() 在中间进行操作
- 顺序表是连续存储的,不要想着跳过一个
- 动态扩容时,不要每次增加一个,会增加很多消耗
我们实现了,发现顺序表在很多地方是有问题的
- 中间和头部的插入,需要移动,复杂度为O(N)
- 增容需要申请新空间,拷贝数据,释放旧空间。会有不小的消耗
- 增容一般是呈2倍的增长,势必会有一定的空间浪费。例如当前容量为100,满了以后增容到200,我们再继续插入了5个数据,后面没有数据插入了,那么就浪费了95个数据空间
顺序表的缺陷自然也很明显,但是它确实有自身的不可替代的优势,不然早就被淘汰了
既然顺序表经常会涉及到空间浪费的问题,那么有没有一种结构, 我用一个就开辟一个呢 ,绝对不多余开辟呢?
有的,就是链表链表
链表是一种物理存储结构上非连续、非顺序的存储结构,数据元素的逻辑顺序是通过链表
中的指针链接次序实现的 。同样链表是线性表
我们经常看到的链表是这样的

事实上,链表可以分为 带头/不带头 , 循环/不循环 ,单向/双向
它们互相排列组合, 2^ 3 = 8
所以有8种链表- 无头单向不循环链表
- 无头单向循环链表
- 带头单向不循环链表
- 带头单向循环链表
- 无头双向不循环链表
- 带头双向循环链表
- 无头双向循环链表
- 带头双向不循环链表
以上8种链表,各有优劣,在这里,因为最简单的是无头单向不循环链表 最复杂的是带头双向循环链表
所以我在这里实现2种,剩下的都类似,这两种在实际情况是比较常用的无头单向不循环链表

以后简称就为单链表, 逻辑结构是这样的, 就是前一个结点指向后一个节点, 有一个头结点, 但并不是哨兵位的头结点,我们来分析一下单链表的物理结构和逻辑结构物理结构
物理结构就是 前一个节点存储下一个节点的地址,通过前一个节点找见后一个节点

就是前一个节点存储了后一个节点的地址, 如果没有后一个节点,就存储NULL ,我们只有一个头结点,具体每个节点在内存中的哪个位置是未知的,不确定的,逻辑结构
逻辑结构就是大家所认为的,方便大家理解的, 前一个节点指向后一个节点

本质还是物理结构,大家一定要分清楚,但是我们实现的时候都用逻辑结构来分析
单链表结构
我们需要一个成员存储数据,还需要一个成员存储下一个位置的值
//单链表结构定义 typedef int SListDataType; typedef struct SListNode { SListDataType val; //存储的数据 struct SListNode* next; //下一个节点 //很多书上管这里叫 数据域 和 指针域 }SListNode;- 1
- 2
- 3
- 4
- 5
- 6
- 7
- 8
- 9
- 10
我们前面写顺序表的时候进行了初始化,那么单链表需不需要初始化呢?
我们在单链表中存储数据,就是在这一个一个的节点, 既然是没有哨兵位的,那么初始化就没有意义,我们定义单链表的时候,也是通过指针来定义,让它指向NULL, 不是定义一个节点出来,
SListNode * plist = NULL;
SListNode plist;
大家可以想一下这两种定义的方式, 第二种就相当于定义了一个节点出来, 我们需要的是指向单链表的指针单链表申请一个节点
SListNode* BuySListNode(SListDataType x);
我们使用malloc 动态开辟一个节点的空间返回就可以
SListNode* BuySListNode(SListDataType x) { //动态开辟一个节点 SListNode* ptr = (SListNode*)malloc(sizeof(SListNode)); if (NULL == ptr) { perror("malloc fail"); exit(-1); } //赋值 ptr->val = x; //默认生成的是随机值,所以要手动置空 ptr->next = NULL; return ptr; }- 1
- 2
- 3
- 4
- 5
- 6
- 7
- 8
- 9
- 10
- 11
- 12
- 13
- 14
- 15
- 16
- 17
单链表尾插
尾插的接口定义是这样的
void SListPushBack(SListNode** pphead, SListDataType x)
有些朋友就很疑惑,为什么这里使用二级指针,我们带大家来分析一下,什么原因
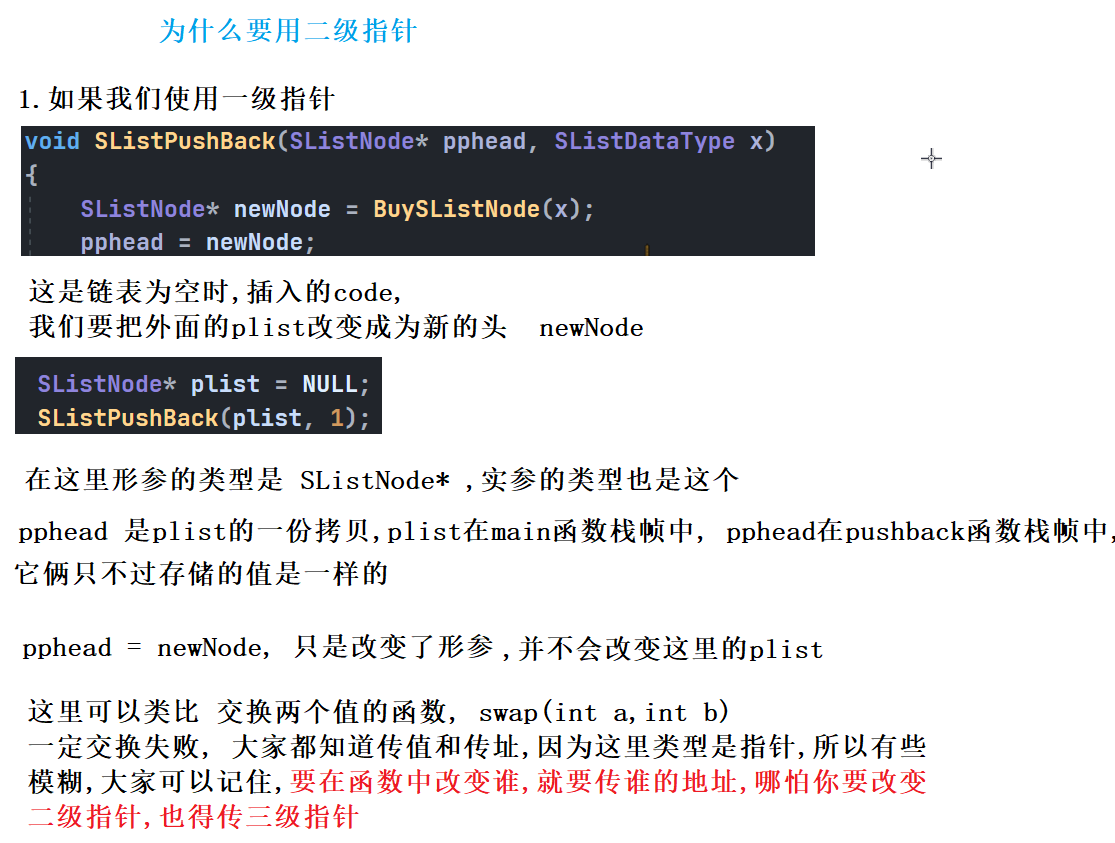
那么有一个问题,如果不使用二级指针,就解决不了这里的问题了吗,当然不是,我们来看看
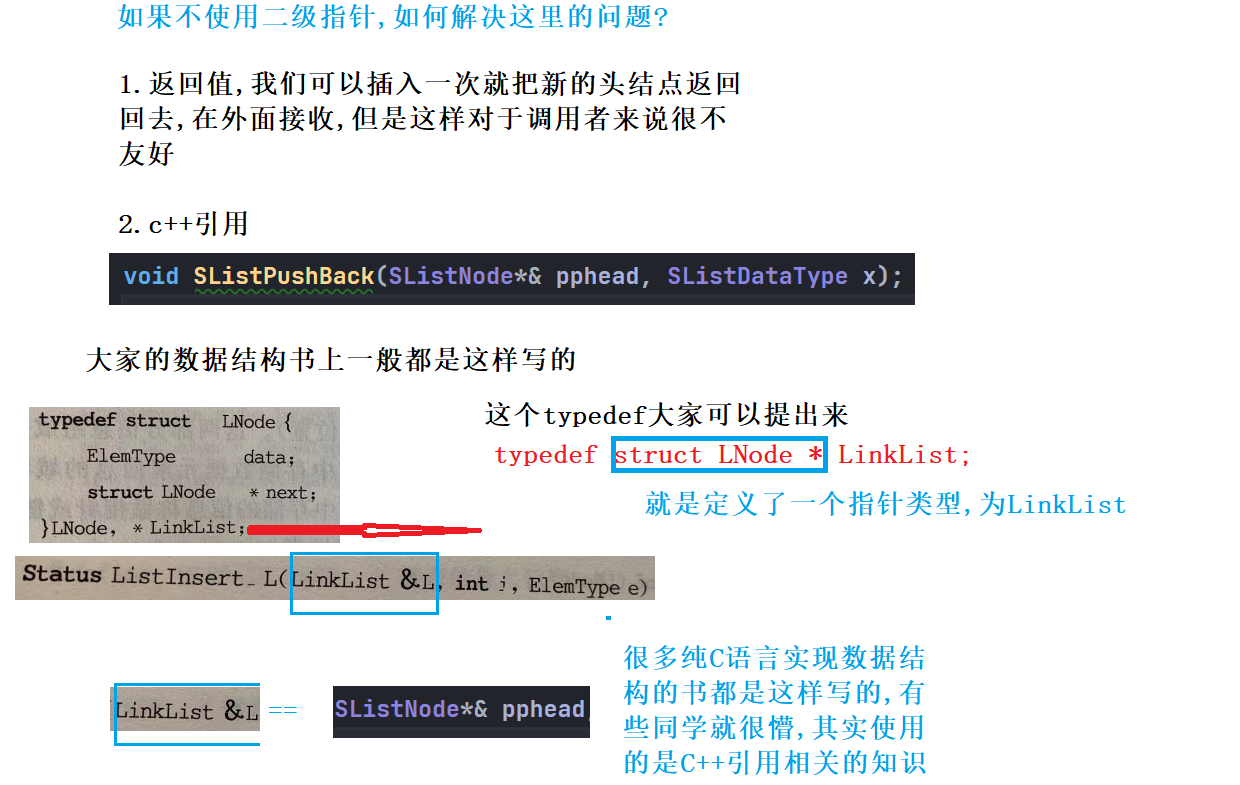
如果学过C++的同学就可以使用引用, 没学过的就用二级指针吧
理解了上面那个问题,我们来分析一下尾插该怎么实现
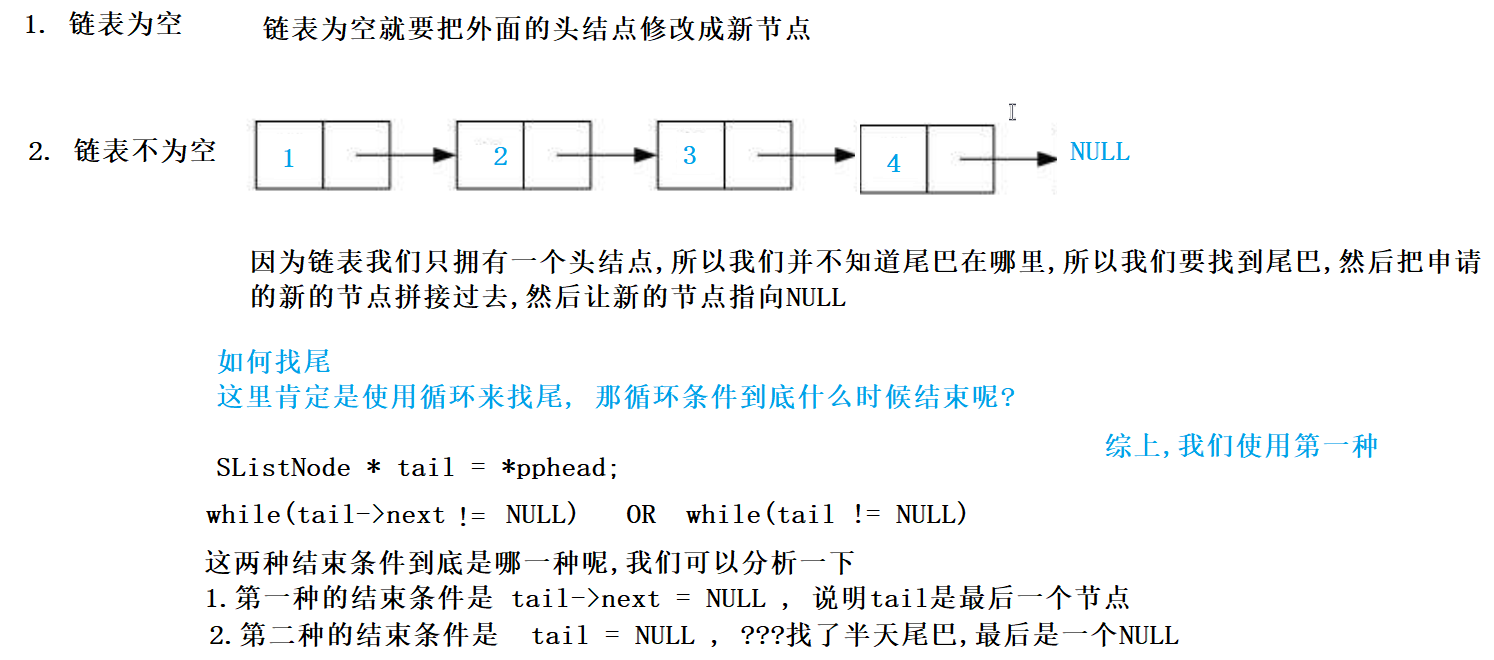
//单链表尾插 void SListPushBack(SListNode** pphead, SListDataType x) { //此处二级指针不能为空,如果为空,说明外面就没有头指针 assert(pphead); //申请一个新的节点 SListNode* newNode = BuySListNode(x); //分两种情况 1.链表为空, 2. 链表不为空 // if (*pphead == NULL) { *pphead = newNode; } else { //链表不为空 //找尾 SListNode* tail = *pphead; //此处不理解可以画图分析一下 while (tail->next != NULL) { tail = tail->next; } //现在tail是最后一个节点 tail->next = newNode; } }- 1
- 2
- 3
- 4
- 5
- 6
- 7
- 8
- 9
- 10
- 11
- 12
- 13
- 14
- 15
- 16
- 17
- 18
- 19
- 20
- 21
- 22
- 23
- 24
- 25
- 26
- 27
- 28
- 29
只要大家把尾插理解了,其他几个接口就很好理解了
单链表尾删
尾删其实和尾插差不多, 都需要找尾巴
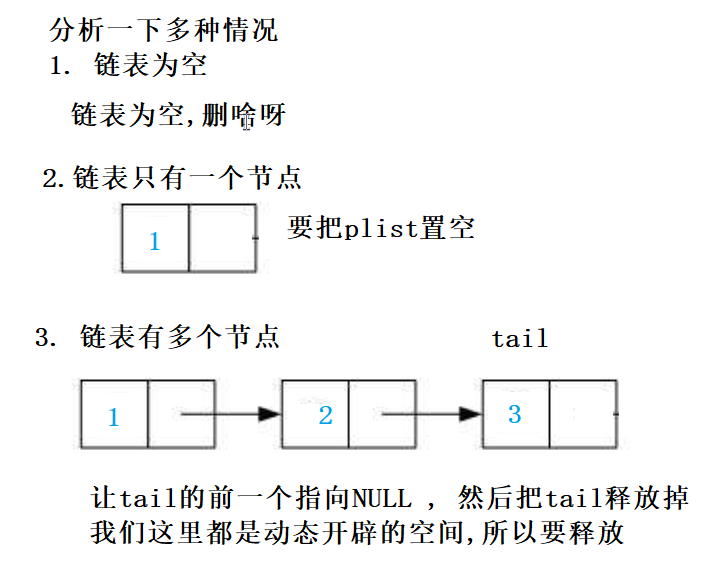
我们来用代码实现一下
//单链表尾删 void SListPopBack(SListNode** pphead) { assert(pphead); //1.如果链表为空,强制停止 assert(*pphead != NULL); //2.链表只有一个元素 if ((*pphead)->next == NULL) { //把空间free掉,让外面的plist为NULL free(*pphead); *pphead = NULL; } else //3.链表有多个元素 { //找尾,但是我们还要找尾巴的前一个 SListNode* prev = NULL; SListNode* tail = *pphead; while (tail->next != NULL) { prev = tail; tail = tail->next; } //释放尾巴 free(tail); prev->next = NULL; } }- 1
- 2
- 3
- 4
- 5
- 6
- 7
- 8
- 9
- 10
- 11
- 12
- 13
- 14
- 15
- 16
- 17
- 18
- 19
- 20
- 21
- 22
- 23
- 24
- 25
- 26
- 27
- 28
- 29
- 30
单链表头插
头插,要修改plist ,所以还是传二级指针
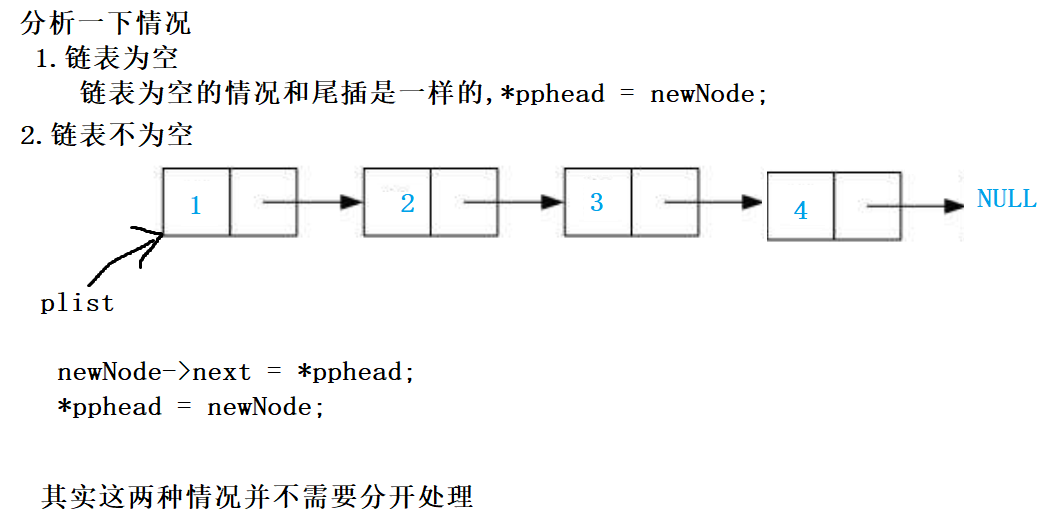
使用代码实现一下
void SListPushFront(SListNode** pphead, SListDataType x) { assert(pphead); //申请一个节点 SListNode* newNode = BuySListNode(x); newNode->next = *pphead; *pphead = newNode; }- 1
- 2
- 3
- 4
- 5
- 6
- 7
- 8
- 9
单链表头删
单链表的头删也是比较简单的, 分情况讨论就可以
void SListPopFront(SListNode** pphead);
void SListPopFront(SListNode** pphead) { assert(pphead); assert(*pphead != NULL); SListNode* next = (*pphead)->next; free(*pphead); *pphead = next; }- 1
- 2
- 3
- 4
- 5
- 6
- 7
- 8
- 9
单链表遍历
遍历还是比较简单的,就是挨着走就可以了
void SListPrint(SListNode* phead)
有些朋友又懵了,这里为什么又使用一级呢? 因为这里不需要改变外面的头结点
//遍历 void SListPrint(SListNode* phead) { SListNode* cur = phead; while (cur) { printf("%d->", cur->val); cur = cur->next; } printf("NULL\n"); }- 1
- 2
- 3
- 4
- 5
- 6
- 7
- 8
- 9
- 10
- 11
- 12
- 13
单链表查找
查找就和顺序表的大差不差,都比较简单,遍历着走就行了
SListNode* SListFind(SListNode* phead, SListDataType x) { assert(phead); SListNode* cur = phead; while (cur) { if (cur->val == x) { //如果等于就返回 return cur; } //向后走 cur = cur->next; } return NULL; }- 1
- 2
- 3
- 4
- 5
- 6
- 7
- 8
- 9
- 10
- 11
- 12
- 13
- 14
- 15
- 16
- 17
- 18
单链表插入在指定位置之后
接口声明
void SListInsertAfter(SListNode* pos, SListDataType x);

//单链表在pos位置之后插入x void SListInsertAfter(SListNode* pos, SListDataType x) { assert(pos); //申请一个节点 SListNode* newNode = BuySListNode(x); //存储原先指向 SListNode* next = pos->next; pos->next = newNode; newNode->next = next; }- 1
- 2
- 3
- 4
- 5
- 6
- 7
- 8
- 9
- 10
- 11
- 12
- 13
代码还是比较简单的,此处为什么不在pos之前插入呢??? 大家可以思考一下
单链表删除指定位置之后的值
接口声明
void SListEraseAfter(SListNode* pos)
如果pos之后没有值,就不需要删除
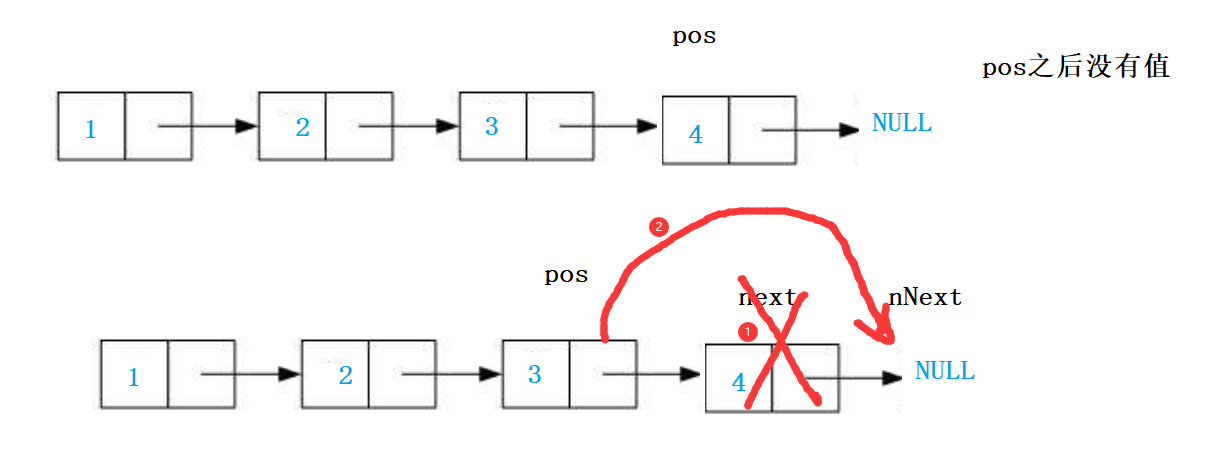
// 单链表删除pos位置之后的值 void SListEraseAfter(SListNode* pos) { assert(pos); //如果pos位置之后没有值,就无法删除 assert(pos->next); SListNode* next = pos->next; SListNode* nNext = pos->next->next; free(next); pos->next = nNext; }- 1
- 2
- 3
- 4
- 5
- 6
- 7
- 8
- 9
- 10
- 11
- 12
- 13
单链表的销毁
每一个结点都不挨着,所以要挨着释放
void SListDestory(SListNode** pphead) { assert(pphead); SListNode* cur = *pphead; while (cur) { SListNode* next = cur->next; free(cur); cur = next; } *pphead = NULL; }- 1
- 2
- 3
- 4
- 5
- 6
- 7
- 8
- 9
- 10
- 11
- 12
- 13
单链表总结
单链表到这里,基本的功能就实现完了,可以看到单链表还是稍微有一些难写的
单链表本身也是有缺陷的,当然优点也很明显
- 无空间浪费
- 头插 复杂度O(1)
希望大家能亲手实现,画图研究

单链表有很多练习题, 可以看一下我之前写的博客 单链表OJ 题
单链表和顺序表区别
它俩各有优劣,单链表最大的缺陷在于不支持随机访问, 比如我们之前学习的二分查找
不同点 顺序表 链表 存储空间上 物理上一定连续 逻辑上连续,但物理上不一定 连续 随机访问 支持O(1) 不支持:O(N) 任意位置插入或者删除 元素 可能需要搬移元素,效率低 O(N) 只需修改指针指向 插入 动态顺序表,空间不够时需要 扩容 没有容量的概念 应用场景 元素高效存储+频繁访问 任意位置插入和删除频繁 缓存利用率 高 低 带头双向循环链表
上面我们研究了单链表,我们来研究一下带头双向循环链表
循环–> 头的前一个是尾巴,像一个圈一样
带头 --> 有一个不存储有效数据的哨兵位的头结点
双向 --> 后一个可以找见前一个这个链表的结构颇为复杂,很容易把同学们劝退,但实现功能的时候,却异常的简单

看起来有点复杂哈哈初始化
初始化有2种方式
- init() 申请头结点然后赋值给外面的list
- create() 申请头结点,然后返回,
这两种方式皆可,第一种还是需要使用二级指针 ,大家可以尝试一下
我这里使用返回值的方式来创建// 创建返回链表的头结点. ListNode* ListCreate() { ListNode* head = (ListNode*)malloc(sizeof(ListNode)); if (NULL == head) { perror("malloc fail"); exit(-1); } //因为循环,所以它的前一个就是本身 head->prev = head; //因为循环,所以它的后一个也是本身 head->next = head; return head; }- 1
- 2
- 3
- 4
- 5
- 6
- 7
- 8
- 9
- 10
- 11
- 12
- 13
- 14
- 15
销毁
这里的销毁和单链表的销毁也是非常类似的,一定要把头结点也销毁了

// 双向链表销毁 void ListDestory(ListNode* plist) { assert(plist); //遍历销毁 ListNode* cur = plist->next; while (cur != plist) { ListNode* next = cur->next; free(cur); cur = next; } //释放头结点 free(plist); }- 1
- 2
- 3
- 4
- 5
- 6
- 7
- 8
- 9
- 10
- 11
- 12
- 13
- 14
- 15
- 16
- 17
遍历
关键是怎么找到结束位置
// 双向链表打印 void ListPrint(ListNode* plist) { //因为有头结点,所以plist一定不能为空 assert(plist); ListNode* cur = plist->next; while (cur != plist) { printf("%d ", cur->_data); cur = cur->next; } }- 1
- 2
- 3
- 4
- 5
- 6
- 7
- 8
- 9
- 10
- 11
- 12
- 13
尾插
接口声明
void ListPushBack(ListNode* plist, LTDataType x)我们来分析一下
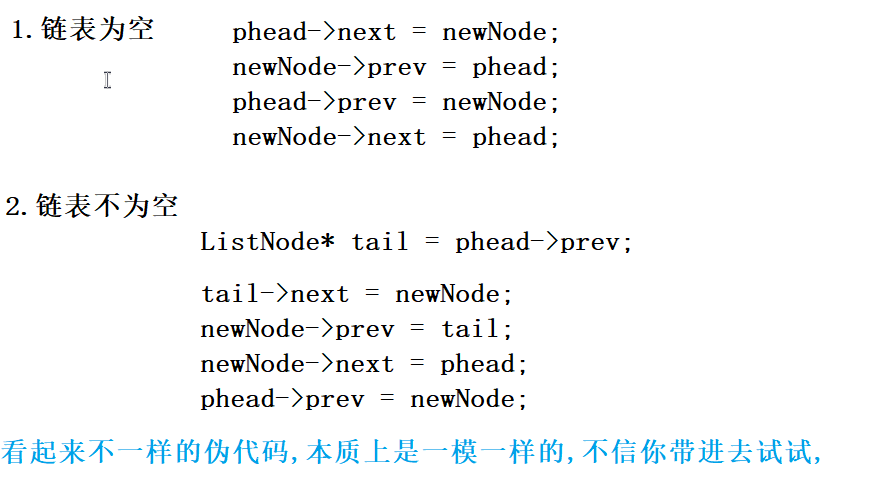
// 双向链表尾插 void ListPushBack(ListNode* plist, LTDataType x) { assert(plist); //申请一个节点 ListNode* newNode = buyListNode(x); ListNode* tail = plist->prev; tail->next = newNode; newNode->prev = tail; newNode->next = plist; plist->prev = newNode; }- 1
- 2
- 3
- 4
- 5
- 6
- 7
- 8
- 9
- 10
- 11
- 12
头插
头插也是非常简单的,我们来分析一下情况
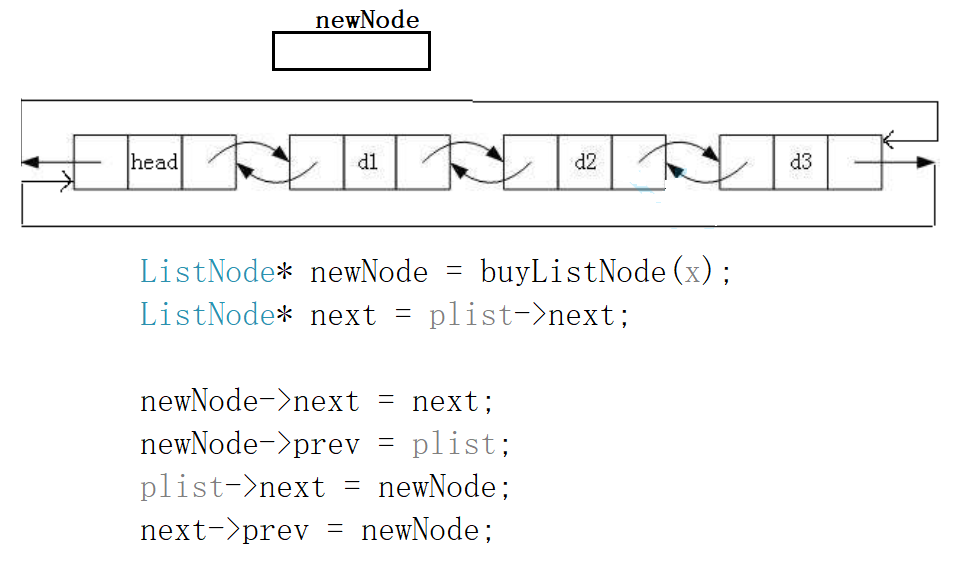
// 双向链表头插 void ListPushFront(ListNode* plist, LTDataType x) { assert(plist); //申请一个节点 ListNode* newNode = buyListNode(x); ListNode* next = plist->next; newNode->next = next; newNode->prev = plist; plist->next = newNode; next->prev = newNode; }- 1
- 2
- 3
- 4
- 5
- 6
- 7
- 8
- 9
- 10
- 11
- 12
- 13
头删
头删需要注意的点还是那些, 比如链表为空,
因为这里是循环的,没有空指针的问题,大家只要想清楚哪一个应该指向哪一个,顺序是怎么样的就可以了,如果想不清楚,就把每一个都存下来,就没有顺序的问题了
// 双向链表头删 void ListPopFront(ListNode* plist) { assert(plist); //判断链表是否为空 assert(plist->next != plist); ListNode* next = plist->next; plist->next = plist->next->next; plist->next->next->prev = plist; free(next); }- 1
- 2
- 3
- 4
- 5
- 6
- 7
- 8
- 9
- 10
- 11
- 12
- 13
尾删
尾删和头删差不多,其实这里的头插尾插头删尾删都非常像
// 双向链表尾删 void ListPopBack(ListNode* plist) { assert(plist); //判断链表是否为空 assert(plist->next != plist); //找尾 ListNode* tail = plist->prev; //需要找到尾巴的前一个 ListNode* prev = tail->prev; prev->next = plist; plist->prev = prev; free(tail); }- 1
- 2
- 3
- 4
- 5
- 6
- 7
- 8
- 9
- 10
- 11
- 12
- 13
- 14
- 15
- 16
其他
大家可以看到,如果玩明白了单链表,双向链表写起来非常容易, 所以我在此也不在赘述, 把剩下的接口实现到我的代码中,下面会把所有代码按照文件的方式放在下面
建议大家可以自己分析一下,多画画图,其他没那么难
总结
数据结构的学习和语言的学习不一样,在数据结构的学习里,非常注重画图和思考,只要图画的好,按照图的思路去走,非常容易就能把这些东西实现了,所以大家一定要多画图

所有代码
测试文件Test.c(所有测试都在这里)
#define _CRT_SECURE_NO_WARNINGS 1 #include "SeqList.h" #include "SList.h" #include "List.h" void TestSeqList() { SeqList sq; SeqListInit(&sq); SeqListPushBack(&sq, 1); SeqListPushBack(&sq, 2); SeqListPushBack(&sq, 3); SeqListPushBack(&sq, 4); SeqListPushBack(&sq, 5); SeqListPushFront(&sq, 0); SeqListPushFront(&sq, -1); SeqListPushFront(&sq, -2); SeqListPrint(&sq); SeqListInsert(&sq, SeqListFind(&sq, 2), 200); SeqListErase(&sq, SeqListFind(&sq, -2)); SeqListErase(&sq, SeqListFind(&sq, 200)); /*SeqListPopFront(&sq); SeqListPopFront(&sq); SeqListPopFront(&sq); SeqListPopFront(&sq); SeqListPopFront(&sq);*/ SeqListPrint(&sq); SeqListDestroy(&sq); } void TestSList() { SListNode* plist = NULL; //SListPushBack(&plist, 1); //SListPushBack(&plist, 2); //SListPushBack(&plist, 3); //SListPushBack(&plist, 4); //SListPopBack(&plist); //SListPopBack(&plist); //SListPopBack(&plist); //SListPopBack(&plist); SListPushFront(&plist, 1); SListPushFront(&plist, 2); SListPushFront(&plist, 3); SListPushFront(&plist, 4); SListPushFront(&plist, 5); //SListPopFront(&plist); //SListPopFront(&plist); //SListPopFront(&plist); //SListPopFront(&plist); //SListPopFront(&plist); SListInsertAfter(SListFind(plist, 3), 10); SListInsertAfter(SListFind(plist, 1), 10); SListEraseAfter(SListFind(plist, 1)); SListEraseAfter(SListFind(plist, 3)); SListEraseAfter(SListFind(plist, 3)); SListPrint(plist); SListDestory(&plist); } void TestList() { ListNode* head = ListCreate(); /*ListPushBack(head, 1); ListPushBack(head, 2); ListPushBack(head, 3); ListPushBack(head, 4); ListPushBack(head, 5);*/ ListPushFront(head, 1); ListPushFront(head, 2); ListPushFront(head, 3); /*ListPopFront(head); ListPopFront(head); ListPopFront(head); ListPopFront(head);*/ //ListPopBack(head); //ListPopBack(head); //ListPopBack(head); ListPrint(head); printf("\n"); ListInsert(ListFind(head, 3), 1); ListPrint(head); printf("\n"); ListErase(ListFind(head, 3)); ListErase(ListFind(head, 1)); ListErase(ListFind(head, 2)); ListErase(ListFind(head, 1)); ListPrint(head); ListDestory(head); } int main(void) { //TestSeqList(); //TestSList(); TestList(); return 0; }- 1
- 2
- 3
- 4
- 5
- 6
- 7
- 8
- 9
- 10
- 11
- 12
- 13
- 14
- 15
- 16
- 17
- 18
- 19
- 20
- 21
- 22
- 23
- 24
- 25
- 26
- 27
- 28
- 29
- 30
- 31
- 32
- 33
- 34
- 35
- 36
- 37
- 38
- 39
- 40
- 41
- 42
- 43
- 44
- 45
- 46
- 47
- 48
- 49
- 50
- 51
- 52
- 53
- 54
- 55
- 56
- 57
- 58
- 59
- 60
- 61
- 62
- 63
- 64
- 65
- 66
- 67
- 68
- 69
- 70
- 71
- 72
- 73
- 74
- 75
- 76
- 77
- 78
- 79
- 80
- 81
- 82
- 83
- 84
- 85
- 86
- 87
- 88
- 89
- 90
- 91
- 92
- 93
- 94
- 95
- 96
- 97
- 98
- 99
- 100
- 101
- 102
- 103
- 104
- 105
- 106
- 107
- 108
- 109
- 110
- 111
- 112
- 113
- 114
- 115
- 116
顺序表头文件以及.c文件
SeqList.h
#pragma once #include#include #include //静态顺序表 //typedef int SeqDataType; //#define MAX_SIZE 100 // //typedef struct SeqList //{ // SeqDataType data[MAX_SIZE]; //存储数据 // int size;//当前数据个数 //}SeqList; //动态顺序表 typedef int SLDataType; typedef struct SeqList { SLDataType* data;//数据开头的指针 int size; //代表当前有效数据个数 int capacity; //代表顺序表当前的容量 }SeqList; void SeqListInit(SeqList* psl); // 检查空间,如果满了,进行增容 void CheckCapacity(SeqList* psl); // 顺序表尾插 void SeqListPushBack(SeqList* psl, SLDataType x); // 顺序表尾删 void SeqListPopBack(SeqList* psl); // 顺序表头插 void SeqListPushFront(SeqList* psl, SLDataType x); // 顺序表头删 void SeqListPopFront(SeqList* psl); // 顺序表查找 int SeqListFind(SeqList* psl, SLDataType x); // 顺序表在pos位置插入x void SeqListInsert(SeqList* psl, size_t pos, SLDataType x); // 顺序表删除pos位置的值 void SeqListErase(SeqList* psl, size_t pos); // 顺序表销毁 void SeqListDestroy(SeqList* psl); // 顺序表打印 void SeqListPrint(SeqList* psl); - 1
- 2
- 3
- 4
- 5
- 6
- 7
- 8
- 9
- 10
- 11
- 12
- 13
- 14
- 15
- 16
- 17
- 18
- 19
- 20
- 21
- 22
- 23
- 24
- 25
- 26
- 27
- 28
- 29
- 30
- 31
- 32
- 33
- 34
- 35
- 36
- 37
- 38
- 39
- 40
- 41
- 42
- 43
- 44
- 45
- 46
- 47
- 48
- 49
- 50
- 51
- 52
- 53
SeqList.c
#include "SeqList.h" void SeqListInit(SeqList* psl) { //因为此处psl一定不能为空,所以此处断言 assert(psl); psl->size = psl->capacity = 0; psl->data = NULL; } // 检查空间,如果满了,进行增容 void CheckCapacity(SeqList* psl) { //此处psl也一定不能为空,所以需要断言 assert(psl); //如果size 和 capacity 相等了,说明就满了,需要扩容 if (psl->size == psl->capacity) { //定义一个新的容量,一般增容方式都是当前2倍, //这里还有一个问题就是,默认初始容量是0,所以使用三目运算符判断 int newCapacity = psl->capacity == 0 ? 4 : psl->capacity * 2; //使用realloc进行扩容--需要注意的是,此处sizeof中应该写待存储数据类型,而不是顺序表自身 SLDataType* ptr = (SLDataType*)realloc(psl->data, sizeof(SLDataType) * newCapacity); //判断开辟空间失败情况 if (NULL == ptr) { perror("realloc fail"); exit(-1); } //把新的容量赋值给旧的容量,把新的指针同样赋值过去 psl->capacity = newCapacity; psl->data = ptr; } //如果空间不满,则啥也不需要做. pass } // 顺序表尾插 void SeqListPushBack(SeqList* psl, SLDataType x) { //此处psl依旧不能为空 assert(psl); //首先检查是否需要扩容 CheckCapacity(psl); //因为size指向的是最后一个元素的下一个位置 psl->data[psl->size] = x; //添加了一个元素,有效元素个数要 + 1 psl->size++; } // 顺序表打印 void SeqListPrint(SeqList* psl) { assert(psl); for (int i = 0; i < psl->size; i++) { printf("%d ", psl->data[i]); } printf("\n"); } // 顺序表头插 void SeqListPushFront(SeqList* psl, SLDataType x) { assert(psl); //首先检查是否需要扩容 CheckCapacity(psl); //向后移动元素 for (int i = psl->size - 1; i >= 0; i--) { psl->data[i + 1] = psl->data[i]; } //在起始位置插入x psl->data[0] = x; psl->size++; } // 顺序表尾删 void SeqListPopBack(SeqList* psl) { assert(psl); //顺序表一定不能为空 assert(psl->size > 0); //只需要--,下次增加数据的时候就自动覆盖了, psl->size--; } // 顺序表头删 void SeqListPopFront(SeqList* psl) { assert(psl); //顺序表一定不能为空 assert(psl->size > 0); //移动 int begin = 0; while (begin < psl->size - 1) { psl->data[begin] = psl->data[begin + 1]; begin++; } psl->size--; } // 顺序表查找 int SeqListFind(SeqList* psl, SLDataType x) { assert(psl); for (int i = 0; i < psl->size; i++) { if (psl->data[i] == x) { //找到了返回下标 return i; } } //找不到返回-1 return -1; } // 顺序表在pos位置插入x void SeqListInsert(SeqList* psl, size_t pos, SLDataType x) { assert(psl); //判断pos位置是否合理 assert(pos >= 0 && psl->size > pos); //检查容量 CheckCapacity(psl); //把pos位置之后的向后移动 int end = psl->size - 1; while (end >= pos) { psl->data[end + 1] = psl->data[end]; end--; } //插入到pos位置 psl->data[pos] = x; } // 顺序表删除pos位置的值 void SeqListErase(SeqList* psl, size_t pos) { assert(psl); //判断pos位置是否合理 assert(pos >= 0 && psl->size > pos); //这里是否需要判断psl->size //把pos后面的值向前移动,覆盖掉pos位置 int begin = pos; while (begin < psl->size - 1) { psl->data[begin] = psl->data[begin + 1]; begin++; } psl->size--; } // 顺序表销毁 void SeqListDestroy(SeqList* psl) { assert(psl); //释放空间 free(psl->data); //把其他成员置空, 无关紧要 psl->capacity = psl->size = 0; }- 1
- 2
- 3
- 4
- 5
- 6
- 7
- 8
- 9
- 10
- 11
- 12
- 13
- 14
- 15
- 16
- 17
- 18
- 19
- 20
- 21
- 22
- 23
- 24
- 25
- 26
- 27
- 28
- 29
- 30
- 31
- 32
- 33
- 34
- 35
- 36
- 37
- 38
- 39
- 40
- 41
- 42
- 43
- 44
- 45
- 46
- 47
- 48
- 49
- 50
- 51
- 52
- 53
- 54
- 55
- 56
- 57
- 58
- 59
- 60
- 61
- 62
- 63
- 64
- 65
- 66
- 67
- 68
- 69
- 70
- 71
- 72
- 73
- 74
- 75
- 76
- 77
- 78
- 79
- 80
- 81
- 82
- 83
- 84
- 85
- 86
- 87
- 88
- 89
- 90
- 91
- 92
- 93
- 94
- 95
- 96
- 97
- 98
- 99
- 100
- 101
- 102
- 103
- 104
- 105
- 106
- 107
- 108
- 109
- 110
- 111
- 112
- 113
- 114
- 115
- 116
- 117
- 118
- 119
- 120
- 121
- 122
- 123
- 124
- 125
- 126
- 127
- 128
- 129
- 130
- 131
- 132
- 133
- 134
- 135
- 136
- 137
- 138
- 139
- 140
- 141
- 142
- 143
- 144
- 145
- 146
- 147
- 148
- 149
- 150
- 151
- 152
- 153
- 154
- 155
- 156
- 157
- 158
- 159
- 160
- 161
- 162
- 163
- 164
- 165
- 166
- 167
- 168
- 169
- 170
- 171
- 172
- 173
- 174
- 175
- 176
- 177
- 178
- 179
- 180
- 181
- 182
- 183
- 184
单链表头文件以及.c文件
SList.h
#pragma once #include#include #include //单链表结构定义 typedef int SListDataType; typedef struct SListNode { SListDataType val; //存储的数据 struct SListNode* next; //下一个节点 //很多书上管这里叫 数据域 和 指针域 }SListNode; SListNode* BuySListNode(SListDataType x); // void SListPrint(SListNode* phead); //单链表尾插 void SListPushBack(SListNode** pphead, SListDataType x); //单链表尾删 void SListPopBack(SListNode** pphead); void SListPushFront(SListNode** pphead, SListDataType x); void SListPopFront(SListNode** pphead); SListNode* SListFind(SListNode* phead, SListDataType x); //单链表在pos位置之后插入x void SListInsertAfter(SListNode* pos, SListDataType x); // 单链表删除pos位置之后的值 void SListEraseAfter(SListNode* pos); void SListDestory(SListNode** pphead); - 1
- 2
- 3
- 4
- 5
- 6
- 7
- 8
- 9
- 10
- 11
- 12
- 13
- 14
- 15
- 16
- 17
- 18
- 19
- 20
- 21
- 22
- 23
- 24
- 25
- 26
- 27
- 28
- 29
- 30
- 31
- 32
- 33
- 34
- 35
- 36
- 37
- 38
- 39
- 40
- 41
- 42
- 43
SList.c
#include "SList.h" //单链表尾插 void SListPushBack(SListNode** pphead, SListDataType x) { //此处二级指针不能为空,如果为空,说明外面就没有头指针 assert(pphead); //申请一个新的节点 SListNode* newNode = BuySListNode(x); //分两种情况 1.链表为空, 2. 链表不为空 // if (*pphead == NULL) { *pphead = newNode; } else { //链表不为空 //找尾 SListNode* tail = *pphead; //此处不理解可以画图分析一下 while (tail->next != NULL) { tail = tail->next; } //现在tail是最后一个节点 tail->next = newNode; } } SListNode* BuySListNode(SListDataType x) { //动态开辟一个节点 SListNode* ptr = (SListNode*)malloc(sizeof(SListNode)); if (NULL == ptr) { perror("malloc fail"); exit(-1); } //赋值 ptr->val = x; //默认生成的是随机值,所以要手动置空 ptr->next = NULL; return ptr; } //遍历 void SListPrint(SListNode* phead) { SListNode* cur = phead; while (cur) { printf("%d->", cur->val); cur = cur->next; } printf("NULL\n"); } //单链表尾删 void SListPopBack(SListNode** pphead) { assert(pphead); //1.如果链表为空,强制停止 assert(*pphead != NULL); //2.链表只有一个元素 if ((*pphead)->next == NULL) { //把空间free掉,让外面的plist为NULL free(*pphead); *pphead = NULL; } else //3.链表有多个元素 { //找尾,但是我们还要找尾巴的前一个 SListNode* prev = NULL; SListNode* tail = *pphead; while (tail->next != NULL) { prev = tail; tail = tail->next; } //释放尾巴 free(tail); prev->next = NULL; } } void SListPushFront(SListNode** pphead, SListDataType x) { assert(pphead); //申请一个节点 SListNode* newNode = BuySListNode(x); newNode->next = *pphead; *pphead = newNode; } void SListPopFront(SListNode** pphead) { assert(pphead); assert(*pphead != NULL); SListNode* next = (*pphead)->next; free(*pphead); *pphead = next; } SListNode* SListFind(SListNode* phead, SListDataType x) { assert(phead); SListNode* cur = phead; while (cur) { if (cur->val == x) { //如果等于就返回 return cur; } //向后走 cur = cur->next; } return NULL; } //单链表在pos位置之后插入x void SListInsertAfter(SListNode* pos, SListDataType x) { assert(pos); //申请一个节点 SListNode* newNode = BuySListNode(x); //存储原先指向 SListNode* next = pos->next; pos->next = newNode; newNode->next = next; } // 单链表删除pos位置之后的值 void SListEraseAfter(SListNode* pos) { assert(pos); //如果pos位置之后没有值,就无法删除 assert(pos->next); SListNode* next = pos->next; SListNode* nNext = pos->next->next; free(next); pos->next = nNext; } void SListDestory(SListNode** pphead) { assert(pphead); SListNode* cur = *pphead; while (cur) { SListNode* next = cur->next; free(cur); cur = next; } *pphead = NULL; }- 1
- 2
- 3
- 4
- 5
- 6
- 7
- 8
- 9
- 10
- 11
- 12
- 13
- 14
- 15
- 16
- 17
- 18
- 19
- 20
- 21
- 22
- 23
- 24
- 25
- 26
- 27
- 28
- 29
- 30
- 31
- 32
- 33
- 34
- 35
- 36
- 37
- 38
- 39
- 40
- 41
- 42
- 43
- 44
- 45
- 46
- 47
- 48
- 49
- 50
- 51
- 52
- 53
- 54
- 55
- 56
- 57
- 58
- 59
- 60
- 61
- 62
- 63
- 64
- 65
- 66
- 67
- 68
- 69
- 70
- 71
- 72
- 73
- 74
- 75
- 76
- 77
- 78
- 79
- 80
- 81
- 82
- 83
- 84
- 85
- 86
- 87
- 88
- 89
- 90
- 91
- 92
- 93
- 94
- 95
- 96
- 97
- 98
- 99
- 100
- 101
- 102
- 103
- 104
- 105
- 106
- 107
- 108
- 109
- 110
- 111
- 112
- 113
- 114
- 115
- 116
- 117
- 118
- 119
- 120
- 121
- 122
- 123
- 124
- 125
- 126
- 127
- 128
- 129
- 130
- 131
- 132
- 133
- 134
- 135
- 136
- 137
- 138
- 139
- 140
- 141
- 142
- 143
- 144
- 145
- 146
- 147
- 148
- 149
- 150
- 151
- 152
- 153
- 154
- 155
- 156
- 157
- 158
- 159
- 160
- 161
- 162
- 163
- 164
- 165
- 166
- 167
- 168
- 169
- 170
- 171
- 172
- 173
- 174
- 175
- 176
双向循环链表头文件以及.c文件
List.h
#pragma once #include#include #include typedef int LTDataType; typedef struct ListNode { LTDataType _data; struct ListNode* next; struct ListNode* prev; }ListNode; // 创建返回链表的头结点. ListNode* ListCreate(); // 双向链表销毁 void ListDestory(ListNode* plist); // 双向链表打印 void ListPrint(ListNode* plist); // 双向链表尾插 void ListPushBack(ListNode* plist, LTDataType x); // 双向链表尾删 void ListPopBack(ListNode* plist); // 双向链表头插 void ListPushFront(ListNode* plist, LTDataType x); // 双向链表头删 void ListPopFront(ListNode* plist); // 双向链表查找 ListNode* ListFind(ListNode* plist, LTDataType x); // 双向链表在pos的前面进行插入 void ListInsert(ListNode* pos, LTDataType x); // 双向链表删除pos位置的结点 void ListErase(ListNode* pos); - 1
- 2
- 3
- 4
- 5
- 6
- 7
- 8
- 9
- 10
- 11
- 12
- 13
- 14
- 15
- 16
- 17
- 18
- 19
- 20
- 21
- 22
- 23
- 24
- 25
- 26
- 27
- 28
- 29
- 30
- 31
- 32
- 33
- 34
- 35
- 36
- 37
List.c
#define _CRT_SECURE_NO_WARNINGS 1 #include "SeqList.h" #include "SList.h" #include "List.h" void TestSeqList() { SeqList sq; SeqListInit(&sq); SeqListPushBack(&sq, 1); SeqListPushBack(&sq, 2); SeqListPushBack(&sq, 3); SeqListPushBack(&sq, 4); SeqListPushBack(&sq, 5); SeqListPushFront(&sq, 0); SeqListPushFront(&sq, -1); SeqListPushFront(&sq, -2); SeqListPrint(&sq); SeqListInsert(&sq, SeqListFind(&sq, 2), 200); SeqListErase(&sq, SeqListFind(&sq, -2)); SeqListErase(&sq, SeqListFind(&sq, 200)); /*SeqListPopFront(&sq); SeqListPopFront(&sq); SeqListPopFront(&sq); SeqListPopFront(&sq); SeqListPopFront(&sq);*/ SeqListPrint(&sq); SeqListDestroy(&sq); } void TestSList() { SListNode* plist = NULL; //SListPushBack(&plist, 1); //SListPushBack(&plist, 2); //SListPushBack(&plist, 3); //SListPushBack(&plist, 4); //SListPopBack(&plist); //SListPopBack(&plist); //SListPopBack(&plist); //SListPopBack(&plist); SListPushFront(&plist, 1); SListPushFront(&plist, 2); SListPushFront(&plist, 3); SListPushFront(&plist, 4); SListPushFront(&plist, 5); //SListPopFront(&plist); //SListPopFront(&plist); //SListPopFront(&plist); //SListPopFront(&plist); //SListPopFront(&plist); SListInsertAfter(SListFind(plist, 3), 10); SListInsertAfter(SListFind(plist, 1), 10); SListEraseAfter(SListFind(plist, 1)); SListEraseAfter(SListFind(plist, 3)); SListEraseAfter(SListFind(plist, 3)); SListPrint(plist); SListDestory(&plist); } void TestList() { ListNode* head = ListCreate(); /*ListPushBack(head, 1); ListPushBack(head, 2); ListPushBack(head, 3); ListPushBack(head, 4); ListPushBack(head, 5);*/ ListPushFront(head, 1); ListPushFront(head, 2); ListPushFront(head, 3); /*ListPopFront(head); ListPopFront(head); ListPopFront(head); ListPopFront(head);*/ //ListPopBack(head); //ListPopBack(head); //ListPopBack(head); ListPrint(head); printf("\n"); ListInsert(ListFind(head, 3), 1); ListPrint(head); printf("\n"); ListErase(ListFind(head, 3)); ListErase(ListFind(head, 1)); ListErase(ListFind(head, 2)); ListErase(ListFind(head, 1)); ListPrint(head); ListDestory(head); } int main(void) { //TestSeqList(); //TestSList(); TestList(); return 0; }- 1
- 2
- 3
- 4
- 5
- 6
- 7
- 8
- 9
- 10
- 11
- 12
- 13
- 14
- 15
- 16
- 17
- 18
- 19
- 20
- 21
- 22
- 23
- 24
- 25
- 26
- 27
- 28
- 29
- 30
- 31
- 32
- 33
- 34
- 35
- 36
- 37
- 38
- 39
- 40
- 41
- 42
- 43
- 44
- 45
- 46
- 47
- 48
- 49
- 50
- 51
- 52
- 53
- 54
- 55
- 56
- 57
- 58
- 59
- 60
- 61
- 62
- 63
- 64
- 65
- 66
- 67
- 68
- 69
- 70
- 71
- 72
- 73
- 74
- 75
- 76
- 77
- 78
- 79
- 80
- 81
- 82
- 83
- 84
- 85
- 86
- 87
- 88
- 89
- 90
- 91
- 92
- 93
- 94
- 95
- 96
- 97
- 98
- 99
- 100
- 101
- 102
- 103
- 104
- 105
- 106
- 107
- 108
- 109
- 110
- 111
- 112
- 113
- 114
- 115
- 116
本文到这里就结束了,感谢观看,希望大家对于链表的理解可以加深

-
相关阅读:
认识端口号(netstat指令查看网络状态)
Vue中使用VueAMap
神经网络和深度学习-后向传播back propagation
chapter four in C primer plus
使用DMFLDR工具将Excel数据导入到达梦数据库
ABB MPRC086444-005数字输入模块
ch03:算数运算(长沙师范学院)
04-React脚手架 & 集成Axios
淘宝/天猫API接口,item_sku - 淘宝商品SKU详细信息查询,淘宝/天猫获取sku详细信息 API 返回值说明
CycloneDDS配置详细说明中文版(二)
- 原文地址:https://blog.csdn.net/weixin_54580407/article/details/127737660
