-
kubeadm搭建k8s集群1.25版本完整教程【doker、网络插件calico、中间层cri-docker】
前言
基础描述
- 从 k8s 1.24开始,dockershim已经从kubelet中移除,但因为历史问题docker却不支持kubernetes主推的CRI(容器运行时接口)标准,所以docker不能再作为k8s的容器运行时了,即从k8s v1.24开始不再使用docker了
- 但是如果想继续使用docker的话,可以在kubelet和docker之间加上一个中间层cri-docker。cri-docker是一个支持CRI标准的shim(垫片)。一头通过CRI跟kubelet交互,另一头跟docker api交互,从而间接的实现了kubernetes以docker作为容器运行时。但是这种架构缺点也很明显,调用链更长,效率更低。
- 本文采用了cri-docker的使用,但是更推荐使用containerd作为k8s的容器运行时
- 其实本来我也准备采用containerd作为容器运行时的,怎奈技术和时间有限,且最新版本网上资料比较少,核心目的还是为了考cka证书,想快速构建起集群
其他
- 为了搭建次教程虚拟机已经重装系统三次啦,含泪整理出此教程,请各位小伙伴仔细小心的阅读,按照此教程的顺序一步步搭建肯定是能成功的,后面教程也会有遇到的问题处理
- 期间会用到如calico插件及其他需要的安装包,博主也会上传镜像包供大家下载,所有大家不慌不忙,仔细阅读争取一次就能搭建成功。
- 教程如果没有特殊说明的命令和操作, 默认所有机器都需要执行
机器环境

基础环境
hostname设置
- 把每一台虚拟机或者云服务器进行hostname设置,方便查看【master、node节点】
- 不同节点设置不同的hostname
hostnamectl set-hostname k8s-master hostnamectl set-hostname k8s-node-1 hostnamectl set-hostname k8s-node-2- 1
- 2
- 3
- 所有节点,包括master节点,修改/etc/hosts文件,在最后加入如下你的集群IP信息,内网外网都行,只要能够互相ping通
vi /etc/hosts 172.24.214.110 k8s-master 172.24.214.108 k8s-node-1 172.24.214.109 k8s-node-2- 1
- 2
- 3
- 4
- 5
yum更新
- 更新为最新的内核版本,更新lrzsz方便后面上传镜像包
yum install update yum install lrzsz yum install -y conntrack ipvsadm ipset jq sysstat curl iptables libseccomp- 1
- 2
- 3
docker安装
脚本安装【推荐】
- 直接在linux上面执行该命令,选择了脚本安装docker,下面的命令安装无需执行。
wget -O docker.sh https://files.rundreams.net/sh/docker.sh && sh docker.sh- 1
命令安装
- 设置repo
sudo yum-config-manager --add-repo http://mirrors.aliyun.com/docker-ce/linux/centos/docker-ce.repo- 1
- 设置国内镜像并重启 daemon
sudo mkdir -p /etc/docker sudo tee /etc/docker/daemon.json <<-'EOF' { "registry-mirrors": ["https://j16wttpi.mirror.aliyuncs.com"] } EOF- 1
- 2
- 3
- 4
- 5
- 6
wget https://mirrors.aliyun.com/docker-ce/linux/centos/docker-ce.repo -O /etc/yum.repos.d/docker-ce.repo- 1
- 进行安装命令,并设置docker自动重启
yum install -y docker-ce systemctl start docker systemctl enable docker- 1
- 2
- 3
- 查看是否成功
docker info- 1
k8s安装配置
脚本配置【推荐】
- linux直接执行该命令,选择了脚本配置,无需执行命令配置 。
wget -O k8s-init.sh https://files.rundreams.net/sh/k8s-init.sh && sh k8s-init.sh- 1
命令配置
- 关闭防火墙
systemctl stop firewalld && systemctl disable firewalld- 1
- 关闭selinux
setenforce 0 sed -i 's/^SELINUX=enforcing$/SELINUX=permissive/' /etc/selinux/config- 1
- 2
- 关闭swap
swapoff -a sed -i '/swap/s/^\(.*\)$/#\1/g' /etc/fstab- 1
- 2
- 配置iptables的ACCEPT规则
iptables -F && iptables -X && iptables -F -t nat && iptables -X -t nat && iptables -P FORWARD ACCEPT- 1
- 设置系统参数
cat <<EOF > /etc/sysctl.d/k8s.conf net.bridge.bridge-nf-call-ip6tables = 1 net.bridge.bridge-nf-call-iptables = 1 EOF sysctl --system- 1
- 2
- 3
- 4
- 5
- 6
部署 cri-dockerd
官方信息
百度网盘下载
链接:https://pan.baidu.com/s/1zBjp74MDV8Kkrnp2ZZbeNQ?pwd=8dpk
提取码:8dpk中国移动云盘下载
链接:https://caiyun.139.com/m/i?1F5C35BxQfMvl
提取码:De7bcri-dockerd部署【所有节点均要执行】
- 解压并执行以下命令
tar -xf cri-dockerd-0.2.6.amd64.tgz- 1
cp cri-dockerd/cri-dockerd /usr/bin/- 1
chmod +x /usr/bin/cri-dockerd- 1
- 配置启动⽂件,执行如下命令
cat <<"EOF" > /usr/lib/systemd/system/cri-docker.service [Unit] Description=CRI Interface for Docker Application Container Engine Documentation=https://docs.mirantis.com After=network-online.target firewalld.service docker.service Wants=network-online.target Requires=cri-docker.socket [Service] Type=notify ExecStart=/usr/bin/cri-dockerd --network-plugin=cni --pod-infra-container-image=registry.aliyuncs.com/google_containers/pause:3.7 ExecReload=/bin/kill -s HUP $MAINPID TimeoutSec=0 RestartSec=2 Restart=always StartLimitBurst=3 StartLimitInterval=60s LimitNOFILE=infinity LimitNPROC=infinity LimitCORE=infinity TasksMax=infinity Delegate=yes KillMode=process [Install] WantedBy=multi-user.target EOF- 1
- 2
- 3
- 4
- 5
- 6
- 7
- 8
- 9
- 10
- 11
- 12
- 13
- 14
- 15
- 16
- 17
- 18
- 19
- 20
- 21
- 22
- 23
- 24
- 25
- ⽣成 socket ⽂件,执行如下命令
cat <<"EOF" > /usr/lib/systemd/system/cri-docker.socket [Unit] Description=CRI Docker Socket for the API PartOf=cri-docker.service [Socket] ListenStream=%t/cri-dockerd.sock SocketMode=0660 SocketUser=root SocketGroup=docker [Install] WantedBy=sockets.target EOF- 1
- 2
- 3
- 4
- 5
- 6
- 7
- 8
- 9
- 10
- 11
- 12
- 启动 cri-docker 并设置开机⾃动启动
systemctl daemon-reload- 1
systemctl enable cri-docker --now- 1
systemctl is-active cri-docker- 1
- 添加阿⾥云 YUM 源
cat > /etc/yum.repos.d/kubernetes.repo << EOF [kubernetes] name=Kubernetes baseurl=https://mirrors.aliyun.com/kubernetes/yum/repos/kubernetes-el7-x86_64/ enabled=1 gpgcheck=0 repo_gpgcheck=0 gpgkey=https://mirrors.aliyun.com/kubernetes/yum/doc/yum-key.gpg https://mirrors.aliyun.com/kubernetes/yum/doc/rpm-package-key.gpg EOF- 1
- 2
- 3
- 4
- 5
- 6
- 7
- 8
- 9
k8s安装
安装 kubeadm kubelet kubectl
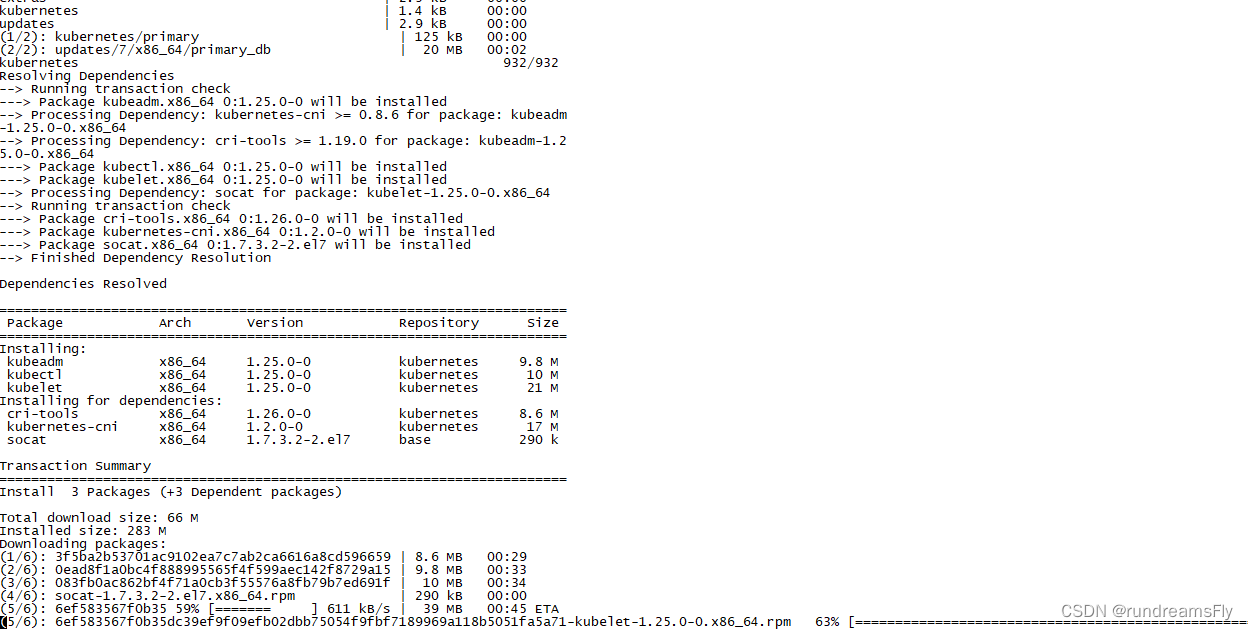
- 执行如下命令
yum install -y kubelet-1.25.0 kubeadm-1.25.0 kubectl-1.25.0- 1

- 大概执行1分钟左右吧,看网络情况而定。
kubeadm version- 1
k8s其他必须配置
systemctl enable kubelet- 1
- 配置cgroup-driver=systemd
cat <<EOF > /etc/sysconfig/kubelet KUBELET_EXTRA_ARGS="--cgroup-driver=systemd" EOF- 1
- 2
- 3
- 配置 docker native.cgroupdriver=systemd
cat <<EOF > /etc/docker/daemon.json { "registry-mirrors": ["https://j16wttpi.mirror.aliyuncs.com"], "exec-opts": ["native.cgroupdriver=systemd"] } EOF- 1
- 2
- 3
- 4
- 5
- 6
- 重新加载daemon
systemctl daemon-reload- 1
- 重启docker
systemctl restart docker- 1
初始化master节点
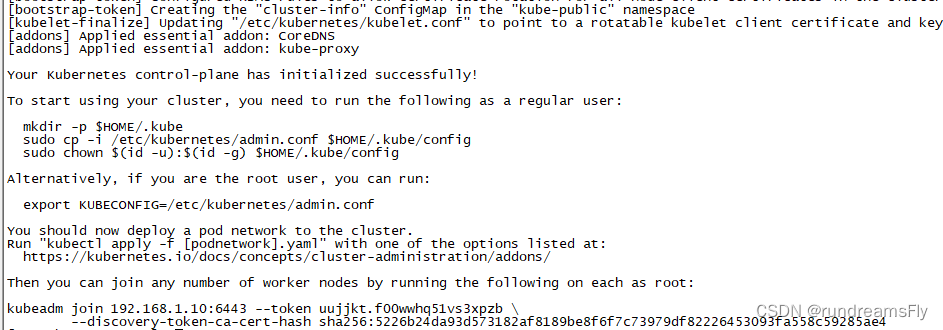
- 此命令只在master节点执行,172.24.214.110替换为你的master节点IP
kubeadm init \ --apiserver-advertise-address=172.24.214.110 \ --image-repository registry.aliyuncs.com/google_containers \ --kubernetes-version v1.25.0 \ --service-cidr=10.10.0.0/12 \ --pod-network-cidr=172.17.0.0/16 \ --cri-socket /var/run/cri-dockerd.sock \ --ignore-preflight-errors=all- 1
- 2
- 3
- 4
- 5
- 6
- 7
- 8

- 执行成功后,会有加入节点的代码,然后复制到其他节点进行加入。
kubeadm join 172.24.214.110:6443 --token 5efiso.2zibi97nx4cunivt \ --discovery-token-ca-cert-hash sha256:158fb29cb08d54e58d76239292eed553c25c54fb307424bee8d5776690827303 \ --cri-socket /var/run/cri-dockerd.sock- 1
- 2
- 3
网络插件calico
网络插件 yaml下载
wget https://docs.projectcalico.org/manifests/calico.yaml --no-check-certificate- 1
- 然后自行修改,建议大家使用我修改过的yaml直接使用
百度网盘下载calico.yaml
链接:https://pan.baidu.com/s/1KATNHOZdtZ0169NLfa2JDQ?pwd=nhp6
提取码:nhp6阿里云网盘下载calico.yaml
calico.yaml https://www.aliyundrive.com/s/geVBb4b4t2A
中国移动云盘下载calico.yaml
链接: https://caiyun.139.com/m/i?1F5C2RFMpI4zl
提取码:Fm1S- 下载calico镜像压缩包,然后手动上传至每台主机
百度网盘下载 calico-v3.24.3
链接:https://pan.baidu.com/s/1nxQAJX21-dbaZRkv4pbvWg?pwd=6w6j
提取码:6w6j中国移动云盘 calico-v3.24.3
链接:https://caiyun.139.com/m/i?1F5C2lG1dGd66
提取码:Odq8- 下载calico到本地进行解压

- 把三个压缩包分别上传到全部节点
- 每个节点手动通过docker离线加载镜像
docker load -i calico~cni~v3.24.3.tar.gz docker load -i calico~kube~controllers~v3.24.3.tar.gz docker load -i calico~node~v3.24.3.tar.gz- 1
- 2
- 3
- 通过命令
docker images | grep calico查看是否成功

- 在master节点执行命令进行calico插件安装
kubectl apply -f calico.yaml- 1
查看节点情况
- 在主节点执行命令看集群是否成功
kubectl get node -o wide

参考资料
参考文献
https://blog.csdn.net/qq_41822345/article/details/126679925
https://blog.csdn.net/xiaohuixing16134/article/details/102784269
https://blog.csdn.net/bilibilidicks/article/details/125825282
https://blog.csdn.net/zl8751/article/details/126308198
https://blog.csdn.net/weibo1230123/article/details/121732361其他低版本搭建参考
https://blog.csdn.net/u010800804/article/details/124524688
问题
问题1:初始化master节点错误
Unfortunately, an error has occurred:
timed out waiting for the condition
This error is likely caused by:
- The kubelet is not running
- The kubelet is unhealthy due to a misconfiguration of the node in some way (required cgroups disabled)
If you are on a systemd-powered system, you can try to troubleshoot the error with the following commands:
- ‘systemctl status kubelet’
- ‘journalctl -xeu kubelet’
Additionally, a control plane component may have crashed or exited when started by the container runtime.
To troubleshoot, list all containers using your preferred container runtimes CLI.
Here is one example how you may list all running Kubernetes containers by using crictl:
- ‘crictl --runtime-endpoint unix:///var/run/cri-dockerd.sock ps -a | grep kube | grep -v pause’
Once you have found the failing container, you can inspect its logs with:
- ‘crictl --runtime-endpoint unix:///var/run/cri-dockerd.sock logs CONTAINERID’
error execution phase wait-control-plane: couldn’t initialize a Kubernetes cluster
To see the stack trace of this error execute with --v=5 or higher解决
- 我的问题是 重启机器 reboot 解决问题。
- 参考文献:https://blog.csdn.net/weixin_66536807/article/details/124903478
问题2:加入节点报错
Found multiple CRI endpoints on the host. Please define which one do you wish to use by setting the ‘criSocket’ field in the kubeadm configuration file: unix:///var/run/containerd/containerd.sock, unix:///var/run/cri-dockerd.sock
To see the stack trace of this error execute with --v=5 or higher- 大概的意思是找到多个cri,需要指定一个
结尾
k8s集群搭建起来确实有些困难,比如插件多、有的镜像在国外不能拉去等诸多原因,但大家一定要坚持多尝试几次就会学到 更多的知识。
如果大家在搭建中需要帮助,大家也可以私信我。
-
相关阅读:
jenkins 使用原生 git clone 命令,指定ssh密钥文件
数组与指针实验
Springboot 结合 MQTT、Redis ,对接硬件以及做消息分发,最佳实践
固态硬盘有缓存和没缓存之间的区别在哪
校园安防监控系统升级改造方案:如何实现设备利旧上云与AI视频识别感知?
重学Java的第一章
感知器 - 西瓜好坏自动识别——python
苹果专用解压缩推荐 BetterZip 5 中文for mac
TMGM外汇平台官网最全测评(2022年版)
ABAP技术总结2022.8.30(ALV和smart forms)
- 原文地址:https://blog.csdn.net/u010800804/article/details/127709691
