-
springboot 点滴(1)springboot IOC
Spring是一个开源,轻量化,具有IOC和AOP两大核心功能的容器型框架。
Spring Boot是简化新Spring应用的初始搭建以及开发过程。
下面介绍一下Spring Boot IOC。1 IOC简介
IOC(Inversion of Control):控制反转。
DI(Dependency Injection):依赖注入。传统:手动new对象。
IOC:统一的容器对对象进行管理(创建、销毁、协调)。2 springboot IOC简介
Spring实现IOC的两种方法:
1 配置文件管理
2 注解Spring Boot 特性:
绝对没有代码生成和对XML没有要求配置,采用注解配置。
所以Spring Boot 只有注解实现IOC。springboot 注解 实现IOC的三种方法:
1 @Configuration注解和@Bean注解来实现。
2 @Component、@Repository、@Service、@Controller注解。
3 @Configuration注解和@ComponentScan注解来实现。2.1 @Configuration注解和@Bean注解
第1步:先定义一个普通的bean;
public class ConfigurationBean { private String server = ""; private int port; private String style = ""; public String getServer() { return server; } public void setServer(String server) { this.server = server; } public int getPort() { return port; } public void setPort(int port) { this.port = port; } public String getStyle() { return style; } public void setStyle(String style) { this.style = style; } }- 1
- 2
- 3
- 4
- 5
- 6
- 7
- 8
- 9
- 10
- 11
- 12
- 13
- 14
- 15
- 16
- 17
- 18
- 19
- 20
- 21
- 22
- 23
- 24
- 25
- 26
- 27
- 28
- 29
第2步:定义@Configuration
注解的bean来获取ConfigurationBean ;@Configuration public class BeanIOC { //获取配置参数 @Bean(name="configurationBean") public ConfigurationBean getConfigBean(){ ConfigurationBean configBean = new ConfigurationBean(); configBean.setServer("127.0.0.1"); configBean.setPort(8081); configBean.setStyle("通过bean注解装配到IOC容器"); return configBean; } }- 1
- 2
- 3
- 4
- 5
- 6
- 7
- 8
- 9
- 10
- 11
- 12
第3步:使用ConfigurationBean 时,@Autowired注入:
@RestController @RequestMapping(value = "/ioc") public class IOCController { @Autowired private BeanIOC beanIOC; @RequestMapping(value = "/beanStyle", method = RequestMethod.GET) public String beanStyle() { return JSON.toJSONString(beanIOC.getConfigBean()); } }- 1
- 2
- 3
- 4
- 5
- 6
- 7
- 8
- 9
- 10
- 11
- 12
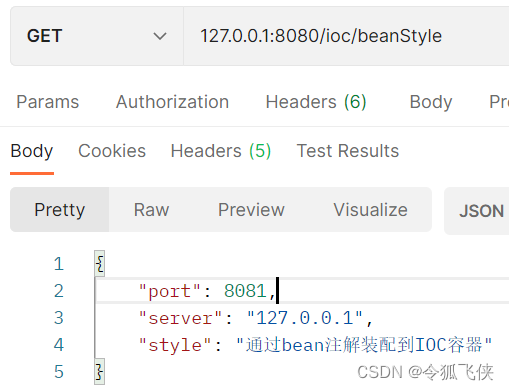
最后Postman请求url:127.0.0.1:8080/ioc/beanStyle验证:

可见ConfigurationBean 这个bean创建调用成功。2.2 @Component、@Repository、@Service、@Controller注解实现IOC
注解 使用范围 @Controller RequestMapping 处理相关 @Repository 存储相关 @Service 模型相关 @Component 其它相关 @Repository、@Service、@Controller比较普遍。
比如`:@RestController public class UserController { @Autowired private UserService userService; ... }- 1
- 2
- 3
- 4
- 5
- 6
- 7
我们需要UserService 这个bean的通过注解@Autowired直接来获取。
这里以@Component举例说明IOC的实现:
第1步:自定义bean,注解@Component。@Component("componentIOC") public class ComponentIOC { @Value("127.0.0.2") private String host; @Value("8082") private int port; @Value("通过Component注解扫描注入bean到IOC容器") private String style = ""; public String getHost() { return host; } public void setHost(String host) { this.host = host; } public int getPort() { return port; } public void setPort(int port) { this.port = port; } public String getStyle() { return style; } public void setStyle(String style) { this.style = style; } }- 1
- 2
- 3
- 4
- 5
- 6
- 7
- 8
- 9
- 10
- 11
- 12
- 13
- 14
- 15
- 16
- 17
- 18
- 19
- 20
- 21
- 22
- 23
- 24
- 25
- 26
- 27
- 28
- 29
- 30
- 31
- 32
- 33
- 34
- 35
第2步:使用ComponentIOC 时,@Autowired注入:
@RestController @RequestMapping(value = "/ioc") public class IOCController { @Autowired private ComponentIOC componentIOC; @RequestMapping(value = "/componentStyle", method = RequestMethod.GET) public String componentStyle() { return JSON.toJSONString(componentIOC); } }- 1
- 2
- 3
- 4
- 5
- 6
- 7
- 8
- 9
- 10
- 11
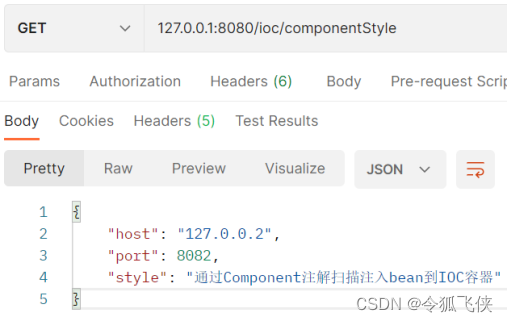
最后Postman请求url:127.0.0.1:8080/ioc/componentStyle验证:

可见ComponentIOC 这个bean创建调用成功。2.3 @Configuration和@ComponentScan
第1步:定义@Configuration和@ComponentScan同时注解的bean;
@Configuration @ComponentScan public class ComponentScanIOC { @Value("127.0.0.3") private String host; @Value("8083") private int port; @Value("通过ComponentScan注解扫描注入bean到IOC容器") private String style = ""; public String getHost() { return host; } public void setHost(String host) { this.host = host; } public int getPort() { return port; } public void setPort(int port) { this.port = port; } public String getStyle() { return style; } public void setStyle(String style) { this.style = style; } }- 1
- 2
- 3
- 4
- 5
- 6
- 7
- 8
- 9
- 10
- 11
- 12
- 13
- 14
- 15
- 16
- 17
- 18
- 19
- 20
- 21
- 22
- 23
- 24
- 25
- 26
- 27
- 28
- 29
- 30
- 31
- 32
- 33
- 34
- 35
- 36
- 37
第2步:使用ComponentScanIOC 时,@Autowired注入:
@RestController @RequestMapping(value = "/ioc") public class IOCController { @Autowired private ComponentScanIOC componentScanIOC; @RequestMapping(value = "/componentScanStyle", method = RequestMethod.GET) public String componentScanStyle() { //return JSON.toJSONString(componentScanIOC);报错 JSONObject jsonObject = new JSONObject(); jsonObject.put("host", componentScanIOC.getHost()); jsonObject.put("port", componentScanIOC.getPort()); jsonObject.put("style", componentScanIOC.getStyle()); return jsonObject.toJSONString(); } }- 1
- 2
- 3
- 4
- 5
- 6
- 7
- 8
- 9
- 10
- 11
- 12
- 13
- 14
- 15
- 16
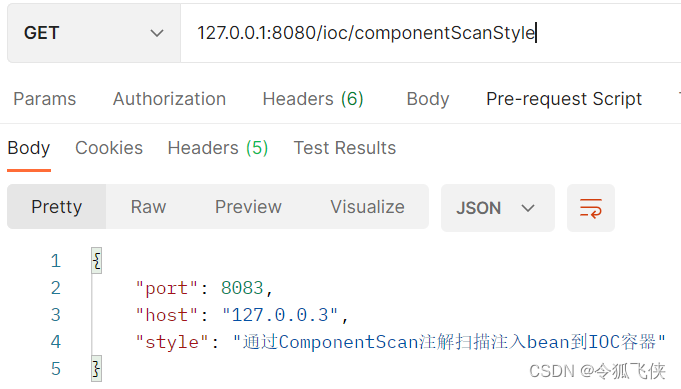
最后Postman请求url:127.0.0.1:8080/ioc/componentScanStyle验证:

可见ComponentScanIOC 这个bean创建调用成功。有个遗留问题:如果修改为注释中的代码,报错。
return JSON.toJSONString(componentScanIOC);- 1
下次再好好研究一下。
-
相关阅读:
论文精读:Axial-DeepLab: Stand-Alone Axial-Attention forPanoptic Segmentation
【TDengine】 TDengine时序数据库的快速入门总结
docker学习笔记(3)- 镜像
新霉素牛血清白蛋白纳米粒Neomycin-BSA|吲哚美辛人血清白蛋白纳米粒Indometacin-HSA\齐岳
Golang Copy()方法学习
算法通关村18关 | 透析回溯的模板
近期部分航院部分消息(主要是长长见识摘录的)
Go语言语法分析之我想打同事的脸--编译
计算机毕业设计之java+javaweb的面向社区健康服务的医疗平台
【一天一个设计模式】——工厂模式
- 原文地址:https://blog.csdn.net/afei8080/article/details/127709158
