-
Android界面开发基础
前言
安卓开发(指原生开发)和普通的Java开发,web开发最大的不同是什么?界面。老早的Java awt/swing以及现在的JavaFX,里面的UI库和安卓完全不是一个体系。至于web开发的各种UI框架,和安卓UI库也是天壤之别。所以说,掌握了安卓的界面开发,也就是掌握了安卓开发的一半。
我2015年前后做过一段时间的安卓开发,七八年过后,安卓的版本升级了,API也发生了不小的变化。最让人头疼的是,一个需求、一个界面功能可能会有多种实现方式,有开源的,还有标准库的,让我们实现时不得不先考察一番彼此优缺。
为此,不得不记录一下个人开发过程中遇到的主要疑难点。Android界面库从Android View为基础的UI库目前已经进化到Jetpack Compose界面库,差异比较大。本文会简单介绍两者开发的基础知识。 View 系统可以和Compose系统共存,你可以逐步改写和迁移。
Android库简史:从Android Support Library到Jetpack(androidx)
Android开发基于Java语言,除了Java SDK提供的标准API外,肯定得有一个支持移动特性的库,早期这个库名称叫android support库。最早的 Support 库发布于 2011 年,版本号为:android.support.v4 ,2013 年在 v4 的基础上,Android 团队发布了 v7 库,版本号为:android.support.v7,之后还发布了用于特定场景的 v8、v13、v14、v17。
由于support库版本增长混乱,还有一些重复依赖,Google 重写了 Support 库,推出了新的 AndroidX,AndroidX 将原有的 Support 库拆分为 85 个大大小小的支持库。
新版支持库AndroidX在Android 9.0(API 级别28)中发布,也称之为Jetpack库。Jetpack 是一堆实用的组件。对开发者而言,Jetpack 和 AndroidX 可以认为是同一个东西,从产品的维度它叫做 Jetpack,从技术的维度它叫做 AndroidX。Jetpack组件库包含四个基本部分:
- Foundation:基础
- Architecture:体系结构
- UI:视觉交互
- Behavior:行为
Jetpack带来了一个新的编程框架:Jetpack Compose,它是用于构建原生 Android 界面的新工具包。可简化并加快 Android 上的界面开发,使用更少的代码、强大的工具和直观的 Kotlin API,快速打造生动而精彩的应用。重点:Compose 是一个声明性界面框架。声明性界面工具包是相当于面向对象的命令式界面工具包而言的。Compose 提供声明性 API,让您可在不以命令方式改变前端视图的情况下呈现应用界面。这个和web端常用的视图数据绑定有点类似,详细的介绍和示例可以看看Jetpack Compose
MVVM框架
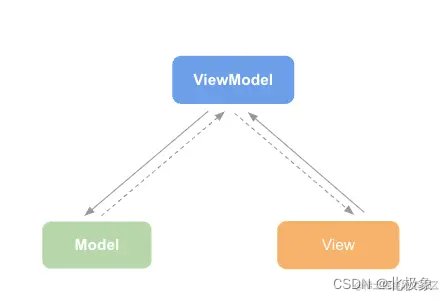
Android项目架构经历了从MVC、MVP到MVVM的演化,从2015年开始,Google官方开始对Android项目架构做出指导,随后推出DataBinding组件以及后边一系列的Jetpack组件来帮助开发者优化项目架构。Google官方给出的这一套指导架构就是MVVM。MVVM是 Model-View-ViewModel 的简称。这一架构在一定程度上解决了MVP架构中存在的问题。虽然近期官方的指导架构由MVVM变为了MVI,但MVVM依然是目前Android项目的主流架构。
- 模型层(Model) 与MVP中的Model层一致,负责与数据库和网络层通信,获取并存储数据。与MVP的区别在于Model层不再通过回调通知业务逻辑层数据改变,而是通过观察者模式实现。这个Model一般为pure data,无状态。
- 视图(View) 负责将Model层的数据做可视化的处理,同时与ViewModel层交互。
- 视图模型(ViewModel) 主要负责业务逻辑的处理,同时与 Model 层 和 View层交互。与MVP的Presenter相比,ViewModel不再依赖View,使得解耦更加彻底。ViewModel持有LiveData数据,具有自己的生命周期。

MVVM架构的本质是数据驱动,它的最大的特点是单向依赖。MVVM架构通过观察者模式让ViewModel与View解耦,实现了View依赖ViewModel,ViewModel依赖Model的单向依赖。Jetpack MVVM 简介

- View对应于Activity/Fragment,对于复杂的UI组件,通常还有一个Adapter层,Adapter和ViewModel交互
- ViewModel从Repository中获得数据,然后更新UI组件
- Model是数据层的表示
界面与布局
先看一个关系图:

View 和 ViewGroup 的区别:
- View:View主要执行layout方法,使用 serFrame 方法来设置本身 View 的四个顶点的位置,确定View本身的位置
- ViewGroup:ViewGroup主要执行onLayout方法,递归遍历所有子View,确定子View的位置
再看一下界面的绘制流程:

能把组件按照需求摆放整齐,该对齐的对齐,该滚动的滚动,那你的界面就搞掂了一半。界面开发=UI布局+事件处理。
-
AbsoluteLayout:绝对布局,每个组件通过指定layour_x和layour_y按坐标定位,不灵活,不推荐使用。
-
android.widget.LinerLayout
线性布局用得非常多也是相对比较简单的布局,组件按照水平或垂直方向依次排下来,通过android:orientation控制方向。 -
android.widget.FrameLayout
通常用来显示单一项widget,通过layout_gravity来调节组件相对于容器的位置。注意android:gravity和android:layout_gravity的差别,前者是调节组件自身。 -
TableLayout和GridLayout
行列布局器。LinerLayout只有一行或一列,而TableLayout和GridLayout可以有多行多列。TableLayout继承自LinearLayout,本质上仍然是线性布局管理器。表格布局采用行、列的形式来管理UI组件,并不需要明确地声明包含多少行、多少列,而是通过添加TableRow、其他组件来控制表格的行数和列数。GridLayout比TableLayout更强大,是Android4.0新增的布局。 -
androidx.coordinatorlayout.widget.CoordinatorLayout
在android5.0的时候引入了CoordinatorLayout、AppBarLayout、Toolbar、CollapsingToolbarLayout等等一系列的新控件,CoordinatorLayout遵循Material 风格。协调什么?协调里面组件的联动,通过设置app:layout_behavior属性,只有CoordinatorLayout的直接子布局才能响应。CoordinatorLayout的使用核心是Behavior,简单地说,如果一个子view的行为会影响到依赖它的其它子view,就可以采用CoordinatorLayout。所以这个布局一般用于一些特效中。例如CoordinatorLayout+AppBarLayout+CollapsingToolbarLayout的结合使用。 -
android.widget.RelativeLayout和androidx.constraintlayout.widget.ConstraintLayout
这两个布局比较相似,都可以创建扁平视图层次结构(无嵌套视图组),适用于复杂的大型布局(组件多)。其中所有的视图均根据同级视图与父布局之间的关系进行布局。相对布局,相对什么?相对于容器,相对于其他组件,例如layout_alignParentLeft指定和容器左对齐,layout_toRightOf表示位于指定组件的右侧。ConstraintLayout的灵活性要高于 RelativeLayout,并且更易于与 Android Studio 的布局编辑器配合使用。有编辑器的支持,通过拖放的形式(而非修改 XML)来构建布局,能达到传统桌面胖客户端UI开发中所见即所得的效果。 -
androidx.swiperefreshlayout.widget.SwipeRefreshLayout
-
com.google.android.material.appbar.AppBarLayout
继承于LinearLayout的,默认的方向是Vertical。必须在它的子view上设置app:layout_scrollFlags属性或者是在代码中调用setScrollFlags()设置这个属性。其作用就是Content布局文件中某个可垂直滚动的View发生滚动事件时,其内部的子View也跟随发生相应变化。
ConstraintLayout的使用
ConstraintLayout是默认的布局,比较灵活,能减少布局的嵌套,性能也不错。在 View 系统中,建议使用 ConstraintLayout 来创建复杂的大型布局,因为扁平视图层次结构比嵌套视图的效果更好。
ConstraintLayout 包含引导线、屏障线和链三个基本概念。引导线分为垂直和水平引导线,屏障线会引用多个可组合项,从而根据所指定边中处于最边缘位置的 widget 创建虚拟引导线,链在单条轴(水平或垂直方向)上提供类似于组的行为。另一条轴可单独约束。
下面给出一个基本例子。
<androidx.constraintlayout.widget.ConstraintLayout xmlns:android="http://schemas.android.com/apk/res/android" xmlns:app="http://schemas.android.com/apk/res-auto" android:layout_width="match_parent" android:layout_height="wrap_content" android:paddingTop="10dp"> <Button android:id="@+id/button1" android:layout_width="wrap_content" android:layout_height="wrap_content" android:layout_marginLeft="100dp" android:layout_marginTop="100dp" android:text="button1" app:layout_constraintLeft_toLeftOf="parent" app:layout_constraintRight_toRightOf="parent" app:layout_constraintTop_toTopOf="parent" /> <Button android:layout_width="wrap_content" android:layout_height="wrap_content" android:text="button2" app:layout_constraintHorizontal_bias="0.8" app:layout_constraintLeft_toLeftOf="parent" app:layout_constraintRight_toRightOf="parent" app:layout_constraintTop_toBottomOf="@+id/button1" /> <TextView android:id="@+id/tv1" android:layout_width="wrap_content" android:layout_height="wrap_content" android:text="20" android:textColor="@color/black" android:textSize="50sp" android:textStyle="bold" app:layout_constraintStart_toStartOf="parent" app:layout_constraintTop_toTopOf="parent" /> <TextView android:id="@+id/tv2" android:layout_width="wrap_content" android:layout_height="wrap_content" android:text="¥" android:textColor="@color/black" android:textSize="20sp" app:layout_constraintBaseline_toBaselineOf="@id/tv1" app:layout_constraintStart_toEndOf="@id/tv1" /> androidx.constraintlayout.widget.ConstraintLayout>- 1
- 2
- 3
- 4
- 5
- 6
- 7
- 8
- 9
- 10
- 11
- 12
- 13
- 14
- 15
- 16
- 17
- 18
- 19
- 20
- 21
- 22
- 23
- 24
- 25
- 26
- 27
- 28
- 29
- 30
- 31
- 32
- 33
- 34
- 35
- 36
- 37
- 38
- 39
- 40
- 41
- 42
- 43
- 44
- 45
- 46
- 47
- 48
- 49
使用ConstraintLayout的一大好处是可以通过Android Studio可视化设计界面布局:

通过设置上下左右的Constraint属性就能方便地控制组件的位置。上图对应的xml内容:<androidx.constraintlayout.widget.ConstraintLayout xmlns:android="http://schemas.android.com/apk/res/android" xmlns:app="http://schemas.android.com/apk/res-auto" xmlns:tools="http://schemas.android.com/tools" android:layout_width="match_parent" android:layout_height="match_parent"> <Button android:id="@+id/button" android:layout_width="wrap_content" android:layout_height="wrap_content" android:layout_marginStart="20dp" android:layout_marginTop="20dp" android:text="Button1" app:layout_constraintStart_toStartOf="parent" app:layout_constraintTop_toTopOf="parent" /> <TextView android:id="@+id/textView2" android:layout_width="235dp" android:layout_height="94dp" android:layout_marginStart="100dp" android:layout_marginTop="148dp" android:text="TextView" app:layout_constraintStart_toStartOf="parent" app:layout_constraintTop_toBottomOf="@+id/button" /> <Button android:id="@+id/button3" android:layout_width="wrap_content" android:layout_height="wrap_content" android:layout_marginStart="44dp" android:layout_marginTop="20dp" android:text="Button2" app:layout_constraintStart_toEndOf="@+id/button" app:layout_constraintTop_toTopOf="parent" /> androidx.constraintlayout.widget.ConstraintLayout>- 1
- 2
- 3
- 4
- 5
- 6
- 7
- 8
- 9
- 10
- 11
- 12
- 13
- 14
- 15
- 16
- 17
- 18
- 19
- 20
- 21
- 22
- 23
- 24
- 25
- 26
- 27
- 28
- 29
- 30
- 31
- 32
- 33
- 34
- 35
- 36
- 37
自定义布局
实现onLayout方法即可。
使用布局的注意事项
- 布局的嵌套。布局可以嵌套,这也是我们组合出复杂界面的依赖基础。但嵌套越多越深越复杂会影响渲染性能
- 使用 标签来合并布局
- 使用include标签可以重用布局
Activity和Fragment
- 一个应用是一系列 Activity 的集合,放在堆栈中,在当前 Activity 启动另一个 Activity 时,新的 Activity 将被推送到堆栈顶部并获得焦点。上一个 Activity 仍保留在堆栈中,但会停止。当 Activity 停止时,系统会保留其界面的当前状态。当用户按返回按钮时,当前 Activity 会从堆栈顶部退出(该 Activity 销毁),上一个 Activity 会恢复(界面会恢复到上一个状态)。堆栈中的 Activity 永远不会重新排列,只会被送入和退出,在当前 Activity 启动时被送入堆栈,在用户使用返回按钮离开时从堆栈中退出。因此,返回堆栈按照“后进先出”的对象结构运作。
- Fragment 表示应用界面中可重复使用的一部分。Fragment 定义和管理自己的布局,具有自己的生命周期,并且可以处理自己的输入事件。Fragment 不能独立存在,而是必须由 Activity 或另一个 Fragment 托管。Fragment 的视图层次结构会成为宿主的视图层次结构的一部分,或附加到宿主的视图层次结构。
- Activity 类提供六个生命周期方法:onCreate()、onStart()、onResume()、onPause()、onStop() 和 onDestroy()
- Fragment 的生命周期方法:onCreate(), onStart(), onResume(), onPause(), onStop(), and onDestroy()
- 两个 Fragment 如何使用共享的 ViewModel 进行通信
<fragment android:id="@id/main_fragment" android:layout_width="fill_parent" android:layout_height="fill_parent" android:layout_above="@id/tab_bar_container" android:layout_alignParentTop="true" class="io.toutiao.android.ui.fragment.MainFragment" />- 1
- 2
- 3
- 4
- 5
- 6
- 一般来说,Activity和Fragment都拥有自己的layout文件,setContentView()设置其layout
- 可以往Activity里添加Fragment,然后在多个Fragment之间切换显示,通常采用FrameLayout和Tab管理多个Fragment的切换。
public void onCreate() { FragmentManager fm = getSupportFragmentManager(); FragmentTransaction ft = fm.beginTransaction(); Fragment fg = fm.findFragmentById(R.id.frag_container); // 实例化 ft.add(R.id.frame_container, fg); //将fragment添加到布局当中 ft.commit(); // 显示和隐藏 ft.show(fg); ft.hide(fg); }- 1
- 2
- 3
- 4
- 5
- 6
- 7
- 8
- 9
- 10
- 11
Activity和Context

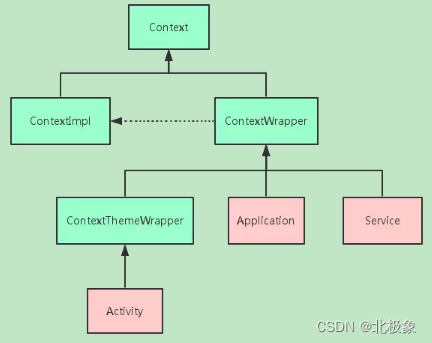
- Context可以实现诸如弹出Toast、启动Activity、启动Service、发送广播等系统级或者说和外界交互的能力
- Activity、Service和Application这三种类型的Context都是可以通用的,但也有功能上的差别和安全上限制的差异
- 一个应用程序中Context数量的计算公式就可以这样写:
Context数量 = Activity数量 + Service数量 + 1
也就是说,一个应用程序中可以有多个Activity和多个Service,但是只能有一个Application。
我们经常把一些全局的对象如数据库操作工具类,放在Application里,那如何获得这个全局的Application对象?Context context = getApplicationContext();
Application application = context.getApplication();可以在任意的 Activity 中直接调用 getApplication() 方法:
Application application = getApplication();对于Kotlin,可以这么写:
class MyApplication : Application() { companion object { lateinit var instance: Application } init { instance = this } } 然后: val appContext: Context = MyApplication.application.applicationContext- 1
- 2
- 3
- 4
- 5
- 6
- 7
- 8
- 9
- 10
几种常见的Activity
- AppCompatActivity相对于Activity的主要的两点变化:主界面带有Action Bar 的标题栏;theme主题只能用android:theme=”@style/AppTheme (appTheme主题或者其子类),而不能用android:style
实现Tab的几种方式
com.google.android.material.tabs.TabLayout
出镜频率最高的组件:无限滚动列表
强大的ViewPager2
- androidx.viewpager.widget.ViewPager
定义:以可滑动的格式显示视图或 Fragment,通常和TabLayout结合使用。注意:滑动可以是左右滑动,也可以是上下滑动。通过ViewPager2.ORIENTATION_HORIZONTAL|ORIENTATION_VERTICAL设置。
viewpager2 内部实现原理是使用recycleview加LinearLayoutManager实现竖直滚动,其实可以理解为对recyclerview的二次封装。 - RecyclerView 可以让您轻松高效地显示大量数据。您提供数据并定义每个列表项的外观,而 RecyclerView 库会根据需要动态创建元素。
- Adapter 和 ViewHolder:一个提供数据来源,一个定义每个item的UI
Toolbar
androidx.appcompat.widget.Toolbar
TODOScrollView
TODO
Jetpack Compose编程简介
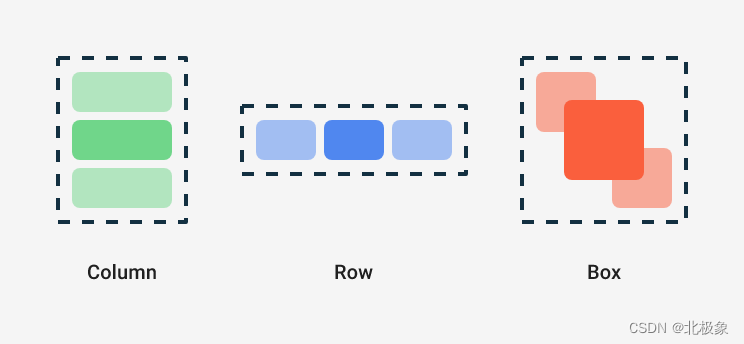
- Jetpack Compose提供了一套组合式API(Compose API)帮助我们简化界面编程。最常用的组合式API就是@Composable注解。通过@Composable注解可以声明一个组合式函数,其代表了一个UI组件或者说界面的一部分。在组合函数中,采用 DSL进行界面的定义和布局。所以就不再需要layout资源文件。通过众多的组合式函数,就构成了一颗界面树,界面树的结构是不可变的,但其中每个组件的状态可变,通过单向数据流 (UDF) 设计模式可以更新其状态。

上图是最常用的三种布局:列式,行式和盒式。
例如:@Composable fun ConstraintLayoutContent() { ConstraintLayout { // Create references for the composables to constrain val (button, text) = createRefs() Button( onClick = { /* Do something */ }, // Assign reference "button" to the Button composable // and constrain it to the top of the ConstraintLayout modifier = Modifier.constrainAs(button) { top.linkTo(parent.top, margin = 16.dp) } ) { Text("Button") } // Assign reference "text" to the Text composable // and constrain it to the bottom of the Button composable Text("Text", Modifier.constrainAs(text) { top.linkTo(button.bottom, margin = 16.dp) }) } }- 1
- 2
- 3
- 4
- 5
- 6
- 7
- 8
- 9
- 10
- 11
- 12
- 13
- 14
- 15
- 16
- 17
- 18
- 19
- 20
- 21
- 22
- 23
- 24
上面组合式函数等价于我们在view系统中的定义。
- 组合函数可以调用其它组合函数,就像搭积木一样,这样我们的界面才能更好复用。组合函数定义的界面可以小到一个按钮,大到一个布局。
- 组合函数的顺序只是代表空间上的上下左右位置关系,但不代表时间上的先后顺序,它们是可以并行执行的。可组合函数可以按任何顺序执行。
- Jetpack Compose 提供了 Material Design 的实现,提供了一系列的Material组件。
典型界面编程案例分析
- 头尾固定,中间内容滚动
(未完待续,TODO)
参考文档
- https://github.com/android/compose-samples
- https://github.com/google-developer-training
- https://developer.android.com/training/data-storage/room/accessing-data?hl=zh-cn
- Jetpack 导航
-
相关阅读:
【Linux命令】ubuntu识别u盘、磁盘操作相关命令、网络相关概念和命令
【突破舒适圈】在SpringBoot中配置Redis
猿创征文|实例展示Sklearn中三种常用的编码方式OneHotEncoder,LabelEncoder,OrdinalEncoder的使用过程
什么是VLAN?VLAN是如何工作的?
bzoj3396 [Usaco2009 Jan]Total flow 水流
【LeetCode】187. 重复的DNA序列
【Rust】Rust环境配置与语法基础
掌握C语言指针,轻松解锁代码高效性与灵活性
php农村生态游服务平台
UDP数据报套接字编程
- 原文地址:https://blog.csdn.net/jgku/article/details/127515259