-
3、Atomic原子操作类详解
目录
Atomic原子操作类
作用
在并发编程中很容易出现并发安全的问题,有一个很简单的例子就是多线程更新变量i=1,比如多个线程执行i++操作,就有可能获取不到正确的值,而这个问题,最常用的方法是通过Synchronized进行控制来达到线程安全的目的。但是由于synchronized是采用的是悲观锁策略,并不是特别高效的一种解决方案。实际上,在J.U.C下的atomic包提供了一系列的操作简单,性能高效,并能保证线程安全的类去更新基本类型变量,数组元素,引用类型以及更新对象中的字段类型。atomic包下的这些类都是采用的是乐观锁策略去原子更新数据,在java中则是使用CAS操作具体实现
分类
- 基本类型:AtomicInteger、AtomicLong、AtomicBoolean
- 引用类型:AtomicReference、AtomicStampedRerence、AtomicMarkableReference
- 数组类型:AtomicIntegerArray、AtomicLongArray、AtomicReferenceArray
- 对象属性原子修改器:AtomicIntegerFieldUpdater、AtomicLongFieldUpdater、AtomicReferenceFieldUpdater
- 原子类型累加器(jdk1.8增加的类):DoubleAccumulator、DoubleAdder、LongAccumulator、LongAdder、Strip
基本类型
以AtomicInteger为例总结常用的方法
- getAndIncrement
以原子的方式将实例中的原值加1,返回的是自增前的旧值
- getAndSet
将实例中的值更新为新值,并返回旧值
- incrementAndGet
以原子的方式将实例中的原值进行加1操作,并返回最终相加后的结果
- addAndGet
以原子方式将输入的数值与实例中原本的值相加,并返回最后的结果
测试示例:public class AtomicIntegerTest { static AtomicInteger sum = new AtomicInteger(0); public static void main(String[] args) { for (int i = 0; i < 10; i++) { Thread thread = new Thread(() -> { for (int j = 0; j < 10000; j++) { // 原子自增 CAS sum.incrementAndGet(); } }); thread.start(); } try { Thread.sleep(3000); } catch (InterruptedException e) { e.printStackTrace(); } System.out.println(sum.get()); } } //运行结果:100000- 1
- 2
- 3
- 4
- 5
- 6
- 7
- 8
- 9
- 10
- 11
- 12
- 13
- 14
- 15
- 16
- 17
- 18
- 19
- 20
- 21
- 22

如下图所示,incrementAndGet()方法通过CAS自增实现,如果CAS失败,自旋直到成功+1,此处会有一定的性能损耗问题,下文中会有相应补充

引用类型
AtomicReference作用是对普通对象的封装,它可以保证你在修改对象引用时的线程安全性
示例:public class AtomicReferenceTest { public static void main( String[] args ) { User user1 = new User("张三", 23); User user2 = new User("李四", 25); User user3 = new User("王五", 20); //初始化为 user1 AtomicReference<User> atomicReference = new AtomicReference<>(); atomicReference.set(user1); //把 user2 赋给 atomicReference atomicReference.compareAndSet(user1, user2); System.out.println(atomicReference.get()); //把 user3 赋给 atomicReference atomicReference.compareAndSet(user1, user3); System.out.println(atomicReference.get()); } } @Data @AllArgsConstructor class User { private String name; private Integer age; }- 1
- 2
- 3
- 4
- 5
- 6
- 7
- 8
- 9
- 10
- 11
- 12
- 13
- 14
- 15
- 16
- 17
- 18
- 19
- 20
- 21
- 22
运行结果如下:
User(name=李四, age=25)
User(name=李四, age=25)AtomicStampedRerence是给对象添加了一个版本号,用于解决aba问题
public class AtomicStampedReferenceTest { public static void main(String[] args) { // 定义AtomicStampedReference Pair.reference值为1, Pair.stamp为1 AtomicStampedReference<Integer> atomicStampedReference = new AtomicStampedReference<>(1,1); new Thread(()->{ int[] stampHolder = new int[1]; int value = (int) atomicStampedReference.get(stampHolder); int stamp = stampHolder[0]; log.debug("Thread1 read value: " + value + ", stamp: " + stamp); // 阻塞1s LockSupport.parkNanos(1000000000L); // Thread1通过CAS修改value值为3 stamp是版本,每次修改可以通过+1保证版本唯一性 if (atomicStampedReference.compareAndSet(value, 3,stamp,stamp+1)) { log.debug("Thread1 update from " + value + " to 3"); } else { log.debug("Thread1 update fail!"); } },"Thread1").start(); new Thread(()->{ int[] stampHolder = new int[1]; int value = (int)atomicStampedReference.get(stampHolder); int stamp = stampHolder[0]; log.debug("Thread2 read value: " + value+ ", stamp: " + stamp); // Thread2通过CAS修改value值为2 if (atomicStampedReference.compareAndSet(value, 2,stamp,stamp+1)) { log.debug("Thread2 update from " + value + " to 2"); // do something value = (int) atomicStampedReference.get(stampHolder); stamp = stampHolder[0]; log.debug("Thread2 read value: " + value+ ", stamp: " + stamp); // Thread2通过CAS修改value值为1 if (atomicStampedReference.compareAndSet(value, 1,stamp,stamp+1)) { log.debug("Thread2 update from " + value + " to 1"); } } },"Thread2").start(); } }- 1
- 2
- 3
- 4
- 5
- 6
- 7
- 8
- 9
- 10
- 11
- 12
- 13
- 14
- 15
- 16
- 17
- 18
- 19
- 20
- 21
- 22
- 23
- 24
- 25
- 26
- 27
- 28
- 29
- 30
- 31
- 32
- 33
- 34
- 35
- 36
- 37
- 38
运行结果为:
16:13:04.713 [Thread1] DEBUG com.example.demo.seven_two_six.concurrent.atomic.AtomicStampedReferenceTest - Thread1 read value: 1, stamp: 1
16:13:04.713 [Thread2] DEBUG com.example.demo.seven_two_six.concurrent.atomic.AtomicStampedReferenceTest - Thread2 read value: 1, stamp: 1
16:13:04.722 [Thread2] DEBUG com.example.demo.seven_two_six.concurrent.atomic.AtomicStampedReferenceTest - Thread2 update from 1 to 2
16:13:04.722 [Thread2] DEBUG com.example.demo.seven_two_six.concurrent.atomic.AtomicStampedReferenceTest - Thread2 read value: 2, stamp: 2
16:13:04.722 [Thread2] DEBUG com.example.demo.seven_two_six.concurrent.atomic.AtomicStampedReferenceTest - Thread2 update from 2 to 1
16:13:05.736 [Thread1] DEBUG com.example.demo.seven_two_six.concurrent.atomic.AtomicStampedReferenceTest - Thread1 update fail!AtomicMarkableReference是给对象添加了一个是否修改过的标识,可用于简单的解决aba问题,是AtomicStampedRerence的简化版,对于复杂业务场景还是需要使用AtomicStampedRerence的
示例:@Slf4j public class AtomicMarkableReferenceTest { public static void main(String[] args) { // 定义AtomicStampedReference Pair.reference值为1, Pair.stamp为1 AtomicMarkableReference<Integer> atomicStampedReference = new AtomicMarkableReference<>(1, false); new Thread(() -> { boolean[] markHolder = new boolean[1]; int value = atomicStampedReference.get(markHolder); boolean stamp = markHolder[0]; log.debug("Thread1 read value: " + value + ", stamp: " + stamp); // 阻塞1s LockSupport.parkNanos(1000000000L); // Thread1通过CAS修改value值为3 stamp是版本,每次修改可以通过+1保证版本唯一性 if (atomicStampedReference.compareAndSet(value, 3, stamp, true)) { log.debug("Thread1 update from " + value + " to 3"); } else { log.debug("Thread1 update fail!"); } }, "Thread1").start(); new Thread(() -> { boolean[] stampHolder = new boolean[1]; int value = atomicStampedReference.get(stampHolder); boolean stamp = stampHolder[0]; log.debug("Thread2 read value: " + value + ", stamp: " + stamp); // Thread2通过CAS修改value值为2 if (atomicStampedReference.compareAndSet(value, 2, stamp, true)) { log.debug("Thread2 update from " + value + " to 2"); // do something value = (int) atomicStampedReference.get(stampHolder); stamp = stampHolder[0]; log.debug("Thread2 read value: " + value + ", stamp: " + stamp); // Thread2通过CAS修改value值为1 if (atomicStampedReference.compareAndSet(value, 1, stamp, true)) { log.debug("Thread2 update from " + value + " to 1"); } } }, "Thread2").start(); } }- 1
- 2
- 3
- 4
- 5
- 6
- 7
- 8
- 9
- 10
- 11
- 12
- 13
- 14
- 15
- 16
- 17
- 18
- 19
- 20
- 21
- 22
- 23
- 24
- 25
- 26
- 27
- 28
- 29
- 30
- 31
- 32
- 33
- 34
- 35
- 36
- 37
- 38
- 39
运行结果:
16:50:29.915 [Thread1] DEBUG com.example.demo.seven_two_six.concurrent.atomic.AtomicMarkableReferenceTest - Thread1 read value: 1, stamp: false
16:50:29.915 [Thread2] DEBUG com.example.demo.seven_two_six.concurrent.atomic.AtomicMarkableReferenceTest - Thread2 read value: 1, stamp: false
16:50:29.924 [Thread2] DEBUG com.example.demo.seven_two_six.concurrent.atomic.AtomicMarkableReferenceTest - Thread2 update from 1 to 2
16:50:29.924 [Thread2] DEBUG com.example.demo.seven_two_six.concurrent.atomic.AtomicMarkableReferenceTest - Thread2 read value: 2, stamp: true
16:50:29.924 [Thread2] DEBUG com.example.demo.seven_two_six.concurrent.atomic.AtomicMarkableReferenceTest - Thread2 update from 2 to 1
16:50:30.939 [Thread1] DEBUG com.example.demo.seven_two_six.concurrent.atomic.AtomicMarkableReferenceTest - Thread1 update fail!数组类型
以AtomicIntegerArray为例总结常用的方法
- addAndGet
以原子更新的方式将数组中索引为i的元素与输入值相加
- getAndIncrement
以原子更新的方式将数组中索引为i的元素自增加1
- compareAndSet
将数组中索引为i的位置的元素进行更新
测试示例:public class AtomicIntegerArrayTest { static int[] value = new int[]{1, 2, 3, 4, 5}; static AtomicIntegerArray atomicIntegerArray = new AtomicIntegerArray(value); public static void main(String[] args) throws InterruptedException { //设置索引0的元素为100 atomicIntegerArray.set(0, 100); System.out.println(atomicIntegerArray.get(0)); //以原子更新的方式将数组中索引为1的元素与输入值相加 atomicIntegerArray.getAndAdd(1, 5); System.out.println(atomicIntegerArray); } } //运行结果 100 [100, 7, 3, 4, 5]- 1
- 2
- 3
- 4
- 5
- 6
- 7
- 8
- 9
- 10
- 11
- 12
- 13
- 14
- 15
- 16
对象属性原子修改器
以AtomicIntegerFieldUpdater为例进行梳理总结
AtomicIntegerFieldUpdater可以线程安全地更新对象中的整型变量
示例:public class AtomicIntegerFieldUpdaterTest { public static class Candidate { //字段必须是volatile类型 volatile int score = 0; AtomicInteger score2 = new AtomicInteger(); } public static final AtomicIntegerFieldUpdater<Candidate> scoreUpdater = AtomicIntegerFieldUpdater.newUpdater(Candidate.class, "score"); public static AtomicInteger realScore = new AtomicInteger(0); public static void main(String[] args) throws InterruptedException { final Candidate candidate = new Candidate(); Thread[] t = new Thread[10000]; for (int i = 0; i < 10000; i++) { t[i] = new Thread(new Runnable() { @Override public void run() { if (Math.random() > 0.4) { candidate.score2.incrementAndGet(); scoreUpdater.incrementAndGet(candidate); realScore.incrementAndGet(); } } }); t[i].start(); } for (int i = 0; i < 10000; i++) { t[i].join(); } System.out.println("AtomicIntegerFieldUpdater Score=" + candidate.score); System.out.println("AtomicInteger Score=" + candidate.score2.get()); System.out.println("realScore=" + realScore.get()); } }- 1
- 2
- 3
- 4
- 5
- 6
- 7
- 8
- 9
- 10
- 11
- 12
- 13
- 14
- 15
- 16
- 17
- 18
- 19
- 20
- 21
- 22
- 23
- 24
- 25
- 26
- 27
- 28
- 29
- 30
- 31
- 32
- 33
运行结果:
AtomicIntegerFieldUpdater Score=6011
AtomicInteger Score=6011
realScore=6011对于AtomicIntegerFieldUpdater 的使用稍微有一些限制和约束,约束如下:
- 字段必须是volatile类型的,在线程之间共享变量时保证立即可见.eg:volatile int value = 3
- 字段的描述类型(修饰符public/protected/default/private)与调用者与操作对象字段的关系一致。也就是说调用者能够直接操作对象字段,那么就可以反射进行原子操作。但是对于父类的字段,子类是不能直接操作的,尽管子类可以访问父类的字段
- 只能是实例变量,不能是类变量,也就是说不能加static关键字
- 只能是可修改变量,不能使final变量,因为final的语义就是不可修改。实际上final的语义和volatile是有冲突的,这两个关键字不能同时存在
- 对于AtomicIntegerFieldUpdater和AtomicLongFieldUpdater只能修改int/long类型的字段,不能修改其包装类型(Integer/Long)。如果要修改包装类型就需要使用AtomicReferenceFieldUpdater
原子类型累加器(jdk1.8增加的类)
以LongAccumulator和LongAdder为例进行梳理总结
作用
在并发量较低的环境下,线程冲突的概率比较小,自旋的次数不会很多。但是,高并发环境下,N个线程同时进行自旋操作,会出现大量失败并不断自旋的情况,此时AtomicLong的自旋会成为瓶颈
LongAdder引入的初衷——解决高并发环境下AtomicInteger,AtomicLong的自旋瓶颈问题
性能测试
public class LongAdderTest { public static void main(String[] args) { testAtomicLongVSLongAdder(10, 10000); System.out.println("=================="); testAtomicLongVSLongAdder(10, 200000); System.out.println("=================="); testAtomicLongVSLongAdder(100, 200000); } static void testAtomicLongVSLongAdder(final int threadCount, final int times) { try { long start = System.currentTimeMillis(); testLongAdder(threadCount, times); long end = System.currentTimeMillis() - start; System.out.println("条件>>>>>>线程数:" + threadCount + ", 单线程操作计数" + times); System.out.println("结果>>>>>>LongAdder方式增加计数" + (threadCount * times) + "次,共计耗时:" + end); long start2 = System.currentTimeMillis(); testAtomicLong(threadCount, times); long end2 = System.currentTimeMillis() - start2; System.out.println("条件>>>>>>线程数:" + threadCount + ", 单线程操作计数" + times); System.out.println("结果>>>>>>AtomicLong方式增加计数" + (threadCount * times) + "次,共计耗时:" + end2); } catch (InterruptedException e) { e.printStackTrace(); } } static void testAtomicLong(final int threadCount, final int times) throws InterruptedException { CountDownLatch countDownLatch = new CountDownLatch(threadCount); AtomicLong atomicLong = new AtomicLong(); for (int i = 0; i < threadCount; i++) { new Thread(new Runnable() { @Override public void run() { for (int j = 0; j < times; j++) { atomicLong.incrementAndGet(); } countDownLatch.countDown(); } }, "my-thread" + i).start(); } countDownLatch.await(); } static void testLongAdder(final int threadCount, final int times) throws InterruptedException { CountDownLatch countDownLatch = new CountDownLatch(threadCount); LongAdder longAdder = new LongAdder(); for (int i = 0; i < threadCount; i++) { new Thread(new Runnable() { @Override public void run() { for (int j = 0; j < times; j++) { longAdder.add(1); } countDownLatch.countDown(); } }, "my-thread" + i).start(); } countDownLatch.await(); } }- 1
- 2
- 3
- 4
- 5
- 6
- 7
- 8
- 9
- 10
- 11
- 12
- 13
- 14
- 15
- 16
- 17
- 18
- 19
- 20
- 21
- 22
- 23
- 24
- 25
- 26
- 27
- 28
- 29
- 30
- 31
- 32
- 33
- 34
- 35
- 36
- 37
- 38
- 39
- 40
- 41
- 42
- 43
- 44
- 45
- 46
- 47
- 48
- 49
- 50
- 51
- 52
- 53
- 54
- 55
- 56
- 57
运行结果:
条件>>>>>>线程数:10, 单线程操作计数10000
结果>>>>>>LongAdder方式增加计数100000次,共计耗时:5
条件>>>>>>线程数:10, 单线程操作计数10000
结果>>>>>>AtomicLong方式增加计数100000次,共计耗时:3条件>>>>>>线程数:10, 单线程操作计数200000
结果>>>>>>LongAdder方式增加计数2000000次,共计耗时:16
条件>>>>>>线程数:10, 单线程操作计数200000
结果>>>>>>AtomicLong方式增加计数2000000次,共计耗时:37条件>>>>>>线程数:100, 单线程操作计数200000
结果>>>>>>LongAdder方式增加计数20000000次,共计耗时:24
条件>>>>>>线程数:100, 单线程操作计数200000
结果>>>>>>AtomicLong方式增加计数20000000次,共计耗时:315根据测试结果可以得出:
- 线程数越多,并发操作数越大,LongAdder的优势越明显
- 低并发、一般的业务场景下AtomicLong是足够了。如果并发量很多,存在大量写多读少的情况,那LongAdder可能更合适
LongAdder原理
设计思路
AtomicLong中有个内部变量value保存着实际的long值,所有的操作都是针对该变量进行。也就是说,高并发环境下,value变量其实是一个热点,也就是N个线程竞争一个热点。LongAdder的基本思路就是分散热点,将value值分散到一个数组中,不同线程会命中到数组的不同槽中,各个线程只对自己槽中的那个值进行CAS操作,这样热点就被分散了,冲突的概率就小很多。如果要获取真正的long值,只要将各个槽中的变量值累加返回

LongAdder的内部结构
LongAdder内部有一个base变量,一个Cell[]数组:
base变量:非竞态条件下,直接累加到该变量上
Cell[]数组:竞态条件下,累加个各个线程自己的槽Cell[i]中
源码中定义的字段及解释:/** Number of CPUS, to place bound on table size */ //CPU核数,用来决定槽数组的大小 static final int NCPU = Runtime.getRuntime().availableProcessors(); /** * Table of cells. When non-null, size is a power of 2. */ //数组槽,大小为2的幂次方 transient volatile Cell[] cells; /** * Base value, used mainly when there is no contention, but also as * a fallback during table initialization races. Updated via CAS. */ //1、没有遇到并发竞争时,直接使用base累加数值 //2、初始化cells数组时,必须要保证cells数组只能被初始化一次(即只有一个线程能对cells初始化),其他竞争失败的线程会讲数值累加到base上 transient volatile long base; /** * Spinlock (locked via CAS) used when resizing and/or creating Cells. */ //在调整大小或者创建cells数组时,使用自旋锁(基于cas实现) transient volatile int cellsBusy;- 1
- 2
- 3
- 4
- 5
- 6
- 7
- 8
- 9
- 10
- 11
- 12
- 13
- 14
- 15
- 16
- 17
- 18
- 19
- 20
- 21
- 22
- 23
定义了一个内部Cell类,这就是我们之前所说的槽,每个Cell对象存有一个value值,可以通过Unsafe来CAS操作它的值
/** * Padded variant of AtomicLong supporting only raw accesses plus CAS. *//使用填充注解是为了解决缓存行问题,这里仅仅可通过原始访问和cas访问 * JVM intrinsics note: It would be possible to use a release-only * form of CAS here, if it were provided. *//JVM intrinsic注意:在这里可以使用仅发布形式的CAS(如果提供了的话) */ @sun.misc.Contended static final class Cell { volatile long value; Cell(long x) { value = x; } final boolean cas(long cmp, long val) { return UNSAFE.compareAndSwapLong(this, valueOffset, cmp, val); } // Unsafe mechanics private static final sun.misc.Unsafe UNSAFE; private static final long valueOffset; static { try { UNSAFE = sun.misc.Unsafe.getUnsafe(); Class<?> ak = Cell.class; valueOffset = UNSAFE.objectFieldOffset (ak.getDeclaredField("value")); } catch (Exception e) { throw new Error(e); } } }- 1
- 2
- 3
- 4
- 5
- 6
- 7
- 8
- 9
- 10
- 11
- 12
- 13
- 14
- 15
- 16
- 17
- 18
- 19
- 20
- 21
- 22
- 23
- 24
- 25
- 26
- 27
LongAdder#add方法
方法的逻辑判断图如下:

流程图解释
只有从未出现过并发冲突的时候,base基数才会使用到,一旦出现了并发冲突,之后所有的操作都只针对Cell[]数组中的单元Cell
如果Cell[]数组未初始化,会调用父类的longAccumelate去初始化Cell[],如果Cell[]已经初始化但是冲突发生在Cell单元内,则也调用父类的longAccumelate,此时可能就需要对Cell[]扩容了
这也是LongAdder设计的精妙之处:尽量减少热点冲突,不到最后万不得已,尽量将CAS操作延迟
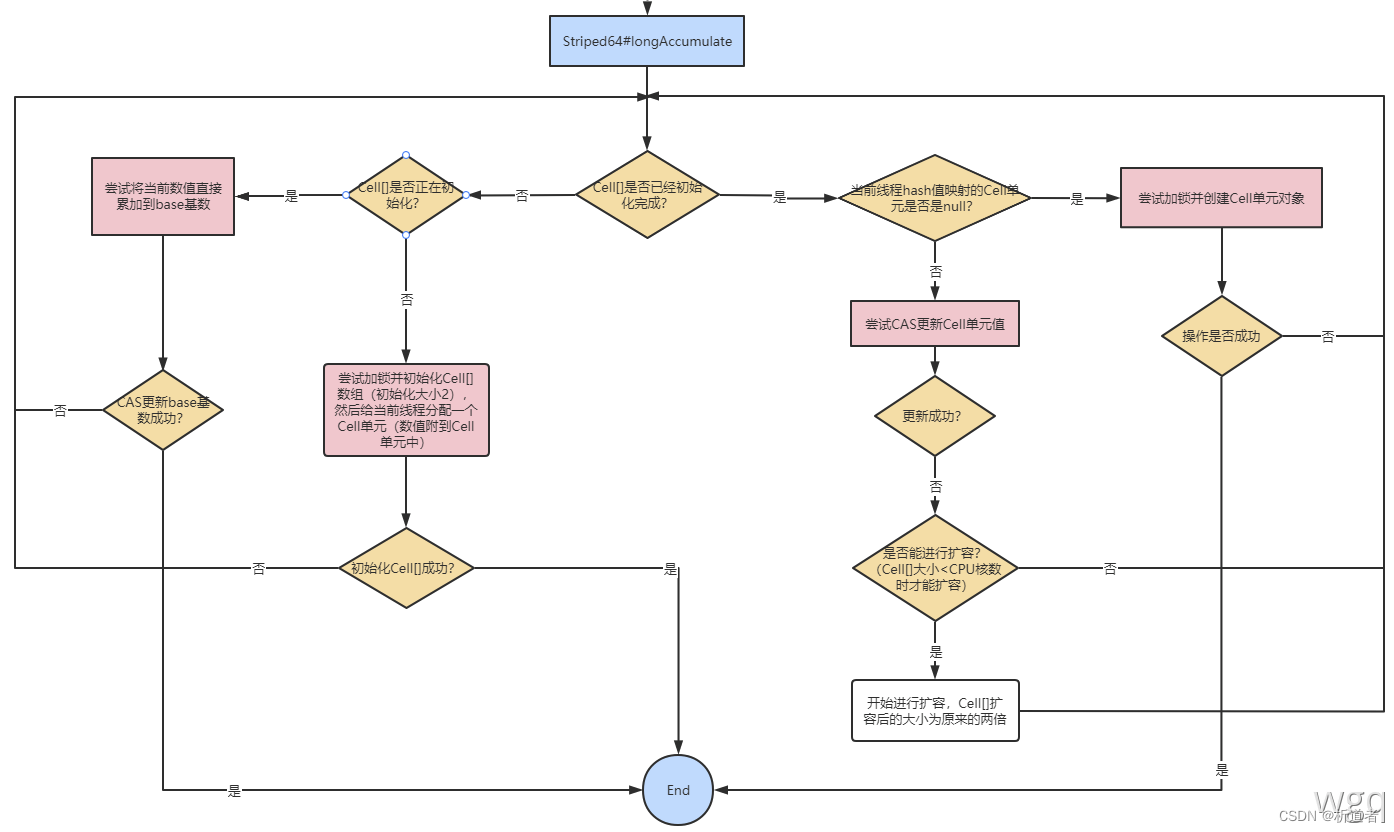
Striped64#longAccumulate方法
方法逻辑判断图如下:
LongAdder#sum方法
源码示例:/** * Returns the current sum. The returned value is NOT an * atomic snapshot; invocation in the absence of concurrent * updates returns an accurate result, but concurrent updates that * occur while the sum is being calculated might not be * incorporated. *//返回当前和。返回值不是原子快照;在没有并发更新的情况下调用将返回准确的结果,但是在计算总和时发生的并发更新可能不会被合并 * @return the sum */ public long sum() { Cell[] as = cells; Cell a; long sum = base; if (as != null) { for (int i = 0; i < as.length; ++i) { if ((a = as[i]) != null) sum += a.value; } } return sum; }- 1
- 2
- 3
- 4
- 5
- 6
- 7
- 8
- 9
- 10
- 11
- 12
- 13
- 14
- 15
- 16
- 17
- 18
- 19
- 20
由于计算总和时没有对Cell数组进行加锁,所以在累加过程中可能有其他线程对Cell中的值进行了修改,也有可能对数组进行了扩容,所以sum返回的值并不是非常精确的,其返回值并不是一个调用sum方法时的原子快照值
LongAccumulator
LongAccumulator是LongAdder的增强版。LongAdder只能针对数值的进行加减运算,而LongAccumulator提供了自定义的函数操作。其构造函数如下:
/** * Creates a new instance using the given accumulator function * and identity element. * @param accumulatorFunction a side-effect-free function of two arguments * @param identity identity (initial value) for the accumulator function * //使用给定的累加器函数和标识元素创建新实例。 形参: identity -累加器函数的标识(初始值) */ public LongAccumulator(LongBinaryOperator accumulatorFunction, long identity) { this.function = accumulatorFunction; base = this.identity = identity; }- 1
- 2
- 3
- 4
- 5
- 6
- 7
- 8
- 9
- 10
- 11
通过LongBinaryOperator,可以自定义对入参的任意操作,并返回结果(LongBinaryOperator接收2个long作为参数,并返回1个long)。LongAccumulator内部原理和LongAdder几乎完全一样,都是利用了父类Striped64的longAccumulate方法
测试示例:public class LongAccumulatorTest { public static void main(String[] args) throws InterruptedException { // 累加 x+y LongAccumulator accumulator = new LongAccumulator((x, y) -> x + y, 0); ExecutorService executor = Executors.newFixedThreadPool(8); // 1到9累加 IntStream.range(1, 10).forEach(i -> executor.submit(() -> accumulator.accumulate(i))); Thread.sleep(2000); System.out.println(accumulator.getThenReset()); } } //运行结果:45- 1
- 2
- 3
- 4
- 5
- 6
- 7
- 8
- 9
- 10
- 11
- 12
-
相关阅读:
[题] 年会抽奖 #错排问题 #递推
20行代码来爬取某某云的榜单音乐
java架构师禁止在项目中使用继承,合理吗?
JVM 对 Java 的 原 生 锁 做 了 哪 些 优 化 ?
java中Date类之GMT、UTC
常用设计模式之.Net示例代码合集
acwing第77场周赛 前两题
iconfont 的symbol字体如何修改颜色 / svg如何修改颜色?
【操作系统】文件管理
【系统架构设计】计算机公共基础知识: 4 数据库系统
- 原文地址:https://blog.csdn.net/weixin_41381248/article/details/127698066