-
读写/dev/kmsg设备编程实例
前言
通过读写/dev/kmsg设备,模拟一个dmesg命令。为代码调试开拓新思路。该实验的作用类似于dmesg -w
使用lsof命令查看/dev/kmsg设备是被谁在用:
- root@hehe:~# ./lsof -a /dev/kmsg
- COMMAND PID USER FD TYPE DEVICE SIZE/OFF NODE NAME
- udevd 123 root 5w CHR 1,11 0t0 93 /dev/kmsg
- root@hehe:~#
一 代码
写一个C语言测试程序,向该设备写入一个字符串,然后进入循环一直读设备。
- #include
- #include
- #include
- #include
- #include
- #include
- #include
- char *msg = "I'm a student\n";
- char buf[100000];
- int main(int argc,char *argv[])
- {
- char *name = "/dev/kmsg";
- int fd = open(name,O_RDWR);
- int len = 0;
- if(fd < 0){
- perror("open");
- return -1;
- }
- printf("open %s ok\n",name);
- len = write(fd,msg,strlen(msg));
- if(len <= 0){
- perror("write");
- close(fd);
- exit(-1);
- }
- printf("write %s ok\n",msg);
- while(1){
- memset(buf,0,sizeof(buf));
- len = read(fd,buf,sizeof(buf));
- if(len <= 0)continue;
- printf("%s",buf);
- }
- close(fd);
- return 0;
- }
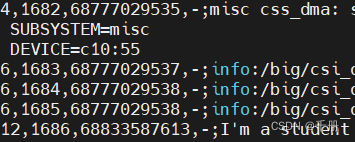
二 测试结果:
gcc kmsg.c -o kmsg执行效果:
下面是dmesg -w的执行效果

三 实例:驱动通过/dev/kmsg向应用传递私密信息
dmesg 输出的调试信息是经过格式化的,我们自己写的代码kmsg.c,输出的是原始的数据。这能拿来做什么呢?例如我们写一个驱动,驱动中输出和一个格式化的信息:例如
[[[MAC = 11:22:33:44:55:66]]]这样kmsg.c就可以解析到MAC的值。这样就需要行读取数据,然后判断"[[["和"]]]",然后取中间的数据。用到读一行,就需要文件流使用fdopen函数
FILE *file = fdopen(fd,"r+");打开模式要与open时O_RDWR保持一致。
char *fgets(char *str, int n, FILE *stream)
从指定的流 stream 读取一行,并把它存储在 str 所指向的字符串内。当读取 (n-1) 个字符时,或者读取到换行符时,或者到达文件末尾时,它会停止,具体视情况而定。char *strstr(const char *haystack, const char *needle)
在字符串 haystack 中查找第一次出现字符串 needle(不包含空结束字符)的位置。代码kmsg.c
- #include
- #include
- #include
- #include
- #include
- #include
- #include
- char *msg = "[[[MAC:112233445566]]]\n";
- char buf[100000];
- int main(int argc,char *argv[])
- {
- char *name = "/dev/kmsg";
- FILE *p;
- int len = 0;
- int count = 0;
- int fd = 0;
- fd = open(name,O_RDWR | O_NONBLOCK);
- if(fd < 0){
- perror("open");
- return -1;
- }
- p = fdopen(fd,"r+");
- if(p == NULL){
- perror("fdopen");
- exit(-1);
- }
- printf("open %s ok\n",name);
- len = write(fd,msg,strlen(msg));
- if(len <= 0){
- perror("write");
- close(fd);
- exit(-1);
- }
- while(1){
- memset(buf,0,sizeof(buf));
- if(fgets(buf,sizeof(buf),p) == NULL){
- printf("line = %d break\n",__LINE__);
- break;
- }
- if(strlen(buf) == 0){
- printf("line = %d break\n",__LINE__);
- break;
- }
- char *start = strstr(buf,"[[[");
- if(start == NULL){
- continue;
- }
- start+=3;
- char *end = strstr(start,"]]]");
- if(end == NULL)continue;
- len = end - start;
- if(len <= 0)continue;
- //printf("len = %d\n",len);
- //printf("start = %s\n",start);
- //printf("end = %s\n",end);
- memcpy(buf,start,len);
- buf[len] = '\0';
- printf("buf = %s\n",buf);
- count++;
- }
- printf("count = %d\n",count);
- printf("%d,\n",fclose(p));
- printf("%d\n",close(fd));
- return 0;
- }
测试验证
测试前,首先执行sudo dmesg -C清空缓冲区
编译:gcc kmsg.c -o kmsg
执行结果:使用dmesg -u查看用户空间的调试信息:
sudo dmesg -C- lkmao@ubuntu:/big/csi_driver/csi_ov$ sudo ./kmsg
- open /dev/kmsg ok
- buf = MAC:112233445566
- buf = MAC:112233445566
- buf = MAC:112233445566
- buf = MAC:112233445566
- buf = MAC:112233445566
- buf = MAC:112233445566
- buf = MAC:112233445566
- buf = MAC:112233445566
- buf = MAC:112233445566
- buf = MAC:112233445566
- buf = MAC:112233445566
- buf = MAC:112233445566
- buf = MAC:112233445566
- buf = MAC:112233445566
- buf = MAC:112233445566
- line = 38 break
- count = 15
- 0,
- -1
- lkmao@ubuntu:/big/csi_driver/csi_ov$
- lkmao@ubuntu:/big/csi_driver/csi_ov$ dmesg -u
- [75094.969931] [[[MAC:112233445566]]]
- lkmao@ubuntu:/big/csi_driver/csi_ov$
四 dmesg的缓冲区不是/dev/kmsg的缓冲区
经过多次测试,虽然每次测试执行前,都sudo dmesg -C清空缓冲区,但是,我们添加的字符串数量还是会增加,这是怎么回事啊?看看dmesg的两个参数,貌似dmesg -c/-C只能清除应用层缓存里的调试信息,而不能清空/dev/kmsg里的调试信息。所以,即便每次都清空,消息还是会出现叠加的状况。/dev/kmsg里的调试信息一直都在。
-C, --clear clear the kernel ring buffer
-c, --read-clear read and clear all messages五 使用echo消息到/dev/kmsg
首先要切换到root用户,使用sudo会提示权限不够。
dmesg -C
dmesg -w&
- root@ubuntu:/# echo hello world > /dev/kmsg
- root@ubuntu:/# [76503.157294] hello world
添加等级1-7,直接在命令行执行如下shell指令
i=0;while [[ $i -lt 8 ]]; do echo "<${i}>""hello world" > /dev/kmsg; let "i+=1";done对比下面dmesg 的-r参数和-x参数输出消息。
然后执行dmesg -r命令
- root@ubuntu:/# dmesg -r
- <1>[76884.200271] hello world
- <1>[76884.200294] hello world
- <3>[76884.200308] hello world
- <3>[76884.200320] hello world
- <5>[76884.200331] hello world
- <5>[76884.200342] hello world
- <7>[76884.200352] hello world
- <7>[76884.200362] hello world
- root@ubuntu:/#
再执行dmesg -x
- root@ubuntu:/# dmesg -x
- user :emerg : [76884.200271] hello world
- user :alert : [76884.200294] hello world
- user :crit : [76884.200308] hello world
- user :err : [76884.200320] hello world
- user :warn : [76884.200331] hello world
- user :notice: [76884.200342] hello world
- user :info : [76884.200352] hello world
- user :debug : [76884.200362] hello world
- root@ubuntu:/#
小结
dmesg的缓冲区不是/dev/kmsg的缓冲区,这样的结论不是很理想的结论。确实比较符合当前实验结果的结论。
-
相关阅读:
Nacos开机自启配置(Linux)-DX的笔记
软件开发工具总结篇
办公开源利器:ONLYOFFICE
美女放电还是整形-从《人月神话》误译谈状态机图
【初识 Docker | 基础篇】 Docker 搭建仓库
前端经典面试题 | v-if/v-show的原理及区别
Docker 安装 Elasticsearch7.16.x
Win11截图工具在哪里?
springboot整合SpringSecurity并实现简单权限控制
怎样开发智能合约中的时间锁
- 原文地址:https://blog.csdn.net/yueni_zhao/article/details/127687329