-
小白学习spring第六天
第四章:SSM整合
第1节:整合思路介绍和分析
介绍:SSM(Spring+SpringMVC+MyBatis)整合,就是三个框架协同开发。 Spring整合Mybatis 就是将Mybatis核心配置文件当中数据源的配置,事务的管理,以及工厂的配置,Mapper接口的实现类等交给Spring管理。 Spring整合SpringMVC,就是在web.xml当中添加监听器,当服务器启动,监听器触发,监听器执行了Spring的核心配置文件,核心配置文件被加载。 整合核心步骤: Spring 基础框架单独运行 SpringMVC 框架单独运行 Spring 整合SpringMVC 框架 Spring 整合Mybatis 框架 测试SSM 整合结果- 1
- 2
- 3
- 4
- 5
- 6
- 7
- 8
- 9
- 10
- 11
- 12
- 13
- 14
- 15
第2节:准备环境
2.1 创建数据库和表结构
CREATE TABLE `role` ( `roleid` int(11) NOT NULL AUTO_INCREMENT COMMENT '主键值', `rolename` varchar(32) DEFAULT NULL COMMENT '角色名称', `roledes` varchar(32) DEFAULT NULL COMMENT '角色描述', PRIMARY KEY (`roleid`) ) ENGINE=InnoDB DEFAULT CHARSET=utf8;- 1
- 2
- 3
- 4
- 5
- 6
2.2 创建 Maven 工程
[外链图片转存失败,源站可能有防盗链机制,建议将图片保存下来直接上传(img-OKwibB9M-1667461067846)(./images/工程结构图.jpg)]
2.3 导入核心坐标
<properties> <project.build.sourceEncoding>UTF-8project.build.sourceEncoding> <maven.compiler.source>1.7maven.compiler.source> <maven.compiler.target>1.7maven.compiler.target> <spring-version>5.2.5.RELEASEspring-version> <mybatis-version>3.4.6mybatis-version> properties> <dependencies> <dependency> <groupId>mysqlgroupId> <artifactId>mysql-connector-javaartifactId> <version>5.1.38version> dependency> <dependency> <groupId>org.mybatisgroupId> <artifactId>mybatisartifactId> <version>${mybatis-version}version> dependency> <dependency> <groupId>com.alibabagroupId> <artifactId>druidartifactId> <version>1.1.10version> dependency> <dependency> <groupId>junitgroupId> <artifactId>junitartifactId> <version>4.12version> <scope>testscope> dependency> <dependency> <groupId>log4jgroupId> <artifactId>log4jartifactId> <version>1.2.17version> dependency> <dependency> <groupId>com.github.pagehelpergroupId> <artifactId>pagehelperartifactId> <version>5.1.10version> dependency> <dependency> <groupId>org.springframeworkgroupId> <artifactId>spring-contextartifactId> <version>${spring-version}version> dependency> <dependency> <groupId>org.springframeworkgroupId> <artifactId>spring-jdbcartifactId> <version>${spring-version}version> dependency> <dependency> <groupId>org.aspectjgroupId> <artifactId>aspectjweaverartifactId> <version>1.9.5version> dependency> <dependency> <groupId>org.springframeworkgroupId> <artifactId>spring-webmvcartifactId> <version>${spring-version}version> dependency> <dependency> <groupId>com.fasterxml.jackson.coregroupId> <artifactId>jackson-databindartifactId> <version>2.9.9version> dependency> <dependency> <groupId>commons-fileuploadgroupId> <artifactId>commons-fileuploadartifactId> <version>1.3.3version> dependency> <dependency> <groupId>javax.servletgroupId> <artifactId>javax.servlet-apiartifactId> <version>3.1.0version> <scope>providedscope> dependency> <dependency> <groupId>javax.servlet.jspgroupId> <artifactId>jsp-apiartifactId> <version>2.2version> <scope>providedscope> dependency> <dependency> <groupId>jstlgroupId> <artifactId>jstlartifactId> <version>1.2version> dependency> <dependency> <groupId>org.mybatisgroupId> <artifactId>mybatis-springartifactId> <version>1.3.2version> dependency> <dependency> <groupId>org.springframeworkgroupId> <artifactId>spring-testartifactId> <version>${spring-version}version> dependency> dependencies>- 1
- 2
- 3
- 4
- 5
- 6
- 7
- 8
- 9
- 10
- 11
- 12
- 13
- 14
- 15
- 16
- 17
- 18
- 19
- 20
- 21
- 22
- 23
- 24
- 25
- 26
- 27
- 28
- 29
- 30
- 31
- 32
- 33
- 34
- 35
- 36
- 37
- 38
- 39
- 40
- 41
- 42
- 43
- 44
- 45
- 46
- 47
- 48
- 49
- 50
- 51
- 52
- 53
- 54
- 55
- 56
- 57
- 58
- 59
- 60
- 61
- 62
- 63
- 64
- 65
- 66
- 67
- 68
- 69
- 70
- 71
- 72
- 73
- 74
- 75
- 76
- 77
- 78
- 79
- 80
- 81
- 82
- 83
- 84
- 85
- 86
- 87
- 88
- 89
- 90
- 91
- 92
- 93
- 94
- 95
- 96
- 97
- 98
- 99
- 100
- 101
- 102
- 103
- 104
- 105
- 106
- 107
- 108
- 109
- 110
- 111
- 112
- 113
- 114
- 115
- 116
- 117
- 118
- 119
- 120
2.4 编写数据模型实体类
/** * @author offcn * 角色实体类 **/ public class Role implements Serializable { private Integer roleid;//角色id private String rolename;//角色名称 private String roledes;//角色的描述 public Integer getRoleid() { return roleid; } public void setRoleid(Integer roleid) { this.roleid = roleid; } public String getRolename() { return rolename; } public void setRolename(String rolename) { this.rolename = rolename; } public String getRoledes() { return roledes; } public void setRoledes(String roledes) { this.roledes = roledes; } @Override public String toString() { return "Role{" + "roleid=" + roleid + ", rolename='" + rolename + '\'' + ", roledes='" + roledes + '\'' + '}'; } }- 1
- 2
- 3
- 4
- 5
- 6
- 7
- 8
- 9
- 10
- 11
- 12
- 13
- 14
- 15
- 16
- 17
- 18
- 19
- 20
- 21
- 22
- 23
- 24
- 25
- 26
- 27
- 28
- 29
- 30
- 31
- 32
- 33
- 34
- 35
- 36
- 37
- 38
- 39
- 40
- 41
- 42
2.5 编写持久层接口
/** * @author offcn **/ public interface RoleMapper { Role findById(Integer id); List<Role> findAll(); void insert(Role role); void update(Role role); void delete(Integer id); }- 1
- 2
- 3
- 4
- 5
- 6
- 7
- 8
- 9
- 10
2.6 编写接口和对应配置文件
DOCTYPE mapper PUBLIC "-//mybatis.org//DTD Mapper 3.0//EN" "http://mybatis.org/dtd/mybatis-3-mapper.dtd"> <mapper namespace="com.offcn.mapper.RoleMapper"> <resultMap id="BaseResultMap" type="com.offcn.pojo.Role" > <id column="roleid" property="roleid" jdbcType="INTEGER" /> <result column="rolename" property="rolename" jdbcType="VARCHAR" /> <result column="roledes" property="roledes" jdbcType="VARCHAR" /> resultMap> <select id="findById" resultMap="BaseResultMap"> select * from role where roleid =#{roleid} select> <select id="findAll" resultMap="BaseResultMap"> select * from role select> <insert id="insert" parameterType="com.offcn.pojo.Role" > insert into role(rolename,roledes) values(#{rolename},#{roledes}) insert> <update id="update" parameterType="com.offcn.pojo.Role"> UPDATE role SET roleid = #{roleid} , rolename = #{rolename} , roledes = #{roledes} WHERE roleid = #{roleid} update> <delete id="delete" parameterType="int"> delete from role where roleid=#{roleid} delete> mapper>- 1
- 2
- 3
- 4
- 5
- 6
- 7
- 8
- 9
- 10
- 11
- 12
- 13
- 14
- 15
- 16
- 17
- 18
- 19
- 20
- 21
- 22
- 23
- 24
- 25
- 26
- 27
- 28
- 29
- 30
- 31
- 32
- 33
- 34
- 35
- 36
- 37
- 38
- 39
- 40
- 41
- 42
- 43
2.7 编写业务层接口
/** * @author offcn **/ public interface RoleService { Role findById(Integer id); List<Role> findAll(); void insert(Role role); void update(Role role); void delete(Integer id); }- 1
- 2
- 3
- 4
- 5
- 6
- 7
- 8
- 9
- 10
2.8 编写业务层接口实现类
/** * @author offcn **/ public class RoleServiceImpl implements RoleService { @Override public Role findById(Integer id) { return null; } @Override public List<Role> findAll() { return null; } @Override public void insert(Role role) { } @Override public void update(Role role) { } @Override public void delete(Integer id) { } }- 1
- 2
- 3
- 4
- 5
- 6
- 7
- 8
- 9
- 10
- 11
- 12
- 13
- 14
- 15
- 16
- 17
- 18
- 19
- 20
- 21
- 22
- 23
- 24
- 25
- 26
- 27
- 28
- 29
- 30
第3节:SSM整合步骤
3.1 Spring在web 工程中独立运行
3.1.1 创建 Spring 配置文件
<beans xmlns="http://www.springframework.org/schema/beans" xmlns:mvc="http://www.springframework.org/schema/mvc" xmlns:xsi="http://www.w3.org/2001/XMLSchema-instance" xmlns:aop="http://www.springframework.org/schema/aop" xmlns:tx="http://www.springframework.org/schema/tx" xmlns:context="http://www.springframework.org/schema/context" xsi:schemaLocation="http://www.springframework.org/schema/beans http://www.springframework.org/schema/beans/spring-beans.xsd http://www.springframework.org/schema/mvc http://www.springframework.org/schema/mvc/spring-mvc.xsd http://www.springframework.org/schema/tx http://www.springframework.org/schema/tx/spring-tx.xsd http://www.springframework.org/schema/aop http://www.springframework.org/schema/aop/spring-aop.xsd http://www.springframework.org/schema/context http://www.springframework.org/schema/context/spring-context.xsd"> <context:component-scan base-package="com.offcn">context:component-scan> beans>- 1
- 2
- 3
- 4
- 5
- 6
- 7
- 8
- 9
- 10
- 11
- 12
- 13
- 14
- 15
- 16
- 17
- 18
- 19
- 20
- 21
3.1.2 使用注解配置业务层
@Service("roleService") //使用注解配置业务层对象 public class RoleServiceImpl implements RoleService { @Override public Role findById(Integer id) { return null; } ... }- 1
- 2
- 3
- 4
- 5
- 6
- 7
- 8
- 9
3.1.3 测试 Spring 独立运行
@RunWith(SpringJUnit4ClassRunner.class) @ContextConfiguration("classpath:applicationContext.xml") public class TestSpring { @Autowired private RoleService roleService; @Test public void testIOC(){ System.out.println(roleService); } } //运行结果: com.offcn.service.RoleServiceImpl@478190fc //说明: SpringIOC 功能能够正常使用- 1
- 2
- 3
- 4
- 5
- 6
- 7
- 8
- 9
- 10
- 11
- 12
- 13
- 14
3.2 SpringMVC 在 web 工程中运行
3.2.1 配置web.xml
<servlet> <servlet-name>DispatcherServletservlet-name> <servlet-class>org.springframework.web.servlet.DispatcherServletservlet-class> <init-param> <param-name>contextConfigLocationparam-name> <param-value>classpath:springmvc.xmlparam-value> init-param> <load-on-startup>1load-on-startup> servlet> <servlet-mapping> <servlet-name>DispatcherServletservlet-name> <url-pattern>/url-pattern> servlet-mapping>- 1
- 2
- 3
- 4
- 5
- 6
- 7
- 8
- 9
- 10
- 11
- 12
- 13
- 14
- 15
- 16
- 17
- 18
3.2.2 SpringMVC 的配置文件
<beans xmlns="http://www.springframework.org/schema/beans" xmlns:mvc="http://www.springframework.org/schema/mvc" xmlns:xsi="http://www.w3.org/2001/XMLSchema-instance" xmlns:aop="http://www.springframework.org/schema/aop" xmlns:tx="http://www.springframework.org/schema/tx" xmlns:context="http://www.springframework.org/schema/context" xsi:schemaLocation="http://www.springframework.org/schema/beans http://www.springframework.org/schema/beans/spring-beans.xsd http://www.springframework.org/schema/mvc http://www.springframework.org/schema/mvc/spring-mvc.xsd http://www.springframework.org/schema/tx http://www.springframework.org/schema/tx/spring-tx.xsd http://www.springframework.org/schema/aop http://www.springframework.org/schema/aop/spring-aop.xsd http://www.springframework.org/schema/context http://www.springframework.org/schema/context/spring-context.xsd"> <context:component-scan base-package="com.offcn.controller">context:component-scan> <mvc:annotation-driven>mvc:annotation-driven> <bean class="org.springframework.web.servlet.view.InternalResourceViewResolver"> <property name="prefix" value="/"/> <property name="suffix" value=".jsp"/> bean> beans>- 1
- 2
- 3
- 4
- 5
- 6
- 7
- 8
- 9
- 10
- 11
- 12
- 13
- 14
- 15
- 16
- 17
- 18
- 19
- 20
- 21
- 22
- 23
- 24
- 25
- 26
- 27
3.2.3 编写 Controller
/** * @author offcn **/ @Controller @RequestMapping("role") public class RoleController { @RequestMapping("findRole") @ResponseBody public Role findRole(Integer roleid){ Role role = new Role(); role.setRoleid(roleid); role.setRolename("管理员"); role.setRoledes("管理整个网站"); return role; } }- 1
- 2
- 3
- 4
- 5
- 6
- 7
- 8
- 9
- 10
- 11
- 12
- 13
- 14
- 15
- 16
- 17
3.2.4 编写index.jsp测试
<%@ page contentType="text/html;charset=UTF-8" language="java" %> <html> <head> <title>角色详情页面title> head> <body> <h2>根据id唯一性查询角色信息h2> <form action="/role/findRole" method="post"> id: <input name="roleid" type="text" ><br/> <button>查询button> form> body> html>- 1
- 2
- 3
- 4
- 5
- 6
- 7
- 8
- 9
- 10
- 11
- 12
- 13
3.3 整合 Spring 和 SpringMVC
<context-param> <param-name>contextConfigLocationparam-name> <param-value>classpath:applicationContext.xmlparam-value> context-param> <listener> <listener-class>org.springframework.web.context.ContextLoaderListenerlistener-class> listener>- 1
- 2
- 3
- 4
- 5
- 6
- 7
- 8
3.4 Spring整合MyBatis配置
3.4.1 Spring 接管 MyBatis 的 Session 工厂
jdbc.driver=com.mysql.jdbc.Driver jdbc.url=jdbc:mysql://localhost:3306/blog jdbc.username=root jdbc.password=root- 1
- 2
- 3
- 4
<context:property-placeholder location="classpath:dbConfig.properties"/> <bean id="dataSource" class="com.alibaba.druid.pool.DruidDataSource"> <property name="driverClassName" value="${jdbc.driver}"/> <property name="url" value="${jdbc.url}"/> <property name="username" value="${jdbc.username}"/> <property name="password" value="${jdbc.password}"/> bean> <bean id="sessionFactory" class="org.mybatis.spring.SqlSessionFactoryBean"> <property name="dataSource" ref="dataSource"/> <property name="typeAliasesPackage" value="com.offcn.pojo"/> <property name="mapperLocations" value="classpath:com/offcn/mapper/*.xml"/> <property name="plugins"> <array> <bean class="com.github.pagehelper.PageInterceptor"> <property name="properties"> <value> helperDialect=mysql reasonable=true supportMethodsArguments=true params=count=countSql autoRuntimeDialect=true value> property> bean> array> property> bean>- 1
- 2
- 3
- 4
- 5
- 6
- 7
- 8
- 9
- 10
- 11
- 12
- 13
- 14
- 15
- 16
- 17
- 18
- 19
- 20
- 21
- 22
- 23
- 24
- 25
- 26
- 27
- 28
- 29
- 30
- 31
- 32
- 33
- 34
3.4.2 配置自动扫描所有 Mapper 接口和文件
<bean id="mapperScannerConfigurer" class="org.mybatis.spring.mapper.MapperScannerConfigurer"> <property name="basePackage" value="com.offcn.mapper"/> bean>- 1
- 2
- 3
- 4
- 5
3.4.3 配置 Spring 的事务
<bean id="transactionManager" class="org.springframework.jdbc.datasource.DataSourceTransactionManager"> <property name="dataSource" ref="dataSource"/> bean> <tx:annotation-driven transaction-manager="transactionManager">tx:annotation-driven>- 1
- 2
- 3
- 4
- 5
- 6
- 7
- 8
第4节:测试 SSM 整合结果
4.1 编写测试jsp文件
<%@ page contentType="text/html;charset=UTF-8" language="java" %> <html> <head> <title>角色详情页面title> head> <body> <h2>根据id唯一性查询角色信息h2> <form action="/role/findRole" method="post"> id: <input name="roleid" type="text" ><br/> <button>查询button> form> <hr/> <a href="/role/findAll">查询所有角色a> <hr/> <h2>添加角色h2> <form action="/role/insert" method="post"> 角色名称: <input name="rolename" type="text" ><br/> 角色描述: <input name="roledes" type="text" ><br/> <button>添加button> form> <hr/> <h2>更新角色h2> <form action="/role/update" method="post"> id: <input name="roleid" type="text" ><br/> 角色名称: <input name="rolename" type="text" ><br/> 角色描述: <input name="roledes" type="text" ><br/> <button>更新button> form> <hr/> <h2>删除角色h2> <form action="/role/delete" method="post"> id: <input name="roleid" type="text" ><br/> <button>删除button> form> body> html>- 1
- 2
- 3
- 4
- 5
- 6
- 7
- 8
- 9
- 10
- 11
- 12
- 13
- 14
- 15
- 16
- 17
- 18
- 19
- 20
- 21
- 22
- 23
- 24
- 25
- 26
- 27
- 28
- 29
- 30
- 31
- 32
- 33
- 34
- 35
- 36
- 37
4.2 控制器中的方法和业务层当中方法
package com.offcn.controller; import com.offcn.pojo.Role; import com.offcn.service.RoleService; import org.springframework.beans.factory.annotation.Autowired; import org.springframework.stereotype.Controller; import org.springframework.web.bind.annotation.RequestMapping; import org.springframework.web.bind.annotation.ResponseBody; import java.util.List; /** * @author offcn **/ @Controller @RequestMapping("role") public class RoleController { @Autowired private RoleService roleService; @RequestMapping("findRole") @ResponseBody public Role findRole(Integer roleid){ Role role = roleService.findById(roleid); return role; } @RequestMapping("findAll") @ResponseBody public List<Role> findAll(){ List<Role> listRoles = roleService.findAll(); return listRoles; } @RequestMapping("insert") @ResponseBody public String insert(Role role){ try { roleService.insert(role); return "ok"; } catch (Exception e) { e.printStackTrace(); } return "fail"; } @RequestMapping("update") @ResponseBody public String update(Role role){ try { roleService.update(role); return "ok"; } catch (Exception e) { e.printStackTrace(); } return "fail"; } @RequestMapping("delete") @ResponseBody public String delete(Integer roleid){ try { roleService.delete(roleid); return "ok"; } catch (Exception e) { e.printStackTrace(); } return "fail"; } }- 1
- 2
- 3
- 4
- 5
- 6
- 7
- 8
- 9
- 10
- 11
- 12
- 13
- 14
- 15
- 16
- 17
- 18
- 19
- 20
- 21
- 22
- 23
- 24
- 25
- 26
- 27
- 28
- 29
- 30
- 31
- 32
- 33
- 34
- 35
- 36
- 37
- 38
- 39
- 40
- 41
- 42
- 43
- 44
- 45
- 46
- 47
- 48
- 49
- 50
- 51
- 52
- 53
- 54
- 55
- 56
- 57
- 58
- 59
- 60
- 61
- 62
- 63
- 64
- 65
- 66
- 67
- 68
- 69
- 70
- 71
/** * @author offcn **/ @Service("roleService") public class RoleServiceImpl implements RoleService { @Autowired private RoleMapper roleMapper; @Override public Role findById(Integer id) { return roleMapper.findById(id); } @Override public List<Role> findAll() { return roleMapper.findAll(); } @Override public void insert(Role role) { roleMapper.insert(role); } @Override public void update(Role role) { roleMapper.update(role); } @Override public void delete(Integer id) { roleMapper.delete(id); } }- 1
- 2
- 3
- 4
- 5
- 6
- 7
- 8
- 9
- 10
- 11
- 12
- 13
- 14
- 15
- 16
- 17
- 18
- 19
- 20
- 21
- 22
- 23
- 24
- 25
- 26
- 27
- 28
- 29
- 30
- 31
- 32
- 33
4.3 测试运行并展示运行结果
<build> <plugins> <plugin> <groupId>org.apache.tomcat.mavengroupId> <artifactId>tomcat7-maven-pluginartifactId> <version>2.2version> <configuration> <path>/path> <port>8080port> <uriEncoding>UTF-8uriEncoding> configuration> plugin> plugins> build>- 1
- 2
- 3
- 4
- 5
- 6
- 7
- 8
- 9
- 10
- 11
- 12
- 13
- 14
- 15
第五章:博客后台管理系统
第1节:功能模块演示
博客后台管理系统,首页主要由博客管理,类别管理,评价信息,用户管理等模块组成。- 1
博客管理:- 1

类别管理:- 1

评价管理:- 1

用户管理:- 1

第2节:环境搭建
Mysql 数据库 5.X SQLyog 视图操作工具 JDK1.8: java开发工具IDEA:2020 web服务器tomcat: 插件~ 项目管理工具Maven 项目架构:分层 +mvc 设计模式 表示层: jsp : 控制层: SpringMVC 业务逻辑层:service: SpringIOC 声明式事务 数据访问层:dao 使用Mybatis,Druid + Mybatis-generator 实体类: pojo- 1
- 2
- 3
- 4
- 5
- 6
- 7
- 8
- 9
- 10
- 11
- 12
- 13
2.1 数据库设计
根据业务逻辑分析和设计共创建了五张表: 员工表,角色表,博客表,博客类别表以及评论表。- 1
员工表:- 1

角色表:- 1

博客表:- 1

类别表:- 1

评价表:- 1

2.2 工程搭建
准备SSM整合环境,创建所需包,将页面信息copy到webapp下,保证页面能够正常访问。- 1

2.3 逆向工程生成资源

第3节:项目功能
3.1 用户模块
用户模块介绍,主要完成用户的基本操作,完成用户列表的查询,用户的注销,根据用户的名称进行模糊查询- 1

3.1.1 用户列表的展示
1. 用户列表的展示功能分析
用户列表展示,主要是展示了用户的基本信息,用户名称, 用户的姓名,邮箱,注册日期等, 所有的信息都来源于user表,所以用户列表查询只需要对user表进行单表操作即可- 1
2. 用户列表页面开发
//加载用户列表: function loadUserList(){ //发送ajax请求: $.ajax({ type:"POST", url:"/user/findAll", dataType:"json", success:function(result){ $(result).each(function(index,item){ var $tr = ``+item.uname+` `+item.truename+` `+item.email+` `+item.utime+` - 1
- 2
- 3
- 4
- 5
- 6
- 7
- 8
- 9
- 10
- 11
- 12
- 13
- 14
- 15
- 16
- 17
- 18
- 19
- 20
- 21
- 22
- 23
- 24
- 25
- 26
3. 用户模块控制层开发
@Controller @RequestMapping("user") public class UserController { @Autowired private UserService userService; //加载用户列表 @RequestMapping("findAll") @ResponseBody public List<User> findAll(){ return userService.findAll(); } }- 1
- 2
- 3
- 4
- 5
- 6
- 7
- 8
- 9
- 10
- 11
- 12
- 13
4. 用户模块业务层开发
@Override public List<User> findAll() { return userMapper.selectByExample(null); }- 1
- 2
- 3
- 4
3.1.2 用户的模糊查询
1. 用户名的模糊查询

输入用户名称,从user表当中根据uname字段进行模糊查询。 对应的sql语句: select * from user where uname like '%明%';- 1
- 2
2. 模糊查询页面开发
//根据用户名称模糊查询 $(".queryBtn").click(function (){ //获得input框的值: var uname = $("#form1").serialize(); //清空tbody: $("table tbody").empty(); //发送异步请求 $.post("user/findByUname",uname,function (result){ $(result).each(function(index,item){ var $tr = ``+item.uname+` `+item.truename+` `+item.email+` `+item.utime+` - 1
- 2
- 3
- 4
- 5
- 6
- 7
- 8
- 9
- 10
- 11
- 12
- 13
- 14
- 15
- 16
- 17
- 18
- 19
- 20
- 21
3. 模糊查询控制层开发
// 用户名模糊查询: findByUname @RequestMapping("findByUname") @ResponseBody public List<User> findByUname( String uname){ return userService.findByUname(uname); }- 1
- 2
- 3
- 4
- 5
- 6
4. 模糊查询业务层开发
@Override public List<User> findByUname(String uname) { UserExample example = new UserExample(); example.createCriteria().andUnameLike("%"+uname+"%"); List<User> userList = userMapper.selectByExample(example); return userList; }- 1
- 2
- 3
- 4
- 5
- 6
- 7
3.1.3 注销用户
1. 注销用户功能分析

点击注销按钮,实现用户的注销操作。 用户的主键字段被博客表所引用,需要删除博客表所对应的数据,对应的sql:delete from blog where u_fk=? 用户的主键字段被评论表所引用,需要删除评论表所对应的数据,对应的sql:delete from evaluate where eid =? 最后删除用户表当中的数据,对应的sql语句: delete from user where uid =?- 1
- 2
- 3
- 4
- 5
- 6
- 7
2. 注销用户页面开发
/** * 如果页面当中的组件动态生成的,应该使用如下的语法: * 参数一: click 点击事件 * 参数二: 具体的组件 * 参数三: 回调函数 */ //注销: $(document).on("click",".deleteBtn",function(result){ var flag = window.confirm("您确定要注销账户吗?..."); if(flag){ //获得用户的id: $(this)点击的组件。 button var uid = $(this).parents("tr").children().eq(0).text(); //发送ajax请求: $.get("/user/deleteByUid?uid="+uid,function(result){ console.info(result); if(result.msg){//删除成功 alert(result.msg); //重新加载页面: window.location.reload(); }else{ alert(result.error); } }); } })- 1
- 2
- 3
- 4
- 5
- 6
- 7
- 8
- 9
- 10
- 11
- 12
- 13
- 14
- 15
- 16
- 17
- 18
- 19
- 20
- 21
- 22
- 23
- 24
- 25
- 26
3. 注销用户控制层开发
//注销账户: @RequestMapping("deleteByUid") @ResponseBody public DialogResult deleteByUid(Integer uid){ DialogResult result = new DialogResult(); try { userService.deleteByUid(uid); result.setMsg("注销成功"); }catch (Exception e){ result.setError("注销失败"); e.printStackTrace(); } return result; }- 1
- 2
- 3
- 4
- 5
- 6
- 7
- 8
- 9
- 10
- 11
- 12
- 13
- 14
4. 注销用户业务层开发
@Service("userService") @Transactional//开启事务的支持。 public class UserServiceImpl implements UserService { @Autowired private UserMapper userMapper; @Autowired private BlogMapper blogMapper; @Autowired private EvaluateMapper evaluateMapper; @Override public void deleteByUid(Integer uid) { //删除用户考虑业务: // 1: 当前用户发布的博客删除: BlogExample blogExample = new BlogExample(); blogExample.createCriteria().andUFkEqualTo(uid); blogMapper.deleteByExample(blogExample); // 2:删除当前用户发布评论信息: EvaluateExample evaluateExample = new EvaluateExample(); evaluateExample.createCriteria().andUFkEqualTo(uid); evaluateMapper.deleteByExample(evaluateExample); //模拟异常的发生: // int i=1/0; // 3: 用户表当中删除用户: userMapper.deleteByPrimaryKey(uid); } }- 1
- 2
- 3
- 4
- 5
- 6
- 7
- 8
- 9
- 10
- 11
- 12
- 13
- 14
- 15
- 16
- 17
- 18
- 19
- 20
- 21
- 22
- 23
- 24
- 25
- 26
- 27
- 28
- 29
- 30
3.1.4 用户登录
1. 用户登录模块功能分析

输入用户名称和密码,点击提交,在后端进行数据校验,判断用户名称是否存在,判断密码是否正确,登录成功跳转到主页,登录失败在前端页面进行错误数据的回显操作。- 1
2. 登录模块页面开发
//用户登录 $(function (){ $("#login-button").click(function(){ //获得用户名称和密码: var userData = $("#userForm").serialize(); $.post("/user/login",userData,function (result){ if(result.error){//失败 $("#error").html(result.error); }else{//成功 alert(result.msg); window.location.href="index.jsp"; } }); }); });- 1
- 2
- 3
- 4
- 5
- 6
- 7
- 8
- 9
- 10
- 11
- 12
- 13
- 14
- 15
3. 登录模块控制层开发
//用户登录: @RequestMapping("login") @ResponseBody public DialogResult login(HttpSession session,String uname, String upass){ DialogResult result = new DialogResult(); try { User user = userService.login(uname); if(user !=null ){ if(user.getUpass().equals(upass)){ //存session: session.setAttribute("user",user); result.setMsg("登录成功"); }else{ throw new Exception("用户密码不正确"); } }else{ throw new Exception("用户名称不正确"); } }catch (Exception e){ result.setError(e.getMessage()); e.printStackTrace(); } return result; }- 1
- 2
- 3
- 4
- 5
- 6
- 7
- 8
- 9
- 10
- 11
- 12
- 13
- 14
- 15
- 16
- 17
- 18
- 19
- 20
- 21
- 22
- 23
- 24
4. 登录模块业务层开发
@Override public User login(String uname) throws Exception { //用户登录: UserExample example = new UserExample(); example.createCriteria().andUnameEqualTo(uname); List<User> userList = userMapper.selectByExample(example); if(userList !=null && userList.size()>0){ return userList.get(0); } return null; }- 1
- 2
- 3
- 4
- 5
- 6
- 7
- 8
- 9
- 10
- 11
3.1.5 用户退出
1. 用户退出模块功能分析

点击退出后台按钮,退出当前用户的登录,跳转到登录页面。需要注意的是将原有登录的session进行销毁- 1
2. 用户退出模块页面开发
index.jsp页面- 1
<a class="a1" href="login.jsp"><div class="div2"> <div class="tcht">div> 退出后台 div> a>- 1
- 2
- 3
- 4
- 5
login.jsp页面- 1
//退出登录: $(function(){ $.get("/user/logout"); })- 1
- 2
- 3
- 4
- 5
3. 用户退出模块控制层开发
//登出: @RequestMapping("logout") @ResponseBody public void login(HttpSession sessions){ sessions.invalidate(); }- 1
- 2
- 3
- 4
- 5
- 6
3.2 博客管理模块
3.2.1 博客列表展示
1. 功能模块分析

(1)博客列表展示,展示博客的基本信息,博客标题,博客类别,博客的发布日期等,基本信息来源于博客表,博客的作者信息来源于用户表,所以当前博客信息数据的展示来与于多个表。 (2)当前博客信息记录数多,需要分页展示,所以后端准备博客数据的同时需要准备分页相关的参数信息。- 1
- 2
2. 博客分页列表页面
var pageSize=3; //首页 function firstPage(){ loadBlogListWithPage(1,pageSize); } //上一页 function prePage(pagenum){ if(pagenum==0){ loadBlogListWithPage(1,pageSize); }else{ loadBlogListWithPage(pagenum,pageSize); } } //下一页 function nextPage(pagenum,maxnum){ console.info("next page...") if(pagenum==0){ loadBlogListWithPage(maxnum,pageSize); }else{ loadBlogListWithPage(pagenum,pageSize); } } //尾页 function tailPage(pagenum){ loadBlogListWithPage(pagenum,pageSize); } //加载博客列表: function loadBlogListWithPage(currentPage,pageSize){ //tbody $("#tbody").empty(); $("#tfoot").empty(); //发送ajax请求: $.ajax({ type:"POST", url:"/blog/findAll?currentPage="+currentPage+"&pageSize="+pageSize,//queryString dataType:"json", success:function(result){ $(result.list).each(function(index,item){ //重置表单: var $tr = ``+item.btitle+` `+item.typename+` `+item.uname+` `+item.date+` 删除 博客详情 共有`+result.pages+`页,当前是第`+result.pageNum+`页 首页 上一页 下一页 尾页 - 1
- 2
- 3
- 4
- 5
- 6
- 7
- 8
- 9
- 10
- 11
- 12
- 13
- 14
- 15
- 16
- 17
- 18
- 19
- 20
- 21
- 22
- 23
- 24
- 25
- 26
- 27
- 28
- 29
- 30
- 31
- 32
- 33
- 34
- 35
- 36
- 37
- 38
- 39
- 40
- 41
- 42
- 43
- 44
- 45
- 46
- 47
- 48
- 49
- 50
- 51
- 52
- 53
- 54
- 55
- 56
- 57
- 58
- 59
- 60
- 61
- 62
- 63
- 64
- 65
- 66
- 67
- 68
- 69
- 70
- 71
- 72
3. 博客分页列表控制层
@Controller @RequestMapping("blog") public class BlogController { @Autowired private BlogService blogService; @RequestMapping("findAll") @ResponseBody public PageInfo<BlogWithType> findAll( @RequestParam(name="currentPage",defaultValue = "1") Integer currentPage, @RequestParam(name="pageSize",defaultValue = "5") Integer pageSize ){ return blogService.findAll(currentPage,pageSize); } }- 1
- 2
- 3
- 4
- 5
- 6
- 7
- 8
- 9
- 10
- 11
- 12
- 13
- 14
- 15
4. 博客分页列表业务层
注意的问题:使用Mybatis的分页插件,必须引入相关依赖,并且在核心配置文件当中配置。- 1
<dependency> <groupId>com.github.pagehelpergroupId> <artifactId>pagehelperartifactId> <version>5.1.10version> dependency>- 1
- 2
- 3
- 4
- 5
- 6
<bean id="sqlSessionFactory" class="org.mybatis.spring.SqlSessionFactoryBean"> <property name="dataSource" ref="dataSource">property> <property name="mapperLocations" value="classpath:com/offcn/mapper/*Mapper.xml">property> <property name="typeAliasesPackage" value="com.offcn.pojo">property> <property name="plugins"> <array> <bean class="com.github.pagehelper.PageInterceptor"> bean> array> property> bean>- 1
- 2
- 3
- 4
- 5
- 6
- 7
- 8
- 9
- 10
- 11
- 12
- 13
- 14
- 15
- 16
- 17
- 18
@Override public PageInfo<BlogWithType> findAll(Integer currentPage, Integer pageSize) { PageHelper.startPage(currentPage,pageSize); List<BlogWithType> bolgList = bolgMapper.selectBlogWithTypeAndUname(); PageInfo<BlogWithType> pageInfo = new PageInfo<>(bolgList); return pageInfo; }- 1
- 2
- 3
- 4
- 5
- 6
- 7
5. 博客分页列表持久层
<select id="selectBlogWithTypeAndUname" resultType="BlogWithTypeAndUname"> SELECT b.bid, b.btitle, b.bid, b.type_fk AS typeFk, b.u_fk AS uFk , b.date, b.bcontent, t.typename , uid, uname FROM bolg b LEFT JOIN btype t ON b.type_fk = t.typeid LEFT JOIN USER u ON b.u_fk= u.uid select>- 1
- 2
- 3
- 4
- 5
- 6
- 7
- 8
- 9
- 10
- 11
- 12
- 13
- 14
- 15
- 16
- 17
- 18
- 19
6. 实体类封装查询的多表数据
上述的查询语句,是多表联合查询,查询的结果需要定义一个单独的实体类进行封装, 实体类的定义如下。- 1
/** * @author offcn * 携带博客信息和博客类型信息,博客所属的用户信息。 * 实体作用:封装多表查询的数据 **/ public class BlogWithTypeAndUname extends Bolg{ private String typename; private String uname; public String getTypename() { return typename; } public void setTypename(String typename) { this.typename = typename; } public String getUname() { return uname; } public void setUname(String uname) { this.uname = uname; } }- 1
- 2
- 3
- 4
- 5
- 6
- 7
- 8
- 9
- 10
- 11
- 12
- 13
- 14
- 15
- 16
- 17
- 18
- 19
- 20
- 21
- 22
- 23
- 24
- 25
3.2.2 博客详情
1. 博客详情页面分析

博客详情页面展示了博客基本信息,博客所属的博主信息,以及当前博客的评价信息。所以在控制层返回数据的时候,应该准备三部分数据。 数据的具体准备方式,可以灵活选择。博客列表展示时,使用了多表操作,一次性查询数据,此功能可以进行多次单表查询准备数据, 两种准备数据方式都需要掌握。- 1
2. 博客详情展示页面开发
blog_list.jsp页面: <a href="blog_detail.jsp?bid=`+item.bid+`">博客详情a>- 1
- 2
<table class="table table-bordered"> <thead> <tr> <th>评价内容th> <th>评价人th> <th>评价时间th> <th>操作th> tr> thead> <tbody id="evaluates"> <%--追加评论信息--%> tbody> table> body> <script> //查询博客的详细信息 function findById(){ $.ajax({ url:"blog/findById", type:"post", data:{"bid":${param.bid}}, dataType:"json", cache:false, success:function(rs){// rs.user.uname //博客基本信息 $("#uname").append(``+rs.user.uid+`" >`+rs.user.uname+``); $("#email").text(rs.user.email); $("#content").text(rs.blog.bcontent); $("#time").text(rs.blog.date); //设置评价信息: $.each(rs.evaluates,function (index,item){ var trs =``+item.econtent+` `+rs.user.uid+`">`+rs.user.uname+` `+item.etime+` - 1
- 2
- 3
- 4
- 5
- 6
- 7
- 8
- 9
- 10
- 11
- 12
- 13
- 14
- 15
- 16
- 17
- 18
- 19
- 20
- 21
- 22
- 23
- 24
- 25
- 26
- 27
- 28
- 29
- 30
- 31
- 32
- 33
- 34
- 35
- 36
- 37
- 38
- 39
- 40
- 41
- 42
- 43
- 44
- 45
- 46
- 47
- 48
3. 博客详情展示控制层开发
//id查询: findById @RequestMapping("findById") @ResponseBody public Map<String,Object> findById(Integer bid){ Map<String, Object> map = blogService.findById(bid); System.out.println("map:"+map); return map; }- 1
- 2
- 3
- 4
- 5
- 6
- 7
- 8
4. 博客详情展示业务层开发
@Override public Map<String,Object> findById(Integer bid) { //查询博客信息: Bolg bolg = bolgMapper.selectByPrimaryKey(bid); //查询博客用户信息: User user = userMapper.selectByPrimaryKey(bolg.getuFk()); //查询评价信息: EvaluateExample evaluateExample = new EvaluateExample(); evaluateExample.createCriteria().andBFkEqualTo(bolg.getBid()); List<Evaluate> evaluates = evaluateMapper.selectByExample(evaluateExample); //创建Map集合 存放准备的数据。 Map<String,Object> map = new HashMap<>(); map.put("blog",bolg); map.put("user",user); map.put("evaluates",evaluates); System.out.println(map); return map; }- 1
- 2
- 3
- 4
- 5
- 6
- 7
- 8
- 9
- 10
- 11
- 12
- 13
- 14
- 15
- 16
- 17
- 18
- 19
3.2.3 博客评价删除
1. 博客评价删除分析

点击删除按钮,携带当前评论的id信息,进行删除。 对应的sql语句; DELETE FROM evaluate WHERE eid=?- 1
2. 博客评论删除页面开发
$(document).on("click","#deleteBtn",function(){ //获得评论的id var eid = $(this).parents("tr").children().eq(0).text(); $.get("/evaluate/deleteById?eid="+eid,function (result){ if(result.msg){//成功 alert(result.msg); //重新加载页面: window.location.reload(); }else{ alert(result.error); } }); })- 1
- 2
- 3
- 4
- 5
- 6
- 7
- 8
- 9
- 10
- 11
- 12
- 13
3. 博客评价删除控制层开发
//id删除: @RequestMapping("deleteById") @ResponseBody public DialogResult deleteById(Integer bid){ DialogResult result = new DialogResult(); try { blogService.deleteById(bid); result.setMsg("删除成功"); }catch (Exception e){ result.setError("删除失败"); e.printStackTrace(); } return result; }- 1
- 2
- 3
- 4
- 5
- 6
- 7
- 8
- 9
- 10
- 11
- 12
- 13
- 14
4. 博客评价删除业务层开发
@Override public void deleteById(Integer bid) { bolgMapper.deleteByPrimaryKey(bid); }- 1
- 2
- 3
- 4
3.2.4 博客作者详情展示
1. 博客作者详情页面分析

点击博主名称,跳转到用户的详情页面,详情页面展示了用户的基本信息,来源于用户表,用户类型来源于角色表,所以展示的数据来源于多张表。- 1
2. 博客作者详情页面开发
blog_detail.jsp页面修改: $("#uname").append(``+result.user.uid+`">`+result.user.uname+``);- 1
- 2
//根据用户的id ,加载用户信息。 function findUserById(){ $.get("/user/findUserById?uid=${param.uid}",function(result){ $("#uname").text(result.user.uname); $("#truename").text(result.user.truename); $("#utype").text(result.role.rolename); $("#email").text(result.user.email); $("#utime").text(result.user.utime); }); } $(function (){ //查询用户基本信息 findUserById(); });- 1
- 2
- 3
- 4
- 5
- 6
- 7
- 8
- 9
- 10
- 11
- 12
- 13
- 14
3. 博客作者详情控制层开发
@RequestMapping("findUserById") @ResponseBody public Map<String,Object> findUserById(Integer uid){ System.out.println(uid); return userService.findByUid(uid); }- 1
- 2
- 3
- 4
- 5
- 6
4. 博客作者详情业务层开发
@Override public Map<String,Object> findByUid(Integer uid) { Map<String,Object> map = new HashMap<>(); //用户信息: User user = userMapper.selectByPrimaryKey(uid); //用户所属的角色信息: Role role = roleMapper.selectByPrimaryKey(user.getUtype()); map.put("user",user); map.put("role",role); return map; }- 1
- 2
- 3
- 4
- 5
- 6
- 7
- 8
- 9
- 10
- 11
3.2.5 博客删除
1. 博客删除分析

点击删除按钮, 执行博客的删除操作。 博客的id,被评论表所引用,所以在删除博客的时候,应该将当前博客的评论信息全部删除,最后再删除当前博客信息。- 1
2. 博客评论删除页面开发
<a href="javascript:deleteInfo(`+item.bid+`)">删除 </a> //删除博客信息: function deleteInfo(bid){ $.get("/blog/deleteById?bid="+bid,function (rs){ console.info(rs); //重新加载页面 if(rs.msg){//成功 alert(rs.msg); window.location.reload(); }else{ alert(rs.error); } }); }- 1
- 2
- 3
- 4
- 5
- 6
- 7
- 8
- 9
- 10
- 11
- 12
- 13
- 14
- 15
- 16
3. 博客评论删除控制层开发
//id删除: @RequestMapping("deleteById") @ResponseBody public DialogResult deleteById(Integer bid){ DialogResult result = new DialogResult(); try { blogService.deleteById(bid); result.setMsg("删除成功"); }catch (Exception e){ result.setError("删除失败"); e.printStackTrace(); } return result; }- 1
- 2
- 3
- 4
- 5
- 6
- 7
- 8
- 9
- 10
- 11
- 12
- 13
- 14
4. 博客评论删除业务层
@Transactional @Override public void deleteById(Integer bid) { // 1: 删除评论表当中当前博客所有评论信息 EvaluateExample evaluateExample = new EvaluateExample(); evaluateExample.createCriteria().andBFkEqualTo(bid); evaluateMapper.deleteByExample(evaluateExample); //模拟异常信息: //int i=1/0; // 2: 删除当前博客信息: blogMapper.deleteByPrimaryKey(bid); }- 1
- 2
- 3
- 4
- 5
- 6
- 7
- 8
- 9
- 10
- 11
- 12
- 13
- 14
3.3 类别管理
3.3.1 类别表分析

3.3.2 大类别列表查询
1. 大类别列表展示功能分析
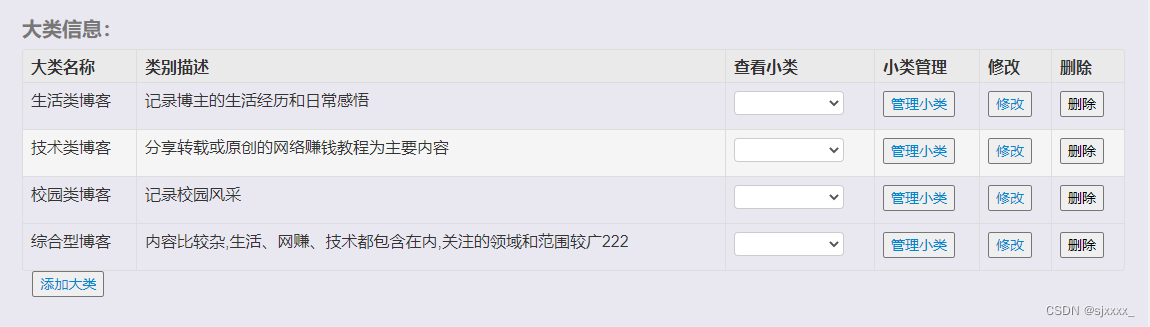
大类别列表展示,展示大类名称,类别描述等基本信息,大类别的type_pid 是null。对应的sql语句: select * from btype where type_pid is null ;- 1
- 2
2. 大类别列表页面
//加载所有大类别信息 function findAll() { $.get("/btype/findAll", function (result) { $(result).each(function(index,item){ var trs = `<tr> <td style="display: none">`+item.typeid+`td> <td>`+item.typename+`td> <td>`+item.typedes+`td> <td> <select class="subType" id=`+index+` style="width: 110px" > select> td> <td> <button type="submit"><a href="subtype_list.jsp?typeid=`+item.typeid+`">管理小类a>button> td> <td> <button type="button"><a href="type_update.jsp?typeid=`+item.typeid+`">修改a>button> td> <td> <button id="deleteBtn" class="deleteBtn" type="button"> 删除 button> td> tr>`; $("#tbody").append(trs); }); }); }- 1
- 2
- 3
- 4
- 5
- 6
- 7
- 8
- 9
- 10
- 11
- 12
- 13
- 14
- 15
- 16
- 17
- 18
- 19
- 20
- 21
- 22
- 23
- 24
- 25
- 26
- 27
- 28
3. 大类别列表控制层
//查询大类别 @RequestMapping("findAll") @ResponseBody public List<Btype> findAll(){ return bTypeService.findAll(); }- 1
- 2
- 3
- 4
- 5
- 6
4. 大类别列表业务层
@Override public List<Btype> findAll() { //查询大类别,type_id是null BtypeExample btypeExample = new BtypeExample(); btypeExample.createCriteria().andTypePidIsNull(); return btypeMapper.selectByExample(btypeExample); }- 1
- 2
- 3
- 4
- 5
- 6
- 7
3.3.3 添加大类别信息
1. 添加大类别页面分析

2. 添加大类别前端页面
//保存类别信息 $("#saveBtn").click(function (){ var data = $("#typeForm").serialize(); $.post("/btype/saveType",data,function (rs){ if(rs.msg){//成功 alert(rs.msg); window.location.href = "type_list.jsp"; }else{ alert(rs.error); } }); });- 1
- 2
- 3
- 4
- 5
- 6
- 7
- 8
- 9
- 10
- 11
- 12
3. 添加大类别控制层
// 保存大类信息: @RequestMapping("saveType") @ResponseBody public DialogResult saveType( Btype btype){ DialogResult result = new DialogResult(); try { bTypeService.save(btype); result.setMsg("保存成功"); }catch (Exception e){ result.setMsg("保存失败"); e.printStackTrace(); } return result; }- 1
- 2
- 3
- 4
- 5
- 6
- 7
- 8
- 9
- 10
- 11
- 12
- 13
- 14
4. 添加大类别业务层
@Override public void save(Btype btype) { btypeMapper.insert(btype); }- 1
- 2
- 3
- 4
3.3.4 查询大类别下的小类别
1. 大类别下的小类别功能分析

功能分析:点击下拉列表框,触发点击事件,携带大类别id(tid)发送异步请求,从数据库当中根据携带的大类别的id,作为type_pid 从btype表当中进行查询,查询的数据设置到option,动态的添加在select框当中。- 1
2. 查询大类别下的小类别页面
//追加大类别下的小类别: $(document).on('click', '.subType', function() { //点击的select 组件:定义变量保存。 var $select = $(this); $select.empty();//清空 var typeid = $(this).parents("tr").children().eq(0).text(); $.get("/btype/findSubTypeByTid?typeid="+typeid,function(result){ $(result).each(function (index,item){ var $option = ``+item.typename+``; $select.append($option); }); }); });- 1
- 2
- 3
- 4
- 5
- 6
- 7
- 8
- 9
- 10
- 11
- 12
- 13
3. 查询大类别下的小类别控制层
// 查询子类别 findSubTypeByTid @RequestMapping("findSubTypeByTid") @ResponseBody public List<Btype> findSubTypeByTid(Integer typeid){ return bTypeService.findSubTypeByTid(typeid); }- 1
- 2
- 3
- 4
- 5
- 6
4. 查询大类别下的小类别业务层
//查询子类别: @Override public List<Btype> findSubTypeByTid(Integer typeid) { BtypeExample btypeExample = new BtypeExample(); btypeExample.createCriteria().andTypePidEqualTo(typeid); List<Btype> btypes = btypeMapper.selectByExample(btypeExample); return btypes; }- 1
- 2
- 3
- 4
- 5
- 6
- 7
- 8
3.3.5 修改大类别数据回显
1. 修改大类别数据回显分析


点击修改按钮,跳转到类别修改页面需携带类别的id,当前页面加载时,需要发送异步请求,查询当前大类别的基本信息,将数据回显。- 1
2. 修改大类别数据回显页面
//查询类型信息,用于数据回显操作。 function findById(){ $.post("/btype/findById?typeid=${param.typeid}",function (rs){ //设置id,用于更新操作; $("#typeid").val(rs.typeid); $("#typename").val(rs.typename); $("#typedes").val(rs.typedes); }); }- 1
- 2
- 3
- 4
- 5
- 6
- 7
- 8
- 9
3. 修改大类别数据回显控制层
//根据id进行唯一性查询: findById @RequestMapping("findById") @ResponseBody public Btype findById(Integer typeid){ return bTypeService.findById(typeid); }- 1
- 2
- 3
- 4
- 5
- 6
4. 修改大类别数据回显业务层
@Override public Btype findById(Integer typeid) { return btypeMapper.selectByPrimaryKey(typeid); }- 1
- 2
- 3
- 4
3.3.6 修改大类类别
1. 修改大类别功能分析
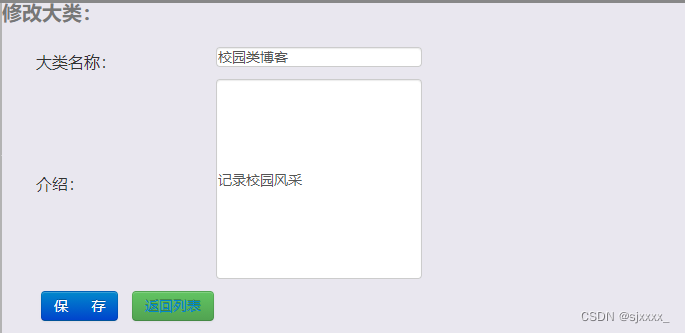
分析:修改大类名称,介绍信息,点击保存按钮,将数据提交给后台,注意的问题是,修改数据的时候, 是根据id进行修改,所以点击保存按钮时,需要将当前记录的id也必须传递给后台。- 1
后台对应的sql语句:- 1
<update id="updateByPrimaryKeySelective" parameterType="com.offcn.pojo.Btype" > update btype <set > <if test="typename != null" > typename = #{typename,jdbcType=VARCHAR}, </if> <if test="typePid != null" > type_pid = #{typePid,jdbcType=INTEGER}, </if> <if test="typedes != null" > typedes = #{typedes,jdbcType=VARCHAR}, </if> </set> where typeid = #{typeid,jdbcType=INTEGER}- 1
- 2
- 3
- 4
- 5
- 6
- 7
- 8
- 9
- 10
- 11
- 12
- 13
- 14
2. 修改大类别页面
//点击实现保存更能: $("#updateBtn").click(function (rs){ var data = $("#typeForm2").serialize(); $.post("/btype/updateType",data,function (rs){ if(rs.msg){//成功 alert(rs.msg); window.location.href = "type_list.jsp"; }else{ alert(rs.error); } }); });- 1
- 2
- 3
- 4
- 5
- 6
- 7
- 8
- 9
- 10
- 11
- 12
3. 修改大类别控制层
//更新操作: @RequestMapping("updateType") @ResponseBody public DialogResult updateType( Btype btype){ DialogResult result = new DialogResult(); try { bTypeService.update(btype); result.setMsg("更新成功"); }catch (Exception e){ result.setMsg("更新失败"); e.printStackTrace(); } return result; }- 1
- 2
- 3
- 4
- 5
- 6
- 7
- 8
- 9
- 10
- 11
- 12
- 13
- 14
4. 修改大类别业务层
@Override public void update(Btype btype) { btypeMapper.updateByPrimaryKeySelective(btype); }- 1
- 2
- 3
- 4
3.3.7 删除大类别
1. 删除大类别功能分析

分析:点击删除按钮,携带当前大类别的id,传递给后台,在删除大类别信息的时候,需要考虑具体的表和表之间的关联关系。 当前大类别下是否有关联的小类别,以及当前大类别是否被博客引用,如果当前大类别下有关联的小类别,当前大类别不能直接删除,如果当前大类别被博客所引用,当前大类别也不能删除。- 1
2. 删除大类别页面开发
//删除大类别 $(document).on('click', '.deleteBtn', function() { var flag = window.confirm("您确定要删除吗?..."); if(flag){//确定 var typeid = $(this).parents("tr").children().eq(0).text(); $.get("/btype/deleteById?typeid="+typeid,function(result){ if(result.msg){//删除成功 alert(result.msg); window.location.reload(); }else{ alert(result.error); } }); } });- 1
- 2
- 3
- 4
- 5
- 6
- 7
- 8
- 9
- 10
- 11
- 12
- 13
- 14
- 15
3. 删除大类别控制层
//删除大类别: @RequestMapping("deleteById") @ResponseBody public DialogResult deleteById( Integer typeid){ DialogResult result = new DialogResult(); try { bTypeService.deleteById(typeid); result.setMsg("删除成功"); }catch (Exception e){ result.setMsg("删除失败,"+e.getMessage()); e.printStackTrace(); } return result; }- 1
- 2
- 3
- 4
- 5
- 6
- 7
- 8
- 9
- 10
- 11
- 12
- 13
- 14
4. 删除大类别业务层
@Override public void deleteById(Integer typeid) throws Exception{ //考虑业务: // 1:判断大类别下是否有小类别 BtypeExample btypeExample = new BtypeExample(); btypeExample.createCriteria().andTypePidEqualTo(typeid); List<Btype> list = btypeMapper.selectByExample(btypeExample); if(list !=null && list.size() >0){//类别被引用 throw new Exception("大类别被小类别引用"); } //2: 判断当前的大类别是否被blog引用: BolgExample bolgExample = new BolgExample(); bolgExample.createCriteria().andTypeFkEqualTo(typeid); List<Bolg> bList = bolgMapper.selectByExample(bolgExample); if(bList !=null && bList.size() >0 ){ throw new Exception("大类别被博客引用"); } btypeMapper.deleteByPrimaryKey(typeid); }- 1
- 2
- 3
- 4
- 5
- 6
- 7
- 8
- 9
- 10
- 11
- 12
- 13
- 14
- 15
- 16
- 17
- 18
- 19
3.3.8 小类管理列表展示
1. 小类列表展示功能分析


分析:点击管理小类按钮,跳转到小类列表页面,注意的问题是,查询的是当前点击的大类别下所管理的小类,所以在跳转页面时,应该携带大类别的id,查询当前大类别下管理的小类别。- 1
对应的sql语句 : select * from btype where type_pid =?- 1
2. 小类别列表展示页面
//查询当前大类别下的,所有小类别 function findSubTypeByTypeid(){ $.get("/btype/findSubTypeByTid?typeid=${param.typeid}",function (rs){ $(rs).each(function (index,item){ var trs = ``+item.typename+` `+item.typedes+` - 1
- 2
- 3
- 4
- 5
- 6
- 7
- 8
- 9
- 10
- 11
- 12
- 13
- 14
- 15
- 16
3. 小类别列表展示控制层&业务层
控制层和业务层代码复用~- 1
3.3.9 删除小类别
1. 删除小类别功能分析

分析:点击删除按钮,携带小类别的id到后端,根据id进行删除,后端代码可以复用。- 1
2. 删除小类别页面
//删除小类别: $(document).on('click', '.deleteSubTypeBtn', function() { var flag = window.confirm("您确定要删除吗?..."); if(flag){//确定 var typeid = $(this).parents("tr").children().eq(0).text(); $.get("/btype/deleteById?typeid="+typeid,function(result){ if(result.msg){//删除成功 alert(result.msg); window.location.reload(); }else{ alert(result.error); } }); } });- 1
- 2
- 3
- 4
- 5
- 6
- 7
- 8
- 9
- 10
- 11
- 12
- 13
- 14
- 15
3. 删除小类别控制层开发&业务层
后端可以复用根据id删除大类别的代码- 1
3.3.10 添加小类别
1. 添加小类别功能分析


分析: 点击添加按钮,跳转到添加类别页面,注意的问题是,添加的小类别,应该属于某个大类别,所以在跳转到添加小类别页面时,需要携带大类别的id,作为type_pid使用。- 1
2. 添加小类别页面
<button type="button" id="addnew"> <a href="subtype_add.jsp?typeid=${param.typeid}">添加小类a> button>- 1
- 2
- 3
//保存小类别: $("#saveBtn").click(function (){ var data = $("#typeForm2").serialize(); $.post("/btype/saveType",data,function (rs){ if(rs.msg){//成功 alert(rs.msg); window.location.href = "subtype_list.jsp?typeid=${param.typeid}"; }else{ alert(rs.error); } }); });- 1
- 2
- 3
- 4
- 5
- 6
- 7
- 8
- 9
- 10
- 11
- 12
3. 添加小类别控制层开发&业务层
复用添加大类别的控制层和业务层代码。- 1
3.4 评价管理【私下完成】
-
相关阅读:
城市广告牌安全传感器特点有哪些?
Day 57 | 647. 回文子串 & 516. 最长回文子序列 & 动态规划总结
计算机毕业设计(附源码)python疫情状态下的图书馆座位预约系统
ftp多用户多目录配置
linux systemctl删除失效的服务单元
app在线客服系统怎么对接
Spring框架系列(4) - 深入浅出Spring核心之面向切面编程(AOP)
集美大学第九届程序设计竞赛 L.序列 逆序对
基于模板匹配的图像拼接技术研究-含Matlab代码
Linux 后台开发必知的 I/O 优化知识总结
- 原文地址:https://blog.csdn.net/sjxxxx_/article/details/127671670
