-
(刘二大人)PyTorch深度学习实践-卷积网络(基础篇)
目录
3.1 代码展示(就是修改了padding换成stride)
1. 简单卷积实现(主要看下shape)

1.1 代码展示
- import torch
- input_channels , output_channels = 5,10
- batch_size = 1
- kernel_size = 3
- width , height = 100,100
- # BxCxWxH 随机定义一个满足要求的输入
- input = torch.randn(batch_size,input_channels,width,height)
- #定义卷积层
- conv_layer = torch.nn.Conv2d(in_channels=input_channels,out_channels=output_channels,kernel_size=kernel_size)
- output = conv_layer(input)
- print(input.shape)
- print(output.shape)
- print(conv_layer.weight.shape)
1.2 结果展示
D:\Anaconda3\envs\pytorch\python.exe E:/learn_pytorch/LE/convolution_base1.py
torch.Size([1, 5, 100, 100])
torch.Size([1, 10, 98, 98])
torch.Size([10, 5, 3, 3])Process finished with exit code 0
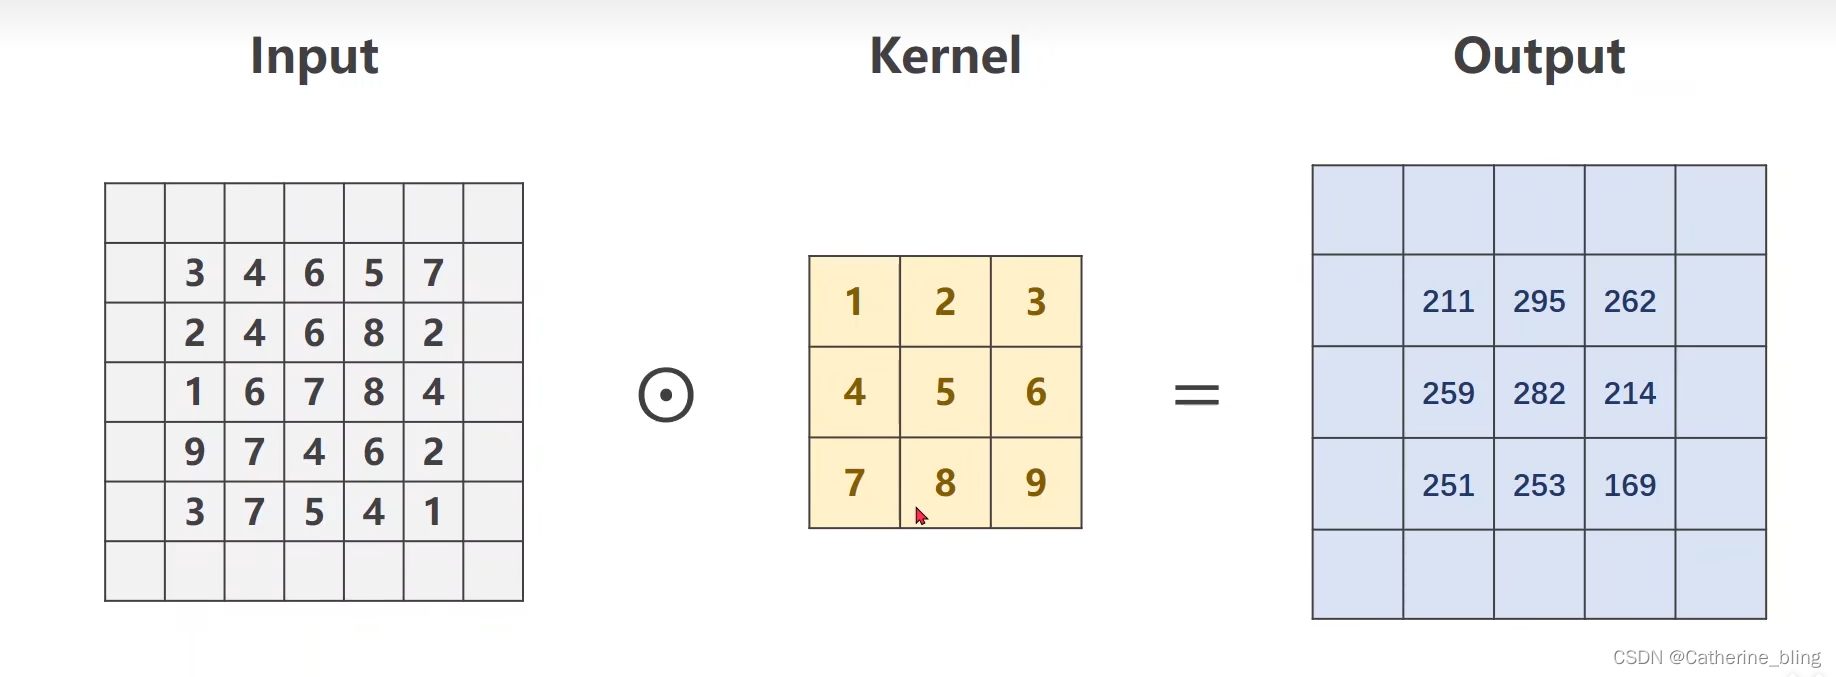
2. 关于padding参数
有时为了保证输入和输出size相同,会使用padding参数,若padding=1,则在输入矩阵外层添加一圈数据,一般默认为0(可以扩大输出的宽和高)
例如:
2.1代码实现
- import torch
- input = [
- 3,4,6,5,7,
- 2,4,6,8,2,
- 1,6,7,8,4,
- 9,7,4,6,2,
- 3,7,5,4,1,
- ]
- #将input转换为1*1*5*5的张量
- input = torch.Tensor(input).view(1,1,5,5)
- kernel_size = 3
- batch_size = 1
- output_channels = 1
- #定义卷积层
- conv_layer = torch.nn.Conv2d(in_channels=1,out_channels=output_channels,kernel_size=kernel_size,padding=1,bias=False)
- #自定义卷积核
- kernel = torch.Tensor([1,2,3,4,5,6,7,8,9]).view(1,1,3,3)
- #将自定义的卷积核的值赋值给卷积层的权重
- conv_layer.weight.data = kernel.data
- output = conv_layer(input)
- print(input.shape)
- print(output.shape)
- print(conv_layer.weight.shape)
2.2 结果展示
D:\Anaconda3\envs\pytorch\python.exe E:/learn_pytorch/LE/convolution_padding.py
torch.Size([1, 1, 5, 5])
torch.Size([1, 1, 5, 5])
torch.Size([1, 1, 3, 3])Process finished with exit code 0
3. 关于stride参数(降低输出的宽和高)

3.1 代码展示(就是修改了padding换成stride)
- import torch
- input = [
- 3,4,6,5,7,
- 2,4,6,8,2,
- 1,6,7,8,4,
- 9,7,4,6,2,
- 3,7,5,4,1,
- ]
- #将input转换为1*1*5*5的张量
- input = torch.Tensor(input).view(1,1,5,5)
- kernel_size = 3
- batch_size = 1
- output_channels = 1
- #定义卷积层
- conv_layer = torch.nn.Conv2d(in_channels=1,out_channels=output_channels,kernel_size=kernel_size,stride=2,bias=False)
- #自定义卷积核
- kernel = torch.Tensor([1,2,3,4,5,6,7,8,9]).view(1,1,3,3)
- #将自定义的卷积核的值赋值给卷积层的权重
- conv_layer.weight.data = kernel.data
- output = conv_layer(input)
- print(input.shape)
- print(output.shape)
- print(conv_layer.weight.shape)
3.2 结果展示
D:\Anaconda3\envs\pytorch\python.exe E:/learn_pytorch/LE/convolution_padding.py
torch.Size([1, 1, 5, 5])
torch.Size([1, 1, 2, 2])
torch.Size([1, 1, 3, 3])Process finished with exit code 0
4. 使用卷积网络实现Minist数据集

4.1 代码展示
- import torch
- from torchvision import datasets
- from torchvision import transforms
- from torch.utils.data import DataLoader
- import torch.nn.functional as F
- import torch.optim as optim
- #准备数据集
- trans = transforms.Compose([transforms.ToTensor(),transforms.Normalize((0.1307,),(0.3801,))])#这里第一个是均值,第二个是标准差
- train_datasets = datasets.MNIST(root='E:\learn_pytorch\LE',train=True,transform=trans,download=True)
- test_datasets = datasets.MNIST(root='E:\learn_pytorch\LE',train=False,transform=trans,download=True)
- #进行数据集的加载
- batch_size = 64
- train_loader = DataLoader(dataset=train_datasets,batch_size=batch_size,shuffle=True)
- test_loader = DataLoader(dataset=test_datasets,batch_size=batch_size,shuffle=False)
- class Conv_model(torch.nn.Module):
- def __init__(self):
- super(Conv_model, self).__init__()
- self.conv1 = torch.nn.Conv2d(1,10,(5,5))#输入通道、输出通道、kernel_size
- self.conv2 = torch.nn.Conv2d(10,20,(5,5))
- self.pooling = torch.nn.MaxPool2d(kernel_size=2)#最大池化层
- self.fc = torch.nn.Linear(320,10)#这里就是一个全连接的分类
- def forward(self,x):
- x = F.relu(self.conv1(x))
- x = self.pooling(x)
- x = F.relu(self.conv2(x))
- x = self.pooling(x)
- x = x.view(-1,320) #这里我试了不可以用torch.nn.Flatten,类型不匹配
- x = self.fc(x)
- return x
- Hui = Conv_model()
- #定义损失函数和优化器
- loss_fn = torch.nn.CrossEntropyLoss()
- optimizer = optim.SGD(Hui.parameters(),lr=0.01,momentum=0.5)
- #我们将一轮epoch单独拿出来作为一个函数
- def train(epoch):
- running_loss = 0.0
- for batch_id,data in enumerate(train_loader,0):
- inputs,targets = data
- optimizer.zero_grad()
- # Forward
- outputs = Hui(inputs)
- loss = loss_fn(outputs,targets)
- loss.backward()
- optimizer.step()
- #标签从0开始
- running_loss+=loss.item()
- if batch_id%300 == 299:
- print('[%d,%5d] loss:%.3f'%(epoch+1,batch_id+1,running_loss/300))
- running_loss = 0.0
- #定义测试集
- def test():
- correct = 0
- total = 0
- with torch.no_grad():
- for data in test_loader:
- images,labels = data
- outputs = Hui(images)
- #这个torch.max函数可以返回最大值和最大值的下标,那个predict取的是最大值下标
- _,predict = torch.max(outputs.data,dim=1)
- total += labels.size(0)#总共有多少个标签样本
- correct+=(predict==labels).sum().item()#将我们预测的最有可能的下标与真实标签对比,最后将这个标量取出来
- print('Accuracy on test set: %d %%' % (100*correct/total))
- #进行训练和测试
- if __name__ == '__main__':
- for epoch in range(5):
- train(epoch)
- test()
4.2 结果展示(5轮,性能提高一个点)
D:\Anaconda3\envs\pytorch\python.exe E:/learn_pytorch/LE/conv_minist.py
[1, 300] loss:0.671
[1, 600] loss:0.192
[1, 900] loss:0.145
Accuracy on test set: 96 %
[2, 300] loss:0.111
[2, 600] loss:0.106
[2, 900] loss:0.094
Accuracy on test set: 97 %
[3, 300] loss:0.086
[3, 600] loss:0.075
[3, 900] loss:0.076
Accuracy on test set: 97 %
[4, 300] loss:0.069
[4, 600] loss:0.064
[4, 900] loss:0.065
Accuracy on test set: 98 %
[5, 300] loss:0.051
[5, 600] loss:0.064
[5, 900] loss:0.055
Accuracy on test set: 98 %Process finished with exit code 0
-
相关阅读:
pytorch.数据结构Tensor
Kotlin Files readAllBytes readAllLines readString
Spring MVC记录传入请求
微软总裁:元宇宙概念应避免炒作,科技行业需配合监管机构
Clock时钟电路PCB设计布局布线要求
MyBatis 配置与测试方式
【模板】2-SAT
vue 封装水球图
idea无法添加spring MVC框架支持
GetPrivateProfileString 中文乱码解决
- 原文地址:https://blog.csdn.net/Catherine_bling/article/details/127642254
