-
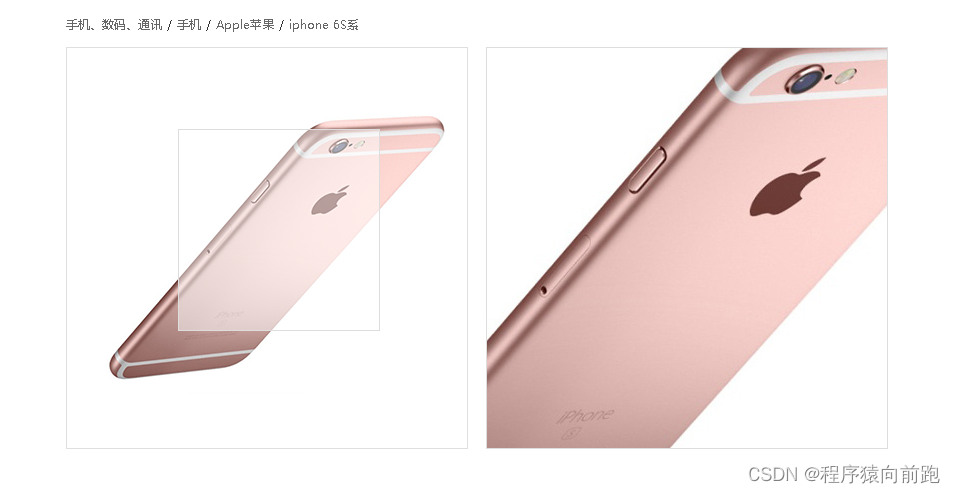
实现放大镜的效果

<!--内容区域开始--> <div id="content"> <!--版心元素--> <div class="contentMain"> <!--路径导航开始--> <div id="navPath"></div> <!--路径导航结束--> <!--中间区域开始--> <div id="center"> <!--左侧放大镜开始--> <div id="left"> <!--上边--> <div id="leftTop"> <!--小图框--> <div id="smallPic"> <!--小图片--> <img src="images/s1.png" alt=""> <!--蒙版元素--> </div> <!--大图框--> </div> <!--下边--> </div> <!--左侧放大镜结束--> <!--右侧商品详情区域开始--> <!--右侧商品详情区域结束--> </div> <!--中间区域结束--> </div> </div> <!--内容区域结束-->- 1
- 2
- 3
- 4
- 5
- 6
- 7
- 8
- 9
- 10
- 11
- 12
- 13
- 14
- 15
- 16
- 17
- 18
- 19
- 20
- 21
- 22
- 23
- 24
- 25
- 26
- 27
- 28
- 29
- 30
- 31
- 32
js代码
//作用:需要将所有的DOM元素对象以及相关的资源全部都加载完毕之后,再来实现的事件函数
window.onload = function () {//路径导航的数据渲染 navPathDataBind(); function navPathDataBind() { /** * 思路: * 1、先获取路径导航的页面元素(navPath) * 2、再来获取所需要的数据(data.js->goodData.path) * 3、由于数据是需要动态产生的,那么相应的DOM元素也应该是动态产生的,含义需要根据数据的数量来进行创建DOM元素 * 4、在遍历数据创建DOM元素的最后一条,只创建a标签,而不创建i标签 */ //1.获取页面导航的元素对象 var navPath = document.querySelector('#wrapper #content .contentMain #navPath'); //2.获取数据 var path = goodData.path; //3.遍历数据 for (var i = 0; i < path.length; i++) { if (i == path.length - 1) { //只需要创建a且没有href属性 var aNode = document.createElement("a"); aNode.innerText = path[i].title; navPath.appendChild(aNode); } else { //4.创建a标签 var aNode = document.createElement("a"); aNode.href = path[i].url; aNode.innerText = path[i].title; //5.创建i标签 var iNode = document.createElement('i'); iNode.innerText = '/'; //6.让navPath元素来追加a和i navPath.appendChild(aNode); navPath.appendChild(iNode); } } } //放大镜的移入、移出效果 bigClassBind(); function bigClassBind(){ /** * 思路: * 1、获取小图框元素对象,并且设置移入事件(onmouseenter) * 2、动态的创建蒙版元素以及大图框和大图片元素 * 3、移出时(onmouseleave)需要移除蒙版元素和大图框 */ //1.获取小图框元素 var smallPic = document.querySelector('#wrapper #content .contentMain #center #left #leftTop #smallPic'); //获取leftTop元素 var leftTop = document.querySelector('#wrapper #content .contentMain #center #left #leftTop'); //2.设置移入事件 smallPic.onmouseenter = function(){ //3. 创建蒙版元素 var maskDiv = document.createElement('div'); maskDiv.className = "mask"; //4.创建大图框元素 var BigPic = document.createElement('div'); BigPic.id = "bigPic"; //5.创建大图片元素 var BigImg = document.createElement('img'); BigImg.src = "images/b1.png"; //6.大图框来追加大图片 BigPic.appendChild(BigImg); //7.让小图框来追加蒙版元素 smallPic.appendChild(maskDiv); //8.让leftTop元素追加大图框 leftTop.appendChild(BigPic); //设置移动事件 smallPic.onmousemove = function(event){ //event.clientX: 鼠标点距离浏览器左侧X轴的值 //getBoundingClientRect().left:小图框元素距离浏览器左侧可视left值 //offsetWidth:为元素的占位宽度 var left = event.clientX - smallPic.getBoundingClientRect().left - maskDiv.offsetWidth / 2; var top = event.clientY - smallPic.getBoundingClientRect().top - maskDiv.offsetHeight / 2; //判断 if(left < 0){ left = 0; }else if(left > smallPic.clientWidth - maskDiv.offsetWidth){ left = smallPic.clientWidth - maskDiv.offsetWidth; } if(top < 0){ top = 0; }else if(top > smallPic.clientHeight - maskDiv.offsetHeight){ top = smallPic.clientHeight - maskDiv.offsetHeight; } //设置left和top属性 maskDiv.style.left = left + "px"; maskDiv.style.top = top + "px"; //移动的比例关系 = 蒙版元素移动的距离 / 大图片元素移动的距离 //蒙版元素移动的距离 = 小图框宽度 – 蒙版元素的宽度 //大图片元素移动的距离 = 大图片宽度 – 大图框元素的宽度 var scale = (smallPic.clientWidth - maskDiv.offsetWidth) / (BigImg.offsetWidth - BigPic.clientWidth); console.log(scale); //0.495 BigImg.style.left = -left / scale + "px"; BigImg.style.top = -top / scale + "px"; } //设置移出事件 smallPic.onmouseleave = function(){ //让小图框移除蒙版元素 smallPic.removeChild(maskDiv); //让leftTop元素移除大图框 leftTop.removeChild(BigPic); } } }- 1
- 2
- 3
- 4
- 5
- 6
- 7
- 8
- 9
- 10
- 11
- 12
- 13
- 14
- 15
- 16
- 17
- 18
- 19
- 20
- 21
- 22
- 23
- 24
- 25
- 26
- 27
- 28
- 29
- 30
- 31
- 32
- 33
- 34
- 35
- 36
- 37
- 38
- 39
- 40
- 41
- 42
- 43
- 44
- 45
- 46
- 47
- 48
- 49
- 50
- 51
- 52
- 53
- 54
- 55
- 56
- 57
- 58
- 59
- 60
- 61
- 62
- 63
- 64
- 65
- 66
- 67
- 68
- 69
- 70
- 71
- 72
- 73
- 74
- 75
- 76
- 77
- 78
- 79
- 80
- 81
- 82
- 83
- 84
- 85
- 86
- 87
- 88
- 89
- 90
- 91
- 92
- 93
- 94
- 95
- 96
- 97
- 98
- 99
- 100
- 101
- 102
- 103
- 104
- 105
- 106
- 107
- 108
- 109
- 110
- 111
- 112
- 113
- 114
- 115
- 116
- 117
- 118
- 119
- 120
- 121
- 122
- 123
- 124
- 125
- 126
- 127
- 128
- 129
- 130
- 131
}
#center{ margin: 5px 0 15px; //左侧放大镜开始 #left{ width: 400px; float: left; //上边 #leftTop{ width: 400px; position: relative; //小图框 #smallPic{ width: 400px; height: 400px; border:1px solid #dfdfdf; position: relative; img{} //蒙版元素 .mask{ width: 200px; height: 200px; background: rgba(255, 255, 255, .5); border:1px solid #ddd; position: absolute; left:0px; top:0px; } } //大图框 #bigPic{ width: 400px; height: 400px; border:1px solid #ddd; left:420px; top:0px; position: absolute; overflow: hidden; //大图片 img{ width: 800px; height: 800px; position: absolute; left:0px; top:0px; } } } } }- 1
- 2
- 3
- 4
- 5
- 6
- 7
- 8
- 9
- 10
- 11
- 12
- 13
- 14
- 15
- 16
- 17
- 18
- 19
- 20
- 21
- 22
- 23
- 24
- 25
- 26
- 27
- 28
- 29
- 30
- 31
- 32
- 33
- 34
- 35
- 36
- 37
- 38
- 39
- 40
- 41
- 42
- 43
- 44
- 45
- 46
- 47
- 48
- 49
数据
var goodData = {
path: [
{
title: “手机、数码、通讯”,
url: “###”
}, {
title: “手机”,
url: “###”
}, {
title: “Apple苹果”,
url: “###”
}, {
title: “iphone 6S系”,
}
],
imagessrc: [
{ b: “./images/b1.png”, s: “./images/s1.png” },
{ b: “./images/b2.png”, s: “./images/s2.png” },
{ b: “./images/b3.png”, s: “./images/s3.png” },
{ b: “./images/b1.png”, s: “./images/s1.png” },
{ b: “./images/b2.png”, s: “./images/s2.png” },
{ b: “./images/b3.png”, s: “./images/s3.png” },
{ b: “./images/b1.png”, s: “./images/s1.png” },
{ b: “./images/b2.png”, s: “./images/s2.png” },
{ b: “./images/b3.png”, s: “./images/s3.png” },
{ b: “./images/b1.png”, s: “./images/s1.png” },
{ b: “./images/b2.png”, s: “./images/s2.png” },
{ b: “./images/b3.png”, s: “./images/s3.png” },
{ b: “./images/b1.png”, s: “./images/s1.png” },
{ b: “./images/b2.png”, s: “./images/s2.png” }
],
goodsDetail: {
title: “Apple iPhone 6s(A1700)64G玫瑰金色 移动通信电信4G手机bbb123”,
recommend: “推荐选择下方[移动优惠购],手机套餐齐搞定,不用换号,每月还有花费返”,
price: 5299,
promoteSales: {
type: “加价购”,
content: “满999.00另加20.00元,或满1999.00另加30.00元,或满2999.00另加40.00元,即可在购物车换购热销商品”
},
support: “以旧换新,闲置手机回收 4G套餐超值抢 礼品购”,
address: “广东省 深圳市 宝安区”,
evaluateNum: 670000,
crumbData: [
{
“title”: “选择颜色”,
“data”: [
{
type: “金色”,
changePrice: 0
},
{
type: “银色”,
changePrice: 40
},
{
type: “黑色”,
changePrice: 90
},
]
},
{
“title”: “内存容量”,
“data”: [
{
type: “16G”,
changePrice: 0
},
{
type: “64G”,
changePrice: 300
},
{
type: “128G”,
changePrice: 900
},
{
type: “256G”,
changePrice: 1300
},
]
},
{
“title”: “选择版本”,
“data”: [
{
type: “公开版”,
changePrice: 0
},
{
type: “移动版”,
changePrice: -1000
}
]
},
{
“title”: “购买方式”,
“data”: [
{
type: “官方标配”,
changePrice: 0
},
{
type: “优惠移动版”,
changePrice: -240
},
{
type: “电信优惠版”,
changePrice: -390
},
]
}
]
}
}


-
相关阅读:
基于FPGA的图像高斯滤波实现,包括tb测试文件和MATLAB辅助验证
Windows平台下OpenCV的编译与安装
CanvasScaler计算方法
分享一个基于SpringBoot+Vue的招生宣传管理系统源码 招生计划管理系统代码
计及电池储能寿命损耗的微电网经济调度(matlab代码)
轮到国产游戏统治Steam榜单
【经典】请求拦截,相应拦截vue3封装,使用dom封装typescript接口
Postgresql JSON对象和数组查询
阳振坤:OceanBase 4.0 核心技术解读
HCIA网络课程第三周作业
- 原文地址:https://blog.csdn.net/qq_46199553/article/details/127635585
