-
Android 开发学习(三)
1. ListView 的 使用
示例使用:
activity_main.xml
<LinearLayout xmlns:android="http://schemas.android.com/apk/res/android" android:layout_height="match_parent" android:layout_width="match_parent" android:orientation="vertical" > <ListView android:id="@+id/lv" android:layout_width="match_parent" android:layout_height="match_parent" /> LinearLayout>- 1
- 2
- 3
- 4
- 5
- 6
- 7
- 8
- 9
- 10
- 11
- 12
- 13
MainActivity
package com.example.mydesssc; import androidx.appcompat.app.AppCompatActivity; import android.os.Bundle; import android.util.Log; import android.view.View; import android.widget.AdapterView; import android.widget.ListView; import java.util.ArrayList; import java.util.List; public class MainActivity extends AppCompatActivity { private List<Bean> data = new ArrayList<>(); @Override protected void onCreate(Bundle savedInstanceState) { super.onCreate(savedInstanceState); setContentView(R.layout.activity_main); // 往data中添加100条数据 for (int i = 0; i < 100; i++) { Bean bean = new Bean(); bean.setName("学生" + i); data.add(bean); } ListView listView = findViewById(R.id.lv); // 通过adapter来配置ListView中的内容 listView.setAdapter(new MyAdapter(data,this)); // 可以设置item的点击监听事件 listView.setOnItemClickListener(new AdapterView.OnItemClickListener() { @Override public void onItemClick(AdapterView<?> adapterView, View view, int i, long l) { Log.e("TAG","setOnItemClickListener被调用"); } }); } }- 1
- 2
- 3
- 4
- 5
- 6
- 7
- 8
- 9
- 10
- 11
- 12
- 13
- 14
- 15
- 16
- 17
- 18
- 19
- 20
- 21
- 22
- 23
- 24
- 25
- 26
- 27
- 28
- 29
- 30
- 31
- 32
- 33
- 34
- 35
- 36
- 37
- 38
- 39
- 40
- 41
- 42
- 43
- 44
list_item.xml:每一个list的元素布局。
<LinearLayout xmlns:android="http://schemas.android.com/apk/res/android" android:layout_width="match_parent" android:layout_height="match_parent" android:orientation="vertical" > <TextView android:id="@+id/tv" android:textSize="30dp" android:layout_width="wrap_content" android:layout_height="wrap_content"/> LinearLayout>- 1
- 2
- 3
- 4
- 5
- 6
- 7
- 8
- 9
- 10
- 11
- 12
- 13
- 14
Bean:存放数据的实体类。
package com.example.mydesssc; public class Bean { String name; public String getName() { return name; } public void setName(String name) { this.name = name; } }- 1
- 2
- 3
- 4
- 5
- 6
- 7
- 8
- 9
- 10
- 11
- 12
- 13
- 14
MyAdapter:配置listview的adapter。
- 创建listview的一个自定义adapter只需要继承BaseAdapter就可以。
package com.example.mydesssc; import android.content.Context; import android.util.Log; import android.view.LayoutInflater; import android.view.View; import android.view.ViewGroup; import android.widget.BaseAdapter; import android.widget.TextView; import androidx.recyclerview.widget.RecyclerView; import java.util.List; public class MyAdapter extends BaseAdapter { private List<Bean> data; private Context context; public MyAdapter(List<Bean> data, Context context) { this.data = data; this.context = context; } // 设置列表长度 @Override public int getCount() { // 有多少数据,其实就是长度 return data.size(); } @Override public Object getItem(int i) { return null; } @Override public long getItemId(int i) { return i; } // getView方法用来设置每一列的视图。 @Override public View getView(int position, View convertView, ViewGroup parent) { // 创建该类和对象的原因就是为了节省findViewById调用的时间,只需要调用一次存到类中即可。 ViewHolder viewHolder; // 只需要赋值一次就可以了 if (convertView == null){ viewHolder = new ViewHolder(); // 将list_item布局赋值给convertView convertView = LayoutInflater.from(context).inflate(R.layout.list_item, parent, false); viewHolder.textView = convertView.findViewById(R.id.tv); // 设置到convertView视图的tag中 convertView.setTag(viewHolder); } else { // 从tag中获取 viewHolder = (ViewHolder)convertView.getTag(); } // 设置TextView的文本,从data中获取。 viewHolder.textView.setText(data.get(position).getName()); Log.e("TAG","经过getView方法"); // 最后直接返回该视图就可以了。 return convertView; } // 可以设置一个类专门存放控件 private final class ViewHolder{ TextView textView; } }- 1
- 2
- 3
- 4
- 5
- 6
- 7
- 8
- 9
- 10
- 11
- 12
- 13
- 14
- 15
- 16
- 17
- 18
- 19
- 20
- 21
- 22
- 23
- 24
- 25
- 26
- 27
- 28
- 29
- 30
- 31
- 32
- 33
- 34
- 35
- 36
- 37
- 38
- 39
- 40
- 41
- 42
- 43
- 44
- 45
- 46
- 47
- 48
- 49
- 50
- 51
- 52
- 53
- 54
- 55
- 56
- 57
- 58
- 59
- 60
- 61
- 62
- 63
- 64
- 65
- 66
- 67
- 68
- 69
- 70
- 71
- 72
- 73
- 74
- 75
- 76
- 77
效果如下:

2. RecyclerView 的 使用 (推荐)
RecyclerView比ListView更加灵活,可以设置很多样式。
- 例如:线性布局、网格布局、交错网格布局(瀑布流)等。
添加RecyclerView的依赖包:
// 添加RecyclerView的依赖包 implementation 'androidx.recyclerview:recyclerview:1.1.0'- 1
- 2

示例代码:
activity_main.xml
<LinearLayout xmlns:android="http://schemas.android.com/apk/res/android" android:orientation="vertical" android:layout_width="match_parent" android:layout_height="match_parent"> <androidx.recyclerview.widget.RecyclerView android:id="@+id/rv" android:layout_width="match_parent" android:layout_height="match_parent" /> LinearLayout>- 1
- 2
- 3
- 4
- 5
- 6
- 7
- 8
- 9
- 10
- 11
- 12
recyclerview_item.xml:RecyclerView对象中的item。
<LinearLayout xmlns:android="http://schemas.android.com/apk/res/android" android:layout_width="match_parent" android:layout_height="match_parent" android:orientation="vertical" > <TextView android:id="@+id/tv" android:textSize="30dp" android:layout_width="wrap_content" android:layout_height="wrap_content"/> LinearLayout>- 1
- 2
- 3
- 4
- 5
- 6
- 7
- 8
- 9
- 10
- 11
- 12
- 13
- 14
Bean:
package com.example.demo01; public class Bean { String name; public String getName() { return name; } public void setName(String name) { this.name = name; } }- 1
- 2
- 3
- 4
- 5
- 6
- 7
- 8
- 9
- 10
- 11
- 12
- 13
- 14
- 15
**MainActivity: **
- 注意与adapter的相互操作。
package com.example.demo01; import androidx.appcompat.app.AppCompatActivity; import androidx.recyclerview.widget.GridLayoutManager; import androidx.recyclerview.widget.LinearLayoutManager; import androidx.recyclerview.widget.RecyclerView; import androidx.recyclerview.widget.StaggeredGridLayoutManager; import android.nfc.Tag; import android.os.Bundle; import android.util.Log; import android.view.MotionEvent; import android.view.View; import android.widget.Button; import android.widget.EditText; import android.widget.LinearLayout; import android.widget.TextView; import java.util.ArrayList; import java.util.List; public class MainActivity extends AppCompatActivity { public static final String TAG = "TAG"; private List<Bean> data = new ArrayList<>(); @Override protected void onCreate(Bundle savedInstanceState) { super.onCreate(savedInstanceState); setContentView(R.layout.activity_main); // 创造1000个假数据 for (int i = 9000; i < 11000; i++) { if (i % 4 != 0){ continue; } Bean bean = new Bean(); bean.setName(TAG + i); data.add(bean); } // 获取RecyclerView对象 RecyclerView recyclerview = findViewById(R.id.rv); // 设置RecyclerView的线性布局 , LinearLayoutManager英文直译是线性布局管理器。 // LinearLayoutManager linearLayoutManager = new LinearLayoutManager(this); // recyclerview.setLayoutManager(linearLayoutManager); // 设置RecyclerView的网格布局 , GridLayoutManager英文直译是网格布局管理器。 // GridLayoutManager gridLayoutManager = new GridLayoutManager(this, 3); // recyclerview.setLayoutManager(gridLayoutManager); // 设置RecyclerView的交错网格布局(也就是瀑布流方式) StaggeredGridLayoutManager staggeredGridLayoutManager = new StaggeredGridLayoutManager(3, StaggeredGridLayoutManager.VERTICAL); recyclerview.setLayoutManager(staggeredGridLayoutManager); // 设置adapter MyAdapter myAdapter = new MyAdapter(data, this); recyclerview.setAdapter(myAdapter); // RecyclerView本身并没有点击事件。 // 但是可以在myAdapter中自定义一个点击事件,并且通过匿名对象来设置监听内容。 myAdapter.setRecyclerItemClickListener(new MyAdapter.OnRecyclerItemClickListener() { @Override public void onRecyclerItemCLick(int position) { Log.e("TAG","onRecyclerItemCLick事件被调用。position:" + position); } }); } }- 1
- 2
- 3
- 4
- 5
- 6
- 7
- 8
- 9
- 10
- 11
- 12
- 13
- 14
- 15
- 16
- 17
- 18
- 19
- 20
- 21
- 22
- 23
- 24
- 25
- 26
- 27
- 28
- 29
- 30
- 31
- 32
- 33
- 34
- 35
- 36
- 37
- 38
- 39
- 40
- 41
- 42
- 43
- 44
- 45
- 46
- 47
- 48
- 49
- 50
- 51
- 52
- 53
- 54
- 55
- 56
- 57
- 58
- 59
- 60
- 61
- 62
- 63
- 64
- 65
- 66
- 67
- 68
- 69
- 70
- 71
- 72
- 73
- 74
MyAdapter:适配器配置很重要!!
package com.example.demo01; import android.content.Context; import android.view.View; import android.view.ViewGroup; import android.widget.TextView; import androidx.annotation.NonNull; import androidx.recyclerview.widget.RecyclerView; import java.util.List; /** * 此处继承RecyclerView的RecyclerView.Adapter,并且还需要配置Holder类泛型,其实就是为了要走holder这种形式。 * 并且泛型要求必须继承RecyclerView.ViewHolder */ public class MyAdapter extends RecyclerView.Adapter<MyAdapter.MyViewHolder> { private List<Bean> data; private Context context; public MyAdapter(List<Bean> data, Context context) { this.data = data; this.context = context; } // onCreateViewHolder方法作用:只需要创建RecyclerView的item视图 @NonNull @Override public MyViewHolder onCreateViewHolder(@NonNull ViewGroup parent, int viewType) { // 通过View.inflate方法获取到context(也就是传入的this),进而创建出recyclerview_item布局视图对象。 View view = View.inflate(context,R.layout.recyclerview_item,null); // 这样返回一个MyViewHolder对象,并传入view对象即可。 return new MyViewHolder(view); } // onBindViewHolder方法作用:绑定数据。 @Override public void onBindViewHolder(@NonNull MyViewHolder holder, int position) { // holder就是上面创建的holder对象,position就是索引。 // 这样就可以在这里设置数据了。 holder.tv.setText(data.get(position).getName()); } // 获取RecyclerView的item个数(也就是总共多少个)。 @Override public int getItemCount() { // 为空要设置为0 return data == null ? 0 : data.size(); } // 上面泛型要求必须继承RecyclerView.ViewHolder public class MyViewHolder extends RecyclerView.ViewHolder{ private TextView tv; public MyViewHolder(@NonNull View itemView) { super(itemView); // 上面函数构造传入的view对象,在这就可以获取操作了。 tv = itemView.findViewById(R.id.tv); // 给itemView布局添加点击事件 itemView.setOnClickListener(new View.OnClickListener() { @Override public void onClick(View view) { if (mOnItemClickListener != null){ // getAdapterPosition()方法:获取position,可以理解为index索引。 mOnItemClickListener.onRecyclerItemCLick(getAdapterPosition()); } } }); } } // 以下用于映射到点击事件上面,这样外面使用MyAdapter对象的时候,只需要通过匿名对象形式创建赋值mOnItemClickListener,并且自定义事件内容即可。 private OnRecyclerItemClickListener mOnItemClickListener; public void setRecyclerItemClickListener(OnRecyclerItemClickListener listener){ mOnItemClickListener = listener; } public interface OnRecyclerItemClickListener{ void onRecyclerItemCLick(int position); } }- 1
- 2
- 3
- 4
- 5
- 6
- 7
- 8
- 9
- 10
- 11
- 12
- 13
- 14
- 15
- 16
- 17
- 18
- 19
- 20
- 21
- 22
- 23
- 24
- 25
- 26
- 27
- 28
- 29
- 30
- 31
- 32
- 33
- 34
- 35
- 36
- 37
- 38
- 39
- 40
- 41
- 42
- 43
- 44
- 45
- 46
- 47
- 48
- 49
- 50
- 51
- 52
- 53
- 54
- 55
- 56
- 57
- 58
- 59
- 60
- 61
- 62
- 63
- 64
- 65
- 66
- 67
- 68
- 69
- 70
- 71
- 72
- 73
- 74
- 75
- 76
- 77
- 78
- 79
- 80
- 81
- 82
- 83
- 84
- 85
- 86
- 87
- 88
- 89
- 90
3. 动画
动画类型:逐帧动画(也叫帧动画)、补间动画、属性动画。
3.1 逐帧动画
帧动画的效果就是图片不断的切换,形成的一个动画效果。
animation-list是作为drawable存在的。因此创建的文件必须在drawable下。
drawable的animation-list的定义:

<RelativeLayout xmlns:android="http://schemas.android.com/apk/res/android" android:layout_width="match_parent" android:layout_height="match_parent" android:background="@drawable/frame"> RelativeLayout>- 1
- 2
- 3
- 4
- 5
- 6
- 7
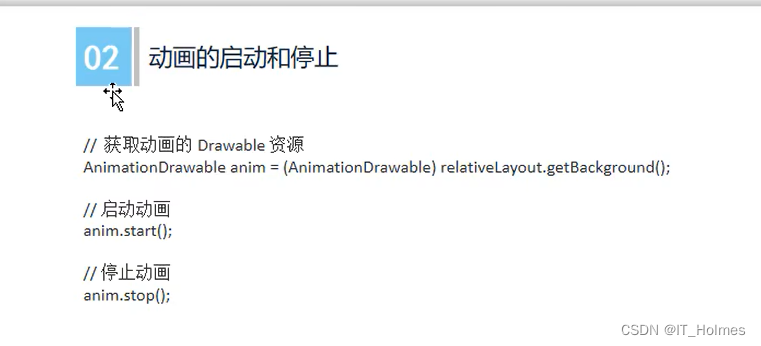
帧动画的启动和停止:

3.2 补间动画
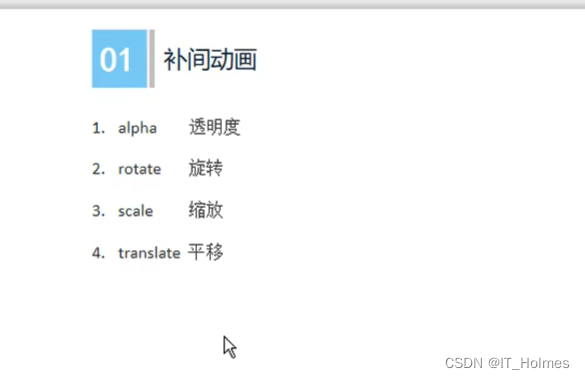
补间动画的属性如下:
3.2.1 补间动画 之 alpha透明度
alpha的透明度动画配置:
- 创建一个anim目录,在该目录下面创建一个alpha.xml。
alpha.xml
<set xmlns:android="http://schemas.android.com/apk/res/android"> <alpha android:fromAlpha="0" android:toAlpha="1" android:duration="2000" /> set>- 1
- 2
- 3
- 4
- 5
- 6
- 7
- 8
- 9
- 10
- 11
activity_main.xml:
- 给imageView图片实现一个从透明显示出来的一个效果。
<RelativeLayout xmlns:android="http://schemas.android.com/apk/res/android" android:layout_width="match_parent" android:layout_height="match_parent"> <ImageView android:id="@+id/iv" android:layout_width="wrap_content" android:layout_height="wrap_content" android:layout_centerInParent="true" android:adjustViewBounds="true" android:maxWidth="300dp" android:maxHeight="300dp" android:src="@drawable/logo" /> RelativeLayout>- 1
- 2
- 3
- 4
- 5
- 6
- 7
- 8
- 9
- 10
- 11
- 12
- 13
- 14
- 15
- 16
- 17
MainActivity:
- 配置动画相关。
package com.example.demo01; import androidx.appcompat.app.AppCompatActivity; import androidx.recyclerview.widget.GridLayoutManager; import androidx.recyclerview.widget.LinearLayoutManager; import androidx.recyclerview.widget.RecyclerView; import androidx.recyclerview.widget.StaggeredGridLayoutManager; import android.nfc.Tag; import android.os.Bundle; import android.util.Log; import android.view.MotionEvent; import android.view.View; import android.view.animation.Animation; import android.view.animation.AnimationUtils; import android.widget.Button; import android.widget.EditText; import android.widget.ImageView; import android.widget.LinearLayout; import android.widget.TextView; import java.util.ArrayList; import java.util.List; public class MainActivity extends AppCompatActivity { public static final String TAG = "TAG"; private List<Bean> data = new ArrayList<>(); @Override protected void onCreate(Bundle savedInstanceState) { super.onCreate(savedInstanceState); setContentView(R.layout.activity_main); ImageView imageView = findViewById(R.id.iv); imageView.setOnClickListener(new View.OnClickListener() { @Override public void onClick(View view) { // 相当于根据alpha.xml动画设置文件创建了一个Animation对象 Animation animation = AnimationUtils.loadAnimation(MainActivity.this, R.anim.alpha); // 对imageView开始动画 imageView.startAnimation(animation); } }); } }- 1
- 2
- 3
- 4
- 5
- 6
- 7
- 8
- 9
- 10
- 11
- 12
- 13
- 14
- 15
- 16
- 17
- 18
- 19
- 20
- 21
- 22
- 23
- 24
- 25
- 26
- 27
- 28
- 29
- 30
- 31
- 32
- 33
- 34
- 35
- 36
- 37
- 38
- 39
- 40
- 41
- 42
- 43
- 44
- 45
- 46
- 47
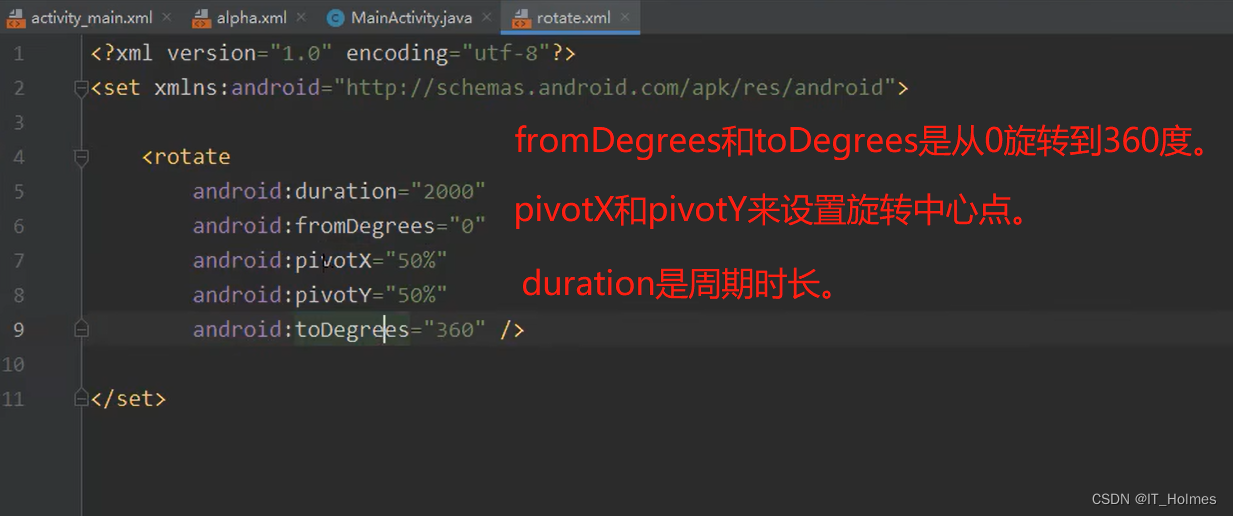
3.2.2 补间动画 之 rotate旋转
与上面相同的一顿操作。只不过配置变成了rotate。
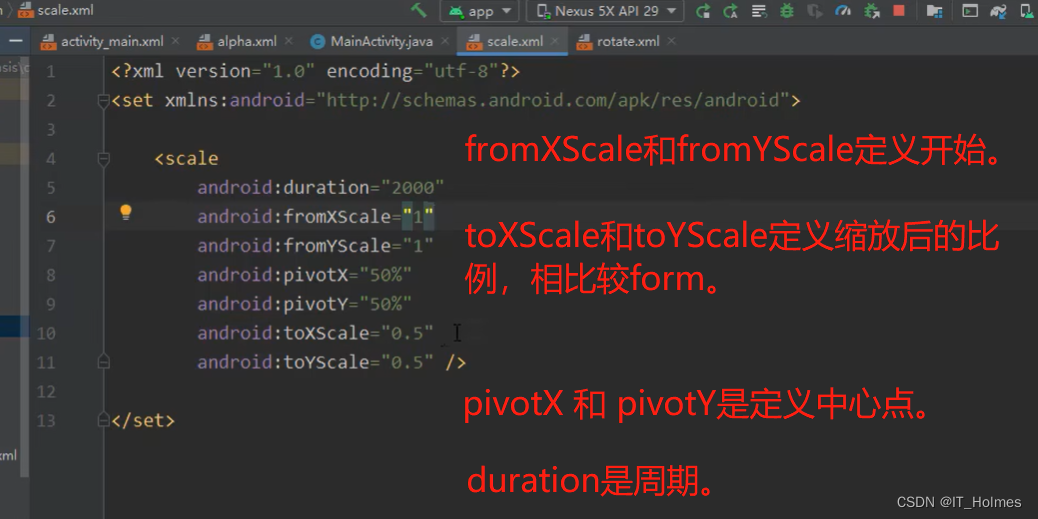
3.2.3 补间动画 之 scale(缩放)
与上面相同的一顿操作。只不过配置变成了scale。
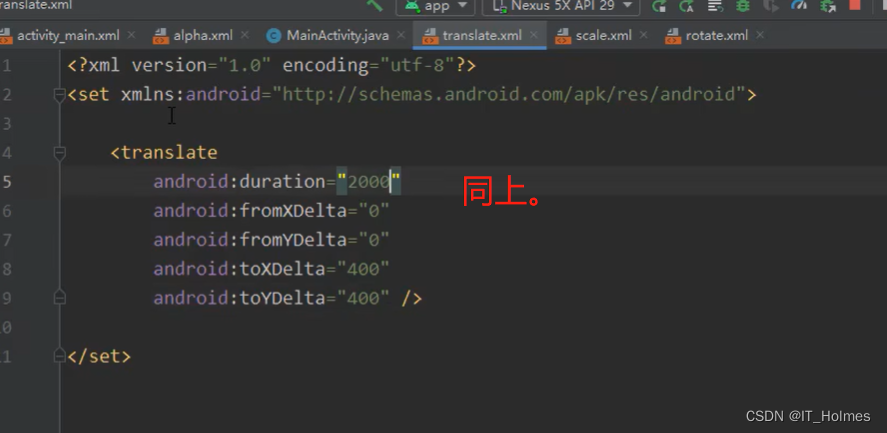
3.2.3 补间动画 之 translate(平移)
3.3 属性动画
属性动画主要依从几个方法。
ValueAnimator方法:针对属性值进行操作。
@Override protected void onCreate(Bundle savedInstanceState) { super.onCreate(savedInstanceState); setContentView(R.layout.activity_main); // 针对valueAnimator属性值操作 ValueAnimator valueAnimator = ValueAnimator.ofFloat(0f, 1f); valueAnimator.setDuration(2000); valueAnimator.addUpdateListener(new ValueAnimator.AnimatorUpdateListener() { @Override public void onAnimationUpdate(ValueAnimator valueAnimator) { float animatedValue = (float) valueAnimator.getAnimatedValue(); Log.e("itholmes","animatedValue:" + animatedValue); } }); }- 1
- 2
- 3
- 4
- 5
- 6
- 7
- 8
- 9
- 10
- 11
- 12
- 13
- 14
- 15
ObjectAnimator方法使用:针对某个object对象(控件对象)操作的动画属性操作。
ImageView imageView = findViewById(R.id.iv); // 修改imageView的动画的alpha属性 ObjectAnimator objectAnimator = ObjectAnimator.ofFloat(imageView, "alpha", 0f, 1f); objectAnimator.setDuration(4000); objectAnimator.start(); // 监听方式一:通过Animator.AnimatorListener方式必须都要实现方法。代码有点冗余。 objectAnimator.addListener(new Animator.AnimatorListener() { // 动画开始的时候调用 @Override public void onAnimationStart(Animator animator) { } // 动画结束的时候调用 @Override public void onAnimationEnd(Animator animator) { } // 动画被取消的时候调用 @Override public void onAnimationCancel(Animator animator) { } // 动画重复执行的时候调用 @Override public void onAnimationRepeat(Animator animator) { } }); // 监听方式二:通过AnimatorListenerAdapter对象的适配方式来调用也是可以的。而且更加更加方便,只需要重写固定方法即可。 objectAnimator.addListener(new AnimatorListenerAdapter() { @Override public void onAnimationStart(Animator animation) { super.onAnimationStart(animation); } });- 1
- 2
- 3
- 4
- 5
- 6
- 7
- 8
- 9
- 10
- 11
- 12
- 13
- 14
- 15
- 16
- 17
- 18
- 19
- 20
- 21
- 22
- 23
- 24
- 25
- 26
- 27
- 28
- 29
- 30
- 31
- 32
- 33
- 34
- 35
- 36
- 37
注意:不仅仅有ofFloat还有ofInt等等的。
4. 单位 和 尺寸
px 与 pt的区别:
- px:pixels(像素)。
- pt:point 一个标准的长度单位,1pt = 1/72 英寸 ,用于印刷业,非常简单易用。
dp 与 sp的作用:
- dp:就是dip,device independent pixels(设备独立像素)。不同设备有不同的显示效果,就是
在不同的手机上面的显示效果。 - sp:scaled pixels(放大像素),主要
用于字体大小设置。显示best for textsize。
LayoutParams相当于一个Layout的信息包,它封装了Layout的位置、高、宽等信息。
// 创建一个LinearLayout对象 LinearLayout linearLayout = new LinearLayout(this); // 设置一个宽高效果 LinearLayout.LayoutParams layoutParams = new LinearLayout.LayoutParams(ViewGroup.LayoutParams.MATCH_PARENT, 500); // 方式一:进而给linearLayout对象设置上。 // linearLayout.setLayoutParams(layoutParams); // 方式二:通过setContentView方法设置主体内容和params的参数。 setContentView(linearLayout,layoutParams); TextView textView = new TextView(this); textView.setText("我是文本"); textView.setBackgroundColor(0xffff00); LinearLayout.LayoutParams textParams = new LinearLayout.LayoutParams(300, 300); // 方式一: // textView.setLayoutParams(textParams); // linearLayout.addView(textView); // 方式二: // 可以通过addView方法给textView赋予textParams的参数 linearLayout.addView(textView,textParams);- 1
- 2
- 3
- 4
- 5
- 6
- 7
- 8
- 9
- 10
- 11
- 12
- 13
- 14
- 15
- 16
- 17
- 18
- 19
- 20
- 21
- 22
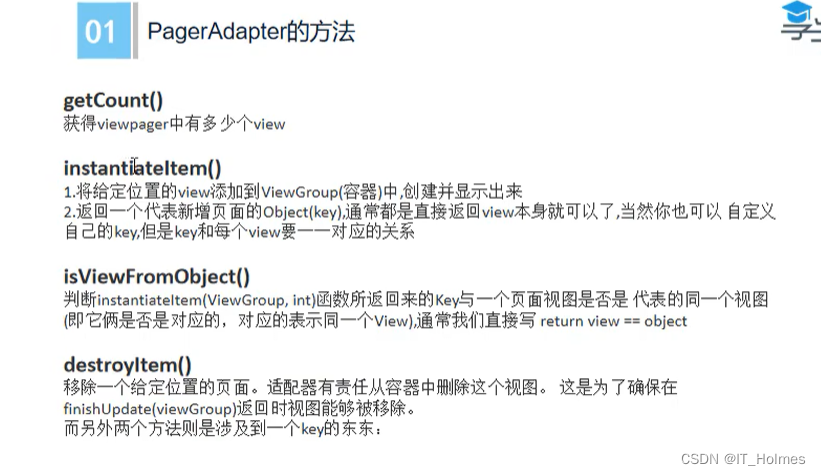
5. ViewPager 的使用
activity_main.xml
<LinearLayout xmlns:android="http://schemas.android.com/apk/res/android" android:layout_width="match_parent" android:layout_height="match_parent" android:orientation="vertical" > <androidx.viewpager.widget.ViewPager android:id="@+id/vp" android:layout_width="match_parent" android:layout_height="match_parent" /> LinearLayout>- 1
- 2
- 3
- 4
- 5
- 6
- 7
- 8
- 9
- 10
- 11
- 12
- 13
三个layout的页面:
layout1.xml
<LinearLayout xmlns:android="http://schemas.android.com/apk/res/android" android:layout_height="match_parent" android:layout_width="match_parent" android:orientation="vertical" > <TextView android:text="layout1" android:textSize="30sp" android:layout_width="wrap_content" android:layout_height="wrap_content" /> LinearLayout>- 1
- 2
- 3
- 4
- 5
- 6
- 7
- 8
- 9
- 10
- 11
- 12
- 13
- 14
layout2.xml
<LinearLayout xmlns:android="http://schemas.android.com/apk/res/android" android:layout_height="match_parent" android:layout_width="match_parent" android:background="#ff00ff00" android:orientation="vertical" > <TextView android:text="layout2" android:textSize="30sp" android:layout_width="wrap_content" android:layout_height="wrap_content" /> LinearLayout>- 1
- 2
- 3
- 4
- 5
- 6
- 7
- 8
- 9
- 10
- 11
- 12
- 13
- 14
- 15
layout3.xml
<LinearLayout xmlns:android="http://schemas.android.com/apk/res/android" android:layout_height="match_parent" android:layout_width="match_parent" android:background="#ffffff00" android:orientation="vertical" > <TextView android:text="layout3" android:textSize="30sp" android:layout_width="wrap_content" android:layout_height="wrap_content" /> LinearLayout>- 1
- 2
- 3
- 4
- 5
- 6
- 7
- 8
- 9
- 10
- 11
- 12
- 13
- 14
- 15
MyAdapter
- 定义适配器。
package com.example.mynotification; import android.view.View; import android.view.ViewGroup; import androidx.annotation.NonNull; import androidx.viewpager.widget.PagerAdapter; import java.util.List; public class MyAdapter extends PagerAdapter { private List<View> mListView; public MyAdapter(List<View> mListView) { this.mListView = mListView; } @NonNull @Override public Object instantiateItem(@NonNull ViewGroup container, int position) { container.addView(mListView.get(position)); return mListView.get(position); } @Override public int getCount() { return mListView.size(); } @Override public boolean isViewFromObject(@NonNull View view, @NonNull Object object) { // 判断是否相等 return view == object; } @Override public void destroyItem(@NonNull ViewGroup container, int position, @NonNull Object object) { container.removeView(mListView.get(position)); } }- 1
- 2
- 3
- 4
- 5
- 6
- 7
- 8
- 9
- 10
- 11
- 12
- 13
- 14
- 15
- 16
- 17
- 18
- 19
- 20
- 21
- 22
- 23
- 24
- 25
- 26
- 27
- 28
- 29
- 30
- 31
- 32
- 33
- 34
- 35
- 36
- 37
- 38
- 39
- 40
- 41
- 42
MainActivity
package com.example.mynotification; import androidx.appcompat.app.AppCompatActivity; import androidx.core.app.NotificationCompat; import androidx.viewpager.widget.ViewPager; import android.app.Notification; import android.app.NotificationChannel; import android.app.NotificationManager; import android.app.PendingIntent; import android.content.Intent; import android.graphics.BitmapFactory; import android.graphics.Color; import android.os.Build; import android.os.Bundle; import android.view.LayoutInflater; import android.view.View; import java.util.ArrayList; import java.util.List; public class MainActivity extends AppCompatActivity { @Override protected void onCreate(Bundle savedInstanceState) { super.onCreate(savedInstanceState); setContentView(R.layout.activity_main); LayoutInflater lf = getLayoutInflater().from(this); View view1 = lf.inflate(R.layout.layout1, null); View view2 = lf.inflate(R.layout.layout2, null); View view3 = lf.inflate(R.layout.layout3, null); List<View> viewList = new ArrayList<>(); viewList.add(view1); viewList.add(view2); viewList.add(view3); ViewPager viewPager = findViewById(R.id.vp); // 将上面的多个布局赋值给adapter中 MyAdapter myAdapter = new MyAdapter(viewList); // 设置好adapter viewPager.setAdapter(myAdapter); } }- 1
- 2
- 3
- 4
- 5
- 6
- 7
- 8
- 9
- 10
- 11
- 12
- 13
- 14
- 15
- 16
- 17
- 18
- 19
- 20
- 21
- 22
- 23
- 24
- 25
- 26
- 27
- 28
- 29
- 30
- 31
- 32
- 33
- 34
- 35
- 36
- 37
- 38
- 39
- 40
- 41
- 42
- 43
- 44
- 45
- 46
- 47
6. Mvvm 项目架构
介绍一下MVP架构:
MVP的全称为Model-View-Presenter,Model提供数据,View负责显示,Controller/Presenter负责逻辑的处理。- 1
—
mvvm架构如下:

7. Fragment 的 基本使用 和 介绍
7.1 Fragment的 产生
对于平板电脑和手机,fragment都非常实用。

7.2 什么是Fragment?
fragment是像一个子activity,具备独立的生命周期。
fragment必须委托在activity中才能运行,fragment会随着对应的activity的生命周期开始结束,当然fragment自己也具有独立的开始结束周期。
7.3 Fragment的 使用方法
创建一个Fragment:
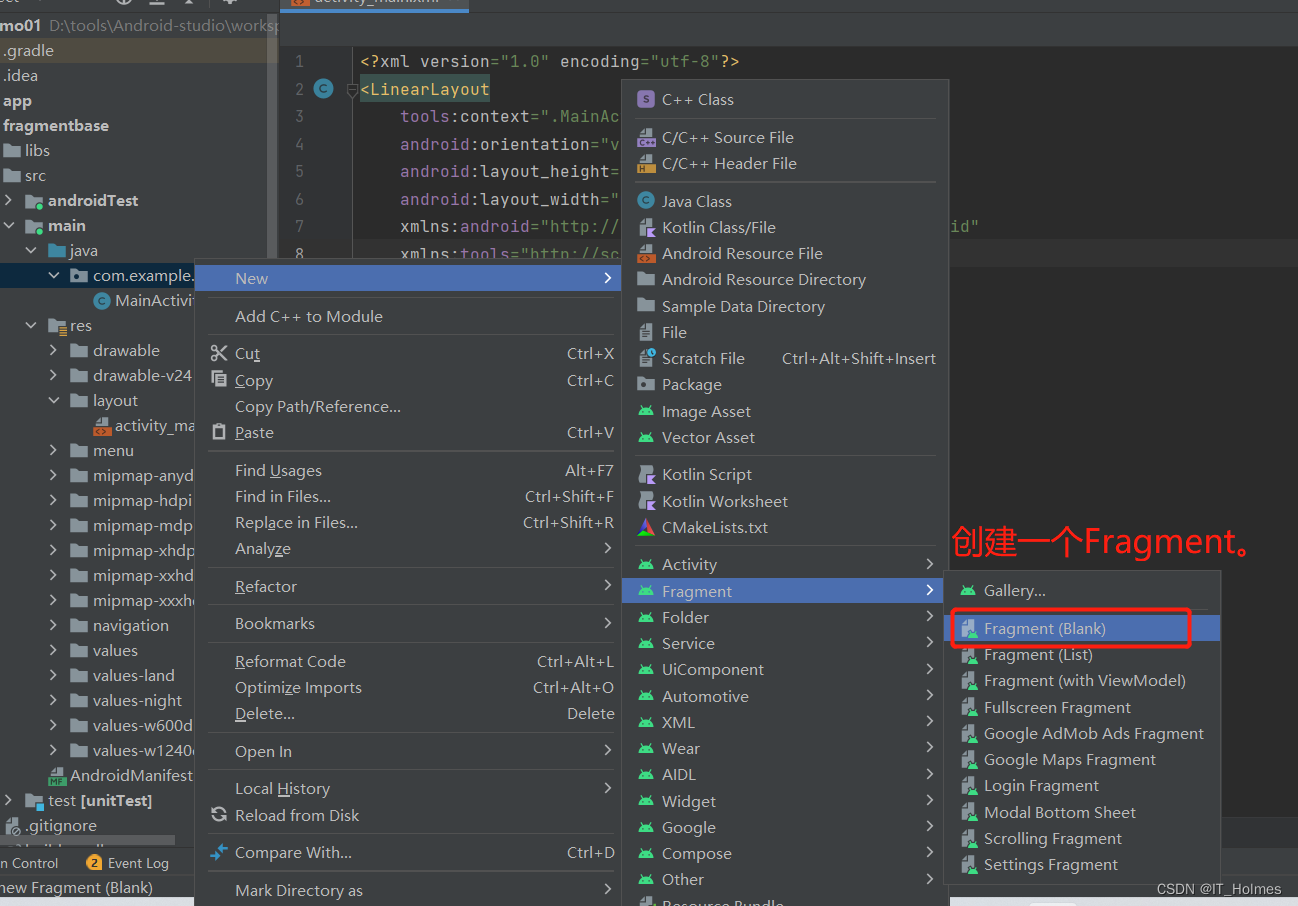
会自动创建一个fragment的类和fragment对应的xml文件。fragment_blank1.xml
<LinearLayout xmlns:android="http://schemas.android.com/apk/res/android" xmlns:tools="http://schemas.android.com/tools" android:layout_width="match_parent" android:layout_height="match_parent" android:orientation="vertical" tools:context=".BlankFragment1"> <TextView android:id="@+id/textview" android:layout_width="match_parent" android:layout_height="40dp" android:text="@string/hello_blank_fragment" /> <Button android:layout_width="match_parent" android:layout_height="40dp" android:text="你好吗" android:id="@+id/btn" /> LinearLayout>- 1
- 2
- 3
- 4
- 5
- 6
- 7
- 8
- 9
- 10
- 11
- 12
- 13
- 14
- 15
- 16
- 17
- 18
- 19
- 20
- 21
- 22
BlankFragment1
package com.example.fragmentbase; import android.os.Bundle; import androidx.fragment.app.Fragment; import android.view.LayoutInflater; import android.view.View; import android.view.ViewGroup; import android.widget.Button; import android.widget.TextView; public class BlankFragment1 extends Fragment { private View root; private TextView textView; private Button button; @Override public void onCreate(Bundle savedInstanceState) { super.onCreate(savedInstanceState); } @Override public View onCreateView(LayoutInflater inflater, ViewGroup container, Bundle savedInstanceState) { if (root == null){ // 通过inflater来定义好root root = inflater.inflate(R.layout.fragment_blank1, container, false); } // 可以直接通过root来操作fragment里面的内容 textView = root.findViewById(R.id.textview); button = root.findViewById(R.id.btn); button.setOnClickListener(new View.OnClickListener() { @Override public void onClick(View view) { textView.setText("你好世界!!!!!!"); } }); return root; } }- 1
- 2
- 3
- 4
- 5
- 6
- 7
- 8
- 9
- 10
- 11
- 12
- 13
- 14
- 15
- 16
- 17
- 18
- 19
- 20
- 21
- 22
- 23
- 24
- 25
- 26
- 27
- 28
- 29
- 30
- 31
- 32
- 33
- 34
- 35
- 36
- 37
- 38
- 39
- 40
- 41
- 42
- 43
- 44
- 45
- 46
activity_main.xml
<LinearLayout tools:context=".MainActivity" android:orientation="vertical" android:layout_height="match_parent" android:layout_width="match_parent" xmlns:android="http://schemas.android.com/apk/res/android" xmlns:tools="http://schemas.android.com/tools"> <fragment android:id="@+id/fragment1" android:name="com.example.fragmentbase.BlankFragment1" android:layout_width="match_parent" android:layout_height="match_parent"/> LinearLayout>- 1
- 2
- 3
- 4
- 5
- 6
- 7
- 8
- 9
- 10
- 11
- 12
- 13
- 14
- 15
- 16
- 17
MainActivity
package com.example.fragmentbase; import android.os.Bundle; import androidx.appcompat.app.AppCompatActivity; public class MainActivity extends AppCompatActivity { @Override protected void onCreate(Bundle savedInstanceState) { super.onCreate(savedInstanceState); setContentView(R.layout.activity_main); } }- 1
- 2
- 3
- 4
- 5
- 6
- 7
- 8
- 9
- 10
- 11
- 12
- 13
-
相关阅读:
1.4_2 Axure RP 9 for mac 高保真原型图 - 案例1 【基础】模仿微信页面
[附源码]JAVA毕业设计婚纱摄影管理(系统+LW)
python报错系列(14)--Selenium support for PhantomJS has been deprecated
中国金属通报杂志中国金属通报杂志社中国金属通报编辑部2022年第4期目录
【数据结构】C语言实现队列
自定义ProjectSettings设置项
栈和队列(8.4)
linux网络初探
【ML】Numpy & Pandas的学习
神经网络算法的关键参数,神经网络的参数有哪些
- 原文地址:https://blog.csdn.net/IT_Holmes/article/details/127355153
