-
React 入门:组件的生命周期(旧)
理解组件生命周期
概念
组件的生命周期就是一个组件从添加到页面 DOM 中(挂载),到从页面中被移除(卸载)的一个过程。
作用
我们可以在组件生命周期(过程)中的某些关键时机或时间点进行编码处理一些我们自定义的业务逻辑,来帮助我们构建更复杂的功能应用。
生命周期中的这些关键时机或关键点,在日常开发中有以下几种称呼:
- 生命周期回调函数
- 生命周期钩子函数
- 生命周期函数
- 生命周期钩子
简单讲,它们都是同一个概念,就是 react 内部定义好的一些方法,供我们调用而已。
生命周期图谱(旧)
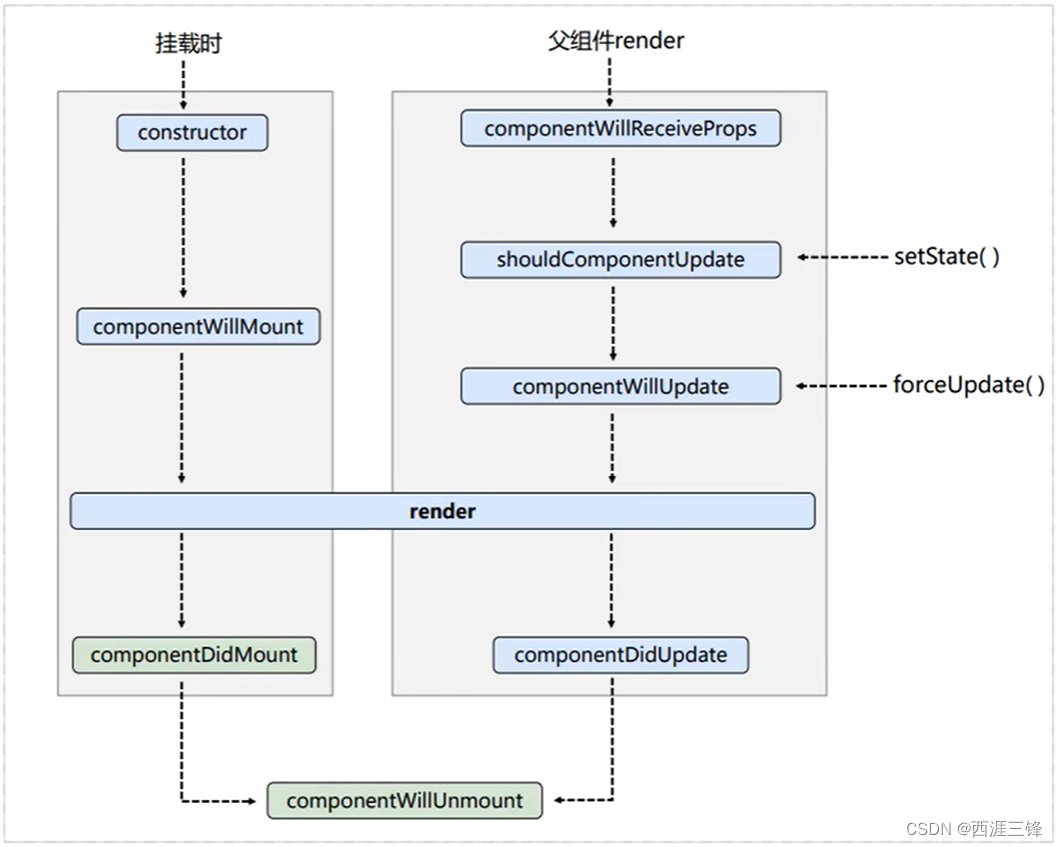
钩子函数介绍
生命周期有一些列钩子函数,他们的执行顺序,与代码中调用钩子函数的位置顺序无关。
constructor
组件在挂载之前,会调用构造函数 constructor。
componentWillMount
组件将要挂载时的钩子,也可以说是挂在前的钩子。
render(常用且必须)
render() 方法是 class 组件中唯一必须实现的方法。
在组件渲染时,和组件更新时都会调用该钩子。
componentDidMount(常用)
该钩子会在组件挂载后(插入 DOM 树中)立即调用。
一般在这个钩子中做一些初始化的事,例如:开启定时器、发送网络请求、订阅消息等。
shouldComponentUpdate
控制组件是否更新的钩子。通过 setState 更新状态是会触发这个钩子。
如果代码中使用了该钩子函数,那么必须设定返回值,否则会报错。返回值只能是 true 或 false:- 如果返回 true,表示允许更新,更新就是继续执行后面的生命周期,将本次更新的 state 数据渲染到组件界面上。
- 如果返回 false,表示不更新,那么就会中断执行后面的生命周期,组件界面上也不会有任何变化。
如果代码中没有使用该钩子,默认返回 true。
componentWillUpdate
组件更新前的钩子。
componentDidUpdate
该钩子会在更新后会被立即调用。首次渲染不会执行此方法。
componentWillUnmount(常用)
该钩子会在组件卸载及销毁之前直接调用。
一般在该钩子中执行必要的清理操作,例如,清除 timer,取消网络请求或清除在 componentDidMount() 中创建的订阅等。注意:componentWillUnmount() 中不应调用 setState(),因为该组件将永远不会重新渲染。
componentWillReceiveProps
该钩子会在已挂载的组件接收新的 props 之前被调用。
在挂载过程中,React 不会针对初始 props 调用 componentWillReceiveProps()。组件只会在组件的 props 更新时调用此方法。
生命周期三大阶段
初始化阶段
由 ReactDOM.render()触发,初次渲染。
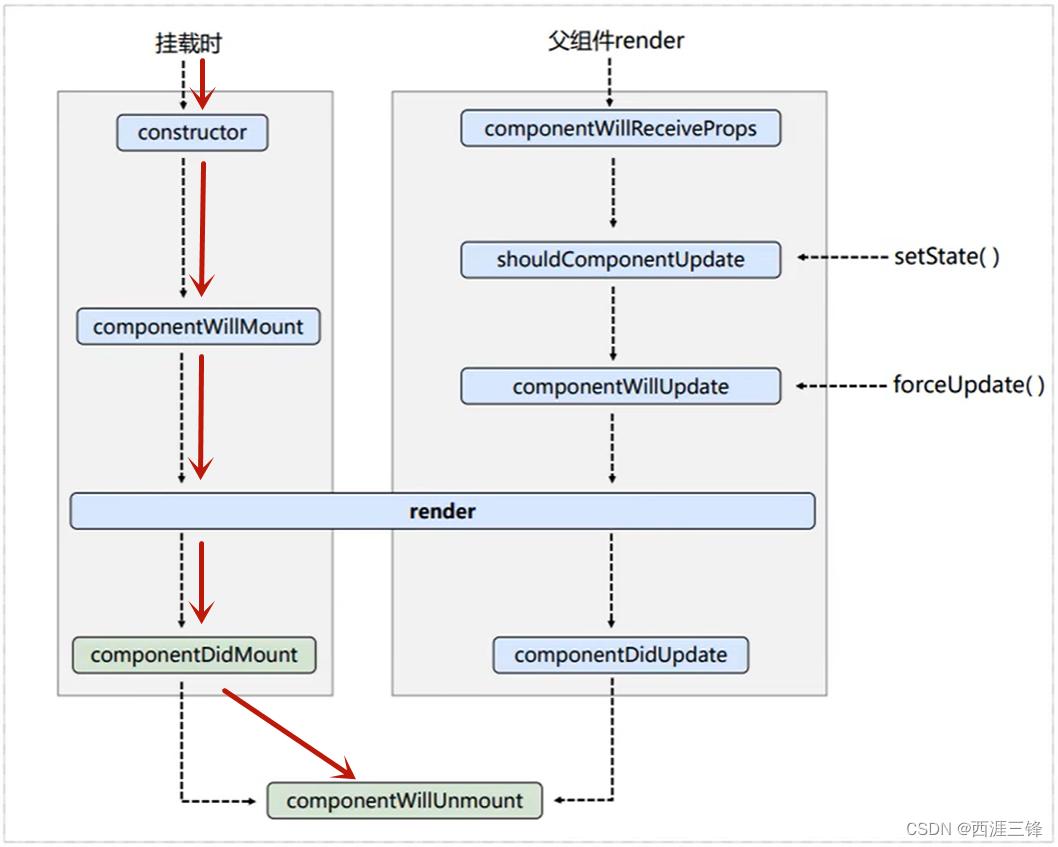
该阶段依次调用以下几个钩子函数:- constructor()
- componentWillMount()
- render()
- componentDidMount()
更新阶段
React 有 3 中触发组件更新的方式:
由组件内部
this.setState()触发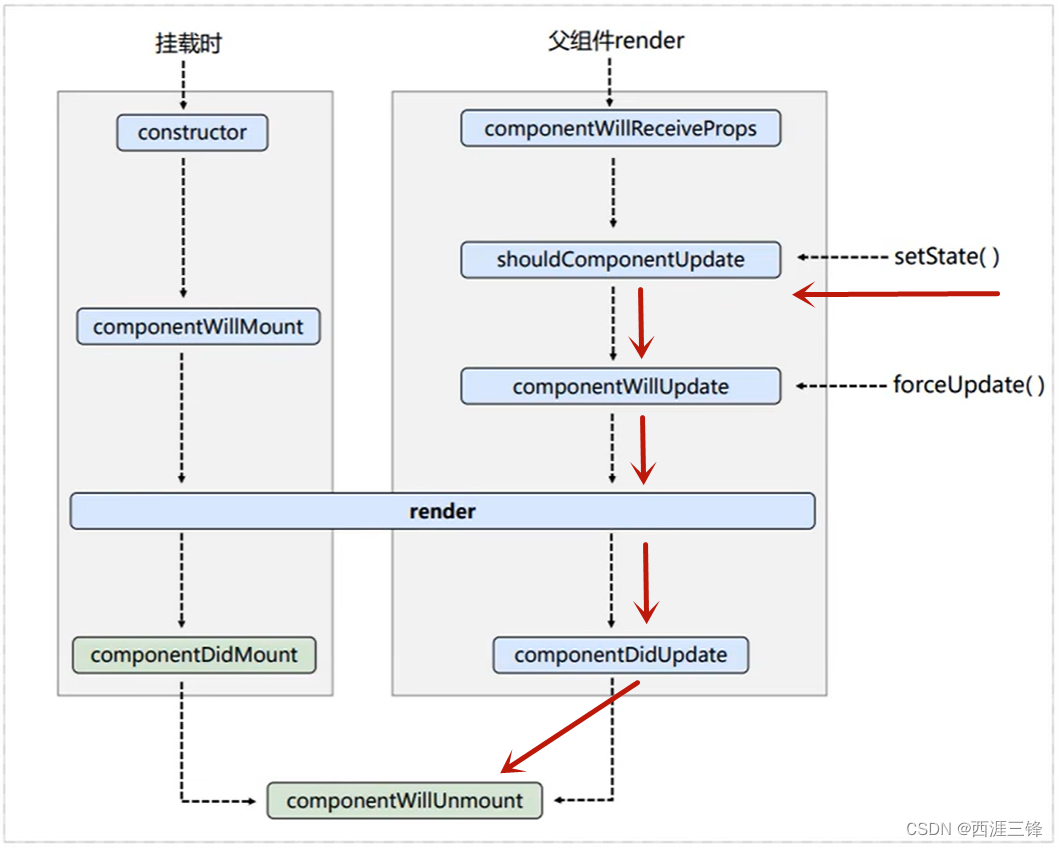
该阶段依次调用以下几个钩子函数:- shouldComponentUpdate()
- componentWillUpdate()
- render()
- componentDidUpdate()
由组件内部
this.forceUpdate()触发强制更新 forceUpdate 是指不更改任何状态中的数据,强制更新组件。
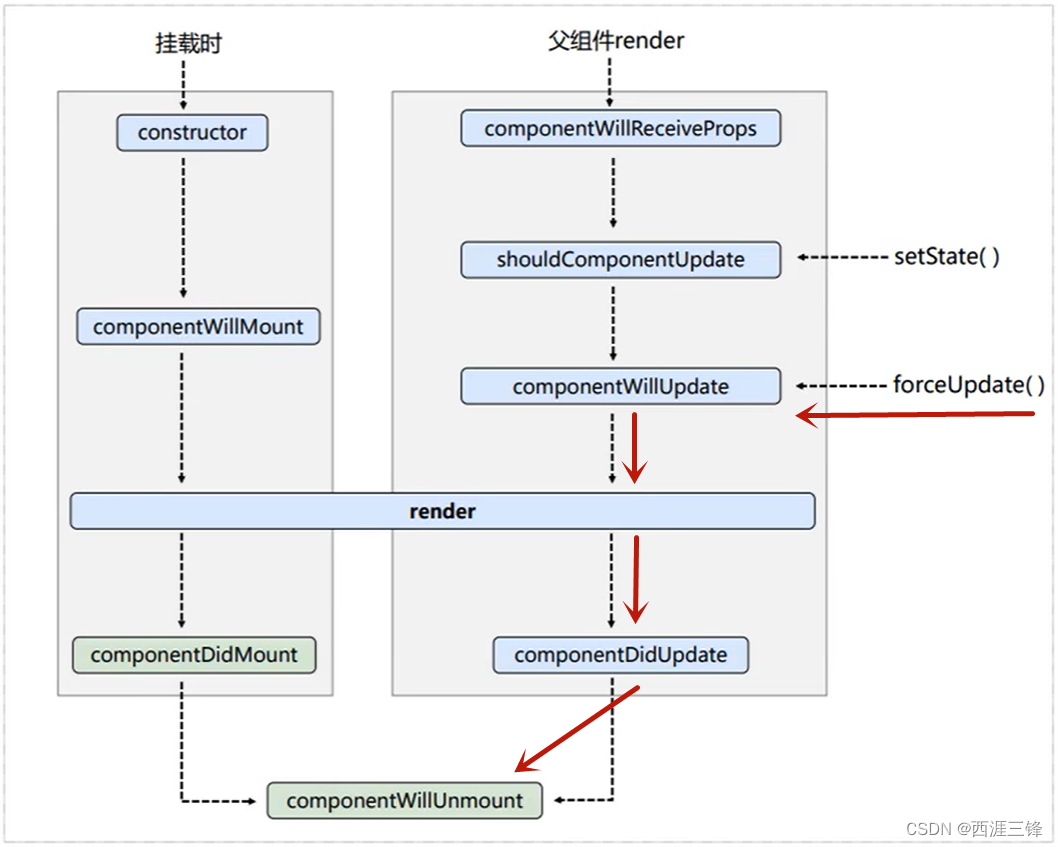
该阶段依次调用以下几个钩子函数:- componentWillUpdate()
- render()
- componentDidUpdate()
由父组件
render()触发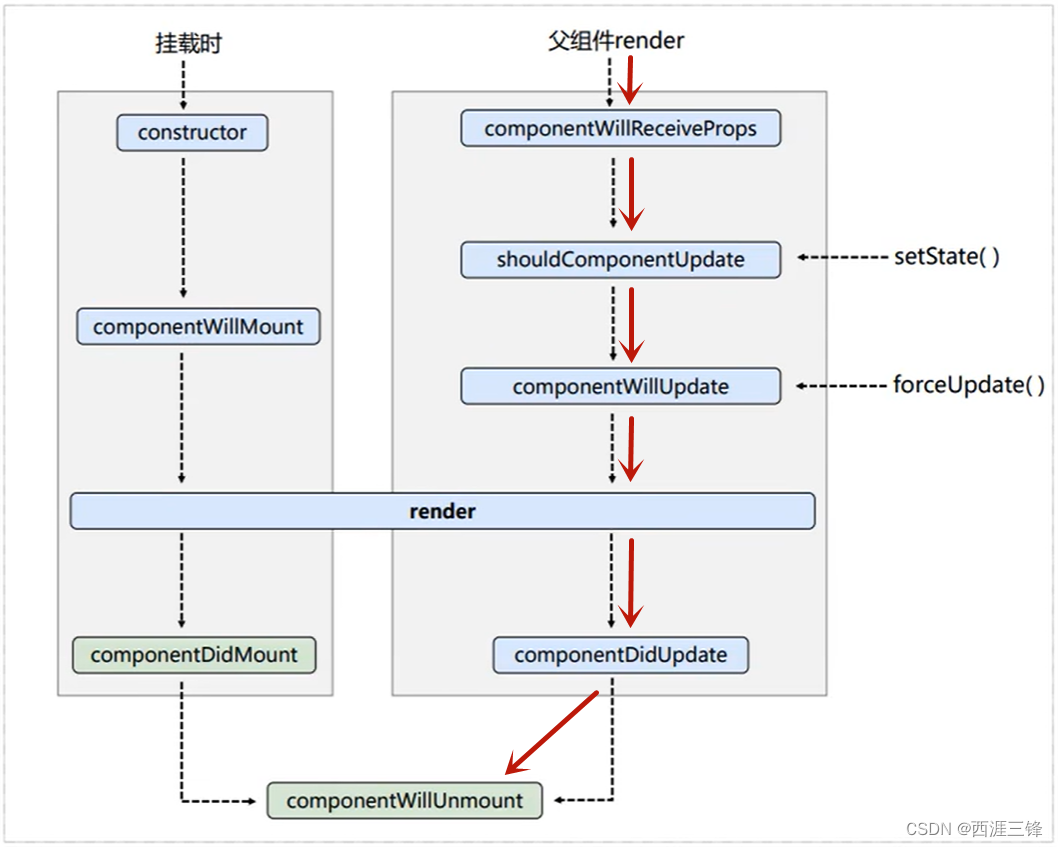
该阶段依次调用以下几个钩子函数:- componentWillReceiveProps()
- shouldComponentUpdate()
- componentWillUpdate()
- render()
- componentDidUpdate()
示例代码
基础生命周期钩子函数示例
<!DOCTYPE html> <html lang="en"> <head> <meta charset="UTF-8"> <title>引出生命周期</title> </head> <body> <!-- 准备好一个容器 --> <div id="app"></div> <!-- step01: 引入react核心库 --> <script type="text/javascript" src="../js/react.development.js"></script> <!-- step02: 引入react-dom,用于支持react操作DOM --> <script type="text/javascript" src="../js/react-dom.development.js"></script> <!-- step03: 引入babel,用于将jsx转为js --> <script type="text/javascript" src="../js/babel.min.js"></script> <script type="text/babel"> /* 此处一定要写babel */ // 1. 创建类式组件 class Countor extends React.Component { // 1、构造器 constructor(props) { console.log('Countor[1] -> constructor') super(props) this.state = { count: 0 } } // 2、组件将要挂载的钩子 componentWillMount() { console.log('Countor[2] -> componentWillMount') } // 3、render 钩子 render() { console.log('Countor[3] -> render ...') const { count } = this.state return ( <div> <h1>当前求和为{ count }</h1> <button onClick={this.add}>点我加1</button> <button onClick={this.unmountSelf}>卸载组件</button> <button onClick={this.force}>强制更新</button> </div> ) } // 4、组件挂载完毕的钩子 componentDidMount() { console.log('Countor[4] -> componentDidMount') } // 5、控制组件是否更新 shouldComponentUpdate() { console.log('Countor[5] -> shouldComponentUpdate') return true // 返回true执行更新,返回false不更新,不返回值报错,默认返回true } // 6、组件将要更新的钩子 componentWillUpdate() { console.log('Countor[6] -> componentWillUpdate') } // 7、组件更新完毕的钩子 componentDidUpdate() { console.log('Countor[7] -> componentDidUpdate') } // 99、组件将要被卸载时的钩子 componentWillUnmount() { console.log('Countor[99] -> componentWillUnmount') } // 执行count自加1 add = () => { let { count } = this.state count++ this.setState({count}) } // 执行强制更新 force = () => { this.forceUpdate() } // 卸载自己 unmountSelf = () => { ReactDOM.unmountComponentAtNode(document.getElementById('app')) } } // 渲染组件到页面 ReactDOM.render(<Countor />, document.getElementById('app')); </script> </body> </html>- 1
- 2
- 3
- 4
- 5
- 6
- 7
- 8
- 9
- 10
- 11
- 12
- 13
- 14
- 15
- 16
- 17
- 18
- 19
- 20
- 21
- 22
- 23
- 24
- 25
- 26
- 27
- 28
- 29
- 30
- 31
- 32
- 33
- 34
- 35
- 36
- 37
- 38
- 39
- 40
- 41
- 42
- 43
- 44
- 45
- 46
- 47
- 48
- 49
- 50
- 51
- 52
- 53
- 54
- 55
- 56
- 57
- 58
- 59
- 60
- 61
- 62
- 63
- 64
- 65
- 66
- 67
- 68
- 69
- 70
- 71
- 72
- 73
- 74
- 75
- 76
- 77
- 78
- 79
- 80
- 81
- 82
- 83
- 84
- 85
- 86
- 87
- 88
- 89
- 90
- 91
- 92
- 93
- 94
- 95
- 96
- 97
- 98
- 99
- 100
- 101
- 102
父组件
render()触发更新钩子函数示例<!DOCTYPE html> <html lang="en"> <head> <meta charset="UTF-8"> <title>引出生命周期</title> </head> <body> <!-- 准备好一个容器 --> <div id="app"></div> <!-- step01: 引入react核心库 --> <script type="text/javascript" src="../js/react.development.js"></script> <!-- step02: 引入react-dom,用于支持react操作DOM --> <script type="text/javascript" src="../js/react-dom.development.js"></script> <!-- step03: 引入babel,用于将jsx转为js --> <script type="text/javascript" src="../js/babel.min.js"></script> <script type="text/babel"> /* 此处一定要写babel */ /** * 下面代码演示组件继承关系,A组件为父组件,B为子组件 */ class A extends React.Component { state = { carName: '奔驰' } changCar = () => { this.setState({carName: '丰田'}) } render() { return ( <div> <h1>我是A组件</h1> <p><button onClick={this.changCar}>换车</button></p> <hr/> {/* 此处调用B组件 */} <B carName={this.state.carName} /> </div> ) } } class B extends React.Component { // 组件将要接收新的props的钩子,该钩子可接受参数props // [坑!!!] 挂载时(虽然传递渲染了props)不会执行该钩子,父组件非挂载时触发render才会执行该钩子 componentWillReceiveProps(props) { console.log('B[..] -> componentWillReceiveProps', props) } shouldComponentUpdate() { console.log('B[..] -> shouldComponentUpdate') return true } componentWillUpdate() { console.log('B[..] -> componentWillUpdate') } componentDidUpdate() { console.log('B[..] -> componentDidUpdate') } render() { console.log('B[..] -> render') return ( <div> <h2>我是B组件</h2> <p>当前汽车品牌:{this.props.carName}</p> </div> ) } } // 渲染组件到页面 ReactDOM.render(<A />, document.getElementById('app')); </script> </body> </html>- 1
- 2
- 3
- 4
- 5
- 6
- 7
- 8
- 9
- 10
- 11
- 12
- 13
- 14
- 15
- 16
- 17
- 18
- 19
- 20
- 21
- 22
- 23
- 24
- 25
- 26
- 27
- 28
- 29
- 30
- 31
- 32
- 33
- 34
- 35
- 36
- 37
- 38
- 39
- 40
- 41
- 42
- 43
- 44
- 45
- 46
- 47
- 48
- 49
- 50
- 51
- 52
- 53
- 54
- 55
- 56
- 57
- 58
- 59
- 60
- 61
- 62
- 63
- 64
- 65
- 66
- 67
- 68
- 69
- 70
- 71
- 72
- 73
- 74
- 75
- 76
- 77
- 78
- 79
- 80
- 81
- 82
- 83
了解组件的生命周期有助于我们实现一些精细化,和复杂的业务逻辑。
如果觉得理解困难,你不需要立马弄明白这些,不过随着你的不断学习和使用,它的参考价值会越来越高。 -
相关阅读:
Pycharm中没有显示miniconda刚创建好的Python2.7的测试环境
【Egg从基础到进阶】二:安装本地Mysql
阿桂天山的技术小结:Flask对Ztree树节点搜索定位
标准RBAC模型表设计
视觉检测程序开发笔记
MySQL-数据定义语言-DDLdatebase define language
动态数组【python】
java+python+nodejs+vue+php留守儿童帮扶网站
T31开发笔记:OTA升级
如何在Mysql取出来的结果中取最大值
- 原文地址:https://blog.csdn.net/assokoo123/article/details/127594660
