-
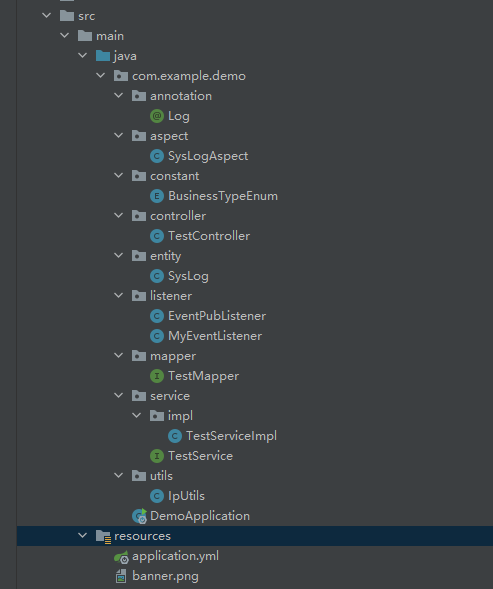
SpringBoot自定义注解+异步+观察者模式实现业务日志保存
一、前言
我们在企业级的开发中,必不可少的是对日志的记录,实现有很多种方式,常见的就是基于
AOP+注解进行保存,但是考虑到程序的流畅和效率,我们可以使用异步进行保存,小编最近在spring和springboot源码中看到有很多的监听处理贯穿前后:这就是著名的观察者模式!!二、基础环境
项目这里小编就不带大家创建了,直接开始!!
1. 导入依赖
小编这里的springboot版本是:
2.7.4<dependency> <groupId>org.projectlombokgroupId> <artifactId>lombokartifactId> <version>1.18.2version> dependency> <dependency> <groupId>org.springframework.bootgroupId> <artifactId>spring-boot-starter-aopartifactId> dependency> <dependency> <groupId>org.springframework.bootgroupId> <artifactId>spring-boot-starter-webartifactId> dependency> <dependency> <groupId>com.alibabagroupId> <artifactId>druid-spring-boot-starterartifactId> <version>1.1.16version> dependency> <dependency> <groupId>org.springframework.bootgroupId> <artifactId>spring-boot-starter-jdbcartifactId> dependency> <dependency> <groupId>mysqlgroupId> <artifactId>mysql-connector-javaartifactId> dependency> <dependency> <groupId>com.baomidougroupId> <artifactId>mybatis-plus-boot-starterartifactId> <version>3.5.1version> dependency>- 1
- 2
- 3
- 4
- 5
- 6
- 7
- 8
- 9
- 10
- 11
- 12
- 13
- 14
- 15
- 16
- 17
- 18
- 19
- 20
- 21
- 22
- 23
- 24
- 25
- 26
- 27
- 28
- 29
- 30
- 31
- 32
- 33
- 34
- 35
- 36
- 37
- 38
2. 编写yml配置
server: port: 8088 spring: datasource: #使用阿里的Druid type: com.alibaba.druid.pool.DruidDataSource driver-class-name: com.mysql.cj.jdbc.Driver url: jdbc:mysql://192.168.239.131:3306/test?serverTimezone=UTC username: root password: root- 1
- 2
- 3
- 4
- 5
- 6
- 7
- 8
- 9
- 10
- 11
三、数据库设计
数据库保存日志表的设计,小编一切从简,一般日志多的后期会进行分库分表,或者搭配
ELK进行分析,分库分表一般采用根据方法类型,这需要开发人员遵循rest风格,不然肯定都是post,纯属个人见解哈!!大家可以根据自己的公司的要求进行补充哈!!DROP TABLE IF EXISTS `sys_log`; CREATE TABLE `sys_log` ( `id` bigint(20) NOT NULL AUTO_INCREMENT COMMENT '日志主键', `title` varchar(50) CHARACTER SET utf8 COLLATE utf8_general_ci NULL DEFAULT '' COMMENT '模块标题', `business_type` int(2) NULL DEFAULT 0 COMMENT '业务类型(0其它 1新增 2修改 3删除)', `method` varchar(100) CHARACTER SET utf8 COLLATE utf8_general_ci NULL DEFAULT '' COMMENT '方法名称', `request_method` varchar(10) CHARACTER SET utf8 COLLATE utf8_general_ci NULL DEFAULT '' COMMENT '请求方式', `oper_name` varchar(50) CHARACTER SET utf8 COLLATE utf8_general_ci NULL DEFAULT '' COMMENT '操作人员', `oper_url` varchar(255) CHARACTER SET utf8 COLLATE utf8_general_ci NULL DEFAULT '' COMMENT '请求URL', `oper_ip` varchar(128) CHARACTER SET utf8 COLLATE utf8_general_ci NULL DEFAULT '' COMMENT '主机地址', `oper_time` datetime(0) NULL DEFAULT NULL COMMENT '操作时间', PRIMARY KEY (`id`) USING BTREE ) ENGINE = InnoDB AUTO_INCREMENT = 1585197503834284034 CHARACTER SET = utf8 COLLATE = utf8_general_ci COMMENT = '操作日志记录' ROW_FORMAT = Dynamic; SET FOREIGN_KEY_CHECKS = 1;- 1
- 2
- 3
- 4
- 5
- 6
- 7
- 8
- 9
- 10
- 11
- 12
- 13
- 14
- 15
实体类:
import com.baomidou.mybatisplus.annotation.TableId; import com.baomidou.mybatisplus.annotation.TableName; import com.fasterxml.jackson.annotation.JsonFormat; import lombok.Data; import java.time.LocalDateTime; /** * 操作日志记录表 sys_log * */ @Data @TableName("sys_log") public class SysLog { private static final long serialVersionUID = 1L; /** * 日志主键 */ @TableId private Long id; /** * 操作模块 */ private String title; /** * 业务类型(0其它 1新增 2修改 3删除) */ private Integer businessType; /** * 请求方式 */ private String requestMethod; /** * 操作人员 */ private String operName; /** * 请求url */ private String operUrl; /** * 操作地址 */ private String operIp; /** * 操作时间 */ @JsonFormat(pattern = "yyyy-MM-dd HH:mm:ss") private LocalDateTime operTime; }- 1
- 2
- 3
- 4
- 5
- 6
- 7
- 8
- 9
- 10
- 11
- 12
- 13
- 14
- 15
- 16
- 17
- 18
- 19
- 20
- 21
- 22
- 23
- 24
- 25
- 26
- 27
- 28
- 29
- 30
- 31
- 32
- 33
- 34
- 35
- 36
- 37
- 38
- 39
- 40
- 41
- 42
- 43
- 44
- 45
- 46
- 47
- 48
- 49
- 50
- 51
- 52
- 53
- 54
- 55
- 56
- 57
- 58
- 59
- 60
四、主要功能
大体思路:
先手写一个注解—>切面来进行获取要保存的数据—>一个发布者来发布要保存的数据—>一个监听者监听后保存(异步)完整项目架构图如下:
1. 编写注解
import com.example.demo.constant.BusinessTypeEnum; import java.lang.annotation.*; /** * 自定义操作日志记录注解 * @author wangzhenjun * @date 2022/10/26 15:37 */ @Target(ElementType.METHOD) // 注解只能用于方法 @Retention(RetentionPolicy.RUNTIME) // 修饰注解的生命周期 @Documented public @interface Log { String value() default ""; /** * 模块 */ String title() default "测试模块"; /** * 功能 */ BusinessTypeEnum businessType() default BusinessTypeEnum.OTHER; }- 1
- 2
- 3
- 4
- 5
- 6
- 7
- 8
- 9
- 10
- 11
- 12
- 13
- 14
- 15
- 16
- 17
- 18
- 19
- 20
- 21
- 22
- 23
- 24
- 25
2. 业务类型枚举
/** * @author wangzhenjun * @date 2022/10/26 11:22 */ public enum BusinessTypeEnum { /** * 其它 */ OTHER(0,"其它"), /** * 新增 */ INSERT(1,"新增"), /** * 修改 */ UPDATE(2,"修改"), /** * 删除 */ DELETE(3,"删除"); private Integer code; private String message; BusinessTypeEnum(Integer code, String message) { this.code = code; this.message = message; } public Integer getCode() { return code; } public String getMessage() { return message; } }- 1
- 2
- 3
- 4
- 5
- 6
- 7
- 8
- 9
- 10
- 11
- 12
- 13
- 14
- 15
- 16
- 17
- 18
- 19
- 20
- 21
- 22
- 23
- 24
- 25
- 26
- 27
- 28
- 29
- 30
- 31
- 32
- 33
- 34
- 35
- 36
- 37
- 38
- 39
- 40
- 41
- 42
- 43
- 44
3. 编写切片
这里小编是以切片后进行发起的,当然规范流程是要加异常后的切片,这里以最简单的进行测试哈,大家按需进行添加!!
import com.example.demo.annotation.Log; import com.example.demo.entity.SysLog; import com.example.demo.listener.EventPubListener; import com.example.demo.utils.IpUtils; import org.aspectj.lang.JoinPoint; import org.aspectj.lang.annotation.After; import org.aspectj.lang.annotation.Aspect; import org.aspectj.lang.annotation.Pointcut; import org.aspectj.lang.reflect.MethodSignature; import org.slf4j.Logger; import org.slf4j.LoggerFactory; import org.springframework.beans.factory.annotation.Autowired; import org.springframework.stereotype.Component; import org.springframework.web.context.request.RequestContextHolder; import org.springframework.web.context.request.ServletRequestAttributes; import javax.servlet.http.HttpServletRequest; import java.time.LocalDateTime; /** * @author wangzhenjun * @date 2022/10/26 15:39 */ @Aspect @Component public class SysLogAspect { private final Logger logger = LoggerFactory.getLogger(SysLogAspect.class); @Autowired private EventPubListener eventPubListener; /** * 以注解所标注的方法作为切入点 */ @Pointcut("@annotation(com.example.demo.annotation.Log)") public void sysLog() {} /** * 在切点之后织入 * @throws Throwable */ @After("sysLog()") public void doAfter(JoinPoint joinPoint) { Log log = ((MethodSignature) joinPoint.getSignature()).getMethod() .getAnnotation(Log.class); ServletRequestAttributes attributes = (ServletRequestAttributes) RequestContextHolder .getRequestAttributes(); HttpServletRequest request = attributes.getRequest(); String method = request.getMethod(); String url = request.getRequestURL().toString(); String ip = IpUtils.getIpAddr(request); SysLog sysLog = new SysLog(); sysLog.setBusinessType(log.businessType().getCode()); sysLog.setTitle(log.title()); sysLog.setRequestMethod(method); sysLog.setOperIp(ip); sysLog.setOperUrl(url); // 从登录中token获取登录人员信息即可 sysLog.setOperName("我是测试人员"); sysLog.setOperTime(LocalDateTime.now()); // 发布消息 eventPubListener.pushListener(sysLog); logger.info("=======日志发送成功,内容:{}",sysLog); } }- 1
- 2
- 3
- 4
- 5
- 6
- 7
- 8
- 9
- 10
- 11
- 12
- 13
- 14
- 15
- 16
- 17
- 18
- 19
- 20
- 21
- 22
- 23
- 24
- 25
- 26
- 27
- 28
- 29
- 30
- 31
- 32
- 33
- 34
- 35
- 36
- 37
- 38
- 39
- 40
- 41
- 42
- 43
- 44
- 45
- 46
- 47
- 48
- 49
- 50
- 51
- 52
- 53
- 54
- 55
- 56
- 57
- 58
- 59
- 60
- 61
- 62
- 63
- 64
- 65
- 66
- 67
- 68
4. ip工具类
import com.baomidou.mybatisplus.core.toolkit.StringUtils; import javax.servlet.http.HttpServletRequest; /** * @author wangzhenjun * @date 2022/10/26 16:27 * 获取IP方法 * * @author jw */ public class IpUtils { /** * 获取客户端IP * * @param request 请求对象 * @return IP地址 */ public static String getIpAddr(HttpServletRequest request) { if (request == null) { return "unknown"; } String ip = request.getHeader("x-forwarded-for"); if (ip == null || ip.length() == 0 || "unknown".equalsIgnoreCase(ip)) { ip = request.getHeader("Proxy-Client-IP"); } if (ip == null || ip.length() == 0 || "unknown".equalsIgnoreCase(ip)) { ip = request.getHeader("X-Forwarded-For"); } if (ip == null || ip.length() == 0 || "unknown".equalsIgnoreCase(ip)) { ip = request.getHeader("WL-Proxy-Client-IP"); } if (ip == null || ip.length() == 0 || "unknown".equalsIgnoreCase(ip)) { ip = request.getHeader("X-Real-IP"); } if (ip == null || ip.length() == 0 || "unknown".equalsIgnoreCase(ip)) { ip = request.getRemoteAddr(); } return "0:0:0:0:0:0:0:1".equals(ip) ? "127.0.0.1" : getMultistageReverseProxyIp(ip); } /** * 从多级反向代理中获得第一个非unknown IP地址 * * @param ip 获得的IP地址 * @return 第一个非unknown IP地址 */ public static String getMultistageReverseProxyIp(String ip) { // 多级反向代理检测 if (ip != null && ip.indexOf(",") > 0) { final String[] ips = ip.trim().split(","); for (String subIp : ips) { if (false == isUnknown(subIp)) { ip = subIp; break; } } } return ip; } /** * 检测给定字符串是否为未知,多用于检测HTTP请求相关 * * @param checkString 被检测的字符串 * @return 是否未知 */ public static boolean isUnknown(String checkString) { return StringUtils.isBlank(checkString) || "unknown".equalsIgnoreCase(checkString); } }- 1
- 2
- 3
- 4
- 5
- 6
- 7
- 8
- 9
- 10
- 11
- 12
- 13
- 14
- 15
- 16
- 17
- 18
- 19
- 20
- 21
- 22
- 23
- 24
- 25
- 26
- 27
- 28
- 29
- 30
- 31
- 32
- 33
- 34
- 35
- 36
- 37
- 38
- 39
- 40
- 41
- 42
- 43
- 44
- 45
- 46
- 47
- 48
- 49
- 50
- 51
- 52
- 53
- 54
- 55
- 56
- 57
- 58
- 59
- 60
- 61
- 62
- 63
- 64
- 65
- 66
- 67
- 68
- 69
- 70
- 71
- 72
- 73
- 74
5. 事件发布
事件发布是由ApplicationContext对象进行发布的,直接注入使用即可!
使用观察者模式的目的:为了业务逻辑之间的解耦,提高可扩展性。
这种模式在spring和springboot底层是经常出现的,大家可以去看看。
发布者只需要关注发布消息,监听者只需要监听自己需要的,不管谁发的,符合自己监听条件即可。import com.example.demo.entity.SysLog; import org.springframework.beans.factory.annotation.Autowired; import org.springframework.context.ApplicationContext; import org.springframework.stereotype.Component; /** * @author wangzhenjun * @date 2022/10/26 16:38 */ @Component public class EventPubListener { @Autowired private ApplicationContext applicationContext; // 事件发布方法 public void pushListener(SysLog sysLogEvent) { applicationContext.publishEvent(sysLogEvent); } }- 1
- 2
- 3
- 4
- 5
- 6
- 7
- 8
- 9
- 10
- 11
- 12
- 13
- 14
- 15
- 16
- 17
- 18
- 19
6. 监听者
@Async:单独开启一个新线程去保存,提高效率!
@EventListener:监听/** * @author wangzhenjun * @date 2022/10/25 15:22 */ @Slf4j @Component public class MyEventListener { @Autowired private TestService testService; // 开启线程池异步 @Async("asyncExecutor") // 开启监听 @EventListener(SysLog.class) public void saveSysLog(SysLog event) { log.info("=====即将异步保存到数据库======"); testService.saveLog(event); } }- 1
- 2
- 3
- 4
- 5
- 6
- 7
- 8
- 9
- 10
- 11
- 12
- 13
- 14
- 15
- 16
- 17
- 18
- 19
- 20
- 21
7. 设置线程池
上面会存在一个问题,并发上来后就会出现线程突然打满,导致
OOM。
所以在阿里开发规范说到:
线程池不允许使用 Executors 去创建,而是通过ThreadPoolExecutor的方式,这样的处理方
式让写的同学更加明确线程池的运行规则,规避资源耗尽的风险。说明:Executors 返回的线程池对象的弊端如下:
1)FixedThreadPool 和 SingleThreadPool:
允许的请求队列长度为 Integer.MAX_VALUE,可能会堆积大量的请求,从而导致 OOM。
2)CachedThreadPool:
允许的创建线程数量为 Integer.MAX_VALUE,可能会创建大量的线程,从而导致 OOM。
3)ScheduledThreadPool:
允许的请求队列长度为 Integer.MAX_VALUE,可能会堆积大量的请求,从而导致 OOM。编写自定义线程池
PoolConfig:/** * @author wangzhenjun * @date 2022/11/25 8:47 */ @Configuration public class PoolConfig { @Bean public ThreadPoolExecutor asyncExecutor() { ThreadPoolExecutor executor = new ThreadPoolExecutor(5, 10, 10, TimeUnit.SECONDS, new LinkedBlockingDeque<>(30), Executors.defaultThreadFactory(), new ThreadPoolExecutor.AbortPolicy()); return executor; } }- 1
- 2
- 3
- 4
- 5
- 6
- 7
- 8
- 9
- 10
- 11
- 12
- 13
- 14
- 15
- 16
- 17
- 18
- 19
上面就是直接使用
@Async("asyncExecutor")就可以直接引用了!!启动类上添加:
@EnableAsync,不然@Async不会生效的!!五、测试
1. controller
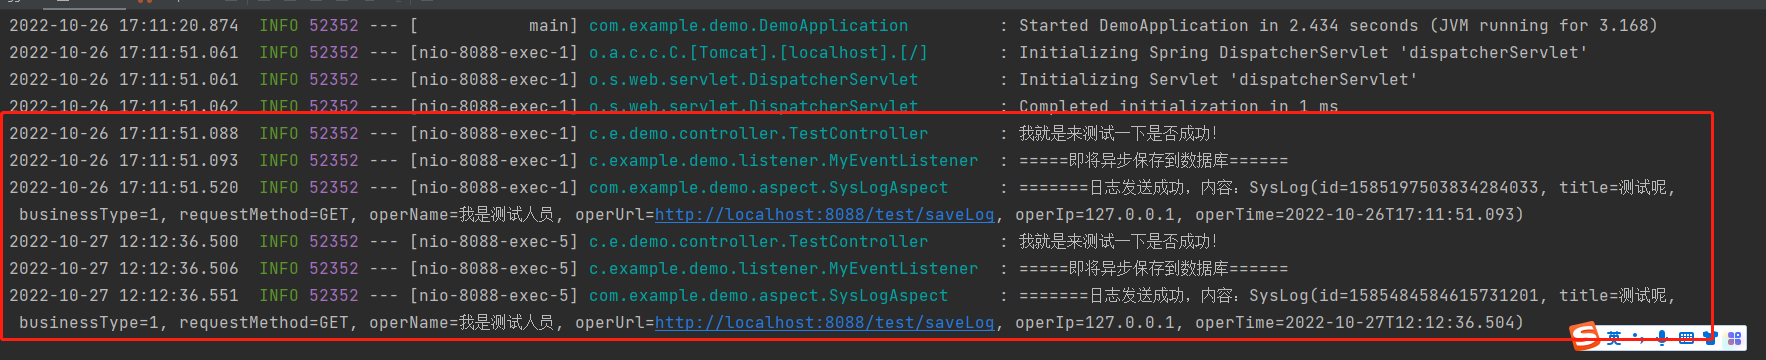
/** * @author wangzhenjun * @date 2022/10/26 16:51 */ @Slf4j @RestController @RequestMapping("/test") public class TestController { @Log(title = "测试呢",businessType = BusinessTypeEnum.INSERT) @GetMapping("/saveLog") public void saveLog(){ log.info("我就是来测试一下是否成功!"); } }- 1
- 2
- 3
- 4
- 5
- 6
- 7
- 8
- 9
- 10
- 11
- 12
- 13
- 14
- 15
2. service
/** * @author wangzhenjun * @date 2022/10/26 16:55 */ public interface TestService { int saveLog(SysLog sysLog); }- 1
- 2
- 3
- 4
- 5
- 6
- 7
- 8
/** * @author wangzhenjun * @date 2022/10/26 16:56 */ @Service public class TestServiceImpl implements TestService { @Autowired private TestMapper testMapper; @Override public int saveLog(SysLog sysLog) { return testMapper.insert(sysLog); } }- 1
- 2
- 3
- 4
- 5
- 6
- 7
- 8
- 9
- 10
- 11
- 12
- 13
- 14
- 15
- 16
3. mapper
这里使用mybatis-plus进行保存
/** * @author wangzhenjun * @date 2022/10/26 17:07 */ public interface TestMapper extends BaseMapper<SysLog> { }- 1
- 2
- 3
- 4
- 5
- 6
4. 测试
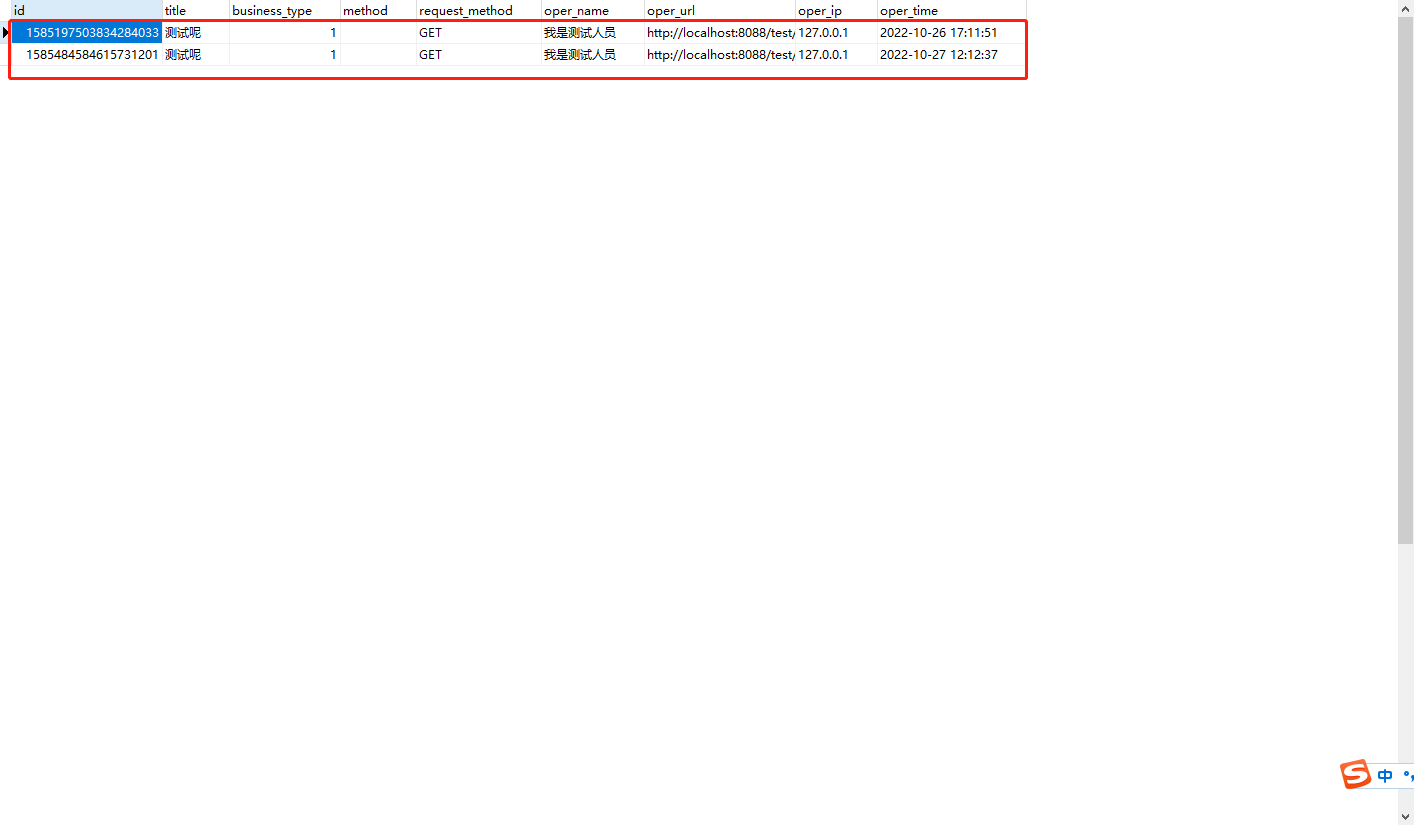
5. 数据库
六、总结
铛铛铛,终于完成了!这个实战在企业级必不可少的,每个项目搭建人不同,但是结果都是一样的,保存日志到数据,这样可以进行按钮的点击进行统计,分析那个功能是否经常使用,那些东西需要优化。只要是有数据的东西,分析一下总会有收获的!后面日志多了就行分库分表,ELK搭建。知道的越多不知道的就越多,这一次下来,知道下面要学什么了嘛!!
可以看下一小编的微信公众号,和网站文章首发看,欢迎关注,一起交流哈!! -
相关阅读:
电脑带不动虚幻引擎渲染卡顿怎么办?本文给你支招
C语言练习百题之9的次数
SpringCloud 学习笔记总结 (五)
十四)Stable Diffusion使用教程:一个线稿渲3D例子
又一超好用的 Python 数据处理工具 Mito 前来报到
信息论自总结笔记(仍然在更新)
java-拓展
基于JAVA校园酒店管理系统计算机毕业设计源码+系统+mysql数据库+lw文档+部署
【算法】二叉树的层序遍历
科技云报道:分布式存储红海中,看天翼云HBlock如何突围?
- 原文地址:https://blog.csdn.net/qq_52423918/article/details/127516173
