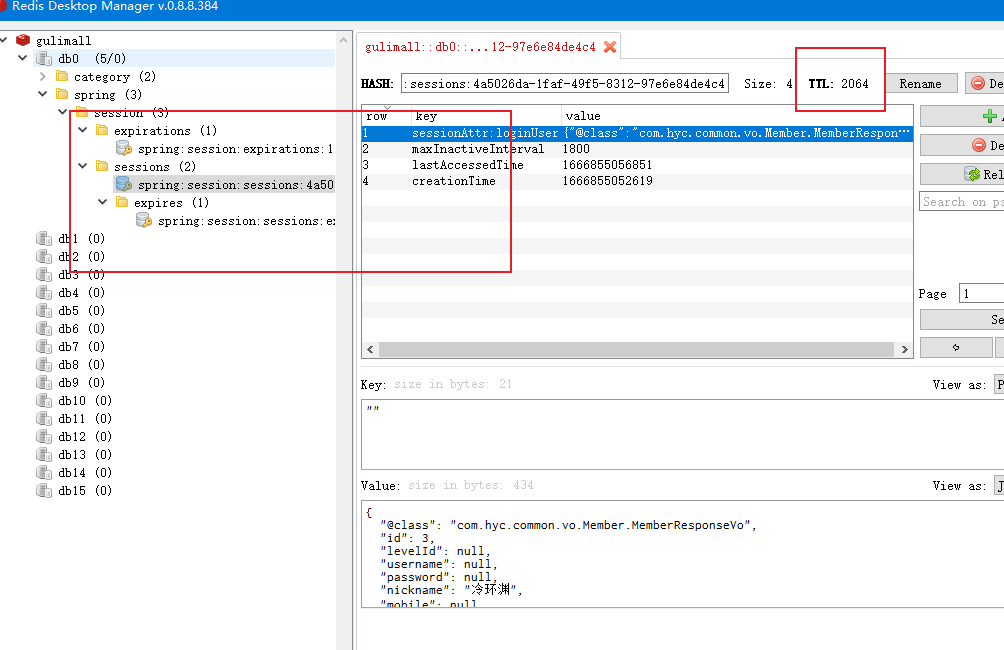
-
理解分布式Session处理来看看spring怎么做的
Spring Session使用Redis存储Session原理理解
1、背景
HttpSession
Session 是我们在做java web项目 或者是其他的web项目时 一定会接触的,在学习中,常常被我们用来存储用户的一些关键信息,如:登录状态等
但是这仅限于单体应用 一旦变成了集群部署,session处理起来 还是比较的麻烦的,要么是保证不了安全性,要么是保证不了性能,很是难受,spring家族是出了名的贴心,所有我们在他的全家桶中也可以找到有关session的框架,
博主最近学习微服务项目的时候,接触到这个框架 感觉相当的实用,于是打算给大家分享一下这个好用的框架,并且分享一下学到的原理思路
简介
Spring Session是Spring的项目之一,GitHub地址:https://github.com/spring-projects/spring-session。Spring Session把servlet容器实现的httpSession替换为spring-session,专注于解决session管理问题。Spring Session提供了集群Session(Clustered Sessions)功能,默认采用外置的数据源来存储Session数据,以此来解决Session共享的问题。
2、场景理解
从场景来理解这个session工具的好处,这里我们以微服务两个域名(父子域名)来举例
auth.mall.commall.com 我们注册需要转到 auth.mall.com中调用用户服务来完成登录,登录完成我们需要记录用户的登录状态
单体服务我们直接httpsession来存放用户的状态,但是我们如果还这么做的话,就会出现这种状态

这里是session的作用域是在auth开头的子域名下,但是登录成功转到我们门户主页 mall.com的时候就会出现读取不到的问题。
这里有几种解决方案,但是都有缺点,列表如下:
- nginx 负载均衡 IP哈希 每一次请求都到同一个服务器,但是随着数量的增多可能会出现问题
- tomcat session复制 这种的话 十分的占用资源且效率低下
- 就是用第三方数据源来存储 这种方式在分布式的环境下应用特别的多
这里我们就来介绍第三种
使用Redis来作为第三方的数据源来存储session的数据,但是我们使用的原生的数据要考虑很多东西比如过期,序列化,session的数据存储更新等等东西,这个时候我们就十分的期待能有一个封装好的适配第三方数据源的工具出现:Spring-Seesion,他完全适配spring的生态环境,可以即插即用,只需要简单的配置就行
依赖
org.springframework.session spring-session-data-redis - 1
- 2
- 3
- 4
配置
yaml只需要配置redis就行:
redis: password: admin host: xxxxxx- 1
- 2
- 3
配置类:
@Configuration public class SessionConfig { //设置cookie的作用于与名称 @Bean public CookieSerializer cookieSerializer() { DefaultCookieSerializer cookieSerializer = new DefaultCookieSerializer(); //放大作用域 cookieSerializer.setDomainName("gulimall.com"); cookieSerializer.setCookieName("GULISESSION"); return cookieSerializer; } //设置redis的序列化 这里使用的是 jackson @Bean public RedisSerializer<Object> springSessionDefaultRedisSerializer() { return new GenericJackson2JsonRedisSerializer(); } }- 1
- 2
- 3
- 4
- 5
- 6
- 7
- 8
- 9
- 10
- 11
- 12
- 13
- 14
- 15
- 16
- 17
- 18
- 19
- 20
- 21
- 22
- 23
- 24
注解:
给配置类加上启动注解
@EnableRedisHttpSession3、使用
只需要在方法的参数上 加入 HTTPSession 就可以了,加入了启动注解 他会去封装原生的http的请求响应,接下里我们使用的session其实是被封装后的session
@GetMapping("/oauth/gitee/Success") public String gitee(@RequestParam("code") String code, HttpSession session){ session.setAttribute(AuthSeverConstant.LOGIN_USER, data); }- 1
- 2
- 3
- 4
只需要在其他的服务中加入依赖配置完成之后,加上注解,就可以共享redis的session域

他还做了很多的事情 比如 我们还在使用的时候 session的过期时间会自动的续上等操作,
4、核心原理
Spring-session 在我们使用session过程中是如何封装的呢?
先从我们使用的注解下手,
EnableRedisHttpSession导入了RedisHttpSessionConfiguration配置@Retention(RetentionPolicy.RUNTIME) @Target({ElementType.TYPE}) @Documented @Import({RedisHttpSessionConfiguration.class}) @Configuration public @interface EnableRedisHttpSession { int maxInactiveIntervalInSeconds() default 1800; String redisNamespace() default "spring:session"; RedisFlushMode redisFlushMode() default RedisFlushMode.ON_SAVE; String cleanupCron() default "0 * * * * *"; }- 1
- 2
- 3
- 4
- 5
- 6
- 7
- 8
- 9
- 10
- 11
- 12
- 13
- 14
RedisHttpSessionConfiguration向容器中注册了Redis适配的组件RedisOperationsSessionRepository用来操作redis中session的封装方法类
public class RedisHttpSessionConfiguration extends SpringHttpSessionConfiguration implements BeanClassLoaderAware, EmbeddedValueResolverAware, ImportAware, SchedulingConfigurer { @Bean public RedisOperationsSessionRepository sessionRepository() { RedisTemplate<Object, Object> redisTemplate = this.createRedisTemplate(); RedisOperationsSessionRepository sessionRepository = new RedisOperationsSessionRepository(redisTemplate); sessionRepository.setApplicationEventPublisher(this.applicationEventPublisher); if (this.defaultRedisSerializer != null) { sessionRepository.setDefaultSerializer(this.defaultRedisSerializer); } sessionRepository.setDefaultMaxInactiveInterval(this.maxInactiveIntervalInSeconds); if (StringUtils.hasText(this.redisNamespace)) { sessionRepository.setRedisKeyNamespace(this.redisNamespace); } sessionRepository.setRedisFlushMode(this.redisFlushMode); int database = this.resolveDatabase(); sessionRepository.setDatabase(database); return sessionRepository; } }- 1
- 2
- 3
- 4
- 5
- 6
- 7
- 8
- 9
- 10
- 11
- 12
- 13
- 14
- 15
- 16
- 17
- 18
- 19
- 20
- 21
- 22
接着我们去看看他继承的类
SpringHttpSessionConfiguration这里应该是放了一些基础的封装配置,RedisHttpSessionConfiguration对redis数据源 实现了针对性封装@Configuration public class SpringHttpSessionConfiguration implements ApplicationContextAware { private final Log logger = LogFactory.getLog(this.getClass()); private CookieHttpSessionIdResolver defaultHttpSessionIdResolver = new CookieHttpSessionIdResolver(); private boolean usesSpringSessionRememberMeServices; private ServletContext servletContext; private CookieSerializer cookieSerializer; private HttpSessionIdResolver httpSessionIdResolver; private List<HttpSessionListener> httpSessionListeners; public SpringHttpSessionConfiguration() { this.httpSessionIdResolver = this.defaultHttpSessionIdResolver; this.httpSessionListeners = new ArrayList(); } @PostConstruct public void init() { CookieSerializer cookieSerializer = this.cookieSerializer != null ? this.cookieSerializer : this.createDefaultCookieSerializer(); this.defaultHttpSessionIdResolver.setCookieSerializer(cookieSerializer); } @Bean public <S extends Session> SessionRepositoryFilter<? extends Session> springSessionRepositoryFilter(SessionRepository<S> sessionRepository) { SessionRepositoryFilter<S> sessionRepositoryFilter = new SessionRepositoryFilter(sessionRepository); sessionRepositoryFilter.setServletContext(this.servletContext); sessionRepositoryFilter.setHttpSessionIdResolver(this.httpSessionIdResolver); return sessionRepositoryFilter; } }- 1
- 2
- 3
- 4
- 5
- 6
- 7
- 8
- 9
- 10
- 11
- 12
- 13
- 14
- 15
- 16
- 17
- 18
- 19
- 20
- 21
- 22
- 23
- 24
- 25
- 26
- 27
- 28
- 29
SpringHttpSessionConfiguration里的init的方法初始化配置,看之前的配置类中设置的cookie设置载入到默认的session适配器中,另外的一个核心方法就是向容器放入了一个session数据操作过滤器,进入这个过滤器@Order(-2147483598) public class SessionRepositoryFilter<S extends Session> extends OncePerRequestFilter { protected void doFilterInternal(HttpServletRequest request, HttpServletResponse response, FilterChain filterChain) throws ServletException, IOException { request.setAttribute(SESSION_REPOSITORY_ATTR, this.sessionRepository); SessionRepositoryFilter<S>.SessionRepositoryRequestWrapper wrappedRequest = new SessionRepositoryFilter.SessionRepositoryRequestWrapper(request, response, this.servletContext); SessionRepositoryFilter.SessionRepositoryResponseWrapper wrappedResponse = new SessionRepositoryFilter.SessionRepositoryResponseWrapper(wrappedRequest, response); try { filterChain.doFilter(wrappedRequest, wrappedResponse); } finally { wrappedRequest.commitSession(); } } }- 1
- 2
- 3
- 4
- 5
- 6
- 7
- 8
- 9
- 10
- 11
- 12
- 13
- 14
- 15
- 16
找到这个
doFilterInternal方法 很清晰就可以看到这两个方法封装了我们的http原生的请求和响应,因为我们如果想设置session 需要去从httprequst里获取session
他就是利用了我们这一点,在获取之前对session进行封装,采用装饰者模式,之后我们getsession获取的就不是原生的session了 是spring封装之后的session
SessionRepositoryFilter<S>.SessionRepositoryRequestWrapper wrappedRequest = new SessionRepositoryFilter.SessionRepositoryRequestWrapper(request, response, this.servletContext); SessionRepositoryFilter.SessionRepositoryResponseWrapper wrappedResponse = new SessionRepositoryFilter.SessionRepositoryResponseWrapper(wrappedRequest, response);- 1
- 2
- 3
- 4
源码篇幅很长这里简单给大家用文字来介绍一下,以请求为例子
经过装饰之后 我们的getsession获取到的就是这个方法的返回值,他继承了HttpSessionWrapper,
这里判断为空的时候就去:
S requestedSession = getRequestedSession();@Override public HttpSessionWrapper getSession(boolean create) { HttpSessionWrapper currentSession = getCurrentSession(); if (currentSession != null) { return currentSession; } S requestedSession = getRequestedSession(); if (requestedSession != null) { if (getAttribute(INVALID_SESSION_ID_ATTR) == null) { requestedSession.setLastAccessedTime(Instant.now()); this.requestedSessionIdValid = true; currentSession = new HttpSessionWrapper(requestedSession, getServletContext()); currentSession.setNew(false); setCurrentSession(currentSession); return currentSession; } }- 1
- 2
- 3
- 4
- 5
- 6
- 7
- 8
- 9
- 10
- 11
- 12
- 13
- 14
- 15
- 16
- 17
getRequestedSession这个方法会用sessionRepository来查找session,而sessionRepository在我们之前的配置中被RedisOperationsSessionRepository并且注入到了容器中,所以可以使用redis来实现session的存储,让多服务可以共享sessionprivate S getRequestedSession() { if (!this.requestedSessionCached) { List<String> sessionIds = SessionRepositoryFilter.this.httpSessionIdResolver .resolveSessionIds(this); for (String sessionId : sessionIds) { if (this.requestedSessionId == null) { this.requestedSessionId = sessionId; } S session = SessionRepositoryFilter.this.sessionRepository .findById(sessionId); if (session != null) { this.requestedSession = session; this.requestedSessionId = sessionId; break; } } this.requestedSessionCached = true; } return this.requestedSession; }- 1
- 2
- 3
- 4
- 5
- 6
- 7
- 8
- 9
- 10
- 11
- 12
- 13
- 14
- 15
- 16
- 17
- 18
- 19
- 20
-
相关阅读:
Word插件开发
Redis实现并发阻塞锁方案
COMSOL泰森多边形Voronoi图多孔骨架优化模型受力分析
网络安全(黑客)自学
shell脚本之数组元素排序
MATLAB算法实战应用案例精讲-【数模应用】决策树(附MATLAB、Java和Python代码)
sentinel
【MATLAB】数学建模没有基础怎么办,看过来一篇文章带你入门 matlab
百望云携手华为发布金融信创与数电乐企联合方案 创新金融合规变革
设计模式-day02
- 原文地址:https://blog.csdn.net/doomwatcher/article/details/127554889
