-
【Linux】基本的指令(三)
大家好我是沐曦希💕
Linux专栏:Linux零基础学习
1.时间相关的指令
date显示
date 指定格式显示时间: date +%Y:%m:%d
date 用法: date [OPTION]… [+FORMAT]1.在显示方面,使用者可以设定欲显示的格式,格式设定为一个加号后接数个标记,其中常用的标记列表如下
- %H : 小时(00…23)
- %M : 分钟(00…59)
- %S : 秒(00…61)
- %X : 相当于 %H:%M:%S
- %d : 日 (01…31)
- %m : 月份 (01…12)
- %Y : 完整年份 (0000…9999)
- %F : 相当于 %Y-%m-%d
[root@iZ2ze79kprp9cai14dsma8Z ~]# date Thu Sep 29 15:46:46 CST 2022 [root@iZ2ze79kprp9cai14dsma8Z ~]# date +%Y/%m/%d-%H:%M:%S 2022/09/29-16:08:19- 1
- 2
- 3
- 4
2.在设定时间方面
- date -s //设置当前时间,只有root权限才能设置,其他只能查看。
- date -s 20080523 //设置成20080523,这样会把具体时间设置成空00:00:00
- date -s 01:01:01 //设置具体时间,不会对日期做更改
- date -s “01:01:01 2008-05-23″ //这样可以设置全部时间
- date -s “01:01:01 20080523″ //这样可以设置全部时间
- date -s “2008-05-23 01:01:01″ //这样可以设置全部时间
- date -s “20080523 01:01:01″ //这样可以设置全部时间
2022/09/29-16:08:19 [root@iZ2ze79kprp9cai14dsma8Z ~]# date +%Y/%m/%d-%X 2022/09/29-04:09:28 PM- 1
- 2
- 3
3.时间戳
时间->时间戳: date +%s
时间戳->时间: date -d@1508749502
Unix时间戳(英文为Unix epoch, Unix time, POSIX time 或 Unix timestamp)是从1970年1月1日(UTC/GMT的
午夜)开始所经过的秒数,不考虑闰秒。[root@iZ2ze79kprp9cai14dsma8Z ~]# date +%s 1664439152 [root@iZ2ze79kprp9cai14dsma8Z ~]# date +%Y/%m/%d-%H:%M:%S -d@1664439152 2022/09/29-16:12:32- 1
- 2
- 3
- 4
2.Cal指令
cal命令可以用来显示公历(阳历)日历。公历是现在国际通用的历法,又称格列历,通称阳历。 “阳历”又名“太阳历”,系以地球绕行太阳一周为一年,为西方各国所通用,故又名“西历”。
命令格式: cal [参数][月份][年份]
功能: 用于查看日历等时间信息,如只有一个参数,则表示年份(1-9999),如有两个参数,则表示月份和年份
常用选项:- -3 显示系统前一个月,当前月,下一个月的月历
- -j 显示在当年中的第几天(一年日期按天算,从1月1号算起,默认显示当前月在一年中的天数)
- -y 显示当前年份的日历
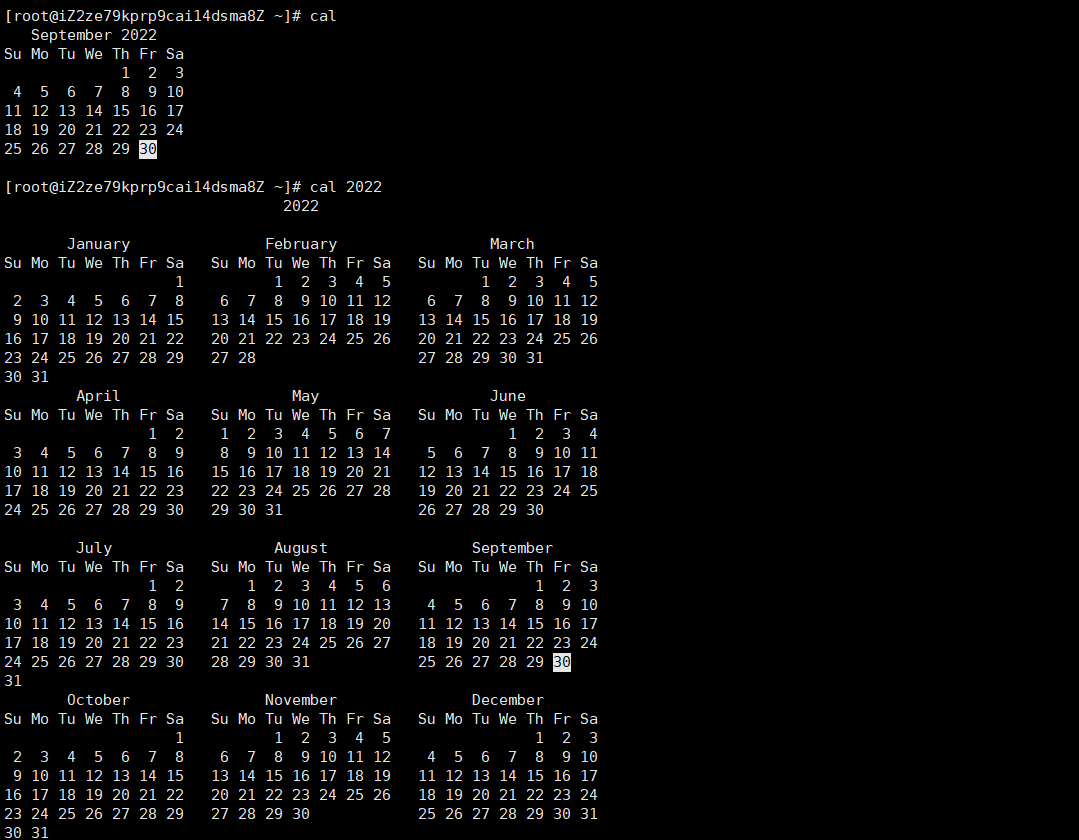
cal -n显示本月前后共n月的日历

查看cal的语法和选项:cal -h
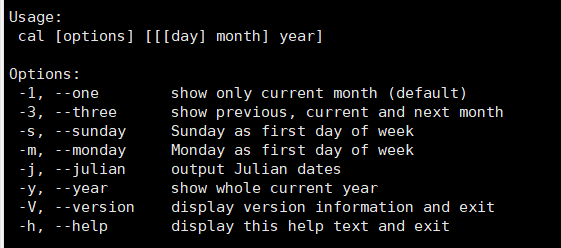
其中cal -s:以星期日为每周的开头
cal -m:以星期一为每周的开头3.find指令:(非常重要)-name
- Linux下find命令在目录结构中搜索文件,并执行指定的操作。
- Linux下find命令提供了相当多的查找条件,功能很强大。由于find具有强大的功能,所以它的选项也很多,其中大部分选项都值得我们花时间来了解一下。
- 即使系统中含有网络文件系统( NFS), find命令在该文件系统中同样有效,只你具有相应的权限。
- 在运行一个非常消耗资源的find命令时,很多人都倾向于把它放在后台执行,因为遍历一个大的文件系统可能会花费很长的时间(这里是指30G字节以上的文件系统)。
find name(目录名)//查找目录并显示该目录下所有的文件和目录
[root@iZ2ze79kprp9cai14dsma8Z ~]# find File- 1
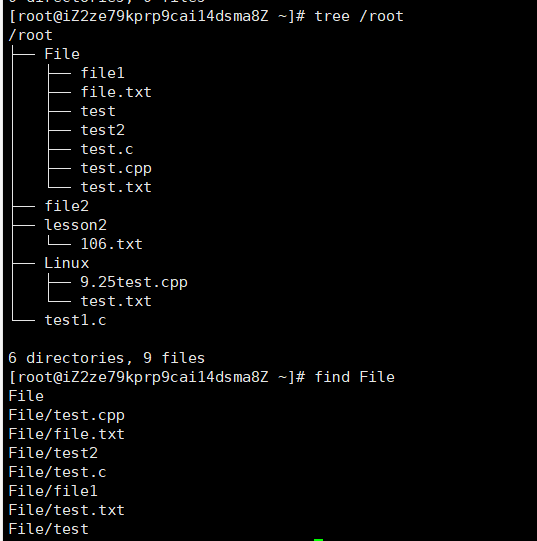
语法: find pathname -options
功能: 用于在文件树种查找文件,并作出相应的处理(可能访问磁盘)
常用选项:-name 按照文件名查找文件。
[root@iZ2ze79kprp9cai14dsma8Z ~]# pwd /root [root@iZ2ze79kprp9cai14dsma8Z ~]# find -name file [root@iZ2ze79kprp9cai14dsma8Z ~]# find -name test ./File/test- 1
- 2
- 3
- 4
- 5
没有找到相应文件则不会显示,找到后显示想要文件的路径。
当我们进行find搜索的时候,可能需要访问磁盘,进而导致效率低下。
whereis指令也是用来进行搜索的。
在特定的路径下,查找指定的文件名对应的指令或文档[root@iZ2ze79kprp9cai14dsma8Z ~]# whereis test test: /usr/bin/test /usr/share/man/man1/test.1.gz /usr/share/man/man1p/test.1p.gz [root@iZ2ze79kprp9cai14dsma8Z ~]# whereis ls ls: /usr/bin/ls /usr/share/man/man1/ls.1.gz /usr/share/man/man1p/ls.1p.gz- 1
- 2
- 3
- 4
whereis的选项
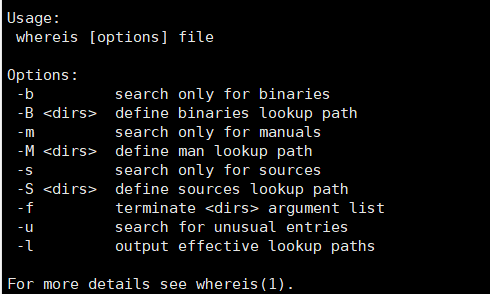
还有一个which指令也用来进行搜索,which常用来搜索指令的所在的路径[root@iZ2ze79kprp9cai14dsma8Z ~]# which find /usr/bin/find [root@iZ2ze79kprp9cai14dsma8Z ~]# which man /usr/bin/man [root@iZ2ze79kprp9cai14dsma8Z ~]# which which alias which='alias | /usr/bin/which --tty-only --read-alias --show-dot --show-tilde' /usr/bin/alias /usr/bin/which [root@iZ2ze79kprp9cai14dsma8Z ~]# which ll alias ll='ls -l --color=auto' /usr/bin/ls- 1
- 2
- 3
- 4
- 5
- 6
- 7
- 8
- 9
- 10
- 11
其中alias相当于对指令进行重命名/起别名
其中查找范围:which4.grep指令
文本内容的行过滤工具,默认会匹配文本中的关键字,匹配上的进行显示。
语法: grep [选项] 搜寻字符串 文件
功能: 在文件中搜索字符串,将找到的行打印出来常用选项:
- -i :忽略大小写的不同,所以大小写视为相同
- -n :顺便输出行号
- -v :反向选择,亦即显示出没有 ‘搜寻字符串’ 内容的那一行
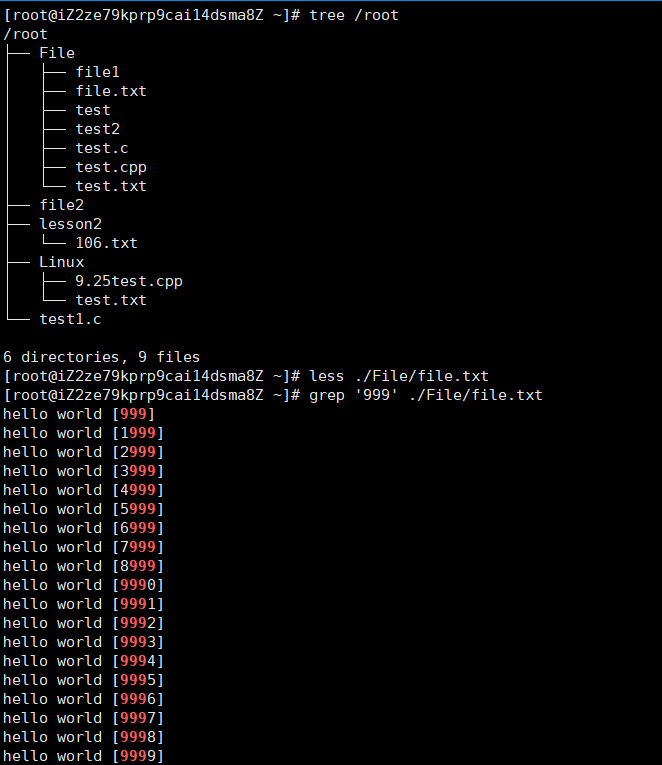
[root@iZ2ze79kprp9cai14dsma8Z ~]# grep '999' ./File/file.txt- 1
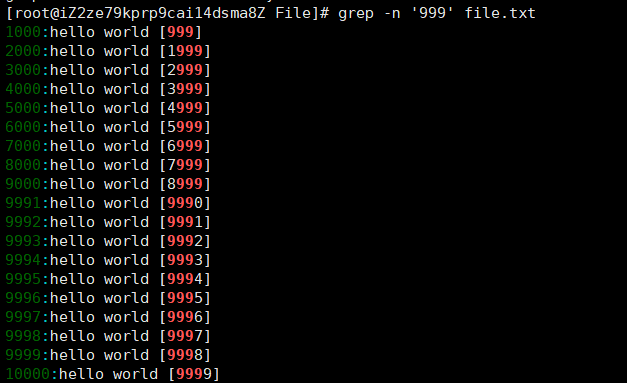
grep -n:带行号[root@iZ2ze79kprp9cai14dsma8Z File]# grep -n '999' file.txt- 1
grep -i:忽略大小写[root@iZ2ze79kprp9cai14dsma8Z File]# grep 'abc' file.txt abc [115] abc [239] abc [428] [root@iZ2ze79kprp9cai14dsma8Z File]# grep -n 'ABC' file.txt [root@iZ2ze79kprp9cai14dsma8Z File]# grep -i 'ABC' file.txt abc [115] abc [239] abc [428]- 1
- 2
- 3
- 4
- 5
- 6
- 7
- 8
- 9
grep -v:把未匹配到的进行显示输出
[root@iZ2ze79kprp9cai14dsma8Z File]# grep -v 'hello world' file.txt abc [115] abc [239] abc [428]- 1
- 2
- 3
- 4
其中grep可以和其他命令结合管道来进行其他的匹配工作
[root@iZ2ze79kprp9cai14dsma8Z File]# grep '999' file.txt | wc -l 19- 1
- 2
wc:统计行数
sort指令用于排序文本内容,按ASCII码值进行行号排序。
[root@iZ2ze79kprp9cai14dsma8Z File]# sort test.txt- 1
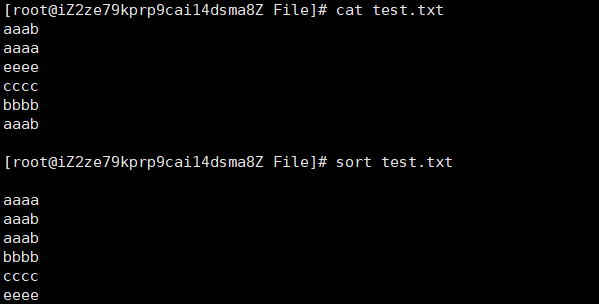
uniq:对文本相邻的相等的内容进行去重,只保留一个.
那么uniq和sort可以通过管道结合对文本进行去重和排序[root@iZ2ze79kprp9cai14dsma8Z File]# cat test.txt aaaa aaaa bbbb cccc cccc bbbb eeee dddd eeee dddd [root@iZ2ze79kprp9cai14dsma8Z File]# uniq test.txt aaaa bbbb cccc bbbb eeee dddd eeee dddd [root@iZ2ze79kprp9cai14dsma8Z File]# sort test.txt | uniq aaaa bbbb cccc dddd eeee- 1
- 2
- 3
- 4
- 5
- 6
- 7
- 8
- 9
- 10
- 11
- 12
- 13
- 14
- 15
- 16
- 17
- 18
- 19
- 20
- 21
- 22
- 23
- 24
- 25
- 26
5.zip/unzip指令
安装zip/unzip指令
yum install -y zip unzip- 1
zip my.zip(文件名+.zip) 要压缩的文件
语法: zip 压缩文件.zip 目录或文件
功能: 将目录或文件压缩成zip格式
常用选项-r 递归处理,将指定目录下的所有文件和子目录一并处理
[root@iZ2ze79kprp9cai14dsma8Z ~]# zip _zip.zip lesson4 adding: lesson4/ (stored 0%) [root@iZ2ze79kprp9cai14dsma8Z ~]# mkdir tmp [root@iZ2ze79kprp9cai14dsma8Z ~]# ll total 24 drwxr-xr-x 3 root root 4096 Sep 30 13:55 File drwxr-xr-x 2 root root 4096 Sep 28 21:27 lesson2 drwxr-xr-x 3 root root 4096 Sep 30 13:54 lesson4 drwxr-xr-x 2 root root 4096 Sep 28 21:19 Linux drwxr-xr-x 2 root root 4096 Sep 30 13:58 tmp -rw-r--r-- 1 root root 166 Sep 30 13:58 _zip.zip [root@iZ2ze79kprp9cai14dsma8Z ~]# cd tmp [root@iZ2ze79kprp9cai14dsma8Z tmp]# mv ../_zip.zip . [root@iZ2ze79kprp9cai14dsma8Z tmp]# unzip _zip.zip Archive: _zip.zip creating: lesson4/ [root@iZ2ze79kprp9cai14dsma8Z tmp]# ll total 8 drwxr-xr-x 2 root root 4096 Sep 30 13:54 lesson4 -rw-r--r-- 1 root root 166 Sep 30 13:58 _zip.zip [root@iZ2ze79kprp9cai14dsma8Z tmp]# tree /lesson4 /lesson4 [error opening dir] 0 directories, 0 files- 1
- 2
- 3
- 4
- 5
- 6
- 7
- 8
- 9
- 10
- 11
- 12
- 13
- 14
- 15
- 16
- 17
- 18
- 19
- 20
- 21
- 22
- 23
- 24
zip默认对一个目录进行打包压缩的时候,只会对这个目录文件进行打包压缩,不会把该目录下的目录和文件进行打包。
zip -r:递归处理,将指定目录下的所有文件和子目录一并处理[root@iZ2ze79kprp9cai14dsma8Z ~]# zip -r lesson4.zip lesson4 adding: lesson4/ (stored 0%) adding: lesson4/lesson4_1/ (stored 0%) adding: lesson4/_file.txt (stored 0%) adding: lesson4/test3.txt (stored 0%)- 1
- 2
- 3
- 4
- 5
[root@iZ2ze79kprp9cai14dsma8Z tmp]# unzip lesson4.zip Archive: lesson4.zip creating: lesson4/ creating: lesson4/lesson4_1/ extracting: lesson4/_file.txt extracting: lesson4/test3.txt- 1
- 2
- 3
- 4
- 5
- 6
zip -r 你命名的压缩包(自定义) dir(要压缩的目录和文件)
unzip 你命名的压缩包(自定义) //在当前目录下进行解包解压功能unzip my.zip -d 路径 //解包解压到指定路径下
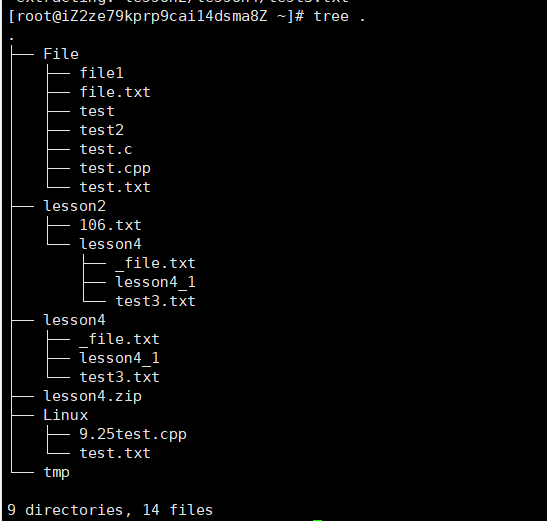
[root@iZ2ze79kprp9cai14dsma8Z ~]# unzip lesson4.zip -d lesson2 Archive: lesson4.zip creating: lesson2/lesson4/ creating: lesson2/lesson4/lesson4_1/ extracting: lesson2/lesson4/_file.txt extracting: lesson2/lesson4/test3.txt- 1
- 2
- 3
- 4
- 5
- 6
为什么会有打包压缩呢?
要传输大量大文件时候,进行打包压缩便于传输和保存,防止丢包。
将多个文件和目录结合成一个文件,进行高效传输。6.写在最后
那么Linux基本指令(三)到这里就结束了。

-
相关阅读:
如何在内网搭建SFTP服务器,并发布到公网可访问
StoneDB 亮相中国信通院OSCAR开源产业大会,石原子科技正式加入科技制造开源社区!
Java的Lambda表达式学习笔记:使用lambda表达式
Echarts5.* 关系图谱(relation graph)添加节点拖拽、点击节点高亮效果
# nest笔记八:使用apifox导入swagger
Linux 文件类信息统计指令(awk、sort、wc -l)
RockTree TOKEN2049 Party 火爆的背后,千亿美元规模的“超级聚会”
物联网开发笔记(2)- 使用Wokwi仿真树莓派Pico点亮LED灯代码分析
优酷 Android 包瘦身治理思路全解
知识体系之Redis
- 原文地址:https://blog.csdn.net/m0_68931081/article/details/127101676