-
[Vue]路由传参 & 命名路由
前言
系列文章目录:
[Vue]目录
老师的课件笔记,不含视频 https://www.aliyundrive.com/s/B8sDe5u56BU
1. 页面组件
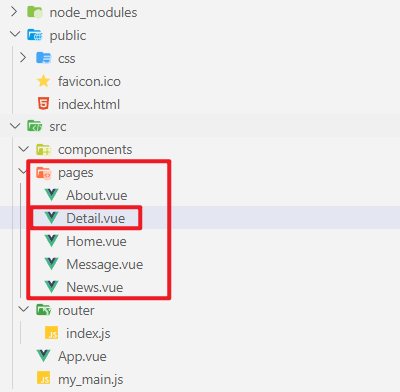
1.1 目录结构
1.3 路由配置
// 该文件专门用于创建整个应用的路由器 import VueRouter from 'vue-router' //引入组件 import About from '../pages/About' import Home from '../pages/Home' import Message from '../pages/Message' import News from '../pages/News' import Detail from '../pages/Detail' //创建并暴露一个路由器 export default new VueRouter({ routes: [ { path: '/about', component: About }, { path: '/home', component: Home, children: [ { path: 'news', component: News }, { path: 'message', component: Message, children: [ { path: 'detail', component: Detail } ] } ] } ] })- 1
- 2
- 3
- 4
- 5
- 6
- 7
- 8
- 9
- 10
- 11
- 12
- 13
- 14
- 15
- 16
- 17
- 18
- 19
- 20
- 21
- 22
- 23
- 24
- 25
- 26
- 27
- 28
- 29
- 30
1.2 组件
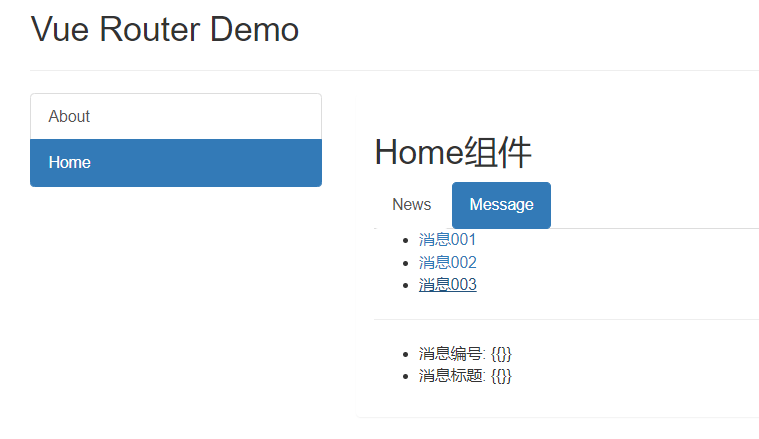
Home.vue
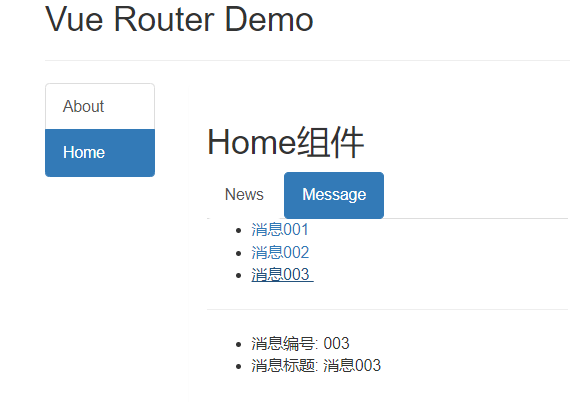
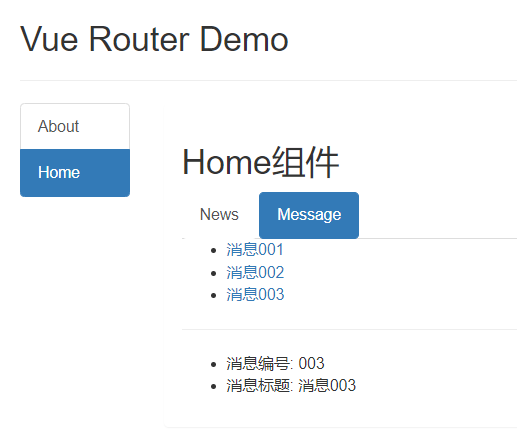
<template> <div> <h2>Home组件h2> <ul class="nav nav-tabs"> <li> <router-link class="list-group-item" active-class="active" to="/home/news">Newsrouter-link> li> <li> <router-link class="list-group-item" active-class="active" to="/home/message">Messagerouter-link> li> ul> <div> <router-view>router-view> div> div> template> <script> export default { name: 'Home' } script> <style> style>- 1
- 2
- 3
- 4
- 5
- 6
- 7
- 8
- 9
- 10
- 11
- 12
- 13
- 14
- 15
- 16
- 17
- 18
- 19
- 20
- 21
- 22
- 23
- 24
- 25
Message.vue
<template> <div> <ul> <li v-for="m in messageList" :key="m.id"> <router-link to="/home/message/detail">{{m.title}}router-link> li> ul> <hr> <router-view>router-view> div> template> <script> export default { name: 'Message', data() { return { messageList: [ {id: '001', title: '消息001'}, {id: '002', title: '消息002'}, {id: '003', title: '消息003'}, ] } }, } script> <style> style>- 1
- 2
- 3
- 4
- 5
- 6
- 7
- 8
- 9
- 10
- 11
- 12
- 13
- 14
- 15
- 16
- 17
- 18
- 19
- 20
- 21
- 22
- 23
- 24
- 25
- 26
- 27
- 28
- 29
Detail.vue
<template> <div> <ul> <li>消息编号: {{}}li> <li>消息标题: {{}}li> ul> div> template> <script> export default { name: 'Detail' } script> <style> style>- 1
- 2
- 3
- 4
- 5
- 6
- 7
- 8
- 9
- 10
- 11
- 12
- 13
- 14
- 15
- 16
- 17
2. 路由 query 传参
2.1 使用 query 传参
2.1.1 to 的字符串写法
<ul> <li v-for="m in messageList" :key="m.id"> <router-link :to="`/home/message/detail?id=${m.id}&title=${m.title}`">{{m.title}}router-link> li> ul>- 1
- 2
- 3
- 4
- 5
2.1.2 to 的对象写法
<ul> <li v-for="m in messageList" :key="m.id"> {m.title}} --> <router-link :to="{ path: '/home/message/detail', query: { id: m.id, title: m.title } }"> {{m.title}} router-link> li> ul>- 1
- 2
- 3
- 4
- 5
- 6
- 7
- 8
- 9
- 10
- 11
- 12
- 13
- 14
- 15
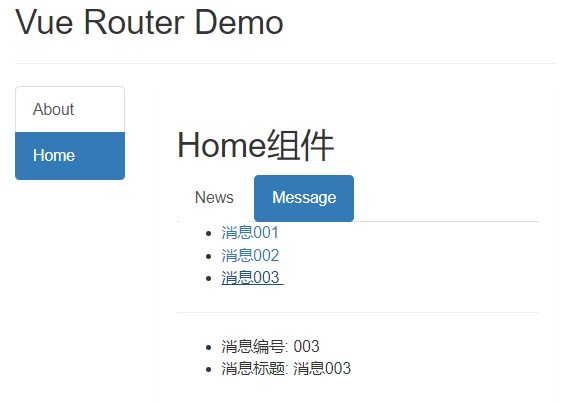
2.2 组件接收 query 参数
在路由跳转时通过 query 进行传参,传递的参数会被存放在组件实例对象的
$route
属性上。Detail.vue
<template> <div> <ul> <li>消息编号: {{}}li> <li>消息标题: {{}}li> ul> div> template> <script> export default { name: 'Detail', mounted() { console.log(this.$route) } } script> <style> style>- 1
- 2
- 3
- 4
- 5
- 6
- 7
- 8
- 9
- 10
- 11
- 12
- 13
- 14
- 15
- 16
- 17
- 18
- 19
- 20

Detail.vue
<template> <div> <ul> <li>消息编号: {{$route.query.id}}li> <li>消息标题: {{$route.query.title}}li> ul> div> template>- 1
- 2
- 3
- 4
- 5
- 6
- 7
- 8

2.3 总结 路由 query 传参
-
传递参数
<router-link :to="/home/message/detail?id=666&title=你好">跳转router-link> <router-link :to="{ path:'/home/message/detail', query:{ id:666, title:'你好' } }" >跳转router-link>- 1
- 2
- 3
- 4
- 5
- 6
- 7
- 8
- 9
- 10
- 11
- 12
- 13
-
接收参数:
$route.query.id $route.query.title- 1
- 2
3. 命名路由
命名路由可以简化使用路由进行跳转时路径的写法。
3.1 配置命名路由
设置命名路由,在配置路由时,为路由添加一个 name 配置项。
router/index.js
// 该文件专门用于创建整个应用的路由器 import VueRouter from 'vue-router' //引入组件 import About from '../pages/About' import Home from '../pages/Home' import Message from '../pages/Message' import News from '../pages/News' import Detail from '../pages/Detail' //创建并暴露一个路由器 export default new VueRouter({ routes: [ { name: 'about', path: '/about', component: About }, { name: 'home', path: '/home', component: Home, children: [ { name: 'news', path: 'news', component: News }, { name: 'message', path: 'message', component: Message, children: [ { name: 'messageDetail', path: 'detail', component: Detail } ] } ] } ] })- 1
- 2
- 3
- 4
- 5
- 6
- 7
- 8
- 9
- 10
- 11
- 12
- 13
- 14
- 15
- 16
- 17
- 18
- 19
- 20
- 21
- 22
- 23
- 24
- 25
- 26
- 27
- 28
- 29
- 30
- 31
- 32
- 33
- 34
- 35
- 36
- 37
- 38
- 39
- 40
- 41
- 42
- 43
3.2 使用命名路由
使用命名路由时,router-link 标签的 to 属性需要使用对象写法,在对象写法中,使用name 替代原来的 path。
Message.vue
<router-link :to="{ name: 'messageDetail', query: { id: m.id, title: m.title } }"> {{m.title}} router-link>- 1
- 2
- 3
- 4
- 5
- 6
- 7
- 8
- 9
3.3 总结 命名路由
-
作用:可以简化路由的跳转。
-
如何使用
-
给路由命名:
{ path:'/demo', component:Demo, children:[ { path:'test', component:Test, children:[ { name:'hello' //给路由命名 path:'welcome', component:Hello, } ] } ] }- 1
- 2
- 3
- 4
- 5
- 6
- 7
- 8
- 9
- 10
- 11
- 12
- 13
- 14
- 15
- 16
- 17
-
简化跳转:
<router-link to="/demo/test/welcome">跳转router-link> <router-link :to="{name:'hello'}">跳转router-link> <router-link :to="{ name:'hello', query:{ id:666, title:'你好' } }" >跳转router-link>- 1
- 2
- 3
- 4
- 5
- 6
- 7
- 8
- 9
- 10
- 11
- 12
- 13
- 14
- 15
- 16
-
4. 路由 params 传参
4.1 使用 params 参数
4.1.1 设置路由地址占位符
router/index.js
{ name: 'message', path: 'message', component: Message, children: [ { name: 'messageDetail', // :id :title 均为params参数的占位 path: 'detail/:id/:title', component: Detail } ] }- 1
- 2
- 3
- 4
- 5
- 6
- 7
- 8
- 9
- 10
- 11
- 12
- 13
4.1.2 params 参数字符串写法
<ul> <li v-for="m in messageList" :key="m.id"> <router-link :to="`/home/message/detail/${m.id}/${m.title}`">{{m.title}}router-link> {{m.title}} router-link> li> ul>- 1
- 2
- 3
- 4
- 5
- 6
- 7
- 8
4.1.3 params 参数对象写法
注意:使用 params 进行传参时,路由地址不能使用 path,只能使用 name。即 params 进行传参时使用对象写法只能使用命名路由。
<ul> <li v-for="m in messageList" :key="m.id"> {m.title}} --> <router-link :to="{ name: 'messageDetail', params: { id: m.id, title: m.title } }"> {{m.title}} router-link> li> ul>- 1
- 2
- 3
- 4
- 5
- 6
- 7
- 8
- 9
- 10
- 11
- 12
- 13
- 14
- 15
4.2 组件接收 params 参数
在路由跳转时通过 params 进行传参,传递的参数会被存放在组件实例对象的
$route
属性上。<template> <div> <ul> <li>消息编号: {{$route.params.id}}li> <li>消息标题: {{$route.params.title}}li> ul> div> template> <script> export default { name: 'Detail', mounted() { console.log(this.$route) } } script> <style> style>- 1
- 2
- 3
- 4
- 5
- 6
- 7
- 8
- 9
- 10
- 11
- 12
- 13
- 14
- 15
- 16
- 17
- 18
- 19
- 20

4.3 总结 路由 params 传参
-
配置路由,声明接收params参数
{ path:'/home', component:Home, children:[ { path:'news', component:News }, { component:Message, children:[ { name:'xiangqing', path:'detail/:id/:title', //使用占位符声明接收params参数 component:Detail } ] } ] }- 1
- 2
- 3
- 4
- 5
- 6
- 7
- 8
- 9
- 10
- 11
- 12
- 13
- 14
- 15
- 16
- 17
- 18
- 19
- 20
-
传递参数
<router-link :to="/home/message/detail/666/你好">跳转router-link> <router-link :to="{ name:'xiangqing', params:{ id:666, title:'你好' } }" >跳转router-link>- 1
- 2
- 3
- 4
- 5
- 6
- 7
- 8
- 9
- 10
- 11
- 12
- 13
特别注意:路由携带params参数时,若使用to的对象写法,则不能使用path配置项,必须使用name配置!
-
接收参数:
$route.params.id $route.params.title- 1
- 2
5. 路由的 props 配置
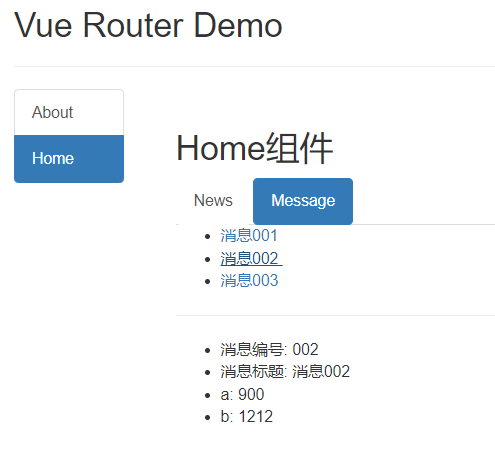
5.1 第一种写法:props值为对象
该对象中所有的key-value的组合最终都会通过props传给组件
但是这种写法传递的数据为死数据
router/index.js
{ name: 'message', path: 'message', component: Message, children: [ { name: 'messageDetail', // :id :title 均为params参数的占位 path: 'detail/:id/:title', component: Detail, props: {a: 900, b: 1212} } ] }- 1
- 2
- 3
- 4
- 5
- 6
- 7
- 8
- 9
- 10
- 11
- 12
- 13
- 14
Detail.vue
<template> <div> <ul> <li>消息编号: {{$route.params.id}}li> <li>消息标题: {{$route.params.title}}li> <li>a: {{a}}li> <li>b: {{b}}li> ul> div> template> <script> export default { name: 'Detail', props: ['a', 'b'], mounted() { console.log(this.$route) } } script> <style> style>- 1
- 2
- 3
- 4
- 5
- 6
- 7
- 8
- 9
- 10
- 11
- 12
- 13
- 14
- 15
- 16
- 17
- 18
- 19
- 20
- 21
- 22
- 23
5.2 第二种写法:props值为布尔值
布尔值为true,则把路由收到的所有params参数通过props传给组件。
router/index.js
{ name: 'message', path: 'message', component: Message, children: [ { name: 'messageDetail', // :id :title 均为params参数的占位 path: 'detail/:id/:title', component: Detail, // props: {a: 900, b: 1212} props: true } ] }- 1
- 2
- 3
- 4
- 5
- 6
- 7
- 8
- 9
- 10
- 11
- 12
- 13
- 14
- 15
Detail.vue
<template> <div> <ul> <li>消息编号: {{id}}li> <li>消息标题: {{title}}li> ul> div> template> <script> export default { name: 'Detail', props: ['id', 'title'], mounted() { console.log(this.$route) } } script> <style> style>- 1
- 2
- 3
- 4
- 5
- 6
- 7
- 8
- 9
- 10
- 11
- 12
- 13
- 14
- 15
- 16
- 17
- 18
- 19
- 20
- 21
5.3 第三种写法:props值为函数
该函数返回的对象中每一组key-value都会通过props传给组件
Detail.vue
使用 query 传参
<router-link :to="{ name: 'messageDetail', query: { id: m.id, title: m.title } }"> {{m.title}} router-link>- 1
- 2
- 3
- 4
- 5
- 6
- 7
- 8
- 9
router/index.js
{ name: 'message', path: 'message', component: Message, children: [ { name: 'messageDetail', // :id :title 均为params参数的占位 path: 'detail', component: Detail, // props: {a: 900, b: 1212} // props: true props($route) { return { id: $route.query.id, title: $route.query.title } }, // 直接从 $route 中解构出 query // props({query}) { // return { // id: query.id, // title: query.title // } // } } ] }- 1
- 2
- 3
- 4
- 5
- 6
- 7
- 8
- 9
- 10
- 11
- 12
- 13
- 14
- 15
- 16
- 17
- 18
- 19
- 20
- 21
- 22
- 23
- 24
- 25
- 26
- 27
- 28
Detail.vue
<template> <div> <ul> <li>消息编号: {{id}}li> <li>消息标题: {{title}}li> ul> div> template> <script> export default { name: 'Detail', props: ['id', 'title'], mounted() { console.log(this.$route) } } script> <style> style>- 1
- 2
- 3
- 4
- 5
- 6
- 7
- 8
- 9
- 10
- 11
- 12
- 13
- 14
- 15
- 16
- 17
- 18
- 19
- 20
- 21
5.4 总结 路由的 props 配置
作用:让路由组件更方便的收到参数
{ name:'xiangqing', path:'detail/:id', component:Detail, //第一种写法:props值为对象,该对象中所有的key-value的组合最终都会通过props传给Detail组件 // props:{a:900} //第二种写法:props值为布尔值,布尔值为true,则把路由收到的所有params参数通过props传给Detail组件 // props:true //第三种写法:props值为函数,该函数返回的对象中每一组key-value都会通过props传给Detail组件 props(route){ return { id:route.query.id, title:route.query.title } } }- 1
- 2
- 3
- 4
- 5
- 6
- 7
- 8
- 9
- 10
- 11
- 12
- 13
- 14
- 15
- 16
- 17
- 18
- 19
6.
- 作用:控制路由跳转时操作浏览器历史记录的模式
- 浏览器的历史记录有两种写入方式:分别为
push和replace,push是追加历史记录,replace是替换当前记录。路由跳转时候默认为push - 如何开启
replace模式:News
-
相关阅读:
mysql的函数
c语言终点站--文件操作
某有色金属集团主数据管理面临的问题和解决方案
Hostlink通讯协议解析【串行 C-Mode和Fins】
HTTP协议和Tomcat服务器
一.基础算法
PHP Error 和 Logging 函数
基于动态数据体积的网络入侵问题
【Python安装-保姆级教程】马哥手把手教你安装Python并配置pycharm环境
如何使用 Blazor 框架在前端浏览器中导入和导出 Excel
- 原文地址:https://blog.csdn.net/m0_53022813/article/details/127462214
