-
SpringBoot高级知识【原理分析、监控、项目部署】
1. 原理分析
1.1 自动配置
1.1.1
@Condition- Condition是在Spring 4.0增加的条件判断功能,通过这个可以功能可以实现选择性的创建Bean操作。
思考- SpringBoot是如何知道要创建哪个Bean的? 比如
- SpringBoot是如何知道要创建RedisTemplate的?
案例实操- 在Spring 的IOC容器中有一个 User 的 Bean,现要求:
- 导入Jedis坐标后,加载该Bean,没导入,则不加载。
- 前期准备
<dependency> <groupId>org.springframework.bootgroupId> <artifactId>spring-boot-starter-data-redisartifactId> dependency>- 1
- 2
- 3
- 4
package com.ithema.springbootconditional.domain; public class User { }- 1
- 2
- 3
- 4
- 定义User的配置类(用来返回与user相关的Bean)
//定义配置类,用来返回与user相关的Bean package com.ithema.springbootconditional.config; import com.ithema.springbootconditional.condition.ClassCondition; import com.ithema.springbootconditional.domain.User; import org.springframework.context.annotation.Bean; import org.springframework.context.annotation.Conditional; import org.springframework.context.annotation.Configuration; @Configuration public class UserConfig { //用来返回与user相关的Bean @Bean @Conditional(ClassCondition.class) public User user(){ return new User(); } }- 1
- 2
- 3
- 4
- 5
- 6
- 7
- 8
- 9
- 10
- 11
- 12
- 13
- 14
- 15
- 16
- 17
- 18
- 19
- 20
- 定义判断类
//定义条件类 package com.ithema.springbootconditional.condition; import org.springframework.context.annotation.Condition; import org.springframework.context.annotation.ConditionContext; import org.springframework.core.type.AnnotatedTypeMetadata; public class ClassCondition implements Condition { @Override public boolean matches(ConditionContext context, AnnotatedTypeMetadata metadata) { //1.需求: 导入Jedis坐标后创建Bean //思路:判断redis.clients.jedis.Jedis.class文件是否存在 boolean flag = true; try { Class<?> cls = Class.forName("redis.clients.jedis.Jedis"); } catch (ClassNotFoundException e) { flag = false; } return flag; } }- 1
- 2
- 3
- 4
- 5
- 6
- 7
- 8
- 9
- 10
- 11
- 12
- 13
- 14
- 15
- 16
- 17
- 18
- 19
- 20
- 21
- 22
- 执行引导类
package com.ithema.springbootcondition; import org.springframework.boot.SpringApplication; import org.springframework.boot.autoconfigure.SpringBootApplication; import org.springframework.context.ConfigurableApplicationContext; @SpringBootApplication public class SpringbootConditionApplication { public static void main(String[] args) { //启动SpringBoot的应用,返回Spring的IOC容器 ConfigurableApplicationContext context = SpringApplication.run(SpringbootConditionApplication.class, args); //获取Bean,redisTemplate Object redisTemplate = context.getBean("redisTemplate"); System.out.println(redisTemplate); } }- 1
- 2
- 3
- 4
- 5
- 6
- 7
- 8
- 9
- 10
- 11
- 12
- 13
- 14
- 15
- 16
- 17
- 18
- 19
- 在Spring 的IOC容器中有一个 Student 的 Bean,现要求:
- 将类的判断定义为动态的。判断哪个字节码文件存在可以动态指定。
(高级)
- 将类的判断定义为动态的。判断哪个字节码文件存在可以动态指定。
package com.ithema.springbootconditional.domain; public class Student { }- 1
- 2
- 3
- 4
//定义配置类,用来返回与user相关的Bean package com.ithema.springbootconditional.config; import com.ithema.springbootconditional.condition.ConditionOnClass; import com.ithema.springbootconditional.domain.Student; import org.springframework.context.annotation.Bean; public class StudentConfig { @Bean @ConditionOnClass("redis.clients.jedis.Jedis") public Student student(){ return new Student(); } }- 1
- 2
- 3
- 4
- 5
- 6
- 7
- 8
- 9
- 10
- 11
- 12
- 13
- 14
- 15
package com.ithema.springbootconditional.condition; import java.lang.annotation.*; import org.springframework.context.annotation.Conditional; @Target({ElementType.TYPE, ElementType.METHOD})//表示该注解(ConditionOnClass)可以加在哪上面TYPE(类)/Method @Retention(RetentionPolicy.RUNTIME)//注解生效的实际 @Documented//生成文档 @Conditional(StudentConditon.class) public @interface ConditionOnClass { String[] value(); }- 1
- 2
- 3
- 4
- 5
- 6
- 7
- 8
- 9
- 10
- 11
- 12
//定义条件类 package com.ithema.springbootconditional.condition; import org.springframework.context.annotation.Condition; import org.springframework.context.annotation.ConditionContext; import org.springframework.core.type.AnnotatedTypeMetadata; import java.util.Map; public class StudentConditon implements Condition { @Override public boolean matches(ConditionContext context, AnnotatedTypeMetadata metadata) { //2.需求: 导入通过注解属性值value指定坐标后创建Bean //获取注解属性值:value String s = ConditionOnClass.class.getName(); System.out.println(s); Map<String, Object> map = metadata.getAnnotationAttributes("s"); System.out.println(map); //{value=[redis.clients.jedis.Jedis]} String[] value = (String[]) map.get("value"); boolean flag = true; try { for (String className : value) { Class.forName(className); } } catch (ClassNotFoundException e) { flag = false; } return flag; } }- 1
- 2
- 3
- 4
- 5
- 6
- 7
- 8
- 9
- 10
- 11
- 12
- 13
- 14
- 15
- 16
- 17
- 18
- 19
- 20
- 21
- 22
- 23
- 24
- 25
- 26
- 27
- 28
- 29
- 30
- 31
- 32
- 33
小结-
自定义条件:
定义条件类:自定义类实现Condition接口,重写matches方法,在matches方法中进行逻辑判断,返回 boolean值。matches方法两个参数:- context:上下文对象,可以获取属性值,获取类加载器,获取BeanFactory等。.
- metadata:元数据对象,用于获取注解属性。
2.判断条件:在初始化Bean时,使用@conditional(条件类.class)注解
-
SpringBoot提供的常用条件注解:
- @ Conditional:根据条件,决定类是否加载到Spring Ioc容器中,在SpringBoot中有大量的运用
- @ConditionalonProperty:判断配置文件中是否有对应属性和值才初始化Bean.
- @ConditionalOnClass:判断环境中是否有对应字节码文件才初始化Bean
- @ConditionalOnMissingBean:判断环境中没有对应Bean才初始化Bean
-
@ConditionalonProperty:案例演示
//使用springboot提供的ConditionalonProperty注解 实现条件判断 @Bean("user2") @ConditionalOnProperty(name = "itcast",havingValue = "heima") public User getUser2(){ return new User(); }- 1
- 2
- 3
- 4
- 5
- 6
# 在yml或这propreties中配置相关内容 # itoldlu=oldlu itoldlu: oldlu- 1
- 2
- 3
1.1.2
切换内置web服务器- SpringBoot的web环境中默认使用tomcat作为内置服务器,其实SpringBoot提供了
4中内置服务器供我们选择,我们可以很方便的进行切换。- tomcat
- Jetty
- Netty
- Undertow
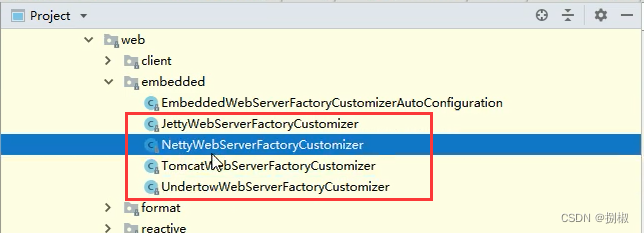
<dependency> <groupId>org.springframework.bootgroupId> <artifactId>spring-boot-starter-webartifactId> <exclusions> <exclusion> <artifactId>spring-boot-starter-tomcatartifactId> <groupId>org.springframework.bootgroupId> exclusion> exclusions> dependency> <dependency> <artifactId>spring-boot-starter-jettyartifactId> <groupId>org.springframework.bootgroupId> dependency>- 1
- 2
- 3
- 4
- 5
- 6
- 7
- 8
- 9
- 10
- 11
- 12
- 13
- 14
- 15
- 16
- 17
1.1.3
@Enable*注解思考- SpringBoot工程是否可以直接获取jar包中定义的Bean?
- 回答:当然不可以
- 那么我们应该怎么获取呢?
- 请看下面讲解
案例讲解- 前提准备
- 创建springboot-enable模块
//springboot-enable引导类,我们在这里获取springboot-enable-other的user Bean。 package com.ithema.springbootenableother; import org.springframework.boot.SpringApplication; import org.springframework.boot.autoconfigure.SpringBootApplication; @SpringBootApplication public class SpringbootEnableApplication { public static void main(String[] args) { ConfigurableApplicationContext context = SpringApplication.run(SpringbootEnableApplication.class, args); //springboot不能直接获取其他模块的Bean,原因为@SpringBootApplication中的注解@ComponentScan Object user = context.getBean("user"); System.out.println(user); } }- 1
- 2
- 3
- 4
- 5
- 6
- 7
- 8
- 9
- 10
- 11
- 12
- 13
- 14
- 15
- 16
- 17
- 前提准备2
- 创建springboot-enable-other模块,该模块主要提供Bean的定义,无实际操作。
//domian包下创建一个User类 package com.ithema.domain; public class User { }- 1
- 2
- 3
- 4
- 5
//config目录下创建一个User的配置类 package com.ithema.config; import com.ithema.domain.User; import org.springframework.context.annotation.Bean; import org.springframework.context.annotation.Configuration; @Configuration public class UserConfig { @Bean public User user(){ return new User(); } }- 1
- 2
- 3
- 4
- 5
- 6
- 7
- 8
- 9
- 10
- 11
- 12
- 13
- 14
- 前期准备3
- 让springboot-enable模块去依赖与springboot-enbale-other模块
<dependency> <groupId>com.ithemagroupId> <artifactId>springboot-enable-otherartifactId> <version>0.0.1-SNAPSHOTversion> dependency>- 1
- 2
- 3
- 4
- 5
解决办法- 方法1:
package com.ithema.springbootenable; import com.ithema.config.EnableUser; import com.ithema.config.UserConfig; import org.springframework.boot.SpringApplication; import org.springframework.boot.autoconfigure.SpringBootApplication; import org.springframework.context.ConfigurableApplicationContext; import org.springframework.context.annotation.ComponentScan; import org.springframework.context.annotation.Import; /** * @ComponentScan 扫描范围:当前引导类所在包及其子包 * * com.ithema.springbootenable * com.ithema.config * 方法 1.解决springboot不能直接获取其他模块的Bean,可以使用@ComponentScan扫描com.ithema.config包 */ @SpringBootApplication @ComponentScan("com.ithema.config") //com.ithema.domain.User@585ac855 public class SpringbootEnableApplication { public static void main(String[] args) { ConfigurableApplicationContext context = SpringApplication.run(SpringbootEnableApplication.class, args); Object user = context.getBean("user"); System.out.println(user); } }- 1
- 2
- 3
- 4
- 5
- 6
- 7
- 8
- 9
- 10
- 11
- 12
- 13
- 14
- 15
- 16
- 17
- 18
- 19
- 20
- 21
- 22
- 23
- 24
- 25
- 26
- 27
- 28
- 29
- 30
- 方法2:
package com.ithema.springbootenable; import com.ithema.config.EnableUser; import com.ithema.config.UserConfig; import org.springframework.boot.SpringApplication; import org.springframework.boot.autoconfigure.SpringBootApplication; import org.springframework.context.ConfigurableApplicationContext; import org.springframework.context.annotation.ComponentScan; import org.springframework.context.annotation.Import; /** * @ComponentScan 扫描范围:当前引导类所在包及其子包 * * com.ithema.springbootenable * com.ithema.config * 方法 1.解决springboot不能直接获取其他模块的Bean,可以使用@ComponentScan扫描com.ithema.config包 * 方法 2.可以使用@Import注解,加载类。这些类都会被Spring创建,并放入IOC容器 */ @SpringBootApplication @Import(UserConfig.class) //com.ithema.domain.User@7c2a69b4 public class SpringbootEnableApplication { public static void main(String[] args) { ConfigurableApplicationContext context = SpringApplication.run(SpringbootEnableApplication.class, args); //springboot不能直接获取其他模块的Bean,原因为@SpringBootApplication中的注解@ComponentScan Object user = context.getBean("user"); System.out.println(user); } }- 1
- 2
- 3
- 4
- 5
- 6
- 7
- 8
- 9
- 10
- 11
- 12
- 13
- 14
- 15
- 16
- 17
- 18
- 19
- 20
- 21
- 22
- 23
- 24
- 25
- 26
- 27
- 28
- 29
- 30
- 方法3:
//提前在springboot-enable-other模块中提供一个@EnableUser供使用 package com.ithema.config; import org.springframework.context.annotation.Import; import java.lang.annotation.*; @Target(ElementType.TYPE) @Retention(RetentionPolicy.RUNTIME) @Documented @Import(UserConfig.class) public @interface EnableUser { }- 1
- 2
- 3
- 4
- 5
- 6
- 7
- 8
- 9
- 10
- 11
- 12
- 13
package com.ithema.springbootenable; import com.ithema.config.EnableUser; import com.ithema.config.UserConfig; import org.springframework.boot.SpringApplication; import org.springframework.boot.autoconfigure.SpringBootApplication; import org.springframework.context.ConfigurableApplicationContext; import org.springframework.context.annotation.ComponentScan; import org.springframework.context.annotation.Import; /** * @ComponentScan 扫描范围:当前引导类所在包及其子包 * * com.ithema.springbootenable * com.ithema.config * 方法 1.解决springboot不能直接获取其他模块的Bean,可以使用@ComponentScan扫描com.ithema.config包 * 方法 2.可以使用@Import注解,加载类。这些类都会被Spring创建,并放入IOC容器 * 方法 3.可以对Import注解进行封装。 */ @SpringBootApplication @EnableUser //com.ithema.domain.User@3eba57a7 public class SpringbootEnableApplication { public static void main(String[] args) { ConfigurableApplicationContext context = SpringApplication.run(SpringbootEnableApplication.class, args); //springboot不能直接获取其他模块的Bean,原因为@SpringBootApplication中的注解@ComponentScan Object user = context.getBean("user"); System.out.println(user); } }- 1
- 2
- 3
- 4
- 5
- 6
- 7
- 8
- 9
- 10
- 11
- 12
- 13
- 14
- 15
- 16
- 17
- 18
- 19
- 20
- 21
- 22
- 23
- 24
- 25
- 26
- 27
- 28
- 29
- 30
- 31
解析:方法3就是我们接下来讲的SpringBoot为我们提供的@Enable*注解。- SpringBoot中提供了很多Enable开头的注解,这些注解都是用于动态启用某些功能的。而其底层原理是使用@lmport注解导入一些配置类,实现Bean的动态加载。
1.1.4
@lmport注解@Enable*底层依赖于@lmport注解导入一些类,使用@lmport导入的类会被Spring加载到IOC容器中。而@Import提供4中用法:- 导入Bean
- 导入配置类
- 导入lmportSelector实现类。一般用于加载配置文件中的类
- 导入lmportBeanDefinitionRegistrar实现类。
用法 1:导入Bean//用法1:导入Bean @SpringBootApplication @Import(User.class) public class SpringbootEnableApplication { public static void main(String[] args) { ConfigurableApplicationContext context = SpringApplication.run(SpringbootEnableApplication.class, args); User user = context.getBean(User.class); System.out.println(user);//com.ithema.domain.User@41477a6d Map<String,User> map = context.getBeansOfType(User.class); System.out.println(map);//获取Bean的名称,全路径:{com.ithema.domain.User=com.ithema.domain.User@41477a6d} } }- 1
- 2
- 3
- 4
- 5
- 6
- 7
- 8
- 9
- 10
- 11
- 12
- 13
- 14
- 15
用法 2:导入配置类//用法2:导入配置类,它可以同时把多个Bean 加载到IOC容器中 package com.ithema.domain; public class Role { }- 1
- 2
- 3
- 4
- 5
- 6
package com.ithema.config; import com.ithema.domain.Role; import com.ithema.domain.User; import org.springframework.context.annotation.Bean; import org.springframework.context.annotation.Configuration; //@Configuration 使用方法2可以不加该注解 public class UserConfig { @Bean public User user() { return new User(); } @Bean public Role role() { return new Role(); } }- 1
- 2
- 3
- 4
- 5
- 6
- 7
- 8
- 9
- 10
- 11
- 12
- 13
- 14
- 15
- 16
- 17
- 18
- 19
- 20
- 21
//用法2:导入配置类,它可以同时把多个Bean 加载到IOC容器中 @SpringBootApplication @Import(UserConfig.class) public class SpringbootEnableApplication { public static void main(String[] args) { ConfigurableApplicationContext context = SpringApplication.run(SpringbootEnableApplication.class, args); User user = context.getBean(User.class); System.out.println(user); Role role = context.getBean(Role.class); System.out.println(role); } }- 1
- 2
- 3
- 4
- 5
- 6
- 7
- 8
- 9
- 10
- 11
- 12
- 13
- 14
- 15
- 16
用法 3:导入lmportSelector实现类。一般用于加载配置文件中的类package com.ithema.config; import org.springframework.context.annotation.ImportSelector; import org.springframework.core.type.AnnotationMetadata; public class MyImportSelector implements ImportSelector { @Override public String[] selectImports(AnnotationMetadata importingClassMetadata) { return new String[]{"com.ithema.domain.User", "com.ithema.domain.Role"}; } }- 1
- 2
- 3
- 4
- 5
- 6
- 7
- 8
- 9
- 10
- 11
- 12
package com.ithema.springbootenable; import com.ithema.config.EnableUser; import com.ithema.config.MyImportSelector; import com.ithema.config.UserConfig; import com.ithema.domain.Role; import com.ithema.domain.User; import org.springframework.boot.SpringApplication; import org.springframework.boot.autoconfigure.SpringBootApplication; import org.springframework.context.ConfigurableApplicationContext; import org.springframework.context.annotation.ComponentScan; import org.springframework.context.annotation.Import; import java.util.Map; @SpringBootApplication @Import(MyImportSelector.class) public class SpringbootEnableApplication { public static void main(String[] args) { ConfigurableApplicationContext context = SpringApplication.run(SpringbootEnableApplication.class, args); User user = context.getBean(User.class); System.out.println(user); Role role = context.getBean(Role.class); System.out.println(role); } }- 1
- 2
- 3
- 4
- 5
- 6
- 7
- 8
- 9
- 10
- 11
- 12
- 13
- 14
- 15
- 16
- 17
- 18
- 19
- 20
- 21
- 22
- 23
- 24
- 25
- 26
- 27
- 28
- 29
- 30
- 31
用法4:导入lmportBeanDefinitionRegistrar实现类//用法4 package com.ithema.config; import com.ithema.domain.User; import org.springframework.beans.factory.support.AbstractBeanDefinition; import org.springframework.beans.factory.support.BeanDefinitionBuilder; import org.springframework.beans.factory.support.BeanDefinitionRegistry; import org.springframework.context.annotation.ImportBeanDefinitionRegistrar; import org.springframework.core.type.AnnotationMetadata; public class MyImportBeanDefinitionRegistrar implements ImportBeanDefinitionRegistrar { @Override public void registerBeanDefinitions(AnnotationMetadata importingClassMetadata, BeanDefinitionRegistry registry) { AbstractBeanDefinition beanDefinition = BeanDefinitionBuilder.rootBeanDefinition(User.class).getBeanDefinition(); registry.registerBeanDefinition("user", beanDefinition); } }- 1
- 2
- 3
- 4
- 5
- 6
- 7
- 8
- 9
- 10
- 11
- 12
- 13
- 14
- 15
- 16
- 17
- 18
package com.ithema.springbootenable; import com.ithema.config.EnableUser; import com.ithema.config.MyImportBeanDefinitionRegistrar; import com.ithema.config.MyImportSelector; import com.ithema.config.UserConfig; import com.ithema.domain.Role; import com.ithema.domain.User; import org.springframework.boot.SpringApplication; import org.springframework.boot.autoconfigure.SpringBootApplication; import org.springframework.context.ConfigurableApplicationContext; import org.springframework.context.annotation.ComponentScan; import org.springframework.context.annotation.Import; import java.util.Map; @SpringBootApplication @Import(MyImportBeanDefinitionRegistrar.class) public class SpringbootEnableApplication { public static void main(String[] args) { ConfigurableApplicationContext context = SpringApplication.run(SpringbootEnableApplication.class, args); User user = context.getBean(User.class); System.out.println(user); //com.ithema.domain.User@796d3c9f Object user2 = context.getBean("user"); System.out.println(user2);//com.ithema.domain.User@796d3c9f 为什么对象一样?是单例哦 } }- 1
- 2
- 3
- 4
- 5
- 6
- 7
- 8
- 9
- 10
- 11
- 12
- 13
- 14
- 15
- 16
- 17
- 18
- 19
- 20
- 21
- 22
- 23
- 24
- 25
- 26
- 27
- 28
- 29
- 30
- 31
- 32
- 33
1.1.5
@EnableAutoConfiguration注解- @EnableAutoConfiguration注解内部使用@Import (AutoConfigurationImportselector.class)来加载配置类。
- 配置文件位置:META-INF/spring.factories,该配置文件中定义了大量的配置类,当SpringBoot应用启动时,会自动载这些配置类,初始化Bean
- 并不是所有的Bean都会被初始化,在配置类中使用Condition来加载满足条件的Bean
1.1.6 小结:
案例实操- 需求:
- 自定义redis-starter。要求当导入redis坐标时,SpringBoot自动创建Jedis的Bean。
- 实现步骤:
- 创建redis-spring-boot-autoconfigure模块
- 创建redis-spring-boot-starter模块,依赖redis-spring-boot-autoconfigure的模块
- 在redis-spring-boot-autoconfigure模块中初始化Jedis 的Bean。并定义META-INF/spring.factories文件
- 在测试模块中引入自定义的redis-starter依赖,测试获取Jedis 的Bean,操作redis。
1.2 监听机制
1.2.1 Java监听机制
SpringBoot的监听机制,其实是对
Java提供的事件监听机制的封装。Java中的事件监听机制定义了以下几个角色:
- 事件: Event,继承java.util.EventObject类的对象
- 事件源:Source,任意对象Object
- 监听器:Listener,实现java.util.EventListener 接口的对象
1.2.2 SpringBoot监听机制
SpringBoot在项目启动时,会对几个监听器进行回调,我们可以实现这些监听器接口,在项目启动时完成—些操作。
- ApplicationContextInitializer、
- SpringApplicationRunListener、
- CommandLineRunner、
- ApplicationRunner
1.3 启动流程分析
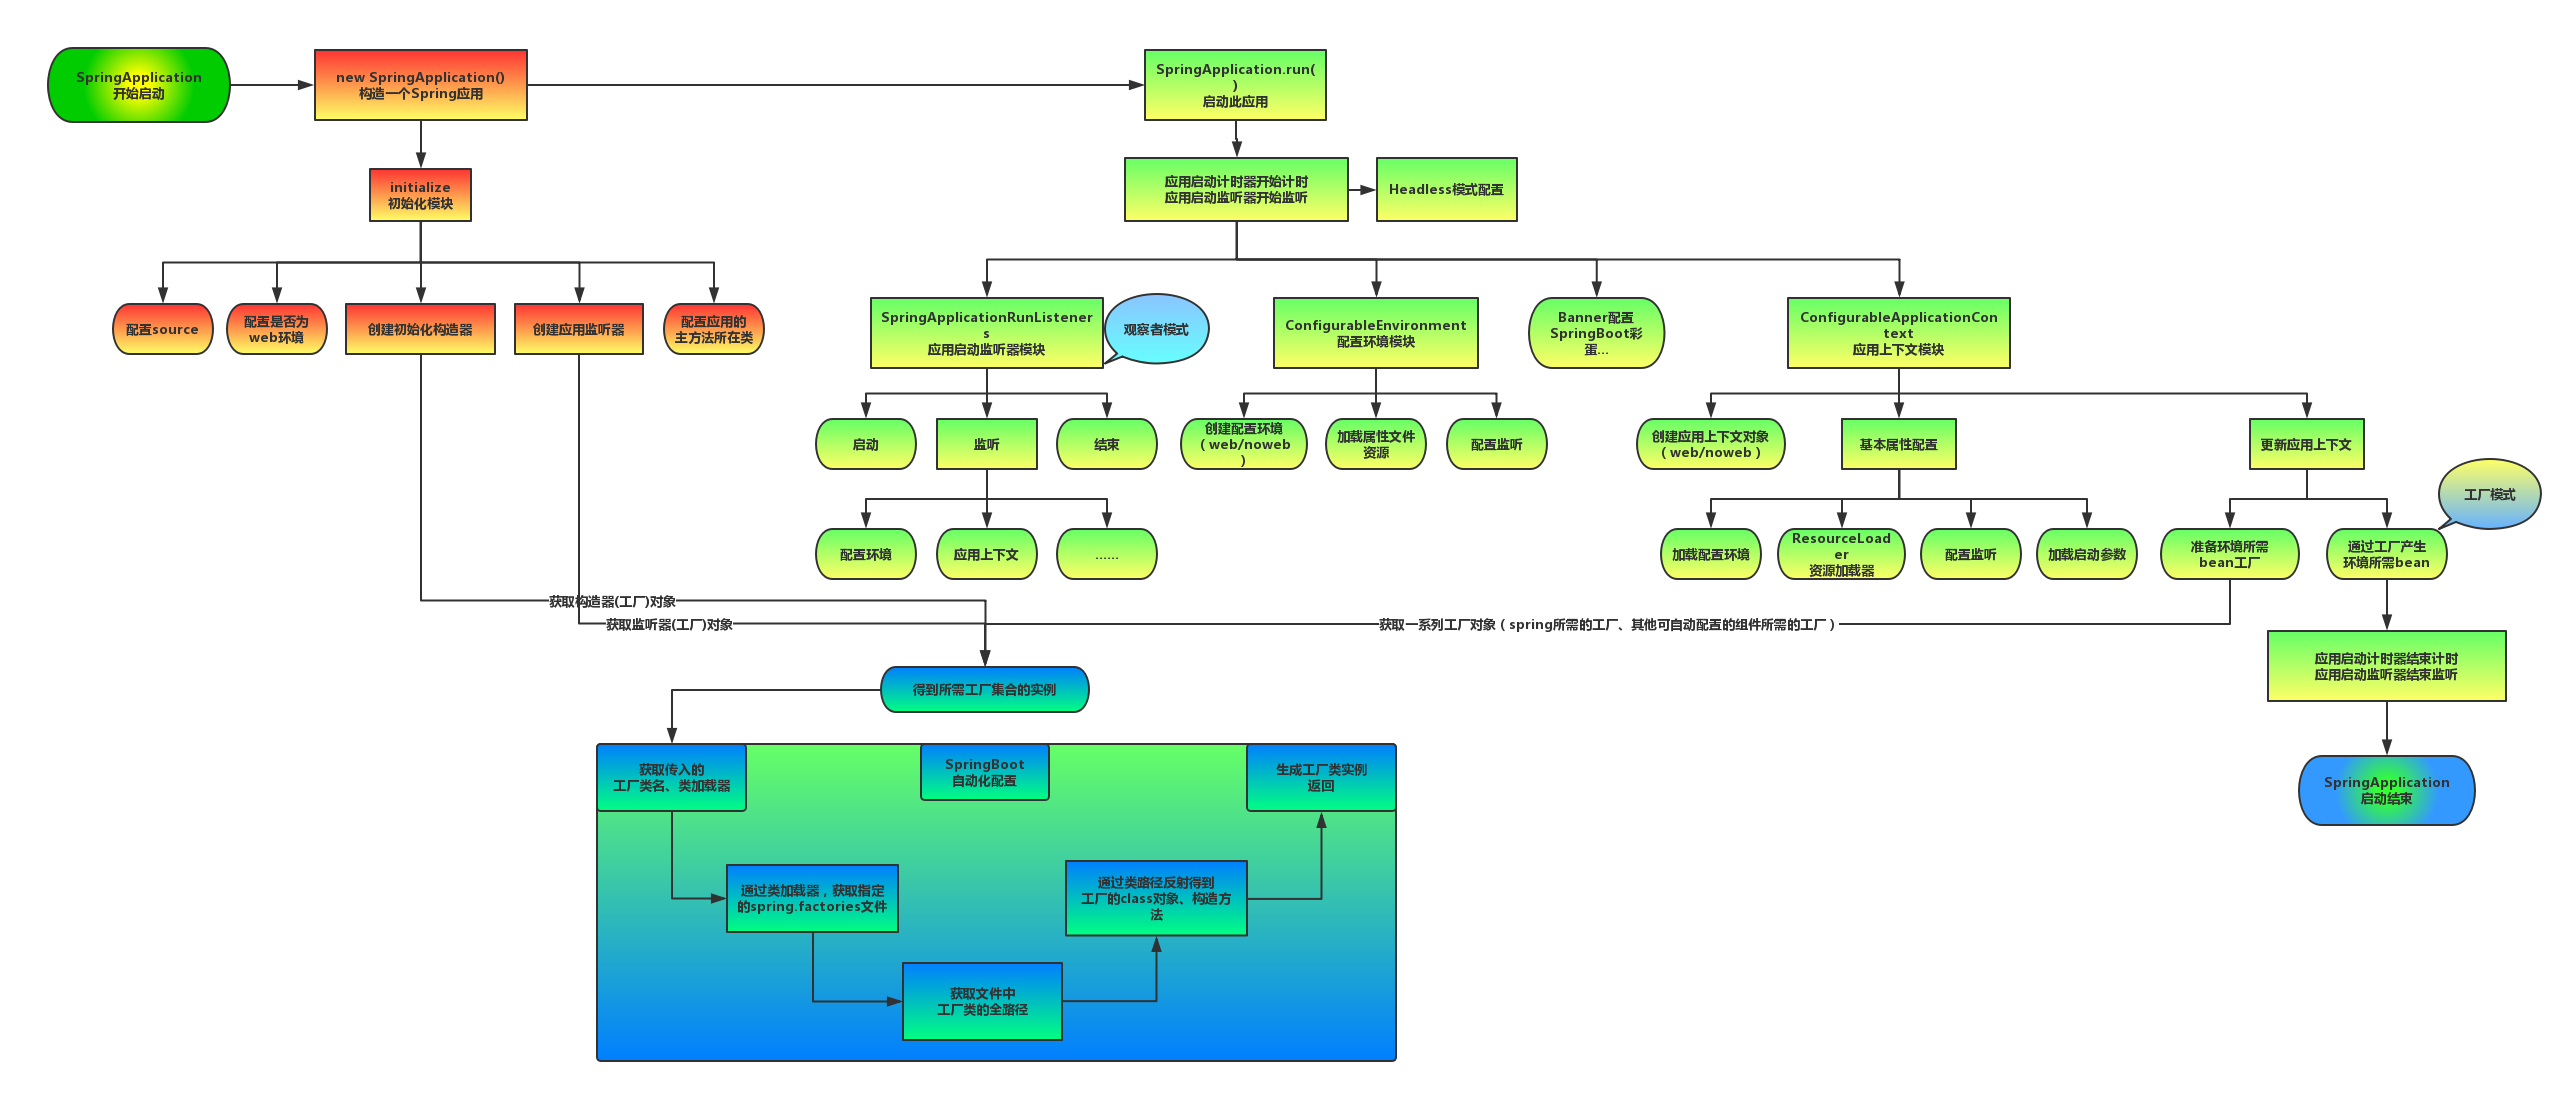
2. 监控
2.1 监控概述
SpringBoot自带
监控功能Actuator,可以帮助实现对程序内部运行情况监控,比如- 监控状况、
Bean加载情况、配置属性、- 日志信息等。
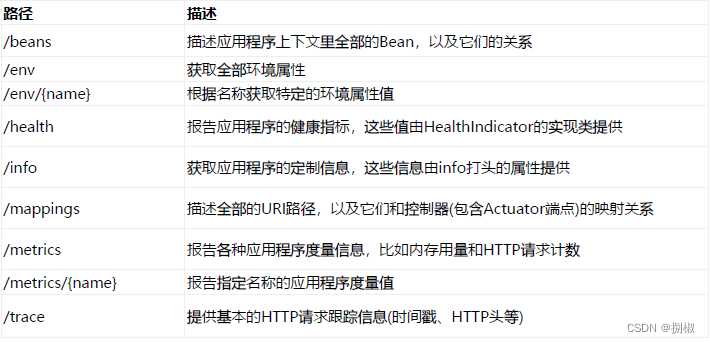
2.2 监控使用
2.2.1
使用步骤第一步:导入依赖坐标<dependency> <groupld>org.springframework.bootgroupld> <artifactld>spring-boot-starter-actuatorartifactld> dependency>- 1
- 2
- 3
- 4
- 5
第二步:访问 http://localhost:8080/actuator2.2.2
案例实操可以在
application.properties配置下面相关信息。若不配置则只能监控info和health的内容# 注意:springboot2.7.2中,info端点默认是不启用,info开头的变量默认也是不启用的 info.name=zhangsan info.age=23 # springboot2.7.2需要 启用配置里的info开头的变量 management.info.env.enabled=true # 开启健康检查的完整信息 management.endpoint.health.show-details=always # 将所有的监控endpoint暴露出来 management.endpoints.web.exposure.include=*- 1
- 2
- 3
- 4
- 5
- 6
- 7
- 8
- 9
- 10
- 11
- 12
访问

2.3 SpringBoot Admin
- Spring Boot Admin是一个开源社区项目,用于管理和监控SpringBoot应用程序。
- Spring Boot Admin有两个角色,客户端
(Client)和服务端(Server)。 - 应用程序作为
Spring Boot Admin Client向为Spring Boot Admin Server注册 Spring Boot Admin Server的UI界面将Spring Boot Admin Client的Actuator Endpoint上的一些监控信息。
2.3.1
操作步骤1.admin-server:- 创建admin-server模块
- 导入依赖坐标admin-starter-server
- 在
引导类上启用监控功能@EnableAdminServer
2.admin-client:- 创建admin-client模块
- 导入依赖坐标admin-starter-client
配置相关信息: server地址等- 启动server和client服务,访问server
2.3.2
案例实操1. 创建admin-server模块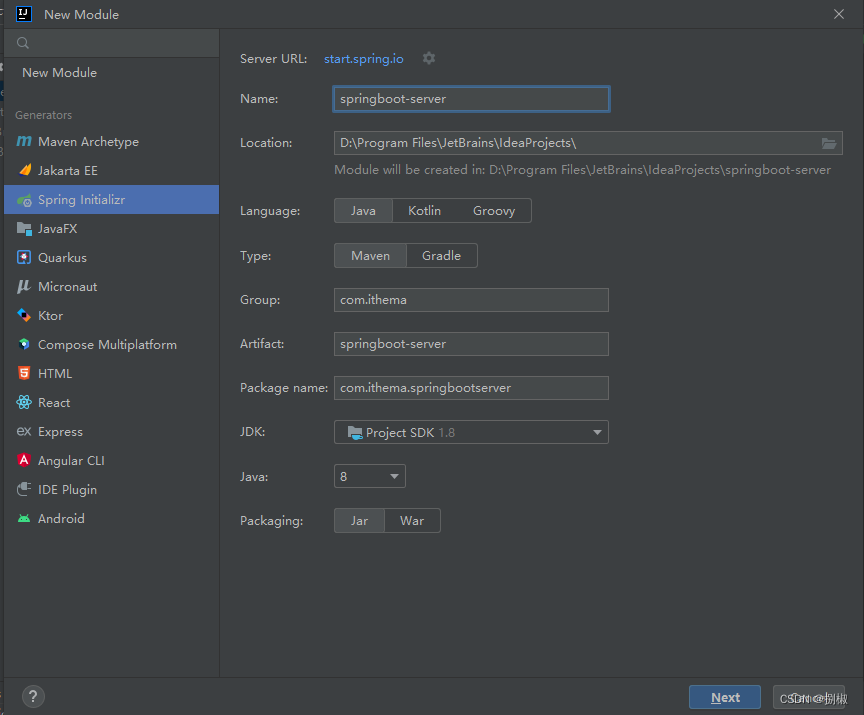
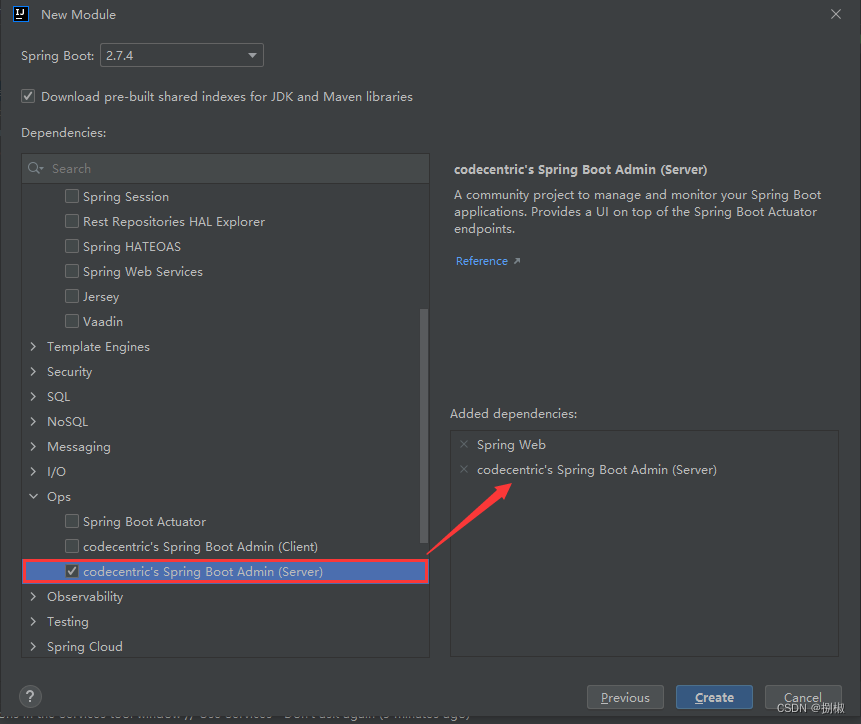
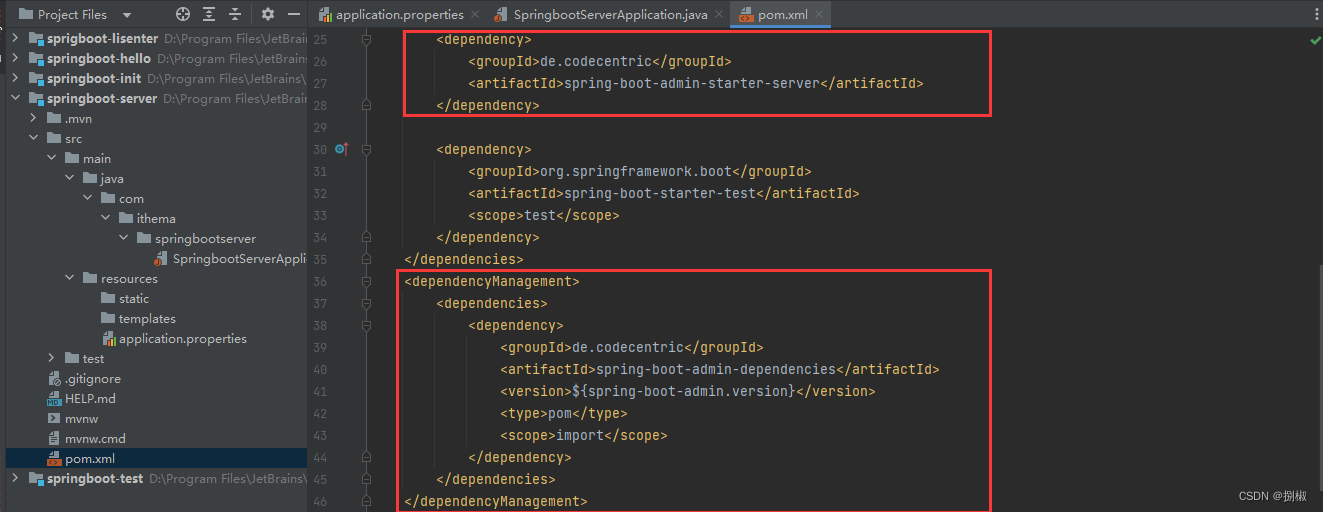

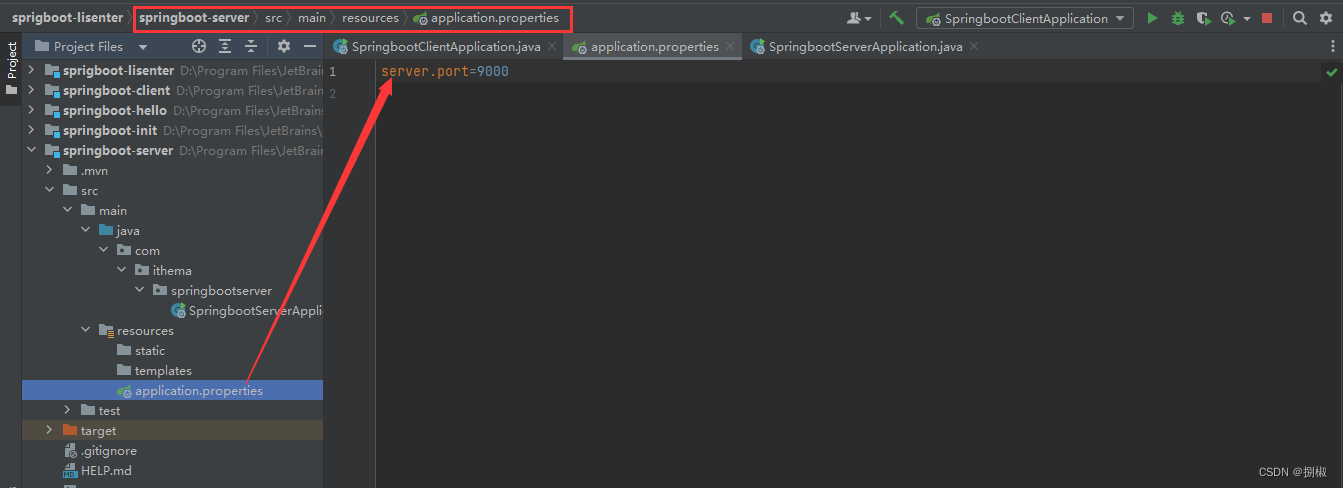
把服务器端中server.port改成9000,避免启动客户端和服务器两个模块时,端口冲突
2. 创建admin-client模块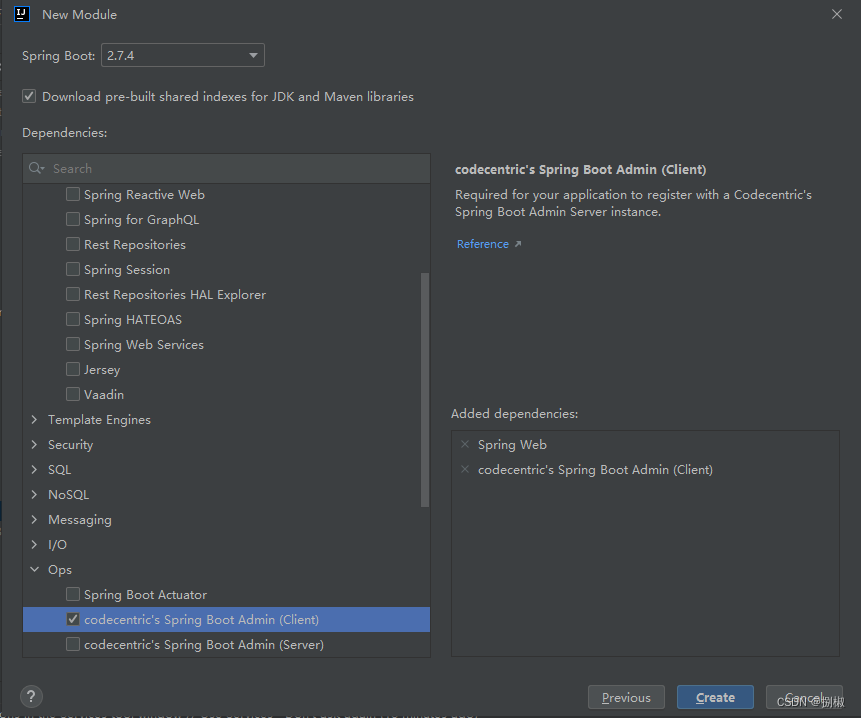
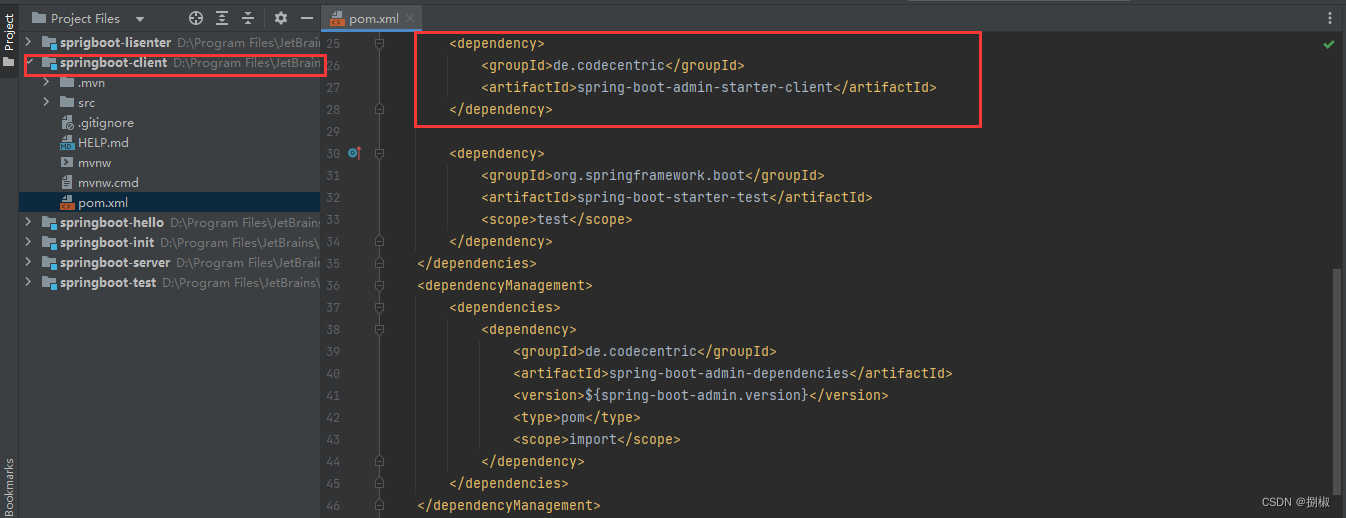

3. 检测- 启动服务端
- 启动客户端
- 访问
localhost:9000查看结果
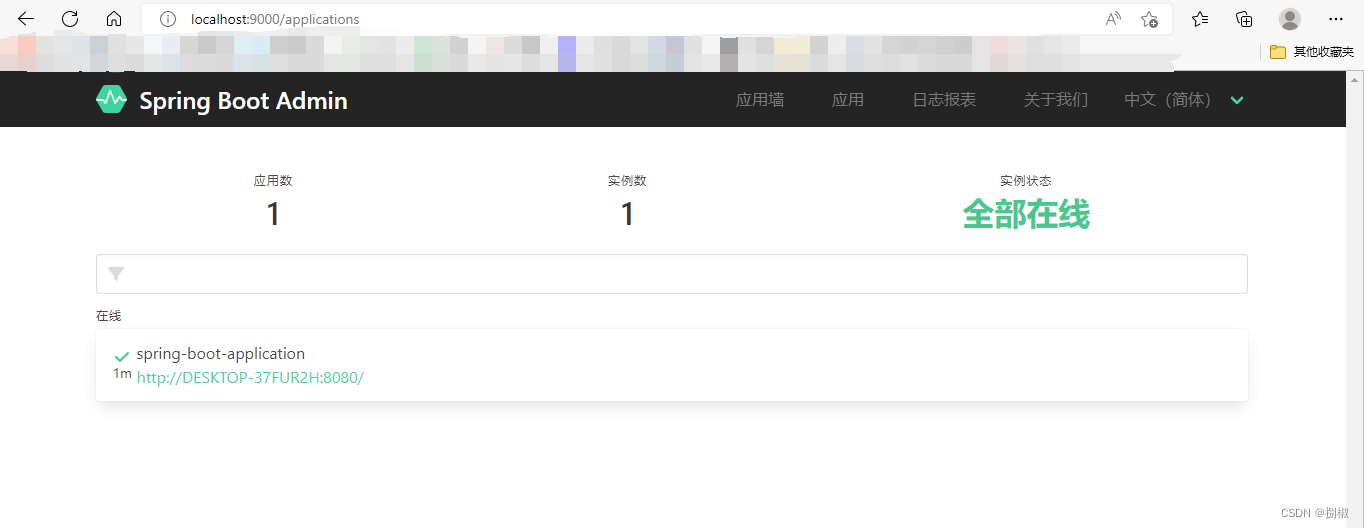
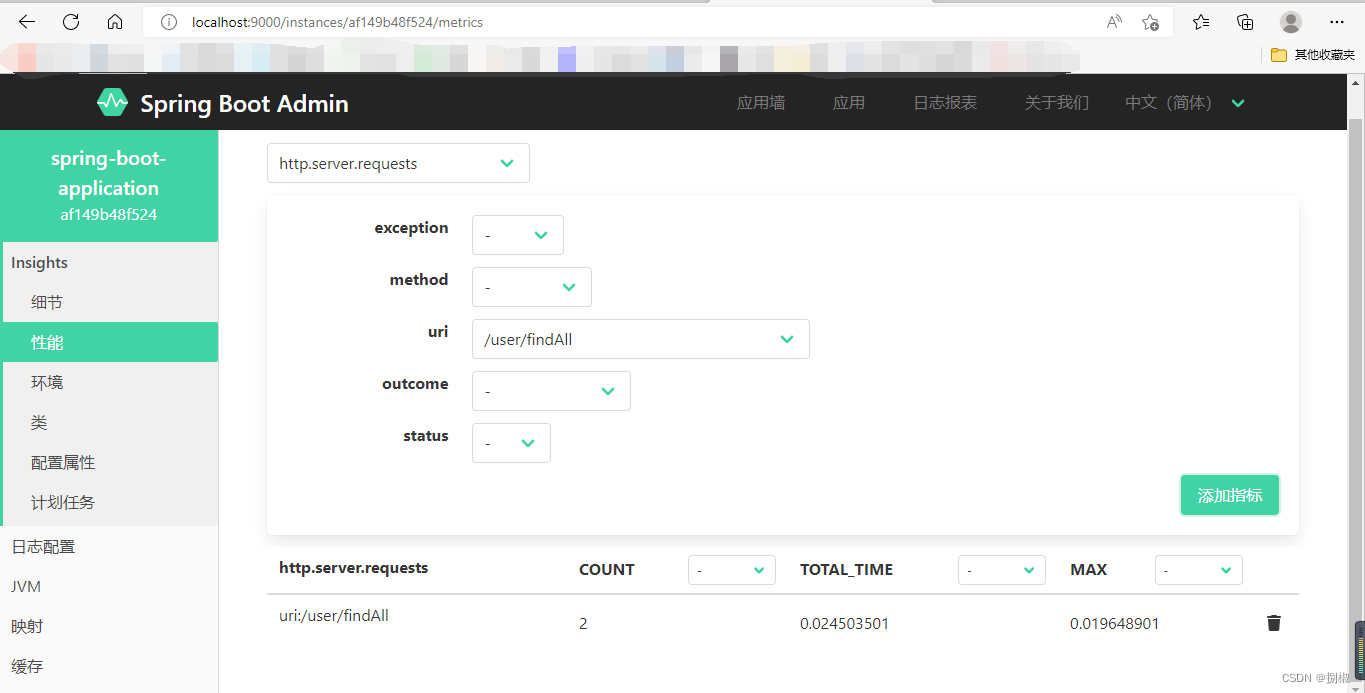
打开应用墙
执行客户端的uerfindAll方法:localhost:8080/user/findAll

查看相关信息,可以看到findAll被访问了两次
3. 项目部署
SpringBoot 项目开发完毕后,支持两种方式部署到服务器:
- jar包(官方推荐)
- war包
3.1 jar 包
右侧边栏找到Maven,找到要打包的项目。进行package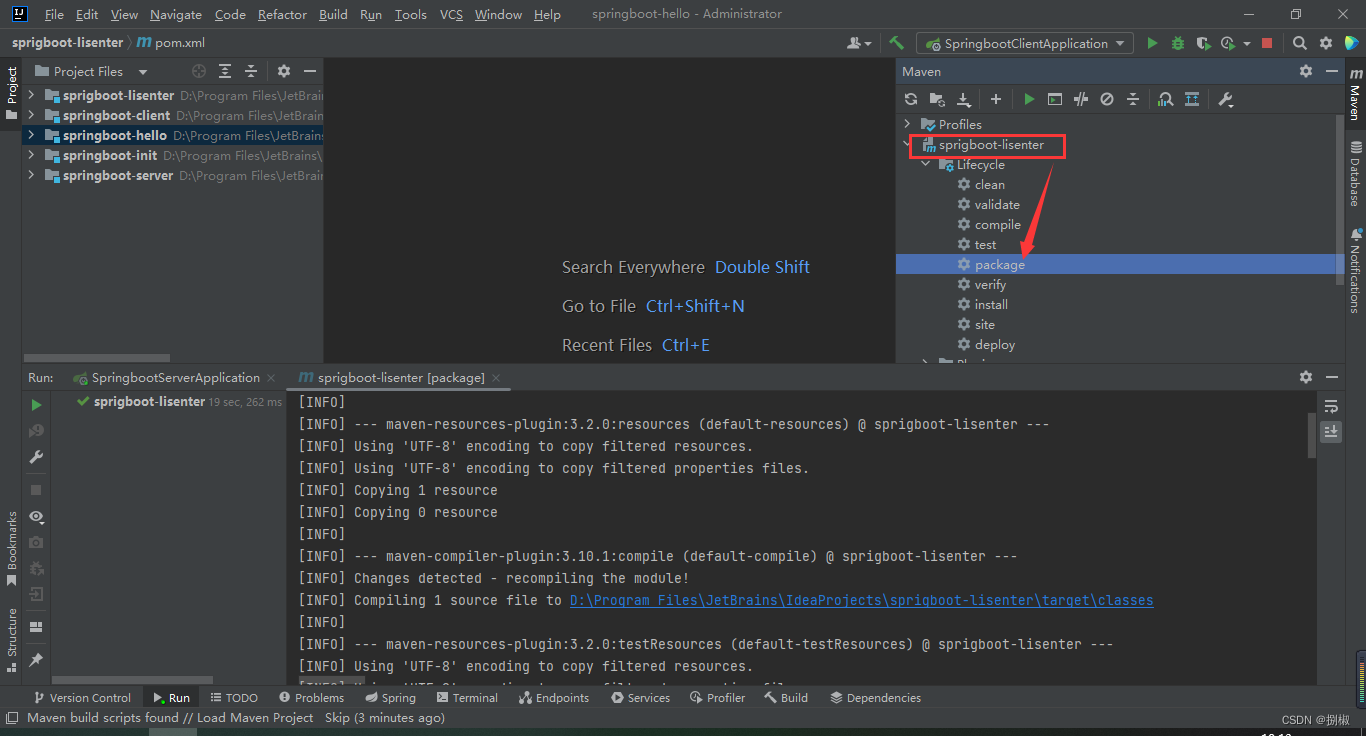
通过下面的地址,找到jar包,在目标文件的目录下,按(shlft+右键)执行java -jar命令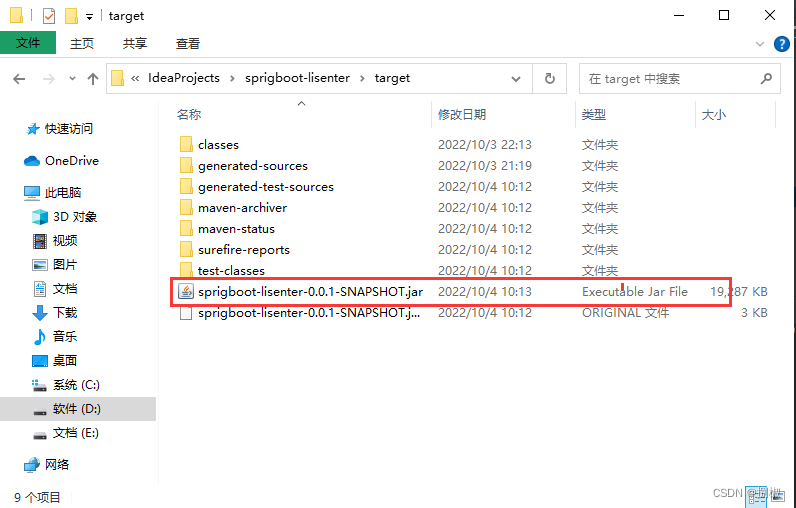

3.2 war 包
- 首先,我们需要对引导类进行一点点的修改
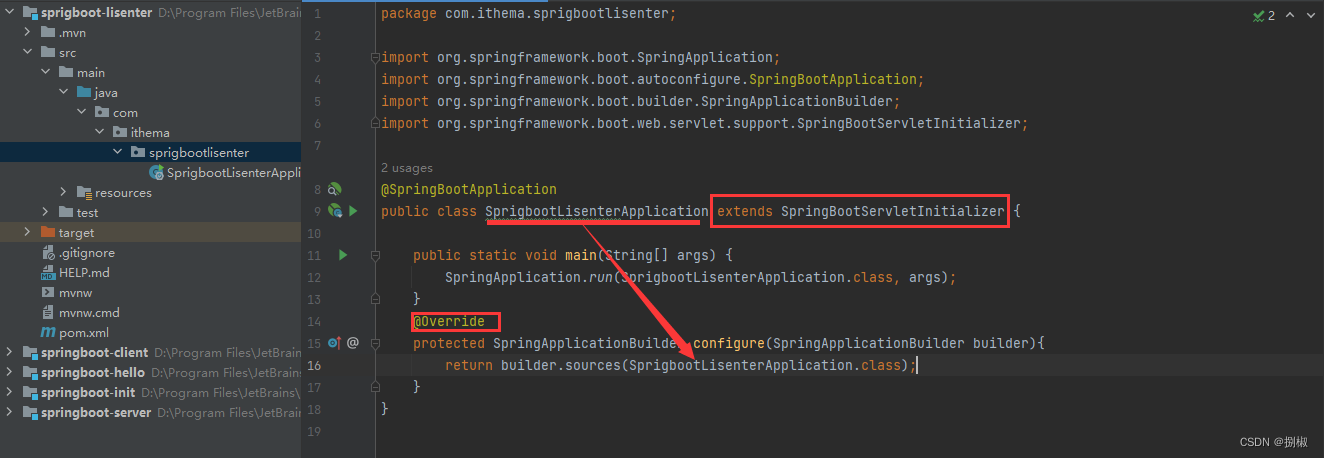
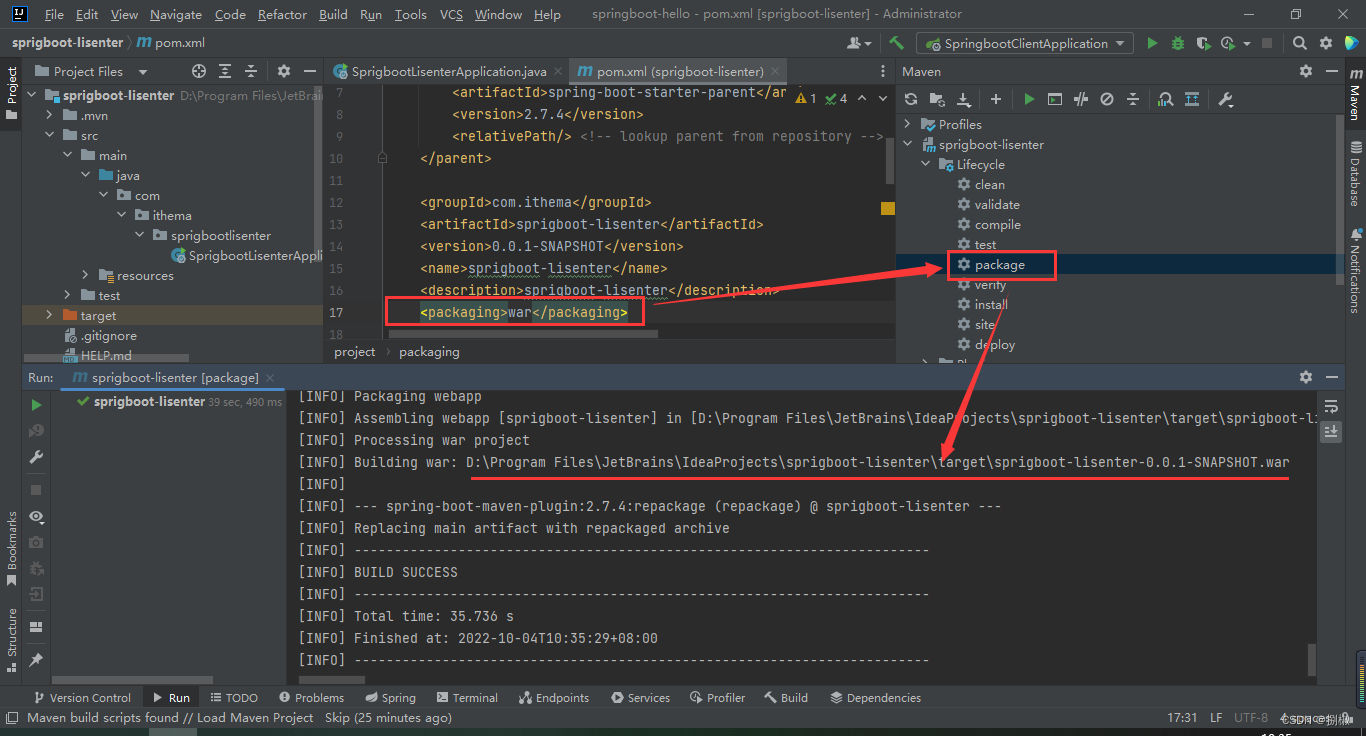
- 然后把打包方式改为
war包。进行打包
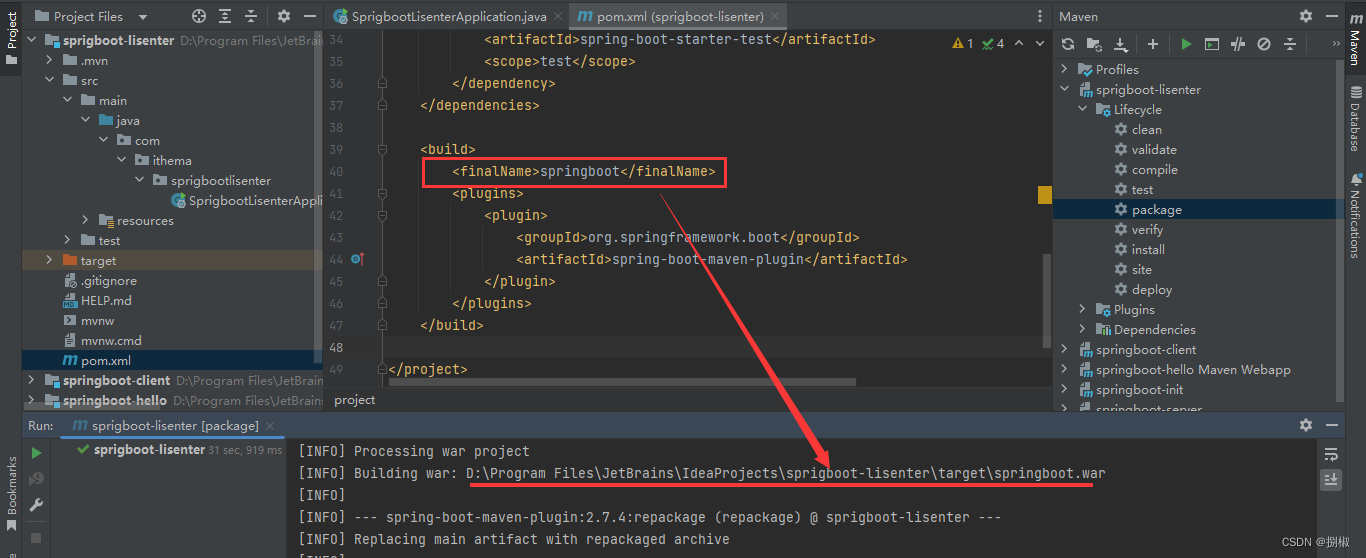
当然,如果觉得名字太长,在打包的同时想给war包指定一个名字也是可以的。例如下图
- 找到
war包,把他放到一个tomcat服务器的webapps文件夹下执行。

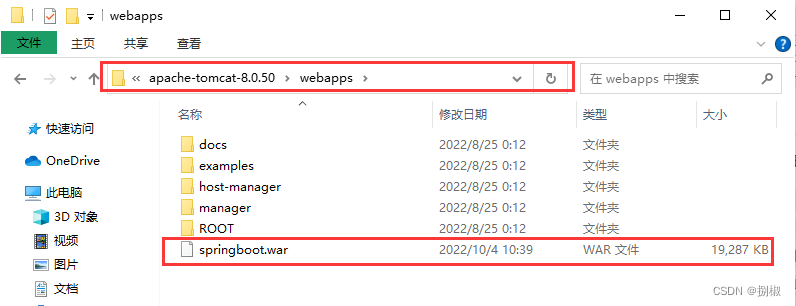
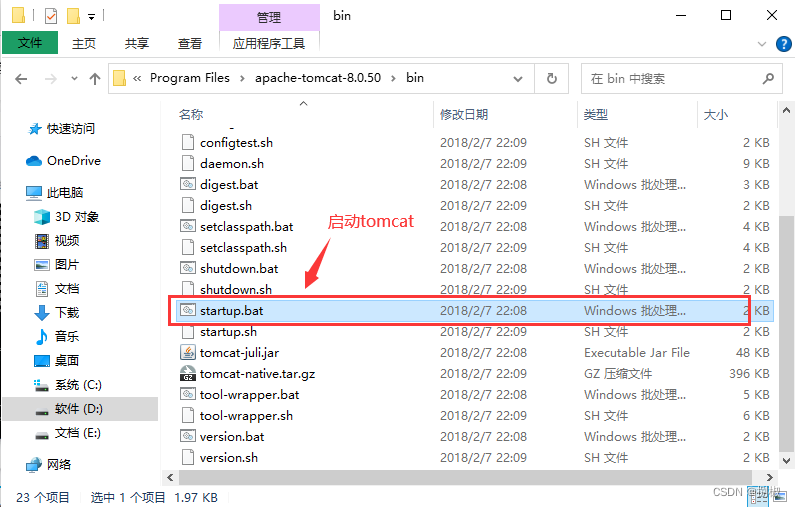
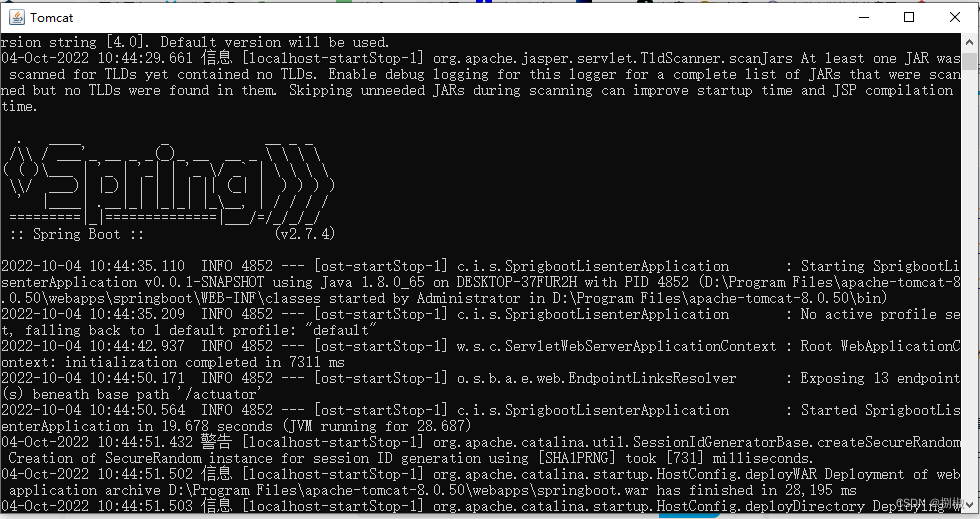
可以看到项目已经启动,访问项目localhost:8080/springboot/.....- 例如:上面的findAll方法:localhost:8080/springboot/user/findAll
-
相关阅读:
2023年阿里云双11优惠活动,省钱攻略来了!
每日刷题记录 (三)
0066 线程基础
OpenID Connect Federation 入门指南
Node的模块化管理、Node的module对象、require命令、Buffer对象
论文解读(BGRL)《Large-Scale Representation Learning on Graphs via Bootstrapping》
科技+智慧+颜值,智慧公厕黑科技提升城市形象
我的这个c++程序到底是怎么了?(相关搜索:for循环|主线程)
怎么通过联表合并表格的后查找不同职务职称的人数(python自动化办公,表格合并,同时查询不同类别情况下的个数)
ALGO开发源码【node服务】
- 原文地址:https://blog.csdn.net/qq_40926887/article/details/127158969
