-
javaweb之过滤器与监听器
1、过滤器
1.1 概述
- Filter表示过滤器,是JavaWeb三大组件(Servlet、Filter、Listener)之一。
- 过滤器可以把对web资源的请求拦截下来,做一些处理后再交给下一个过滤器或客户端,实现许多特殊功能。
- 过滤器用于完成一些通用的操作:如登录验证,统一编码的处理(UTF-8、GBK…)、权限管理,过滤敏感词、日志管理等等。
1.1.1 Filter接口
Filter类来自于Servlet规范下的接口,在servlet-api.jar包中,它包含三个接口,如下:
package javax.servlet; import java.io.IOException; public interface Filter { default void init(FilterConfig filterConfig) throws ServletException { } void doFilter(ServletRequest var1, ServletResponse var2, FilterChain var3) throws IOException, ServletException; default void destroy() { } }- 1
- 2
- 3
- 4
- 5
- 6
- 7
- 8
- 9
- 10
- 11
- 12
- 13
接口说明:
返回值类型 方法 功能描述 void init (FilterConfig filterConfig) 该方法用于初始化过滤器。 void doFilter(ServletRequest request,SeivletResponse response, FilterChain chain) 该方法完成实际的过滤操作,当客户端请求的 URL 与过滤器映射的 URL 匹配时,容器会先调用该方法对请求进行拦截。
参数 request 和 response 表示请求和响应对象。
参数 chain 代表当前 Filter 链对象,在该方法内部,调用 chain.doFilter() 方法,才能把请求交付给 Filter 链中的下一个 Filter 或者 Web 资源。void destroy() 该方法在销毁 Filter 对象之前被调用,用于释放被 Filter 对象占用的资源。 1.2 Filter执行流程
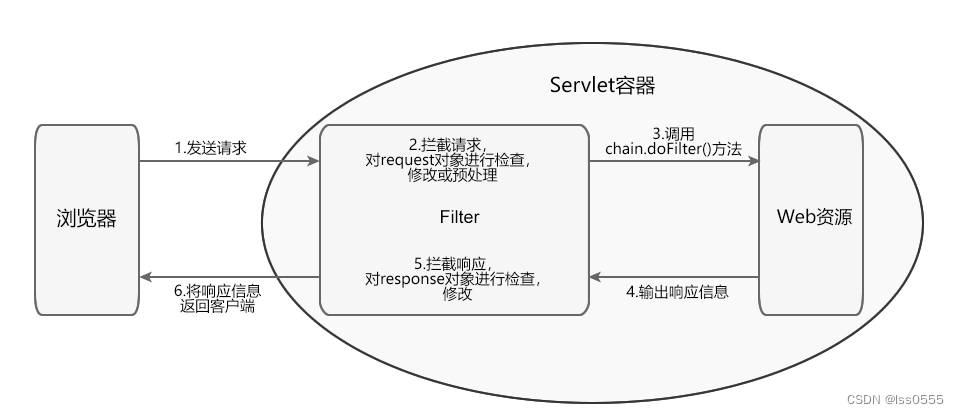
1.2.1 整体工作流程
(1)客户端浏览器发送请求访问容器指定的 Web 资源
(2)Servlet 容器接收请求,并针对本次的请求分别创建一个 request 对象和 response 对象
(3)请求到达 Web 资源之前,先读取 web.xml 或 @WebFilter 的配置信息对所有的过滤器进行加载和实例化。先调用 Filter 的 doFilter() 方法,检查 request 对象,对请求进行预处理操作。
(4)在 Filter 的 doFilter() 方法内,调用 FilterChain.doFilter() 方法,将请求传递给下一个过滤器或目标资源。如果不放行,将无法访问Servlet资源以及响应数据给客户端浏览器,界面将显示空白页面。
(5)目标资源生成响应信息返回客户端之前,处理控制权会再次回到 Filter 的 doFilter() 方法,执行 FilterChain.doFilter() 后的语句,检查 response 对象,可进行修改响应头和响应正文。
(6)响应信息返回客户端浏览器1.2.2 过滤器Filter执行步骤
- (1)放行前逻辑 : 对request数据进行处理
- (2)放行,访问资源
- (3)放行后逻辑 : 对response数据进行处理
1.2.3 Filter实例
public class filterTest implements Filter { @Override public void init(FilterConfig filterConfig) throws ServletException { } @Override public void doFilter(ServletRequest servletRequest, ServletResponse servletResponse, FilterChain filterChain) throws IOException, ServletException { //放行前逻辑 System.out.println("放行前逻辑"); //放行 使用FilterChain接口实现类对象调用doFilter()方法 filterChain.doFilter(servletRequest, servletResponse); //放行后逻辑 System.out.println("放行后逻辑"); } @Override public void destroy() { } }- 1
- 2
- 3
- 4
- 5
- 6
- 7
- 8
- 9
- 10
- 11
- 12
- 13
- 14
- 15
- 16
- 17
- 18
- 19
- 20
- 21
1.3 Filter配置方式
1.3.1 web.xml配置
web.xml配置如下:
<filter> <!--过滤器的名字--> <filter-name>name</filter-name> <filter-class>filePath</filter-class> <init-param> <!--以下就为参数的名字和相应的值--> <param-name>paramName1</param-name> <param-value>value1</param-value> </init-param> </filter> <!--下面就为相关的范围--> <filter-mapping> <!--过滤器的名字--> <filter-name>name</filter-name> <!--过滤器的范围--> <url-pattern>/*REQUEST - 1
- 2
- 3
- 4
- 5
- 6
- 7
- 8
- 9
- 10
- 11
- 12
- 13
- 14
- 15
- 16
- 17
- 18
- 19
参数说明:
属性名 类型 描述 filterName String 指定过滤器的 name 属性,等价于 。 urlPatterns String[] 指定过滤器的 URL 匹配模式。等价于 标签。 value String[] 该属性等价于 urlPatterns 属性,但是两者不能同时使用。 servletNames String[] 指定过滤器将应用于哪些 Servlet。取值是 @WebServlet 中 filterName 属性的取值,或者 web.xml 中 的取值。 dispatcherTypesDispatcherType 指定过滤器拦截的资源被 Servlet 容器调用的方式。具体取值包括: ASYNC、ERROR、FORWARD、INCLUDE、REQUEST。 initParams WebInitParam[] 指定一组过滤器初始化参数,等价于 asyncSupportedboolean 声明过滤器是否支持异步操作模式,等价于 descriptionString 指定过滤器的描述信息,等价于 displayName String 指定过滤器的显示名,等价于 1.3.2 注解配置
在Filter的自定义类增加@WebFilter注解,如下
@WebFilter(filterName = "testFilter",urlPatterns = "/TestServlet",initParams = @WebInitParam(name = "name",value = "ABC123456"),dispatcherTypes = DispatcherType.REQUEST) public class TestFilter implements Filter { ... }- 1
- 2
- 3
- 4
1.4 Filter生命周期
- (1) 初始化阶段 Servlet 容器负责加载和实例化 Filter。容器启动时,读取 web.xml 或 @WebFilter 的配置信息对所有的过滤器进行加载和实例化。 加载和实例化完成后,Servlet 容器调用 init() 方法初始化 Filter 实例。在 Filter 的生命周期内, init() 方法只执行一次。
- (2) 拦截和过滤阶段 该阶段是 Filter 生命周期中最重要的阶段。当客户端请求访问 Web 资源时,Servlet 容器会根据 web.xml 或 @WebFilter 的过滤规则进行检查。当客户端请求的 URL 与过滤器映射匹配时,容器将该请求的 request 对象、response 对象以及 FilterChain 对象以参数的形式传递给 Filter 的 doFilter() 方法,并调用该方法对请求/响应进行拦截和过滤。
- (3) 销毁阶段 Filter 对象创建后会驻留在内存中,直到容器关闭或应用被移除时销毁。销毁 Filter 对象之前,容器会先调用 destory() 方法,释放过滤器占用的资源。在 Filter 的生命周期内,destory() 只执行一次。
1.4.1 实践
实现一个过滤器,通过打印日志查看它的生命周期
1.5 Filter拦截路径配置
- 拦截具体的资源:/index.jsp:只有访问index.jsp时才会被拦截。
- 目录拦截:/user/*:访问/user下的所有资源,都会被拦截
- 后缀名拦截:*.jsp:访问后缀名为jsp的资源,都会被拦截
- 拦截所有:/*:访问所有资源,都会被拦截
- 拦截所有url:/:会匹配到/login这样的路径型url,不会匹配到模式为*.jsp这样的后缀型url
1.6 Filter拦截方式
Filter过滤器有五种拦截方式:
- REQUEST:默认值,浏览器直接请求的资源会被过滤器拦截
- FORWARD:转发访问资源会被过滤器拦截、
- INCLUDE:包含访问资源
- ERROR:错误跳转资源
- ASYNC:异步访问资源
用注解配置dispatcherTypes属性,如果是web.xml配置,就是配置其< dispatcher>标签
1.6.1 DispatcherType.REQUEST、DispatcherType.FORWARD 实例
forward方法调用后在响应中的没有提交的内容被自动消除。将请求转发给其他的Servlet后,由被调用的Servlet负责对请求做出响应,而原先Servlet的执行则终止。
定义2个过滤,test2Filter、test3Filter、index.jsp和Test2Servlet
test2Filter如下:@WebFilter(filterName = "test2Filter",urlPatterns = "/index.jsp",dispatcherTypes = DispatcherType.FORWARD) public class Test2Filter implements Filter { @Override public void init(FilterConfig filterConfig) throws ServletException { String name = filterConfig.getInitParameter("name"); System.out.println("TestFilter2:init"+" name值:"+name); } @Override public void doFilter(ServletRequest servletRequest, ServletResponse servletResponse, FilterChain filterChain) throws IOException, ServletException { System.out.println("TestFilter2:doFilter"); filterChain.doFilter(servletRequest,servletResponse); } @Override public void destroy() { System.out.println("TestFilter2:destroy"); } }- 1
- 2
- 3
- 4
- 5
- 6
- 7
- 8
- 9
- 10
- 11
- 12
- 13
- 14
- 15
- 16
- 17
- 18
- 19
test3Filter如下:
@WebFilter(filterName = "test3Filter",urlPatterns = "/index.jsp",dispatcherTypes = DispatcherType.REQUEST) public class Test3Filter implements Filter { @Override public void init(FilterConfig filterConfig) throws ServletException { String name = filterConfig.getInitParameter("name"); System.out.println("TestFilter3:init"+" name值:"+name); } @Override public void doFilter(ServletRequest servletRequest, ServletResponse servletResponse, FilterChain filterChain) throws IOException, ServletException { System.out.println("TestFilter3:doFilter"); filterChain.doFilter(servletRequest,servletResponse); } @Override public void destroy() { System.out.println("TestFilter3:destroy"); } }- 1
- 2
- 3
- 4
- 5
- 6
- 7
- 8
- 9
- 10
- 11
- 12
- 13
- 14
- 15
- 16
- 17
- 18
- 19
Test2Servlet
@WebServlet("/Test2Servlet") public class Test2Servlet extends HttpServlet { @Override protected void doGet(HttpServletRequest req, HttpServletResponse resp) throws ServletException, IOException { System.out.println("Test2Servlet"); req.getRequestDispatcher("/index.jsp").forward(req,resp); } @Override protected void doPost(HttpServletRequest req, HttpServletResponse resp) throws ServletException, IOException { doGet(req,resp); } }- 1
- 2
- 3
- 4
- 5
- 6
- 7
- 8
- 9
- 10
- 11
- 12
- 13
index.jsp页面
<%@ page contentType="text/html;charset=UTF-8" language="java" %> <html> <head> <title>index</title> </head> <body> hello world <% System.out.println("index.jsp页面"); %> </body> </html>- 1
- 2
- 3
- 4
- 5
- 6
- 7
- 8
- 9
- 10
- 11
- 12
测试以下路径,来区分FORWARD和REQUEST差异:
1、访问/index.jsp路径,后台显示TestFilter3:doFilter index.jsp页面- 1
- 2
2、访问/Test2Servlet路径,后台显示
Test2Servlet TestFilter2:doFilter index.jsp页面- 1
- 2
- 3
如果是定义FORWARD与FORWARD一起,则两种方式都生效
dispatcherTypes = {DispatcherType.FORWARD,DispatcherType.FORWARD}- 1
1.6.2 DispatcherType.ERROR实例
在web.xml定义错误页面配置
<error-page> <error-code>404</error-code> <location>/404.jsp</location> </error-page>- 1
- 2
- 3
- 4
404.jsp页面如下
<%@ page contentType="text/html;charset=UTF-8" language="java" %> <html> <head> <title>404</title> </head> <body> 抱歉,404页面找不到 </body> </html>- 1
- 2
- 3
- 4
- 5
- 6
- 7
- 8
- 9
过滤器ErrorFilter
@WebFilter(filterName = "errorFilter",urlPatterns = "/*",dispatcherTypes = DispatcherType.ERROR) public class ErrorFilter implements Filter { @Override public void init(FilterConfig filterConfig) throws ServletException { System.out.println("ErrorFilter:init"); } @Override public void doFilter(ServletRequest servletRequest, ServletResponse servletResponse, FilterChain filterChain) throws IOException, ServletException { System.out.println("ErrorFilter:doFilter"); filterChain.doFilter(servletRequest,servletResponse); } @Override public void destroy() { System.out.println("ErrorFilter:destroy"); } }- 1
- 2
- 3
- 4
- 5
- 6
- 7
- 8
- 9
- 10
- 11
- 12
- 13
- 14
- 15
- 16
- 17
- 18
测试,访问一个不存在的路径,/231123,页面如下
抱歉,404页面找不到- 1
控制台显示如下:
ErrorFilter:doFilter- 1
1.6.3 DispatcherType.INCLUDE实例
include方法使原先的Servlet和转发到的Servlet都可以输出响应信息,即原先的Servlet还可以继续输出响应信息。
新增InCludeServlet、InCludeFilter、include.jsp,
InCludeServlet如下:@WebServlet("/InCludeServlet") public class InCludeServlet extends HttpServlet { @Override protected void doGet(HttpServletRequest req, HttpServletResponse resp) throws ServletException, IOException { resp.setContentType("text/html;charset=utf-8"); req.getRequestDispatcher("/index.jsp").include(req,resp); req.getRequestDispatcher("/include.jsp").include(req,resp); resp.getWriter().write("你好,inCludeFilter"); } @Override protected void doPost(HttpServletRequest req, HttpServletResponse resp) throws ServletException, IOException { doGet(req,resp); } }- 1
- 2
- 3
- 4
- 5
- 6
- 7
- 8
- 9
- 10
- 11
- 12
- 13
- 14
- 15
inCludeFilter.java如下:
@WebFilter(filterName = "inCludeFilter",urlPatterns = "/include.jsp",dispatcherTypes = DispatcherType.INCLUDE) public class InCludeFilter implements Filter { @Override public void init(FilterConfig filterConfig) throws ServletException { System.out.println("InCludeFilter:init"); } @Override public void doFilter(ServletRequest servletRequest, ServletResponse servletResponse, FilterChain filterChain) throws IOException, ServletException { System.out.println("InCludeFilter:doFilter"); filterChain.doFilter(servletRequest,servletResponse); } @Override public void destroy() { System.out.println("InCludeFilter:destroy"); } }- 1
- 2
- 3
- 4
- 5
- 6
- 7
- 8
- 9
- 10
- 11
- 12
- 13
- 14
- 15
- 16
- 17
- 18
- 19
include.jsp如下:
<%@ page contentType="text/html;charset=UTF-8" language="java" %> <html> <head> <title>include页面</title> </head> <body> <h2> hi,include页面</h2> </body> </html>- 1
- 2
- 3
- 4
- 5
- 6
- 7
- 8
- 9
测试,访问 /include.jsp路径,页面显示结果如下:
hello world hi,include页面 你好,inCludeFilter- 1
- 2
- 3
控制台结果如下:
index.jsp页面 InCludeFilter:doFilter- 1
- 2
说明通过include的调用形式,调用指定路径的DispatcherType.INCLUDE过滤器
1.7 过滤器链(配置多个过滤器)
1.7.1 多 个过滤器执行流程
如果有多个过滤器,过滤器Filter1和过滤器Filter2,则顺序如下
1、过滤器Filter1 2、过滤器Filter2 3、执行路径资源 4、返回Filter2执行 5、返回Filter1执行- 1
- 2
- 3
- 4
- 5
示例代码:
Filter1如下:@WebFilter(filterName = "Filter1",urlPatterns = "/*") public class Filter1 implements Filter { private String filterName; @Override public void init(FilterConfig filterConfig) throws ServletException { filterName = filterConfig.getFilterName(); System.out.println(filterName +":init"); } @Override public void doFilter(ServletRequest servletRequest, ServletResponse servletResponse, FilterChain filterChain) throws IOException, ServletException { System.out.println(filterName +":doFilter------------------------------------------"); filterChain.doFilter(servletRequest,servletResponse); System.out.println(filterName +":执行完成------------------------------------------"); } @Override public void destroy() { System.out.println(filterName +":destroy"); } }- 1
- 2
- 3
- 4
- 5
- 6
- 7
- 8
- 9
- 10
- 11
- 12
- 13
- 14
- 15
- 16
- 17
- 18
- 19
- 20
- 21
- 22
- 23
Filter2如下:
@WebFilter(filterName = "Filter2",urlPatterns = "/*") public class Filter2 implements Filter { private String filterName; @Override public void init(FilterConfig filterConfig) throws ServletException { filterName = filterConfig.getFilterName(); System.out.println(filterName +":init"); } @Override public void doFilter(ServletRequest servletRequest, ServletResponse servletResponse, FilterChain filterChain) throws IOException, ServletException { System.out.println(filterName +":doFilter------------------------------------------"); filterChain.doFilter(servletRequest,servletResponse); System.out.println(filterName +":执行完成------------------------------------------"); } @Override public void destroy() { System.out.println(filterName +":destroy"); } }- 1
- 2
- 3
- 4
- 5
- 6
- 7
- 8
- 9
- 10
- 11
- 12
- 13
- 14
- 15
- 16
- 17
- 18
- 19
- 20
- 21
- 22
- 23
测试,访问 /index.jsp,控制台输出如下 :
Filter1:doFilter------------------------------------------ Filter2:doFilter------------------------------------------ index.jsp页面 Filter2:执行完成------------------------------------------ Filter1:执行完成------------------------------------------- 1
- 2
- 3
- 4
- 5
1.7.2 多个过滤器执行先后顺序
1.7.2.1 注解配置的Filter:
优先级按照过滤器的实现类类名(字符串)的自然排序,值小的先排序。
示例: AFilter和BFilter,则AFilter先执行。 Filter1和Filter2,则Filter1先执行- 1
- 2
- 3
1.7.2.2 web.xml配置的Filter:
按在web.xml中配置的顺序,从上到下执行。
1.7.2.3 既有注解配置也有xml配置:
优先执行web.xml中配置的Filter。
1.8 具体实现(记录接口日志)
1.8.1 实现步骤
- (1)定义一个类,实现Filter接口
- (2)复写方法(init、destroy、doFilter)
- (3)配置拦截路径(web.xml或者注解配置)
/** * 对请求的接口进行日志简单记录 */ @WebFilter(filterName = "logFilter",urlPatterns = "/*") public class LogFilter implements Filter { private String filterName; @Override public void init(FilterConfig filterConfig) throws ServletException { filterName = filterConfig.getFilterName(); System.out.println(filterName+" init"); } @Override public void destroy() { System.out.println(filterName+" destroy"); } @Override public void doFilter(ServletRequest servletRequest, ServletResponse servletResponse, FilterChain filterChain) throws IOException, ServletException { HttpServletRequest request= (HttpServletRequest) servletRequest; HttpServletResponse response= (HttpServletResponse) servletResponse; //接口名称 String requestURI = request.getRequestURI(); long startTime=System.currentTimeMillis();//请求开始时间 filterChain.doFilter(servletRequest,servletResponse); //放行 long endTime = System.currentTimeMillis();//请求结束时间 System.out.println("请求地址:"+requestURI+" 耗时:"+(endTime-startTime)+"ms"); } }- 1
- 2
- 3
- 4
- 5
- 6
- 7
- 8
- 9
- 10
- 11
- 12
- 13
- 14
- 15
- 16
- 17
- 18
- 19
- 20
- 21
- 22
- 23
- 24
- 25
- 26
- 27
- 28
- 29
- 30
- 31
- 32
- 33
- 34
1.9 实践
1.9.1 登录验证
- 写一个登录界面和主页界面
- 访问主页界面,验证是否已经登录,如果没有登录,则提示请先登录 ,如果已经登录则直接放行
2、监听器
2.1 介绍
- 概念:Listener是Servlet的监听器,它可以监听客户端的请求、服务端的操作等。通过监听器,可以监听某个对象的状态变化的组件,比如监听在线的用户的数量。
- 事件源:SerlvetConext,HttpSession和ServletRequest这三个域对象
- 监听源:监听事件源对象,事件源对象状态的变化都会触发监听源
- 响应行为:监听器监听到事件源的状态变化时,对其进行采取的功能行为
2.2 监听器分类
2.2.1 相关介绍
- ServletContext
上下文对象,在服务器启动时被创建,关闭时被注销,被所有Servlet共享,可在web.xml中进行配置,存放一些初始化数据,拥有最长的生命周期。 - HttpSession
会话对象,浏览器请求服务器时被创建,关闭浏览器窗口或页面不刷新过期时被销毁,拥有较长的生命周期。 - ServletRequest
请求对象,浏览器每次发送请求时被创建,响应结束之后被销毁,用于存放来自页面的参数和浏览器信息,生命周期最短。 - 作用域范围
HttpSession的范围大于ServletRequest,可以在一个会话中多个请求之间共享数据。但HttpSession的范围小于ServletContext,HttpSession不能在多个用户之间共享数据
ServletContext > HttpSession > HttpServletRequest- 1
2.2.2 HttpSession工作原理
- 1、当一个客户端浏览器向服务器发送第一个请求时,服务器为其建立一个session,并为此session创建一个标识号;
- 2、服务端把生成的 Session ID 通过 set-cookie返回给浏览器,浏览器随后的所有请求会带上这个标识号。
- 3、服务器会校对这个标识号以判断请求属于哪个session,此后的请求都会交换这个 Session ID,进行有状态的会话 。
2.2.3 监听器分类
监听器有三种,分为监听生命周期、监听对象属性值变化与监听Session 内的对象
- (1)监听生命周期
HttpSessionLister、ServletContextListener、ServletRequestListener - (2)监听对象属性值变化
HttpSessionAttributeLister、ServletContextAttributeListener、ServletRequestAttributeListener - (3)监听Session 内的对象
HttpSessionBindingListener 和 HttpSessionActivationListener
注意:与上面六类不同,这两类 Listener 监听的是Session 内的对象,而非 Session 本身,不需要在 web.xml中配置。
2.3 使用方法
2.3.1 编写一个类实现ServletContextListener接口
public class MyHttpSessionLister implements HttpSessionListener { private static final String TAG = "MyHttpSessionLister"; /** * 当session对象被创建时执行 * @param se */ @Override public void sessionCreated(HttpSessionEvent se) { System.out.println(TAG+" :sessionCreated"); } /** * 将session对象销毁时执行 * @param se */ @Override public void sessionDestroyed(HttpSessionEvent se) { System.out.println(TAG+" :sessionDestroyed"); } }- 1
- 2
- 3
- 4
- 5
- 6
- 7
- 8
- 9
- 10
- 11
- 12
- 13
- 14
- 15
- 16
- 17
- 18
- 19
- 20
2.3.2 配置监听器
(1)在web.xml中配置listner标签
<listener> <listener-class>com.example.servletdemo.listner.MyHttpSessionLister</listener-class> </listener>- 1
- 2
- 3
(2)在类使用注解@WebListener
@WebListener public class MyHttpSessionLister implements HttpSessionListener { ...... }- 1
- 2
- 3
- 4
2.4 监听器具体实现
2.4.1 监听生命周期HttpSession
HttpSessionListener用来监听HttpSession对象的创建和销毁,实时监听WEB 程序中的活动会话的数量,常用在网站在线人数的精准统计。
2.4.1.1 HttpSession创建与销毁监听
- sessionCreated 当一个浏览器第一次访问web资源的时候,J2EE应用服务器新建一个HttpSession对象并触发 HttpSession创建事件
,此时如果注册了HttpSessionListener事件监听器,则会调用HttpSessionListener事件监听器的
sessionCreated方法。 - sessionDestroyed 相反,当这个浏览器访问结束超时的时候,J2EE应用服务器会销毁相应的HttpSession对象,触发
HttpSession销毁事件,同时调用所注册HttpSessionListener事件监听器的sessionDestroyed方法。 - 以下两种情况下就会发生sessionDestoryed(会话销毁)事件:
1.执行session.invalidate()方法时 会调用sessionListener的sessionDestroyed方法
2.如果用户长时间没有访问服务器,超过了会话最大超时时间 ,服务器就会自动销毁超时的session。
2.4.1.2 HttpSession超时配置
- 在Servlet中设置
HttpSession session = request.getSession(); session.setMaxInactiveInterval(30);//单位为秒- 1
- 2
- 在web.xml中进行设置
<web-app> <session-config> <!-- 单位分钟--> <session-timeout>1</session-timeout> </session-config> ...... </web-app>- 1
- 2
- 3
- 4
- 5
- 6
- 7
- 在Tomcat的/conf/web.xml中session-config
<!-- ==================== Default Session Configuration ================= --> <!-- You can set the default session timeout (in minutes) for all newly --> <!-- created sessions by modifying the value below. <session-config> <!-- 默认为30分钟--> <session-timeout>30</session-timeout> </session-config>- 1
- 2
- 3
- 4
- 5
- 6
- 7
- 说明
1.优先级:Servlet中API设置 > 程序/web.xml设置 > Tomcat/conf/web.xml设置 2.若访问服务器session超时(本次访问与上次访问时间间隔大于session最大的不活动的间隔时间)了,即上次会话结束,但服务器与客户端会产生一个新的会话,之前的session里的属性值全部丢失,产生新的sesssionId 3.客户端与服务器一次有效会话(session没有超时),每次访问sessionId相同,若代码中设置了session.setMaxInactiveInterval()值,那么这个session的最大不活动间隔时间将被修改,并被应用为新值。 4.Session的销毁(代表会话周期的结束):在某个请求周期内调用了Session.invalidate()方法,此请求周期结束后,session被销毁;或者是session超时后自动销毁;或者客户端关掉浏览器 5.对于JSP,如果指定了<%@ page session="false"%>,则在JSP中无法直接访问内置的session变量,同时也不会主动创建session,因为此时JSP未自动执行request.getSession()操作获取session。- 1
- 2
- 3
- 4
- 5
2.4.1.3 MyHttpSessionLister实例
@WebListener public class MyHttpSessionLister implements HttpSessionListener { private static final String TAG = "MyHttpSessionLister"; /** * 一个浏览器第一次访问网站的时候,J2EE应用服务器会新建一个HttpSession对象 ,并触发 HttpSession创建事件 , * 如果注册了HttpSessionListener事件监听器,则会调用HttpSessionListener事件监听器的 sessionCreated方法。 * @param se */ @Override public void sessionCreated(HttpSessionEvent se) { System.out.println(TAG+" :session对象被创建"); } /** * 当这个浏览器访问结束超时的时候,J2EE应用服务器会销毁相应的HttpSession对象,触发 HttpSession销毁事件, * 同时调用所注册HttpSessionListener事件监听器的sessionDestroyed方法 * * 以下两种情况下就会发生sessionDestoryed(会话销毁)事件: * 1.执行session.invalidate()方法时 会调用sessionListener的sessionDestroyed方法 * 2.如果用户长时间没有访问服务器,超过了会话最大超时时间 ,服务器就会自动销毁超时的session。会调用sessionListener的sessionDestroyed方法 * @param se */ @Override public void sessionDestroyed(HttpSessionEvent se) { System.out.println(TAG+" :session对象被销毁"); } }- 1
- 2
- 3
- 4
- 5
- 6
- 7
- 8
- 9
- 10
- 11
- 12
- 13
- 14
- 15
- 16
- 17
- 18
- 19
- 20
- 21
- 22
- 23
- 24
- 25
- 26
- 27
问题
访问HTML是否创建Session :不会
访问JSP是否创建Session :会
访问Servlet是否创建Session :不会
说明:session是jsp的内建对象,所当我们在jsp里面用session的时候不需要创建,但是session不是servlet的内建对象,你在servlet用session的时候需要创建一个session2.4.2 监听生命周期ServletRequest
ServletRequestListener是用户响应监听器,用于对Request请求进行监听(创建、销毁)
2.4.2.1 ServletRequestListener监听器的方法
- requestInitialized
监听ServletRequest对象的创建 - requestDestroyed
监听ServletRequest对象的销毁
2.4.2.2 servletRequestListener来实现web网站浏览量记录
@WebListener public class MyServletRequestListener implements ServletRequestListener { private static final String TAG = "MyHttpSessionLister=>"; @Override public void requestDestroyed(ServletRequestEvent arg0) { System.out.println(TAG+"requestDestroyed=>"+"当前访问次数:" + arg0.getServletContext().getAttribute("count")); } @Override public void requestInitialized(ServletRequestEvent arg0) { Object count = arg0.getServletContext().getAttribute("count"); Integer his_count = 0; if (count != null) { his_count = Integer.valueOf(count.toString()); System.out.println(TAG+"requestInitialized=>" +"历史访问次数::" + count+" 当前访问次数:" + arg0.getServletContext().getAttribute("count")); } his_count++; arg0.getServletContext().setAttribute("count",his_count ); } }- 1
- 2
- 3
- 4
- 5
- 6
- 7
- 8
- 9
- 10
- 11
- 12
- 13
- 14
- 15
- 16
- 17
- 18
- 19
- 20
2.4.3 监听生命周期ServletContext
2.4.3.1 ServletContextListener介绍
在Servlet API中有一个ServletContextListener接口,它能够监听ServletContext对象的生命周期,实际上就是监听Web应用的生命周期。
当Servlet容器启动或终止Web应用时,会触发ServletContextEvent事件,该事件由 ServletContextListener 来处理。在 ServletContextListener 接口中定义了处理ServletContextEvent事件的contextInitialized和contextDestroyed两个方法。
-
contextInitialized(ServletContextEvent sce)
当Servlet容器启动Web应用时调用该方法。在调用完该方法之后,容器再对Filter初始化,并且对那些在Web应用启动时就需要被初始化的Servlet进行初始化 -
contextDestroyed(ServletContextEvent sce)
当Servlet容器终止Web应用时调用该方法。在调用该方法之前,容器会先销毁所有的Servlet和Filter过滤器。
2.4.3.2 MyServletContextListener 实例
@WebListener public class MyServletContextListener implements ServletContextListener { private static final String TAG = "MyServletContextListene"; @Override public void contextInitialized(ServletContextEvent sce) { System.out.println(TAG+" :ServletContext对象已创建"); } @Override public void contextDestroyed(ServletContextEvent sce) { System.out.println(TAG+" :ServletContext对象已销毁"); } }- 1
- 2
- 3
- 4
- 5
- 6
- 7
- 8
- 9
- 10
- 11
- 12
- 13
- 14
2.4.3.3 实践
通过使用ServletContextListener与HttpSessionListener监听器实现网站在线人数的统计
2.4.4 监听对象属性值变化HttpSession
2.4.4.1 介绍
HttpSessionAttributeLister它响应的是HttpSession范围属性的添加、删除和替换,包括以下3个接口:
- attributeAdded
在一个HttpSession范围属性被添加时(session.setAttribute)被容器调用。 - attributeRemoved
在一个HttpSession范围属性被删除时(session.removeAttribute)被容器调用。 - attributeReplaced
在一个HttpSession范围属性被新的替换时(session.setAttribute)被容器调用
2.4.4.2 MyHttpSessionAttributeLister示例
@WebListener public class MyHttpSessionAttributeLister implements HttpSessionAttributeListener { private static final String TAG = "MyHttpSessionAttributeLister"; @Override public void attributeAdded(HttpSessionBindingEvent event) { System.out.println(TAG+"=>attributeAdded"); } @Override public void attributeRemoved(HttpSessionBindingEvent event) { System.out.println(TAG+"=>attributeRemoved"); } @Override public void attributeReplaced(HttpSessionBindingEvent event) { System.out.println(TAG+"=>attributeReplaced"); } }- 1
- 2
- 3
- 4
- 5
- 6
- 7
- 8
- 9
- 10
- 11
- 12
- 13
- 14
- 15
- 16
- 17
- 18
- 19
2.4.5 监听对象属性值变化ServletContext
2.4.5.1 介绍
ServletContextListener监听器成功监听到了ServletContext域对象(application)中的属性值的变化情况
当调用如下操作时,就会自动执行监听
ServletContext servletContext = req.getServletContext(); servletContext.setAttribute("username","abcd"); //添加或者替换 servletContext .removeAttribute("username"); //移除- 1
- 2
- 3
2.4.5.2 MyServletContextAttributeListener 实例
@WebListener public class MyServletContextAttributeListener implements ServletContextAttributeListener { private static final String TAG = "MyServletContextAttributeListener"; //当程序把一个属性存入ServletContext时触发该方法 @Override public void attributeAdded(ServletContextAttributeEvent event) { System.out.println(TAG+"=>attributeAdded"); } //当程序把一个属性替换ServletContext内的属性时触发该方法 @Override public void attributeRemoved(ServletContextAttributeEvent event) { System.out.println(TAG+"=>attributeRemoved"); } //当程序把一个属性从ServletContext删除时触发该方法 @Override public void attributeReplaced(ServletContextAttributeEvent event) { System.out.println(TAG+"=>attributeReplaced"); } }- 1
- 2
- 3
- 4
- 5
- 6
- 7
- 8
- 9
- 10
- 11
- 12
- 13
- 14
- 15
- 16
- 17
- 18
- 19
- 20
- 21
- 22
2.4.6 监听对象属性值变化ServletRequest
2.4.6.1 介绍
Web服务器收到一个http请求,会针对每个请求创建一个HttpServletRequest和HttpServletResponse对象
ServletRequestAttributeListeners是对HttpServletRequest范围属性的添加、删除或替换监听//添加或者替换httpServletRequest属性值 httpServletRequest.setAttribute("username","abcd"); //移除httpServletRequest属性值 httpServletRequest.removeAttribute("username");- 1
- 2
- 3
- 4
2.4.6.2 MyServletRequestAttributeListener实例
@WebListener public class MyServletRequestAttributeListener implements ServletRequestAttributeListener { private static final String TAG = "MyServletRequestAttributeListener"; @Override public void attributeAdded(ServletRequestAttributeEvent srae) { System.out.println(TAG+"=>attributeAdded"); } @Override public void attributeRemoved(ServletRequestAttributeEvent srae) { System.out.println(TAG+"=>attributeAdded"); } @Override public void attributeReplaced(ServletRequestAttributeEvent srae) { System.out.println(TAG+"=>attributeAdded"); } }- 1
- 2
- 3
- 4
- 5
- 6
- 7
- 8
- 9
- 10
- 11
- 12
- 13
- 14
- 15
- 16
- 17
- 18
- 19
2.4.7 监听Session 内的对象 HttpSessionBindingListener
2.4.7.1 介绍
Java 中对于Http协议的管理接口,如果一个类(对象)实现了该接口,那么当这个对象在被绑定,或者从Session中删除时,Servlet会通知这个对象,当接受到通知之后,则可以进行一些初始化或者清除。 如果一个对象实现了HttpSessionBindingListener接口,当这个对象被绑定到Session中或者从session中被删除时,Servlet容器会通知这个对象,而这个对象在接收到通知后,可以做一些初始化或清除状态的操作,HttpSessionBindingListener接口提供了以下接口方法:
- valueBound
当对象正在被绑定到Session中,Servlet容器调用这个方法来通知该对象 - valueBound
当从Session中删除对象时,Servlet容器调用这个方法来实现了HttpSessionBindingListener接口的对象,而这个对象 可以利用HttpSessionBindingEvent对象来访问与它相联系的HttpSession对象。
2.4.7.2 MyHttpSessionBindingListener实例
public class MyHttpSessionBindingListener implements HttpSessionBindingListener { private static final String TAG = "MyHttpSessionBindingListener"; @Override public void valueBound(HttpSessionBindingEvent event) { System.out.println(TAG+"=>valueBound"); } @Override public void valueUnbound(HttpSessionBindingEvent event) { System.out.println(TAG+"=>valueUnbound"); } }- 1
- 2
- 3
- 4
- 5
- 6
- 7
- 8
- 9
- 10
- 11
- 12
- 13
将执行sess
HttpSession session = req.getSession(); MyHttpSessionBindingListener myHttpSessionBindingListener = new MyHttpSessionBindingListener(); //触发valueBound方法 session.setAttribute("abc",myHttpSessionBindingListener); //触发valueUnbound方法 session.removeAttribute("abc");- 1
- 2
- 3
- 4
- 5
- 6
2.4.8 监听Session 内的对象 HttpSessionActivationListener
2.4.8.1 活化与钝化
当一个会话开始时,Servlet容器会为会话创建一个HttpSession对象。Servlet容器在某些情况下会把这些HttpSession对象从内存中转移到永久性存储设备中(钝化),并在需要访问HttpSession信息时再把它们加载到内存中(活化)。该过程被称为会话的持久化
持久化的好处:
- 节约内存空间
- 确保服务器重启或单个Web应用重启后,能够恢复重启前的会话。
以下情况会被持久化:
- 服务器或单个应用终止
- 会话不活动时间到达限定值
- 会话数目太多,到达了限定值
以下情况会被活化:
- 服务器或者是单个Web应用被重启
- 客户端向Web应用发起HTTP请求,相应的会话会被激活
2.4.8.2 HttpSessionActivationListener介绍
HttpSessionActivationListener是监听特殊javaBean在session作用域钝化或活化,它实现了以下两个方法:
- void sessionWillPassivate(HttpSessionBindingEvent event)
将Session内存中的对象持久化(序列化)到磁盘 - void sessionDidActive(HttpSessionBindingEvent event)方法
将磁盘上的对象再次恢复到session内存中
注意:
2.4.8.3 MyHttpSessionActivationListener实例
- UserSession 类
public class UserSession implements HttpSessionActivationListener, Serializable { private String username; private String password; public String getUsername() { return username; } public void setUsername(String username) { this.username = username; } public String getPassword() { return password; } public void setPassword(String password) { this.password = password; } private static final String TAG = "UserSession"; /** * 将Session内存中的对象持久化(序列化)到磁盘 * @param se */ @Override public void sessionWillPassivate(HttpSessionEvent se) { UserSession user= (UserSession) se.getSession().getAttribute("user"); SimpleDateFormat df= new SimpleDateFormat("yyyy-MM-dd :hh:mm:ss"); System.out.println(TAG+"=>sessionWillPassivate =>将Session内存中的对象持久化(序列化)到磁盘="+user.getUsername()+":"+user.getPassword()+"=>"+df.format(new Date())); } /** * 将磁盘上的对象再次恢复到session内存中 * @param se */ @Override public void sessionDidActivate(HttpSessionEvent se) { UserSession user= (UserSession) se.getSession().getAttribute("user"); SimpleDateFormat df= new SimpleDateFormat("yyyy-MM-dd :hh:mm:ss"); System.out.println(TAG+"=>sessionDidActivate=>将磁盘上的对象再次恢复到session内存中="+user.getUsername()+":"+user.getPassword()+"=>"+df.format(new Date())); } }- 1
- 2
- 3
- 4
- 5
- 6
- 7
- 8
- 9
- 10
- 11
- 12
- 13
- 14
- 15
- 16
- 17
- 18
- 19
- 20
- 21
- 22
- 23
- 24
- 25
- 26
- 27
- 28
- 29
- 30
- 31
- 32
- 33
- 34
- 35
- 36
- 37
- 38
- 39
- 40
- 41
- 42
- 43
- 44
- UserSessionActivationServlet
将UserSession新增到session中
@WebServlet("/UserSessionActivationServlet") public class UserSessionActivationServlet extends HttpServlet { @Override protected void doGet(HttpServletRequest req, HttpServletResponse resp) throws ServletException, IOException { //HttpSession属性的设置 HttpSession session = req.getSession(); UserSession user = new UserSession(); user.setUsername("a"); user.setPassword("123456"); session.setAttribute("user",user); resp.setContentType("text/html;charset=utf-8"); SimpleDateFormat df= new SimpleDateFormat("yyyy-MM-dd :hh:mm:ss"); resp.getWriter().write("添加Usersession=>"+df.format(new Date())); } @Override protected void doPost(HttpServletRequest req, HttpServletResponse resp) throws ServletException, IOException { doGet(req,resp); } }- 1
- 2
- 3
- 4
- 5
- 6
- 7
- 8
- 9
- 10
- 11
- 12
- 13
- 14
- 15
- 16
- 17
- 18
- 19
- 20
- 21
- 22
- UserSessionActivationGetServlet
从session获取UserSession的值
@WebServlet("/UserSessionActivationGetServlet") public class UserSessionActivationGetServlet extends HttpServlet { @Override protected void doGet(HttpServletRequest req, HttpServletResponse resp) throws ServletException, IOException { //HttpSession属性的设置 HttpSession session = req.getSession(); resp.setContentType("text/html;charset=utf-8"); UserSession user = (UserSession) session.getAttribute("user"); resp.getWriter().write("User session =>"+user.getUsername()+":"+user.getPassword()); } @Override protected void doPost(HttpServletRequest req, HttpServletResponse resp) throws ServletException, IOException { doGet(req,resp); } }- 1
- 2
- 3
- 4
- 5
- 6
- 7
- 8
- 9
- 10
- 11
- 12
- 13
- 14
- 15
- 16
- 17
- 配置文件
可配置多长时间不使用被钝化以及钝化文件的位置,在META-INF下创建一个context.xml
<?xml version="1.0" encoding="UTF-8"?> <Context> <!-- maxIdleSwqp:session中的对象多久不使用就钝化,单位:分钟 --> <Manager className="org.apache.catalina.session.PersistentManager" maxIdleSwqp="1" > <!-- directory:钝化文件的位置 --> <Store className="org.apache.catalina.session.FileStore" directory="F:\test\servletdemo" /> </Manager> </Context>- 1
- 2
- 3
- 4
- 5
- 6
- 7
- 8
-
相关阅读:
将 Fedora 38 平滑升级至 Fedora 39
【无标题】
vue 代理
Vue项目实战——【基于 Vue3.x + NodeJS】实现的课程表排课系统四(MyMessageBox)动态组件的编写
为什么在使用PageHelper插件时,指定的每页记录数大小失效?显示所有的记录数
mysql详细笔记
学生HTML个人网页作业作品计——基于HTML电商购物商城现---(服装商城 4页 带登录 带动画)
vue2 编写自己的组件库,并发布到npm
亚马逊一分钟1000+的僵尸链接获取只需三步
qt实现打开pdf(阅读器)功能用什么库比较合适
- 原文地址:https://blog.csdn.net/u010520146/article/details/127440344
