-
SpringBoot
参考文章:https://blog.csdn.net/qq_41978509/article/details/116104434
一、SpringBoot简介
路线:是什么、如何配置编写 yaml、自动装配资源、集成web开发、集成数据库、分布式开发、swagger:接口文档、任务调度、SpringSecurity(类似拦截器,过滤器)
1、springBoot是什么
Spring Boot 基于 Spring 开发,Spirng Boot 本身并不提供 Spring 框架的核心特性以及扩展功能,只是用于快速、敏捷地开发新一代基于 Spring 框架的应用程序。也就是说,它并不是用来替代 Spring 的解决方案,而是和 Spring 框架紧密结合用于提升 Spring 开发者体验的工具。Spring Boot 以约定大于配置的核心思想,默认帮我们进行了很多设置,多数 Spring Boot 应用只需要很少的 Spring 配置。同时它集成了大量常用的第三方库配置(例如 Redis、MongoDB、Jpa、RabbitMQ、Quartz 等等),Spring Boot 应用中这些第三方库几乎可以零配置的开箱即用。
简单来说就是SpringBoot其实不是什么新的框架,它默认配置了很多框架的使用方式,就像maven整合了所有的jar包,spring boot整合了所有的框架 。
Spring Boot 出生名门,从一开始就站在一个比较高的起点,又经过这几年的发展,生态足够完善,Spring Boot 已经当之无愧成为 Java 领域最热门的技术。
Spring Boot的主要优点:
- 为所有Spring开发者更快的入门
- 开箱即用,提供各种默认配置来简化项目配置
- 内嵌式容器简化Web项目
- 没有冗余代码生成和XML配置的要求
2、微服务架构
微服务是一种架构风格,他要求我们在开发一个应用的时候,这个应用必须建成一系列小服务组合,可以通过http方式进行通信。
所谓微服务加购,就是打破之前all in one的架构方式,把每个功能元素独立出来,把独立出来的功能元素的动态组合,需要的功能元素才去拿来组合,需要多一些可以整合多个功能元素,所以微服务架构是对功能元素进行赋值,而没有对整个应用进行复制,这样做的好处是:
- 节省了调用资源
- 每个功能元素的服务都是一个可替换的,可独立升级的软件代码
程序核心:高内聚(在划分模块时,要把功能关系紧密的放到一个模块中)
低耦合(模块之间的联系越少越好,接口越简单越好)
建议阅读的论文:https://martinfowler.com/articles/microservices.html#CharacteristicsOfAMicroserviceArchitecture

- 构建一个个功能独立的微服务应用单元,可以使用springboot,可以帮我们快速构建一个应用
- 大型分布式网络服务的调用,这部分springcloud来完成,实现分布式
- 在分布式中间,进行流式数据计算,批处理,我们有spring cloud data flow
- spring为我们想清楚了整个开始构建应用到大型分布式应用全流程方案
二、第一个spring boot程序
- jdk1.8
- maven 3.6
- springboot2.7
- idea
官方提供了一个快速生成网站!idea集成了这个网站
- 可以在官网直接下载后,导入idea开发(https://start.spring.io/)
- 直接使用idea创建springboot项目(常用)
1、新建项目

勾选spring web

清空无用文件

在src\main\java\com.jjl\下创建controller测试

启动

2、修改默认端口
在src\main\resources下的application.properties中添加端口

3、自定义banner
程序启动时日志头
可以去https://www.bootschool.net/ascii网站下载自己喜欢的banner文件,放在resources文件夹中

三、原理探究
自动配置:
pom.xml- spring-boot-dependencies:核心依赖在父工程中
- 我们在写或者引入一下springboot依赖的时候,不需要指定版本,就因为有这些版本仓库
启动器
<dependency> <groupId>org.springframework.bootgroupId> <artifactId>spring-boot-starter-webartifactId> dependency>- 1
- 2
- 3
- 4
- 启动器:就是springboot的启动器场景
- 比如spring-boot-starter-web,他就会帮我们自动导入web环境所有的依赖
- springboot会将所有的功能场景,都变成一个个启动器
- 要使用什么功能,就只需要找到的对应的启动器就可以了 starter
主程序
package com.jjl; import org.springframework.boot.SpringApplication; import org.springframework.boot.autoconfigure.SpringBootApplication; //标准这个类是一个springboot的应用 @SpringBootApplication public class Springboot01HellowordApplication { public static void main(String[] args) { //将springboot应用启动 SpringApplication.run(Springboot01HellowordApplication.class, args); } }- 1
- 2
- 3
- 4
- 5
- 6
- 7
- 8
- 9
- 10
- 11
- 12
- 13
- 14
- 15
- 注解
@SpringBootConfiguration :springboot的配置 @Configuration :spring配置类 @Component :本质还是一个spring组件 @EnableAutoConfiguration :自动配置 @AutoConfigurationPackage :自动配置包 @Import({AutoConfigurationPackages.Registrar.class}) :自动配置‘包注册’ @Import({AutoConfigurationImportSelector.class}) :自动配置导入选择- 1
- 2
- 3
- 4
- 5
- 6
- 7
- 8
- 9
- 10
核心文件

结论: springboot所有自动配置都是在启动的时候扫描并加载: spring.factoriesl所有的自动配置类都在这里面,但是不一定生效,要判断条件是否成立,只要导入了对应的start,就有对应的启动器了,有了启动器,我们自动装配就会生效,然后就配置成功!- SpringBoot在启动的时候从类路径下的META-INF/spring.factories中获取EnableAutoConfiguration指定的值
- 将这些值作为自动配置类导入容器 , 自动配置类就生效 , 帮我们进行自动配置工作;
- 整个JavaEE的整体解决方案和自动配置都在springboot-autoconfigure的jar包中;
- 它会给容器中导入非常多的自动配置类 (xxxAutoConfiguration), 就是给容器中导入这个场景需要的所有组件 , 并配置好这些组件 ;
- 有了自动配置类 , 免去了我们手动编写配置注入功能组件等的工作;
Run方法
这里不是运行一个main方法,而是开启一个服务@SpringBootApplication public class SpringbootApplication { public static void main(String[] args) { SpringApplication.run(SpringbootApplication.class, args); } }- 1
- 2
- 3
- 4
- 5
- 6
- 7
SpringApplication.run分析
分析该方法主要分两部分,一部分是SpringApplication的实例化,二是run方法的执行;SpringApplication
这个类主要做了以下四件事情:
1、推断应用的类型是普通的项目还是Web项目
2、查找并加载所有可用初始化器 , 设置到initializers属性中
3、找出所有的应用程序监听器,设置到listeners属性中
4、推断并设置main方法的定义类,找到运行的主类四、yaml语法、配置文件
1、配置文件
springboot使用一个全局的配置文件,配置文件名称是固定的
- application.properties(默认)
- 语法结构 : key=value
- application.yml
- 语法结构:key:空格 value

配置文件的作用:修改SpringBoot自动配置的默认值,因为SpringBoot在底层都给我们自动配置好了;
2、yaml
YAML是"YAML Ain’t a Markup Language"(YAML不是一种标记语言)的递归缩写。在开发的这种语言时,YAML 的意思其实是:“Yet Another Markup Language”(仍是一种标记语言),但为了强调这种语言以数据做为中心,而不是以标记语言为重点,而用反向缩略语重命名。
1、基本语法
server: port: 8081 # 普通的key.value name: jjl # 对象 student1: name: jjl age: 4 # 行内写法 student2: {name: jjl,age: 3} # 数组 pets: - cat - dog - pig pets1: [cat,dog,pig]- 1
- 2
- 3
- 4
- 5
- 6
- 7
- 8
- 9
- 10
- 11
- 12
- 13
- 14
- 15
- 16
- 17
- 18
- 19
- 20
2、yaml给实体类赋值
1、新建两个实体类person(并绑定yaml中的对象)、dog
package com.jjl.pojo; import org.springframework.boot.context.properties.ConfigurationProperties; import org.springframework.stereotype.Component; import java.util.Date; import java.util.List; import java.util.Map; @Component //绑定application中的属性 将配置文件中配置的每一个属性的值,映射到这个组件中; 告诉springBoot将本类中的所有属性和配置文件中相关的配置进行绑定 参数 prefix - “person”:将配置文件中的peraon下面的所有属性——对应 只有这个组件是容器中的姐件。才能使用容器提供的econfigurationProperties功能 @ConfigurationProperties(prefix = "person") public class Person { private String name; private Integer age; private Boolean happy; private Date birth; private Map<String,Object> maps; private List<Object> lists; private Dog dog; public Person(String name, Integer age, Boolean happy, Date birth, Map<String, Object> maps, List<Object> lists, Dog dog) { this.name = name; this.age = age; this.happy = happy; this.birth = birth; this.maps = maps; this.lists = lists; this.dog = dog; 添加有参无参、getset方法、toString方法 }- 1
- 2
- 3
- 4
- 5
- 6
- 7
- 8
- 9
- 10
- 11
- 12
- 13
- 14
- 15
- 16
- 17
- 18
- 19
- 20
- 21
- 22
- 23
- 24
- 25
- 26
- 27
- 28
- 29
- 30
- 31
- 32
- 33
- 34
- 35
- 36
- 37
- 38
package com.jjl.pojo; import org.springframework.stereotype.Component; //@Component 添加到spring组件中 @Component public class Dog { private String name; private Integer age; 添加有参无参、getset方法、toString方法- 1
- 2
- 3
- 4
- 5
- 6
- 7
- 8
- 9
- 10
- 11
2、在application.yaml中创建对象
person: name: jjl age: 3 happy: true birth: 2022/10/18 maps: {k1: v1,k2: v2} lists: - code - music - girl dog: name: dog age: 3- 1
- 2
- 3
- 4
- 5
- 6
- 7
- 8
- 9
- 10
- 11
- 12
- 13
3、测试;
package com.jjl; import com.jjl.pojo.Person; import org.junit.jupiter.api.Test; import org.springframework.beans.factory.annotation.Autowired; import org.springframework.boot.test.context.SpringBootTest; @SpringBootTest class Springboot02ConfigApplicationTests { @Autowired private Person person; @Test void contextLoads() { System.out.println(person); } }- 1
- 2
- 3
- 4
- 5
- 6
- 7
- 8
- 9
- 10
- 11
- 12
- 13
- 14
- 15
- 16
- 17
- 18


3、在yaml中添加占位符
person: name: jjl${random.uuid} # 添加一串uuid在后面 age: ${random.int} happy: true birth: 2022/10/18 maps: {k1: v1,k2: v2} hello: happy lists: - code - music - girl dog: # 如果person中存在hello这个属性,则获取hello属性的值,否则赋值为:”hello2“ name: ${person.hello:hello2}_wangcai age: 3- 1
- 2
- 3
- 4
- 5
- 6
- 7
- 8
- 9
- 10
- 11
- 12
- 13
- 14
- 15

3、总结:

1、@ConfigurationProperties只需要写一次即可 , @Value则需要每个字段都添加2、松散绑定:这个什么意思呢? 比如我的yml中写的last-name,这个和实体类中lastName是一样的, - 后面跟着的字母默认是大写的。这就是松散绑定。可以测试一下
3、JSR303数据校验 , 这个就是我们可以在字段是增加一层过滤器验证 , 可以保证数据的合法性
4、复杂类型封装,yml中可以封装对象 , 使用value就不支持
结论:
- 配置yml和配置properties都可以获取到值 , 强烈推荐 yml;
- 如果我们在某个业务中,只需要获取配置文件中的某个值,可以使用一下 @value;
- 如果说,我们专门编写了一个JavaBean来和配置文件进行一一映射,就直接@configurationProperties,不要犹豫!
4、配置文件可存放的位置,多文件配置
1、配置文件可存放的位置,以及各位置的优先级
1-4优先级以此递减

2、多文件配置指定启用某一个配置文件
方法一
使用properties
在默认的properties文件中指定启用哪一个配置文件

方法二使用yaml模块
每个模块用 — 分隔,使用active指定调用那个模块的配置# 指定要调用下面那个模块的配置 spring: profiles: active: dev # 模块一: --- server: port: 8081 # 给当前模板命名 spring: profiles: dev --- # 模块二: --- server: port: 8082 spring: profiles: test ---- 1
- 2
- 3
- 4
- 5
- 6
- 7
- 8
- 9
- 10
- 11
- 12
- 13
- 14
- 15
- 16
- 17
- 18
- 19
- 20
- 21
5、自动配置原理
我们以HttpEncodingAutoConfiguration(Http编码自动配置)为例解释自动配置原理;
//表示这是一个配置类,和以前编写的配置文件一样,也可以给容器中添加组件; @Configuration //启动指定类的ConfigurationProperties功能; //进入这个HttpProperties查看,将配置文件中对应的值和HttpProperties绑定起来; //并把HttpProperties加入到ioc容器中 @EnableConfigurationProperties({HttpProperties.class}) //Spring底层@Conditional注解 //根据不同的条件判断,如果满足指定的条件,整个配置类里面的配置就会生效; //这里的意思就是判断当前应用是否是web应用,如果是,当前配置类生效 @ConditionalOnWebApplication( type = Type.SERVLET ) //判断当前项目有没有这个类CharacterEncodingFilter;SpringMVC中进行乱码解决的过滤器; @ConditionalOnClass({CharacterEncodingFilter.class}) //判断配置文件中是否存在某个配置:spring.http.encoding.enabled; //如果不存在,判断也是成立的 //即使我们配置文件中不配置pring.http.encoding.enabled=true,也是默认生效的; @ConditionalOnProperty( prefix = "spring.http.encoding", value = {"enabled"}, matchIfMissing = true ) public class HttpEncodingAutoConfiguration { //他已经和SpringBoot的配置文件映射了 private final Encoding properties; //只有一个有参构造器的情况下,参数的值就会从容器中拿 public HttpEncodingAutoConfiguration(HttpProperties properties) { this.properties = properties.getEncoding(); } //给容器中添加一个组件,这个组件的某些值需要从properties中获取 @Bean @ConditionalOnMissingBean //判断容器没有这个组件? public CharacterEncodingFilter characterEncodingFilter() { CharacterEncodingFilter filter = new OrderedCharacterEncodingFilter(); filter.setEncoding(this.properties.getCharset().name()); filter.setForceRequestEncoding(this.properties.shouldForce(org.springframework.boot.autoconfigure.http.HttpProperties.Encoding.Type.REQUEST)); filter.setForceResponseEncoding(this.properties.shouldForce(org.springframework.boot.autoconfigure.http.HttpProperties.Encoding.Type.RESPONSE)); return filter; } //。。。。。。。 }- 1
- 2
- 3
- 4
- 5
- 6
- 7
- 8
- 9
- 10
- 11
- 12
- 13
- 14
- 15
- 16
- 17
- 18
- 19
- 20
- 21
- 22
- 23
- 24
- 25
- 26
- 27
- 28
- 29
- 30
- 31
- 32
- 33
- 34
- 35
- 36
- 37
- 38
- 39
- 40
- 41
- 42
- 43
- 44
- 45
- 46
- 47
- 48
自动装配过程:
- springboot启动加载大量的自动装配类
- 检查我们需要的功能是否在springboot默认写好的自动配置类中;
- 我们再来看这个自动配置类中到底配置了那些组件,只要我们要用的组件存在其中,我们就不需要手动配置了;
- 给容器中自动配置类添加组件的时候,会从properties类中获取某些属性,我们只需要在配置文件中指定这些属性的值即可;
XXXXAutoConfigurartion:自动配置类;给容器中添加配置组件
XXXXProperties:封装配置文件中相关属性;(就是配置文件)
可以通过在配置文件中配置:
dug总结:
一但这个配置类生效;这个配置类就会给容器中添加各种组件;
这些组件的属性是从对应的properties类中获取的,这些类里面的每一个属性又是和配置文件绑定的;
所有在配置文件中能配置的属性都是在xxxxProperties类中封装着;
配置文件能配置什么就可以参照某个功能对应的这个属性类五、SpringBoot Web开发
要解决的问题:
- 导入静态资源html,css,js
- 首页
- 写jsp的地方,模板引擎Thymeleaf
- 装配和扩展SpringMVC
- 增删改查
- 拦截器
1、静态资源
1、存放位置
方法一——webjars
静态资源存放位置源码分析
在WebMvcAutoConfiguration.class类——WebMvcAutoConfigurationAdapter方法——addResourceHandlers方法public void addResourceHandlers(ResourceHandlerRegistry registry) { if (!this.resourceProperties.isAddMappings()) { logger.debug("Default resource handling disabled"); } else { this.addResourceHandler(registry, "/webjars/**", "classpath:/META-INF/resources/webjars/"); this.addResourceHandler(registry, this.mvcProperties.getStaticPathPattern(), (registration) -> { registration.addResourceLocations(this.resourceProperties.getStaticLocations()); if (this.servletContext != null) { ServletContextResource resource = new ServletContextResource(this.servletContext, "/"); registration.addResourceLocations(new Resource[]{resource}); } }); } }- 1
- 2
- 3
- 4
- 5
- 6
- 7
- 8
- 9
- 10
- 11
- 12
- 13
- 14
可以将静态资源放在这里面:“classpath:/META-INF/resources/webjars/”,前提需要导入jquery包
<dependency> <groupId>org.webjarsgroupId> <artifactId>jqueryartifactId> <version>3.6.1version> dependency>- 1
- 2
- 3
- 4
- 5

测试访问:

方法二:(常用)


以上四个位置都可以被找到,这四个位置下的资源都可以通过localhost:8080访问
优先级:resoures—static(静态资源)—public(公共资源)如果在配置文件里自定义了目录(不建议使用),则以上的五个位置就会失效
2、模板引擎 Thymeleaf
1、认识thymeleaf
狂神说SpringBoot11:Thymeleaf模板引擎
由于springboot不支持直接使用jsp静态资源,需要通过模板引擎来访问导入maven包
<dependency> <groupId>org.thymeleafgroupId> <artifactId>thymeleaf-spring5artifactId> dependency> <dependency> <groupId>org.thymeleaf.extrasgroupId> <artifactId>thymeleaf-extras-java8timeartifactId> dependency>- 1
- 2
- 3
- 4
- 5
- 6
- 7
- 8
要使用thymeleaf的模板引擎需要写在templates目录下
查看ThymeleafProperties配置类

测试:
在templates目录下创建一个html静态测试页面

通过controller来跳转

2、thymeleaf的使用
DOCTYPE html> <html xmlns:th="http://www.thymeleaf.org"> <head> <title>Good Thymes Virtual Grocerytitle> <meta http-equiv="Content-Type" content="text/html; charset=UTF-8" /> <link rel="stylesheet" type="text/css" media="all" href="../../css/gtvg.css" th:href="@{/css/gtvg.css}" /> head> <body> <p th:text="#{home.welcome}">Welcome to our grocery store!p> body> html>- 1
- 2
- 3
- 4
- 5
- 6
- 7
- 8
- 9
- 10
- 11
- 12
- 13
- 14
- 15
需要在html中导入:xmlns:th=“http://www.thymeleaf.org”
测试使用:
这测试类中定义一个model的msgpackage com.jjl.controller; import org.springframework.stereotype.Controller; import org.springframework.ui.Model; import org.springframework.web.bind.annotation.RequestMapping; @Controller public class IndexController { @RequestMapping("/test") public String test(Model model){ model.addAttribute("msg","hello,springboot
"); return "test"; } }- 1
- 2
- 3
- 4
- 5
- 6
- 7
- 8
- 9
- 10
- 11
- 12
- 13
- 14
在html中使用thymeleaf接管的方式获取msg
DOCTYPE html> <html lang="en" xmlns:th="http://www.thymeleaf.org"> <head> <meta charset="UTF-8"> <title>Titletitle> head> <body> <div th:text="${msg}">div> <div th:utext="${msg}">div> body> html>- 1
- 2
- 3
- 4
- 5
- 6
- 7
- 8
- 9
- 10
- 11
- 12

遍历数据
在controller测试类中添加一个数组
model.addAttribute("users", Arrays.asList("jjl","chengdu"));- 1
在html中使用thymeleaf接管的方式遍历数组 th:each
<h3 th:each="user:${users}" th:text="${user}">h3> <h3 th:each="user:${users}">[[ ${user} ]]h3>- 1
- 2
- 3
- 4
- 5
3、首页实现
1、导入静态资源到templates

2、在com.jjl.config.MyMvcConfig.class创建springmvc扩展视图,实现首页跳转package com.jjl.config; import org.springframework.context.annotation.Configuration; import org.springframework.web.servlet.config.annotation.ViewControllerRegistry; import org.springframework.web.servlet.config.annotation.WebMvcConfigurer; //扩展springMVC @Configuration public class MyMvcConfig implements WebMvcConfigurer { @Override public void addViewControllers(ViewControllerRegistry registry) { registry.addViewController("/").setViewName("index"); registry.addViewController("/index.html").setViewName("index"); } }- 1
- 2
- 3
- 4
- 5
- 6
- 7
- 8
- 9
- 10
- 11
- 12
- 13
- 14
- 15
3、修改首页html时期支持thymeleaf
- 添加:xmlns:th=“http://www.thymeleaf.org”
- 修改静态资源链接为 “th:” 格式

4、可以在配置springboot配置文件中配置:清空spring缓存、添加项目根目录

测试:

4、页面国际化
1、通过thymeleaf手动匹配
1、在resources目录下创建i18n(国际化的缩写)目录,并新建“login.properties”文件,idea会自动创建一个Resources Bundle ‘login’目录,并将“login.properties”文件自动放在该目录下。
然后右击Resources Bundle ‘login’目录,可以新增"en_US" 和 “zh_CN”两个文件。


2、在idea安装Resource Bundle插件,然后打开login.properties配置文件,单击窗口下面的Resource Bundle,单击左上方的+,添加国家化。

3、在springboot配置文件中应用国际化配置文件

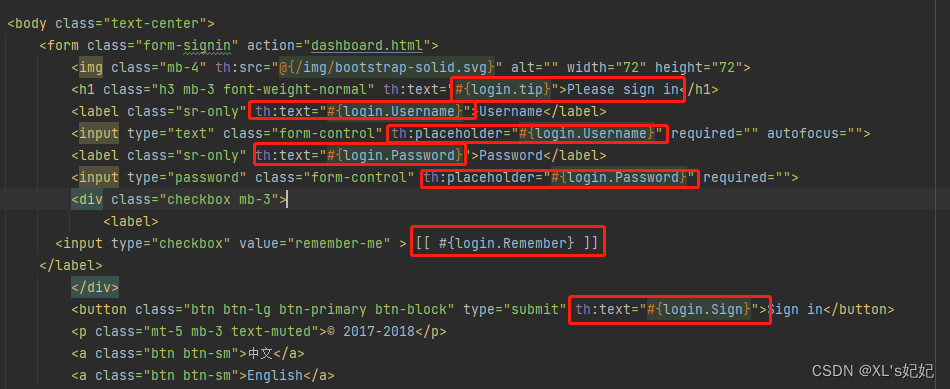
4、在html中使用thyemleaf的表达式来表示需要国际化的文本
5、测试

2、手动自定义写一个实现国际化的类
如果用户配置了,则就从配置文件中获取用户配置的,否则就走内置的AcceptHeaderLocaleResolver()


如果需要自定义写一个国际化的类,则需要实现LocaleResolver接口1、让html页面中实现中英文切换的标签能发起一个请求

2、在config目录中创建MyLocaleResolver类接收处理并返回请求:package com.jjl.config; import org.springframework.web.servlet.LocaleResolver; import org.thymeleaf.util.StringUtils; import javax.servlet.http.HttpServletRequest; import javax.servlet.http.HttpServletResponse; import java.util.Locale; //自定义国际化类 public class MyLocaleResolver implements LocaleResolver { //解析请求 @Override public Locale resolveLocale(HttpServletRequest request) { //获取请求中的语言参数 String language = request.getParameter("l"); System.out.println("debug==>" + language); Locale locale = Locale.getDefault();//如果没有就使用默认的 //如果请求的链接携带了国际化的参数 if(!StringUtils.isEmpty(language)){ //将获取到的language参数进去分割 String[] split = language.split("_"); //国家,地区 locale = new Locale(split[0],split[1]); } return locale; } @Override public void setLocale(HttpServletRequest request, HttpServletResponse response, Locale locale) { } }- 1
- 2
- 3
- 4
- 5
- 6
- 7
- 8
- 9
- 10
- 11
- 12
- 13
- 14
- 15
- 16
- 17
- 18
- 19
- 20
- 21
- 22
- 23
- 24
- 25
- 26
- 27
- 28
- 29
- 30
- 31
- 32
- 33
- 34
- 35
- 36
- 37
- 38
3、将自定义的国际化类在springMVC扩展类(MyMvcConfig)中引入到@Bean中,使其能被springboot识别到。

4、重启项目测试

5、实现登录跳转
1、修改html中form表单请求位置,给用户名密码添加name属性
- 修改html中form表单请求位置,使其form表单能提交到后台处理;
- 添加一个p标签,用于当用户名密码错误时接收并显示提示消息;
- 给用户名密码标签添加name属性,使其的参数能被后台获取到;

2、添加地址映射

3、编写controller后台处理类(loginController)
package com.jjl.controller; import org.springframework.stereotype.Controller; import org.springframework.ui.Model; import org.springframework.web.bind.annotation.RequestMapping; import org.springframework.web.bind.annotation.RequestParam; import org.thymeleaf.util.StringUtils; @Controller public class LoginController { @RequestMapping("/user/login") public String login( @RequestParam("username") String username, @RequestParam("password") String password, Model model){ // 接收html传递过来的数据 Model model回传参数 //具体业务; if (!StringUtils.isEmpty(username)&&"123456".equals(password)){ return "redirect:/main.html";//重定向到main.html }else { //告诉用户登录失败 model.addAttribute("msg","用户名或密码错误"); return "index"; } } }- 1
- 2
- 3
- 4
- 5
- 6
- 7
- 8
- 9
- 10
- 11
- 12
- 13
- 14
- 15
- 16
- 17
- 18
- 19
- 20
- 21
- 22
- 23
- 24
- 25
测试登录
6、拦截器
1、获取用户session
在处理登录请求的LoginController中添加获取用户session的代码
//获取session,将用户的session消息放入”loginUser“中

2、自定义拦截器类(LoginHandlerInterceptor)
- 获取session中的loginUser,并判断是否为空
- 如果为空就被拦截,返回登录页,给出提示信息
- 如果不为空,就运行放行。
package com.jjl.config; import org.springframework.web.servlet.HandlerInterceptor; import org.springframework.web.servlet.ModelAndView; import javax.servlet.http.HttpServletRequest; import javax.servlet.http.HttpServletResponse; public class LoginHandlerInterceptor implements HandlerInterceptor { @Override public boolean preHandle(HttpServletRequest request, HttpServletResponse response, Object handler) throws Exception { // 登录成功之后因该有用户的session Object loginUser = request.getSession().getAttribute("loginUser"); if (loginUser==null){ request.setAttribute("msg","请登录"); request.getRequestDispatcher("/index.html").forward(request,response); return false;//不放行 }else { return true;//放行 } } }- 1
- 2
- 3
- 4
- 5
- 6
- 7
- 8
- 9
- 10
- 11
- 12
- 13
- 14
- 15
- 16
- 17
- 18
- 19
- 20
- 21
- 22
- 23
3、在MyMvcConfig中添加配置拦截器
- 重写spring的拦截器
- 要拦截的请求
- 不拦截的请求
//重写拦截器 @Override public void addInterceptors(InterceptorRegistry registry) { registry.addInterceptor(new LoginHandlerInterceptor()). //addPathPatterns("/**"):拦截所有请求, // 但是”excludePathPatterns("/index.html","/","/user/login")“中的"/index.html"、"/"、"/user/login"……这些请求不能拦截 addPathPatterns("/**").excludePathPatterns("/index.html","/","/user/login","/css/**","/js/**","/img/**"); }- 1
- 2
- 3
- 4
- 5
- 6
- 7
- 8
4、成功跳转之后,在首页显示当前用户名称
在首页获取session的用户名称,并展示到页面

重启测试7、员工列表展示
1、创建实体类
导入lombok包
package com.jjl.pojo; import lombok.Data; import lombok.NoArgsConstructor; import java.util.Date; //员工表 @Data @NoArgsConstructor public class Employee { private Integer id; private String lastName; private String email; private Integer gender; //0:女,1:男 private Department department; private Date birth; public Employee(Integer id, String lastName, String email, Integer gender, Department department) { this.id = id; this.lastName = lastName; this.email = email; this.gender = gender; this.department = department; /*默认创建日期*/ this.birth = new Date(); } }- 1
- 2
- 3
- 4
- 5
- 6
- 7
- 8
- 9
- 10
- 11
- 12
- 13
- 14
- 15
- 16
- 17
- 18
- 19
- 20
- 21
- 22
- 23
- 24
- 25
- 26
- 27
2、编写Dao层
- 无数据库,所以模拟数据;
- 编写增删改查方法
package com.jjl.dao; import com.jjl.pojo.Department; import com.jjl.pojo.Employee; import org.springframework.beans.factory.annotation.Autowired; import org.springframework.stereotype.Repository; import java.util.Collection; import java.util.HashMap; import java.util.Map; //员工dao @Repository public class EmployeeDao { //模拟数据 private static Map<Integer, Employee> employees =null; //员工有所属的部门 @Autowired private DepartmentDao departmentDao; static { employees = new HashMap<Integer, Employee>();//创建员工表 employees.put(101,new Employee(1001,"aa","1345616@qq.com",1,new Department(101,"教学部"))); employees.put(102,new Employee(1002,"bb","1345616@qq.com",0,new Department(102,"教研部"))); employees.put(103,new Employee(1003,"cc","1345616@qq.com",1,new Department(102,"教研部"))); employees.put(104,new Employee(1004,"dd","1345616@qq.com",0,new Department(101,"教学部"))); } //主键自增! private static Integer initId =1006; //增加一个员工 public void save(Employee employee){ if (employee.getId()==null){ employee.setId(initId++); } employee.setDepartment(departmentDao.getDepartmentById(employee.getDepartment().getId())); employees.put(employee.getId(),employee); } //查询员工信息 public Collection<Employee> getAll(){ return employees.values(); } //通过id查询员工 public Employee getEmployeeById(Integer id){ return employees.get(id); } //删除员工通过id public void delete(Integer id){ employees.remove(id); } }- 1
- 2
- 3
- 4
- 5
- 6
- 7
- 8
- 9
- 10
- 11
- 12
- 13
- 14
- 15
- 16
- 17
- 18
- 19
- 20
- 21
- 22
- 23
- 24
- 25
- 26
- 27
- 28
- 29
- 30
- 31
- 32
- 33
- 34
- 35
- 36
- 37
- 38
- 39
- 40
- 41
- 42
- 43
- 44
- 45
- 46
- 47
- 48
- 49
- 50
- 51
- 52
- 53
- 54
- 55
3、controller层
- 实现员工信息页面的跳转
- 获取员工信息,并传递(model)到前端页面
package com.jjl.controller; import com.jjl.dao.EmployeeDao; import com.jjl.pojo.Employee; import org.springframework.beans.factory.annotation.Autowired; import org.springframework.stereotype.Controller; import org.springframework.ui.Model; import org.springframework.web.bind.annotation.RequestMapping; import java.util.Collection; @Controller public class EmployeeController { @Autowired EmployeeDao employeeDao; @RequestMapping("/emps") public String list(Model model){ Collection<Employee> employees = employeeDao.getAll(); model.addAttribute("emps",employees); return "emp/list"; } }- 1
- 2
- 3
- 4
- 5
- 6
- 7
- 8
- 9
- 10
- 11
- 12
- 13
- 14
- 15
- 16
- 17
- 18
- 19
- 20
- 21
- 22
- 23
- 24
4、前端页面的处理
1、提取网页公共部分:
由于顶部导航栏、侧边导航栏都是相同的,所以可以将它们提取出来,需要时直接引用即可- 在templates目录中新建commons/commons.html用于存放公共页面
- 使用 th:fragment 给代码片段做一个标记,用于应用时的标识符,参考官方文档

- 使用 th:insert 或者 th:replace 在首页和员工页的相应位置引用公共部分 参考官方文档

5、处理侧边导航栏选中时高亮效果
1、在首页和员工列表的引用侧边栏的代码上给组件传递一个参数
使用()传参
首页

员工列表页

2、在公共页的侧边栏的首页标签和员工管理标签上获取传递的参数,并做判断是否高亮-
thymeleaf的条件运算符

-
当active传递的参数为:main.html是首页高亮;list.html是“员工管理”高亮


6、显示员工信息表单
- 修改list.html页面
- 修改th
- 在tr中获取后台数据并使用thymeleaf的th:each循环,并赋值到td中
- thymeleaf的条件运算符修改性别显示格式
- 使用thymeleaf的dates调整时间显示格式
<div class="table-responsive"> <table class="table table-striped table-sm"> <thead> <tr> <th>idth> <th>lastnameth> <th>emailth> <th>genderth> <th>departmentth> <th>birthth> <th>操作th> tr> thead> <tbody> <tr th:each="emp:${emps}"> <td th:text="${emp.getId()}">td> <td>[[${emp.getLastName()}]]td> <td th:text="${emp.getEmail()}">td> <td th:text="${emp.getGender()==0?'女':'男'}">td> <td th:text="${emp.getDepartment.getDepartmentName()}">td> <td th:text="${#dates.format(emp.getBirth(),'yyyy-MM-dd HH:mm:ss')}">td> <td> <button class="btn btn-sm btn-primary">编辑button> <button class="btn btn-sm btn-danger">删除button> td> tr> tbody> table> div>- 1
- 2
- 3
- 4
- 5
- 6
- 7
- 8
- 9
- 10
- 11
- 12
- 13
- 14
- 15
- 16
- 17
- 18
- 19
- 20
- 21
- 22
- 23
- 24
- 25
- 26
- 27
- 28
- 29
- 30
测试:

8、添加员工
1、新建一个添加页面add.html
- 复制list.html替换一个表单即可
- 给需要提交的数据添加一个name属性
<form th:action="@{/emp}" method="post"> <div class="form-group"> <label>LastNamelabel> <input type="text" name="lastName" class="form-control" placeholder="jjl"> div> <div class="form-group"> <label>Emaillabel> <input type="email" name="email" class="form-control" placeholder="1176244270@qq.com"> div> <div class="form-group"> <label>Genderlabel><br> <div class="form-check form-check-inline"> <input class="form-check-input" type="radio" name="gender" value="1"> <label class="form-check-label">男label> div> <div class="form-check form-check-inline"> <input class="form-check-input" type="radio" name="gender" value="0"> <label class="form-check-label">女label> div> div> <div class="form-group"> <label>departmentlabel> <select class="form-control" name="department.id"> <option th:each="dept:${departments}" th:text="${dept.getDepartmentName()}" th:value="${dept.getId()}">option> select> div> <div class="form-group"> <label>Birthlabel> <input type="text" name="birth" class="form-control" placeholder=""> <button class="btn btn-primary">添加button> div> form>- 1
- 2
- 3
- 4
- 5
- 6
- 7
- 8
- 9
- 10
- 11
- 12
- 13
- 14
- 15
- 16
- 17
- 18
- 19
- 20
- 21
- 22
- 23
- 24
- 25
- 26
- 27
- 28
- 29
- 30
- 31
- 32
- 33
2、获取部门信息
1、在EmployeeController类中添加获取部门信息的方法
/*前端来get部门信息*/ @GetMapping("/emp") public String toAddpage(Model model){ //查询所有部门的信息 Collection<Department> departments = departmentDao.getDepartments(); /*将所有的部门信息返回到前端*/ model.addAttribute("departments",departments); return "emp/add"; }- 1
- 2
- 3
- 4
- 5
- 6
- 7
- 8
- 9
2、在add.html中获取获取后台的部门信息

3、处理提交的form表单
在EmployeeController类中添加新增的方法
/*前端想后端提交表单信息*/ @PostMapping("/emp") public String AddEmp(Employee employee){ System.out.println("save=>"+employee); //添加的操作 employeeDao.save(employee);//调用业务层方法保存员工信息 return "redirect:/emps"; }- 1
- 2
- 3
- 4
- 5
- 6
- 7
- 8
4、注意spring的默认时间格式

在springboot配置文件中可以修改时间格式

9、修改员工信息
-
给list.html的编辑按钮发起一个请求,并携带要修改用户的id

-
在EmployeeController,编写一个方法接收请求,并根据携带的id,查出该员工的信息和所有的部门信息,返回给update页面。
/*跳转到员工修改页面*/ @GetMapping("/emp/{id}") public String toUpdateRmp(@PathVariable("id") Integer id,Model model){ //查出原理的数据 Employee employee = employeeDao.getEmployeeById(id); model.addAttribute("emp",employee); Collection<Department> departments = departmentDao.getDepartments(); /*将所有的部门信息返回到前端*/ model.addAttribute("departments",departments); return "emp/update"; }- 1
- 2
- 3
- 4
- 5
- 6
- 7
- 8
- 9
- 10
- 11
-
将add页面复制一份为update页面,接收后台查询到的员工信息,展示到相应标签上。注意判断性别,和根据查询到的所属部门id去所有部门id中匹配。修改提交修改请求的地址。注意:EmployeeDao中HashMap的key与员工id要一致
<form th:action="@{/updateEmp}" method="post"> <div class="form-group"> <input type="hidden" name="id" th:value="${emp.getId()}"> <label>LastNamelabel> <input type="text" th:value="${emp.getLastName()}" name="lastName" class="form-control"> div> <div class="form-group"> <label>Emaillabel> <input type="text" th:value="${emp.getEmail()}" name="email" class="form-control"> div> <div class="form-group"> <label>Genderlabel><br> <div class="form-check form-check-inline"> <input th:checked="${emp.getGender()==1}" class="form-check-input" type="radio" name="gender" value="1"> <label class="form-check-label">男label> div> <div class="form-check form-check-inline"> <input th:checked="${emp.getGender()==0}" class="form-check-input" type="radio" name="gender" value="0"> <label class="form-check-label">女label> div> div> <div class="form-group"> <label>departmentlabel> <select class="form-control" name="department.id"> <option th:selected="${dept.getId()==emp.getDepartment().getId}" th:each="dept:${departments}" th:text="${dept.getDepartmentName()}" th:value="${dept.getId()}">option> select> div> <div class="form-group"> <label>Birthlabel> <input th:value="${#dates.format(emp.getBirth(),'yyyy-MM-dd HH:mm:ss')}" type="text" name="birth" class="form-control"> <button class="btn btn-primary">修改button> div> form>- 1
- 2
- 3
- 4
- 5
- 6
- 7
- 8
- 9
- 10
- 11
- 12
- 13
- 14
- 15
- 16
- 17
- 18
- 19
- 20
- 21
- 22
- 23
- 24
- 25
- 26
- 27
- 28
- 29
- 30
- 31
- 32
- 33
- 34
-
在EmployeeController,编写一个方法处理修改请求,修改成功之后重定向到首页
@PostMapping("/updateEmp") /*处理修改请求*/ public String UpdateEmp(Employee employee){ System.out.println("save=>"+employee); employeeDao.save(employee); return "redirect:/emps"; }- 1
- 2
- 3
- 4
- 5
- 6
- 7
- 8
10、删除员工、注销登录
1、删除员工
-
给list.html的删除按钮发起一个请求,并携带要修改用户的id

-
在EmployeeController,编写一个方法接收请求,并根据携带的id,删除该员工,重定向到首页。
//删除员工 @GetMapping("/delemp/{id}") public String deleteEmp(@PathVariable("id") Integer id){ employeeDao.delete(id); return "redirect:/emps"; }- 1
- 2
- 3
- 4
- 5
- 6
2、注销登录、404错误页面
- 在公共页面中commons.html,给注销添加一个请求

- 在EmployeeController,编写一个方法接收请求,删除session,返回登录页。
@RequestMapping("/user/logout") public String logout(HttpSession session){ session.invalidate();//删除session return "redirect:/index.html"; }- 1
- 2
- 3
- 4
- 5
- 6
404错误页面
在springboot直接将报错html页面放在error文件夹里就好

-
相关阅读:
js 什么时候必须使用[‘属性名‘] 的方式??
DPDK&VPP关键技术文档总结
OpenFeign实现分析、源码解析
厉害了,腾讯云云巢荣获信通院“云原生技术创新案例”奖!
ARM+SD2405 IIC_RTC驱动编写及IIC通讯协议
Aspose导出word使用记录
HTML(超文本标记语言)
论文解读(LG2AR)《Learning Graph Augmentations to Learn Graph Representations》
Docker部署Nginx-常用命令
线程池的实现
- 原文地址:https://blog.csdn.net/qq_43427354/article/details/127384909