-
运维工具 ansible
一、简介
ansible 不是服务端-客户端,在一台机器安装ansible后,ansible通过ssh服务,给其他机器下发任务
ansible # 命令
ansible # 模块,模块理解为命令
ansible playbook # ansible的脚本,使用的yaml语法格式
playbook中可实现 # 变量、tags 标签、handlers 触发器、playbook 模板(templates)、playbook条件判断(when)、playbook 字典(with_items)、循环等等,脚本能做的 playbook 几乎都可以
ansible roles # 一个功能可能需要使用多个playbook脚本,我们需要组合各种不同的脚本实现不同的功能,进而来实现一个复杂功能。组合各种playbook,以及把各种相关不同类型的文件分别类组合,进行管理,叫做角色,可以理解多个脚本的集合,实现复杂任务。Ansible 组成:
HOSTS 管理的设备,如Linux、windoes
NETWORKING 交换机、路由器
INVENTORY 将需要将管理的设备(HOSTS、NETWORKING)加入到清单中
MODULES 模块、PLIGINS 插件、
API 做软件开发调用API,可以通过运维平台调用ansible 的API,进而让Ansible来管理后端HOSTS
USERS 代表用户,使用命令直接调用模块、插件来管理后端
ANSIBLE PLAYBOOOK 代表脚本来管理后端
PUBLIC/PRIVITE CLOUD 公有云/私有云去调用
CMDB 配置管理数据库,也是一个软件,调用Ansible来管理后端
等等,还有其他的软件,比如运维平台,一个web 调用ansible 的API,进而让Ansible来管理后端
二、安装Ansible
Ansible部署方式有4种,包括yum、二进制、Git clone,由于Ansible是基于python,所以可以通过python的命令 pip 部署
1、yum (EPEL源的 rpm 包安装)
- yum info ansible # 查看ansible当前的版本
- yum install ansible

2、二进制编译安装
1、下载ansible安装包
https://releases.ansible.com/ansible/]# wget https://releases.ansible.com/ansible/ansible-2.9.5.tar.gz2、下载python安装包
https://www.python.org/downloads/wget https://www.python.org/ftp/python/3.8.12/Python-3.8.12.tar.xz
3、安装python,配置pip
- 1、yum -y install zlib-devel bzip2-devel openssl-devel ncurses-devel sqlite-devel readline-devel tk-devel gdbm-devel db4-devel libpcap-devel xz-devel libffi-devel gcc
- 2、安装python
- tar -xvf Python-3.8.12.tar.xz
- cd Python-3.8.12
- ./configure --prefix=/usr/local/python3.8
- make && make install
- linux默认自带的python是2.7.5
- 编译期间报错查看https://blog.csdn.net/Jerry00713/article/details/127380845
- 3、添加软连接
- rm -f /usr/bin/python /usr/bin/pip
- ln -s /usr/local/python3.8/bin/python3.8 /usr/bin/python
- ln -s /usr/local/python3.8/bin/pip3.8 /usr/bin/pip
- 4、配置pip源
- mkdir /root/.pip
- ]# cat <<EOF > /root/.pip/pip.conf
- [global]
- index-url = https://mirrors.huaweicloud.com/repository/pypi/simple
- trusted-host = mirrors.huaweicloud.com
- timeout = 120
- EOF
4、安装ansible
- 1、解压并安装
- tar -xvf ansible-2.9.5.tar.gz
- cd ansible-2.9.5
- python setup.py install
- 报错:
- Ansible now needs setuptools in order to build. Install it using your package manager
- (usually python-setuptools) or via pip (pip install setuptools).
- 安装依赖:
- 更新pip
- python -m pip install --upgrade pip
- 卸载并重装setuptools
- pip uninstall setuptools ##需要输入Y确定
- pip install setuptools
- 2、继续安装
- python setup.py install
- ##如果缺少依赖就会卡住,可以ctrl +c停掉,使用pip安装完依赖,再重新执行安装命令
- 3、添加软连接
- ansible安装完默认都安装到/usr/local/python3.8/bin下面
- ln -s /usr/local/python3.8/bin/ansible* /usr/bin/
- 4、创建默认配置文件
- 二进制安装的,配置文件在解压包里面有个模板
- mkdir /etc/ansible
- cp /root/ansible-2.9.5/examples/ansible.cfg /etc/ansible
- 5、验证
- ansible localhost -m ping

查看版本

注意:Centos7 安装为python3后,yum将会有问题

- File "/usr/bin/yum", line 30
- except KeyboardInterrupt, e:
- ^
- SyntaxError: invalid syntax
原因:yum需要用python2编译,如果服务器安装的是python3以上,并作为默认编译器的话,就会出现这个错误。
解决方法:whereis python

修改yum配置文件:vim /usr/bin/yum
第一行修改为你python2.7的路经所在位置即可!
如果还不好使,可以yum的卸载与重新安装
一、将现有的yum源卸载
- [root@linux-node3 ~]# rpm -qa yum
- yum-3.4.3-150.el7.centos.noarch
- [root@linux-node3 ~]# rpm -qa | grep yum | xargs rpm -e --nodeps #这一步一定要执行,而且要将所有的组件卸载掉,如果卸载不干净,后面安装会有问题
- [root@linux-node3 ~]# rpm -qa yum

二、从centos官网上下载和yum有关的rpm包
1、下载rpm包,如果提示404,去地址查看具体现在是什么版本
- wget http://mirror.centos.org/centos/7/os/x86_64/Packages/yum-3.4.3-168.el7.centos.noarch.rpm
- wget http://mirror.centos.org/centos/7/os/x86_64/Packages/yum-metadata-parser-1.1.4-10.el7.x86_64.rpm
- wget http://mirror.centos.org/centos/7/os/x86_64/Packages/yum-plugin-fastestmirror-1.1.31-54.el7_8.noarch.rpm
2、安装
- [root@linux-node3 ~]# ls
- yum-3.4.3-167.el7.centos.noarch.rpm
- yum-metadata-parser-1.1.4-10.el7.x86_64.rpm
- yum-plugin-fastestmirror-1.1.31-53.el7.noarch.rpm
- [root@linux-node3 ~]# rpm -ivh yum-* #安装
- [root@linux-node3 ~]# rpm -qa yum #查看是否已经安装上
- yum-3.4.3-150.el7.centos.noarch.rpm
包括 yum install 的时候

vi /usr/libexec/urlgrabber-ext-down 修改报错文件,将头行"#!/usr/bin/python" 改为 "#!/usr/bin/python2"即可

3、Git 安装
- git clone git://github.com/ansible/ansible.git --recursive
- cd ./ansible
- source ./hacking/env-setup
4、pip 安装
- yum install python-pip python-devel
- yum install gcc glibc-devel zibl-devel rpm-build openssl-devel
- pip install --upgrade pip
- pip install ansible --upgrade
三、部署配置使用
两台设备:
192.168.86.5 hostname=86-5-master 控制端
192.168.86.6 hostname=86-6-slave 被控制端1、配置hostname
- [root@localhost ~]# hostnamectl set-hostname 86-5-master
- [root@localhost ~]# bash
- [root@86-5-master ~]# cat /etc/hosts # 配置域名解析
- 127.0.0.1 localhost localhost.localdomain localhost4 localhost4.localdomain4
- ::1 localhost localhost.localdomain localhost6 localhost6.localdomain6
- 192.168.86.6 86-6-slave
- 192.168.86.5 86-5-master
- [root@86-5-master ~]#
- [root@localhost ~]# hostnamectl set-hostname 86-6-slave
- [root@localhost ~]# bash
- [root@86-5-slave ~]# cat /etc/hosts
- 127.0.0.1 localhost localhost.localdomain localhost4 localhost4.localdomain4
- ::1 localhost localhost.localdomain localhost6 localhost6.localdomain6
- 192.168.86.6 86-6-slave
- [root@86-5-slave~]#
2、86-5-master部署ansible,查看ansible的工具命令

ansible 基于python 编写

3、配置文件讲解
/etc/ansible/ansible.cfg # 主配置文件,配置ansible工作特性,一般不需要改
/etc/ansible/hosts # 主机清单,管理的网络设备,写入目标主机地址
/etc/ansible/roles/ # 存放角色的目录/etc/ansible/ansible.cfg # 主配置文件详解
- [defaults] # 默认配置
- #inventory = /etc/ansible/hosts # 主机列表配置文件
- #library = /usr/share/my_modules/ # 库文件存放目录,基于python实现
- #remote_tmp = ~/.ansible/tmp # ansible 执行命令,是将执行的命令(py命令文件)推送到远程主机的一个目录中随后执行,此文件只是临时文件执行完毕清空,此配置配置对端存储在哪
- #local_tmp = ~/.ansible/tmp # 对标remote_tmp,执行命令时候在本机生成命令py文件,存储在local_tmp目录,远程主机的时候会自动获取此文件,推送给对端,此文件时临时文件执行完毕清空
- #plugin_filters_cfg = /etc/ansible/plugin_filters.yml # 插件配置
- #forks = 5 # 默认并发数,给多少台机器同时发送
- #poll_interval = 15
- #sudo_user = root # 使用什么用户执行,需要配置ssh授权有此用户的权限
- #ask_sudo_pass = True # 每次执行ansible命令是否询问ssh密码
- #ask_pass = True # 这些配置都不用,我么使用基于key的ssh认证
- #transport = smart
- #remote_port = 22 # 连接对端的端口号
- #module_lang = C
- #module_set_locale = False
- #host_key_checcking = False # 检查对应服务器的host_key,建议取消注释,第一次ssh提示Yes/no,此提示ssh配置可以改,ansible也可以改
- #log_path=/var/log/ansible.log # 日志文件,建议启用
- #module_name = command # 默认模块,可以修改为shell模块
- [inventory] # 主机清单相关的
- [privilege_escalation] # 权限相关信息
- [paramiko_connection] # python 模块连接情况
- [ssh_connection] # ssh连接情况

4、开启日志
- [root@86-5-master tmp]# grep 'log_path' /etc/ansible/ansible.cfg
- log_path = /var/log/ansible.log
- [root@86-5-master tmp]#
5、配置主机清单文件
/etc/ansible/hosts
# 需要做分类管理,数据库、tomcat 服务器安装的程序是不一样的,通过自定义名字用[] 括起来
# 可以写IP或者写域名,也可以写IP范围- 192.168.23.1 # 不属于任何类,每一个ansible语句都要执行
- [webserver] # 定义webserver类,名字自定义,说明一下的机器都是webserver,区分那些机器需要执行webserver的命令
- 192.168.68.7 # 单台ip
- 192.168.23.1:2222 # 指定端口号,比如此机器没有使用标准的22端口号,给此IP特指2222
- alpha.example.org # 域名
- [dbservers]
- db-1.server
- db-2.server
- db-[3:100].server # 范围
- db-[a:f].server # 范围
- 192.168.78.4
- 192.168.8.[1:100] # 192.168.8.1 ~ 192.168.8.100
基于当前只有一台机器, vi /etc/ansible/hosts
- [root@86-5-master tmp]# vi /etc/ansible/hosts
- [root@86-5-master tmp]# cat /etc/ansible/hosts
- [dbserver]
- 86-6-slave
四、Ansible相关命令使用
1、ansible-doc命令
Ad-Hoc 即利用ansible命令,主要用于临时命令使用场景,一条一条执行
ansible-doc命令查看模块帮助,ansible模块太多。- ansible-doc -l # 查看模块
- ansible-doc -l |wc -l # 查看有多少个模块
- ansible-doc -s 模块名字 # 查看模块使用方式,-s 只显示重点
2、ansible 命令
格式:ansible 分类管理的类名字(如果要所有的写all) 模块名 模块参数
- --version # 显示版本
- -m module # 指定 模块
- -v # 大略执行过程
- -vv # 详细过程
- -vvv # 超级详细过程
- --list-hosts # 显示匹配的主机列表,可简写 --list
- -k, --ask-pass # 添加-k,才会提示输入ssh连接密码。一般不用,一般使用ssh_key验证
- -c, --check # 检查,并不执行
- -T, --timeout=TIMEOUT # 检查命令的超时时间,默认10s
- -u, --user=REMOTE_USER # 指定使用哪个角色登录远程和操作
- -b, --become # 到远程机器后,使用sudo命令切换哪个用户,后续操作都在这个角色中,默认root。具体使用 -b --become-user=USERNAME
- 例如--become --become-method=sudo --become-user=root
- -k, --ask-become-pass # 提示输入sudo时的口令
3、ansible-playbook 简单案例
cat hello.yaml # 编写playbook
- ---
- #hello world yaml file
- - hosts: dbserver
- remote_user: root
- tasks:
- - name: hello world
- command: /usr/bin/wall hello world
ansible-playbook hello.yaml # 执行hello.yaml
- PLAY [dbserver] *****************************************************************************************************************************
- TASK [Gathering Facts] **********************************************************************************************************************
- ok: [192.168.86.6]
- ok: [86-6-slave]
- TASK [hello world] **************************************************************************************************************************
- changed: [86-6-slave]
- changed: [192.168.86.6]
- PLAY RECAP **********************************************************************************************************************************
- 192.168.86.6 : ok=2 changed=1 unreachable=0 failed=0 skipped=0 rescued=0 ignored=0
- 86-6-slave : ok=2 changed=1 unreachable=0 failed=0 skipped=0 rescued=0 ignored=0
4、ansible-vault
ansible-vault 是 加密/解密 yaml 的工具
- [root@86-5-master ansible_playbook]# ansible-vault
- usage: ansible-vault [-h] [--version] [-v] {create,decrypt,edit,view,encrypt,encrypt_string,rekey} ...
- ansible-vault: error: the following arguments are required: action
ansible-vault encrypt 加密
- [root@86-5-master ansible_playbook]# ansible-vault encrypt hello.yaml
- New Vault password:
- Confirm New Vault password:
- Encryption successful
- [root@86-5-master ansible_playbook]# cat hello.yaml
- $ANSIBLE_VAULT;1.1;AES256
- 65366232383766313134373164623664633361633266613232623030356364306635386538353165
- 3535313563323432386539363730336135353633323932310a343236373365316333303339353165
- 34363938326463303637383931646437343362393736396438613461386462323833633537383238
- 6430313566383434660a333135393437653836333836313961306134303630313437363965333638
- 66663564653262613830396465643730303463616533363935343531396264393333383732656164
- 36303939646530653862363134643934303534336361353330623932623837333935366536333137
- 65346434386263613533376338323833383533633836363837323163323531333538396265396164
- 31343965306362646631303535643337646233643664343864353633666632373562386433376338
- 38313062323961633031356433396462666639353562333537376135323135313064353133373265
- 62313334373935316333643764613063343133623462343939313435663963636662306337663934
- 376663303732636263366339616635366262
加密后无法使用ansible-playbook
- [root@86-5-master ansible_playbook]# ansible-playbook hello.yaml
- ERROR! Attempting to decrypt but no vault secrets found
ansible-vault decrypt 解密
- [root@86-5-master ansible_playbook]# ansible-vault decrypt hello.yaml
- Vault password:
- Decryption successful
- [root@86-5-master ansible_playbook]# cat hello.yaml
- ---
- #hello world yaml file
- - hosts: dbserver
- remote_user: root
- tasks:
- - name: hello world
- command: /usr/bin/wall hello world
5、ansible-console 用的不多
ansible-console 是 ansible 的控制台
- [root@86-5-master ansible_playbook]# ansible-console
- Welcome to the ansible console.
- Type help or ? to list commands.
- root@all (2)[f:5]$ list # 默认不加参数,真对的是all,默认使用当前的用户权限,list显示hosts,f 代表5个并发
- 86-6-slave
- 192.168.86.6
- root@all (2)[f:5]$ cd 123 # 切换all类到123类,找不到
- [WARNING]: Could not match supplied host pattern, ignoring: 123
- no host matched
- root@all (2)[f:5]$ cd dbserver # 切换all类到dbserver
- root@dbserver (2)[f:5]$ cd all
- root@all (2)[f:5]$ forks 10 # 修改并发数
- root@all (2)[f:10]$ yum name=httpd state=present # yum 是ansible模块,也就是Linux中的安装卸载等操作
- root@all (2)[f:10]$ service name=httpd state=started
6、ansible-galaxy
使用galaxy提供好的playbook https://galaxy.ansible.com/geerlingguy

Ansible Galaxy命令行工具,从命令行搜索角色,用户可以使用–author、–platforms和–galaxy-tags选项来缩小搜索结果的范围。搜索到的都是可以用的,命令ansible-galaxy search --author geerlingguy将显示由用户geerlingguy提交的所有角色
- ansible-galaxy search --author geerlingguy
- Found 101 roles matching your search:
- Name Description
- ---- -----------
- geerlingguy.adminer Installs Adminer for Database management.
- geerlingguy.ansible Ansible for RedHat/CentOS/Debian/Ubuntu.
- geerlingguy.apache Apache 2.x for Linux.
- geerlingguy.apache-php-fpm Apache 2.4+ PHP-FPM support for Linux.
- geerlingguy.aws-inspector AWS Inspector installation for Linux.
- geerlingguy.awx Installs and configures AWX (Ansible Tower's open source version).
- geerlingguy.awx-container Ansible AWX container for Docker.
- geerlingguy.backup Backup for Simple Servers.
- geerlingguy.bad_judgement DO NOT USE THIS ROLE! It is for demonstration purposes.
- geerlingguy.blackfire Blackfire installation for Linux
- geerlingguy.certbot Installs and configures Certbot (for Let's Encrypt).
- geerlingguy.clamav ClamAV installation and configuration.
显示包含redis并且适用于企业Linux(EL)平台的角色的名称
- [root@86-5-master ~]# ansible-galaxy search 'redis' --platforms EL
- Found 255 roles matching your search:
- Name Description
- ---- -----------
- 0x0i.consul Consul - a service discovery, mesh and configuration control plane and networking tool
- 0x0i.grafana Grafana - an analytics and monitoring observability platform
- 0x5a17ed.ansible_role_netbox Installs and configures NetBox, a DCIM suite, in a production setting.
- 1it.sudo Ansible role for managing sudoers
- abarrak.redis_ansible_role Ansible role to install and configure redis instances based on Bitnami's chart.
- adfinis-sygroup.redis Ansible role for Redis
- AerisCloud.librato Install and configure the Librato Agent
- AerisCloud.redis Installs redis on a server
- AlbanAndrieu.java Manage Java installation
- alikins.php_pecl PHP PECL extension installation.
- alikins.php_redis PhpRedis support for Linux
- alikins.redis Redis for Linux
- andrewrothstein.redis builds Redis from src and installs
- anjia0532.ansible_beats Beats for Linux
- [root@86-5-master ~]# ansible-galaxy search --author abarrak
- Found 3 roles matching your search:
- Name Description
- ---- -----------
- abarrak.docker_server_role Ansible role to install and expose docker server on RHEL
- abarrak.plik_ansible_role Ansible role to install and configure plik file server.
- abarrak.redis_ansible_role Ansible role to install and configure redis instances based on Bitnami's chart.
- [root@86-5-master ~]#
ansible-galaxy info子命令显示与角色相关的更多详细信息。Ansible Galaxy从多个位置获取这一信息,包括角色的meta/main.yml文件及其GigHub存储库
- [root@86-5-master ~]# ansible-galaxy info geerlingguy.redis
- Role: geerlingguy.redis
- 平台说明 description: Redis for Linux
- 是否能用 active: True
- 特征码 commit: 4f6fbdff6b566a596b2eaac168f88be820d4bbc5
- 忽略 commit_message: Ignore the tyranny of ansible-lint rule 106.
- 提交的url commit_url: https://api.github.com/repos/geerlingguy/ansible-role-red>
- 所属公司 company: Midwestern Mac, LLC
- 创建时间 created: 2014-03-06T16:48:12.451903Z
- 下载次数 download_count: 378170
- 转载次数 forks_count: 131
- 放置位置 github_branch: master
- github_repo: ansible-role-redis
- github_user: geerlingguy
- id: 468
- 进口 imported: 2020-09-18T15:06:33.499261-04:00
- is_valid: True
- issue_tracker_url: https://github.com/geerlingguy/ansible-role-redis/>
- 许可 license: license (BSD, MIT)
- min_ansible_version: 2.4
- modified: 2020-09-18T19:06:33.507214Z
- open_issues_count: 6
- 路径 path: ('/root/.ansible/roles', '/usr/share/ansible/roles', '/etc/ansi>
- role_type: ANS
- stargazers_count: 161
- travis_status_url: https://travis-ci.org/geerlingguy/ansible-role-red>
- (END)
从Ansible Galaxy安装角色,ansible-galaxy install,从Ansible Galaxy下载角色,并将它安装到控制节点本地,默认为Ansible设置的默认roles_path,~/.ansible/roles目录。默认的roles_path可能会被用户当前Ansible配置文件或环境变量ANSIBLE_ROLES_PATH覆盖
- [root@86-5-master ~]# ansible-galaxy install geerlingguy.mysql
- [root@86-5-master ~]# ll /root/.ansible/roles/geerlingguy.mysql/ # 下载成功后,默认在/root/.ansible/roles/下
- 总用量 16
- drwxr-xr-x 2 root root 22 10月 18 13:02 defaults
- drwxr-xr-x 2 root root 22 10月 18 13:02 handlers
- -rw-rw-r-- 1 root root 1080 8月 30 22:40 LICENSE
- drwxr-xr-x 2 root root 50 10月 18 13:02 meta
- drwxr-xr-x 3 root root 21 10月 18 13:02 molecule
- -rw-rw-r-- 1 root root 9056 8月 30 22:40 README.md
- drwxr-xr-x 2 root root 231 10月 18 13:02 tasks
- drwxr-xr-x 2 root root 67 10月 18 13:02 templates
- drwxr-xr-x 2 root root 147 10月 18 13:02 vars
- [root@86-5-master ~]# ansible-galaxy install geerlingguy.mysql # 在执行提示已经下载了
- [WARNING]: - geerlingguy.mysql (4.1.0) is already installed - use --force to change version to unspecified
用户可以通过使用-p 选项,指定具体的目录来安装角色
- [root@ansible project]# ls
- playbook.yml roles
- [root@ansible project]# ansible-galaxy install geerlingguy.redis -p roles/
- - downloading role 'redis', owned by geerlingguy
- - downloading role from https://github.com/geerlingguy/ansible-role-redis/archive/1.6.0.tar.gz
- - extracting geerlingguy.redis to /project/roles/geerlingguy.redis
- - geerlingguy.redis (1.6.0) was installed successfully
- [root@ansible project]# ls roles/
- geerlingguy.redis httpd
- [root@ansible project]# pwd
- /project
根据某一文本文件中的定义来安装一个角色列表。src指定角色的来源,本例中为来自Ansible Galaxy的geerlingguy.redis角色。version属性是可选的,指定要安装的角色版本,本例中为1.5.0。例如,一个用于安装geerlingguy.redis的简单requirements.yml可能类似于如下:
- [root@ansible roles]# rm -rf geerlingguy.redis/ //先删掉刚下载的角色
- [root@ansible roles]# rm -rf robertdebock.httpd/
- [root@86-5-master project]# pwd
- /root/project
- [root@86-5-master project]# ll
- drwxr-xr-x 2 root root 6 10月 20 03:04 roles
- [root@ansible project]# vi roles/requirements.yml //写个文件添加要下载的角色
- - src: geerlingguy.redis # 下载geerlingguy人的redis项目,在sraech --author中可找
- - src: robertdebock.httpd # 下载robertdebock人的httpd项目,在sraech --author中可找
-r指定要安装文件的内容,-p指定安装位置
- [root@ansible project]# ansible-galaxy install -r roles/requirements.yml -p roles/
- - downloading role 'redis', owned by geerlingguy
- - downloading role from https://github.com/geerlingguy/ansible-role-redis/archive/1.6.0.tar.gz
- - extracting geerlingguy.redis to /project/roles/geerlingguy.redis
- - geerlingguy.redis (1.6.0) was installed successfully
- - downloading role 'httpd', owned by robertdebock
- - downloading role from https://github.com/robertdebock/ansible-role-httpd/archive/5.3.0.tar.gz
- - extracting robertdebock.httpd to /project/roles/robertdebock.httpd
- - robertdebock.httpd (5.3.0) was installed successfully
- - src: geerlingguy.redis
- version: "1.5.0"
- [root@ansible project]# ls roles/ //查看,成功安装角色
- geerlingguy.redis httpd requirements.yml robertdebock.httpd
重要
应当在requirements.yml文件中指定角色版本,特别是生产环境中的playbook。
如果不指定版本,将会获取角色的最新版本。如果作者对角色做出了更改,并与用户的playbook不兼容,这可能会造成自动化失败或其他问题用户可以使用ansible-galaxy来安装不在Ansible Galaxy中的角色。可以在私有的Git存储库或Web服务器上托管自有的专用或内部角色。下例演示了如何利用各种远程来源配置要求文件
- [root@localhost project]# cat roles/requirements.yml
- # from Ansible Galaxy, using the latest version
- - src: geerlingguy.redis
- # from Ansible Galaxy, overriding the name and using a specific version
- - src: geerlingguy.redis
- version: "1.5.0"
- name: redis_prod # 自定义名字
- # from any Git-based repository, using HTTPS
- - src: https://gitlab.com/guardianproject-ops/ansible-nginx-acme.git
- scm: git
- version: 56e00a54
- name: nginx-acme
- # from any Git-based repository, using SSH
- - src: git@gitlab.com:guardianproject-ops/ansible-nginx-acme.git
- scm: git
- version: master
- name: nginx-acme-ssh
- # from a role tar ball, given a URL
- # supports 'http', 'https', or 'file' protocols
- - src: file:///opt/local/roles/myrole.tar
- name: myrole
src关键字指定Ansible Galaxy角色名称。如果角色没有托管在Ansible Galaxy中,则src关键字将指明角色的URL
如果角色托管在来源控制存储库中,则需要使用scm属性。ansible-galaxy命令能够从基于git或mercurial的软件存储库下载和安装角色。基于Git的存储库要求scm值为git,而托管在Mercurial存储库中的角色则要求值为hg。如果角色托管在Ansible Galaxy中,或者以tar存档形式托管在Web服务器上,则省略scm关键字
name关键字用于覆盖角色的本地名称。version关键字用于指定角色的版本。version关键字可以是与严自角色的软件存储库的分支、标记或提交哈希对应的任何值
管理下载的角色
ansible-galaxy命令也可管理本地的角色,如位于playbook项目的roles目录中的角色。ansible-galaxy list子命令列出本地找到的角色
- [root@ansible project]# ansible-galaxy list
- # /root/.ansible/roles
- - geerlingguy.redis, 1.6.0
- # /usr/share/ansible/roles
- - linux-system-roles.kdump, (unknown version)
- - linux-system-roles.network, (unknown version)
- - linux-system-roles.postfix, (unknown version)
- - linux-system-roles.selinux, (unknown version)
- - linux-system-roles.storage, (unknown version)
- - linux-system-roles.timesync, (unknown version)
- - rhel-system-roles.kdump, (unknown version)
- - rhel-system-roles.network, (unknown version)
- - rhel-system-roles.postfix, (unknown version)
- - rhel-system-roles.selinux, (unknown version)
- - rhel-system-roles.storage, (unknown version)
- - rhel-system-roles.timesync, (unknown version)
- # /etc/ansible/roles
- [root@ansible project]# mv roles/* /etc/ansible/roles/ //把所有角色移动到能搜索到的角色目录下
- [root@ansible project]# ansible-galaxy list
- # /root/.ansible/roles
- - geerlingguy.redis, 1.6.0
- # /usr/share/ansible/roles
- - linux-system-roles.kdump, (unknown version)
- - linux-system-roles.network, (unknown version)
- - linux-system-roles.postfix, (unknown version)
- - linux-system-roles.selinux, (unknown version)
- - linux-system-roles.storage, (unknown version)
- - linux-system-roles.timesync, (unknown version)
- - rhel-system-roles.kdump, (unknown version)
- - rhel-system-roles.network, (unknown version)
- - rhel-system-roles.postfix, (unknown version)
- - rhel-system-roles.selinux, (unknown version)
- - rhel-system-roles.storage, (unknown version)
- - rhel-system-roles.timesync, (unknown version)
- # /etc/ansible/roles //搜的刚下载的两个角色
- - geerlingguy.redis, 1.6.0
- - httpd, (unknown version)
- - robertdebock.httpd, 5.3.0
可以使用ansible-galaxy remove子命令本地删除角色
- [root@ansible roles]# ansible-galaxy remove geerlingguy.redis
- [root@ansible roles]# ansible-galaxy list
在playbook中使用下载并安装的角色的方式与任何其他角色都一样。在roles部分中利用其下载的角色名称来加以引用。如果角色不在项目的roles目录中,则将检查roles_path来查看角色是否安装在了其中一个目录中,将使用第一个匹配项。以下use-role.ymlplaybook引用了redis_prod和geerlingguy.redis角色:
- [root@localhost project]# cat use-role.yml
- ---
- - name: use redis_prod for prod machines
- hosts: redis_prod_servers
- remote_user: devops
- become: True
- roles:
- - redis_prod
- - name: use geerlingguy.redis for Dev machines
- hosts: redis_dev_servers
- remote_user: devops
- become: True
- roles:
- - geerlingguy.redis
此playbook使不同版本的geerlingguy.redis角色应用到生产和开发服务器。借助这种方式可以对角色更改进行系统化测试和集成,然后再部署到生产服务器上。如果角色的近期更改造成了问题,则借助版本控制来开发角色,就能回滚到过去某一个稳定的角色版本
五、Ansible 的模块
1、Command 模块
- 格式:ansible 类 -m command -a '命令'
- 例如:ansible srvs -m command -a 'systemctl restart mysqld'
- 他是一个默认模块,所以可以省略-m command
- [root@86-5-master ~]# ansible-doc -s command
- - name: Execute commands on targets
- command:
- argv: # 将命令作为列表而不是字符串传递。使用“argv”避免引用否则会解释不正确(例如“用户名”)。只有字符串或列表
- chdir: # 在运行命令之前,请切换到此目录
- cmd: # 要运行的命令
- creates: # 文件名或(自2.0以来)glob模式。如果它已经存在,则此步骤不会运行
- free_form: # 命令模块采用自由格式命令运行。没有名为“free form”的实际参数
- removes: # 文件名或(自2.0以来)glob模式。如果它已经存在,则将运行此步骤。
- stdin: # 将命令的stdin直接设置为指定值
- stdin_add_newline: # If set to `yes', append a newline to stdin data.
- strip_empty_ends: # Strip empty lines from the end of stdout/stderr in result.
- warn: # Enable or disable task warnings.
案例:
- [root@86-5-master ~]# ansible dbserver -m command -a 'chdir=/etc cat redhat-release' # 文件在/etc/redhat-release,使用chdir=/etc 等价于 cd /etc
- 192.168.86.6 | CHANGED | rc=0 >>
- CentOS Linux release 7.5.1804 (Core)
- 86-6-slave | CHANGED | rc=0 >>
- CentOS Linux release 7.5.1804 (Core)
- [root@86-5-master ~]# ansible dbserver -m command -a 'creates=/etc/redhat-release chdir=/etc cat redhat-release'
- 192.168.86.6 | SUCCESS | rc=0 >>
- skipped, since /etc/redhat-release exists
- 86-6-slave | SUCCESS | rc=0 >>
- skipped, since /etc/redhat-release exists
- [root@86-5-master ~]#
- [root@86-5-master ~]# ansible dbserver -m command -a 'removes=/etc/redhat-release chdir=/etc cat redhat-release'
- 192.168.86.6 | CHANGED | rc=0 >>
- CentOS Linux release 7.5.1804 (Core)
- 86-6-slave | CHANGED | rc=0 >>
- CentOS Linux release 7.5.1804 (Core)
- [root@86-5-master ~]#
缺点:不识别通配符(* .* ^ 等等)、重定向(echo)、管道符( | )、变量 ($hostname) 等等
2、Shell 模块
功能:和 Command 相似,相对 Command 没有过多的限制
- 格式:ansible 类 -m shell -a '命令'
- 例如:ansible srvs -m shell -a 'systemctl restart mysqld'
- [root@86-5-master ~]# ansible dbserver -m shell -a 'echo 123456|passwd --stdin jerry'
- 192.168.86.6 | CHANGED | rc=0 >>
- 更改用户 jerry 的密码 。
- passwd:所有的身份验证令牌已经成功更新。
- 86-6-slave | CHANGED | rc=0 >>
- 更改用户 jerry 的密码 。
- passwd:所有的身份验证令牌已经成功更新。
- [root@86-5-master ~]# ansible-doc -s shell
- - name: Execute shell commands on targets
- shell:
- chdir: # Change into this directory before running the command.
- cmd: # The command to run followed by optional arguments.
- creates: # A filename, when it already exists, this step will *not* be run.
- executable: # Change the shell used to execute the command. This expects an absolute path to the executable.
- free_form: # The shell module takes a free form command to run, as a string. There is no actual parameter named 'free
- form'. See the examples on how to use this module.
- removes: # A filename, when it does not exist, this step will *not* be run.
- stdin: # Set the stdin of the command directly to the specified value.
- stdin_add_newline: # Whether to append a newline to stdin data.
- warn: # Whether to enable task warnings.
- [root@86-5-master ~]#
既然 shell 模块比 Command好,如果修改默认模块为 shell
- [root@86-5-master ~]# grep "module_name" /etc/ansible/ansible.cfg
- #module_name = command
- [root@86-5-master ~]# vi /etc/ansible/ansible.cfg # 修改为shell
- module_name = shell
3、Script 模块
功能:将远程机器上运行 ansible 服务器上的脚本
- [root@86-5-master ansible_playbook]# vi test.sh
- echo "My hostname is `echo $HOSTNAME`"
- [root@86-5-master ansible_playbook]# chmod +x test.sh
- [root@86-5-master ansible_playbook]# ./test.sh
- My hostname is 86-5-master
- [root@86-5-master ansible_playbook]# ansible-doc -s script
- - name: Runs a local script on a remote node after transferring it
- script:
- chdir: # Change into this directory on the remote node before running the script.
- cmd: # Path to the local script to run followed by optional arguments.
- creates: # A filename on the remote node, when it already exists, this step will *not* be run.
- decrypt: # This option controls the autodecryption of source files using vault.
- executable: # Name or path of a executable to invoke the script with.
- free_form: # Path to the local script file followed by optional arguments.
- removes: # A filename on the remote node, when it does not exist, this step will *not* be run.
- [root@86-5-master ansible_playbook]#
[root@86-5-master ansible_playbook]# ansible dbserver -m script -a '/root/ansible_playbook/test.sh'
4、Copy模块
功能:从 ansible 服务器主控端复制文件到远程主机
- # 如果目标存在,默认覆盖
- ansible srv -m copy -a "src=/root/test.sh dest=/tmp/test2.sh"
- # 拷贝过去,如果目标存在,先备份,在覆盖
- ansible dbserver -m copy -a "src=/root/ansible_playbook/test.sh dest=/tmp/test2.sh backup=yes"
- [root@86-6-slave tmp]# ll
- -rw-r--r-- 1 root root 50 10月 18 17:29 test2.sh
- -rw-r--r-- 1 root root 39 10月 18 17:28 test2.sh.6765.2022-10-18@17:29:46~
- # 可以修改其权限,owner所属主、mode=权限
- ansible srv -m copy -a "src=/root/test.sh dest=/tmp/test2.sh owner=jerry mode=600"
- [root@86-6-slave tmp]# ll
- -rw------- 1 jerry root 50 10月 18 17:29 test2.sh
- # 指定内容,直接生成目标文件
- ansible dbserver -m copy -a "content='test content\n' dest=/tmp/test.txt"
- [root@86-6-slave tmp]# cat /tmp/test.txt
- test content
- # 复制/etc/下的文件。不包括/etc/目录自身
- ansible dbserver -m copy -a "src=/etc/ dest=/backup"
- # 拷贝文件夹
- ansible dbserver -m copy -a "src=/etc/sysconfig dest=/backup1/"
- [root@86-6-slave /]# ll /backup1/*
- -rw-r--r-- 1 root root 260 10月 18 17:44 anaconda
- -rw-r--r-- 1 root root 483 10月 18 17:44 authconfig
- drwxr-xr-x 2 root root 43 10月 18 17:44 cbq
- -rw-r--r-- 1 root root 150 10月 18 17:44 cpupower
5、Fetch模块
功能:从远程主机提取文件至ansible的主控端,和copy相反,目前不支持目录
- [root@86-5-master ansible_playbook]# ansible-doc -s fetch
- - name: Fetch files from remote nodes
- fetch:
- dest: # (required) A directory to save the file into. For example, if the `dest' directory is `/backup' a `src' file
- named `/etc/profile' on host `host.example.com', would be saved into
- `/backup/host.example.com/etc/profile'. The host name is based on the
- inventory name.
- fail_on_missing: # When set to `yes', the task will fail if the remote file cannot be read for any reason. Prior to Ansible 2.5,
- setting this would only fail if the source file was missing. The default was
- changed to `yes' in Ansible 2.5.
- flat: # Allows you to override the default behavior of appending hostname/path/to/file to the destination. If `dest'
- ends with '/', it will use the basename of the source file, similar to the
- copy module. This can be useful if working with a single host, or if
- retrieving files that are uniquely named per host. If using multiple hosts
- with the same filename, the file will be overwritten for each host.
- src: # (required) The file on the remote system to fetch. This `must' be a file, not a directory. Recursive fetching
- may be supported in a later release.
- validate_checksum: # Verify that the source and destination checksums match after the files are fetched.
- [root@86-5-master ansible_playbook]#
- [root@86-5-master ansible_playbook]# ansible dbserver -m fetch -a "src=/etc/redhat-release dest=/tmp/"
- [root@86-5-master ansible_playbook]# ll /tmp/
- drwxr-xr-x 3 root root 17 10月 18 17:48 192.168.86.6
- drwxr-xr-x 3 root root 17 10月 18 17:48 86-6-slave
- [root@86-5-master ansible_playbook]# ll /tmp/86-6-slave/
- drwxr-xr-x 2 root root 28 10月 18 17:48 etc
- [root@86-5-master 86-6-slave]# ll /tmp/86-6-slave/etc/
- -rw-r--r-- 1 root root 38 10月 18 17:48 redhat-release
6、File 模块
功能:设置文件属性,比如所属主、组、权限等
- # 创建空文件
- ansible dnbserver -m file -a "path=/data/test.txt state=touch" 创建文件
- ansible dnbserver -m file -a "path=/data/test.txt state=absent" 删除文件
- ansible dnbserver -m file -a "path=/data/test.sh owner=jerry mode=755" 修改文件所属主、组
- # 创建目录
- ansible dnbserver -m file -a "path=/data/mysql state=directory owner=mysql group=mysql"
- # 创建软连接
- ansible dnbserver -m file -a 'src=/data/testfile dest=/data/testfile-link state=link'
- [root@86-5-master ~]# ansible-doc -s file
- - name: Manage files and file properties
- file:
- state: #如果是“absent”,代表删除,目录将被递归删除,文件或符号链接将被取消链接。
- #如果是“touch”(1.4中新增),代表创建
- #如果为“directory”,则将创建所有中间子目录(如果它们不存在)。
- #如果为“link”,将创建软连接或更改软连接符号
- recurse: # 递归设置目录内容的指定文件属性。这仅适用于“state”设置`directory”。
8、unarchive 模块
功能:解包解压缩
实现两种方法:
1、将ansible主机上的压缩包传到远程主机后解压缩至特定目录,设置copy=yes
2、将远程主机上的某个压缩包解压缩到指定路径下,设置copy=no参数:
copy: 默认是yes,当copy=yes,拷贝的文件是从ansible主机复制到远程主机上,如果设置为copy=no,会在远程主机上 寻找src源文件
remote_src: 和copy功能一样且互斥,yes表示在远程主机,不在ansible主机,no表示文件在ansible主机上
src: 源路径,可以是ansible主机上的路径,也可以是远程主机上的路径,如果是远程主机上的路径,则需要设置copy=no
dest: 远程主机上的目标路径
mode: 设置解压缩后的文件权限传递解包
- # 如果dest没有/root/ansible/目录则会报错,修改owner group是递归
- ansible dbserver -m unarchive -a "src=/root/ansible-2.9.5.tar.gz dest=/root/ansible/ owner=jerry group=jerry"
- [root@86-6-slave ~]# ll /root/
- drwxr-xr-x 3 root root 27 10月 19 05:37 ansible
- [root@86-6-slave ~]# ll /root/ansible/
- drwxr-xr-x 12 jerry jerry 320 2月 14 2020 ansible-2.9.5
- [root@86-6-slave ~]# ll /root/ansible/ansible-2.9.5/
- drwxr-xr-x 2 jerry jerry 243 2月 14 2020 bin
- drwxr-xr-x 2 jerry jerry 53 2月 14 2020 changelogs
- drwxr-xr-x 3 jerry jerry 40 2月 14 2020 contrib
- [root@86-5-master ~]# ansible dbserver -m copy -a 'src=/root/ansible-2.9.5.tar.gz dest=/root'
- [root@86-5-master ~]# ansible dbserver -m unarchive -a "src=/root/ansible-2.9.5.tar.gz dest=/root/ansible/ copy=no"
- [root@86-6-slave ~]# ll /root/
- drwxr-xr-x 3 root root 27 10月 19 05:45 ansible
- -rw-r--r-- 1 root root 14186885 10月 19 05:44 ansible-2.9.5.tar.gz
- [root@86-6-slave ~]# ll /root/ansible
- drwxr-xr-x 12 root root 320 2月 14 2020 ansible-2.9.5
9、archive 模块
功能:打包压缩
- # -m archive 打包
- # path=/tmp/ ansible主机目录
- # dest=/root/tmp.tar.gz 打包位置
- # format=bz2 打包类型
- ansible dbserver -m archive -a 'path=/tmp/ dest=/root/tmp.tar.gz format=bz2 owner=jerry mode=0600'
- [root@86-6-slave ~]# ll /root/
- -rw------- 1 jerry root 140249 10月 19 05:54 tmp.tar.gz
10、Hostname 模块
功能:管理主机名
- 真对特定主机、变量修改名字
- [root@86-5-master ~]# ansible dbserver -m hostname -a "name=centos7-ans"
- [root@86-6-slave ~]# bash
- [root@centos7-ans ~]#
11、Cron 模块
功能:计划任务
支持时间:minute ,hour , day , month , weekday
- # 备份数据库脚本
- [root@86-5-master ansible_playbook]# pwd
- /root/ansible_playbook
- [root@86-5-master ansible_playbook]# vi mysql_backup.sh
- mysqldump -A -F --single-transaction --master-data=2 -q -uroot |gzip > /data/mysql_`data +%F_%T`.sql.gz
- # 创建脚本任务
- 其中没有定义day,month 代表* * 每天每月,hour=2 minute=30 代表每2小时30分钟
- name起个名字,job 是执行的任务,定期在此机器上执行的ansible上的这个脚本
- 注意,job后的脚本必须在远程主机上有
- ansible 192.168.78.6 -m cron -a "hour=2 minute=30 weekday=1-5 name='backup mysql' job=/root/ansible_playbook/mysql_backup.sh"
- [root@86-6-slave ~]# crontab -l
- #Ansible: backup mysql
- 30 2 * * 1-5 /root/ansible_playbook/mysql_backup.sh
- [root@86-6-slave ~]#
- # 创建命令任务
- 其中没有定义hour,day,month,weekday 代表* * * * 每时每天每月每周,minute=*/5 代表每5分钟
- ansible dbserver -m cron -a "minute=*/5 job='/usr/sbin/ntpdate 172.20.0.1 & >/dev/null' name=Synctime "
- [root@86-6-slave ~]# crontab -l
- #Ansible: Synctime
- */5 * * * * /usr/sbin/ntpdate 172.20.0.1 & >/dev/null
- [root@86-6-slave ~]#
- # 禁用任务
- ansible dbserver -m cron -a "minute=*/5 job='/usr/sbin/ntpdate 172.20.0.1 & >/dev/null' name=Synctime disabled=yes"
- [root@86-6-slave ~]# crontab -l
- #Ansible: backup mysql
- 30 2 * * 1-5 /root/ansible_playbook/mysql_backup.sh
- #Ansible: Synctime
- #*/5 * * * * /usr/sbin/ntpdate 172.20.0.1 & >/dev/null
- # 启动计划任务
- ansible dbserver -m cron -a "minute=*/5 job='/usr/sbin/ntpdate 172.20.0.1 & >/dev/null' name=Synctime disabled=no"
总结:Cron 模块就是修改的本地的 crontab 定时任务,所以,创建就是添加。禁用就是注释。启动就是去掉注释
12、Yum 模块
功能:管理软件包,只支持RHEL,Centos,fedora,不支持 Ubuntu 其他版本
- [root@86-5-master ~]# ansible-doc -s yum
- state: # 安装(“present”还是“installed”,“latest”),还是删(“absent”或“removed”)软件包
- # latest 代表安装的最新版,present 和 installed 可以指定版本,如果不指定则尽量也是最新版。
- # absent 和 removed 将删除指定的包
安装,默认安装后不会协助启动
- # yum install -y httpd,如果本机已经存在httpd,则不执行
- [root@86-5-master ~]# ansible dbserver -m yum -a "name=httpd state=present"
- # 如果要安装多个,直接用,隔离 name=libaio,perl-Date-Dumper,per-Getopt-Long
- [root@86-6-slave ~]# rpm -qa httpd
- 部署后
- [root@86-6-slave ~]# rpm -qa httpd
- httpd-2.4.6-97.el7.centos.5.x86_64
- [root@86-6-slave ~]# rpm -qi httpd
- Name : httpd
- Version : 2.4.6
- Release : 97.el7.centos.5
- Architecture: x86_64
- Install Date: 2022年10月19日 星期三 07时40分24秒
- Group : System Environment/Daemons
- Size : 9821136
- License : ASL 2.0
- Signature : RSA/SHA256, 2022年03月25日 星期五 02时21分56秒, Key ID 24c6a8a7f4a80eb5
- Source RPM : httpd-2.4.6-97.el7.centos.5.src.rpm
- Build Date : 2022年03月24日 星期四 22时59分42秒
- Build Host : x86-02.bsys.centos.org
- Relocations : (not relocatable)
- Packager : CentOS BuildSystem <http://bugs.centos.org>
- Vendor : CentOS
- URL : http://httpd.apache.org/
- Summary : Apache HTTP Server
- Description :
- The Apache HTTP Server is a powerful, efficient, and extensible
- web server.
卸载
- [root@86-5-master ~]# ansible dbserver -m yum -a "name=httpd state=removed"
- [root@86-6-slave ~]# rpm -qa httpd
- [root@86-6-slave ~]#
13、Service 模块
功能:管理服务,启动查看服务,使用的是service/systemctl start 服务
- [root@86-5-master ~]# ansible-doc -s service
- - name: Manage services
- service:
- arguments: # Additional arguments provided on the command line.
- enabled: # Whether the service should start on boot. *At least one of state and enabled are required.*
- name: # (required) Name of the service.
- pattern: # If the service does not respond to the status command, name a substring to look for as would be found in the
- output of the `ps' command as a stand-in for a status result. If the string is
- found, the service will be assumed to be started.
- runlevel: # For OpenRC init scripts (e.g. Gentoo) only. The runlevel that this service belongs to.
- sleep: # If the service is being `restarted' then sleep this many seconds between the stop and start command. This
- helps to work around badly-behaving init scripts that exit immediately after
- signaling a process to stop. Not all service managers support sleep, i.e when
- using systemd this setting will be ignored.
- state: # started/stopped/enabled
- use: # The service module actually uses system specific modules, normally through auto detection, this setting can
- force a specific module. Normally it uses the value of the
- 'ansible_service_mgr' fact and falls back to the old 'service' module when
- none matching is found.
- [root@86-5-master ~]#
yum 安装httpd,service启动httpd
- # 没有启动80端口
- [root@86-6-slave ~]# netstat -anp |grep 80
- unix 2 [ ACC ] STREAM LISTENING 15809 636/VGAuthService /var/run/vmware/guestServicePipe
- unix 3 [ ] STREAM CONNECTED 17780 997/sshd
- unix 2 [ ] DGRAM 18053 999/rsyslogd
- # 启动httpd
- [root@86-5-master ~]# ansible dbserver -m service -a "name=httpd state=started"
- # 启动80端口
- [root@86-6-slave ~]# netstat -anp |grep 80
- tcp6 0 0 :::80 :::* LISTEN 23974/httpd
- unix 2 [ ACC ] STREAM LISTENING 15809 636/VGAuthService /var/run/vmware/guestServicePipe
- unix 3 [ ] STREAM CONNECTED 17780 997/sshd
- unix 2 [ ] DGRAM 18053 999/rsyslogd
- [root@86-6-slave ~]# ps -ef |grep httpd
- root 23974 1 0 07:49 ? 00:00:00 /usr/sbin/httpd -DFOREGROUND
- apache 23975 23974 0 07:49 ? 00:00:00 /usr/sbin/httpd -DFOREGROUND
- apache 23976 23974 0 07:49 ? 00:00:00 /usr/sbin/httpd -DFOREGROUND
- apache 23977 23974 0 07:49 ? 00:00:00 /usr/sbin/httpd -DFOREGROUND
- apache 23980 23974 0 07:49 ? 00:00:00 /usr/sbin/httpd -DFOREGROUND
- apache 23981 23974 0 07:49 ? 00:00:00 /usr/sbin/httpd -DFOREGROUND
- root 23999 22870 0 07:49 pts/0 00:00:00 grep --color=auto httpd
- [root@86-6-slave ~]# systemctl status httpd
- ● httpd.service - The Apache HTTP Server
- Loaded: loaded (/usr/lib/systemd/system/httpd.service; disabled; vendor preset: disabled)
- Active: active (running) since 三 2022-10-19 07:49:10 CST; 47s ago
- Docs: man:httpd(8)
- man:apachectl(8)
- Main PID: 23974 (httpd)
- Status: "Total requests: 0; Current requests/sec: 0; Current traffic: 0 B/sec"
- CGroup: /system.slice/httpd.service
- ├─23974 /usr/sbin/httpd -DFOREGROUND
- ├─23975 /usr/sbin/httpd -DFOREGROUND
- ├─23976 /usr/sbin/httpd -DFOREGROUND
- ├─23977 /usr/sbin/httpd -DFOREGROUND
- ├─23980 /usr/sbin/httpd -DFOREGROUND
- └─23981 /usr/sbin/httpd -DFOREGROUND
- 10月 19 07:49:10 86-6-slave systemd[1]: Starting The Apache HTTP Server...
- 10月 19 07:49:10 86-6-slave httpd[23974]: AH00558: httpd: Could not reliably determine the server's fully qualified domain name, using 192.168.86.6. ...s message
- 10月 19 07:49:10 86-6-slave systemd[1]: Started The Apache HTTP Server.
- Hint: Some lines were ellipsized, use -l to show in full.
设置 httpd 服务 enabled
- # 设置自启动httpd
- [root@86-5-master ~]# ansible dbserver -m service -a "name=httpd state=started enabled=yes"
- # 配置reload
- [root@86-5-master ~]# ansible dbserver -m service -a "name=httpd state=reload"
- # 修改httpd的80端口
- [root@86-5-master ~]# ansible dbserver -m shell -a "sed -i 's/^Listen 80$/Listen 8080/' /etc/httpd/conf/httpd.conf"
- # 重启httpd服务
- [root@86-5-master ~]# ansible dbserver -m service -a "name=httpd state=restarted"
14、User 模块
功能 :管理用户
- 常见的参数:
- name:用户名,必选参数
- state=present|absent:创建账号或者删除账号,present表示创建,absent表示删除
- system=yes|no:是否为系统账号
- uid:用户uid
- group:用户基本组
- shell:默认使用的shell
- move_home=yes|no:如果设置的家目录已经存在,是否将已经存在的家目录进行移动
- password:用户的密码,建议使用加密后的字符串
- comment:用户的注释信息
- remove=yes|no:当state=absent时,是否删除用户的家目录
- # 创建用户
- # name用户名、comment描述、home家目录、group所属组(前提有这个组,使用Group模块)
- ansible 192.168.86.6 -m user -a "name=user1 comment='test user' uid=2048 home=/app/user1 group=root"
- # 创建用户
- # group所属组、groups属于多个组都有哪些
- # shell=/sbin/nologin 此账号禁止登陆系统无法su登录
- # system=yes 是不是系统账号
- # create_home=no 默认创建家目录,此位置指定没有家目录
- # non_unoque=yes uid是不是唯一性,可不可以重复。也就是Linux的-o 配合-u选项,不检查UID的唯一性,通常用来让两个用户使用相同的uid useradd 用户 -ou uid
- ansible 192.168.86.6 -m user -a "name=nginx comment=nginx uid=88 group=nginx groups="root,daeon" shell=/sbin/nologin system=yes create_home=no home=/data/nginx non_unoque=yes'
- # 删除用户及家目录等数据
- # state=absent删除用户
- # remove=yes删除家目录、邮箱等数据
- ansible 192.168.86.6 -m user -a "name=nginx state=absent remove=yes'
15、Group 模块
功能:管理组
- # 创建组
- [root@86-5-master ~]# ansible 192.168.86.6 -m group -a "name=nginx gid=88 system=yes"
- # 删除组
- [root@86-5-master ~]# ansible 192.168.86.6 -m group -a "name=nginx state=absent"
16、Lineinfile 模块
ansible 在使用 sed 进行替换的时候,经常会遇到需要转义的问题,而且ansible在遇到特殊符号进行替换,存在问题,无法正常替换。其实在ansible自身提供了两个模块:Lineinfile 模块和replacce模块,可以方便的进行替换
功能:通过regexp匹配到带有此信息的最后一行,整行替换成 line=
- # path=指定修改那个文件
- # regexp=写正则表达式,表示修改哪行
- # line=写要替换的内容
- [root@86-6-slave ~]# cat /root/selinux_config
- # This file controls the state of SELinux on the system.
- SELINUX=disabled
- SELINUX=enforcing
- SELINUX=disable
- SELINUX=disabled 113
- [root@86-5-master ~]# ansible dbserver -m lineinfile -a "path=/root/selinux_config regexp='^SELINUX=' line='SELINUX=enforcing'"
- [root@86-6-slave ~]# cat selinux_config
- # This file controls the state of SELinux on the system.
- SELINUX=disabled
- SELINUX=enforcing
- SELINUX=disable
- SELINUX=enforcing
删除匹配到的此信息所有行
- [root@86-6-slave ~]# cat selinux_config
- # This file controls the state of SELinux on the system
- SELINUX=disabled
- #SELINUX=disabled
- #SELINUX=enforcing
- [root@86-5-master ~]# ansible 192.168.86.6 -m lineinfile -a "dest=/root/selinux_config state=absent regexp='^#'"
- [root@86-6-slave ~]# cat selinux_config
- SELINUX=disabled
- [root@86-6-slave ~]#
17、Replace 模块
功能:该模块有点类似于sed命令,主要也是基于正则进行匹配和替换
- [root@86-6-slave ~]# vi /root/selinux_config
- SELINUX=disabled
- UUID123
- UUID456
- # ^(UUID.*) 以UUID开头的
- # #\1 其中\1代表()中的信息,也就是UUID.* ,#\1则代表在()之前添加一个#,就是sed 's/^(UUID.*)/#\1/'
- [root@86-5-master ~]# ansible 192.168.86.6 -m replace -a "path=/root/selinux_config regexp='^(UUID.*)' replace='#\1'"
- [root@86-6-slave ~]# cat selinux_config
- SELINUX=disabled
- #UUID123
- #UUID456
- # 去除#
- [root@86-5-master ~]# ansible 192.168.86.6 -m replace -a "path=/root/selinux_config regexp='^#(.*)' replace='\1'"
如下可知,Replace只是替换正在匹配的信息,并不会替换整行
- [root@86-6-slave ~]# cat /root/selinux_config
- # This file controls the state of SELinux on the system.
- NUX=disabled
- SELINUX=enforcing
- SELINUX=disable
- SELINUX=disabled 113
- [root@86-5-master ~]# ansible 192.168.86.6 -m replace -a "path=/root/selinux_config regexp='^SELINUX=' replace='SELINUX=enforcing'"
- [root@86-6-slave ~]# cat selinux_config
- NUX=disabled
- SELINUX=enforcingenforcing
- SELINUX=enforcingdisable
- SELINUX=enforcingdisabled 113
- [root@86-6-slave ~]#
- [root@86-5-master ~]# ansible 192.168.86.6 -m replace -a "path=/root/selinux_config regexp='^SELINUX=.*' replace='SELINUX=enforcing'"
- [root@86-6-slave ~]# cat selinux_config
- NUX=disabled
- SELINUX=enforcing
- SELINUX=enforcing
- SELINUX=enforcing
18、Setup 模块
功能:收集远程主机的信息、硬件、系统、软件、网络设置等信息。
后期写 playbook 时候可能会用到这些 facts 信息,可以直接将 facts 信息中的 key 以变量的形式使用 ,但是如果主机较多,Setup 模块会影响执行速度,所以 playbook 并不用的时候,可以使用 gather_facts:no 来禁止 Ansible 收集 facts 信息
- [root@86-5-master ~]# ansible 192.168.86.6 -m setup # 显示IP、挂载等等。
- [root@86-5-master ~]# ansible 192.168.86.6 -m setup |grep ansible_dis # 用处是可以根据当前系统的信息,决定执行的命令,比如Centos 执行的是yum ,Centos 执行的是dnf
- "ansible_distribution": "CentOS",
- "ansible_distribution_file_parsed": true,
- "ansible_distribution_file_path": "/etc/redhat-release",
- "ansible_distribution_file_variety": "RedHat",
- "ansible_distribution_major_version": "7",
- "ansible_distribution_release": "Core",
- "ansible_distribution_version": "7.5",
- [root@86-5-master ~]#
查看指定的数值
- [root@86-5-master ~]# ansible 192.168.86.6 -m setup -a "filter=ansible_distribution_version"
- 192.168.86.6 | SUCCESS => {
- "ansible_facts": {
- "ansible_distribution_version": "7.5",
- "discovered_interpreter_python": "/usr/bin/python"
- },
- "changed": false
- }
六、Playbook
yaml 形式的文本文件,会通过编写 yaml,实现 Ansible 的各种模块调用
playbook 由一个或者多个play组成1、yaml 格式
List 列表
- 多元素组成,且所有元素前均使用'-'开头
- # A list of tasty fruits
- - Apple
- - Orange
- - Strawberry
- - Mango
- 可以写成一行
- [Apple,Orange,Strawberry,Mango]
dict 字典
- key value 组成
- name : Example Developer
- job : Devolper
- skill : Elite
- 也可以写成一行
- {name : Example Developer,job : Devolper,skill : Elite}
2、Playbook 核心元素
- Hosts 执行的远程主机列表
- Task 任务集,实现每个Playbook的调用,每个模块的使用
- Variables 内置变量或自定义变量在playbook中调用
- Templates 支持模板,可替换模板文件中的变量并实现一些简单逻辑的文件
- Handlers 和 notify 结合使用,由特定条件触发操作,满足条件方可执行,否则不执行。比如修改文件会触发另外动作的执行。
- Tags 标签给某个任务起名字,指定某条任务执行,可以实现挑出 playbook 中的部分任务起标签,然后执行标签,而不是所有的。用于选择运行playbook中的部分代码,
- ansible具有幂等性,因此会自动跳过没有变化的部分,即便如此 ,有些 代码为 测试其确实没有发生变化的时间依然会非常的长。此时,如果确定其没有变化,就可以通过Tage跳过这些代码片段
3、Hosts 组建
Hosts : playbook 中的每一个 play 的目录都是为了让特定主机以某个指定的用户身份执行任务。hosts用于指定要执行指定任务的主机,需事先定义在主机清单中
- one.example.com
- one.example.com:two.example.com
- 192.168.1.50
- webserver:dbserver # 或者,两个组的并集
- webserver:&dbserver # 与,两个组的交集
- webserver:!dbserver # 在webserver组,但是不在dbserver组
案例:
- host:webserver:dbserver4、remote_user 组件
remote_user:可用于Host 和 task 中,连接到远程主机上,使用什么身份执行操作。可以用于全局或者某任务,使用此身份。此外,可以在 sudo 时使用 sudo_user 指定 sudo 时切换的用户 。
- - hosts: webserver
- remote_user: root
- tasks:
简单的playbook案例:
- ---
- - hosts: websrvs # 使用过websrvs的主机
- remote_user: root # 切换root身份执行后续操作
- tasks:
- - name: install httpd # 起个名字
- yum: name=httpd # 使用 yum 模块,安装httpd
- - name: start httpd
- service: name=httpd state=started enabled=yes # 使用service模块,启动httpd服务。并且设置为enabled
5、playbook 命令执行
格式:
- ansible-playbook yaml文件 参数
- 参数:
- --check -C # 执行前,运行检测语法,会提示可能会发生的错误,此过程不真正执行操作
- --list-hosts # 列出运行任务的主机
- --list-tags # 列出tag
- --list-tasks # 列出task
- --limit 主机列表 # 只针对主机列表中的主机执行
- -v -vv -vvv # 显示过程
- 解释:
- ansible-playbook file.yaml --limit 192.168.86.6
- ansible-playbook file.yaml --limit websrvs
- --limit 主机列表 # 只针对主机列表中的主机执行,什么意思,如下--limit 192.168.86.6 只针对websrvs下的192.168.86.6主机执行,而不是所有的主机都执行
- ---
- - hosts: websrvs # 使用过websrvs的主机
- remote_user: root # 切换root身份执行后续操作
- tasks:
- ansible-playbook file.yaml --check -C
6、简单案例
1、利用 Ploybook 创建 mysql 用户
- [root@86-5-master ansible_playbook]# cat mysql_user.yaml
- ---
- - hosts:dbserver
- remote_user: root
- tasks:
- - name: create group
- group: name=mysql system=yes gid=306
- - name: create user
- user: name=mysql shell=/sbin/nologon system=yes group=mysql uid=306 home=/data/mysql create_home=no
检查语法有没有问题
- [root@86-5-master ansible_playbook]# ansible-playbook -C mysql_user.yaml
- PLAY [dbserver] *****************************************************************************************************************************
- TASK [Gathering Facts] **********************************************************************************************************************
- ok: [86-6-slave]
- ok: [192.168.86.6]
- 注释:一个问题,Facts 代表默认 playbook 会使用 Setup 模块收集你远程主机的信息,所以可以考虑添加gather_facts: no
TASK [Gathering Facts] ,Facts 代表默认 playbook 会使用 Setup 模块收集你远程主机的信息,所以可以考虑添加gather_facts: no
- [root@86-5-master ansible_playbook]# cat mysql_user.yaml
- ---
- - hosts:dbserver
- remote_user: root
- gather_facts: no
- tasks:
- - name: create group
- group: name=mysql system=yes gid=306
- - name: create user
- user: name=mysql shell=/sbin/nologon system=yes group=mysql uid=306 home=/data/mysql create_home=no
- [root@86-5-master ansible_playbook]# ansible-playbook -C mysql_user.yaml
- PLAY [dbserver] *****************************************************************************************************************************
- TASK [create group] *************************************************************************************************************************
- changed: [86-6-slave]
- changed: [192.168.86.6]
- TASK [create user] **************************************************************************************************************************
- changed: [86-6-slave]
- changed: [192.168.86.6]
- PLAY RECAP **********************************************************************************************************************************
- 192.168.86.6 : ok=2 changed=2 unreachable=0 failed=0 skipped=0 rescued=0 ignored=0
- 86-6-slave : ok=2 changed=2 unreachable=0 failed=0 skipped=0 rescued=0 ignored=0
- [root@86-5-master ansible_playbook]#
执行
[root@86-5-master ansible_playbook]# ansible-playbook mysql_user.yaml- [root@86-5-master ansible_playbook]# ansible dbserver -a "getent passwd mysql"
- 86-6-slave | CHANGED | rc=0 >>
- mysql:x:306:306::/data/mysql:/sbin/nologon
- [root@86-5-master ansible_playbook]# ansible dbserver -a "id mysql"
- 86-6-slave | CHANGED | rc=0 >>
- uid=306(mysql) gid=306(mysql) 组=306(mysql)
- [root@86-5-master ansible_playbook]#
2、利用 Ploybook 安装和卸载 httpd
安装
- [root@86-5-master ansible_playbook]# vi install_httpd.yaml
- ---
- # install httpd
- - hosts: dbserver
- remote_user: root
- gather_facts: no
- tasks:
- - name: Install httpd
- yum: name=httpd state=present
- - name: Install configure file
- copy: src=/root/httpd.conf dest=/etc/httpd/conf/
- - name:
- service: name=httpd state=stared enabled=yes
卸载
- [root@86-5-master ansible_playbook]# vi install_nginx
- ---
- # install nginx
- - hosts: dbserver
- remote_user: root
- gather_facts: no
- tasks:
- - name: remove httpd
- yum: name=httpd state=absent
- - name: remove httpd user
- user: name=nginx state=absent
- - name: remove httpd group
- group: name=nginx state=absent
- - name: remove date file
- file: name=/etc/httpd state=absent
3、利用 Ploybook 安装nginx
- [root@86-5-master ansible_playbook]# vi install_nginx
- ---
- # install nginx
- - hosts: dbserver
- remote_user: root
- gather_facts: no
- tasks:
- - name: add group nginx
- group: name=nginx system=yes
- - name: add user nginx
- user: name=nginx state=present group=nginx
- - name: Install nginx
- yum: name=nginx state=present
- - name: Start nginx
- service: name=nginx state=started enabled=yes
通过检查可能有如下提示
问题:ansible yum模块安装nginx,提示:No package matching 'nginx' found available, installed or updated

解决方案:
- 在被管远程主机添加nginx仓库 ,
- 参考url: http://nginx.org/en/linux_packages.html#RHEL-CentOS
- vim /etc/yum.repos.d/nginx.repo
- [nginx-stable]
- name=nginx stable repo
- baseurl=http://nginx.org/packages/centos/$releasever/$basearch/
- gpgcheck=1
- enabled=1
- gpgkey=https://nginx.org/keys/nginx_signing.key
- module_hotfixes=true
- [nginx-mainline]
- name=nginx mainline repo
- baseurl=http://nginx.org/packages/mainline/centos/$releasever/$basearch/
- gpgcheck=1
- enabled=0
- gpgkey=https://nginx.org/keys/nginx_signing.key
- module_hotfixes=true
安装部署
- [root@86-5-master ansible_playbook]# ansible-playbook -C install_nginx ^C
- [root@86-5-master ansible_playbook]# ansible-playbook install_nginx
- [root@86-6-slave ~]# rpm -qi nginx
- Name : nginx
- Epoch : 1
- Version : 1.22.0
- Release : 1.el7.ngx
- Architecture: x86_64
- Install Date: 2022年10月19日 星期三 20时24分
执行过的方案,下次是不会在执行,如下我们编写一个nginx的html文件,传递给远程端的默认网页位置
- [root@86-5-master ansible_playbook]# vi install_nginx
- ---
- # install nginx
- - hosts: dbserver
- remote_user: root
- gather_facts: no
- tasks:
- - name: add group nginx
- group: name=nginx system=yes
- - name: add user nginx
- user: name=nginx state=present group=nginx
- - name: Install nginx
- yum: name=nginx state=present
- - name: nginx Page
- copy: src=files/index.html dest=/usr/share/nginx/html # 代表当前目录下的files目录下的/index.html
- - name: Start nginx
- service: name=httpd state=restarted enabled=yes
再次执行后发现,以前执行过的不发生改动。
Ansible执行的时候根据结果会显示为绿色(成功执行),黄色(成功伴随状态改变)和红色(执行失败)等颜色,颜色的显示与changed的状态相关联,并可以在ansible.cfg中进行定制颜色的设定。

8、playbok 的 limit
默认ansible-playbook install_nginx 执行的是整个hosts
- [root@86-5-master ansible_playbook]# ansible-playbook --list-hosts install_nginx
- playbook: install_nginx
- play #1 (dbserver): dbserver TAGS: []
- pattern: ['dbserver']
- hosts (2):
- 192.168.86.6
- 86-6-slave
如果只是想对 dbserver 下的主机清单执行
[root@86-5-master ansible_playbook]# ansible-playbook --list-hosts install_nginx --limit dbserver如果只是想对 hosts下的192.168.86.6主机执行
[root@86-5-master ansible_playbook]# ansible-playbook --list-hosts install_nginx --limit 192.168.86.67、案例安装 mysql
安装 mysql 5.6.46
1、准备 mysql-5.6.46-linux-glibc2.12-×86_64.tar.gz (/root/mysql-5.6.46-linux-glibc2.12-×86_64.tar.gz)
2、准备my.cnf (/data/ansible/files/my.cnf)
3、准备安全加固的脚本(/data/ansible/files/secure_mysql.sh)
- a)为root用户设置密码
- b)删除匿名账号
- c)取消root用户远程登录
- d)删除test库和对test库的访问权限
- e)刷新授权表使修改生效
4、playbook 的 mysql_install.yaml
- [root@86-5-master ansible_playbook]# vi mysql_install.yaml
- ---
- # install mysql-5.6.46
- - hosts: dbserver
- remote_user: root
- tasks:
- - name: install package
- yum: name=libaio,perl-Date-Dumper,per-Getopt-Long
- - name: create mysql group
- group: name=mysql gid=306
- - name: create mysql user
- user: name=mysql uid=306 group=mysql shell=/sbin/nologin system=yes create_home=no home=/data/mysql
- - name: copy tar to remote host and file mode
- unarchive: src=/data/ansible/files/mysql-5.6.46-linux-glibc2.12-×86_64.tar.gz dest=/usr/local/ owner=root group=root
- - name: mkdir /usr/local/mysql
- file: src=/usr/local/mysql-5.6.46-linux-glibc2.12-×86_64 dest=/usr/local/mysql state=link
- - name: data dir
- shell: chdir=/usr/local/mysql/ ./scripts/mysql_install_db --datadir=/data/mysql --user=mysql # 脚本实现初始数据库导入
- tags: data # 打标签
- - name: config my.cnf
- copy: src=/data/ansible/files/my.cnf dest=/etc/my.cnf
- - name: service script
- shell: /bin/cp /usr/local/mysql/support-files/mysql.server /etc/init.d/mysqld
- - name: enable service
- shell: /etc/init.d/mysqld start;chkconfig --add mysqld;chkconfig mysqld on
- tags: service
- - name: PATH variable
- copy: content='PATH=/usr/local/mysql/bin:$PATH' dest=/etc/profile.d/mysql.sh
- - name: secure script
- sripte: /data/ansible/files/secure_mysql.sh
- tags: script
注意:在使用ansible-playbook -C 检查的时候,遇到检查软连接失败,是正常党的,因为我们是解压mysql-5.6.46后才生成的目录,而检查是不会解压缩,所以判断目录没有,软连接失败
七、Pkaybook中使用 handlers 和 notify
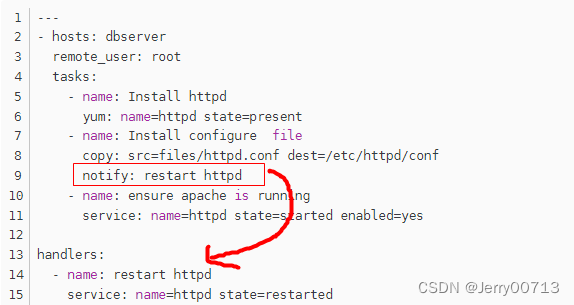
handlers 本质是 task list,类似于 Mysql 中的触发器触发行为,handlers 要求需要配合 notify , notify (通知) 就是触发器本身,handlers 触发的动作。当某件事发生之后,我可以让其通知触发器中的定义的一个行为,触发的行为在handlers 。notify 那个事件发生了,造成了触发器的执行。handlers 本质上就是一个task,多个task形成了task list,只不过这么多的task list不会互动执行,是需要notify对应的某个动作发生变化后,触发。
简单案例
比如监控配置文件,如果发生更改需要重新触发重启服务。
- ---
- - hosts: dbserver
- remote_user: root
- gather_facts: no
- tasks:
- - name: Install httpd
- yum: name=httpd state=present
- - name: Install configure file
- copy: src=files/httpd.conf dest=/etc/httpd/conf
- notify: restart httpd
- - name: ensure apache is running
- service: name=httpd state=started enabled=yes
- handlers:
- - name: restart httpd
- service: name=httpd state=restarted
- [root@86-5-master ansible_playbook]# pwd
- /root/ansible_playbook
- [root@86-5-master ansible_playbook]# cat http_handler.yaml
- ---
- - hosts: dbserver
- remote_user: root
- gather_facts: no
- tasks:
- - name: Install httpd
- yum: name=httpd state=present
- - name: Install configure file
- copy: src=files/httpd.conf dest=/etc/httpd/conf
- notify: restart httpd
- - name: ensure apache is running
- service: name=httpd state=started enabled=yes
- handlers:
- - name: restart httpd
- service: name=httpd state=restarted
- [root@86-5-master ansible_playbook]# yum install -y httpd # 本机安装httpd,以便获取httpd.conf
- [root@86-5-master ansible_playbook]# cp /etc/httpd/conf/httpd.conf files/
- [root@86-5-master ansible_playbook]# grep "Listen" files/httpd.conf # 对端口修改80→8081
- # Listen: Allows you to bind Apache to specific IP addresses and/or
- # Change this to Listen on specific IP addresses as shown below to
- #Listen 12.34.56.78:80
- Listen 8081
- [root@86-5-master ansible_playbook]# ansible-playbook -C http_handler.yaml # 检查
- [root@86-5-master ansible_playbook]# ansible-playbook http_handler.yaml --limit
- [root@86-5-master ansible_playbook]# ansible 192.168.86.6 -a "ss -ntl"
- 192.168.86.6 | CHANGED | rc=0 >>
- State Recv-Q Send-Q Local Address:Port Peer Address:Port
- LISTEN 0 128 *:80 *:*
- LISTEN 0 128 *:22 *:*
- LISTEN 0 100 127.0.0.1:25 *:*
- LISTEN 0 128 :::8081 :::* # 8081 已经启动
- LISTEN 0 128 :::22 :::*
- LISTEN 0 100 ::1:25 :::*
修改配置文件,在执行一次
- [root@86-5-master ansible_playbook]# vi files/httpd.conf
- [root@86-5-master ansible_playbook]# grep "Listen" files/httpd.conf
- Listen 8082
- [root@86-5-master ansible_playbook]# ansible-playbook http_handler.yaml --limit 192.168.86.6
会发现只有RUNNING HANDLER [restart httpd]是黄色,代表的是执行并发生改变,其他的都是绿色,代表是执行成功 ,但是没有修改


可以触发多个任务,如下
- ---
- - hosts: dbserver
- remote_user: root
- gather_facts: no
- tasks:
- - name: add group nginx
- group: name=nginx state=present
- - name: add user nginx
- user: name=nginx state=present group=nginx
- - name: Install nginx
- yum: name=httpd state=present
- - name: Install configure file
- copy: src=files/nginx.conf dest=/etc/nginx/nginx.conf
- notify:
- - restart httpd
- - Check nginx process
- - name: ensure nginx is running
- service: name=nginx state=started enabled=yes
- handlers:
- - name: restart nginx
- service: name=nginx state=restarted
- - name: Check nginx process
- shell: killall -0 nginx &> /tmp/nginx.log # 向nginx 发送一个0信号,检查进程是不是存在,比如给某个程序发送kill -0信号,如果程序运行异常就会返回一个非0的状态码,运行正常则无任何提示,echo $?则返回0的状态码
八、Pkaybook中使用 tags 组件
在playbook文件中,可以利用tags组件,为特定 task 指定标签,当在执行playbook时,可以只执行特定的tags的task,而非整个playboook文件
简单案例
- vi nginx_tags.yaml
- ---
- - hosts: dbserver
- remote_user: root
- gather_facts: no
- tasks:
- - name: Install httpd
- yum: name=httpd state=present
- - name: Install configure file
- copy: src=files/httpd.conf dest=/etc/httpd/conf
- tags: conf
- - name: start httpd service
- tags: service
- service: name=httpd state=started enabled=yes
将触发器合并
- [root@86-5-master ansible_playbook]# cat http_tags.yaml
- ---
- - hosts: dbserver
- remote_user: root
- gather_facts: no
- tasks:
- - name: Install httpd
- yum: name=httpd state=present
- - name: Install configure file
- copy: src=files/httpd.conf dest=/etc/httpd/conf
- notify: restart httpd
- tags: conf
- - name: start httpd service
- tags: service
- service: name=httpd state=started enabled=yes
- handlers:
- - name: restart httpd
- service: name=httpd state=restarted
显示出有几个标签
- [root@86-5-master ansible_playbook]# ansible-playbook http_tags.yaml --list-tags
- playbook: http_tags.yaml
- play #1 (dbserver): dbserver TAGS: []
- TASK TAGS: [conf, service] # 两个标签conf 和 service
- [root@86-5-master ansible_playbook]#
执行tags = conf ,通过执行操作发现,并没有触发notify: restart httpd,是因为配置文件没有被修改
- [root@86-5-master ansible_playbook]# ansible-playbook -t conf http_tags.yaml --limit 192.168.86.6
执行tags中的任务,此任务中顺便带有触发notify,恰好配置文件被修改,触发器是执行

八、Pkaybook 的变量
变量名:仅能由数字、字母和下划线组成,且只能以字母开头
定义: key=value 比如: http_port = 80,其中 key 就是变量
变量调用方式:{{ variable_name }} {{ key }} 建议前后加空格
变量来源:
1、ansible 的 setup模块中的 facts ,远程主机的所有变量都可直接调用,如下操作系统的版本 key:value "ansible_distribution_version": "7.5" 其中 key 就是变量,所以ansible_distribution_version 就是变量,变量调用方式:{{ ansible_distribution_version }}
- [root@86-5-master ~]# ansible 192.168.86.6 -m setup |grep ansible_dis # 用处是可以根据当前系统的信息,决定执行的命令,比如Centos 执行的是yum ,Centos 执行的是dnf
- "ansible_distribution": "CentOS",
- "ansible_distribution_file_parsed": true,
- "ansible_distribution_file_path": "/etc/redhat-release",
- "ansible_distribution_file_variety": "RedHat",
- "ansible_distribution_major_version": "7",
- "ansible_distribution_release": "Core",
- "ansible_distribution_version": "7.5",
- [root@86-5-master ~]# ansible 192.168.86.6 -m setup -a 'filter="ansible_distribution_version"'
- 192.168.86.6 | SUCCESS => {
- "ansible_facts": {
- "ansible_distribution_version": "7.5",
- "discovered_interpreter_python": "/usr/bin/python"
- },
- "changed": false
- }
- [root@86-5-master ~]#
2、通过命令行指定变量,优先级最高
ansible-playbook -e varname=vaule3、在playbook文件夹定义
- vars:
- - var1: value1
- - var2: value2
4、在独立的变量YAML文件中定义
简单案例
1、获取 setup 模块的变量
- #注意,直接执行命令,会提示无法找到变量,需要在playbook才生效,为什么后续会说
- [root@86-5-master ansible_playbook]# ansible 192.168.86.6 -m file -a "path=/tmp/{{ ansible_distribution_version }}.txt state=touch"

- # 重点,一定不要开启gather_facts: no,默认playbook是开启到的gather_facts,检索远程端的信息,如果关闭后,扫描不出来,就会报错,无法找到此变量。
- # 这就是为什么上述的 ansible -m file -a "path=/tmp/{{ ansible_distribution_version }}.txt state=touch"不好使的原因,直接执行命令是不检索远程端的信息
- [root@86-5-master ansible_playbook]# cat setup_variable.yaml
- ---
- - hosts: dbserver
- remote_user: root
- # gather_facts: no
- tasks:
- - name: create log file
- file: name=/var/log/{{ ansible_distribution_version }}.log state=touch owner=jerry mode=600
- [root@86-5-master ansible_playbook]# ansible-playbook -C setup_variable.yaml # 检查无问题
- [root@86-5-master ansible_playbook]# ansible-playbook setup_variable.yaml # 执行
- [root@86-5-master ansible_playbook]# ansible 192.168.86.6 -a "ls /var/log/*.log"
- 192.168.86.6 | CHANGED | rc=0 >>
- /var/log/7.5.log
- /var/log/boot.log
- /var/log/vmware-vmsvc.log
- /var/log/yum.log
2、自定义变量-ansible-playbook -e
- [root@86-5-master ansible_playbook]# ansible-playbook --help
- -e EXTRA_VARS, --extra-vars EXTRA_VARS
- 将其他变量设置为key=value或YAML/JSON,如果文件名前缀为@
在playboook外定义变量,传递给playboook内。如下playb定义ok使用yum命令,通过外部定义需要yum什么软件
并没有对pkname 变量定义
- [root@86-5-master ansible_playbook]# cat var1.yaml
- ---
- - hosts: dbserver
- remote_user: root
- tasks:
- - name: create_group
- yum: name={{ pkname }} state=present
由我们自己指定ansible -e定义
- [root@86-5-master ansible_playbook]# ansible-playbook -e pkname=memcached var1.yaml # 指定给var1.yaml中的pkname=memcached,此语句直接执行
- [root@86-5-master ansible_playbook]# ansible-playbook -C var1.yaml -e pkname=memcached # 如果要检查加上-C
3、在 playboook 中定义变量vars
可以配置主组跟附加组,这种形式的用处在于,一个 playboook 中要使用多个相同的值,减少代码到的冗余性,可以定义变量
- [root@86-5-master ansible_playbook]# cat var.yaml
- ---
- - hosts: dbserver
- remote_user: root
- vars:
- - username: user1
- - groupname: group1
- tasks:
- - name: create_group
- group: name={{ groupname }} state=present
- - name: create_user
- user: name={{ username }} state=present
- [root@86-5-master ansible_playbook]# ansible-playbook -C var.yaml
- [root@86-5-master ansible_playbook]# ansible-playbook var.yaml
4、单独一个文件,只存放变量
- [root@86-5-master ansible_playbook]# cat /root/ansible_playbook/variables_list.yaml
- ---
- package_name: vsftpd
- service_name: vsftpd
- [root@86-5-master ansible_playbook]# cat install_vsft.yaml
- ---
- - hosts: dbserver
- remote_user: root
- vars_files:
- - /root/ansible_playbook/variables_list.yaml # 如果在同目录直接写文件名
- tasks:
- - name: install package
- yum: name={{ package_name }}
- tags: install
- - name: start service
- service: name={{ service_name }} state=started enabled=yes
- handlers:
- - name: restart httpd service
- service: name={{ service }} state=restarted
- [root@86-5-master ansible_playbook]# ansible-playbook -C install_vsft.yaml
5、主机清单中定义变量
第一种:单个主机变量
在 inventory 主机清单文件中(/etc/ansible/hosts)为指定的主机定义变量以便于playbook中使用
- [dbserver] # 真对[dbserver] 下的主机
- 86-6-slave http_port=80 uid=80 # 真对86-6-slave的主机
- 192.168.86.7 http_port=8081 uid=421 # 真对192.168.86.6的主机
第二种:组(公共)变量
在inventory主机清单文件(/etc/ansible/hosts)赋予给指定组内所有的机器上的playbook中使用
- [dbserver] # [dbserver] 下的所有主机
- 86-6-slave
- 192.168.86.7
- [dbserver:vars] # 代表[dbserver] 下的主机进行变量赋值
- ntp_server=ntp.jerry.com
- nts_server=nts.jerry.com
简单案例1:
- [root@86-5-master ansible_playbook]# cat /etc/ansible/hosts # 定义主机清单文件
- [dbserver]
- 86-6-slave host=node1
- 192.168.86.7 host=node2
- [dbserver:vars]
- domain=jerry.com
- [root@86-5-master ansible_playbook]# ansible dbserver -m hostname -a "name={{ host }}.{{ domain }}"
- [root@86-6-slave ~]# hostname
- node1.jerry.com
- [root@86-7-slave ~]# hostname
- node2.jerry.com
简单案例2:
- [root@86-5-master ansible_playbook]# cat /etc/ansible/hosts # 定义主机清单文件
- [dbserver] # [dbserver] 下的所有主机
- 86-6-slave http_port=8080 hname=www1
- 192.168.86.7 http_port=8080 hname=www1
- [dbserver:vars] # 代表[dbserver] 下的主机进行变量赋值
- http_port=808
- mark="-"
- ansible dbserver -m hostname -a "name={{ hname }}{{ http_port }}"
注意:
单个主机变量、组(公共)变量都定义了http_port,听谁的,听单个主机变量
- [root@86-5-master ~]# cat /etc/ansible/hosts
- [dbserver]
- 86-6-slave http_port=8080
- [dbserver:vars]
- http_port=808
主机清单文件已经定义了http_port,ansible-playbook -e 也定义了,听谁的,听ansible-playbook -e
ansible-playbook dnserver -e http_port=8080 -m hostname -a "name={{ hname }}{{ http_port }}"九、playboook 模板Templeate
模板是一个文本文件,可以作为生成文件的模板,模板文件中还可嵌套 jinja 语法
1、 jinja 语法
jinja2 语言使用字面量,有下面形式:
字符串:使用单引号或双引号
数字:整数、浮点数
列表:[item1,item2,.....]
元组、字典、布尔、算术运算、比较操作、逻辑运算、流表达式、jinjn相关等等字面量:
表达式最简单的形式就是字面量。字面量表示诸如字符串和数值的Python对象。如"Hello World"
双引号或单引号中间的一切都是字符串。无论何时你需要在模板中使用一个字符串(比如函数调用、过滤器或只是包含或继承一个模板的参数),如42,42.23
数值可以为整数和浮点数。如果有小数点,则为浮点数,否则为整数。在Python里,42和42.0是不一样的算术运算:
Jinja允许用计算值。支持下面的运算符
+:把两个对象加到一起。通常对象是数字,但是如果两者是字符串或列表,你可以用这种方式来衔接它们。无论如何这都不是首选的连接字符串的方式!连接字符串见~运算符。{{ 1 + 1 }}等于 2
-:用第一个数减去第二个数。{{ 3 - 2 }}等于 1
/:对两个数做除法。返回值会是一个浮点数。 {{ 1 / 2 }}等于{{ 0.5 }}
//:对两个数做除法,返回整数商。{{ 20 // 7 }}等于2
%:用右边的数乘左边的操作数。{{ 11 % 7 }}等于 4
*:用右边的数乘左边的操作数。{{ 2 * 2 }}会返回4 。 也可以用于重复一个字符串多次。{{ ‘=’ * 80 }}会打印80个等号的横条
**:取左操作数的右操作数次幂。{{ 2 ** 3}}比较操作符
== 比较两个对象是否相等
!= 比较两个对象是否不等
> 如果左边大于右边,返回true
>= 如果左边大于等于右边,返回true
< 如果左边小于右边,返回true
<= 如果左边小于等于右边,返回true逻辑运算符
对于 if 语句,在 for 过滤或 if 表达式中,它可以用于联合多个表达式
and 如果左操作数和右操作数同为真,返回true
or 如果左操作数和右操作数有一个为真,返回true
not 对一个表达式取反
(expr)表达式组
true / false true永远是true,而false始终是false
2、模板Templeate介绍
- [root@86-5-master ansible_playbook]# ansible-doc -s templeate
- [WARNING]: module templeate not found in: /root/.ansible/plugins/modules:/usr/share/ansible/plugins/modules:/usr/lib/python2.7/site-
- packages/ansible/modules
- [root@86-5-master ansible_playbook]# ansible-doc -s template
- - name: Template a file out to a remote server
- template:
- attributes: # The attributes the resulting file or directory should have. To get supported flags look at the man page for
- `chattr' on the target system. This string should contain the attributes in
- the same order as the one displayed by `lsattr'. The `=' operator is assumed
- as default, otherwise `+' or `-' operators need to be included in the string.
- backup: # Create a backup file including the timestamp information so you can get the original file back if you somehow
- clobbered it incorrectly.
- block_end_string: # The string marking the end of a block.
- block_start_string: # The string marking the beginning of a block.
- dest: # (required) Location to render the template to on the remote machine.
- follow: # Determine whether symbolic links should be followed. When set to `yes' symbolic links will be followed, if
- they exist. When set to `no' symbolic links will not be followed. Previous to
- Ansible 2.4, this was hardcoded as `yes'.
- force: # Determine when the file is being transferred if the destination already exists. When set to `yes', replace
- the remote file when contents are different than the source. When set to `no',
- the file will only be transferred if the destination does not exist.
- group: # Name of the group that should own the file/directory, as would be fed to `chown'.
- lstrip_blocks: # Determine when leading spaces and tabs shou
官网:http://jinja.pocoo.org/docs/templates/
注意:Templeate模板只能用在plybook中,不能再 ansible 命令中
模板可以放在相对路径和绝对路径,所以一般都放在一个文件夹中
模板需要以.j2 为后缀命名文件
3、案例 template 同步 nginx 配置文件
利用 template 同步 nginx 配置文件,直接使用copy模块,能实现拷贝过去,但想让 nginx 通过取本机的cpu核数,进而启动几个 nginx 的进程,需要配置 nginx.conf 的 worker_processes。怎么动态发现,并自动修改 nginx.conf 的 worker_processes
- [root@86-5-master templates]# pwd
- /root/ansible_playbook/templates
- [root@86-5-master ansible_playbook]# mkdir templates;cd templates # 创建templates工作目录
- [root@86-5-master templates]# vi temnginx.yaml #
- ---
- - hosts: dbserver
- remote_user: root
- tasks:
- - name: install nginx
- yum: name=nginx
- - name: template config to remote hosts
- template: src=nginx.conf.j2 dest=/etc/nginx/nginx.conf # 将nginx.conf.j2文件拷贝到远程端/etc/nginx/下并改名字叫nginx.conf。注意必须是.j2文件。
- notify: restart nginx
- - name: start service
- service: name=nginx state=started enabled=yes
- handlers:
- - name: restart nginx
- service: name=nginx state=restarted
- 思考:原封不动的拷贝过来,使用copy模块就行了,那template跟copy有什么区别呢?template根本区别
- 是src=的是一个.j2文件,我们要做些一些内容,里面包含的是jinja2的语法等
编写 jinja2 文件 nginx.conf.j2
- [root@86-5-master templates]# cp /etc/nginx/nginx.conf ./nginx.conf.j2
- [root@86-5-master templates]# vi nginx.conf.j2 # 修改worker_processes
- [root@86-5-master templates]# grep "worker" nginx.conf.j2
- worker_processes {{ ansible_processor_vcpus+2 }};
- 解释:
- 此处调用了setup的变量,.j2 文件,就能可以调用之前讲过得所有的变量
- worker_processes设置好合适大小,可以提升nginx处理性能,非常重要。worker_processes,设置几个就有几个工作进程数
- worker_processes {{ ansible_processor_vcpus }}; 的意思就是根据cpu的核数,进行启动几个nginx的工作进程
- worker_processes {{ ansible_processor_vcpus+2 }}; # 加2
- worker_processes {{ ansible_processor_vcpus**2 }}; # 乘以2
执行 playbook
- [root@86-5-master templates]# ansible-playbook -C temnginx.yaml
- [root@86-5-master templates]# ansible-playbook temnginx.yaml
查看 nginx 的进程数
- [root@86-5-master templates]# ansible dbserver -m setup -a 'filter="ansible_processor_vcpus"'
- 86-6-slave | SUCCESS => {
- "ansible_facts": {
- "ansible_processor_vcpus": 1,
- "discovered_interpreter_python": "/usr/bin/python"
- },
- "changed": false
- }
- [root@86-5-master templates]# ansible dbserver -a "pstree"
- 86-6-slave | CHANGED | rc=0 >>
- systemd-+-NetworkManager---2*[{NetworkManager}]
- |-VGAuthService
- |-agetty
- |-auditd---{auditd}
- |-crond
- |-dbus-daemon
- |-lvmetad
- |-master-+-pickup
- | `-qmgr
- |-nginx---3*[nginx] # 进程数3
- |-polkitd---5*[{polkitd}]
- |-rsyslogd---2*[{rsyslogd}]
- |-sshd-+-sshd---bash
- | `-sshd---sh---python---pstree
- |-systemd-journal
- |-systemd-logind
- |-systemd-udevd
- |-tuned---4*[{tuned}]
- `-vmtoolsd---{vmtoolsd}
- [root@86-6-slave ~]# head -n 10 /etc/nginx/nginx.conf
- # For more information on configuration, see:
- # * Official English Documentation: http://nginx.org/en/docs/
- # * Official Russian Documentation: http://nginx.org/ru/docs/
- user nginx;
- worker_processes 3;
- error_log /var/log/nginx/error.log;
- pid /run/nginx.pid;
- # Load dynamic modules. See /usr/share/doc/nginx/README.dynamic.
- [root@86-6-slave ~]#
注意:远程主机内核已经是1,所以就算+2,实际物理上实现不到,所以还是1
4、Template 使用 for 和 if
利用 for 循环动态的生成指令,for 循环可以循环列表、字典等
循环列表:作用可以批量快速生成配置文件信息
- [root@86-5-master templates]# cat list.conf.j2
- {% for vhost in vhosts %}
- server {
- listen {{ vhost }}
- }
- {% endfor %}
- [root@86-5-master templates]# cat template_list.yaml
- ---
- - hosts: dbserver
- remote_user: root
- vars:
- vhosts:
- - 81
- - 82
- - 83
- tasks:
- - name: template config
- template: src=list.conf.j2 dest=/data/list.conf
- [root@86-5-master templates]# ansible-playbook -C template_list.yaml
- [root@86-5-master templates]# ansible dbserver -a "cat /data/list.conf"
- 86-6-slave | CHANGED | rc=0 >>
- server {
- listen 81
- }
- server {
- listen 82
- }
- server {
- listen 83
- }
- [root@86-5-master templates]#

循环字典:
- [root@86-5-master templates]# cat template_dict.yaml
- ---
- - hosts: dbserver
- remote_user: root
- vars:
- key_port:
- - listen: 8080
- server_name: "web1.jerry.com"
- root: "/var/www/nginx/web1/"
- - listen: 8081
- server_name: "web2.jerry.com"
- root: "/var/www/nginx/web2"
- - {listen: 8082, server_name: "web3.jerry.com", root: "/var/www/nginx/web3"}
- tasks:
- - name: template config
- template: src=dict.conf.j2 dest=/data/dict.conf
- [root@86-5-master templates]#
- [root@86-5-master templates]# cat dict.conf.j2
- {% for vhost in key_port %}
- server {
- listen {{ vhost.listen }} # 获取listen中的value
- server_name {{ vhost.server_name }} # 获取server_name 中的value
- root {{ vhost.root}} # 获取root 中的value
- }
- {% endfor %}
- [root@86-5-master templates]#
- [root@86-5-master templates]# ansible-playbook template_dict.yaml
- [root@86-6-slave ~]# cat /data/dict.conf
- server {
- listen 8080
- server_name web1.jerry.com
- root /var/www/nginx/web1/
- }
- server {
- listen 8081
- server_name web2.jerry.com
- root /var/www/nginx/web2
- }
- server {
- listen 8082
- server_name web3.jerry.com
- root /var/www/nginx/web3
- }
if 循环判断,上述的字典,如果在某一个字典中,有一项比如 server_name 没有写,for 循环到,则会提示找不到
- [root@86-5-master templates]# cat template_dict.yaml
- ---
- - hosts: dbserver
- remote_user: root
- vars:
- key_port:
- - listen:
- root: "/var/www/nginx/web1/"
- - listen: 8081
- server_name: "web2.jerry.com"
- root: "/var/www/nginx/web2"
- - {listen: 8082, server_name: "web3.jerry.com", root: "/var/www/nginx/web3"}
- tasks:
- - name: template config
- template: src=dict.conf.j2 dest=/data/dict.conf
- [root@86-5-master templates]# cat dict.conf.j2
- {% for vhost in key_port %}
- server {
- listen {{ vhost.listen }}
- server_name {{ vhost.server_name }}
- root {{ vhost.root}}
- }
- {% endfor %}
- [root@86-5-master templates]# ansible-playbook template_dict.yaml
- fatal: [86-6-slave]: FAILED! => {"changed": false, "msg": "AnsibleUndefinedVariable: 'dict object' has no attribute 'server_name'"}
则增加if判断
- [root@86-5-master templates]# cat dict.conf.j2
- {% for vhost in key_port %}
- server {
- listen {{ vhost.listen }}
- {% if vhost.server_name is defined %}
- server_name {{ vhost.server_name }} # 有if后注意缩进,要不无法对其
- {% endif %}
- root {{ vhost.root}} # 注意缩进,要不无法对其
- }
- {% endfor %}
- [root@86-5-master templates]#
- [root@86-5-master templates]# cat template_dict.yaml
- ---
- - hosts: dbserver
- remote_user: root
- vars:
- key_port:
- - listen:
- server_name: "web1.jerry.com"
- root: "/var/www/nginx/web1/"
- - listen: 8081
- root: "/var/www/nginx/web2"
- - {listen: 8082, server_name: "web3.jerry.com", root: "/var/www/nginx/web3"}
- tasks:
- - name: template config
- template: src=dict.conf.j2 dest=/data/dict.conf
- [root@86-5-master templates]#
通过上述,在一台物理机器上搭建了好几个网站
- [root@86-6-slave ~]# cat /data/dict.conf
- server {
- listen
- server_name web1.jerry.com
- root /var/www/nginx/web1/
- }
- server {
- listen 8081
- root /var/www/nginx/web2
- }
- server {
- listen 8082
- server_name web3.jerry.com
- root /var/www/nginx/web3
- }
- [root@86-6-slave ~]#
字典,案例可以做证书之类,有效期、OU、CN等等。
shell 没有字典,可以通过数组、关联数组等下标进行便利
5、playbook 使用 when
when 语句,可以实现条件测试。如果需要根据变量,facts或此前任务执行结果作为task执行与否的前提时,要用到条件测试,通过在tasks后添加 when子句即可使用条件测试,jinja2的语法格式
案例:
- ---
- - hosts: dbserver
- remote_user: root
- tasks:
- - name: "shutdown RedHat flavored systems"
- command: /sbin/shutdown -h now
- when: ansible_os_family == "RedHat" # 模块是属于setup
- ---
- - hosts: dbserver
- remote_user: root
- tasks:
- - name: install conf file to centos7
- template: src=nginx.conf.c7.j2 dest=/etc/nginx/nginx.conf
- when: ansible_distribution_major_version == "7"
- - name: install conf file to centos6
- template: src=nginx.conf.c6.j2 dest=/etc/nginx/nginx.conf
- when: ansible_distribution_major_version == "6"
6、playbook 使用迭代 with_items
迭代:当有需要重复性的任务时,可以使用迭代机制
对迭代项的引用,固定变量名为"item"
要在task中使用with_item给定要迭代的元素列表列表元素格式:字符串、字典
字符串案例:
- # 用 with_item 把我们要调用的不同的元素,都写到最后以列表的形式
- ---
- - hosts: dbserver
- remotes_user: root
- tasks:
- - name: add serveral users
- user: name={{ item }} state=present groups=whell
- with_items: # 列表序列
- - testuser1
- - testuser2
- - testuser3
- # 上面的语句的功能等同于下面的语句
- - name: add user testuser1
- user: name=testuser1 state=present groups=whell
- - name: add user testuser2
- user: name=testuser2 state=present groups=whell
- - name: add user testuser3
- user: name=testuser3 state=present groups=whell
- ---
- - hosts: dbserver:!192.168.86.7 # dbserver组中除了192.168.86.7
- remotes_user: root
- tasks:
- - name: stop service
- shell: /etc/init.d/mysqld stop
- - name: delete files and dir
- file: path={{ item }} state=absent
- with_items:
- - /usr/local/mysql
- - /usr/local/mariadb
- - /etc/init.d/mysqld.sh
- - /etc/my.cnf
- - name delete user
- user: name=mysql state=absent remove=yes
- ---
- - hosts: dbserver:!192.168.86.7 # dbserver组中除了192.168.86.7
- remotes_user: root
- tasks:
- - name: copy file
- copy: src={{item }} dest=/tmp/{{ item }}
- - name: delete files and dir
- file: path={{ item }} state=absent
- with_items:
- - file1
- - file2
字典案例:
迭代嵌套子变量:在迭代中,还可以嵌套子变量,关联多个变量在一起使用
字符串with_items,有局限性,如何通过字典创建用户,有自己的属性
- ---
- - hosts: dbserver:!192.168.86.7 # dbserver组中除了192.168.86.7
- remotes_user: root
- tasks:
- - name: add some users
- group: name={{ item.name }} group={{ item.group }} state=present
- with_items:
- - { name: 'nginx',group: 'nginx'}
- - { name: 'mysql',group: 'mysql'}
- - { name: 'apache',group: 'apache'}
十、roles角色
角色是ansible自1.2版本引入的新特性,用于层次性、结构化地组织playbook。roles能够根据层次型结构自动装载变量文件、tasks以及handlers等。要使用roles只需要在playbook中使用incluede指令即可。简单来讲,roles就是通过分别将变量、文件、任务、模板及处理器放置于单独的目录中,并可以便捷地include它们的一种机制。角色一般用于基于主机构建服务的场景中,但也可以是用于构建守护进程等场景中
运维复杂的场景:建议使用roles,代码复用度高
如果不写 role,可能要写多个 playbook,如何能提高整合率,实现在一个 playbook 有多个功能(安装mysql、httpd 等等),或者playbook 能不能调用另一个 playbook,所以有了角色。shell 脚本可以调用另一个脚本,角色也可以互相之间调用,但这样会导致很乱,为了解决,角色中有严格规定,他把不同类型的资源,分别放在不同的路径下。一个yaml中写的拆开到不同目录中。好处是修改后不影响其他,而且其他项目也能调用。先创一个roles目录,在创建多个的 role 目录 (mysql、redis目录等),分别放至 roles 目录下,作为独立子目录中
- roles/
- mysql/
- httpd/
- nginx/
- redis/
1、Ansible Roles目录编排
roles目录结构如下所示,roles 目录下有 git 、user 目录,在 git 、user 目录还继续有多层子目录,思想将所有的服务打散到不同地方,降低耦合度,甚至可以将 Handlers 触发器也单独做一个目录

比如 mysql
- roles/
- mysql/
- file/ # 放配置文件
- package # 放安装包
- vars # 变量
- 。。。。
查看 ansible-galaxy 下载的官方提供的
- [root@86-5-master ~]# tree /root/.ansible/roles/geerlingguy.redis/
- /root/.ansible/roles/geerlingguy.redis/
- ├── defaults
- │ └── main.yml
- ├── handlers
- │ └── main.yml
- ├── LICENSE
- ├── meta # 元数据
- │ └── main.yml
- ├── molecule
- │ └── default
- │ ├── converge.yml
- │ └── molecule.yml
- ├── README.md
- ├── tasks
- │ ├── main.yml
- │ ├── setup-Archlinux.yml
- │ ├── setup-Debian.yml
- │ └── setup-RedHat.yml
- ├── templates
- │ └── redis.conf.j2
- └── vars
- ├── Archlinux.yml
- ├── Debian.yml
- └── RedHat.yml
常见的目录结构
Roles各目录作用
/roles/project/ :项目名称,有以下子目录
- files/ :存放由copy或script模块等调用的文件
- templates/ : template模块查找所需要模板文件的目录
- tasks/ :定义task, role的基本元素,至少应该包含一个名为main.yml的文件;其它的文件需要在此文件中通过include进行包含
- handlers/ :至少应该包含一个名为main.yml的文件;其它的文件需要在此文件中通过include进行包含
- vars/ :定义变量,至少应该包含一个名为main.yml的文件;其它的文件需要在此文件中通过include进行包含
- meta/ :定义当前角色的特殊设定及其依赖关系,至少应该包含一个名为main.yml的文件,其它文件需在此文件中通过include进行包含
- default/ :设定默认变量时使用此目录中的main.yml文件,比vars的优先级低
2、创建 role
创建role的步骤
(1)创建以roles命名的目录
(2)在roles目录中分别创建以各角色名称命名的目录,如webservers等
(3)在每个角色命名的目录中分别创建files、handlers、meta、tasks、templates和vars目录;用不到的目录可以创建为空目录,也可以不创建
(4)在playbook中调用各角色
针对大型项目使用Roles进行编排
范例: roles的目录结构- nginx-role.yml
- roles/
- └── nginx
- ├── files
- │ └── main.yml
- ├── tasks # 存放的所有任务
- │ ├── groupadd.yml # 专门建组的
- │ ├── install.yml # 安装软件的
- │ ├── main.yml # 主函数,在tasks任务中,先执行谁在执行谁?main定义
- │ ├── restart.yml # 重启服务
- │ └── useradd.yml # 创建账号
- └── vars
- └── main.yml
3、调用角色
定义了角色将来怎么用,还需要定义palybook,调用 role
方式一:
- ---
- - hosts: dbserver
- remote_user: root
- roles: # 定义调用的角色,也就是roles目录
- - mysql # 定义调用mysql角色, 也就是roles/mysql目录
- - memcached
- - nginx
方式二:
定义角色role,后续的key value用于传递变量给角色
- ---
- - hosts: dbserver
- remote_user: root
- roles:
- - mysql # 单纯的调用mysql角色
- - { role: nginx, username: nginx} # 调用nginx角色,并给这个角色赋值username=nginx
方式三:
还可以基于条件测试实现角色的调用
- ---
- - hosts: dbserver
- remote_user: root
- roles:
- - { role: nginx, username: nginx, when: ansible_distribuion_version == '7' } # 调用nginx角色,并给这个角色赋值username=nginx,前提是要满足是centos 7
4、roles 中的 tags 使用
- # role.yaml
- ---
- - hosts: dbserver
- remote_user: root
- roles:
- - { role: httpd, tags: httpd } # 给httpd角色贴一个标签
- - { role: nginx, tags: ['nginx','web'], when: ansible_distribuion_version == '7' }
- - { role: mysql, tags: ['mysql','db'] } # 给mysql角色贴两个标签
- - { role: mysql, tags: ['mariadb','db'] } # 给mysql角色贴两个标签
- 多标签的好处是
- # 比如我想执行mysql安装
- ansible-playbook --tags="mysql" role.yaml
- # 比如我想执行mysql、mariadb安装
- ansible-playbook --tags="db" role.yaml # 由于数据库都有db的标签,所以直接使用db标签
- # 比如我想执行mysql、nginx、httpd 安装
- ansible-playbook --tags="mysql,nginx,httpd" role.yaml
5、roles案例
先创建一个roles目录,官方建议在如下位置创建
- [root@86-5-master ansible]# ansible-galaxy list
- # /root/.ansible/roles
- - geerlingguy.redis, 1.8.0
- # /usr/share/ansible/roles
- # /etc/ansible/roles
- [root@86-5-master ansible]# grep "roles" /etc/ansible/ansible.cfg
- #roles_path = /etc/ansible/roles
我们在 /data/ansible/roles
- [root@86-5-master ~]# mkdir /data/ansible
- [root@86-5-master ~]# cd /data/ansible/ && mkdir roles
案例1:http 服务(使用 tasks,files,handers)
第一步:先创建 httpd 的 role 目录
- [root@86-5-master roles]# pwd
- /data/ansible/roles
- [root@86-5-master roles]# mkdir httpd/{tasks,files,handers} -pv # 目前先定义这些,后续需要可以在扩充
- [root@86-5-master roles]# cd ../
- [root@86-5-master ansible]# tree roles/
- roles/
- └── httpd
- ├── files
- ├── handers
- └── tasks
第二步:
在/data/ansible/roles/httpd/tasks/下创建每一个操作的yaml文件
创建main.yaml 主程序入口,必须有不能改名字,里面记录的是每一个操作的yaml文件,按照顺序执行。
在data/ansible/roles/httpd/handlers/handlers.yaml 下必须创建 main.yaml 作为触发器
修改/data/ansible/roles/httpd/tasks/config.yaml 添加 handlers 的 name- [root@86-5-master httpd]# pwd
- /data/ansible/roles/httpd
- [root@86-5-master tasks]# cat tasks/group.yaml
- - name: create apache group
- group: name=apache system=yes gid=80 # 为什么要指定gid=80,一般指定uid和gid=你服务的端口号,虽然说uid gid是多少无所谓,但是这样规划是有层次的
- [root@86-5-master tasks]# cat tasks/user.yaml
- - name: create user
- user: name=apache system=yes shell=/sbin/nologin home=/var/www/ uid=80 group=apache
- # shell=/sbin/nologin 代表的是人不能登录
- # home=/var/www/ 代表如果能登录你会发现,默认登录在/var/www/下,如果/sbin/nologin人登录不了,程序在
- # 后台运行是可以登录,默认执行程序是从/var/www/下作为当前目录。比如你登录root账户,默认在/root下
- [root@86-5-master tasks]# cat tasks/config.yaml
- - name: index.html
- copy: src=httpd.conf dest=/etc/httpd/conf backup=yes # 注意,其实httpd.conf文件在../files/httpd.conf,这里可以直接写httpd.conf,playbook会自动检索../files目录
- notify: restart httpd
- [root@86-5-master httpd]# cat tasks/index.yaml
- - name: index.html
- copy: src=index.html dest=/var/www/html/ # 注意,其实index.html文件在../files/index.html,这里可以直接写index.html,playbook会自动检索../files目录
- [root@86-5-master httpd]# cat stasks/ervice.yaml
- - name: start service
- service: name=httpd state=started enabled=yes
- [root@86-5-master httpd]# cat handlers/main.yaml # 注意在httpd/handlers目录中,创建
- - name: restart httpd
- service: name=httpd state=restarted
- [root@86-5-master httpd]# cat stasks/main.yaml # 主程序入口,必须有而且是main.yaml,按照顺序执行
- - include: group.yaml
- - include: user.yaml
- - include: install.yaml
- - include: config.yaml
- - include: index.yaml
- - include: service.yaml
第三步:
制作httpd.conf 到 httpd/files/httpd.conf下,并做端口的修改以便我们的观察
添加自定义的index.html- [root@86-5-master httpd]# cp /etc/httpd/conf/httpd.conf files/
- # 修改Listen=8081,以便我们的观察
- [root@86-5-master httpd]# grep "Listen" files/httpd.conf
- Listen 8081
- # 添加自定义的index.html
- [root@86-5-master httpd]# cat files/index.html
- <h1> welcome to world </h1>
第四步:制作调用此 httpd 角色的playbook, 文件所在的路径一定是跟 roles 平级
- [root@86-5-master ansible]# ll
- drwxr-xr-x 3 root root 19 10月 20 17:02 roles
- [root@86-5-master ansible]# pwd
- /data/ansible
- [root@86-5-master ansible]# vi /data/ansible/role_httpd.yaml
- ---
- - hosts: dbserver
- remote_user: root
- roles:
- - role: httpd
- 运行playbook
- ansible-playbook -C /data/ansible/role_httpd.yaml
- ansible-playbook /data/ansible/role_httpd.yaml
- [root@86-6-slave ~]# netstat -anp |grep 80
- tcp 0 0 0.0.0.0:22 0.0.0.0:* LISTEN 980/sshd
- tcp6 0 0 :::8081 :::* LISTEN 26866/httpd
- tcp6 0 0 :::22 :::* LISTEN 980/sshd
- unix 2 [ ACC ] STREAM LISTENING 18580 1114/master private/proxywrite
- unix 3 [ ] STREAM CONNECTED 17777 980/sshd
- [root@86-6-slave ~]# curl 192.168.86.6:8081
- <h1> welcome to world </h1>
案例2:nginx 服务(tasks,handlers,templates,vars)
第一步:先创建 nginx 的 role 目录
- [root@86-5-master roles]# pwd
- /data/ansible/roles
- [root@86-5-master roles]# mkdir nginx/{tasks,handlers,templates,vars} -pv # 目前先定义这些,后续需要可以在扩充
- [root@86-5-master roles]# cd ../
- [root@86-5-master ansible]# tree roles/
- roles/
- ├── httpd
- │ ├── files
- │ │ ├── httpd.conf
- │ │ └── index.html
- │ ├── handlers
- │ │ └── main.yaml
- │ └── tasks
- │ ├── config.yaml
- │ ├── group.yaml
- │ ├── index.yaml
- │ ├── install.yaml
- │ ├── main.yaml
- │ ├── service.yaml
- │ └── user.yaml
- └── nginx
- ├── handlers
- ├── tasks
- ├── templates
- └── vars
第二步:
在/data/ansible/roles/nginx/tasks/下创建每一个操作的yaml文件
在/data/ansible/roles/nginx/tasks/下创建config.yaml 并添加 when 条件判断是哪个系统进行哪个操作
在/data/ansible/roles/nginx/tasks/下创建main.yaml 主程序入口,必须有不能改名字,里面记录的是每一个操作的yaml文件,按照顺序执行。
在data/ansible/roles/httpd/handlers/handlers.yaml 下必须创建 main.yaml 作为触发器
修改/data/ansible/roles/nginx/tasks/config.yaml 添加 handlers 的 name- [root@86-5-master nginx]# cat tasks/install.yaml
- - name: install nginx
- yum: name=nginx
- [root@86-5-master nginx]# cat tasks/index.yaml
- - name: index.html
- copy: src=roles/httpd/files/index.html dest=/usr/share/nginx/html/ # 可以直接将httpd/files/index.html下的index.html拿来用,注意真对当前项目,会默认从roles下找,作为相对路径
- [root@86-5-master nginx]# cat tasks/config.yaml
- - name: config file for centos7
- template: src=nginx7.conf.j2 dest=/etc/nginx/nginx.conf # 使用template代替copy,使用template就需要使用.j2文件,文件中可以定义变量
- when: ansible_distribution_major_version=='7' # 增加判断,只有是7版本的才能执行
- notify: restart nginx
- - name: config file for centos8
- template: src=nginx8.conf.j2 dest=/etc/nginx/nginx.conf
- when: ansible_distribution_major_version=='8' # 增加判断,只有是7版本的才能执行
- notify: restart nginx
- [root@86-5-master nginx]# cat tasks/service.yaml
- - name: start service
- service: name=nginx state=started enabled=yes
- [root@86-5-master nginx]# cat handlers/main.yaml
- - name: restart nginx
- service: name=nginx state=restarted
- [root@86-5-master nginx]# cat tasks/main.yaml
- - include: install.yaml
- - include: config.yaml
- - include: index.yaml
- - include: service.yaml
第三步:
在/data/ansible/roles/nginx/templates/下创建nginx7.conf.j2 nginx8.conf.j2,其中里面调用了setup变量和自定义变量,自定义变量写在 templates/main.yaml 下
- # 注意,建议先进行操作系统的yum源更新 ,都是用同一个yum源,比如阿里源跟Centos源,他们的最nginx版本不一样,
- # 会导致你拷贝过去的是nginx:1.22.1,而下方使用的源yum安装后是nginx:1.16.1,nginx版本差异发,配置文件不通用
- [root@86-5-master tasks]# cp /etc/nginx/nginx.conf templates/nginx7.conf.j2
- [root@86-5-master tasks]# cp /etc/nginx/nginx.conf templates/nginx8.conf.j2
- [root@86-5-master nginx]# head -n 10 templates/nginx7.conf.j2
- # For more information on configuration, see:
- user {{ user }}; # 默认是 user nginx ,修改为获取变量user,变量从哪来,如果是setup,则自动获取,如果不是,可以在roles/nginx/vars/下定义main.yaml,声明变量
- worker_processes {{ ansible_processor_vcpus+1 }}; # 修改按照cpu的个数,启动ngin的工作进行,此变量就是setup的变量
- error_log /var/log/nginx/error.log;
- pid /run/nginx.pid;
- [root@86-5-master nginx]# head -n 10 templates/nginx8.conf.j2
- # For more information on configuration, see:
- user nginx;
- worker_processes {{ ansible_processor_vcpus }};
- error_log /var/log/nginx/error.log;
- pid /run/nginx.pid;
- [root@86-5-master nginx]# cat vars/main.yaml # 上述templates/nginx7.conf.j2中定义了{{ user }}; 此user 在vars/main.yaml配置
- user: daemon
第四步:制作调用此 nginx 角色的 playbook, 文件所在的路径一定是跟 roles 平级
- [root@86-5-master ansible]# ll
- drwxr-xr-x 3 root root 19 10月 20 17:02 roles
- [root@86-5-master ansible]# pwd
- /data/ansible
- [root@86-5-master ansible]# vi /data/ansible/role_nginx.yaml
- ---
- - hosts: dbserver
- remote_user: root
- roles:
- - role: nginx
- # 如果你想调用nginx和httpd,如下
- [root@86-5-master ansible]# vi /data/ansible/role_nginx.yaml
- ---
- - hosts: dbserver
- remote_user: root
- roles:
- - role: nginx
- - role: httpd
- [root@86-5-master ansible]# tree roles/nginx/
- roles/nginx/
- ├── handlers
- │ └── main.yaml
- ├── tasks
- │ ├── config.yaml
- │ ├── index.yaml
- │ ├── install.yaml
- │ ├── main.yaml
- │ └── service.yaml
- ├── templates
- │ ├── nginx7.conf.j2
- │ └── nginx8.conf.j2
- └── vars
- └── main.yaml
- 运行playbook
- ansible-playbook -C /data/ansible/role_nginx.yaml
- ansible-playbook /data/ansible/role_nginx.yaml
案例3:实现 memcached 角色(tasks,templates)
memcached 是一个将内存作为缓存使用,思考内存占用多大空间当缓存使用,默认分配缓存比较小,大约应该是64M,如果是一个大内存的物理机,只是用了64M,根本没充分使用,因此可以修改此配置。功能不强,已经不建议使用了,可以使用 redis 。
第一步:先创建 memcached 的 role 目录
- [root@86-5-master roles]# pwd
- /data/ansible/roles
- [root@86-5-master roles]# mkdir memcached/{tasks,templates} -pv # 目前先定义这些,后续需要可以在扩充
- [root@86-5-master roles]# cd ../
- [root@86-5-master ansible]# tree roles/
- [root@86-5-master ansible]# tree roles/
- roles/
- ├── httpd
- │ ├── files
- │ │ ├── httpd.conf
- │ │ └── index.html
- │ ├── handlers
- │ │ └── main.yaml
- │ └── tasks
- │ ├── config.yaml
- │ ├── group.yaml
- │ ├── index.yaml
- │ ├── install.yaml
- │ ├── main.yaml
- │ ├── service.yaml
- │ └── user.yaml
- ├── memcached
- │ ├── tasks
- │ └── templates
- └── nginx
- ├── handlers
- │ └── main.yaml
- ├── tasks
- │ ├── config.yaml
- │ ├── index.yaml
- │ ├── install.yaml
- │ ├── main.yaml
- │ └── service.yaml
- ├── templates
- │ ├── nginx7.conf.j2
- │ └── nginx8.conf.j2
- └── vars
- └── main.yaml
第二步:
- [root@86-5-master memcached]# cat tasks/install.yaml
- - name: install memcached
- yum: name=memcached
- [root@86-5-master memcached]# cat tasks/config.yaml
- - name: config file
- template: src=memcached.j2 dest=/etc/sysconfig/memcached
- [root@86-5-master memcached]# cat tasks/service.yaml
- - name: start service
- service: name=memcached state=started enabled=yes
- [root@86-5-master nginx]# cat tasks/main.yaml
- - include: install.yaml
- - include: config.yaml
- - include: service.yaml
第三步:
- # 在ansible机器上,部署memcached,获取对应的配置文件
- [root@86-5-master ansible]# yum install -y memcached
- [root@86-5-master memcached]# cp /etc/sysconfig/memcached templates/memcached.j2
- [root@86-5-master memcached]# vi templates/memcached.j2
- PORT="11211" # 端口号
- USER="memcached" # 用户名
- MAXCONN="1024" # 最大并发连接数
- CACHESIZE="{{ ansible_memtotal_mb//4 }}" # 缓存的空间,默认CACHESIZE="64" 64M,ansible_memtotal_mb是setup获取的内存大小,ansible_memtotal_mb/4 占用1/4,但都知道一般内存都是虚标,大概率是不能整除的,所以//4的意思是,除以4后不能整除去掉小数,取整
- OPTIONS="" # 其他选项
第四步:制作调用此 nginx 角色的 playbook, 文件所在的路径一定是跟 roles 平级
- [root@86-5-master ansible]# ll
- drwxr-xr-x 3 root root 19 10月 20 17:02 roles
- [root@86-5-master ansible]# pwd
- /data/ansible
- [root@86-5-master ansible]# vi /data/ansible/role_memcached.yaml
- ---
- - hosts: dbserver
- remote_user: root
- roles:
- - role: memcached
- 运行playbook
- ansible-playbook -C /data/ansible/role_memcached.yaml
- ansible-playbook /data/ansible/role_memcached.yaml
- [root@86-6-slave ~]# cat /etc/sysconfig/memcached
- PORT="11211"
- USER="memcached"
- MAXCONN="1024"
- CACHESIZE="248" # 虚拟机内存1G。1024//4=248
- OPTIONS=""
案例4:部署 mysql5.6 角色(tasks,files)
第一步:先创建 mysql5.6 的 role 目录
- [root@86-5-master roles]# pwd
- /data/ansible/roles
- [root@86-5-master roles]# mkdir mysql5.6/{tasks,files} -pv
- [root@86-5-master roles]# tree mysql5.6/
- mysql5.6/
- ├── files
- └── tasks
第二步:
安装、 建组、 建用户、 解包解压缩、 建软连接、 建数据库初始目录,生成初始数据库、 拷贝配置文件、 启动服务、 配置PATH变量、 执行安全加固脚本
- [root@86-5-master mysql5.6]# cat tasks/install.yaml
- - name: install mysql5.6 environment
- yum: name=libaio,perl-Date-Dumper,perl-Getopt-Long
- [root@86-5-master mysql5.6]# cat tasks/group.yaml
- - name: create mysql5.6 group
- group: name=mysql gid=306 # 之前说过,主动配置是为了规整,为什么是306,因为uid数值201–999:系统用户用来运行服务,不需要登录系统(动态分配),对应gid也规划uid数值
- [root@86-5-master mysql5.6]# cat tasks/user.yaml
- - name: create mysql5.6 user
- user: name=mysql uid=306 group=mysql shell=/sbin/nologin system=yes create_home=no home=/data/mysql
- [root@86-5-master mysql5.6]# cat tasks/unarchive.yaml
- - name: copy mysql5.6 package
- unarchive: src=mysql-5.6.44-linux-glibc2.12-x86_64.tar.gz dest=/usr/local/ owner=root group=root
- [root@86-5-master mysql5.6]# cat tasks/link.yaml
- - name: link /usr/local/mysql
- file: src=/usr/local/mysql-5.6.44-linux-glibc2.12-x86_64 dest=/usr/local/mysql state=link
- [root@86-5-master mysql5.6]# cat tasks/data.yaml # 切换目录,对 mysql 初始化
- - name: data dir
- shell: chdir=/usr/local/mysql ./scripts/mysql_install_db --datadir=/data/mysql --user=mysql
- [root@86-5-master mysql5.6]# cat tasks/config.yaml
- - name: config my.cnf
- copy: src=my.cnf dest=/etc/my.cnf
- # 由于是二进制安装,不能使用service模块,servicem模块是通过systemctl或者service启动,默认yum安
- # 装生成mysqld.service文件,二进制不生成,所以只能是二进制启动,并加入到启动启动列表chkconfig
- [root@86-5-master mysql5.6]# cat tasks/service.yaml
- - name: service start
- shell: /bin/cp /usr/local/mysql/support-files/mysql.server /etc/init.d/mysqld;/etc/init.d/mysqld start;chkconfig --add mysqld;chkconfig mysqld on
- [root@86-5-master mysql5.6]# cat tasks/path.yaml # 使用copy模块将content后的内容写入文件并拷贝,将mysql/bin下的所有执行文件加入环境变量,这样以后能直接使用命令
- - name: PATH variable
- copy: content='PATH=/usr/local/mysql/bin:$PATH' dest=/etc/profile.d/mysql.sh
- [root@86-5-master mysql5.6]# cat tasks/secure.yaml
- - name: secure script
- script: secure_mysql.sh
- [root@86-5-master nginx]# cat tasks/main.yaml
- - include: install.yaml # 安装
- - include: group.yaml # 建组
- - include: user.yaml # 建用户
- - include: unarchive.yaml # 解包解压缩
- - include: link.yaml # 建软连接
- - include: data.yaml # 建数据库初始目录,生成初始数据库
- - include: config.yaml # 拷贝配置文件
- - include: service.yaml # 启动服务
- - include: path.yaml # 配置PATH变量
- - include: secure.yaml # 执行安全加固脚本
第三步:
- [root@86-5-master files]# pwd
- /data/ansible/roles/mysql5.6/files
- [root@86-5-master files]# ll
- 总用量 321404
- -rw-r--r-- 1 root root 232 10月 21 07:58 my.cnf
- -rw-r--r-- 1 root root 329105487 3月 3 2020 mysql-5.6.44-linux-glibc2.12-x86_64.tar.gz
- -rw-r--r-- 1 root root 94 10月 21 07:57 secure_mysql.sh
- [root@86-5-master files]# cat my.cnf
- [mysqld]
- socket=/tmp/mysql.sock
- user=mysql
- symbolic-links=0
- datadir=/data/mysql
- innodb_file_per_table=1
- log-bin
- pid-file=/data/mysql/mysqld.pid
- [client]
- port=3306
- socket=/tmp/mysql.sock
- [mysqld_safe]
- log-error=/var/log/mysqld.log
- [root@86-5-master files]# cat secure_mysql.sh
- #!/bin/bash
- /usr/local/mysql/bin/mysql_secure_installation <<EOF
- y
- magedu
- magedu
- y
- y
- y
- y
- EOF
- [root@86-5-master files]# chmod +x secure_mysql.sh
第四步:制作调用此 nginx 角色的 playbook, 文件所在的路径一定是跟 roles 平级
- [root@86-5-master ansible]# ll
- drwxr-xr-x 3 root root 19 10月 20 17:02 roles
- [root@86-5-master ansible]# pwd
- /data/ansible
- [root@86-5-master ansible]# vi /data/ansible/role_mysql5.6.yaml
- ---
- - hosts: dbserver
- remote_user: root
- roles:
- - role: mysql5.6
- 运行playbook
- ansible-playbook -C /data/ansible/role_mysql5.6.yaml
- ansible-playbook /data/ansible/role_mysql5.6.yaml
报错提示:matching 'libio.perl-Data-Dumper' found

解决方案:1、本地生成 mysql 的 yum 源(没好事) 2、改成安装 autoconf,此包安装时会安装Data:Dumper模块( perl-Data-Dumper-2.145-3.el7.x86_64)
案例5:实现多角色的选择,剧本
- vim /data/ansible/role_httpd_nginx.yml
- ---
- - hosts: dbserver
- roles:
- - {role: httpd,tags: [httpd,web], when: ansible_distibution_major_version=='7'}
- - {role: httpd,tags: [httpd,web], when: ansible_distibution_major_version=='8'}
- ansibel-playbook -t nginx /data/ansible/role_httpd_nginx.yml
-
相关阅读:
计算机毕业设计Java教师职称评定系统(源码+系统+mysql数据库+lw文档)
试除法求素数
MacOS电脑上面怎么运行Windows软件程序?
防抖与节流
POI实现Excel导入和导出(源码测试)
webrtc性能优化:MacOS下的快速截屏录屏方式
1162 Postfix Expression – PAT甲级真题
Java 根据Map的值对 List<Map<String, Object>> 进行排序
String的常用方法
01-Linux
- 原文地址:https://blog.csdn.net/Jerry00713/article/details/127380473
