-
【Spring】spring核心思想——IOC和DI
1. Spring 是什么?
我们通常所说的 Spring 指的是 Spring Framework(Spring 框架),它是一个开源框架,有着活跃而庞 大的社区,这就是它之所以能长久不衰的原因。Spring 支持广泛的应用场景,它可以让 Java 企业级的应用程序开发起来更简单。
一句话概括 Spring :Spring 是包含了众多工具方法的 IOC 容器
那么什么是 IOC 呢
2. IOC 是什么
IOC (Inversion of Control 控制反转),就是说 Spring 是一个控制反转的容器
既然提到了控制反转,那么就来看看什么是正向控制,什么是反向控制
2.1 正向控制
在我们之前的大部分代码中,当我们要用到一个对象时,我们就需要自己构造这个对象,自己 new 对象,自己造,自己用,典型的自给自足生产模式
2.2 反向控制
在 Spring 的大部分代码中,我们只需要声明我们需要一个什么样的对象,对象的构造我们不管,这里的对象就是 Spring 帮我们注入进来的,对象就来自于 IOC 容器
3. DI 概念说明
说到 IoC 不得不提的一个词就是“DI”,DI 是 Dependency Injection 的缩写,翻译成中文是“依赖注入”的 意思。
所谓依赖注入,就是由 IoC 容器在运行期间,动态地将某种依赖关系注入到对象之中。所以,依赖注入 (DI)和控制反转(IoC)是从不同的角度的描述的同一件事情,就是指通过引入 IoC 容器,利用依赖关系注入的方式,实现对象之间的解耦。
4. Spring 的工作模式可以理解成一个买卖对象的市场
Spring 容器就是这个市场,我们既可以是卖家,也可以是买家
当我们是卖家时,将我们的对象注入到 Spring 库
当我们是买家时,声明我们需要的对象,Spring 从库中将对象取出来给我们

5. 以一个小程序来理解 IOC 和 DI
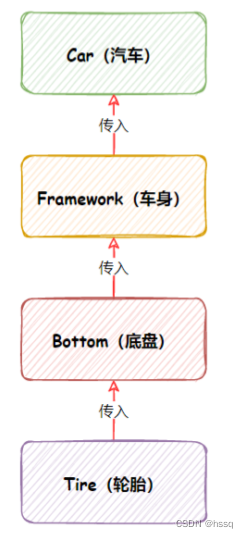
当我们需要造一辆车时,就需要得到一个四个部分,才能造成一辆车
以代码实现时,我们就需要这四个对象,先手动将这四个对象注入到库中

@Component:将被修饰的类注册到库中
@Autowired:自动注入,在这里可以理解成从库中拿到所修饰的元素
这里重写 toSpring() 只是为了打印对象,没有其他特殊意义
使用 context.getBeanDefinitionNames() 得到库中所有对象并打印后,可以清楚的看到,这四个对象已经被注入到库中
后续 car 对象也成功打印
@Component public class Car { @Autowired private Framework framework; @Override public String toString() { return "Car{" + "framework=" + framework + '}'; } }- 1
- 2
- 3
- 4
- 5
- 6
- 7
- 8
- 9
- 10
- 11
- 12
@Component public class Framework { @Autowired private Bottom bottom; @Override public String toString() { return "Framework{" + "bottom=" + bottom + '}'; } }- 1
- 2
- 3
- 4
- 5
- 6
- 7
- 8
- 9
- 10
- 11
- 12
@Component public class Bottom { @Autowired private Tire t1; @Autowired private Tire t2; @Autowired private Tire t3; @Autowired private Tire t4; @Override public String toString() { return "Bottom{" + "t1=" + t1 + ", t2=" + t2 + ", t3=" + t3 + ", t4=" + t4 + '}'; } }- 1
- 2
- 3
- 4
- 5
- 6
- 7
- 8
- 9
- 10
- 11
- 12
- 13
- 14
- 15
- 16
- 17
- 18
- 19
- 20
- 21
@Component public class Tire { @Override public String toString() { return "轮子"; } }- 1
- 2
- 3
- 4
- 5
- 6
- 7
主类
@SpringBootApplication public class IocApplication { public static void main(String[] args) { ConfigurableApplicationContext context = SpringApplication.run(IocApplication.class, args); Car car = context.getBean(Car.class); // 得到库中所有的 bean(对象) String[] beanDefinitionNames = context.getBeanDefinitionNames(); for (String beanDefinitionName : beanDefinitionNames) { System.out.println(beanDefinitionName); } System.out.println(car); } }- 1
- 2
- 3
- 4
- 5
- 6
- 7
- 8
- 9
- 10
- 11
- 12
- 13
- 14
- 15
- 16
- 17
- 18


当有一个对象没有被 @Component 修饰,即库中没有这个对象,那么其他对象就不能用@Autowired 得到这个对象,则就会出现以下异常

6. 以 XML 文件的方式将对象注入到我们自己创建的库中
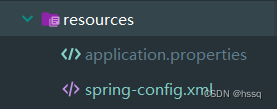
6.1 新建一个 XML 文件
现在这个 XML 文件就可以看成是一个空的 Spring 库

<beans xmlns="http://www.springframework.org/schema/beans" xmlns:xsi="http://www.w3.org/2001/XMLSchema-instance" xsi:schemaLocation="http://www.springframework.org/schema/beans https://www.springframework.org/schema/beans/spring-beans.xsd"> beans>- 1
- 2
- 3
- 4
- 5
- 6
6.2 在 Main 中操作这个库
用 FileSystemXmlApplicationContext() 打开这个 XML 文件之后,就可以在这里对刚刚创建的 Spring 进行一些操作
public class Main { public static void main(String[] args) { //1. 以 XML 配置文件手动创建 Spring 容器 FileSystemXmlApplicationContext context = new FileSystemXmlApplicationContext("spring-config.xml"); // 2. 打印容器中所有对象的 bean-id String[] names = context.getBeanDefinitionNames(); System.out.println("所有对象陈列:"); for (String name : names) { Object bean = context.getBean(name); // 得到此类的全名,即包含包名的名称 String canonicalName = bean.getClass().getCanonicalName(); System.out.println(name + " " + canonicalName); } int count = context.getBeanDefinitionCount(); System.out.println("一共有" + count + "个"); } }- 1
- 2
- 3
- 4
- 5
- 6
- 7
- 8
- 9
- 10
- 11
- 12
- 13
- 14
- 15
- 16
- 17
- 18
- 19
- 20
6.2 XML 文件的方式注入 bean(对象)
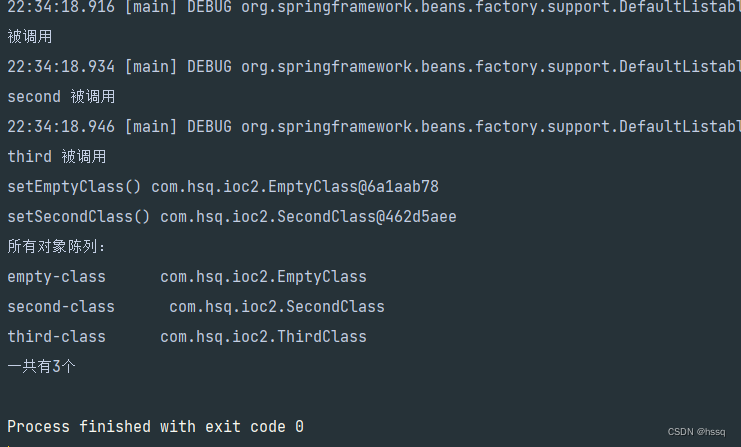
以 bean 标签来对对象进行注入,以下 XML 用不同的三种方法注入了三个对象
打印后可以清楚的看到,三个对象成功注入
<beans xmlns="http://www.springframework.org/schema/beans" xmlns:xsi="http://www.w3.org/2001/XMLSchema-instance" xsi:schemaLocation="http://www.springframework.org/schema/beans https://www.springframework.org/schema/beans/spring-beans.xsd"> <bean id="empty-class" class="com.hsq.ioc2.EmptyClass"/> <bean id="second-class" class="com.hsq.ioc2.SecondClass"> <constructor-arg ref="empty-class"/> bean> <bean id="third-class" class="com.hsq.ioc2.ThirdClass"> <property name="EmptyClass" ref="empty-class"/> <property name="SecondClass" ref="second-class"/> bean> beans>- 1
- 2
- 3
- 4
- 5
- 6
- 7
- 8
- 9
- 10
- 11
- 12
- 13
- 14
- 15
- 16
- 17
- 18
- 19
- 20
- 21
public class EmptyClass { public EmptyClass() { System.out.println("被调用"); } }- 1
- 2
- 3
- 4
- 5
public class SecondClass { public SecondClass(EmptyClass emptyClass) { System.out.println("second 被调用"); } }- 1
- 2
- 3
- 4
- 5
public class ThirdClass { public EmptyClass emptyClass; public SecondClass secondClass; public void setEmptyClass(EmptyClass emptyClass) { System.out.println("setEmptyClass() " + emptyClass); this.emptyClass = emptyClass; } public void setSecondClass(SecondClass secondClass) { System.out.println("setSecondClass() " + secondClass); this.secondClass = secondClass; } public ThirdClass() { System.out.println("third 被调用"); } }- 1
- 2
- 3
- 4
- 5
- 6
- 7
- 8
- 9
- 10
- 11
- 12
- 13
- 14
- 15
- 16
- 17
- 18

-
相关阅读:
前端培训技术Webpack优化构建速度
Excel中多条件判断公式怎么写?
efcore如何优雅的实现按年分库按月分表
Java面试八股之Redis与MySQL双写一致性如何保证
AWS Academy 资源说明
HCIE云计算
找高清、4K图片素材就上这6个网站,免费下载!
半结构化数据
Git版本工具学习
【uvm】Wait for Interface Signals in UVM
- 原文地址:https://blog.csdn.net/m0_56975154/article/details/127436720
