-
04-Jenkins构建Maven项目
1)Jenkins项目构建类型
a)Jenkins构建的项目类型介绍
Jenkins中自动构建项目的类型有很多,常用的有以下三种:
自由风格软件项目(FreeStyle Project)
Maven项目(Maven Project)
流水线项目(Pipeline Project)
每种类型的构建其实都可以完成一样的构建过程与结果,只是在操作方式、灵活度等方面有所区别,在
实际开发中可以根据自己的需求和习惯来选择。(PS:个人推荐使用流水线类型,因为灵活度非常高)
b)自由风格项目构建
拉取代码->编译->打包->部署
1、创建项目

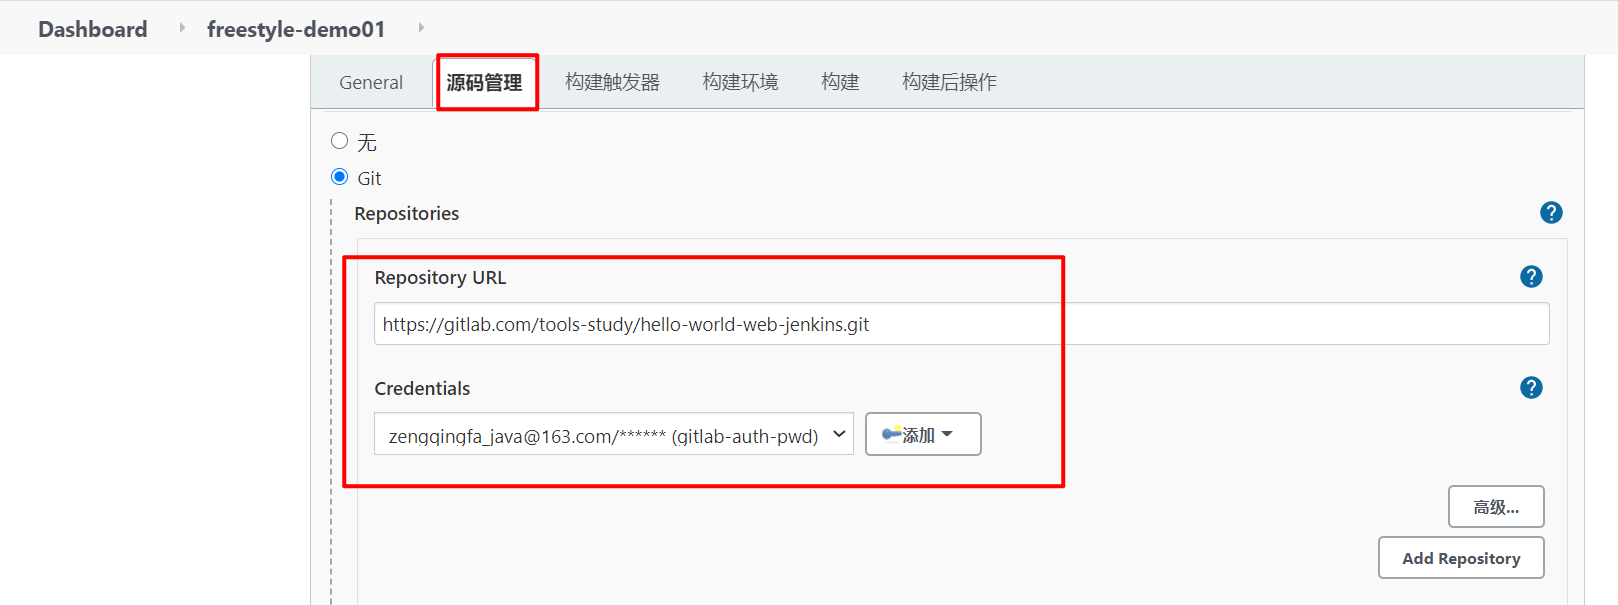
2、配置源码管理,从gitlab拉取代码
https://gitlab.com/tools-study/hello-world-web-jenkins.git
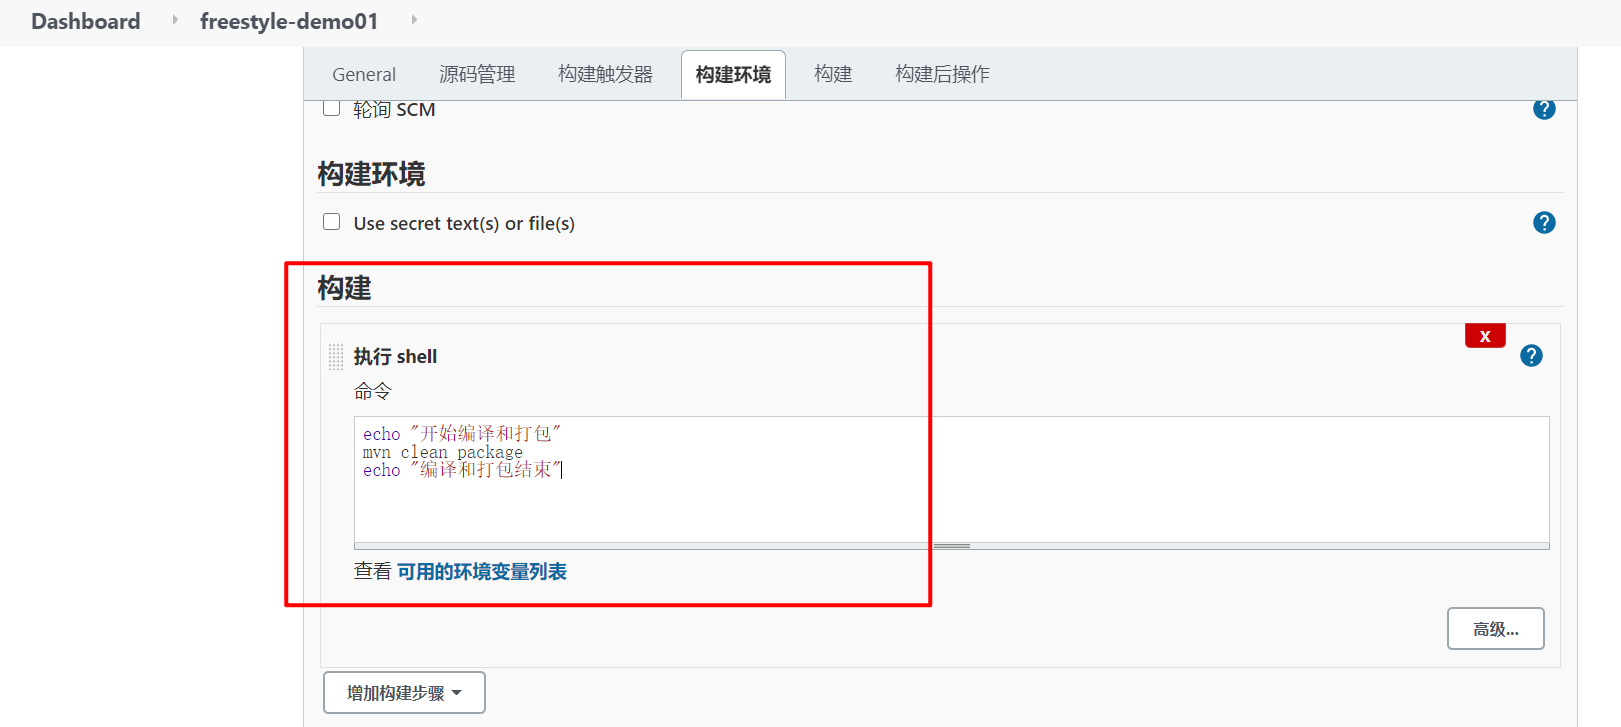
3、编译打包
echo "开始编译和打包" mvn clean package echo "编译和打包结束"- 1
- 2
- 3
[root@k8snode1 freestyle_demo01]# pwd /var/lib/jenkins/workspace/freestyle_demo01 [root@k8snode1 freestyle_demo01]# ll 总用量 16 -rw-r--r-- 1 root root 2636 3月 21 12:42 email.html -rw-r--r-- 1 root root 1374 3月 21 12:42 Jenkinsfile -rw-r--r-- 1 root root 620 3月 21 12:42 pom.xml -rw-r--r-- 1 root root 0 3月 21 12:42 README.md -rw-r--r-- 1 root root 579 3月 21 12:42 sonar-project.properties drwxr-xr-x 3 root root 18 3月 21 12:42 src drwxr-xr-x 6 root root 125 3月 21 12:45 target [root@k8snode1 freestyle_demo01]# cd target/ [root@k8snode1 target]# ll 总用量 100 drwxr-xr-x 3 root root 17 3月 21 12:45 classes drwxr-xr-x 2 root root 28 3月 21 12:45 maven-archiver drwxr-xr-x 3 root root 35 3月 21 12:45 maven-status drwxr-xr-x 4 root root 54 3月 21 12:45 web_demo-1.0-SNAPSHOT -rw-r--r-- 1 root root 101616 3月 21 12:45 web_demo-1.0-SNAPSHOT.war [root@k8snode1 target]#- 1
- 2
- 3
- 4
- 5
- 6
- 7
- 8
- 9
- 10
- 11
- 12
- 13
- 14
- 15
- 16
- 17
- 18
- 19
- 20
4、部署
把项目部署到远程的Tomcat里面
1)安装 Deploy to container插件
Jenkins本身无法实现远程部署到Tomcat的功能,需要安装Deploy to container插件实现
Caused by: org.codehaus.cargo.container.tomcat.internal.TomcatManagerException: The username you provided is not allowed to use the text-based Tomcat Manager (error 403) at org.codehaus.cargo.container.tomcat.internal.TomcatManager.invoke(TomcatManager.java:710) at org.codehaus.cargo.container.tomcat.internal.TomcatManager.list(TomcatManager.java:882) at org.codehaus.cargo.container.tomcat.internal.TomcatManager.getStatus(TomcatManager.java:895) at org.codehaus.cargo.container.tomcat.internal.AbstractTomcatManagerDeployer.redeploy(AbstractTomcatManagerDeployer.java:161) ... 19 more Caused by: java.io.IOException: Server returned HTTP response code: 403 for URL: http://121.196.169.191:8080/manager/text/list at sun.net.www.protocol.http.HttpURLConnection.getInputStream0(HttpURLConnection.java:1900) at sun.net.www.protocol.http.HttpURLConnection.getInputStream(HttpURLConnection.java:1498) at org.codehaus.cargo.container.tomcat.internal.TomcatManager.invoke(TomcatManager.java:577) ... 22 more org.codehaus.cargo.container.tomcat.internal.TomcatManagerException: The username you provided is not allowed to use the text-based Tomcat Manager (error 403)- 1
- 2
- 3
- 4
- 5
- 6
- 7
- 8
- 9
- 10
- 11
- 12
解决:到tomcat的 /webapps/manager/META_INF/context.xml文件,将文件中对访问的来源受限设置注释
/opt/tomcat/webapps/manager/META-INF/context.xml- 1
- 2
- 3
- 4
修改:/opt/tomcat/conf/tomcat-users.xml
<tomcat-users xmlns="http://tomcat.apache.org/xml" xmlns:xsi="http://www.w3.org/2001/XMLSchema-instance" xsi:schemaLocation="http://tomcat.apache.org/xml tomcat-users.xsd" version="1.0"> <role rolename="tomcat"/> <role rolename="role1"/> <role rolename="manager-script"/> <role rolename="manager-gui"/> <role rolename="manager-status"/> <role rolename="admin-gui"/> <role rolename="admin-script"/> <user username="tomcat" password="tomcat" roles="manager-gui,manager-script,tomcat,admin-gui,admin-script"/> </tomcat-users>- 1
- 2
- 3
- 4
- 5
- 6
- 7
- 8
- 9
- 10
- 11
- 12
- 13
即可。

5、访问
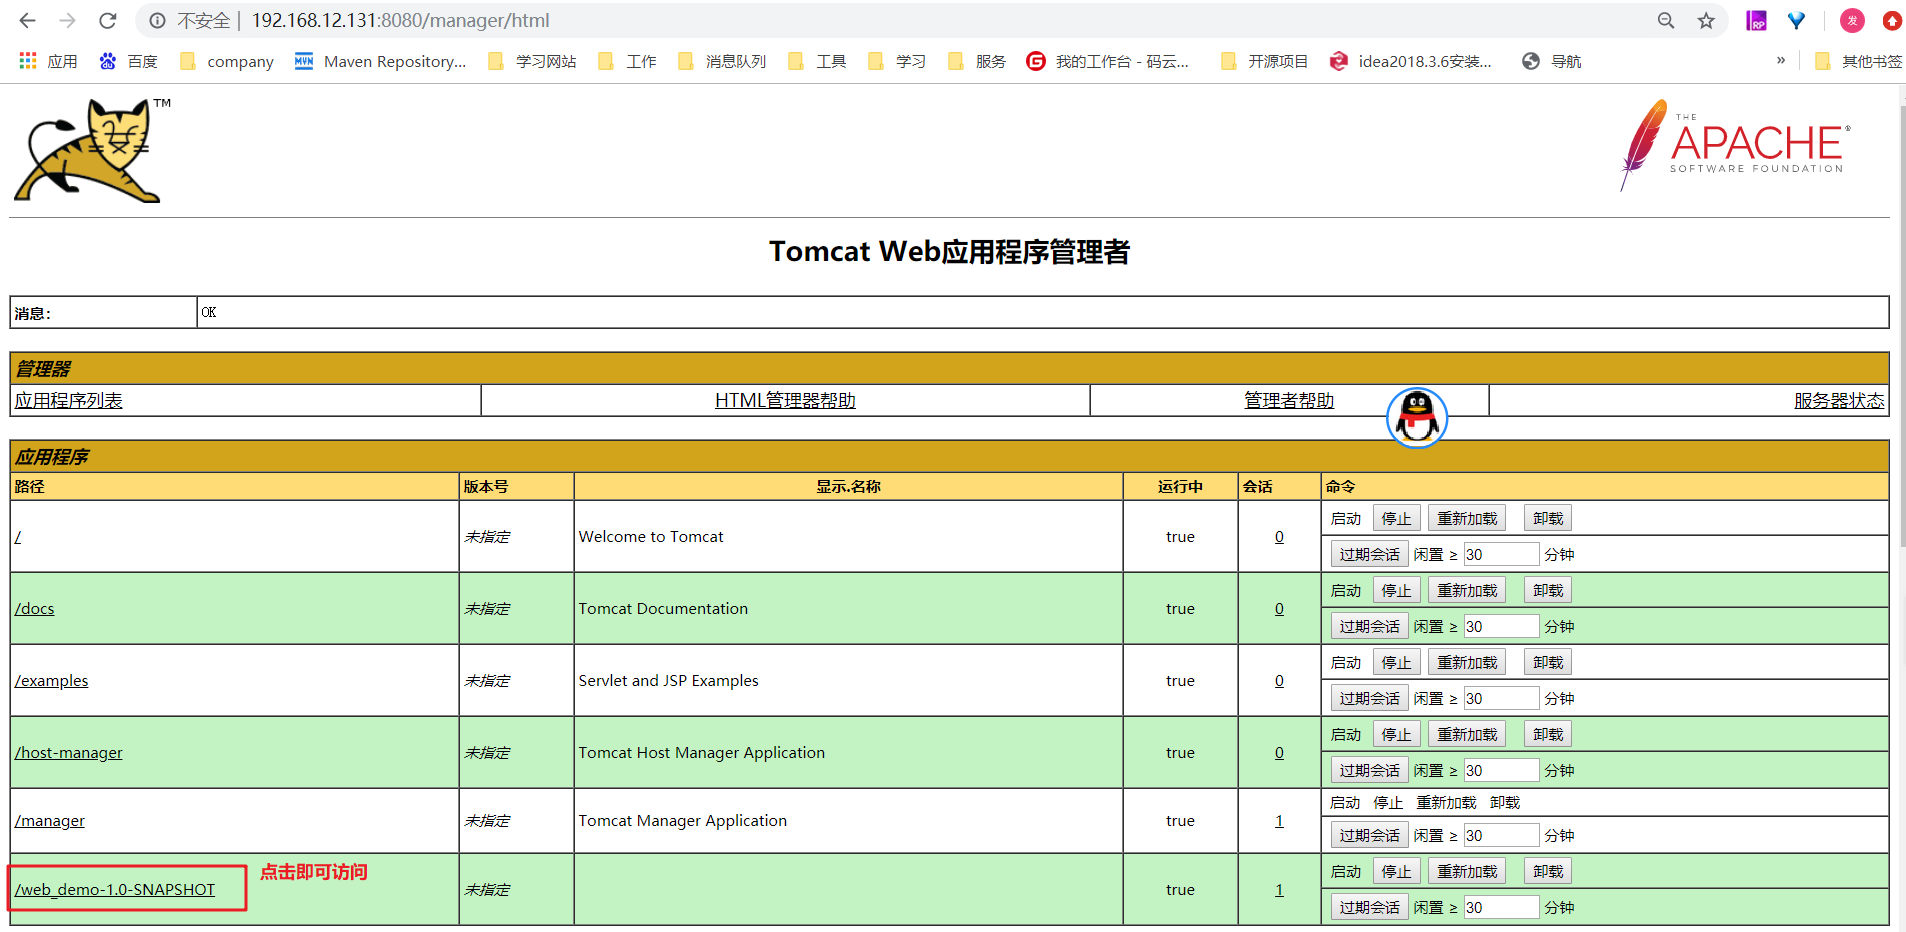
6、演示改动代码后的持续集成
1)IDEA中源码修改并提交到gitlab
2)在Jenkins中项目重新构建
3)访问Tomcat
c)Maven项目构建
1、安装Maven Integration插件

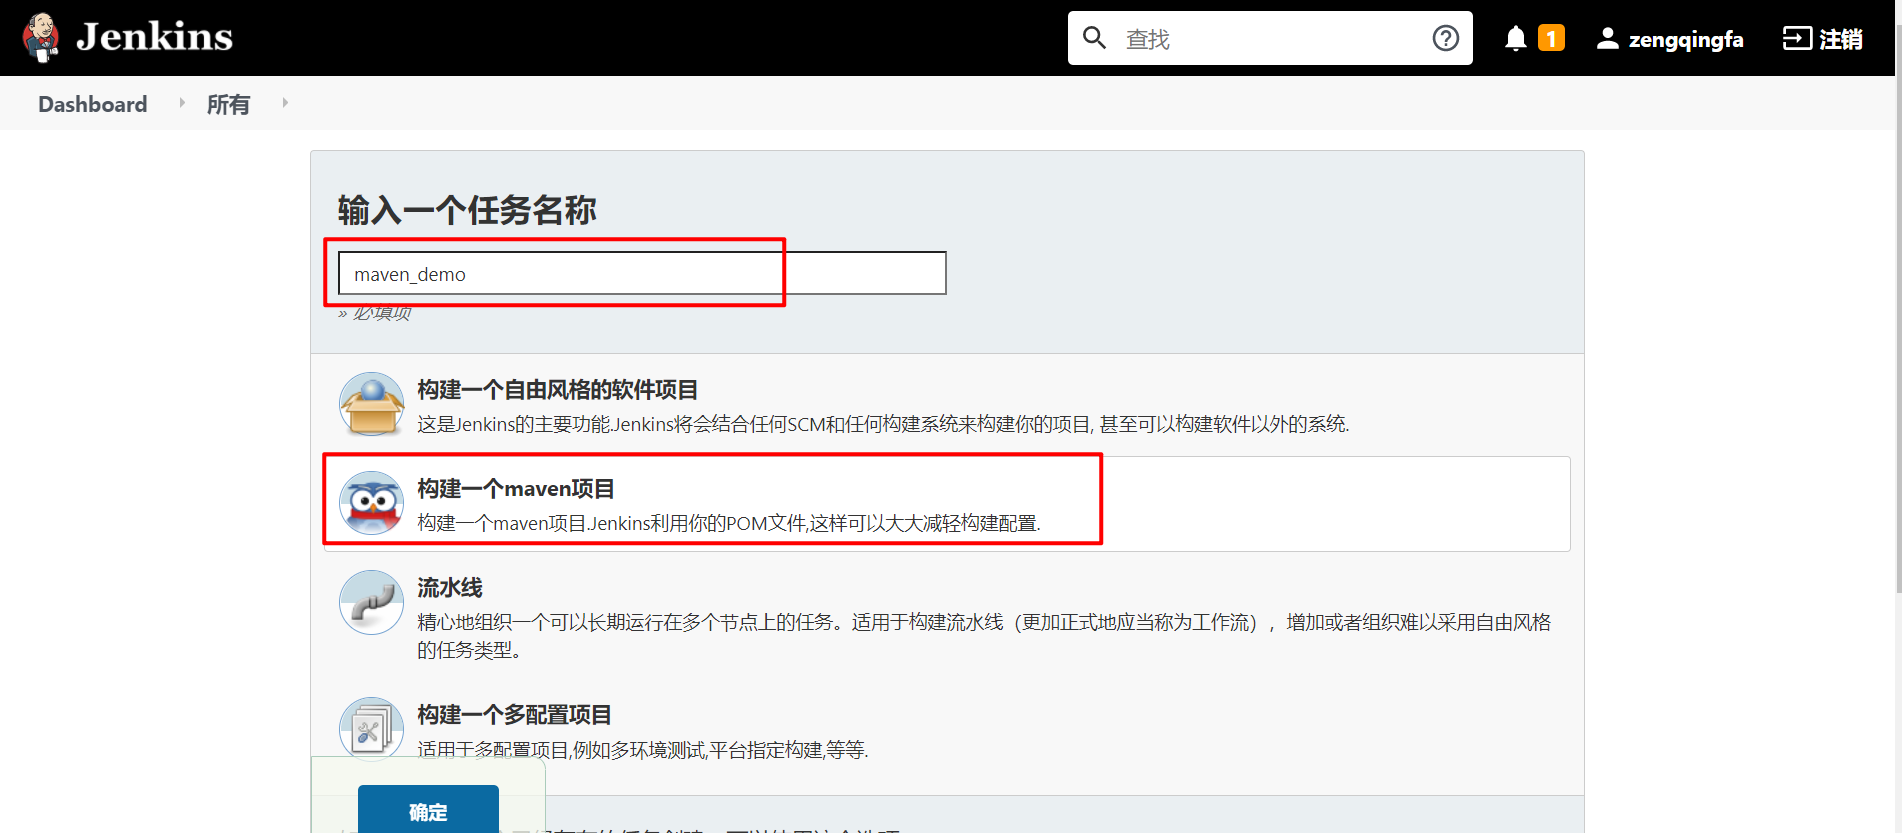
2、创建Maven项目
3、配置项目
拉取代码和远程部署的过程和自由风格项目一样,只是"构建"部分不同

4、maven项目发布脚本到远程服务器执行
前置配置:
maven打包项目名:pom.xml中配置,打包服务jar包去掉版本号
${project.name}<build> <finalName>${project.name}finalName> <plugins> <plugin> <groupId>org.springframework.bootgroupId> <artifactId>spring-boot-maven-pluginartifactId> plugin> plugins> build>- 1
- 2
- 3
- 4
- 5
- 6
- 7
- 8
- 9
在windows执行打包命令

mvn clean install '-Dmaven.test.skip=true'- 1
发版服务器配置目录,结构如下:
[root@k8snode1 app]# yum install tree -y [root@k8snode1 app]# pwd /opt/app [root@k8snode1 app]# tree . ├── startService.sh ├── tensquare_admin_service ├── tensquare_eureka_server │ ├── backup_dir │ ├── nohup.out │ ├── tensquare_eureka_server.jar │ └── tensquare_eureka_server.jar.bak ├── tensquare_gathering └── tensquare_zuul 5 directories, 4 files- 1
- 2
- 3
- 4
- 5
- 6
- 7
- 8
- 9
- 10
- 11
- 12
- 13
- 14
- 15
- 16
处理过期备份
cd b a c k u p d i r s e q n u m = 0 f o r e l e m e n t i n ‘ l s − t ‘ d o s e q n u m = backup_dir seq_num=0 for element in `ls -t` do seq_num= backupdirseqnum=0forelementin‘ls−t‘doseqnum=[$seq_num+1]
if [ $seq_num -gt 5 ]; then
rm -f $element
fi
done执行脚本:报错 ```shell [root@k8snode1 app]# sh startService.sh tensquare_eureka_server startService.sh: line 2: $'\r': command not found ---[tensquare_eureka_server]--- service deploy starts... startService.sh: line 5: $'\r': command not found startService.sh: line 6: $'\r': command not found : No such file or directory: /opt/app startService.sh: line 88: syntax error near unexpected token `$'do\r'' 'tartService.sh: line 88: `do- 1
- 2
- 3
- 4
- 5
- 6
- 7
- 8
- 9
- 10
原因:是Windows和Linux的.sh脚本文件格式不同,如果在脚本中有空行,脚本是在Windows下进行编辑之后上传到linux上去执行的话,就会出现这个问题。windows 下的换行符是\r\n,而 linux 下的换行符是\n,没有识别/r,所以会导致上述的报错,这个属于脚本编码的问题。
解决:
方法一:vim startService.sh # 转换格式,设置脚本格式为Linux形式 :set ff=unix :wq- 1
- 2
- 3
- 4
方法二:去除Shell脚本的\r字符:
sed -i 's/\r//' startService.sh- 1
jenkins新增一个maven项目:

tensquare_back/tensquare_eureka_server/target/tensquare_eureka_server.jar tensquare_back/tensquare_eureka_server/target/ tensquare_back/tensquare_eureka_server cd /opt/app ##发布需要发版的项目 sh /opt/app/startService.sh tensquare_eureka_server- 1
- 2
- 3
- 4
- 5
- 6
- 7
问题:Jenkins控制台不输出自定义shell执行日志:
解决:打开 高级 选项,勾选“Verbose output in console”
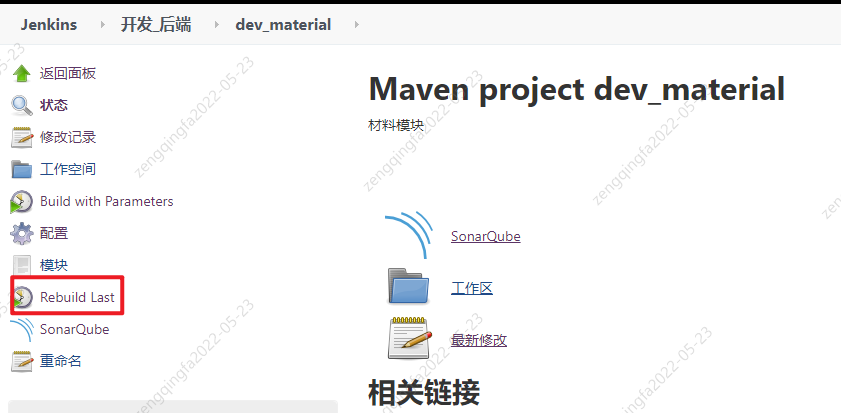
- 官方地址:https://plugins.jenkins.io/rebuild
- 安装方式:在Jenkins插件当中直接搜索即可安装。
- 功能说明:此插件可以直接重复上次构建,也可以用于查看一些参数比较复杂的构建时,上次构建所选的参数是什么。非常nice的一个插件。
d)Pipeline流水线项目构建
1、Pipeline简介
1)概念
Pipeline,简单来说,就是一套运行在 Jenkins 上的工作流框架,将原来独立运行于单个或者多个节点的任务连接起来,实现单个任务难以完成的复杂流程编排和可视化的工作。
2)使用Pipeline有以下好处(来自翻译自官方文档):- 代码:Pipeline以代码的形式实现,通常被检入源代码控制,使团队能够编辑,审查和迭代其传送流程。
- 持久:无论是计划内的还是计划外的服务器重启,Pipeline都是可恢复的。
- 可停止:Pipeline可接收交互式输入,以确定是否继续执行Pipeline。
- 多功能:Pipeline支持现实世界中复杂的持续交付要求。它支持fork/join、循环执行,并行执行任务的功能。
- 可扩展:Pipeline插件支持其DSL的自定义扩展 ,以及与其他插件集成的多个选项。
3)如何创建 Jenkins Pipeline呢?
- Pipeline 脚本是由 Groovy 语言实现的,但是我们没必要单独去学习 Groovy
- Pipeline 支持两种语法:Declarative(声明式)和 Scripted Pipeline(脚本式)语法
- Pipeline 也有两种创建方法:可以直接在 Jenkins 的 Web UI 界面中输入脚本;也可以通过创建一
个 Jenkinsfile 脚本文件放入项目源码库中(一般我们都推荐在 Jenkins 中直接从源代码控制(SCM)
中直接载入 Jenkinsfile Pipeline 这种方法)。
2、安装Pipeline插件
Manage Jenkins->Manage Plugins->可选插件 Pipeline

3、Pipeline语法快速入门
1)Declarative声明式-Pipeline
创建项目
test01-pipeline01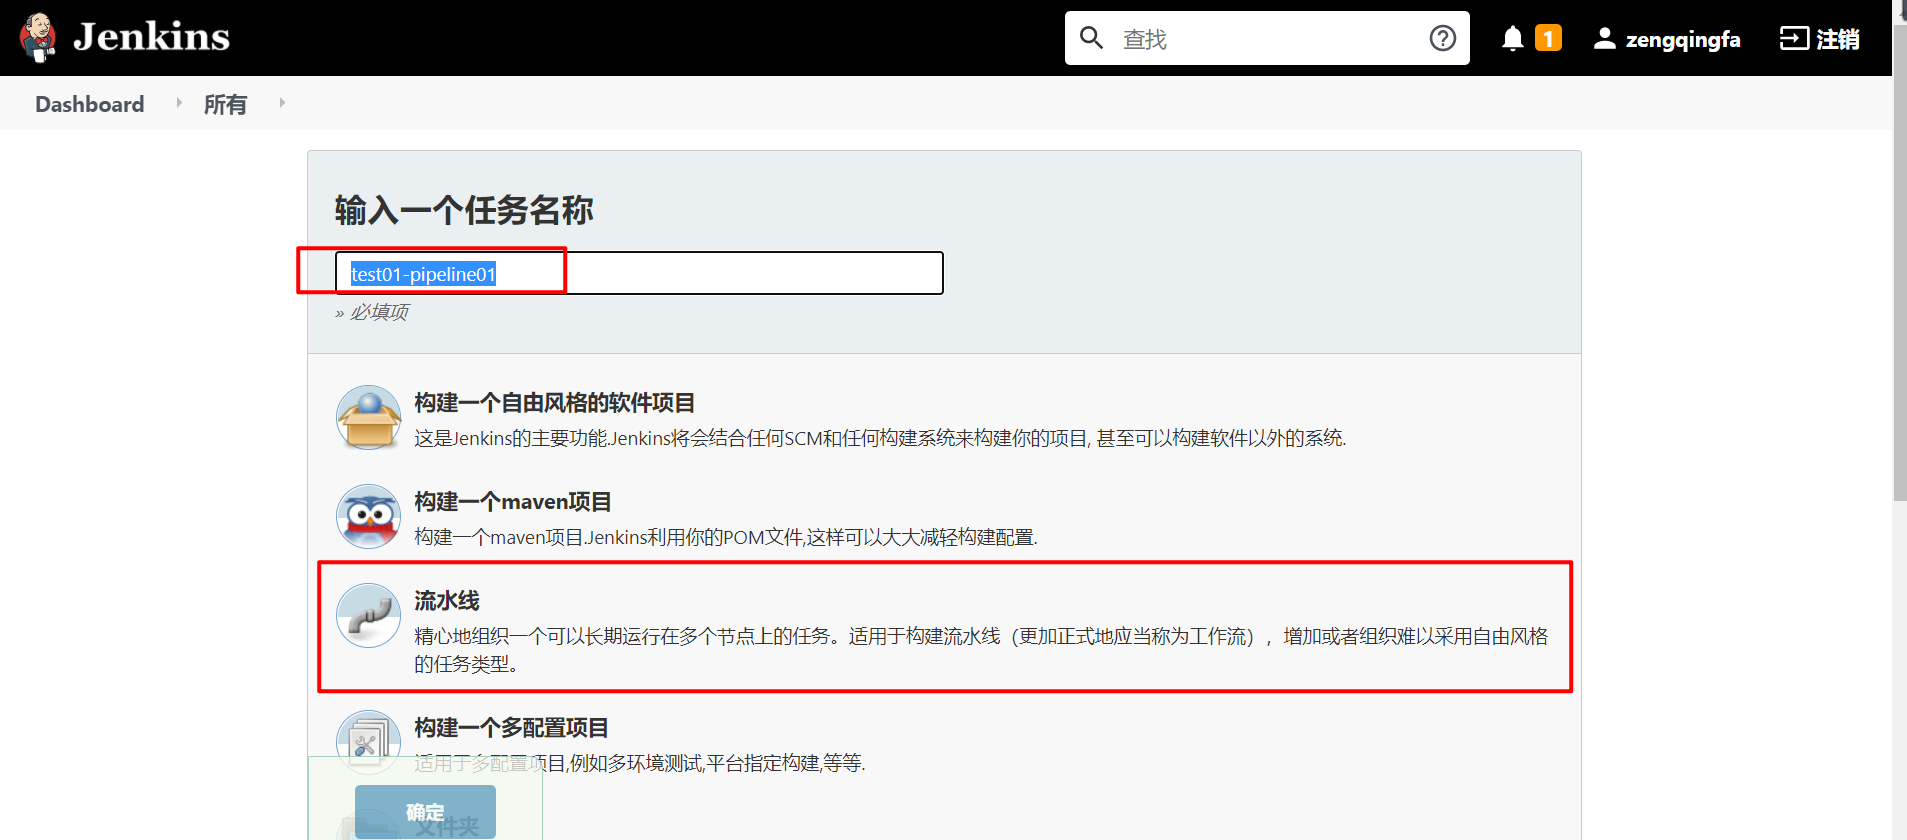
pipeline { agent any stages { stage('Hello') { steps { echo 'Hello World' } } } }- 1
- 2
- 3
- 4
- 5
- 6
- 7
- 8
- 9
- 10
- 11
stages:代表整个流水线的所有执行阶段。通常stages只有1个,里面包含多个stage
stage:代表流水线中的某个阶段,可能出现n个。一般分为拉取代码,编译构建,部署等阶段。
steps:代表一个阶段内需要执行的逻辑。steps里面是shell脚本,git拉取代码,ssh远程发布等任意内容。
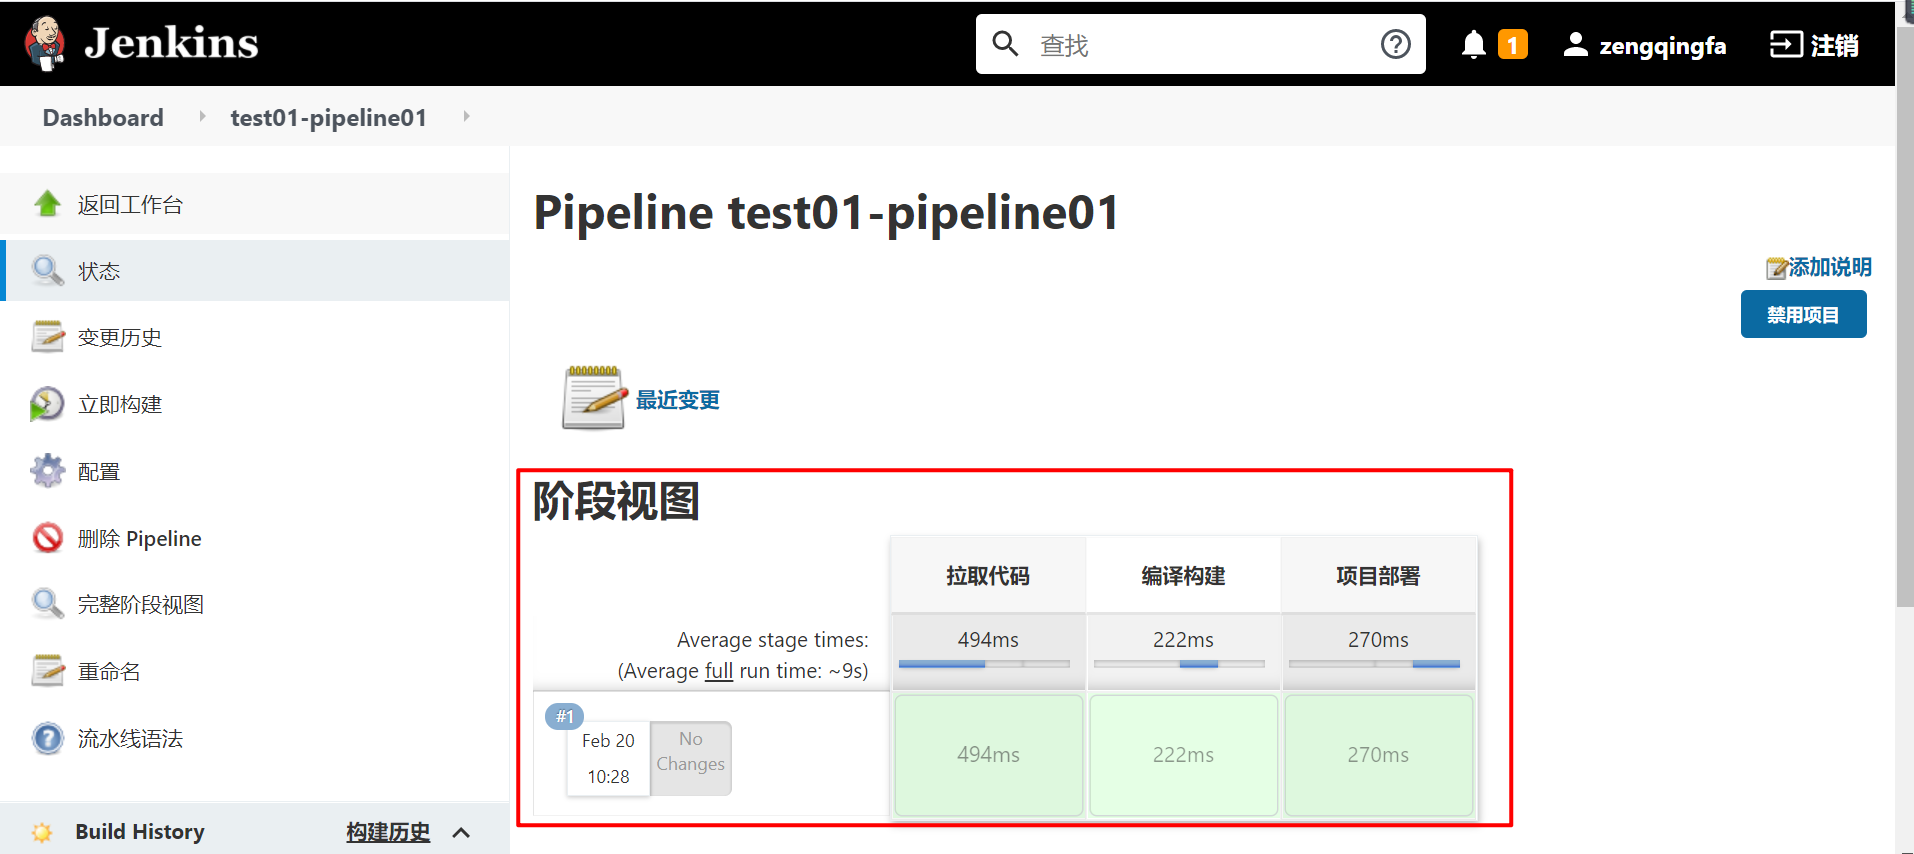
编写一个简单声明式Pipeline:pipeline { agent any //阶段 stages { stage('拉取代码') { //步骤 steps { echo '拉取代码' } } stage('编译构建') { steps { echo '编译构建' } } stage('项目部署') { steps { echo '项目部署' } } } }- 1
- 2
- 3
- 4
- 5
- 6
- 7
- 8
- 9
- 10
- 11
- 12
- 13
- 14
- 15
- 16
- 17
- 18
- 19
- 20
- 21
- 22
点击构建,可以看到整个构建过程:
2)Scripted Pipeline脚本式-Pipeline
1、创建项目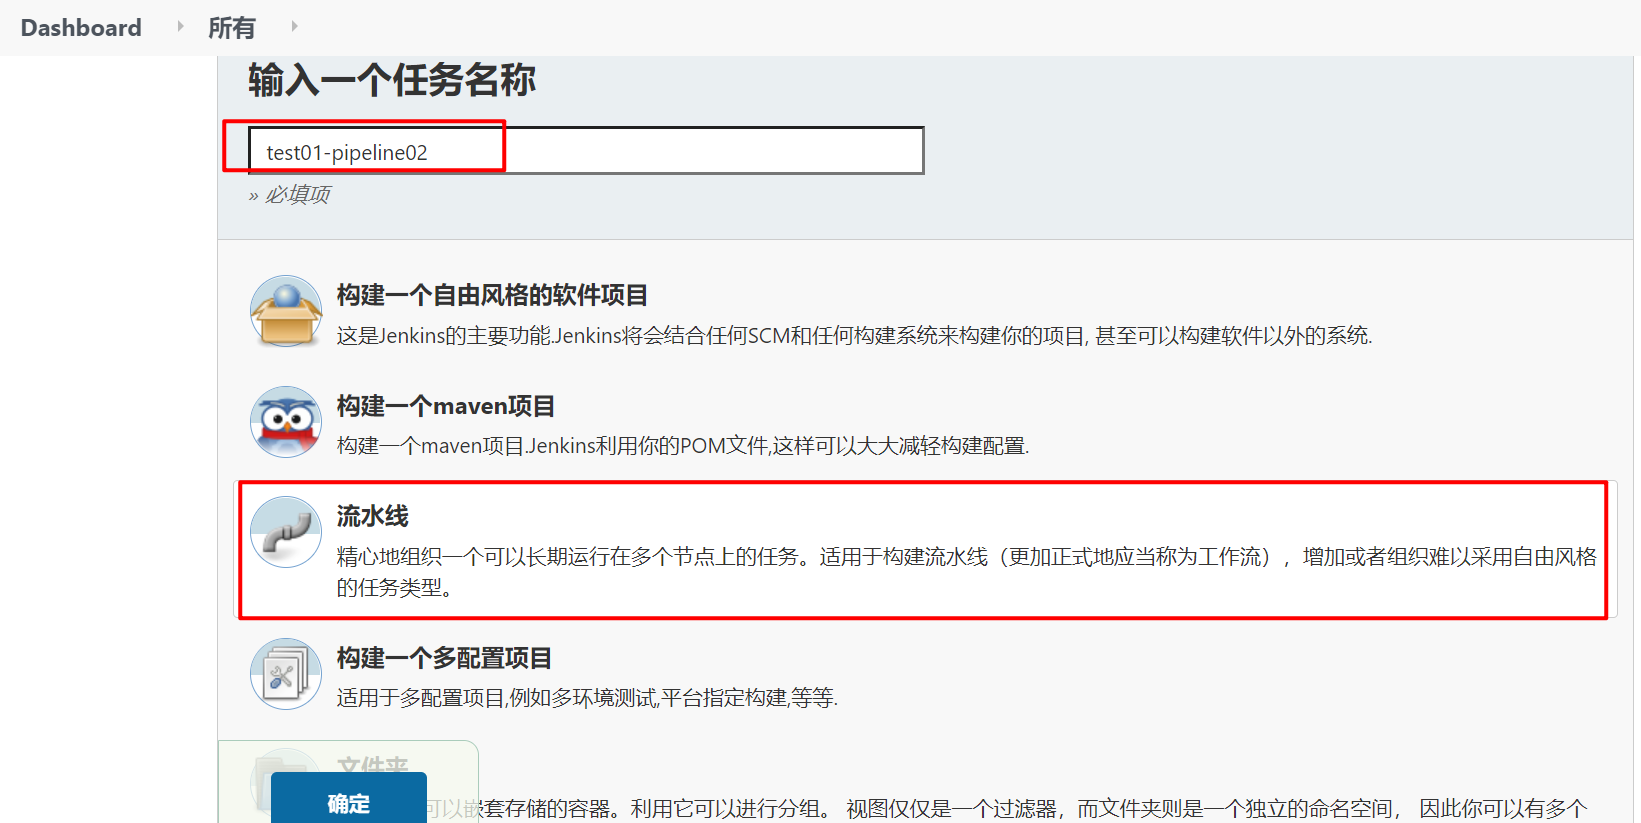
node { def mvnHome stage('Preparation') { // for display purposes } stage('Build') { } stage('Results') { } }- 1
- 2
- 3
- 4
- 5
- 6
- 7
- 8
- 9
- 10
- 11
- 12
Node:节点,一个 Node 就是一个 Jenkins 节点,Master 或者 Agent,是执行 Step 的具体运行环境,后续讲到Jenkins的Master-Slave架构的时候用到。
Stage:阶段,一个 Pipeline 可以划分为若干个 Stage,每个 Stage 代表一组操作,比如:Build、Test、Deploy,Stage 是一个逻辑分组的概念。
Step:步骤,Step 是最基本的操作单元,可以是打印一句话,也可以是构建一个 Docker 镜像,由各类 Jenkins 插件提供,比如命令:sh ‘make’,就相当于我们平时 shell 终端中执行 make 命令一样。
2、编写一个简单的脚本式Pipelinenode { def mvnHome stage('拉取代码') { // for display purposes echo '拉取代码' } stage('编译构建') { echo '编译构建' } stage('项目部署') { echo '项目部署' } }- 1
- 2
- 3
- 4
- 5
- 6
- 7
- 8
- 9
- 10
- 11
- 12
效果一样:
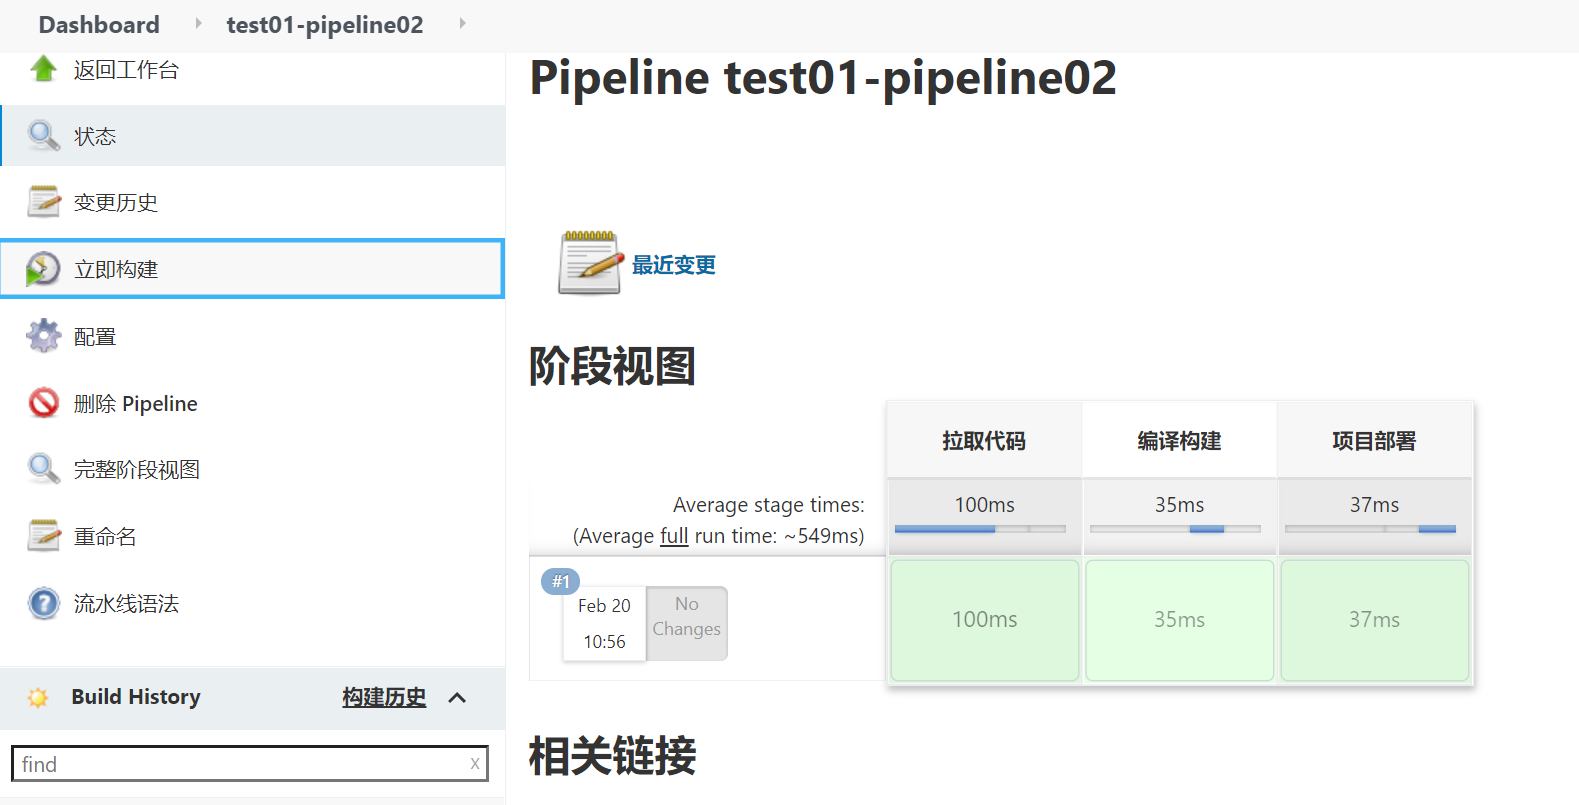
4、流水线项目构建
1)拉取代码
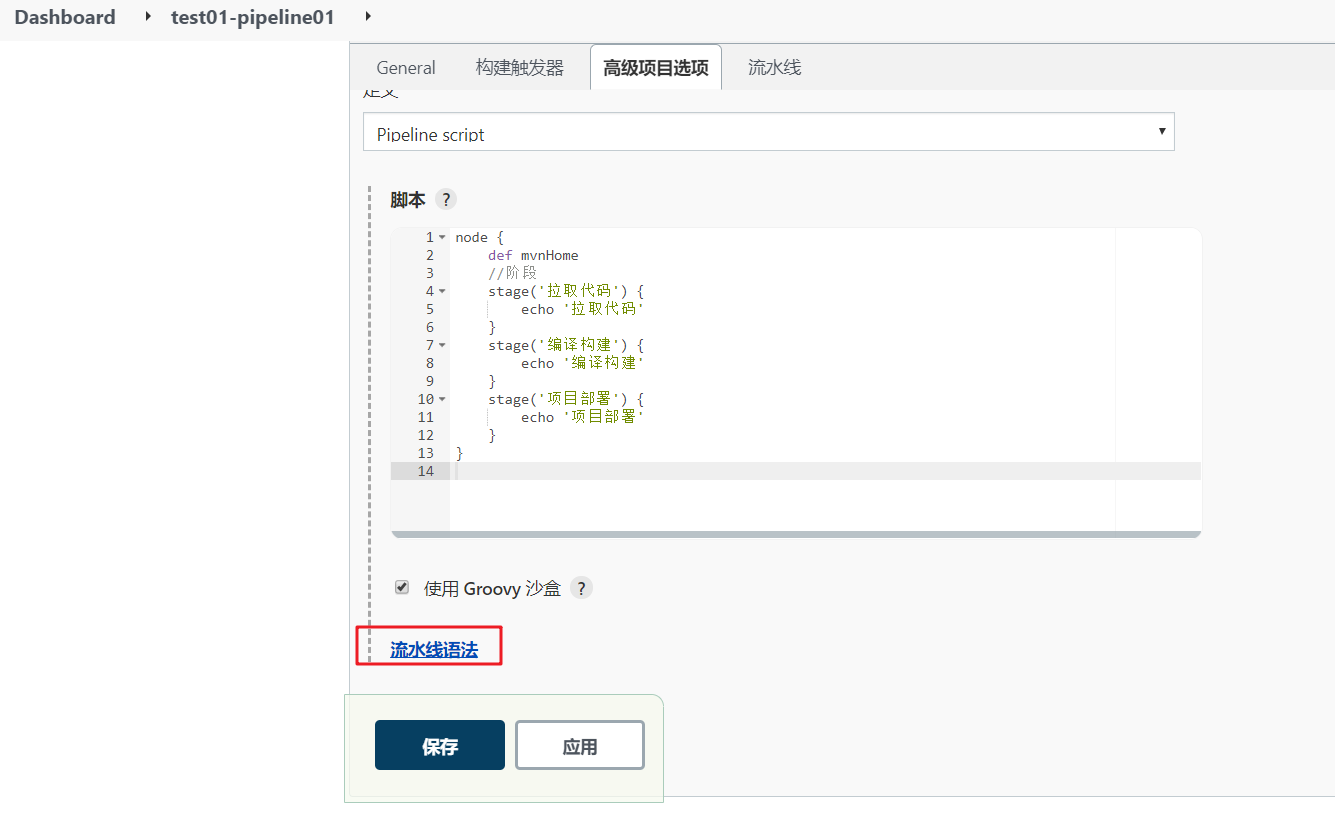
pipeline { agent any stages{ stage('pull code') { // for display purposes steps{ checkout([$class: 'GitSCM', branches: [[name: '*/master']], extensions: [], userRemoteConfigs: [[credentialsId: 'git_auth_ssh', url: 'git@192.168.12.132:slfx_group/web_demo.git']]]) } } stage('编译构建') { steps{ echo '编译构建' } } stage('项目部署') { steps{ echo '项目部署' } } } }- 1
- 2
- 3
- 4
- 5
- 6
- 7
- 8
- 9
- 10
- 11
- 12
- 13
- 14
- 15
- 16
- 17
- 18
- 19
- 20
2)编译打包
查看语法: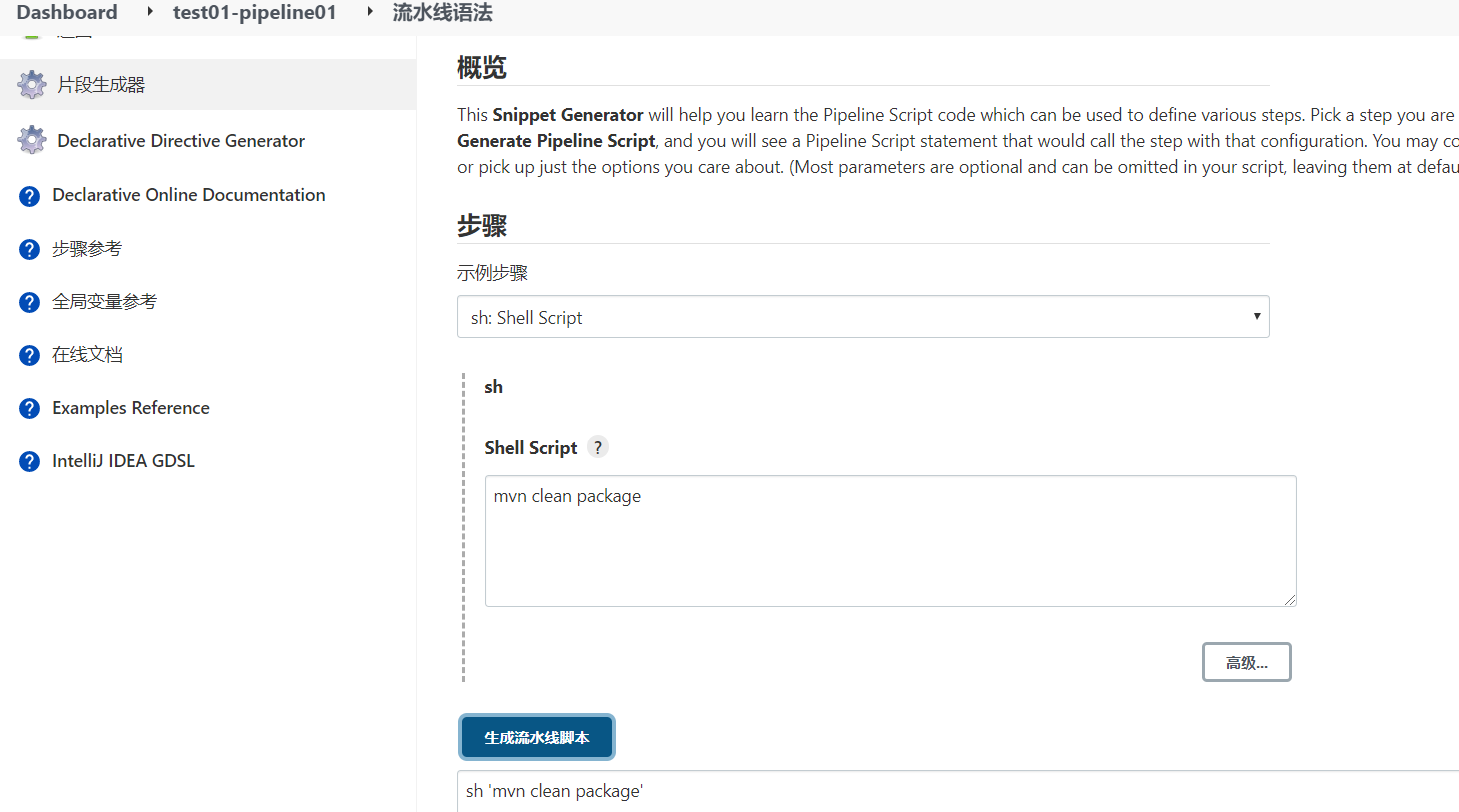
pipeline { agent any //阶段 stages { stage('pull code') { //步骤 steps { checkout([$class: 'GitSCM', branches: [[name: '*/master']], extensions: [], userRemoteConfigs: [[credentialsId: 'git_auth_ssh', url: 'git@192.168.12.132:slfx_group/web_demo.git']]]) } } stage('build project') { steps { sh 'mvn clean package' } } stage('项目部署') { steps { echo '项目部署' } } } }- 1
- 2
- 3
- 4
- 5
- 6
- 7
- 8
- 9
- 10
- 11
- 12
- 13
- 14
- 15
- 16
- 17
- 18
- 19
- 20
- 21
- 22
查看,构建成功:
[root@k8snode1 workspace]# pwd /var/lib/jenkins/workspace [root@k8snode1 workspace]# ll 总用量 0 drwxr-xr-x 5 root root 162 3月 21 13:17 freestyle_demo01 drwxr-xr-x 2 root root 6 3月 21 13:17 freestyle_demo01@tmp drwxr-xr-x 5 root root 162 3月 21 04:11 freestyle-project01 drwxr-xr-x 2 root root 6 3月 21 04:11 freestyle-project01@tmp drwxr-xr-x 5 root root 162 3月 21 04:12 freestyle-project02-ssh drwxr-xr-x 2 root root 6 3月 21 04:12 freestyle-project02-ssh@tmp drwxr-xr-x 5 root root 162 3月 21 13:23 maven_demo drwxr-xr-x 2 root root 6 3月 21 13:23 maven_demo@tmp drwxr-xr-x 5 root root 162 3月 21 13:57 test01-pipeline01 drwxr-xr-x 2 root root 6 3月 21 13:57 test01-pipeline01@tmp [root@k8snode1 workspace]# cd test01-pipeline01 [root@k8snode1 test01-pipeline01]# cd target/ [root@k8snode1 target]# ll 总用量 100 drwxr-xr-x 3 root root 17 3月 21 13:57 classes drwxr-xr-x 2 root root 28 3月 21 13:57 maven-archiver drwxr-xr-x 3 root root 35 3月 21 13:57 maven-status drwxr-xr-x 4 root root 54 3月 21 13:57 web_demo-1.0-SNAPSHOT -rw-r--r-- 1 root root 101620 3月 21 13:57 web_demo-1.0-SNAPSHOT.war- 1
- 2
- 3
- 4
- 5
- 6
- 7
- 8
- 9
- 10
- 11
- 12
- 13
- 14
- 15
- 16
- 17
- 18
- 19
- 20
- 21
- 22
- 23
3)部署
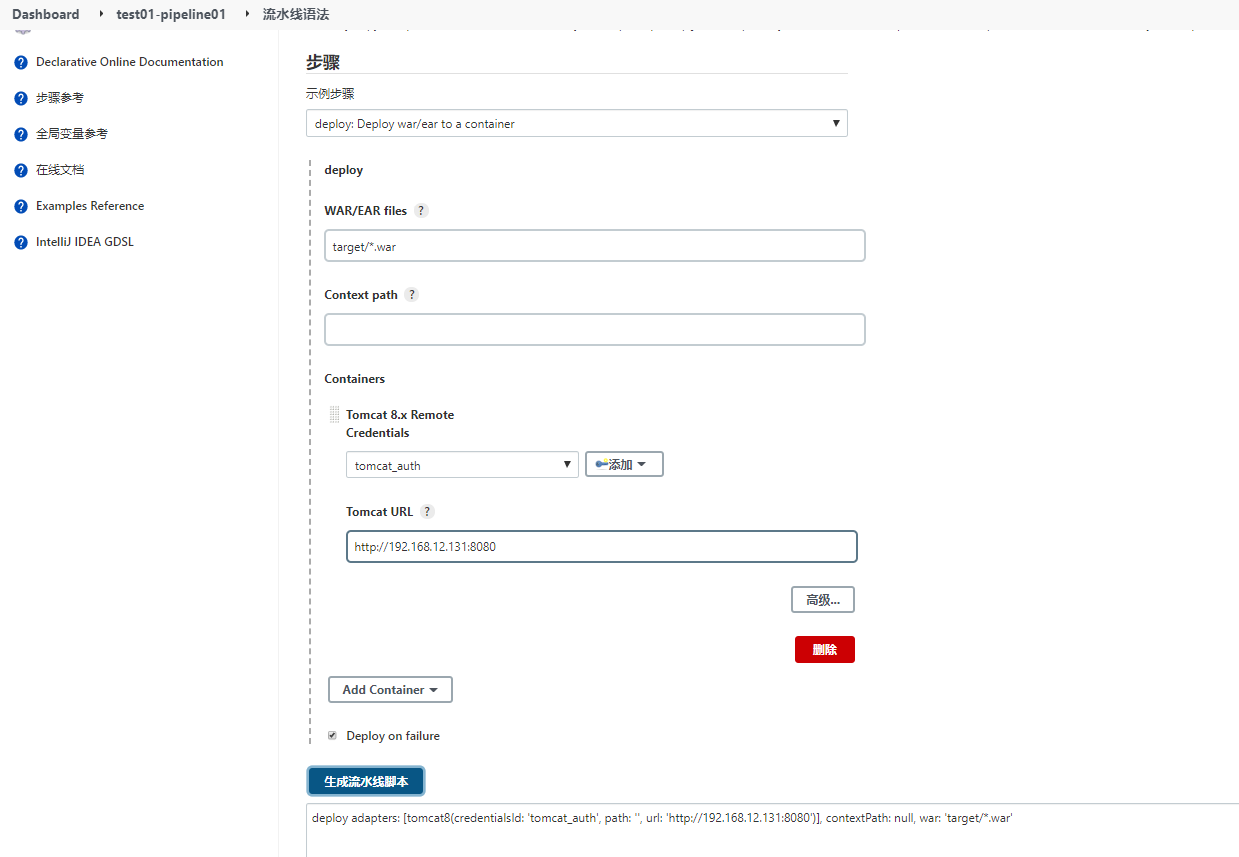
pipeline { agent any //阶段 stages { stage('pull code') { //步骤 steps { checkout([$class: 'GitSCM', branches: [[name: '*/master']], extensions: [], userRemoteConfigs: [[credentialsId: 'git_auth_ssh', url: 'git@192.168.12.132:slfx_group/web_demo.git']]]) } } stage('build project') { steps { sh 'mvn clean package' } } stage('deploy project') { steps { deploy adapters: [tomcat8(credentialsId: 'tomcat_auth', path: '', url: 'http://192.168.12.131:8080')], contextPath: null, war: 'target/*.war' } } } }- 1
- 2
- 3
- 4
- 5
- 6
- 7
- 8
- 9
- 10
- 11
- 12
- 13
- 14
- 15
- 16
- 17
- 18
- 19
- 20
- 21
- 22
4)构建成功
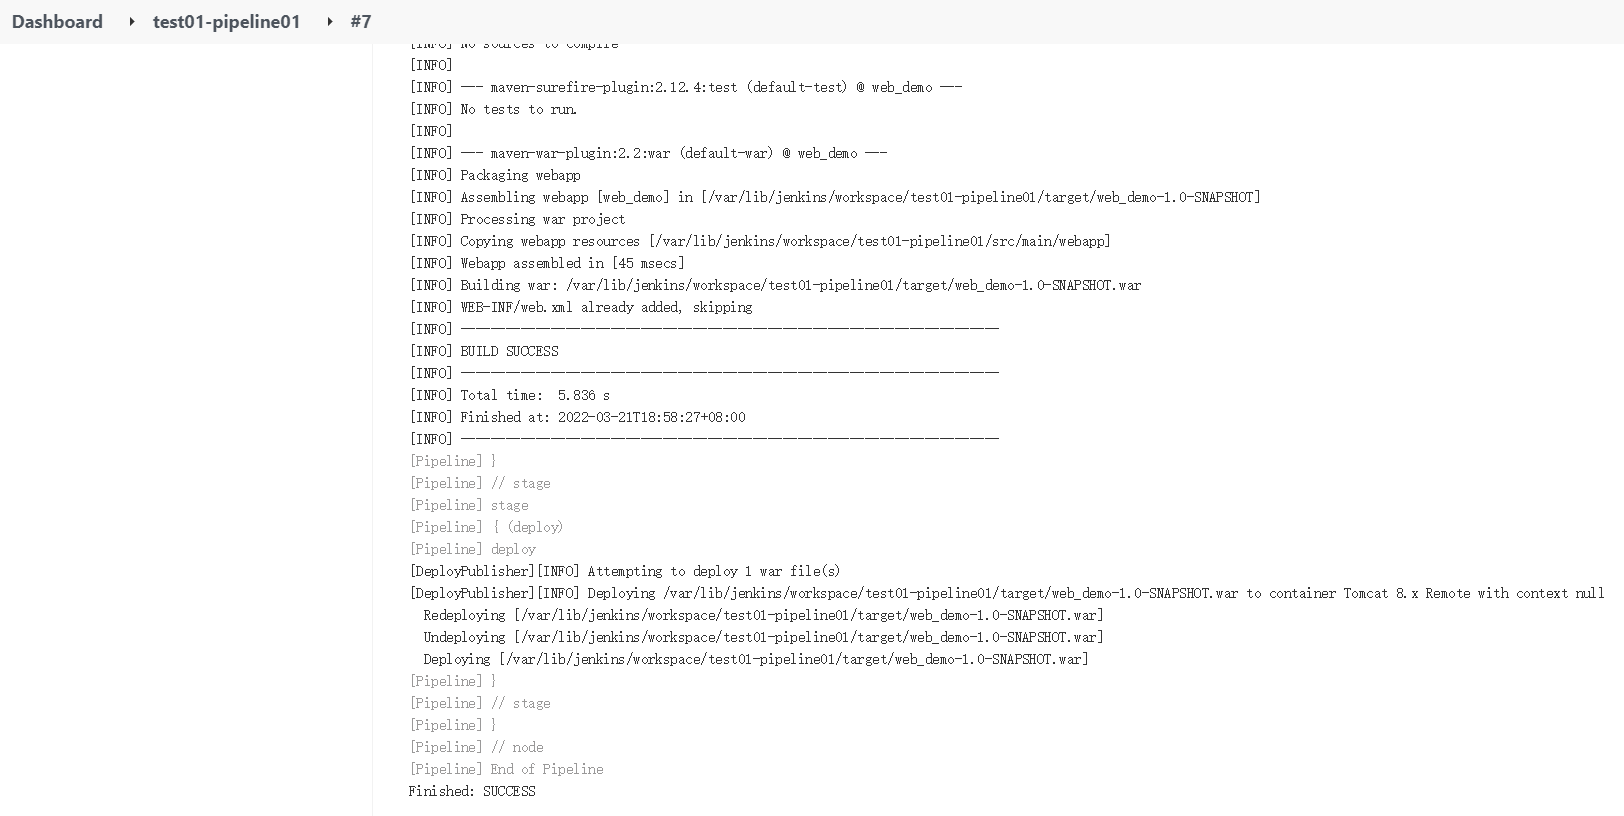
pipeline { agent any environment { // 定义项目git地址 GIT_URL="https://gitee.com/xxx/web_demo.git" // 定义项目git项目凭证 GIT_AUTH="688767e0-16b7-4d05-be0e5875485e6d" } parameters { gitParameter (branch:'', branchFilter: 'origin/(.*)', defaultValue: 'master', description: '选择将要构建的分支', name: 'branch', quickFilterEnabled: true, selectedValue: 'TOP', sortMode: 'DESCENDING_SMART', tagFilter: '*', type: 'PT_BRANCH_TAG', useRepository: env.GIT_URL) } //阶段 stages { stage('pull code') { //步骤 steps { checkout([$class: 'GitSCM', branches: [[name: "*/${branch}"]], extensions: [], userRemoteConfigs: [[credentialsId: "${env.GIT_AUTH}", url: "${env.GIT_URL}"]]]) } } } }- 1
- 2
- 3
- 4
- 5
- 6
- 7
- 8
- 9
- 10
- 11
- 12
- 13
- 14
- 15
- 16
- 17
- 18
- 19
- 20
- 21
- 22
注意:第一次点击构建的时候 可能会没有git parameter选项,先使用的master分支,等构建完成之后再点击构建就会出现git parameter选项了。测试过新建branch也会第一时间更新,只有第一次的时候有点问题。
e)Pipeline Script from SCM
刚才我们都是直接在Jenkins的UI界面编写Pipeline代码,这样不方便脚本维护,建议把Pipeline脚本放
在项目中(一起进行版本控制)
1、在项目根目录建立Jenkinsfile文件,把内容复制到该文件中
Jenkinsfile
pipeline { agent any //阶段 stages { stage('pull code') { //步骤 steps { checkout([$class: 'GitSCM', branches: [[name: '*/master']], extensions: [], userRemoteConfigs: [[credentialsId: 'git_auth_ssh', url: 'git@192.168.12.132:slfx_group/web_demo.git']]]) } } stage('build project') { steps { sh 'mvn clean package' } } stage('publish project') { steps { deploy adapters: [tomcat8(credentialsId: 'tomcat_auth', path: '', url: 'http://192.168.12.131:8080')], contextPath: null, war: 'target/*.war' } } } }- 1
- 2
- 3
- 4
- 5
- 6
- 7
- 8
- 9
- 10
- 11
- 12
- 13
- 14
- 15
- 16
- 17
- 18
- 19
- 20
- 21
- 22

2、在项目中引用该文件
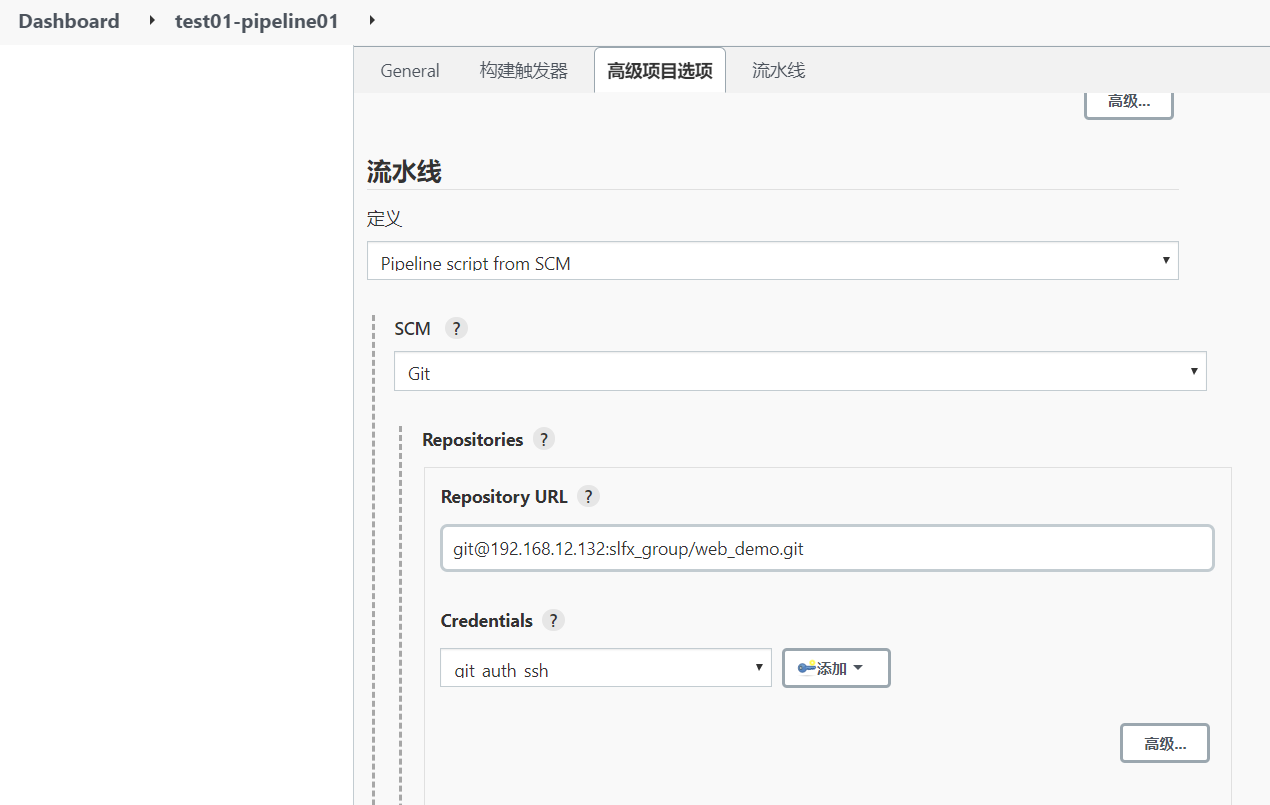
3、项目构建
4、使用git parameter插件来构建
分支参数:
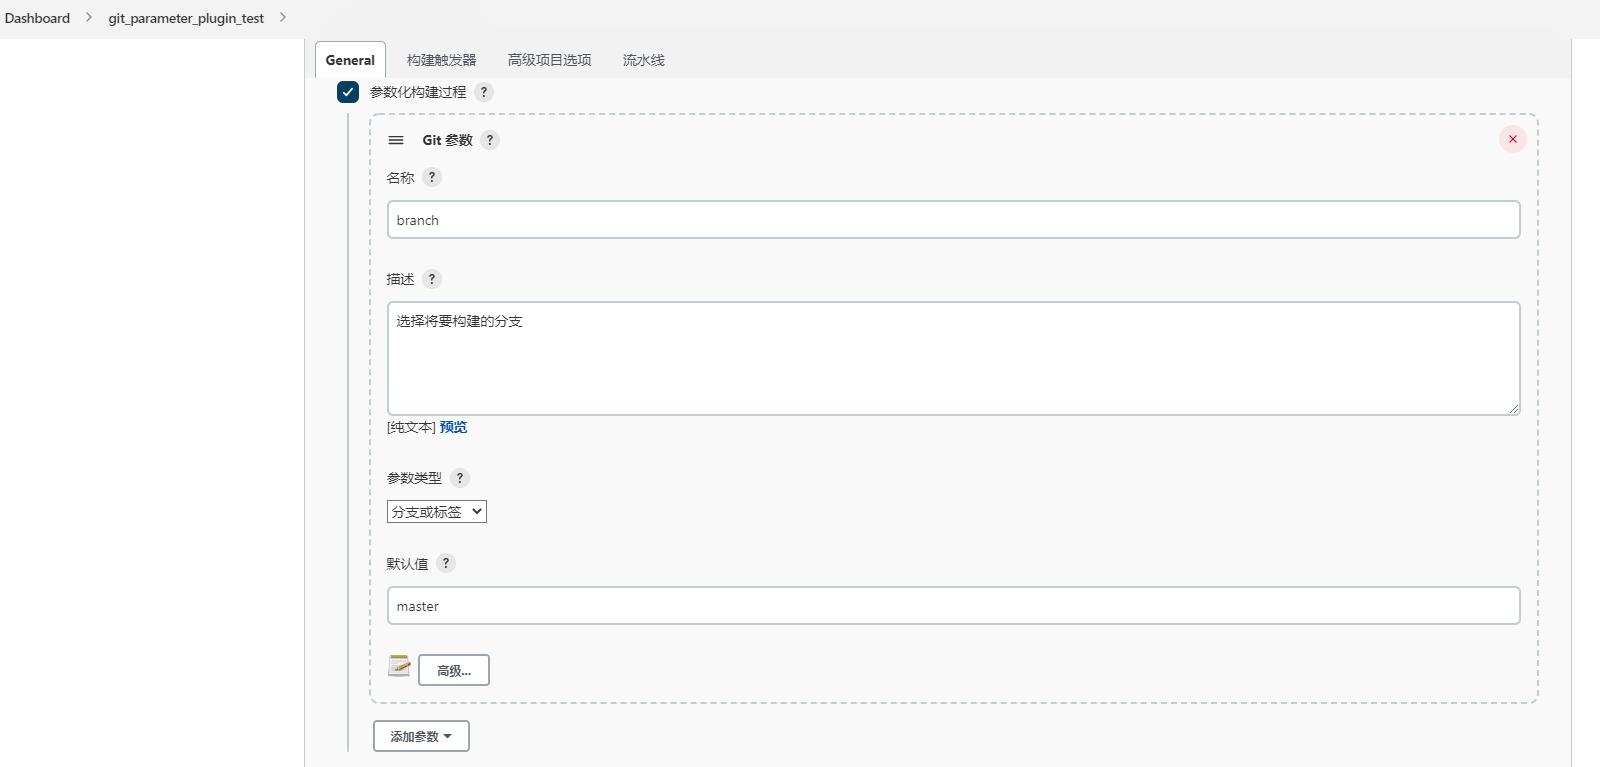
pipeline { agent any environment { // 定义项目git地址 GIT_URL="https://gitee.com/xxxx/web_demo.git" // 定义项目git项目凭证 GIT_AUTH="688767e0-16b7-be0e-815875485e6d" } parameters { gitParameter (branch:'', branchFilter: 'origin/(.*)', defaultValue: 'master', description: '选择将要构建的分支', name: 'branch', quickFilterEnabled: true, selectedValue: 'TOP', sortMode: 'DESCENDING_SMART', tagFilter: '*', type: 'PT_BRANCH_TAG', useRepository: env.GIT_URL) } //阶段 stages { stage('pull code') { //步骤 steps { checkout([$class: 'GitSCM', branches: [[name: "*/${branch}"]], extensions: [], userRemoteConfigs: [[credentialsId: "${env.GIT_AUTH}", url: "${env.GIT_URL}"]]]) } } stage('code checking') { steps { script { //引入SonarQubeScanner工具 scannerHome = tool 'sonarqube-scanner' } //引入SonarQube的服务器环境 withSonarQubeEnv('sonarqube6.7.4') { sh "${scannerHome}/bin/sonar-scanner" } } } stage('build project') { steps { sh 'mvn clean package' } } stage('publish project') { steps { deploy adapters: [tomcat8(credentialsId: '-637a-42df-920f-d7c0384bdfda', path: '', url: 'http://192.168.71.131:8080')], contextPath: null, war: 'target/*.war' } } } post { always { emailext( subject: '构建通知:${PROJECT_NAME}-Build # ${BUILD_NUMBER}-${BUILD_STATUS}!', body: '${FILE,path="email.html"}', to: '810305803@qq.com' ) } } }- 1
- 2
- 3
- 4
- 5
- 6
- 7
- 8
- 9
- 10
- 11
- 12
- 13
- 14
- 15
- 16
- 17
- 18
- 19
- 20
- 21
- 22
- 23
- 24
- 25
- 26
- 27
- 28
- 29
- 30
- 31
- 32
- 33
- 34
- 35
- 36
- 37
- 38
- 39
- 40
- 41
- 42
- 43
- 44
- 45
- 46
- 47
- 48
- 49
- 50
- 51
- 52
- 53
2)常用的构建触发器
Jenkins内置4种构建触发器:
- 触发远程构建
- 其他工程构建后触发(Build after other projects are build)
- 定时构建(Build periodically)
- 轮询SCM(Poll SCM)
a)触发远程构建
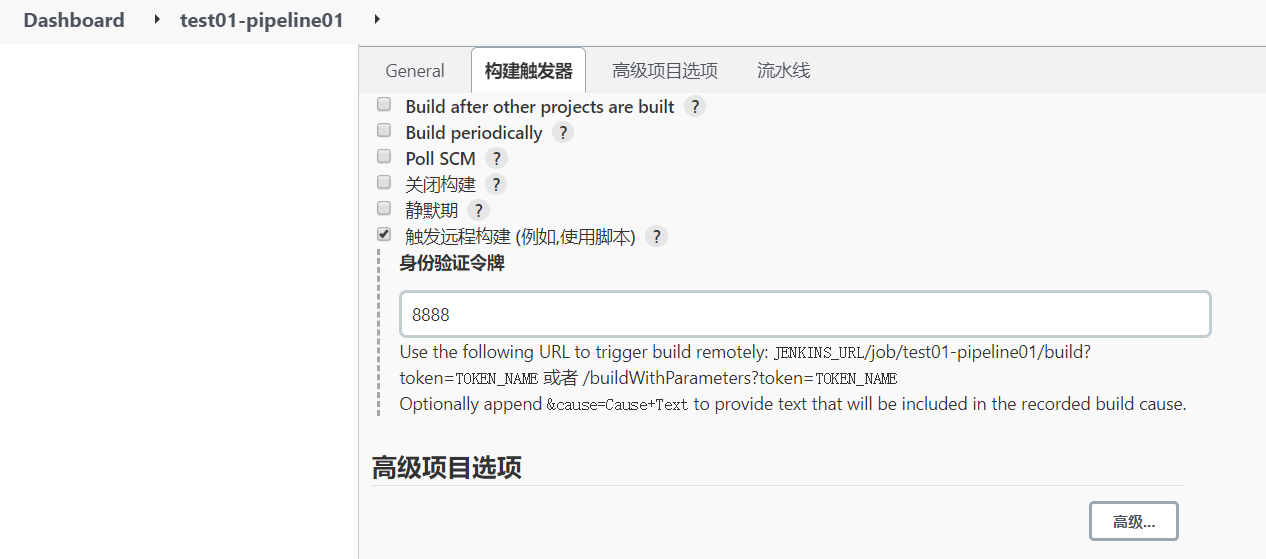
http://192.168.12.133:8888/job/test01-pipeline01/build?token=8888 http://192.168.12.133:8888/job/test01-pipeline01/buildWithParameters?token=8888- 1
- 2
访问:http://192.168.12.133:8888/job/test01-pipeline01/build?token=8888
b)其他工程构建后触发
1、创建项目
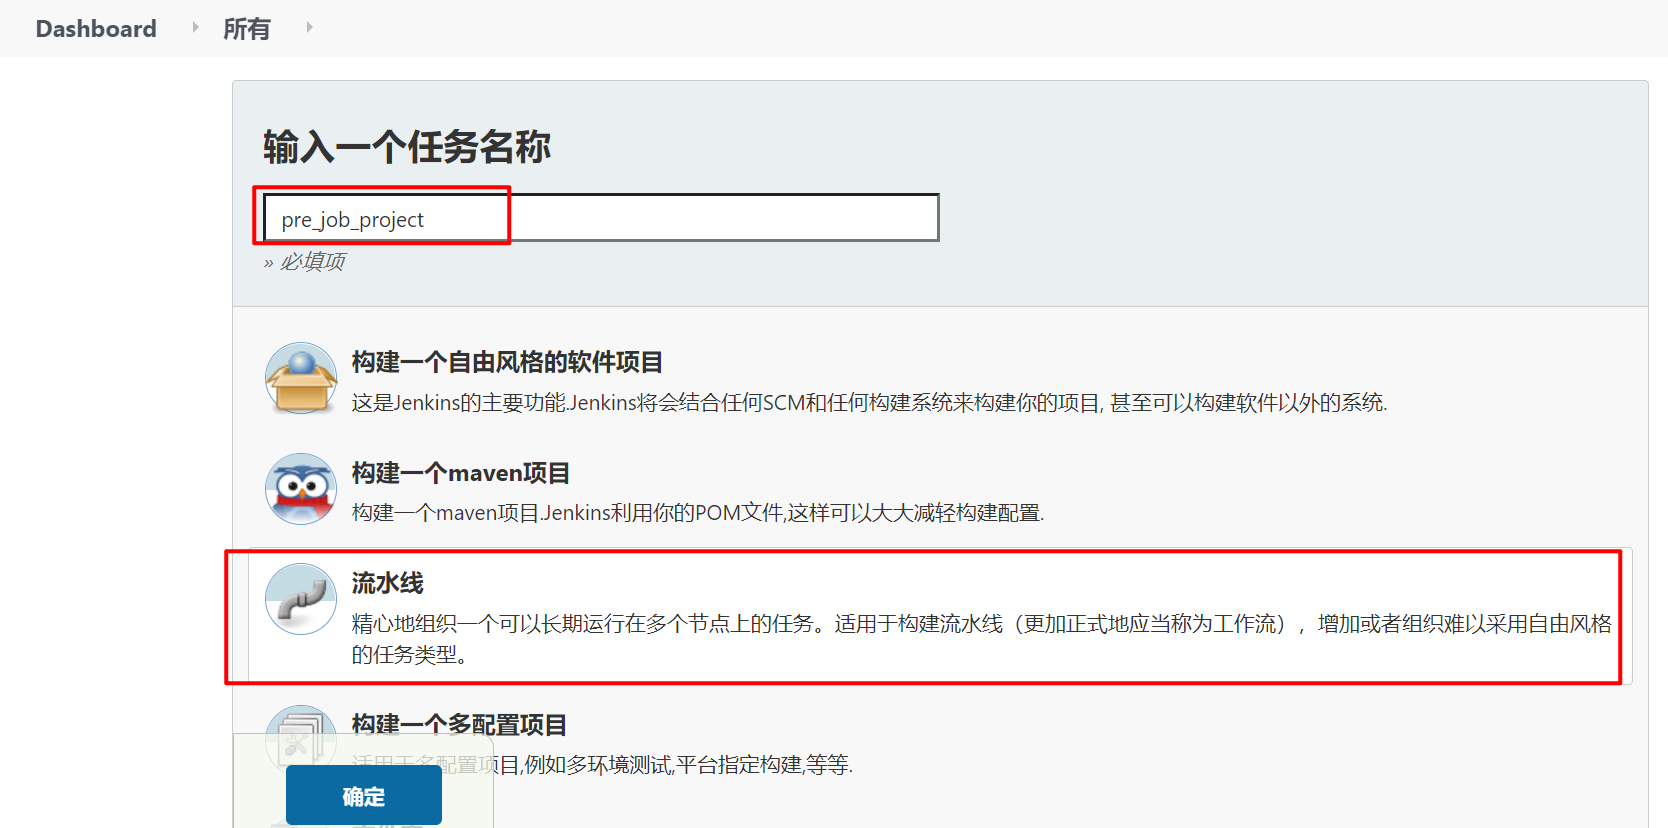
c)定时构建
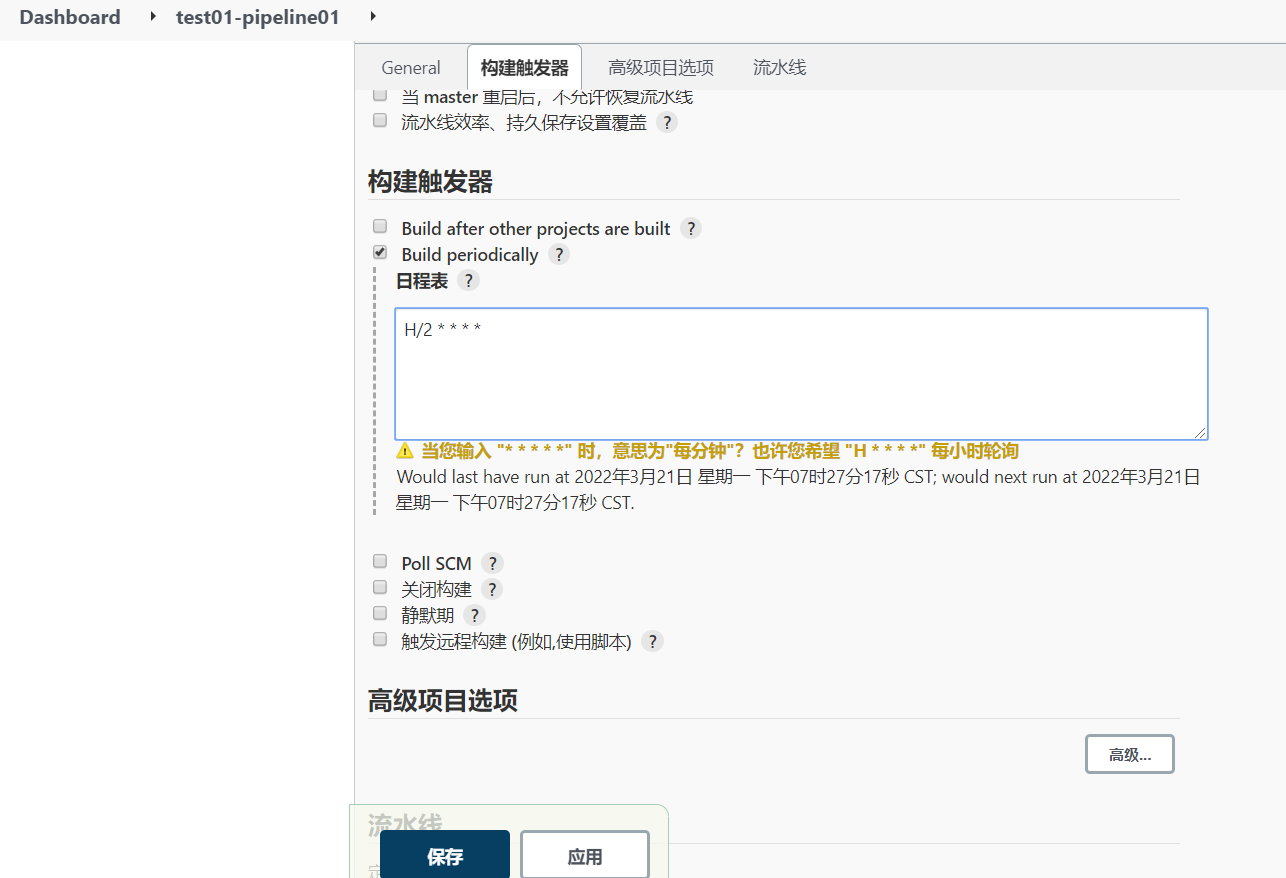
每30分钟构建一次:H代表形参 H/30 * * * * 10:02 10:32
每2个小时构建一次: H H/2 * * *
每天的8点,12点,22点,一天构建3次: (多个时间点中间用逗号隔开) 0 8,12,22 * * *
每天中午12点定时构建一次 H 12 * * *
每天下午18点定时构建一次 H 18 * * *
在每个小时的前半个小时内的每10分钟 H(0-29)/10 * * * *
每两小时一次,每个工作日上午9点到下午5点(也许是上午10:38,下午12:38,下午2:38,下午4:38)
H H(9-16)/2 * * 1-5测试:
每隔两分钟:H/2 * * * *
结果: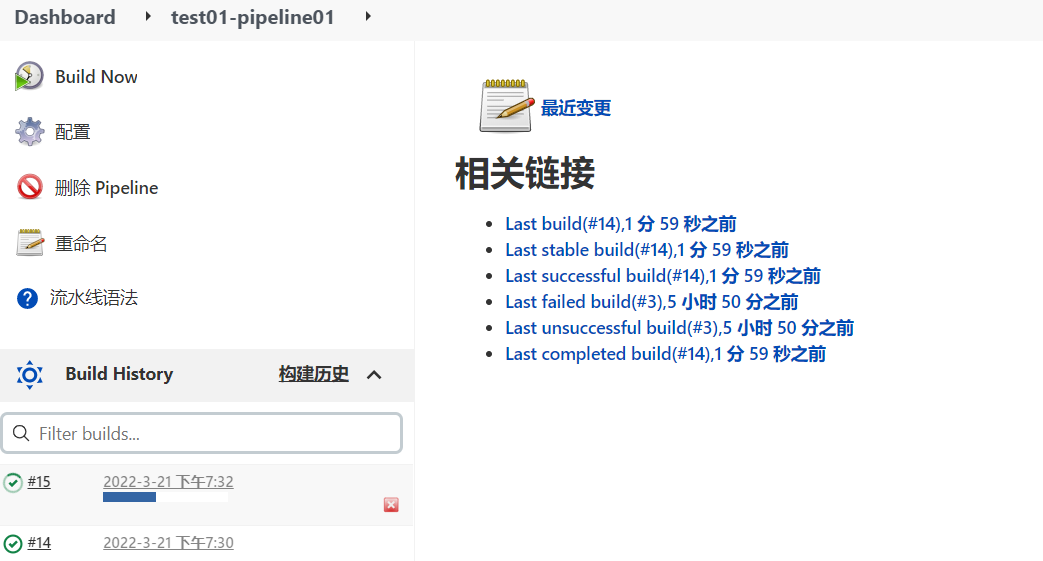
d)轮询SCM
轮询SCM,是指定时扫描本地代码仓库的代码是否有变更,如果代码有变更就触发项目构建。
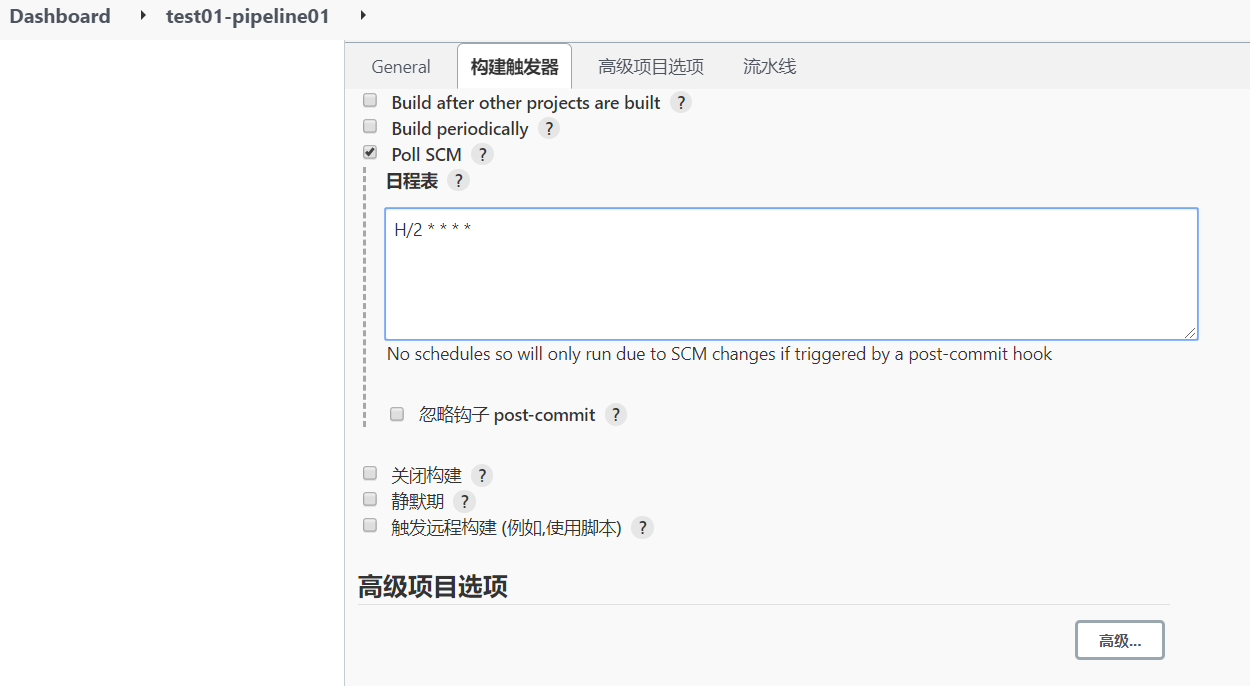
3)Git hook自动触发构建
刚才我们看到在Jenkins的内置构建触发器中,轮询SCM可以实现Gitlab代码更新,项目自动构建,但是
该方案的性能不佳。那有没有更好的方案呢? 有的。就是利用Gitlab的webhook实现代码push到仓
库,立即触发项目自动构建。
a)安装Gitlab Hook插件
需要安装两个插件:
Gitlab Hook和GitLab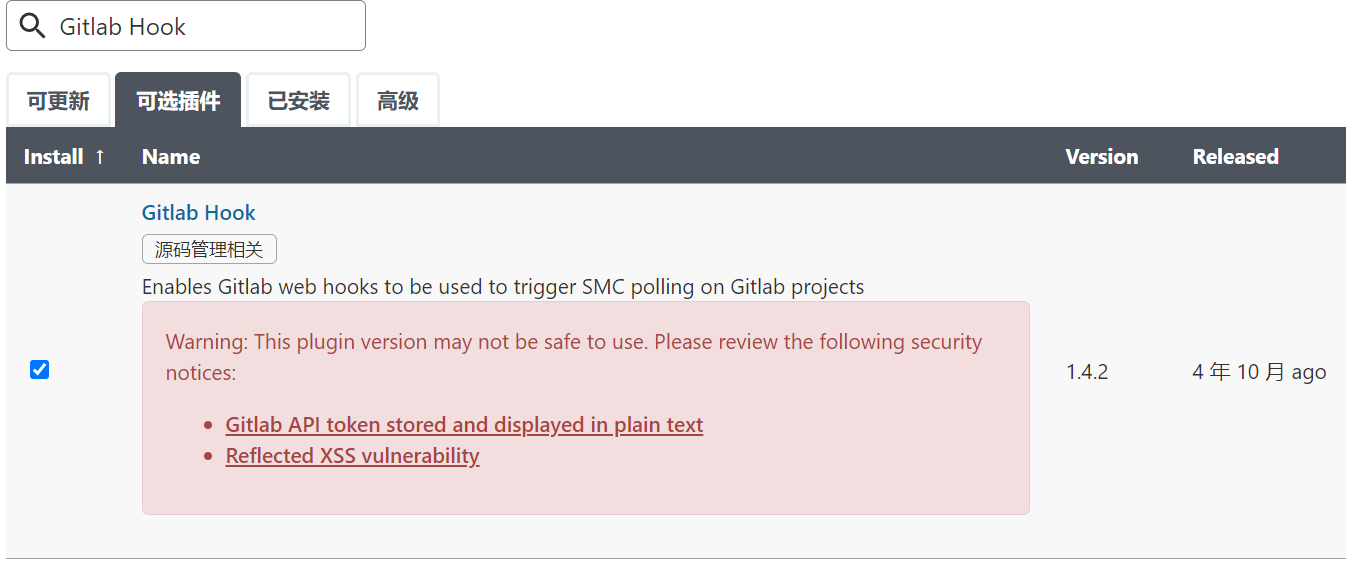
b)Jenkins设置自动构建
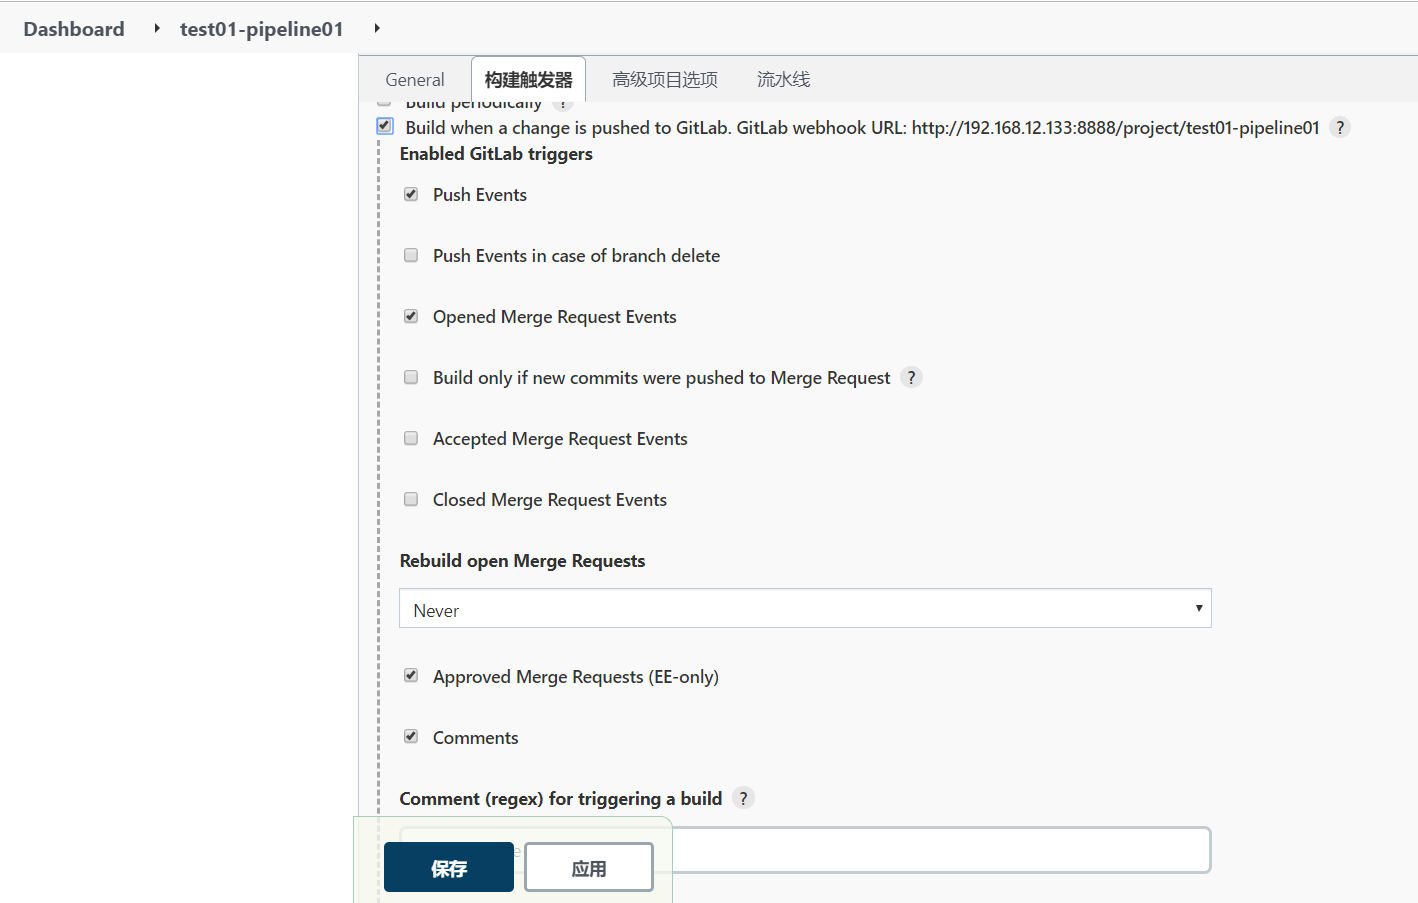
c)Gitlab配置webhook
1、配置gitlab开启钩子(使用root账号)
admin area->settings->network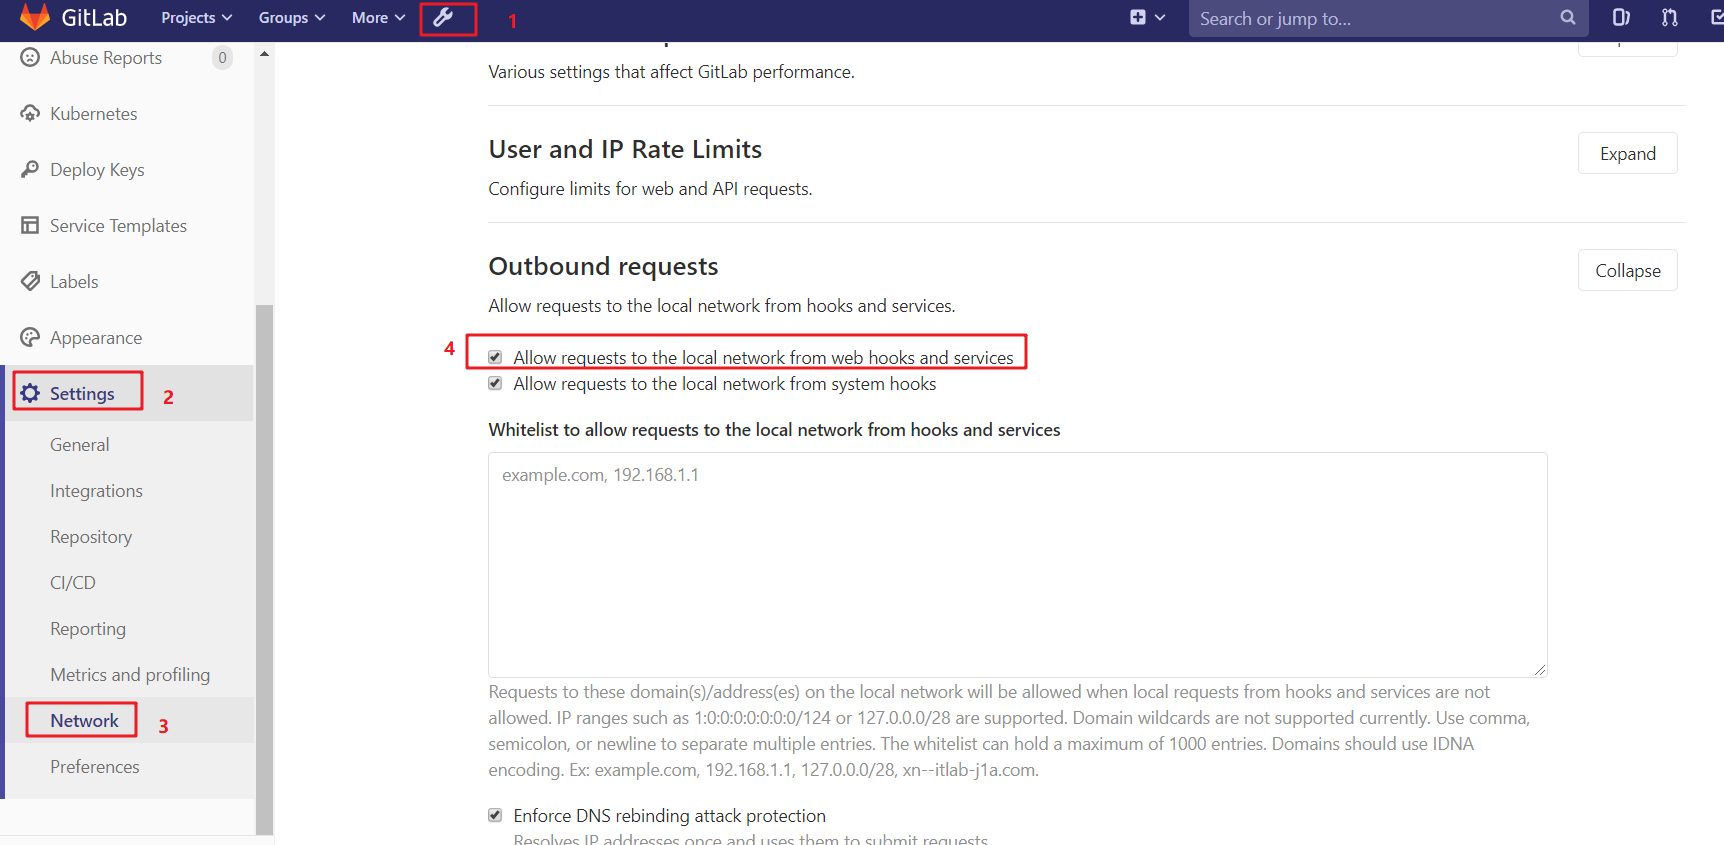
4)Jenkins的参数化构建
有时在项目构建的过程中,我们需要根据用户的输入动态传入一些参数,从而影响整个构建结果,这时
我们可以使用参数化构建。
Jenkins支持非常丰富的参数类型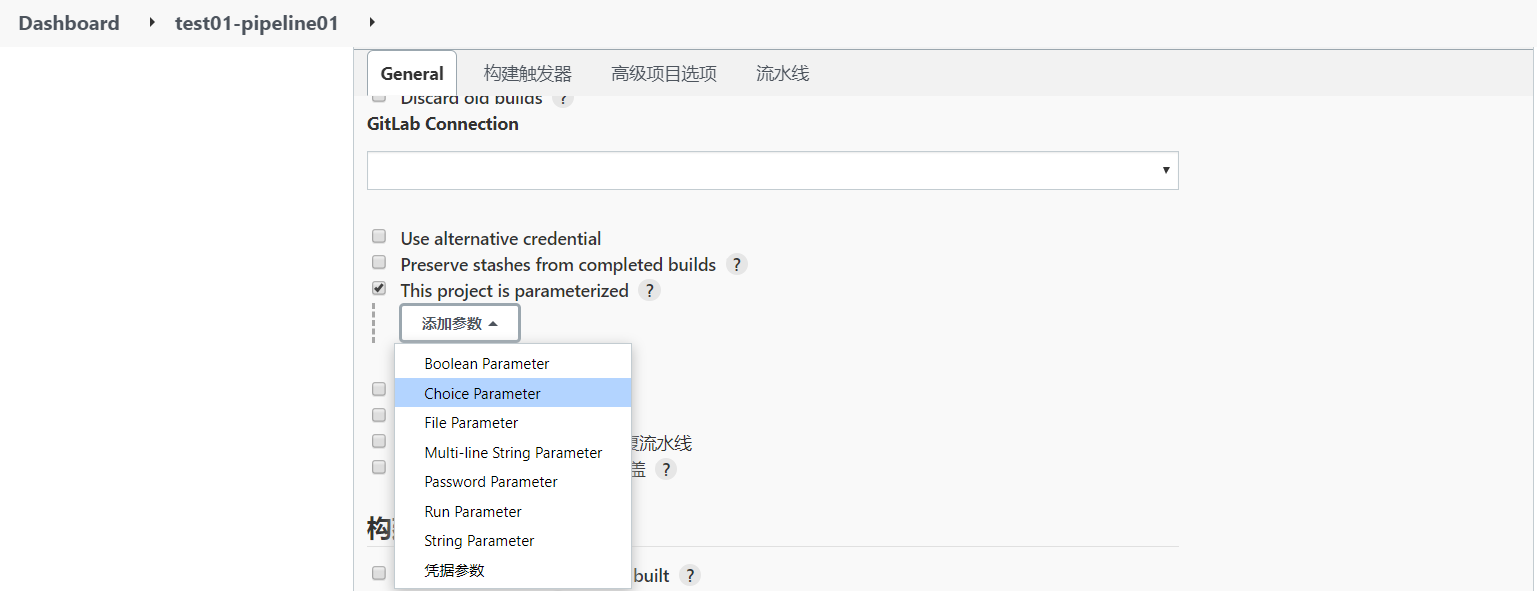
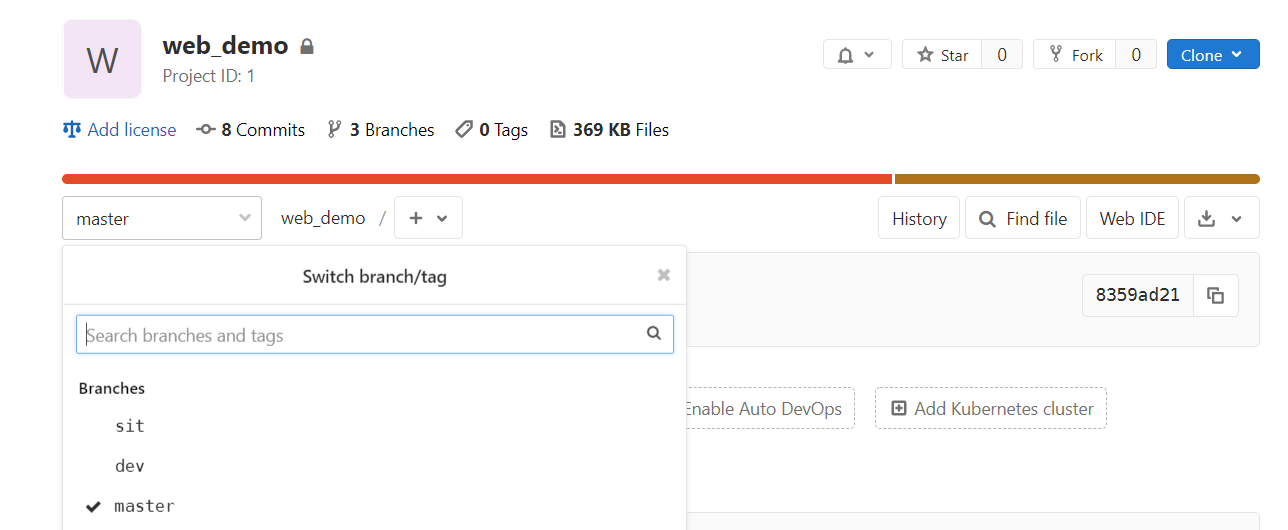
a)项目创建分支,并推送到Gitlab上
创建两个分支:dev sit
b)在Jenkins添加选项类型参数

c)改动pipeline流水线代码
修改分支名称改为引用
stage('pull code') { //步骤 steps { checkout([$class: 'GitSCM', branches: [[name: '*/${branch}']], extensions: [], userRemoteConfigs: [[credentialsId: 'git_auth_ssh', url: 'git@192.168.12.132:slfx_group/web_demo.git']]]) } }- 1
- 2
- 3
- 4
- 5
- 6
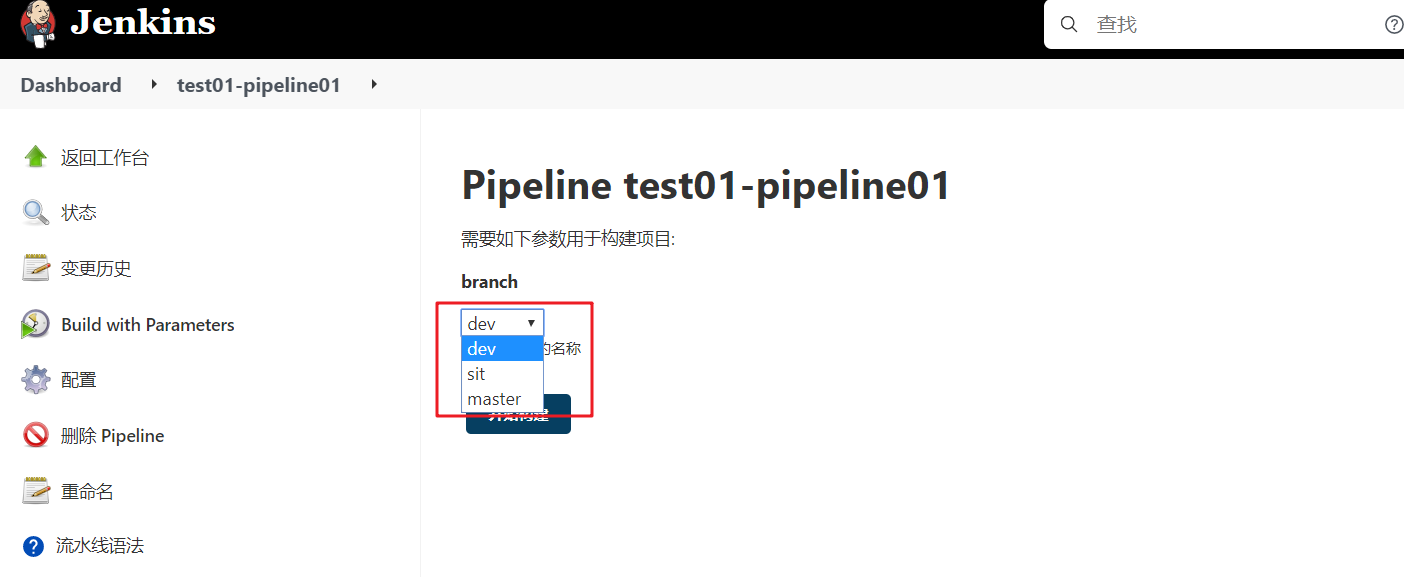
d)Build with Parameters构建
e)根据git分支来构建
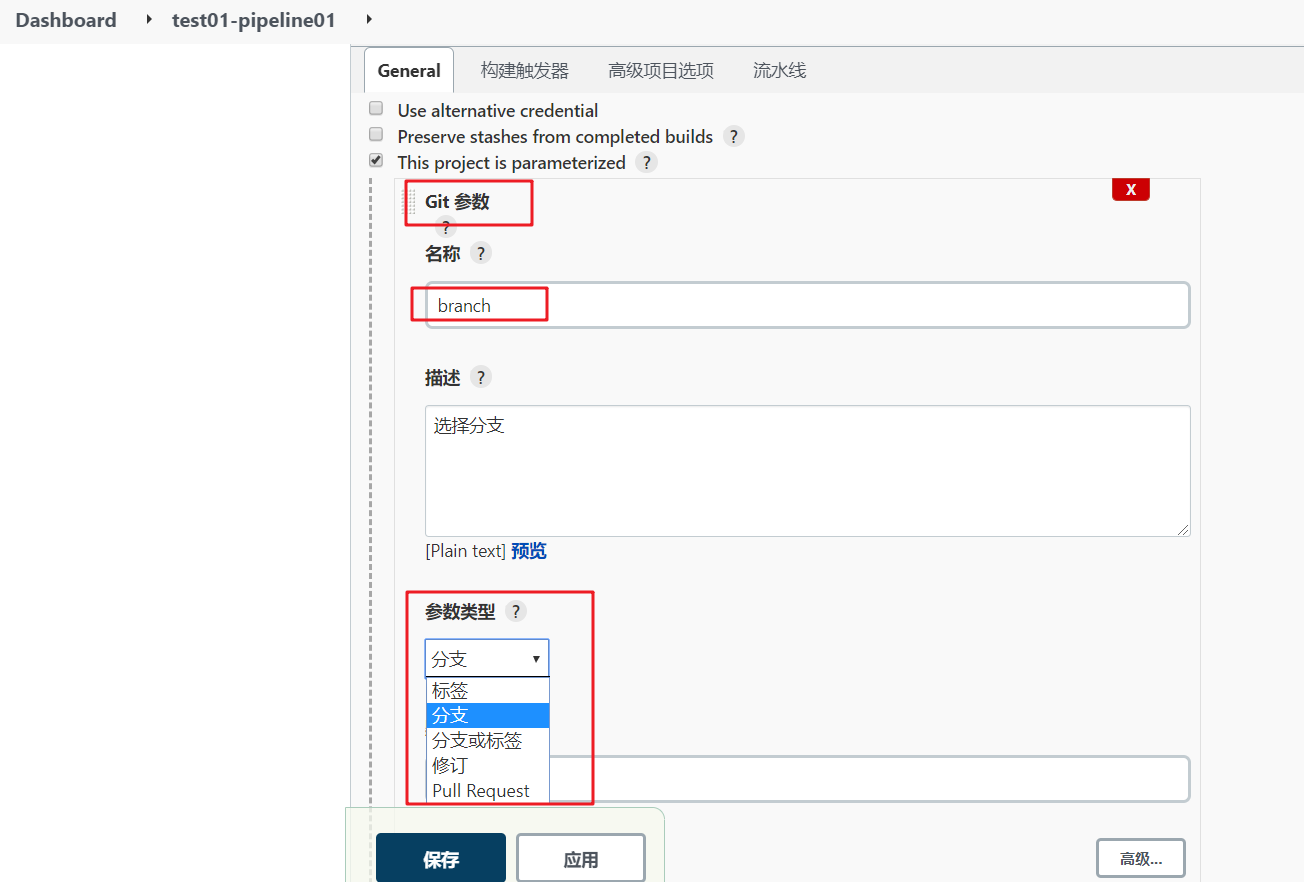
安装插件:Git Parameter
5)配置邮箱服务器发送构建结果
a)安装Email Extension Template插件

b)Jenkins设置邮箱相关参数
邮箱开启stmp

DOCTYPE html> <html> <head> <meta charset="UTF-8"> <title>${ENV, var="JOB_NAME"}-第${BUILD_NUMBER}次构建日志title> head> <body leftmargin="8" marginwidth="0" topmargin="8" marginheight="4" offset="0"> <table width="95%" cellpadding="0" cellspacing="0" style="font-size: 11pt; font-family: Tahoma, Arial, Helvetica, sans-serif"> <tr> <td>(本邮件是程序自动下发的,请勿回复!)td> tr> <tr> <td><h2> <font color="#0000FF">构建结果 - ${BUILD_STATUS}font> h2>td> tr> <tr> <td><br /> <b><font color="#0B610B">构建信息font>b> <hr size="2" width="100%" align="center" />td> tr> <tr> <td> <ul> <li>项目名称 : ${PROJECT_NAME}li> <li>构建编号 : 第${BUILD_NUMBER}次构建li> <li>触发原因: ${CAUSE}li> <li>构建日志: <a href="${BUILD_URL}console">${BUILD_URL}consolea>li> <li>构建 Url : <a href="${BUILD_URL}">${BUILD_URL}a>li> <li>工作目录 : <a href="${PROJECT_URL}ws">${PROJECT_URL}wsa>li> <li>项目 Url : <a href="${PROJECT_URL}">${PROJECT_URL}a>li> ul> td> tr> <tr> <td><b><font color="#0B610B">Changes Since Last Successful Build:font>b> <hr size="2" width="100%" align="center" />td> tr> <tr> <td> <ul> <li>历史变更记录 : <a href="${PROJECT_URL}changes">${PROJECT_URL}changesa>li> ul> ${CHANGES_SINCE_LAST_SUCCESS,reverse=true, format="Changes for Build #%n:<br />%c<br />",showPaths=true,changesFormat="<pre>[%a]<br />%mpre>",pathFormat=" %p"} td> tr> <tr> <td><b>Failed Test Resultsb> <hr size="2" width="100%" align="center" />td> tr> <tr> <td><pre style="font-size: 11pt; font-family: Tahoma, Arial, Helvetica, sans-serif">$FAILED_TESTSpre> <br />td> tr> <tr> <td><b><font color="#0B610B">构建日志 (最后 100行):font>b> <hr size="2" width="100%" align="center" />td> tr> <tr> <td><textarea cols="80" rows="30" readonly="readonly" style="font-family: Courier New">${BUILD_LOG, maxLines=100}textarea> td> tr> table> body> html>- 1
- 2
- 3
- 4
- 5
- 6
- 7
- 8
- 9
- 10
- 11
- 12
- 13
- 14
- 15
- 16
- 17
- 18
- 19
- 20
- 21
- 22
- 23
- 24
- 25
- 26
- 27
- 28
- 29
- 30
- 31
- 32
- 33
- 34
- 35
- 36
- 37
- 38
- 39
- 40
- 41
- 42
- 43
- 44
- 45
- 46
- 47
- 48
- 49
- 50
- 51
- 52
- 53
- 54
- 55
- 56
- 57
- 58
- 59
- 60
- 61
- 62
- 63
- 64
- 65
- 66
- 67
- 68
- 69
- 70
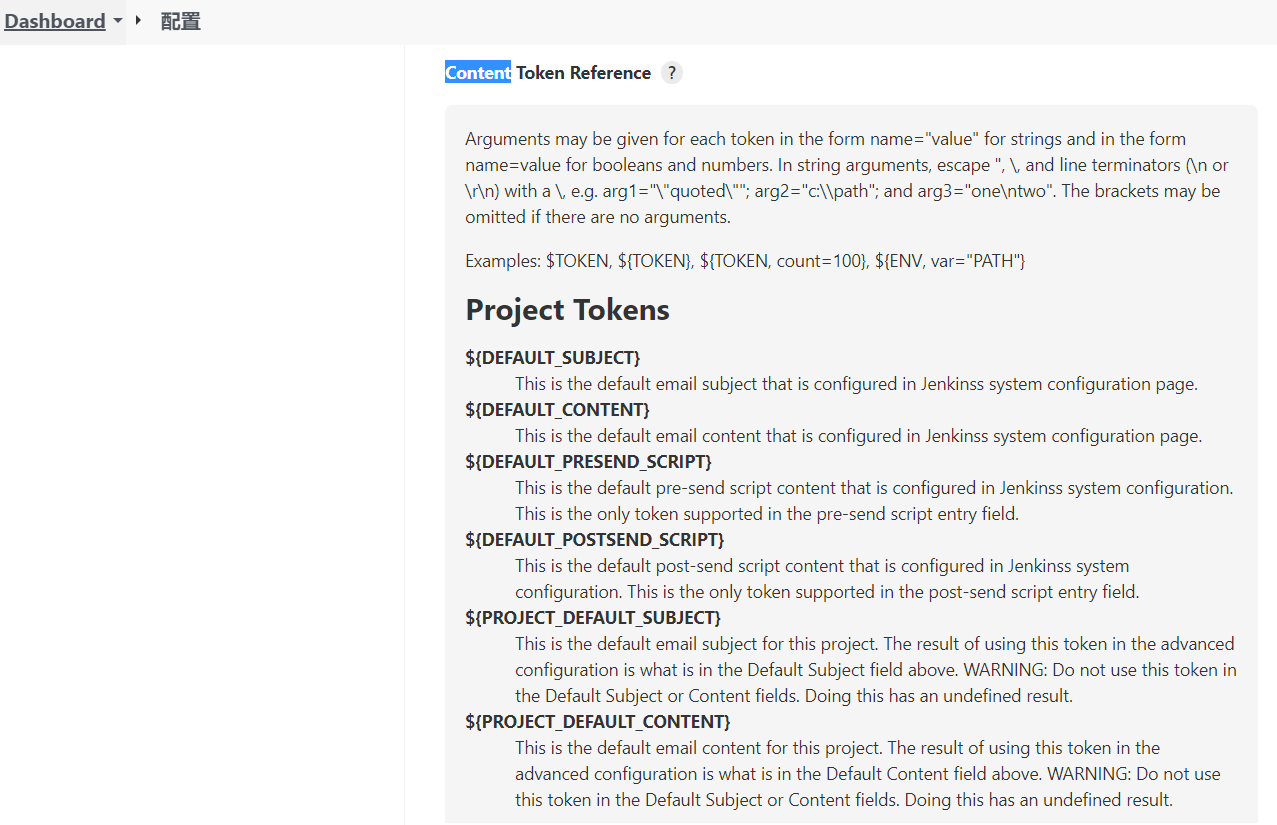
查看jenkins默认的参数:Configure system
pipeline { agent any //阶段 stages { stage('pull code') { //步骤 steps { checkout([$class: 'GitSCM', branches: [[name: "*/${branch}"]], extensions: [], userRemoteConfigs: [[credentialsId: 'git_auth_ssh', url: 'git@192.168.12.132:slfx_group/web_demo.git']]]) } } stage('build project') { steps { sh 'mvn clean package' } } stage('publish project') { steps { deploy adapters: [tomcat8(credentialsId: 'tomcat_auth', path: '', url: 'http://192.168.12.131:8080')], contextPath: null, war: 'target/*.war' } } } post { always { emailext( subject: '构建通知:${PROJECT_NAME} - Build # ${BUILD_NUMBER} - ${BUILD_STATUS}!', body: '${FILE,path="email.html"}', to: '810305803@qq.com' ) } } }- 1
- 2
- 3
- 4
- 5
- 6
- 7
- 8
- 9
- 10
- 11
- 12
- 13
- 14
- 15
- 16
- 17
- 18
- 19
- 20
- 21
- 22
- 23
- 24
- 25
- 26
- 27
- 28
- 29
- 30
- 31
e)测试
-
相关阅读:
新鲜出炉!最新CKA备考指南!!
AtCoder ABC 319E 中国剩余定理
Shell 正则表达式
C语言-指针的进阶
大专毕业,24岁了,转行软件测试还行吗?
vue2.x 迭代更新项目去掉缓存处理
操作符——C语言初阶
Redis使用原生命令搭建集群
Kotlin协程:Flow的融合、Channel容量、溢出策略
【考研复习】《操作系统原理》孟庆昌等编著课后习题+答案——第五章
- 原文地址:https://blog.csdn.net/zengqingfa123/article/details/127436470