-
games101——作业5
总览
在这部分的课程中,我们将专注于使用光线追踪来渲染图像。在光线追踪中
最重要的操作之一就是找到光线与物体的交点。一旦找到光线与物体的交点,就可以执行着色并返回像素颜色。在这次作业中,我们需要实现两个部分:光线的生成和光线与三角的相交。本次代码框架的工作流程为:- 从
main函数开始。我们定义场景的参数,添加物体(球体或三角形)到场景中,并设置其材质,然后将光源添加到场景中。 - 调用
Render(scene)函数。在遍历所有像素的循环里,生成对应的光线并将返回的颜色保存在帧缓冲区(framebuffer)中。在渲染过程结束后,帧缓冲区中的信息将被保存为图像。 - 在生成像素对应的光线后,我们调用
CastRay函数,该函数调用trace来查询光线与场景中最近的对象的交点。 - 然后,我们在此交点执行着色。我们设置了三种不同的着色情况,并且已经为你提供了代码。
你需要修改的函数是:
• Renderer.cpp 中的 Render():这里你需要为每个像素生成一条对应的光线,然后调用函数castRay()来得到颜色,最后将颜色存储在帧缓冲区的相应像素中。
• Triangle.hpp 中的 rayTriangleIntersect():v0,v1,v2是三角形的三个顶点,orig是光线的起点,dir是光线单位化的方向向量。tnear,u,v是你需要使用我们课上推导的 Moller-Trumbore 算法来更新的参数。
开始编写
在本次作业中,你将使用一个新的代码框架。和之前作业相似的是,你可以
选择在自己电脑的系统或者虚拟机上完成作业。请下载项目的框架代码,并使用以下命令像以前一样构建项目:$ mkdir build $ cd build $ cmake .. $ make- 1
- 2
- 3
- 4
之后,你就可以使用./Raytracing 来运行代码。现在我们对代码框架中的一
些类做一下概括性的介绍:
• global.hpp:包含了整个框架中会使用的基本函数和变量。
• Vector.hpp: 由于我们不再使用 Eigen 库,因此我们在此处提供了常见的向量操作,例如:dotProduct,crossProduct,normalize。
• Object.hpp: 渲染物体的父类。Triangle和Sphere类都是从该类继承的。
• Scene.hpp: 定义要渲染的场景。包括设置参数,物体以及灯光。
• Renderer.hpp: 渲染器类,它实现了所有光线追踪的操作。
代码框架详解
main.cpp
从 main.cpp 入手,首先将场景的屏幕的尺寸为 1280 × 960 1280\times960 1280×960
Scene scene(1280, 960);- 1
然后在场景中的加入了两个球体
sph1与sph2,创建时指定其球心坐标以及半径,sph1的反射类型为漫反射,sph2的反射类型为反射+折射,ior为其材质折射率auto sph1 = std::make_unique<Sphere>(Vector3f(-1, 0, -12), 2); sph1->materialType = DIFFUSE_AND_GLOSSY; sph1->diffuseColor = Vector3f(0.6, 0.7, 0.8); auto sph2 = std::make_unique<Sphere>(Vector3f(0.5, -0.5, -8), 1.5); sph2->ior = 1.5; sph2->materialType = REFLECTION_AND_REFRACTION; scene.Add(std::move(sph1)); scene.Add(std::move(sph2));- 1
- 2
- 3
- 4
- 5
- 6
- 7
- 8
- 9
- 10
之后又在场景中加入了两个三角形,或者说是一个由两个三角形组成的矩形,设定其顶点坐标,st坐标,以及反射类型为漫反射
Vector3f verts[4] = {{-5,-3,-6}, {5,-3,-6}, {5,-3,-16}, {-5,-3,-16}}; uint32_t vertIndex[6] = {0, 1, 3, 1, 2, 3}; Vector2f st[4] = {{0, 0}, {1, 0}, {1, 1}, {0, 1}}; auto mesh = std::make_unique<MeshTriangle>(verts, vertIndex, 2, st); mesh->materialType = DIFFUSE_AND_GLOSSY; scene.Add(std::move(mesh));- 1
- 2
- 3
- 4
- 5
- 6
- 7
然后再在场景中加入两个点光源,初始化其点光源的坐标与光线强度
scene.Add(std::make_unique<Light>(Vector3f(-20, 70, 20), 0.5)); scene.Add(std::make_unique<Light>(Vector3f(30, 50, -12), 0.5));- 1
- 2
最后渲染场景
Renderer r; r.Render(scene);- 1
- 2
Render
在
Render方法中,首先定义了尺度scale与宽高比imageAspectRatio,以及相机位置在 ( 0 , 0 , 0 ) (0,0,0) (0,0,0)。std::vector<Vector3f> framebuffer(scene.width * scene.height); float scale = std::tan(deg2rad(scene.fov * 0.5f)); float imageAspectRatio = scene.width / (float)scene.height; // Use this variable as the eye position to start your rays. Vector3f eye_pos(0); int m = 0;- 1
- 2
- 3
- 4
- 5
- 6
- 7
- 8
然后对于每一个像素,从相机向像素射出一条射线,这里屏幕要从光栅空间转换到世界空间中,具体说明放在作业代码部分。
对于射出的光线获得的颜色,使用
castRay获取,获取到的颜色信息保存到framebuffer中,最后写入binary.ppm文件中// save framebuffer to file FILE* fp = fopen("binary.ppm", "wb"); (void)fprintf(fp, "P6\n%d %d\n255\n", scene.width, scene.height); for (auto i = 0; i < scene.height * scene.width; ++i) { static unsigned char color[3]; color[0] = (char)(255 * clamp(0, 1, framebuffer[i].x)); color[1] = (char)(255 * clamp(0, 1, framebuffer[i].y)); color[2] = (char)(255 * clamp(0, 1, framebuffer[i].z)); fwrite(color, 1, 3, fp); } fclose(fp);- 1
- 2
- 3
- 4
- 5
- 6
- 7
- 8
- 9
- 10
- 11
下面具体看
castRay里的代码castRay
一开始对
depth进行比较,这里应该是对光线折射次数的定义(因为Whitted风格的光线追踪考虑光线是不断反射的),在这里场景中的光线折射次数限定为 5 次。然后给颜色初始化为背景颜色if (depth > scene.maxDepth) { return Vector3f(0.0,0.0,0.0); } Vector3f hitColor = scene.backgroundColor;- 1
- 2
- 3
- 4
然后使用
trace判断光线是否与场景中的物体有交点,有交点执行之后的代码,没有交点直接返回背景颜色if (auto payload = trace(orig, dir, scene.get_objects()); payload)- 1

在trace获得的payload->tNear按照光线方程,可以计算出对应的交点坐标hitPoint。Vector3f hitPoint = orig + dir * payload->tNear;- 1
然后使用
getSurfaceProperties计算交点所在平面的法向量,以及交点的st坐标(只有三角形有)。Vector3f N; // normal Vector2f st; // st coordinates payload->hit_obj->getSurfaceProperties(hitPoint, dir, payload->index, payload->uv, N, st);- 1
- 2
- 3
对于球体求法向量,就是球中心连向交点就是法向量方向
void getSurfaceProperties(const Vector3f& P, const Vector3f&, const uint32_t&, const Vector2f&, Vector3f& N, Vector2f&) const override { N = normalize(P - center); }- 1
- 2
- 3
- 4
- 5
对于三角形求法向量,就是两个边法向量的叉积
void getSurfaceProperties(const Vector3f&, const Vector3f&, const uint32_t& index, const Vector2f& uv, Vector3f& N, Vector2f& st) const override { const Vector3f& v0 = vertices[vertexIndex[index * 3]]; const Vector3f& v1 = vertices[vertexIndex[index * 3 + 1]]; const Vector3f& v2 = vertices[vertexIndex[index * 3 + 2]]; Vector3f e0 = normalize(v1 - v0); Vector3f e1 = normalize(v2 - v1); N = normalize(crossProduct(e0, e1)); const Vector2f& st0 = stCoordinates[vertexIndex[index * 3]]; const Vector2f& st1 = stCoordinates[vertexIndex[index * 3 + 1]]; const Vector2f& st2 = stCoordinates[vertexIndex[index * 3 + 2]]; st = st0 * (1 - uv.x - uv.y) + st1 * uv.x + st2 * uv.y; }- 1
- 2
- 3
- 4
- 5
- 6
- 7
- 8
- 9
- 10
- 11
- 12
- 13
- 14
然后就是根据触碰到的物体的材质,执行不同的算法获得对应颜色
switch (payload->hit_obj->materialType)- 1
REFLECTION_AND_REFRACTION
字面意思,既有反射也有折射,首先使用
reflect函数计算反射方向,reflect函数如下

// Compute reflection direction Vector3f reflect(const Vector3f &I, const Vector3f &N) { return I - 2 * dotProduct(I, N) * N; }- 1
- 2
- 3
- 4
- 5
然后使用
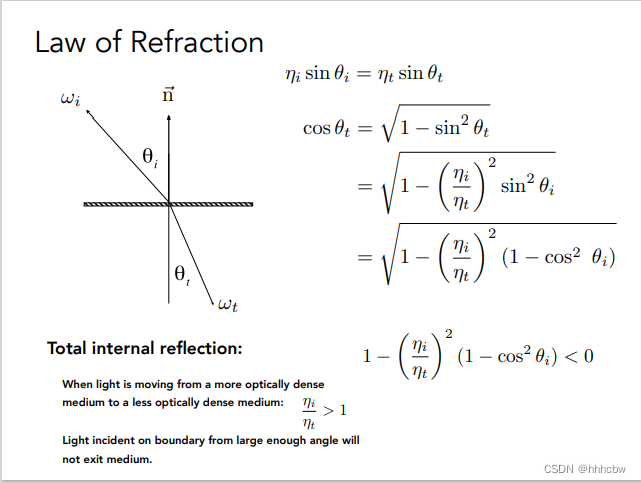
refract函数计算折射方向,refract函数如下Vector3f refract(const Vector3f &I, const Vector3f &N, const float &ior) { float cosi = clamp(-1, 1, dotProduct(I, N)); float etai = 1, etat = ior; Vector3f n = N; if (cosi < 0) { cosi = -cosi; } else { std::swap(etai, etat); n= -N; } float eta = etai / etat; float k = 1 - eta * eta * (1 - cosi * cosi); return k < 0 ? 0 : eta * I + (eta * cosi - sqrtf(k)) * n; }- 1
- 2
- 3
- 4
- 5
- 6
- 7
- 8
- 9
- 10
折射方向推导如下

然后计算反射光线与折射光线的起始点,这里为什么要 ± N ∗ e p s i l o n \pm N*epsilon ±N∗epsilon,是因为之后可能会继续判断射线是否与物体有接触,所以要加上或减取一个很小的值,防止有接触到当前点。Vector3f reflectionRayOrig = (dotProduct(reflectionDirection, N) < 0) ? hitPoint - N * scene.epsilon : hitPoint + N * scene.epsilon; Vector3f refractionRayOrig = (dotProduct(refractionDirection, N) < 0) ? hitPoint - N * scene.epsilon : hitPoint + N * scene.epsilon;- 1
- 2
- 3
- 4
- 5
- 6
然后因为在 Whitted风格的光线追踪模型中
REFLECTION_AND_REFRACTION的光完全由反射和折射光决定,所以之后再用castRay计算出反射颜色reflectionColor与折射颜色refractionColor。Vector3f reflectionColor = castRay(reflectionRayOrig, reflectionDirection, scene, depth + 1); Vector3f refractionColor = castRay(refractionRayOrig, refractionDirection, scene, depth + 1);- 1
- 2
那么涉及到反射与折射,使用菲涅尔项计算出对应的反射比例
kr,然后加权出对应的颜色hitColorfloat kr = fresnel(dir, N, payload->hit_obj->ior); hitColor = reflectionColor * kr + refractionColor * (1 - kr); break;- 1
- 2
- 3
fresnel的对应公式与代码如下
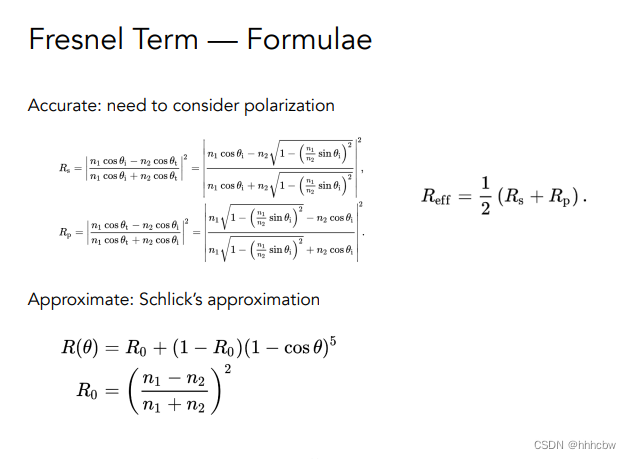
float fresnel(const Vector3f &I, const Vector3f &N, const float &ior) { float cosi = clamp(-1, 1, dotProduct(I, N)); float etai = 1, etat = ior; if (cosi > 0) { std::swap(etai, etat); } // Compute sini using Snell's law float sint = etai / etat * sqrtf(std::max(0.f, 1 - cosi * cosi)); // Total internal reflection if (sint >= 1) { return 1; } else { float cost = sqrtf(std::max(0.f, 1 - sint * sint)); cosi = fabsf(cosi); float Rs = ((etat * cosi) - (etai * cost)) / ((etat * cosi) + (etai * cost)); float Rp = ((etai * cosi) - (etat * cost)) / ((etai * cosi) + (etat * cost)); return (Rs * Rs + Rp * Rp) / 2; } // As a consequence of the conservation of energy, transmittance is given by: // kt = 1 - kr; }- 1
- 2
- 3
- 4
- 5
- 6
- 7
- 8
- 9
- 10
- 11
- 12
- 13
- 14
- 15
- 16
- 17
- 18
- 19
- 20
- 21
REFLECTION
这个与上面
REFLECTION_AND_REFRACTION类似,就是没有折射项。case REFLECTION: { float kr = fresnel(dir, N, payload->hit_obj->ior); Vector3f reflectionDirection = reflect(dir, N); Vector3f reflectionRayOrig = (dotProduct(reflectionDirection, N) < 0) ? hitPoint + N * scene.epsilon : hitPoint - N * scene.epsilon; hitColor = castRay(reflectionRayOrig, reflectionDirection, scene, depth + 1) * kr; break; }- 1
- 2
- 3
- 4
- 5
- 6
- 7
- 8
- 9
- 10
default(DIFFUSE_AND_GLOSSY)
默认项就是漫反射类型的材质,其使用 Phong 模型计算对应的漫反射项与镜面反射项。其公式如下,这里不使用 L a L_a La 项:

首先判断当前点与光线的连线是否与物体接触(即是否被遮挡住),如果被遮挡住,其 漫反射项
lightAmt就是 0Vector3f lightDir = light->position - hitPoint; // square of the distance between hitPoint and the light float lightDistance2 = dotProduct(lightDir, lightDir); lightDir = normalize(lightDir); float LdotN = std::max(0.f, dotProduct(lightDir, N)); // is the point in shadow, and is the nearest occluding object closer to the object than the light itself? auto shadow_res = trace(shadowPointOrig, lightDir, scene.get_objects()); bool inShadow = shadow_res && (shadow_res->tNear * shadow_res->tNear < lightDistance2); lightAmt += inShadow ? 0 : light->intensity * LdotN;- 1
- 2
- 3
- 4
- 5
- 6
- 7
- 8
- 9
- 10
然后计算出镜面反射项
Vector3f reflectionDirection = reflect(-lightDir, N); specularColor += powf(std::max(0.f, -dotProduct(reflectionDirection, dir)), payload->hit_obj->specularExponent) * light->intensity;- 1
- 2
- 3
- 4
当前点的
hitColor就是漫反射项*Kd+镜面反射项*Ks,这里使用evalDiffuseColor(st)渲染出地板的效果,具体什么原理还未搞懂,欢迎大佬指教hitColor = lightAmt * payload->hit_obj->evalDiffuseColor(st) * payload->hit_obj->Kd + specularColor * payload->hit_obj->Ks; break;- 1
- 2
trace
trace就是判断当前射线是否与空间中的物体有交点,如果有交点,返回最近的交点。std::optional<hit_payload> trace( const Vector3f &orig, const Vector3f &dir, const std::vector<std::unique_ptr<Object> > &objects) { float tNear = kInfinity; std::optional<hit_payload> payload; for (const auto & object : objects) { float tNearK = kInfinity; uint32_t indexK; Vector2f uvK; if (object->intersect(orig, dir, tNearK, indexK, uvK) && tNearK < tNear) { payload.emplace(); payload->hit_obj = object.get(); payload->tNear = tNearK; payload->index = indexK; payload->uv = uvK; tNear = tNearK; } } return payload; }- 1
- 2
- 3
- 4
- 5
- 6
- 7
- 8
- 9
- 10
- 11
- 12
- 13
- 14
- 15
- 16
- 17
- 18
- 19
- 20
- 21
- 22
- 23
- 24
当然每个物体判断方式各不相同,这里放在作业代码部分进一步说明
作业代码
屏幕映射回世界坐标
世界坐标轴屏幕中心位于 ( 0 , 0 , − 1 ) (0,0,-1) (0,0,−1)


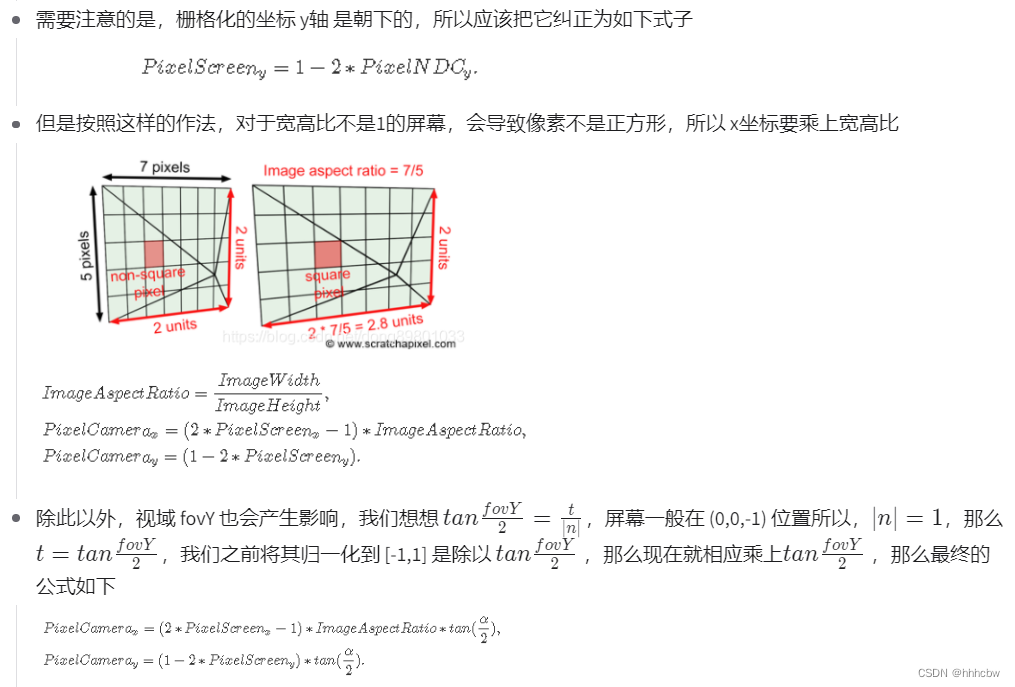
因此这里对应获得x和y的代码为float x = (2.0f*(float(i)+0.5f)/scene.width-1.0f)*scale*imageAspectRatio; float y = (1.0f-2.0f*(float(j)+0.5f)/scene.height)*scale;- 1
- 2
判断光线与物体的交点
球体
光线与球体交点的过程与公式如下(就是光线方程代入球体方程得出)
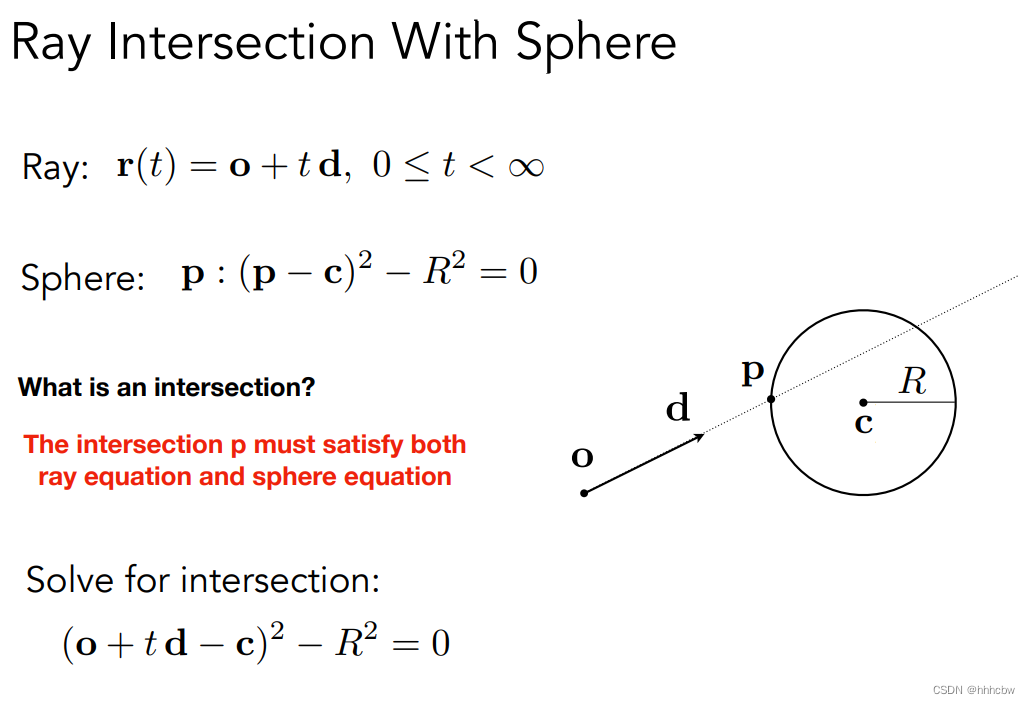
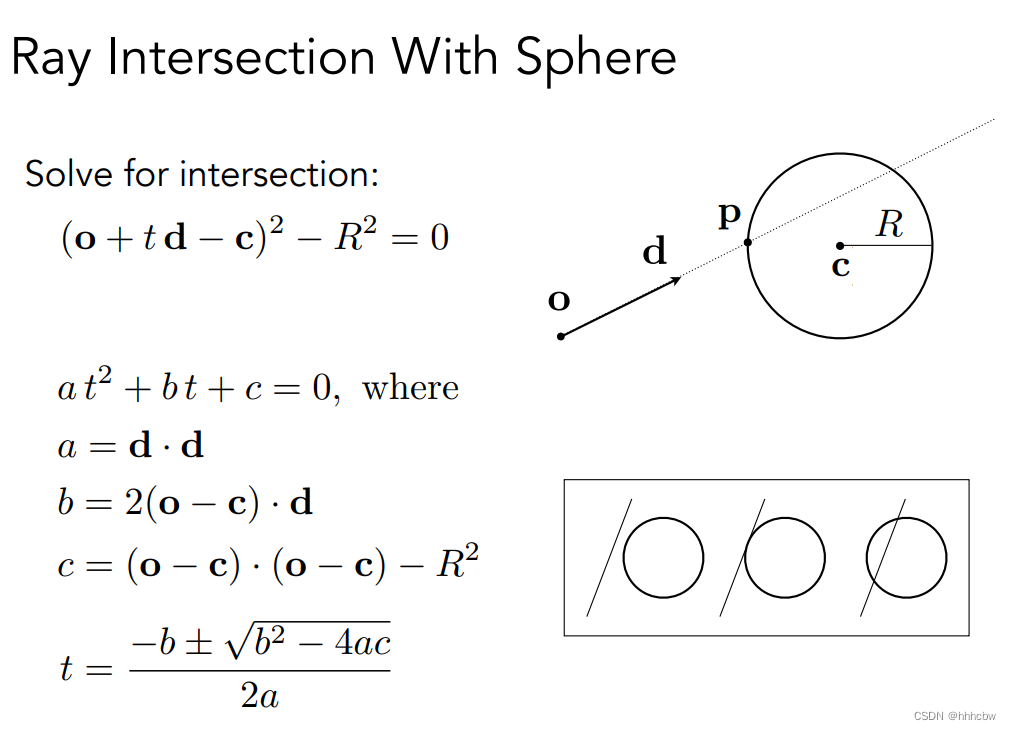

其代码如下bool intersect(const Vector3f& orig, const Vector3f& dir, float& tnear, uint32_t&, Vector2f&) const override { // analytic solution Vector3f L = orig - center; float a = dotProduct(dir, dir); float b = 2 * dotProduct(dir, L); float c = dotProduct(L, L) - radius2; float t0, t1; if (!solveQuadratic(a, b, c, t0, t1)) return false; if (t0 < 0) t0 = t1; if (t0 < 0) return false; tnear = t0; return true; }- 1
- 2
- 3
- 4
- 5
- 6
- 7
- 8
- 9
- 10
- 11
- 12
- 13
- 14
- 15
- 16
- 17
- 18
- 19
三角形
判断光线与三角形是否有交点,一般先判断光线与三角形所在平面是否有交点,在判断交点是否在三角形内部。这里使用的 Möller Trumbore Algorithm可以更快判断光线与三角形交点,其公式如下,具体推导可以看这篇文章
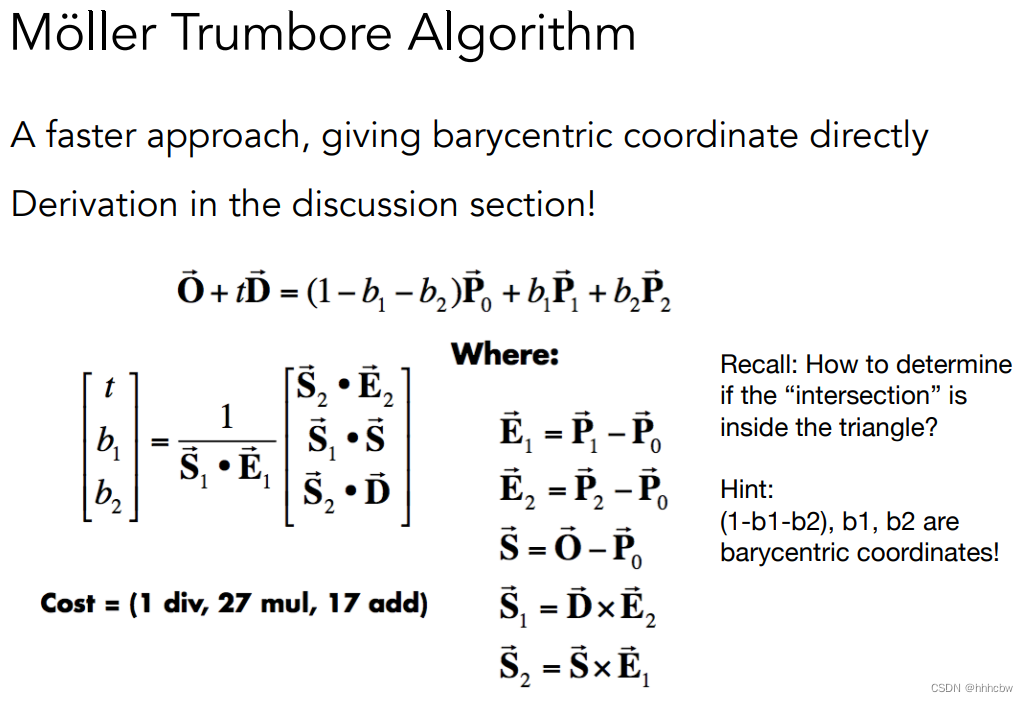
其代码如下,注意最后判断是否在三角形内的条件(前提不能在射线后面,即tnear>0)bool rayTriangleIntersect(const Vector3f& v0, const Vector3f& v1, const Vector3f& v2, const Vector3f& orig, const Vector3f& dir, float& tnear, float& u, float& v) { // TODO: Implement this function that tests whether the triangle // that's specified bt v0, v1 and v2 intersects with the ray (whose // origin is *orig* and direction is *dir*) // Also don't forget to update tnear, u and v. Vector3f E1 = v1 - v0; Vector3f E2 = v2 - v0; Vector3f S = orig - v0; Vector3f S1 = crossProduct(dir, E2); Vector3f S2 = crossProduct(S, E1); float n = 1.0f/dotProduct(S1, E1); Vector3f res(dotProduct(S2,E2),dotProduct(S1,S),dotProduct(S2,dir)); res = n*res; tnear = res.x; u = res.y; v = res.z; if(tnear > 0.f && 1-u-v>=0.f && u>=0.f && v>=0.f) return true; else return false; }- 1
- 2
- 3
- 4
- 5
- 6
- 7
- 8
- 9
- 10
- 11
- 12
- 13
- 14
- 15
- 16
- 17
- 18
- 19
- 20
- 21
- 22
- 23
最终的运行结果如下
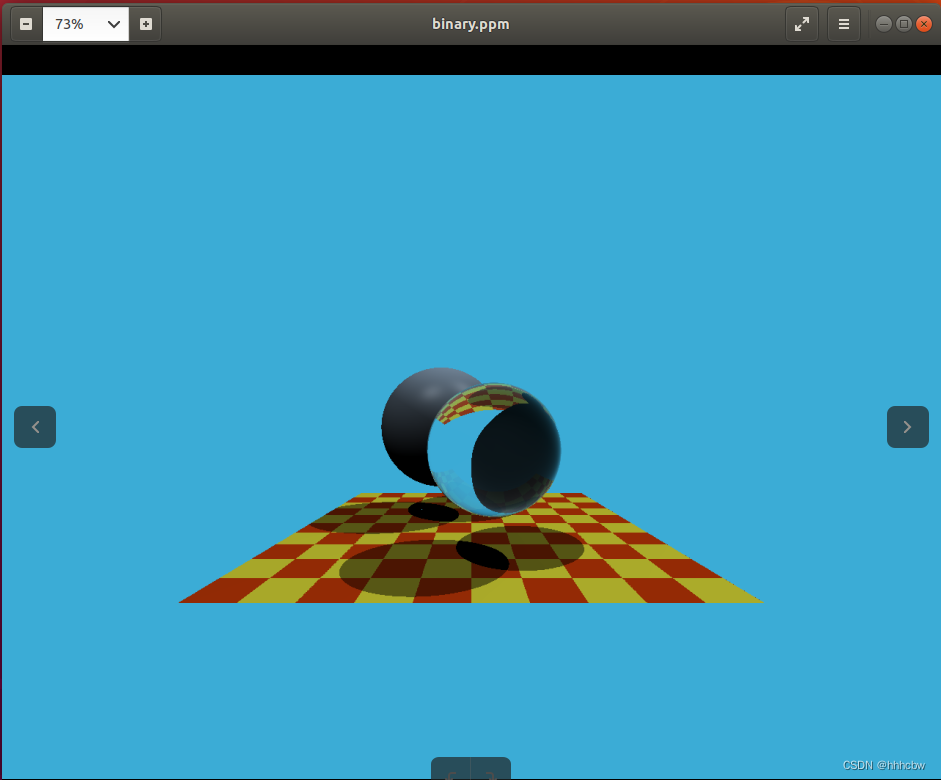
- 从
-
相关阅读:
JVM与垃圾回收
Python基本数据类型介绍
SAS|数组Array
51单片机学习:LCD1602液晶显示实验
Unity自用工具.Photon大厅
零基础Linux_20(进程信号)内核态和用户态+处理信号+不可重入函数+volatile
Node.js详解
Rancher 2.x集群销毁及卸载清理
电脑软件:UPDF - 高效率高颜值的PDF编辑器
在IDEA中使用.env文件配置信息
- 原文地址:https://blog.csdn.net/weixin_44491423/article/details/127424179
