-
RabbitMQ--基础--7.1--工作模式--简单模式
RabbitMQ–基础–7.1–工作模式–简单模式
代码位置
https://gitee.com/DanShenGuiZu/learnDemo/tree/master/rabbitMq-learn/rabbitMq-03- 1
1、常用的工作模式
- 简单模式
- 工作队列模式
- 轮询
- 公平分发
- 发布/订阅模式
- fanout 路由键在这个模式中没有意义
- 路由模式(direct)
- 主题模式
- topic 路由中的 #:表示0个或多个
- topic 路由中的 *:表示1个或多个
2、简单模式

2.1、说明
2.1.1、P(生产者)
消息产生者将消息放入队列
2.1.2、C(消费者)
- 消息的消费者
- 消息的消费者监听消息队列,如果队列中有消息就消费掉
2.1.3、Queue(消息队列)
- 图中红色部分
- 可以缓存消息
- 消息被拿走后,自动从队列中删除
- 生产者向其中投递消息,消费者从其中取出消息
3、MQ实现
3.1、队列
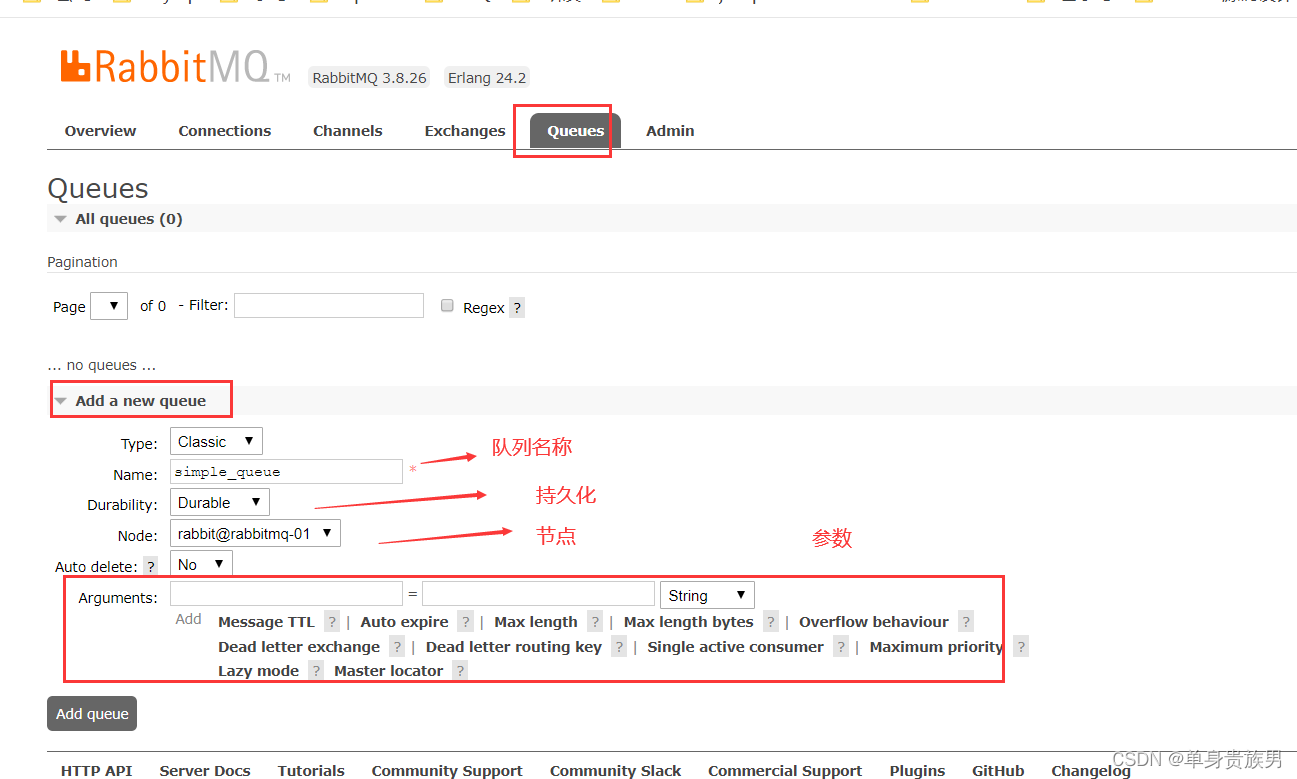
3.1.1、添加一个队列
simple_queue- 1
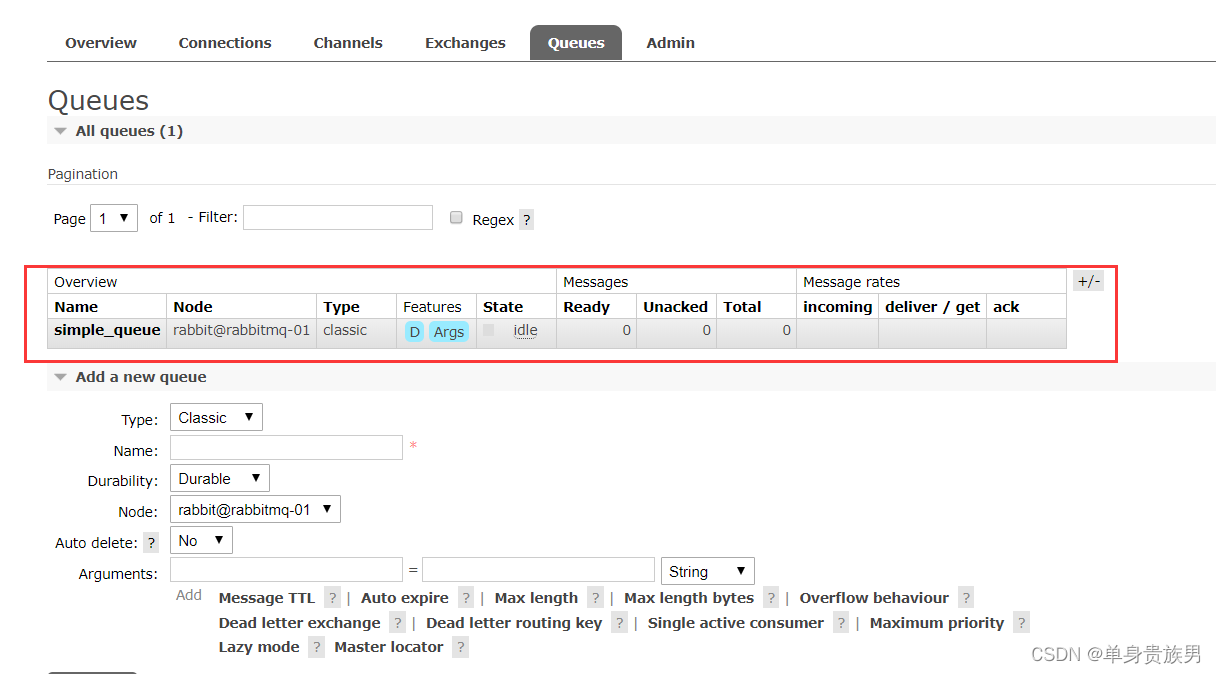
3.1.2、查看队列
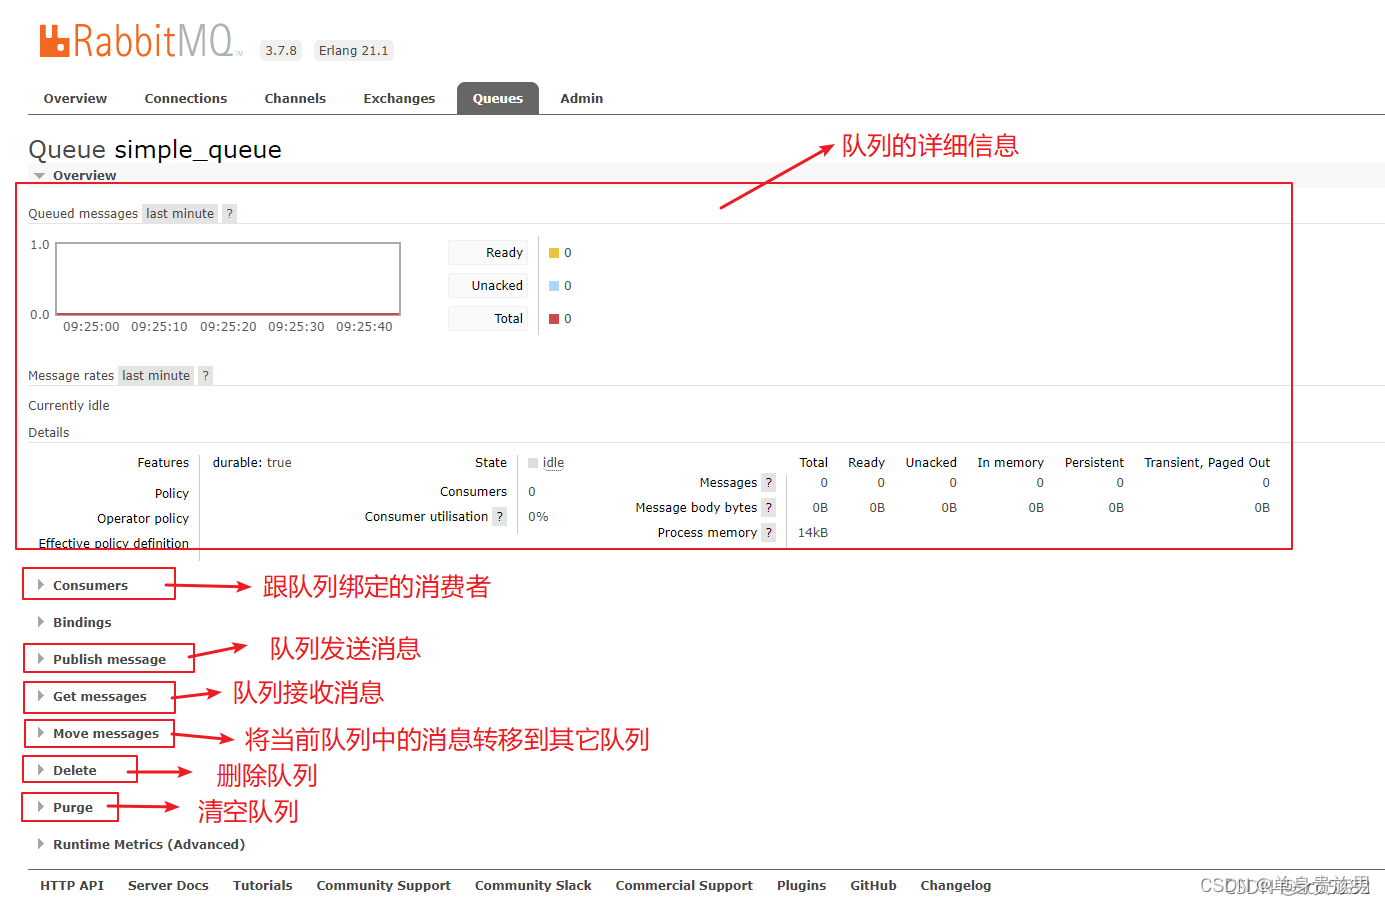
3.1.3、查看队列详细信息
3.2、交换机
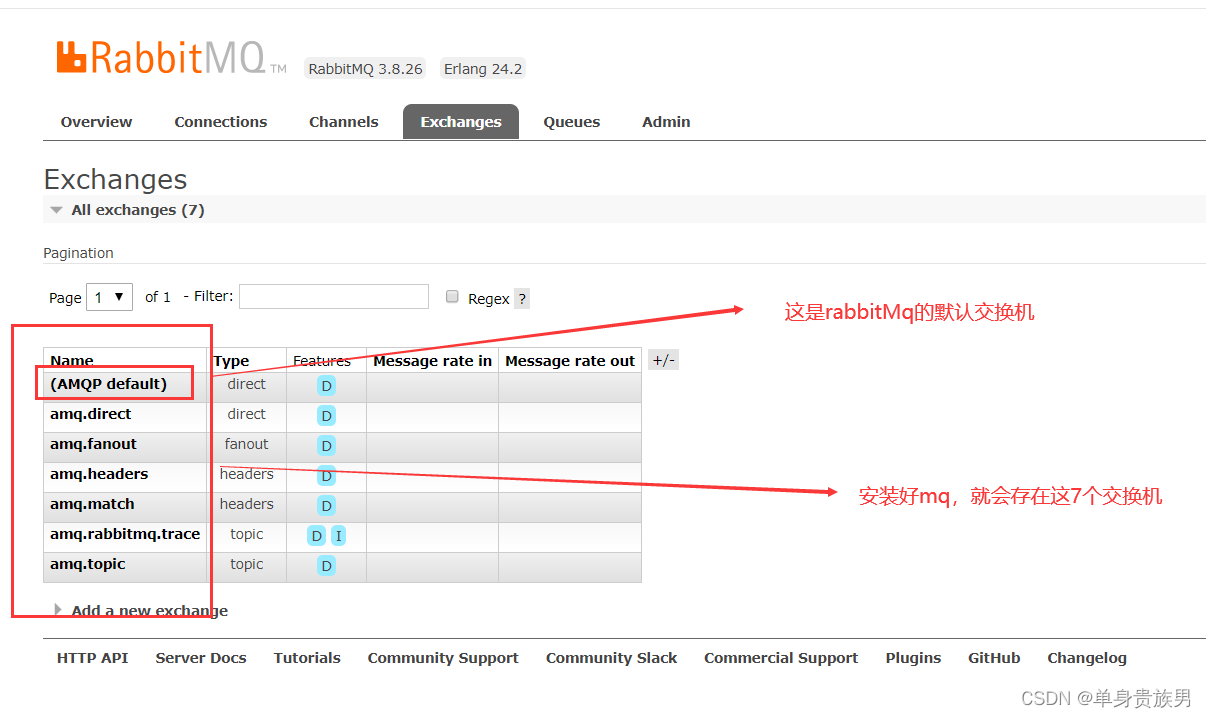
3.2.1、默认的交换机
- 隐式 绑定到每个队列,路由键等于队列名称。
- 无法显式绑定到默认exchange
- 无法显式的从默认exchange解除绑定
- 不能被删除
- 简单模型中的队列,就是绑定的默认的交换机
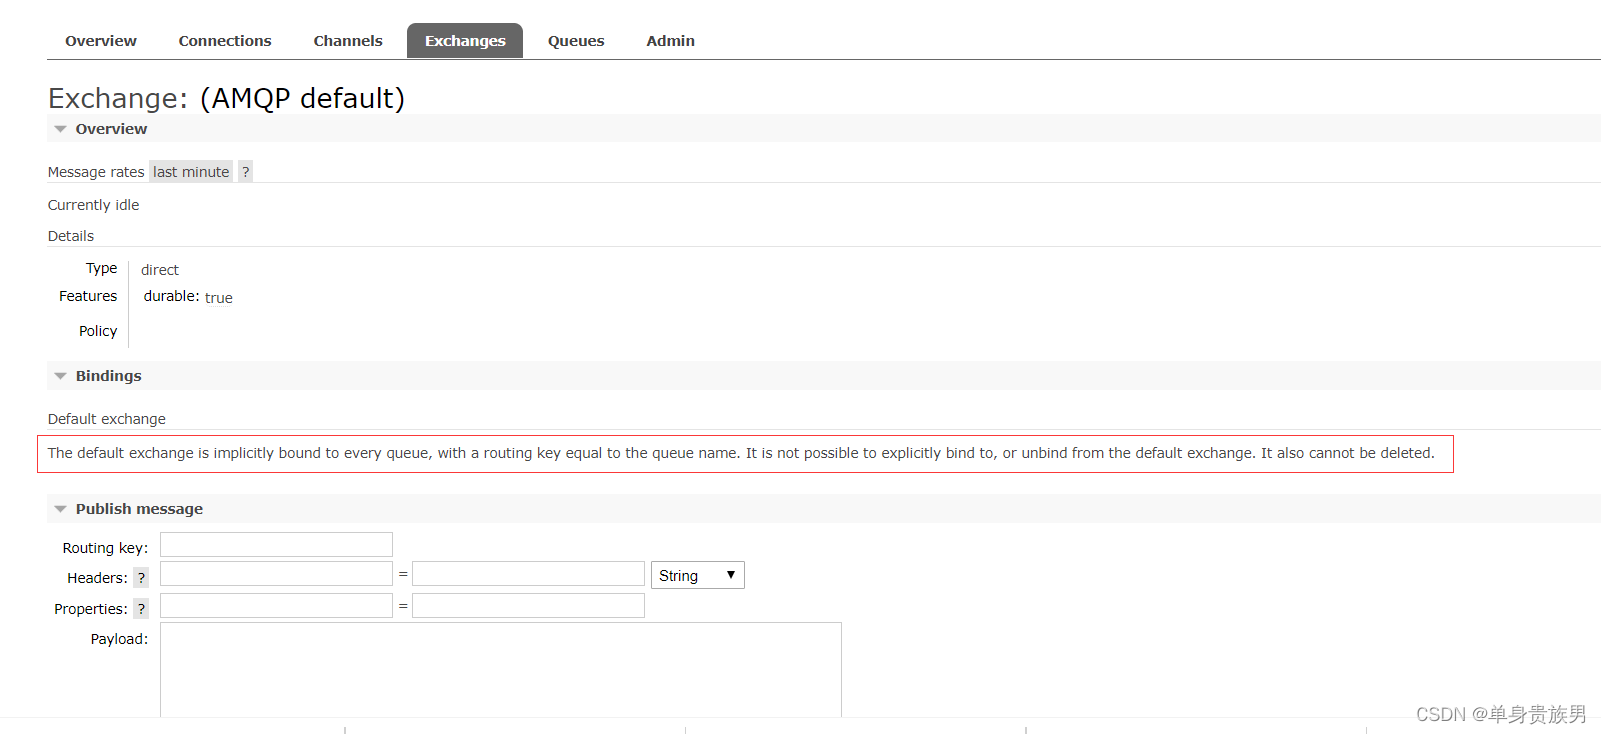
3.2.2、通过交换机发送消息
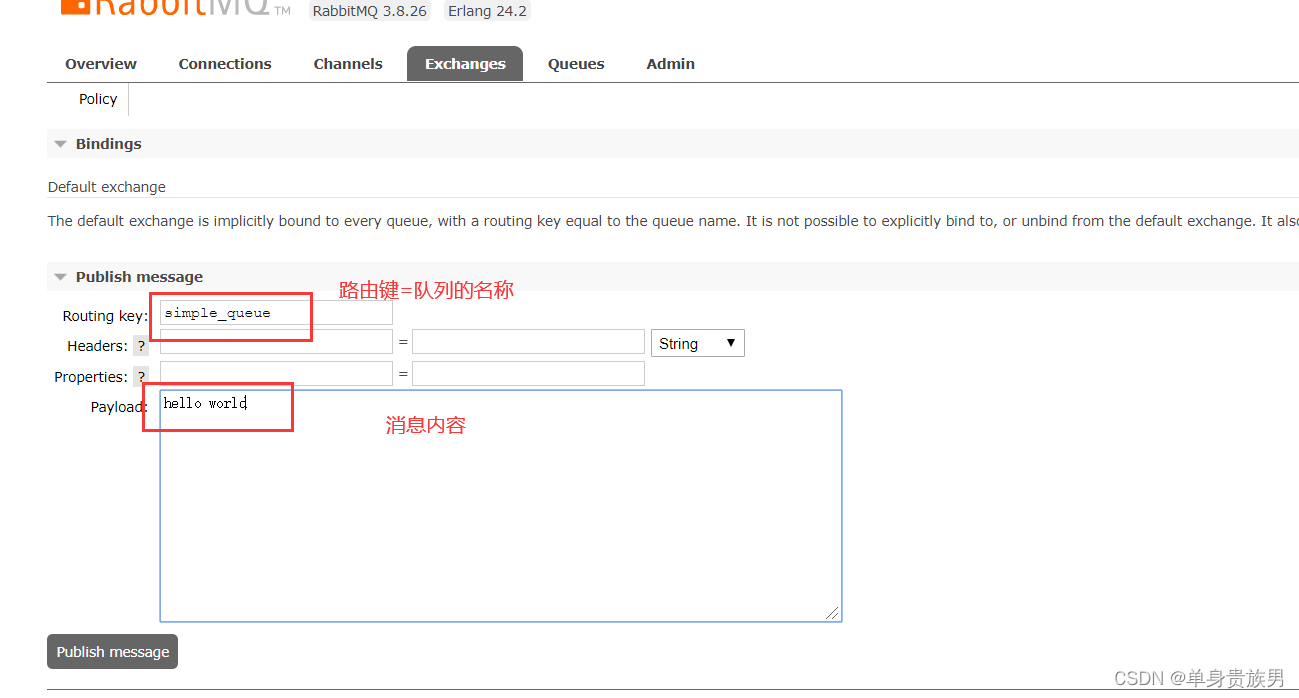
点击"Publish message",会将消息 发送到队列"simple_queue"。
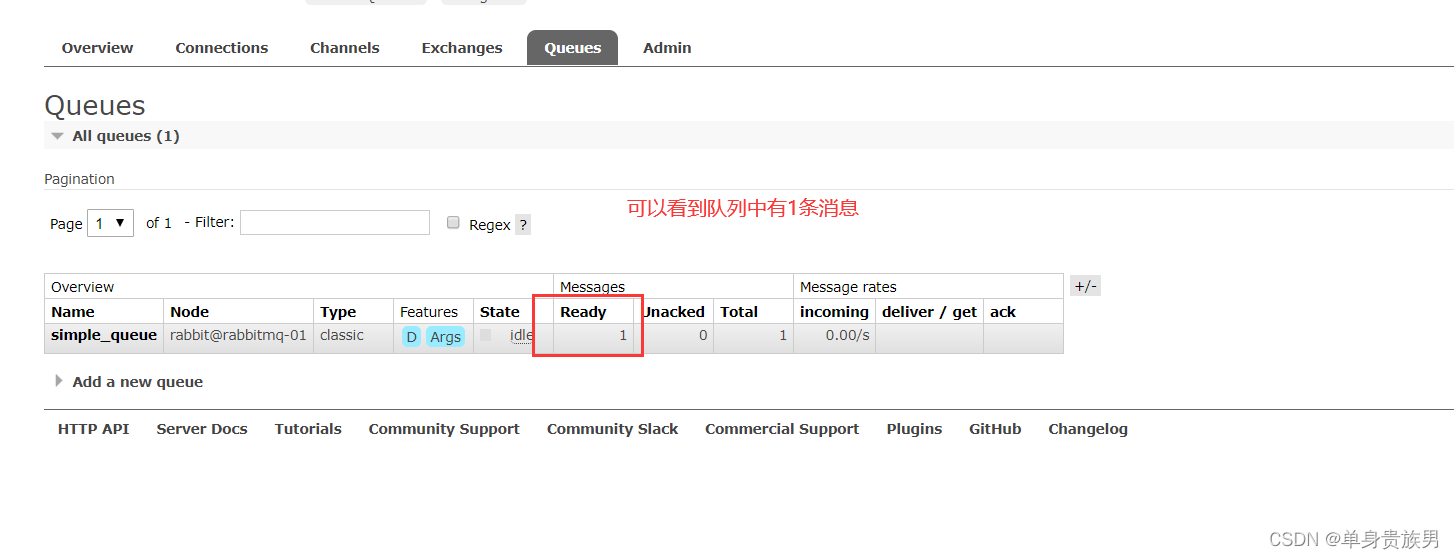
3.2.3、获取消息
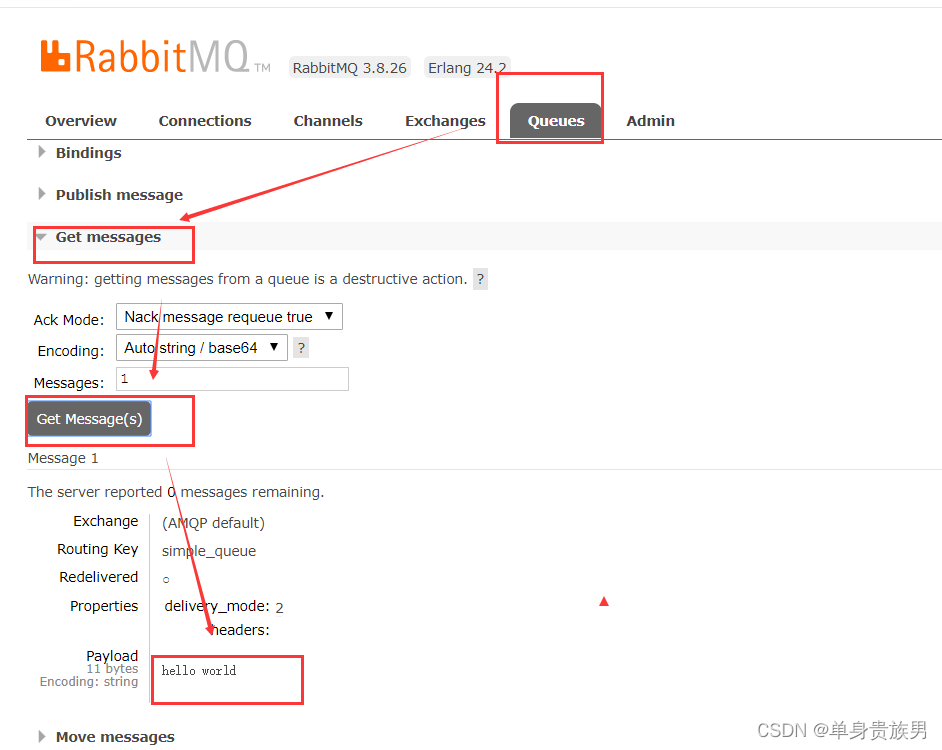
4、Ack Mode(确认模式)
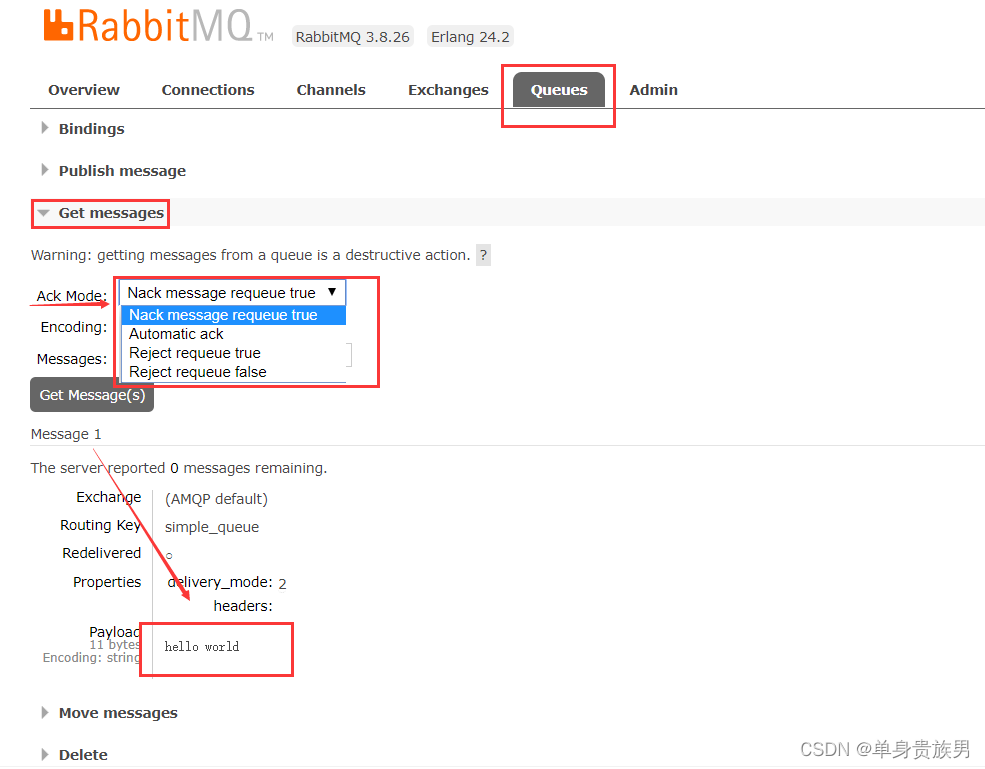
4.1、Nack message requeue true
- 获取到消息的内容
- 不会去消费消息
4.2、Automatic ack
- 获取到消息的内容
- 会真正的去消费消息
5、代码实现
步骤
- 创建连接工厂
- 创建连接(Connection)
- 通过连接获取通道(Channel)
- 通过通道创建 交换机、声明队列、绑定关系、路由 Key、发送消息、接收消息
- 准备消息内容
- 发送消息给队列(Queue)
- 关闭通道
- 关闭连接
5.1、依赖
com.rabbitmq amqp-client 5.10.0 - 1
- 2
- 3
- 4
- 5
- 6
5.2、生产者
5.2.1、代码
package com.example.rabbitmq03.business.test; import com.rabbitmq.client.Channel; import com.rabbitmq.client.Connection; import com.rabbitmq.client.ConnectionFactory; public class Producer { public static void main(String[] args) { // 1. 创建连接工厂 ConnectionFactory connectionFactory = new ConnectionFactory(); // MQ连接配置 connectionFactory.setHost("192.168.102.182"); connectionFactory.setPort(5672); connectionFactory.setUsername("admin"); connectionFactory.setPassword("123456"); connectionFactory.setVirtualHost("/"); Connection connection = null; Channel channel = null; try { // 2. 创建连接 Connection connection = connectionFactory.newConnection("生产者"); // 3. 通过连接获取通道 Channel channel = connection.createChannel(); String queueName = "code_simple_queue1"; // 4. 通过通道创建声明队列 /** * @param1 队列名称 * @param2 是否持久化 持久化:RabbitMQ服务器重启,队列还存在;反之,不存在。 * 持久化的队列中的消息会存盘,不会随着服务器的重启会消失 * @param3 排他性 是否独占一个队列(一般不会) * @param4 是否自动删除 随着最后一个消费者消费消息完毕后,是否自动删除这个队列 * @param5 携带一些附加信息 供其它消费者获取 */ channel.queueDeclare(queueName, false, false, false, null); // 5. 准备消息内容 String message = "Hello RabbitMQ"; // 6. 发送消息给队列 Queue /** * @param1 交换机名称。如果设置为空字符串,则消息会被发送到 RabbitMQ 默认的交换机中 * @param2 路由键/队列名称。交换机根据路由键将消息存储到相应的队列中 * @param3 消息的基本属性集。 * @param4 消息体。真正需要发送的消息 */ channel.basicPublish("", queueName, null, message.getBytes()); System.out.println("发送的消息为:" + message); } catch (Exception e) { e.printStackTrace(); } finally { if (null != channel && channel.isOpen()) { try { // 7. 关闭通道 channel.close(); } catch (Exception e) { e.printStackTrace(); } } if (null != connection && connection.isOpen()) { try { // 8. 关闭连接 connection.close(); } catch (Exception e) { e.printStackTrace(); } } } } }- 1
- 2
- 3
- 4
- 5
- 6
- 7
- 8
- 9
- 10
- 11
- 12
- 13
- 14
- 15
- 16
- 17
- 18
- 19
- 20
- 21
- 22
- 23
- 24
- 25
- 26
- 27
- 28
- 29
- 30
- 31
- 32
- 33
- 34
- 35
- 36
- 37
- 38
- 39
- 40
- 41
- 42
- 43
- 44
- 45
- 46
- 47
- 48
- 49
- 50
- 51
- 52
- 53
- 54
- 55
- 56
- 57
- 58
- 59
- 60
- 61
- 62
- 63
- 64
- 65
- 66
- 67
- 68
- 69
- 70
- 71
5.2.2、测试
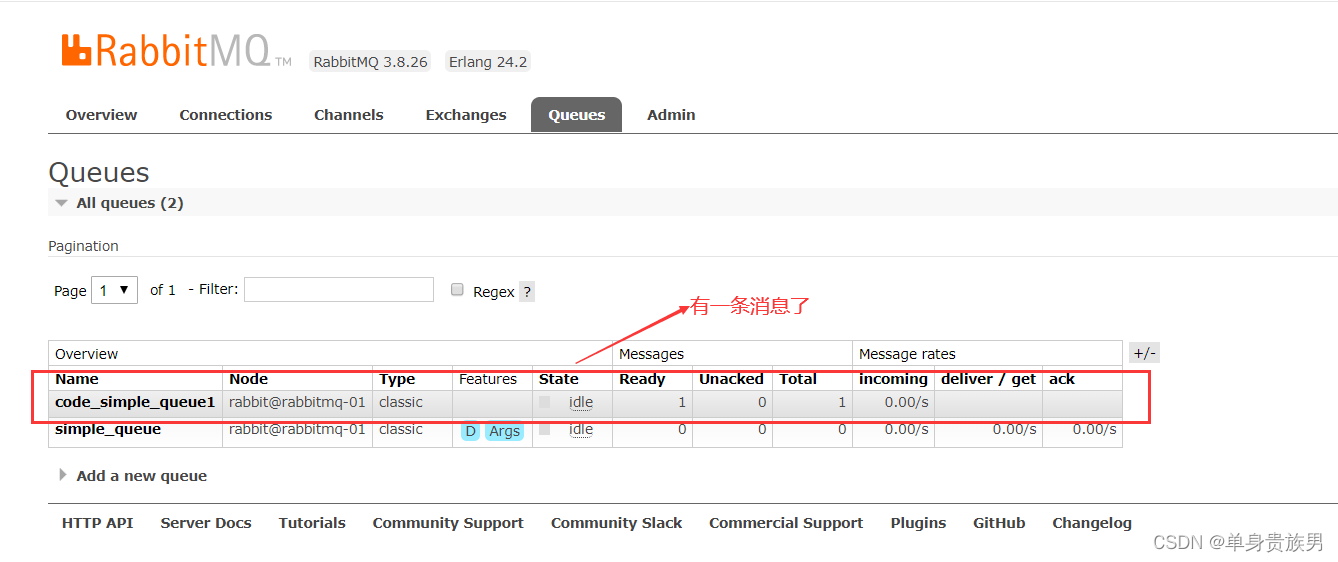
5.3、消费者
5.3.1、代码
package com.example.rabbitmq03.business.test; import com.rabbitmq.client.*; import java.io.IOException; /** * 描述该类 * * @author 周飞 * @class: Consumer * @date 2022/8/10 17:41 * @Verson 1.0 -2022/8/10 17:41 * @see */ public class Consumer { public static void main(String[] args) { ConnectionFactory connectionFactory = new ConnectionFactory(); // MQ连接配置 connectionFactory.setHost("192.168.102.182"); connectionFactory.setPort(5672); connectionFactory.setUsername("admin"); connectionFactory.setPassword("123456"); connectionFactory.setVirtualHost("/"); Connection connection = null; Channel channel = null; try { connection = connectionFactory.newConnection("消费者"); channel = connection.createChannel(); //队列名称 String queueName = "code_simple_queue1"; //接收消息时,一般通过实现 com.rabbitmq.client.Consumer 接口或者继承 DefaultConsumer 类来实现。 //当调用与 Consumer 相关的 API 时,不同的订阅采用不同的消费者标签 ConsumerTag 来区分彼此。 //在同一个 Channel 中的消费者也需要通过唯一的消费者标签以作区分。 // 定义消费者:这里使用了一个匿名内部类 com.rabbitmq.client.Consumer consumer = new DefaultConsumer(channel) { // 这个方法类似事件监听,如果有消息的时候,会被自动调用 @Override public void handleDelivery(String consumerTag, Envelope envelope, AMQP.BasicProperties properties, byte[] body) throws IOException { // 交换机 String exchange = envelope.getExchange(); // 消息id,mq 在 channel 中用来标识消息的 id,可用于确认消息已接收 long deliveryTag = envelope.getDeliveryTag(); // body 消息体 String msg = new String(body, "utf-8"); System.out.println("收到消息:" + msg); } }; // param1:队列名称 // param2:设置是否自动确认。 // 当消费者接收到消息后要告诉 mq 消息已接收,如果将此参数设置为 true 表示会自动回复 mq,如果设置为 false,要通过编程实现回复 // param3:设置消费者的回调函数,用来处理 RabbitMQ 推送过来的消息 // 监听队列 channel.basicConsume(queueName, true, consumer); System.out.println("开始接收消息~~~"); //停止5秒 Thread.sleep(5000); } catch (Exception e) { e.printStackTrace(); } finally { if (null != channel && channel.isOpen()) { try { channel.close(); } catch (Exception e) { e.printStackTrace(); } } if (null != connection && connection.isOpen()) { try { connection.close(); } catch (Exception e) { e.printStackTrace(); } } } } }- 1
- 2
- 3
- 4
- 5
- 6
- 7
- 8
- 9
- 10
- 11
- 12
- 13
- 14
- 15
- 16
- 17
- 18
- 19
- 20
- 21
- 22
- 23
- 24
- 25
- 26
- 27
- 28
- 29
- 30
- 31
- 32
- 33
- 34
- 35
- 36
- 37
- 38
- 39
- 40
- 41
- 42
- 43
- 44
- 45
- 46
- 47
- 48
- 49
- 50
- 51
- 52
- 53
- 54
- 55
- 56
- 57
- 58
- 59
- 60
- 61
- 62
- 63
- 64
- 65
- 66
- 67
- 68
- 69
- 70
- 71
- 72
- 73
- 74
- 75
- 76
- 77
- 78
- 79
- 80
- 81
- 82
- 83
- 84
- 85
- 86
- 87
- 88
5.3.2、测试
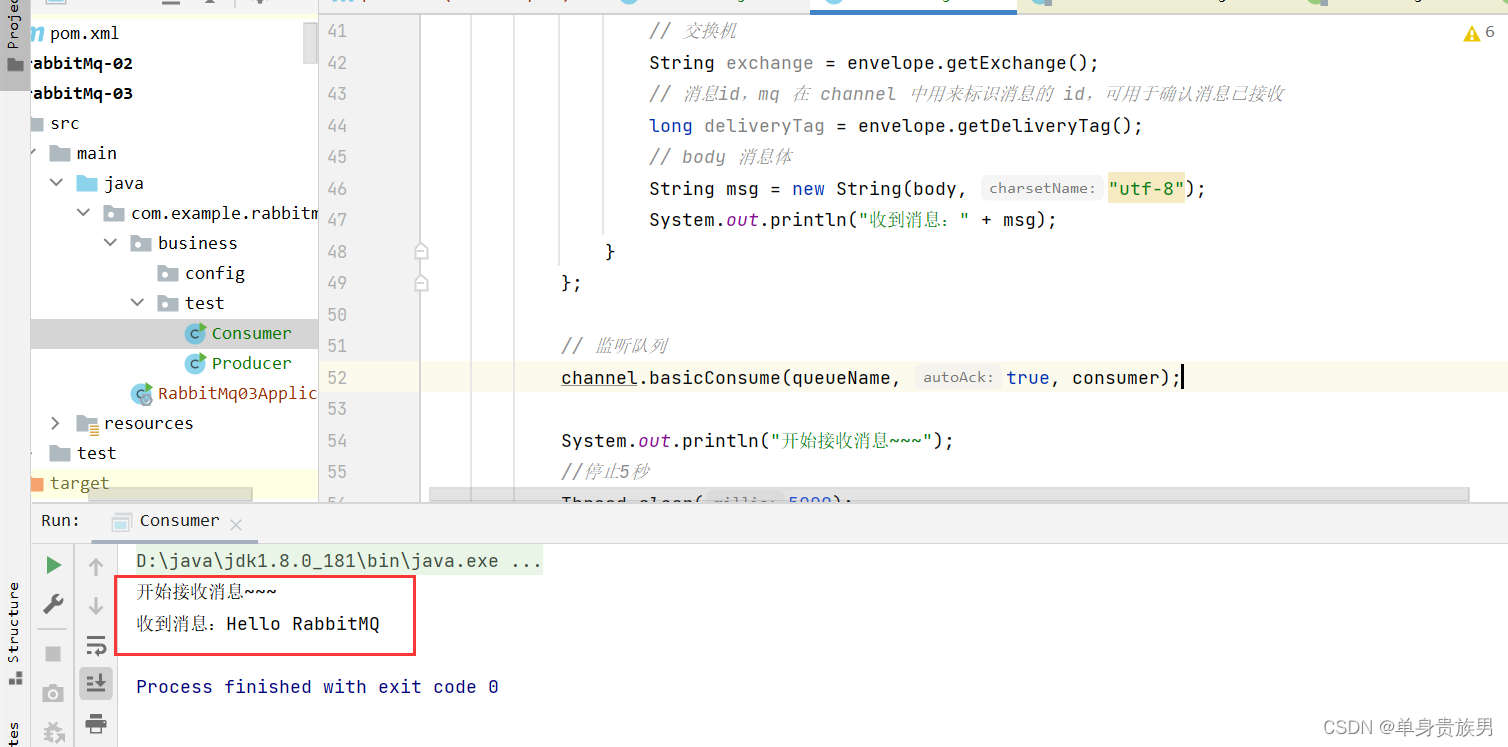
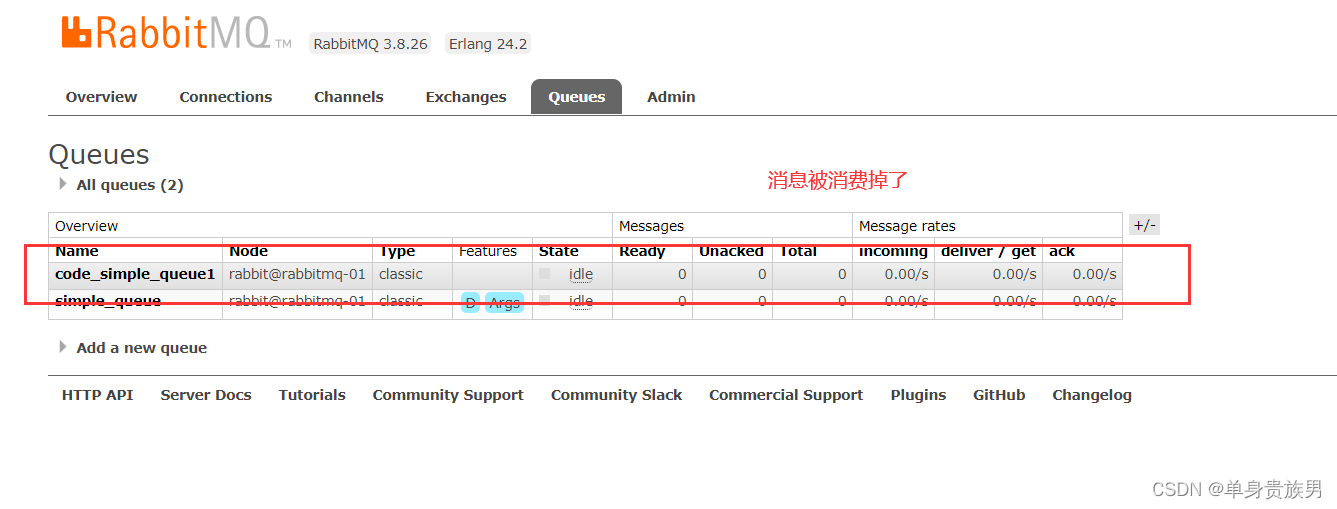
-
相关阅读:
.Net AsyncLocal介绍
Codeforces Round #796 (Div. 2) vp报告A-D
C语言枚举
Mybatis-Plus中的and和or用法
5G消息精准触达,”解锁“新场景
什么叫渗透测试爆破
[Spring Framework]AOP经典案例、AOP总结
LeetCode——判断回文数
前端vue2中全局事件EventBus的使用方法
缓存P27,28,29
- 原文地址:https://blog.csdn.net/zhou920786312/article/details/127425345
