-
深度学习部署神器——triton inference server入门教程指北
开新坑!准备开始聊triton。
老潘用triton有两年多了,一直想写个教程给大家。顺便自己学习学习,拖了又拖,趁着这次换版本的机会,终于有机会了写了。

triton作为一个NVIDIA开源的商用级别的服务框架,个人认为很好用而且很稳定,API接口的变化也不大,我从2020年的20.06切换到2022年的22.06,两个大版本切换,一些涉及到代码的工程变动很少,稍微修改修改就可以直接复用,很方便。
本系列讲解的版本也是基于22.06。
本系列讲解重点是结合实际的应用场景以及源码分析,以及写一些triton周边的插件、集成等。非速成,适合同样喜欢深入的小伙伴。
什么是triton inference server?
肯定很多人想知道triton干啥的,学习这个有啥用?这里简单解释一下:
- triton可以充当服务框架去部署你的深度学习模型,其他用户可以通过http或者grpc去请求,相当于你用flask搭了个服务供别人请求,当然相比flask的性能高很多了
- triton也可以摘出C-API充当多线程推理服务框架,去除http和grpc部分,适合本地部署多模型,比如你有很多模型要部署,然后分时段调用,或者有pipeline,有了triton就省去你处理显存、内存和线程的麻烦
注意,还有一个同名的triton是GPU编程语言,类似于TVM的TVMscript,需要区分,这篇文章中的triton指的是triton inference server
借用官方的图,triton的使用场景结构如下: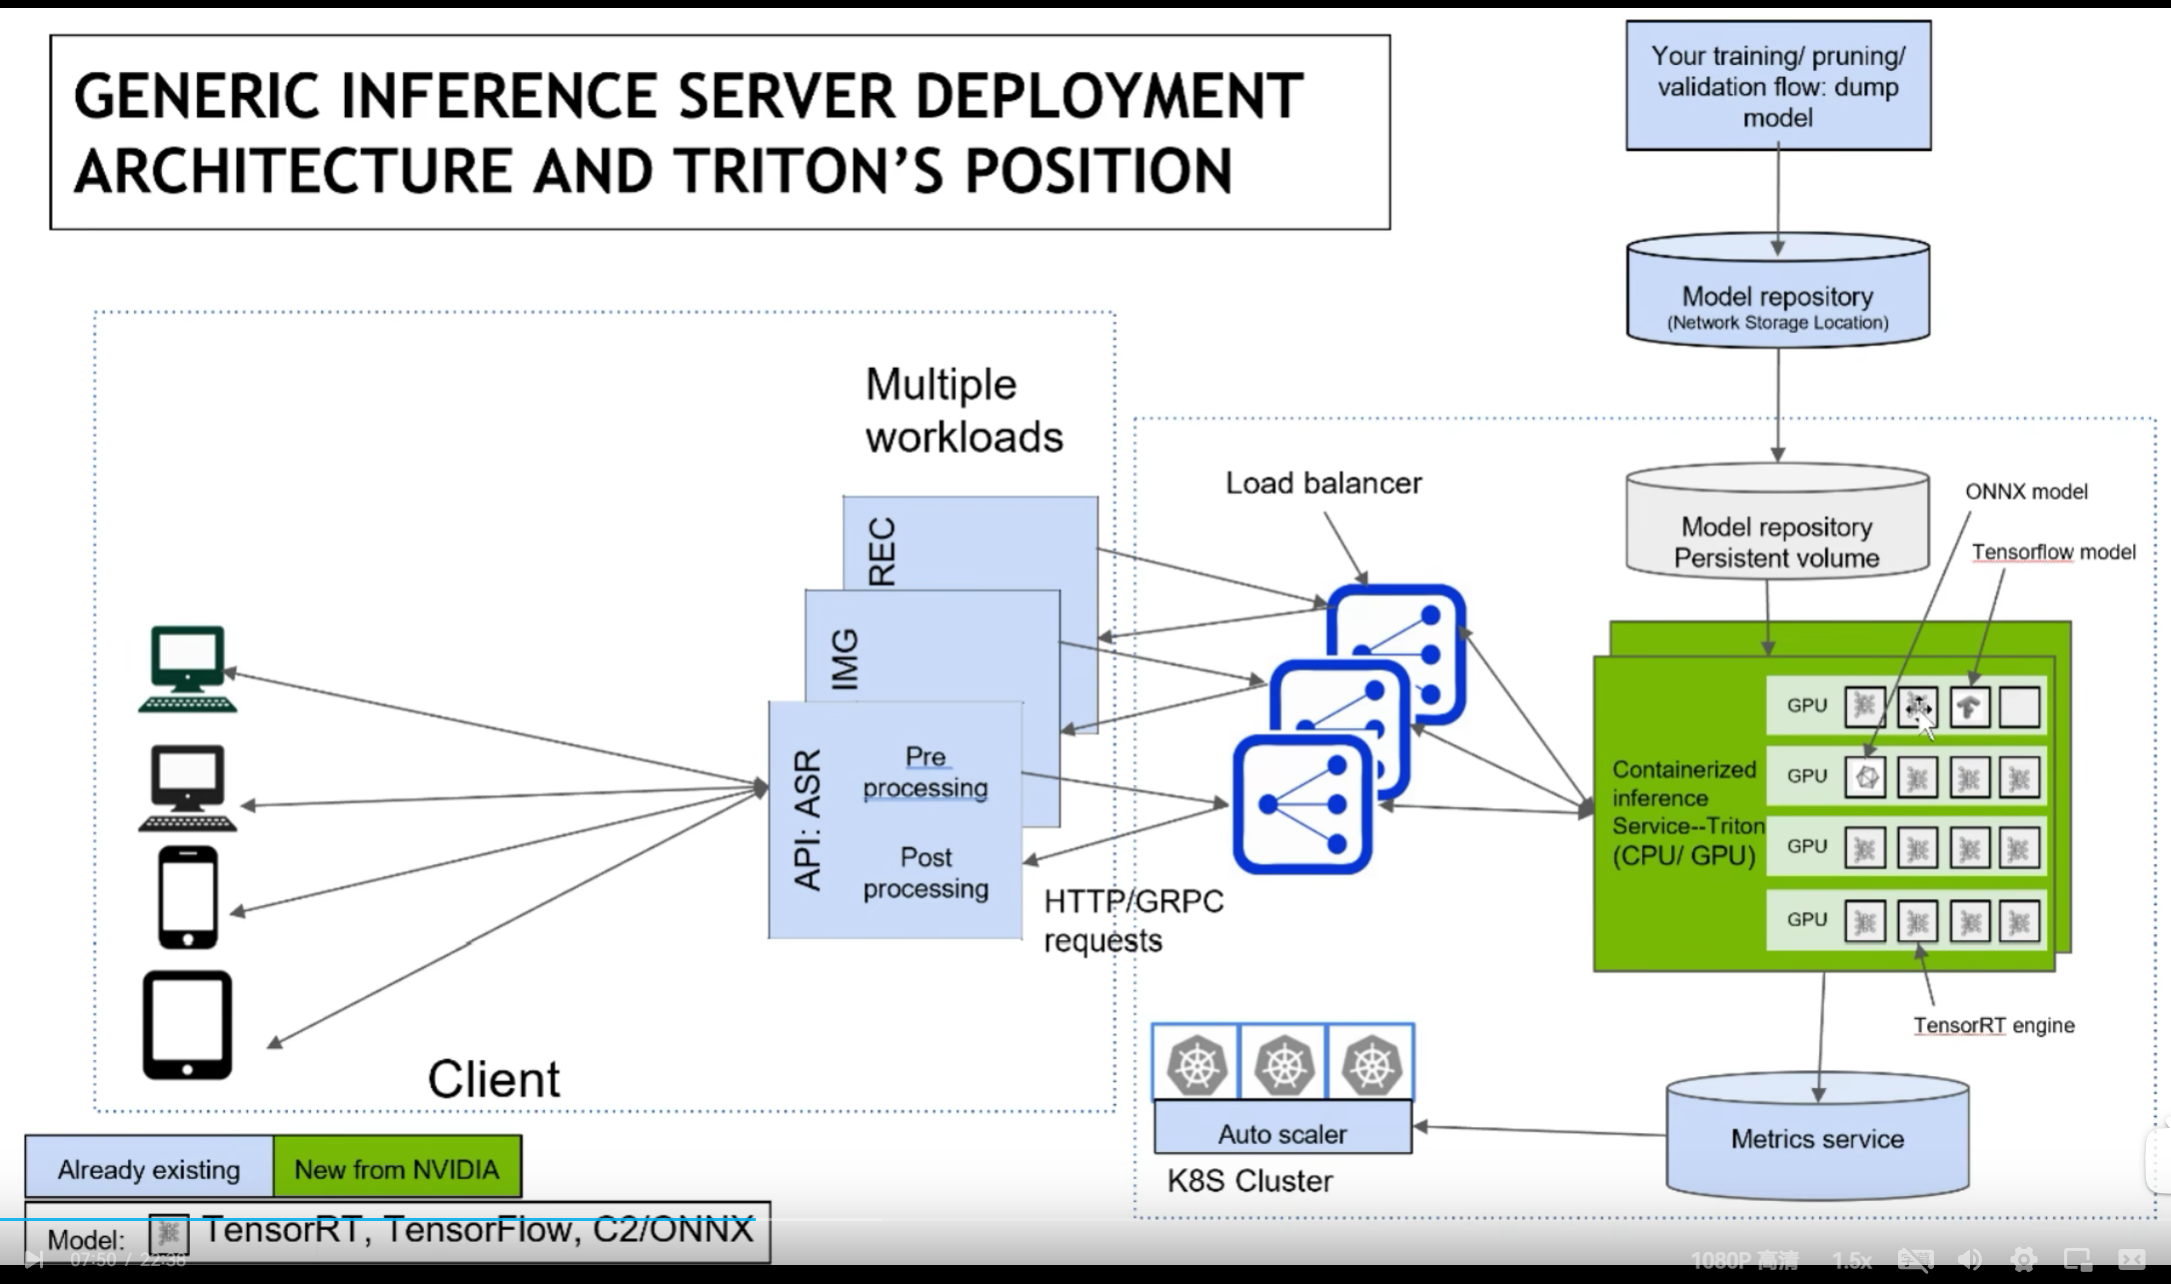
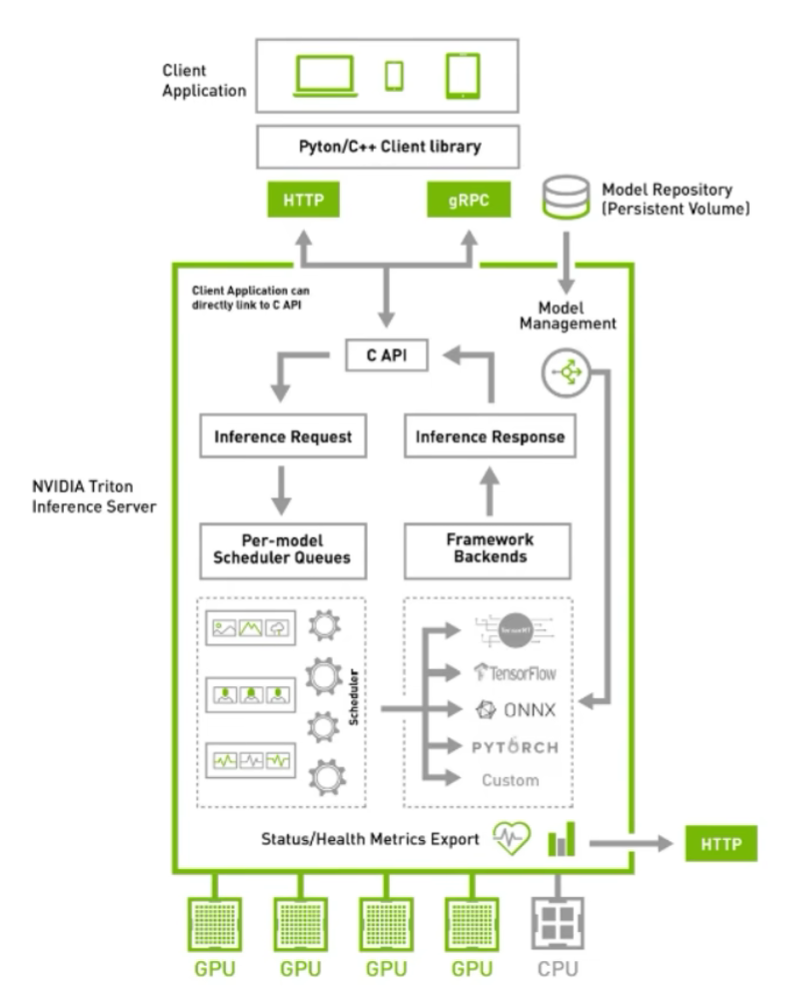
涉及到运维部分,我也不是很懂,抛去K8S后,结构清爽了些:
triton的一些优点
通过上述的两个结构图,可以大概知道triton的一些功能和特点:
- 支持HTTP/GRPC
- 支持多backend,TensorRT、libtorch、onnx、paddle、tvm啥的都支持,也可以自己custom,所以理论上所有backend都可以支持
- 单GPU、多GPU都可以支持,CPU也支持
- 模型可以在CPU层面并行执行
- 很多基本的服务框架的功能都有,模型管理比如热加载、模型版本切换、动态batch,类似于之前的tensorflow server
- 开源,可以自定义修改,很多问题可以直接issue,官方回复及时
- NVIDIA官方出品,对NVIDIA系列GPU比较友好,也是大厂购买NVIDIA云服务器推荐使用的框架
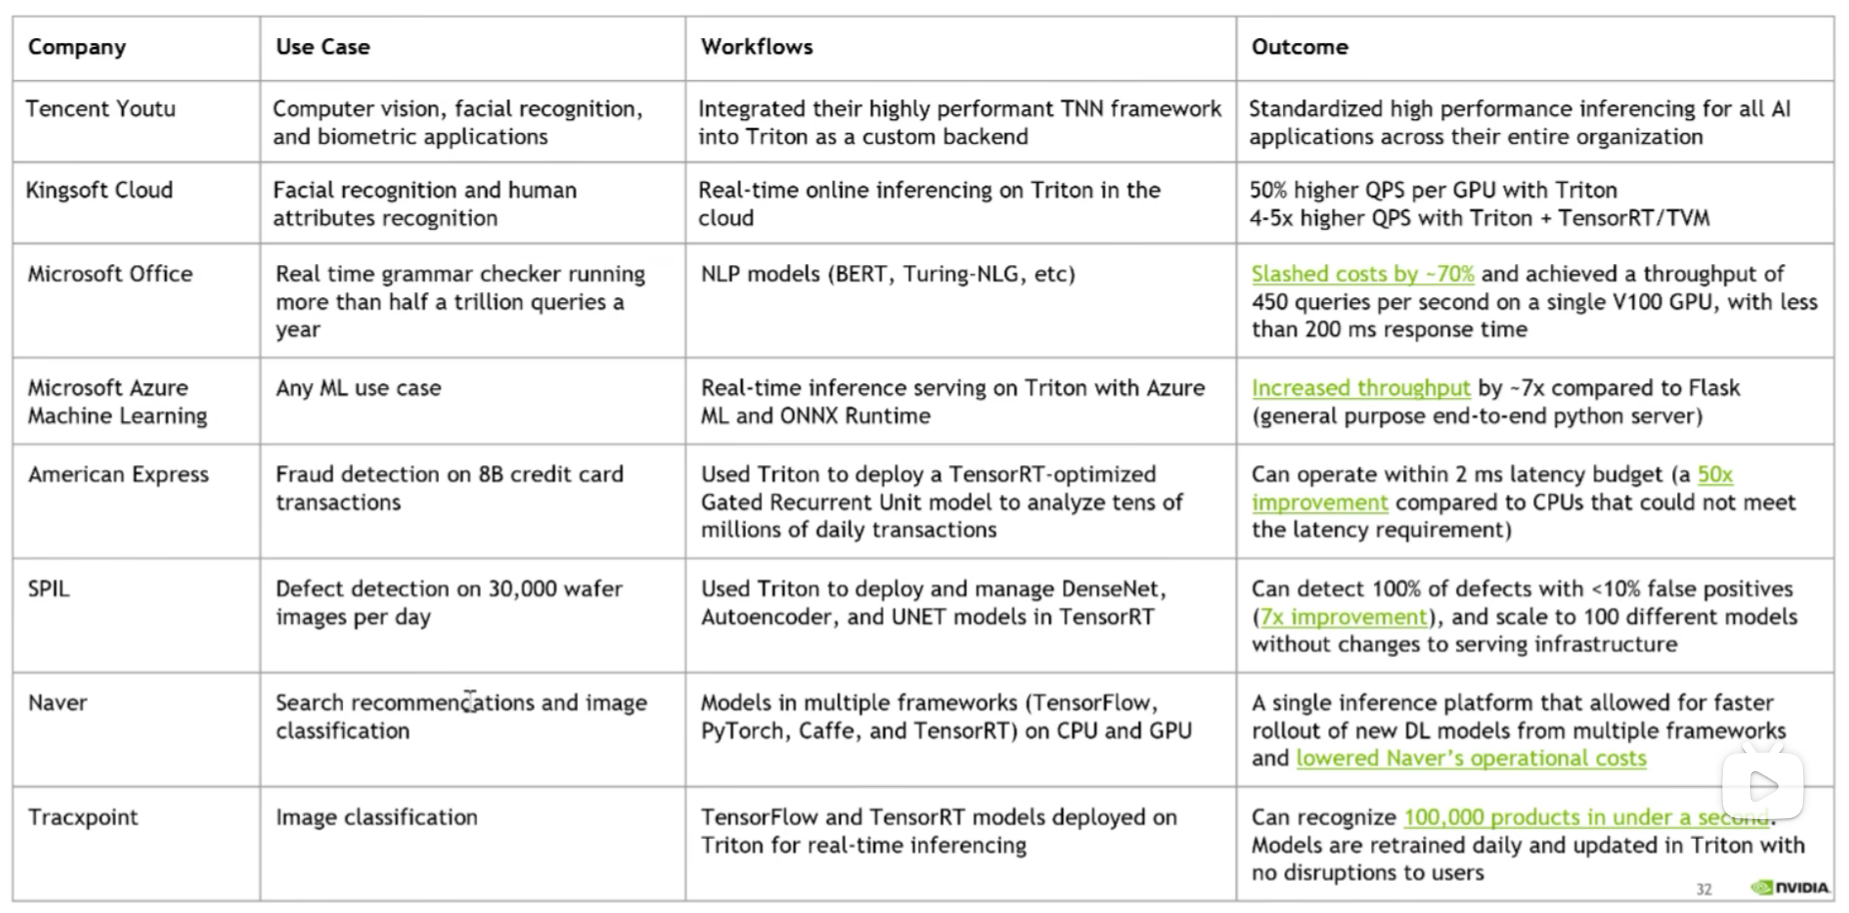
- 很多公司都在用triton,真的很多,不管是互联网大厂还是NVIDIA的竞品都在用,用户多代表啥不用我多说了吧
如何学习triton
两年前开始学习的时候,官方资料比较匮乏, 只能通过看源码来熟悉triton的使用方式,所幸知乎上有个关于TensorRT serving不错的教程,跟着看了几篇大致了解了triton的框架结构。那会triton叫做TensorRT serving,专门针对TensorRT设计的服务器框架,后来才变为triton,支持其他推理后端的。
现在triton的教程比较多了,官方的docs写着比较详细,还有issue中各种用例可以参考,B站上也有视频教程,比两年前的生态要好了不少。
当然,最重要的,还是上手使用,然后看源码, 然后客制化。
源码学习
从triton的源码中可以学到:
- C++各种高级语法
- 设计模式
- 不同backend(libtorch、TensorRT、onnxruntime等)如何正确创建推理端,如何多线程推理
- C++多线程编程/互斥/队列
- API接口暴露/SDK设计
- CMAKE高级用法
等等等等,不列举了,对于程序员来说,好的源码就是好的学习资料。当然,也可以看老潘的文章哈。
triton系列教程计划
triton相关系列也会写一些文章,目前大概规划是这些:
- 什么是triton以及triton入门、triton编译、triton运行
- triton管理模型、调度模型的方式
- triton的backend介绍、自定义backend
- 自定义客户端,python和c++
- 高级特性、优先级、rate limiter等等
编译和安装
一般来说,如果想快速使用triton,直接使用官方的镜像最快。
但是官方镜像有个尴尬点,那就是编译好的镜像需要的环境一般都是最新的,和你的不一定一致。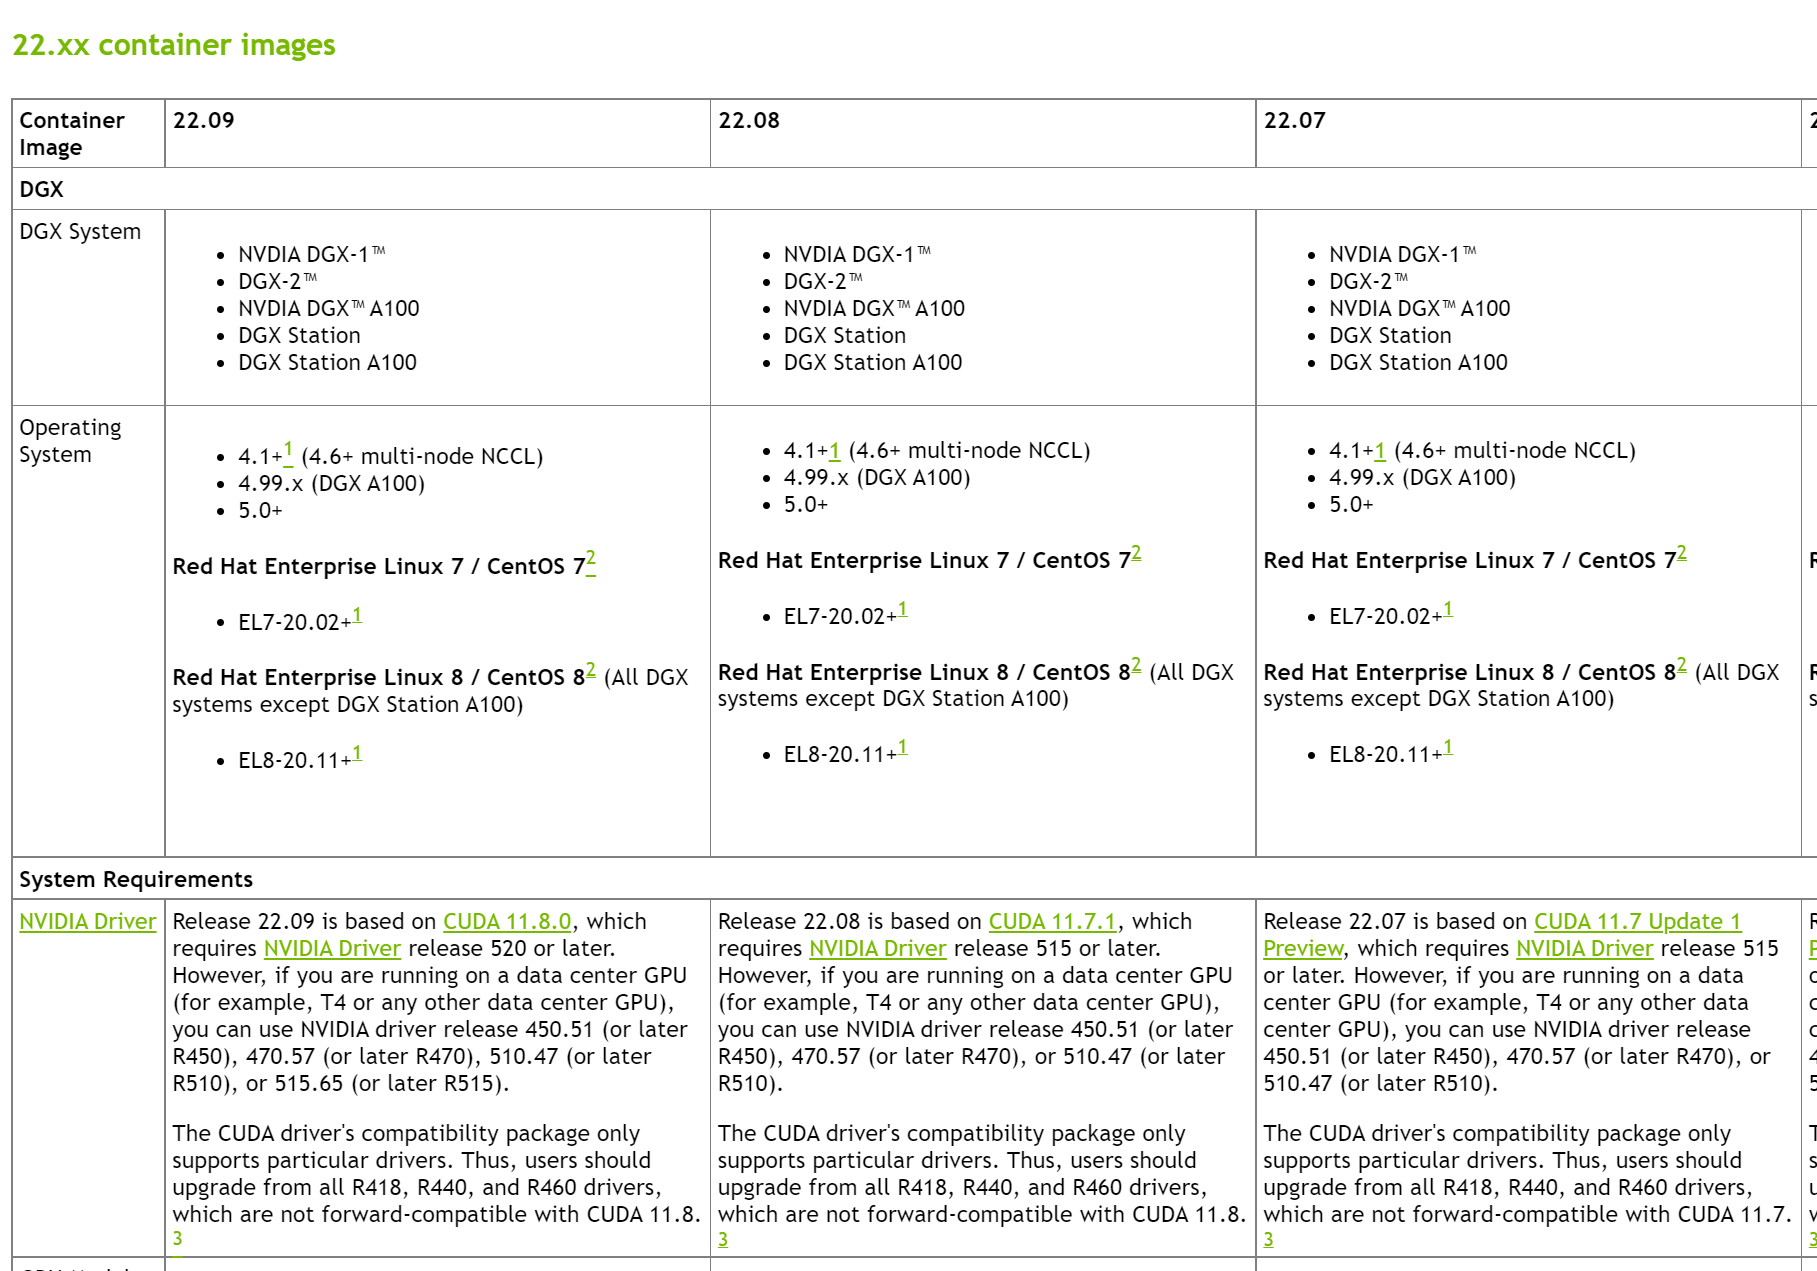
比如22.09版本的镜像需要的显卡驱动为520及以上,如果想满足自己的显卡驱动,就需要自行编译了。
官方也提供了使用镜像的快速使用方法:# 第一步,创建 model repository git clone -b r22.09 https://github.com/triton-inference-server/server.git cd server/docs/examples ./fetch_models.sh # 第二步,从 NGC Triton container 中拉取最新的镜像并启动 docker run --gpus=1 --rm --net=host -v ${PWD}/model_repository:/models nvcr.io/nvidia/tritonserver:22.09-py3 tritonserver --model-repository=/models # 第三步,发送 # In a separate console, launch the image_client example from the NGC Triton SDK container docker run -it --rm --net=host nvcr.io/nvidia/tritonserver:22.09-py3-sdk /workspace/install/bin/image_client -m densenet_onnx -c 3 -s INCEPTION /workspace/images/mug.jpg # Inference should return the following Image '/workspace/images/mug.jpg': 15.346230 (504) = COFFEE MUG 13.224326 (968) = CUP 10.422965 (505) = COFFEEPOT- 1
- 2
- 3
- 4
- 5
- 6
- 7
- 8
- 9
- 10
- 11
- 12
- 13
- 14
- 15
- 16
- 17
- 18
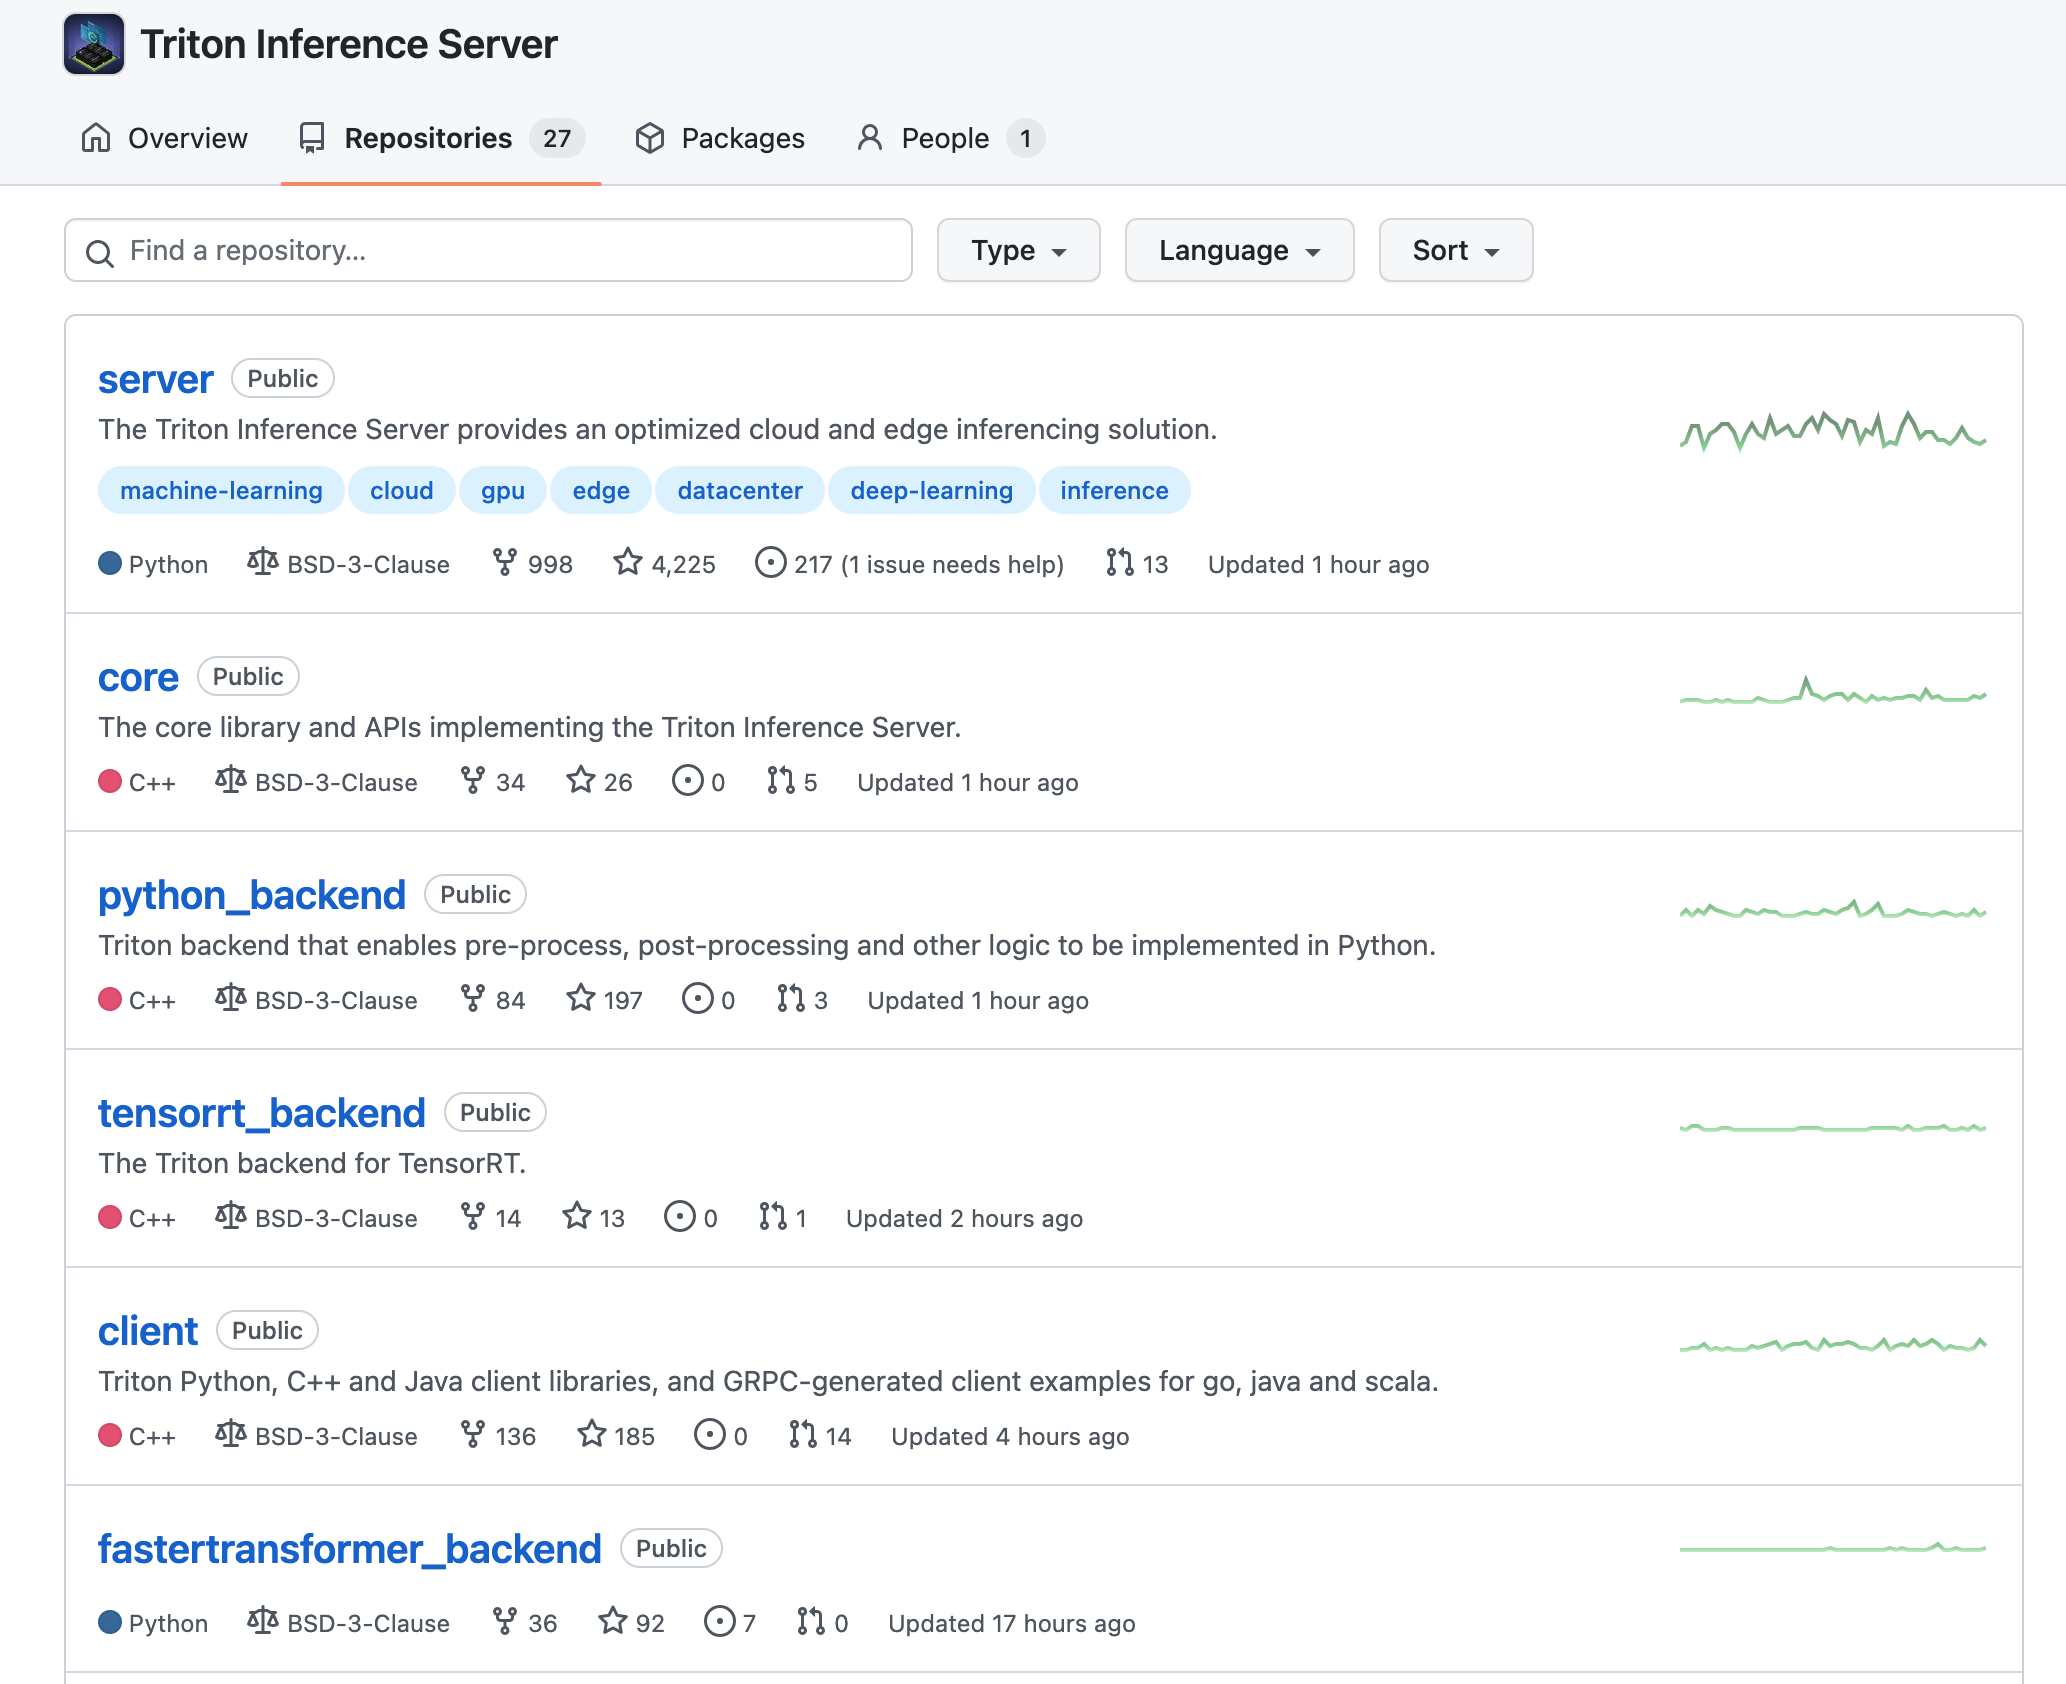
triton官方仓库
两年前的triton只有一个大仓库,tensorrt_backend也默认在triton主仓库中,但是现在tensorrt_backend被拆分出来了,很显然triton除了支持tensorrt还支持很多其他的后端,我们可以自定义使用很多后端。
现在是目前的triton包含的一些仓库:
- [server] triton服务外层框架,包含了http收发请求,服务内存分配等一些功能代码
- [core] triton主框架,如果处理请求、后端管理、模型调度啥的全在这里
- [common] 通用工具,没啥好说的,打日志的代码在这里
- [backend] backend后端框架代码,存放了一些后端通用父类,自定义后端可以集成这些类仿写新的后端
- [third_party] triton使用的第三方库的汇总,主要是cmake里头会包含
- [tensorrt_backend] tensorrt后端代码
- [pytorch_backend] libtorch后端代码
最开始的时候,server、core、common、backend这些代码仓库都是合在一起的,后来都拆分出来了,增加了triton的灵活性。
比如,上述的core仓库可以单独暴露出cAPI作为动态链接库供其他程序调用,去掉http、grpc的外层请求接口,直接一步到位调用。
一般来说,我们都是从最主要的server开始编,编译的时候会链接core、common、backend中的代码,其他自定义backend(比如tensorrt_backend)在编译的时候也需要带上common、core、backend这三个仓库,这些关系我们可以从相应的CMakeList中找到。
自行编译
如果想要研究源码,修改源码实现客制化,那么自行编译是必须的。
triton的编译和安装其实很简单,唯一的难点就是需要加速,因为triton在编译的时候会clone很多第三方库,第三方库也会克隆它们需要的第三方库,这些库当然都是国外的,所以有个好的网络环境很重要。
比如在编译triton的时候需要下载grpc这个库,grpc又依赖很多第三方其他库,网络不好的话,会经常遇到下面的问题:
Failed to recurse into submodule path 'third_party/bloaty' CMake Error at /tmp/tritonbuild/tritonserver/build/_deps/repo-third-party-build/grpc-repo/tmp/grpc-repo-gitclone.cmake:52 (message): Failed to update submodules in: '/tmp/tritonbuild/tritonserver/build/_deps/repo-third-party-build/grpc-repo/src/grpc' make[3]: *** [_deps/repo-third-party-build/CMakeFiles/grpc-repo.dir/build.make:99: _deps/repo-third-party-build/grpc-repo/src/grpc-repo-stamp/grpc-repo-download] Error 1 make[3]: Leaving directory '/tmp/tritonbuild/tritonserver/build' make[2]: *** [CMakeFiles/Makefile2:590: _deps/repo-third-party-build/CMakeFiles/grpc-repo.dir/all] Error 2 make[2]: Leaving directory '/tmp/tritonbuild/tritonserver/build' make[1]: *** [CMakeFiles/Makefile2:145: CMakeFiles/server.dir/rule] Error 2 make[1]: Leaving directory '/tmp/tritonbuild/tritonserver/build'- 1
- 2
- 3
- 4
- 5
- 6
- 7
- 8
- 9
- 10
- 11
- 12
开加速是最好的办法,不管是UI还是命令行,都有相应的软件可以用,比如clash。
如果你的服务器实在是开不了加速,也有其他办法,那就是将triton库中大部分重量级库的git地址全换为国内的。
怎么替换,我是在gitee中,同步github上的仓库,比如triton的core仓库,同步过来,就可以使用国内的地址了。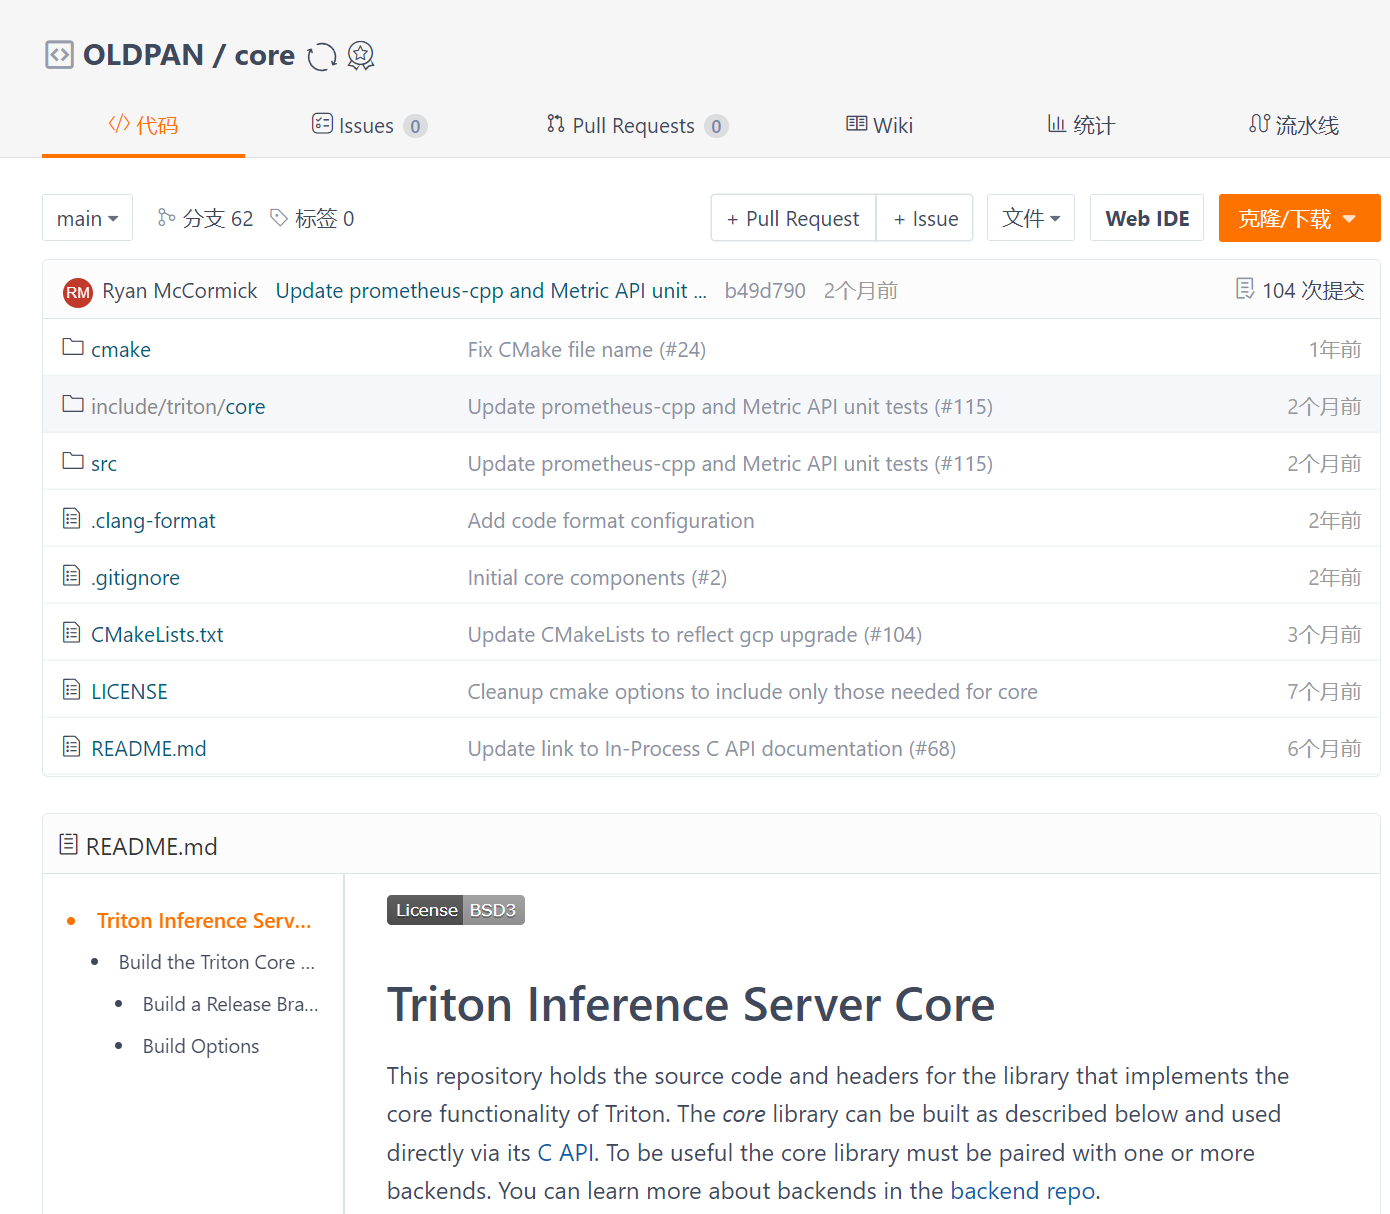
当然也需要将这些库的submodule中的库也修改为国内源,比如grpc这个库依赖很多第三方库,克隆的时候,这是要一个一个下载的:
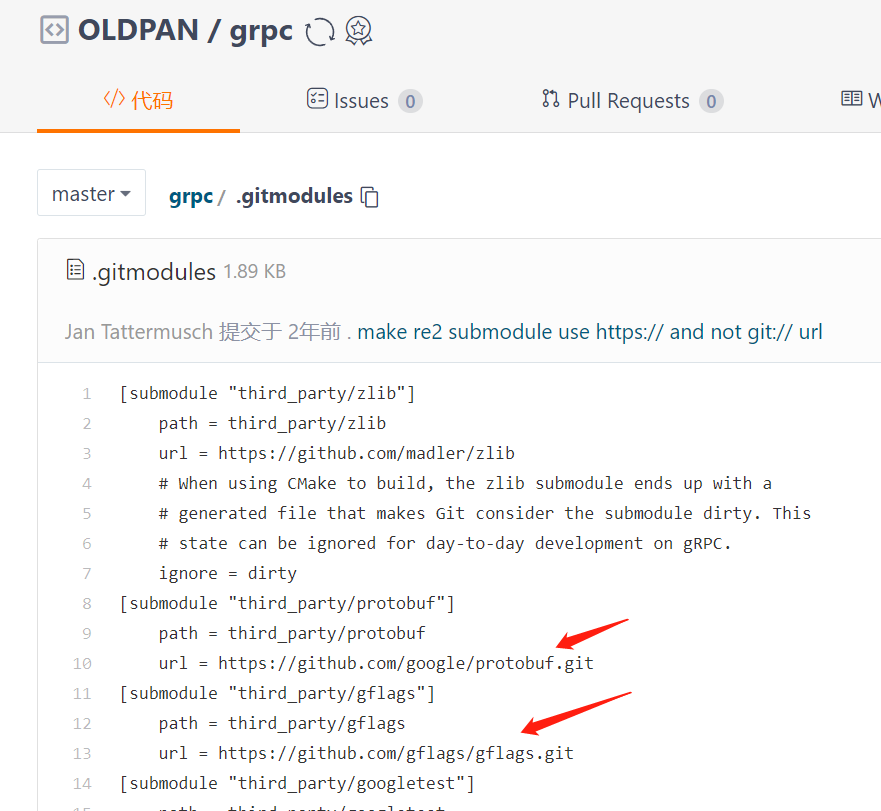
改起来稍微麻烦,还需要注意,要改特定commit分支的git地址:
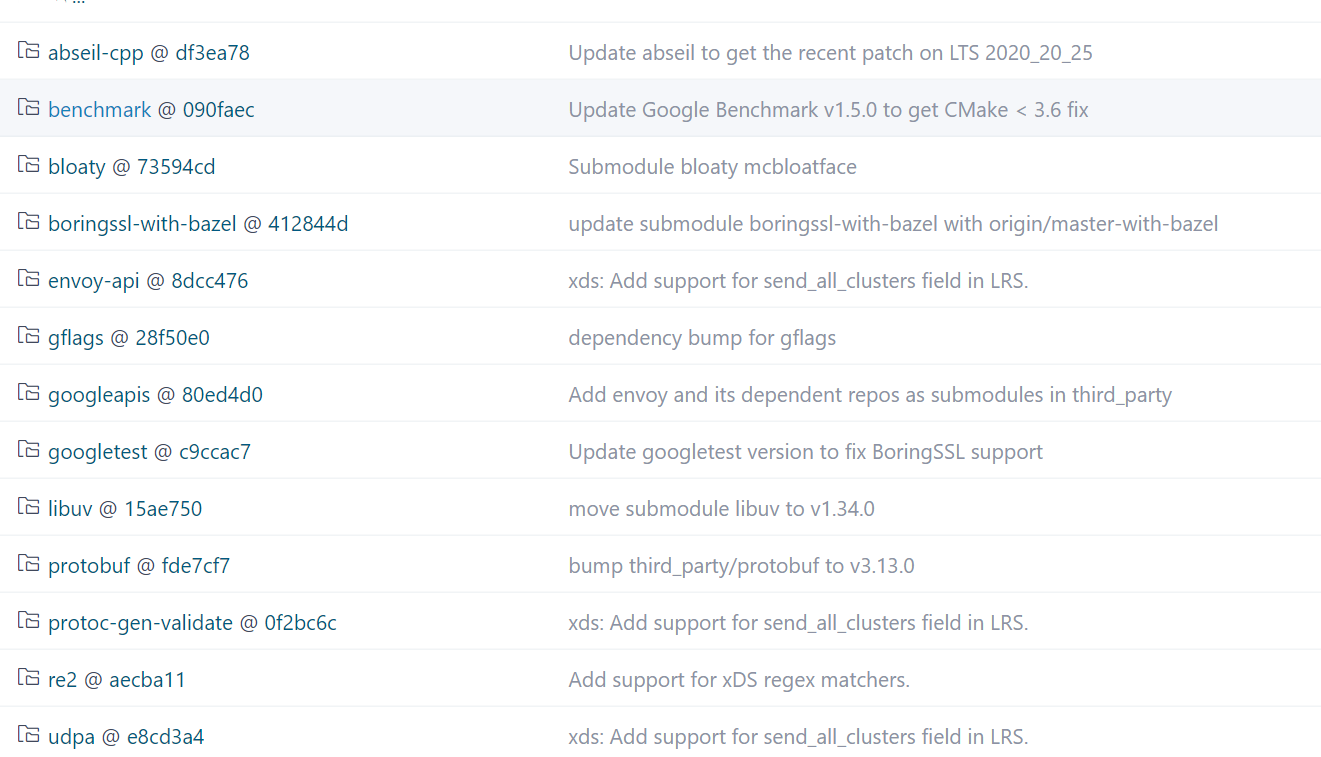
如果有部分第三方库下载太慢下来不下来,我们可以手动进入
/tmp/tritonbuild/tritonserver/build/_deps/repo-third-party-build/grpc-repo/src/grpc/third_part目录然后手动git clone xxx,然后执行一下git submodule init / git submodule update下就可以带进去。示例:
root@64da25af2629:/tmp/tritonbuild/tritonserver/build/_deps/repo-third-party-build/grpc-repo/src/grpc# git submodule init root@64da25af2629:/tmp/tritonbuild/tritonserver/build/_deps/repo-third-party-build/grpc-repo/src/grpc# git submodule update Submodule path 'third_party/googletest': checked out 'c9ccac7cb7345901884aabf5d1a786cfa6e2f397'- 1
- 2
- 3
太麻烦了,不过确实为一种办法呃呃。
还有一点,triton每次build都会clone,是因为其用了cmake中的
ExternalProject_Add指令,假如我们已经有下载好的grpc,那么直接替换到server/build/_deps/repo-third-party-build/grpc-repo/src中然后将/data/oldpan/software/server/build/_deps/repo-third-party-src/CMakeLists.txt:注释掉git下载部分,修改自己本地的就行,就不需要每次再clone一遍了。
# # Get the protobuf and grpc source used for the GRPC endpoint. We must # use v1.25.0 because later GRPC has significant performance # regressions (e.g. resnet50 bs128). # ExternalProject_Add(grpc-repo PREFIX grpc-repo # GIT_REPOSITORY "https://gitee.com/Oldpann/grpc.git" # GIT_TAG "v1.25.x" SOURCE_DIR "${CMAKE_CURRENT_BINARY_DIR}/grpc-repo/src/grpc" CONFIGURE_COMMAND "" BUILD_COMMAND "" INSTALL_COMMAND "" TEST_COMMAND "" PATCH_COMMAND python3 ${CMAKE_CURRENT_SOURCE_DIR}/tools/install_src.py --src <SOURCE_DIR> ${INSTALL_SRC_DEST_ARG} --dest-basename=grpc_1.25.0 )- 1
- 2
- 3
- 4
- 5
- 6
- 7
- 8
- 9
- 10
- 11
- 12
- 13
- 14
- 15
- 16
说了这么多,总之,最好的办法当然还是开科学,全局一下就OK,省去那么多麻烦事儿。
搞定好网络问题,编译triton就很简单了!
git clone --recursive https://github.com/triton-inference-server/server.git cd server python build.py --enable-logging --enable-stats --enable-tracing --enable-gpu --endpoint=http --repo-tag=common:r22.06 --repo-tag=core:r22.06 --repo-tag=backend:r22.06 --repo-tag=thirdparty:r22.06 --backend=ensemble --backend=tensorrt- 1
- 2
- 3
在克隆好的server的目录下执行以上命令(下面是我的设置,我们可以个根据自己的需求进行修改)就可以了。
执行这个命令后triton就会构建
docker在docker中编译,最终会创建3个镜像:- tritonserver:latest
- tritonserver_buildbase:latest
- tritonserver_cibase:latest
最终编译好的
tritonserver_buildbase:latest镜像,我们可以在其中开发,因为环境都帮忙配好了,只需要再执行编译命令,就可以编译了,我们也可以自定义源码进行个性功能的开发。在镜像中开发
需要注意,在编译的时候需要pull官方默认的镜像,而这个镜像是有显卡驱动限制的,比如
r22.06需要显卡驱动版本为470。同志们看看自己的显卡驱动,别下了不能用hhh
可以通过triton镜像历史查看镜像版本要求:

接上,我们不是编译好了triton镜像,直接进去就可以开发了:
docker run -v/home/oldpan/code:/code -v/home/oldpan/software:/software -d tritonserver_buildbase:latest /usr/bin/sh -c "while true; do echo hello world; sleep 20;done"- 1
在docker中修改triton的源码,继续执行以下命令就可以编译,和之前的区别就是加了
--no-container-build参数。python build.py --enable-logging --enable-stats --enable-tracing --enable-gpu --endpoint=http --repo-tag=common:r22.06 --repo-tag=core:r22.06 --repo-tag=backend:r22.06 --repo-tag=thirdparty:r22.06 --backend=ensemble --no-container-build --build-dir=./build- 1
我们如果想编译debug版本的triton,可以在命令中添加:
--build-type=Debug。另外,原始triton镜像中已经有tensorrt,如果想换版本,可以删除原始docker中的旧的tensorrt,自行安装新的tensorrt即可:
说下运行流程吧!
讲了这么多铺垫,接下来简单说下运行流程。
这里通过代码简单梳理下triton运行的整体流程,之后的具体细节,放到接下来的篇章讲解。
首先一开始,main函数在
servers/main.cc下,triton在启动的时候会执行以下函数:// src/servers/main.cc 经过简化 int main(int argc, char** argv) { // 解析参数 TRITONSERVER_ServerOptions* server_options = nullptr; if (!Parse(&server_options, argc, argv)) { exit(1); } ... // 这里创建server TRITONSERVER_Server* server_ptr = nullptr; FAIL_IF_ERR( TRITONSERVER_ServerNew(&server_ptr, server_options), "creating server"); // 这里创建server FAIL_IF_ERR( TRITONSERVER_ServerOptionsDelete(server_options), "deleting server options"); std::shared_ptr<TRITONSERVER_Server> server( server_ptr, TRITONSERVER_ServerDelete); ... // 启动HTTP, GRPC, 以及性能统计的端口 if (!StartEndpoints(server, trace_manager, shm_manager)) { exit(1); } // Trap SIGINT and SIGTERM to allow server to exit gracefully signal(SIGINT, SignalHandler); signal(SIGTERM, SignalHandler); // 等待kill信号区关闭triton while (!exiting_) { ... // 做一些监控模型仓库是否变动的操作 } // 优雅地关闭triton TRITONSERVER_Error* stop_err = TRITONSERVER_ServerStop(server_ptr); // 如果无法优雅地关掉,旧直接exit即可 if (stop_err != nullptr) { LOG_TRITONSERVER_ERROR(stop_err, "failed to stop server"); exit(1); } // 停止监控http、grpc StopEndpoints(); ... return 0; }- 1
- 2
- 3
- 4
- 5
- 6
- 7
- 8
- 9
- 10
- 11
- 12
- 13
- 14
- 15
- 16
- 17
- 18
- 19
- 20
- 21
- 22
- 23
- 24
- 25
- 26
- 27
- 28
- 29
- 30
- 31
- 32
- 33
- 34
- 35
- 36
- 37
- 38
- 39
- 40
- 41
- 42
- 43
- 44
TRITONSERVER_ServerNew这个函数中,会:- new一个triton类
InferenceServer对象 - 根据参数设置配置一下,执行一堆Set函数
- 配置好参数后,
Init服务,这里初始化服务的状态,校验参数 - 创建各种模块,经常使用的有后端管理
TritonBackendManager以及模型仓库管理ModelRepositoryManager - 再进行一些检查、配置一些状态
在启动过程中最重要的是模型仓库,运行triton当然你要有模型,要不然你开它干嘛?
这里我使用的模型仓库目录结构如下(是一个识别姿态的hrnet,hrnet官方有很多预训练模型,转tensorrt也很简单):
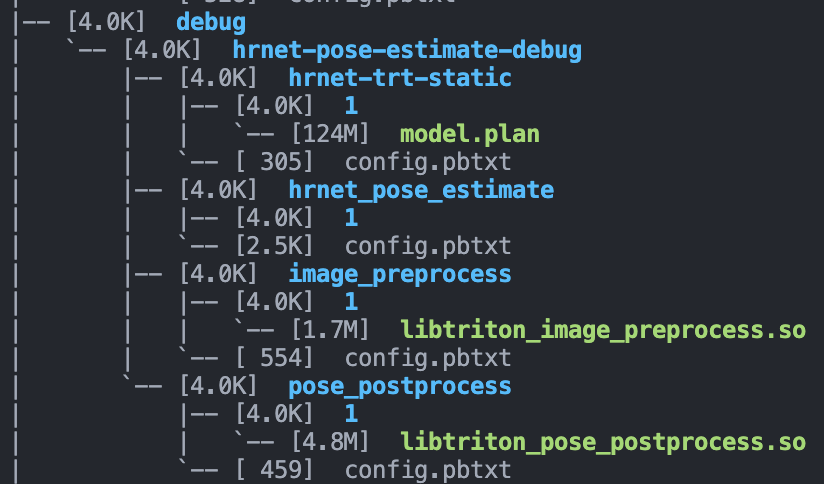
debug目录下有一个模型文件夹叫做
hrnet-pose-estimate-debug的模型文件夹,这个文件夹地址(/path/to/hrnet-pose-estimate-debug)需要传给triton启动命令行,文件夹内的四个子模型文件夹,会被triton检测到并且一一加载。需要注意的是,除了
hrnet_pose_estimate这个其余三个在目录的1子目录下有个so或者model.plan,这代表hrnet-trt-static和image_preprocess还有pose_postprocess**都属于model,使用了backend,**backend会在各自的config中指明:name: "hrnet-trt-static" backend: "tensorrt"- 1
- 2
因为
hrnet-trt-static是tensorrt的模型,所以backend设置为tensorrt,model.plan就是tensorrt的engine。其backend的so文件我放到了其他位置(放到和model.plan同目录也是可以的),而另外两个预处理和后处理的backend就放到了模型仓库中,也就是libtorch_image_preprocess.so和libtriton_pose_postprocess,包含了你的backend代码,封装成so供triton调用关于backend、model以及modelinstanc的关系,说实话稍微复杂点,各自有完整的生命周期,这个嘛,之后文章说,感兴趣的也可以提前看官方文档的介绍:
然后我们就启动triton吧!
# 执行以下函数,模型目录通过 --model-repository 指定 tensorrt的backend通过 --backend-directory 指定 ./tritonserver --model-repository=/path/to/hrnet-pose-estimate-debug --backend-directory=/workspace/backends/tensorrt_backend/- 1
- 2
模型加载成功之后会输出:
... I1016 08:25:37.952055 51771 server.cc:587] +------------------+----------------------------------------------------------------+----------------------------------------------------------------+ | Backend | Path | Config | +------------------+----------------------------------------------------------------+----------------------------------------------------------------+ | image_preprocess | /workspace/triton-models/debug/hrnet-pose-estimate-debug/image | {"cmdline":{"auto-complete-config":"false","min-compute-capabi | | | _preprocess/1/libtriton_image_preprocess.so | lity":"6.000000","backend-directory":"/workspace/backends/tens | | | | orrt_backend/","default-max-batch-size":"4"}} | | | | | | pose_postprocess | /workspace/triton-models/debug/hrnet-pose-estimate-debug/pose_ | {"cmdline":{"auto-complete-config":"false","min-compute-capabi | | | postprocess/1/libtriton_pose_postprocess.so | lity":"6.000000","backend-directory":"/workspace/backends/tens | | | | orrt_backend/","default-max-batch-size":"4"}} | | | | | | tensorrt | /workspace/backends/tensorrt_backend/li | {"cmdline":{"auto-complete-config":"false","min-compute-capabi | | | btriton_tensorrt.so | lity":"6.000000","backend-directory":"/workspace/backends/tens | | | | orrt_backend/","default-max-batch-size":"4"}} | | | | | +------------------+----------------------------------------------------------------+----------------------------------------------------------------+ I1016 08:25:37.952252 51771 server.cc:630] +---------------------+---------+--------+ | Model | Version | Status | +---------------------+---------+--------+ | hrnet-trt-static | 1 | READY | | hrnet_pose_estimate | 1 | READY | | image_preprocess | 1 | READY | | pose_postprocess | 1 | READY | +---------------------+---------+--------+ I1016 08:25:38.051742 51771 metrics.cc:650] Collecting metrics for GPU 0: NVIDIA GeForce RTX 3080 I1016 08:25:38.055197 51771 tritonserver.cc:2159] +----------------------------------+------------------------------------------------------------------------------------------------------------------+ | Option | Value | +----------------------------------+------------------------------------------------------------------------------------------------------------------+ | server_id | triton | | server_version | 2.23.0 | | server_extensions | classification sequence model_repository model_repository(unload_dependents) schedule_policy model_configuration | | | system_shared_memory cuda_shared_memory binary_tensor_data statistics trace | | model_repository_path[0] | /workspace/triton-models/debug/hrnet-pose-estimate-debug | | model_control_mode | MODE_NONE | | strict_model_config | 1 | | rate_limit | OFF | | pinned_memory_pool_byte_size | 268435456 | | cuda_memory_pool_byte_size{0} | 300021772 | | response_cache_byte_size | 0 | | min_supported_compute_capability | 6.0 | | strict_readiness | 1 | | exit_timeout | 30 | +----------------------------------+------------------------------------------------------------------------------------------------------------------+ I1016 08:25:38.055627 51771 http_server.cc:3303] Started HTTPService at 0.0.0.0:8000 I1016 08:25:38.097213 51771 http_server.cc:178] Started Metrics Service at 0.0.0.0:8001- 1
- 2
- 3
- 4
- 5
- 6
- 7
- 8
- 9
- 10
- 11
- 12
- 13
- 14
- 15
- 16
- 17
- 18
- 19
- 20
- 21
- 22
- 23
- 24
- 25
- 26
- 27
- 28
- 29
- 30
- 31
- 32
- 33
- 34
- 35
- 36
- 37
- 38
- 39
- 40
- 41
- 42
- 43
- 44
- 45
- 46
- 47
- 48
- 49
- 50
- 51
- 52
加载好之后,我们开启了http端口,端口号为8000,另一个是metric接口,端口号8001
此时可以使用http请求试一下。
简单请求
请求的话有http和grpc协议,我对http协议熟悉些,所以就搞http吧。
官方也提供了客户端,C++和python的都可以有,可以直接使用官方的,也可以根据官方提供的http协议构造自己的客户端,只要会构造body,一切都很简单。
请求协议可以参考官方:
这里我们用python简单构造一个
body:# 构造triton的输入body json_buf = b'{\"inputs\":[{\"name\":\"INPUT\",\"datatype\":\"BYTES\",\"shape\":[1],\"parameters\":{\"binary_data_size\":' + \ bytes(str(len(data)), encoding = "utf8") + b'}}],\"outputs\":[{\"name\":\"RESULT\",\"parameters\":{\"binary_data\":true}}]}' push_data = json_buf + data print("Inference-Header-Content-Length ",str(len(json_buf)), " Content-Length ",str(len(data) + len(json_buf))) # 构造triton-header header = {"Content-Type": "application/octet-stream", "Accept": "*/*", "Inference-Header-Content-Length":str(len(json_buf)), "Content-Length":str(len(data) + len(json_buf))} server_url = "127.0.0.1:8000" model_name = "hrnet_pose_estimate" # 请求 response = post('http://' + server_url + '/v2/models/' + model_name + '/infer', data=push_data, headers=header)- 1
- 2
- 3
- 4
- 5
- 6
- 7
- 8
- 9
- 10
- 11
- 12
- 13
- 14
- 15
- 16
就可以发送请求,结果也会传回response里。我们也可以使用curl命令,直接传递构造好的body(这个body将上述的push_data写到本地即可):
[oldpan@have-fun client]$ curl -v --max-time 1 --request POST 'http://192.168.1.102:9006/v2/models/hrnet_pose_estimate/infer' --header 'Inference-Header-Content-Length: 230' --header 'Content-Type: application/octet-stream' --data-binary '@data.txt' --output temp_res Note: Unnecessary use of -X or --request, POST is already inferred. * Trying 192.168.1.102:9006... % Total % Received % Xferd Average Speed Time Time Time Current Dload Upload Total Spent Left Speed 0 0 0 0 0 0 0 0 --:--:-- --:--:-- --:--:-- 0* Connected to 172.29.210.105 (172.29.210.105) port 9006 (#0) > POST /v2/models/aocr_cnprint_trt8p/infer HTTP/1.1 > Host: 192.168.1.102:9006 > User-Agent: curl/7.71.1 > Accept: */* > Inference-Header-Content-Length: 230 > Content-Type: application/octet-stream > Content-Length: 1573102 > Expect: 100-continue > * Mark bundle as not supporting multiuse < HTTP/1.1 100 Continue } [56480 bytes data] * We are completely uploaded and fine * Mark bundle as not supporting multiuse < HTTP/1.1 200 OK < Content-Type: application/json < Inference-Header-Content-Length: 394 < Content-Length: 6794 < { [6794 bytes data] 100 1542k 100 6794 100 1536k 127k 28.8M --:--:-- --:--:-- --:--:-- 28.9M- 1
- 2
- 3
- 4
- 5
- 6
- 7
- 8
- 9
- 10
- 11
- 12
- 13
- 14
- 15
- 16
- 17
- 18
- 19
- 20
- 21
- 22
- 23
- 24
- 25
- 26
- 27
结果就不发了,验证没啥问题。
关于如何使用curl直接请求triton,有一些相关链接可以参考:
- https://github.com/triton-inference-server/server/issues/2563
- https://github.com/triton-inference-server/server/issues/1822
后记
算是开triton的新坑了,已经有一些草稿了,正在填充文件中:

triton inference server,很好用的服务框架,开源免费,经过了各大厂的验证,用于生产环境是没有任何问题。各位发愁flask性能不够好的,或者自建服务框架功能不够全的,可以试试triton,老潘很推荐的哦。
参考资料
-
相关阅读:
C#自定义窗体更换皮肤的方法:创建特殊窗体
电脑如何在网页上下载视频 浏览器如何下载网页视频
【Jenkins】win 10 / win 11:Jenkins 的下载、安装、部署(Jenkins 2.365 基于 Java 17)
centos7.6 安装 rlwrap-0.45报 Requires: /usr/bin/python3
Linux上防火墙操作
第五章 详解广播机制(Broadcast Receiver)
java毕业设计电子存证系统(附源码、数据库)
[附源码]Python计算机毕业设计 校园疫情防控系统
AWS DynamoDB浅析
测试原则-阶段-测试用例设计-调试
- 原文地址:https://blog.csdn.net/IAMoldpan/article/details/127350748
