-
C++教程系列之-02-win10系统下codeblocks-20.03下载与安装
1. codeblocks-20.03下载与安装
1.1 codeblocks-20.03mingw-setup.exe 下载
codeblocks-20.03的地址如下:
下载地址:
https://sourceforge.net/projects/codeblocks/files/Binaries/20.03/Windows/
进入后,页面如下:
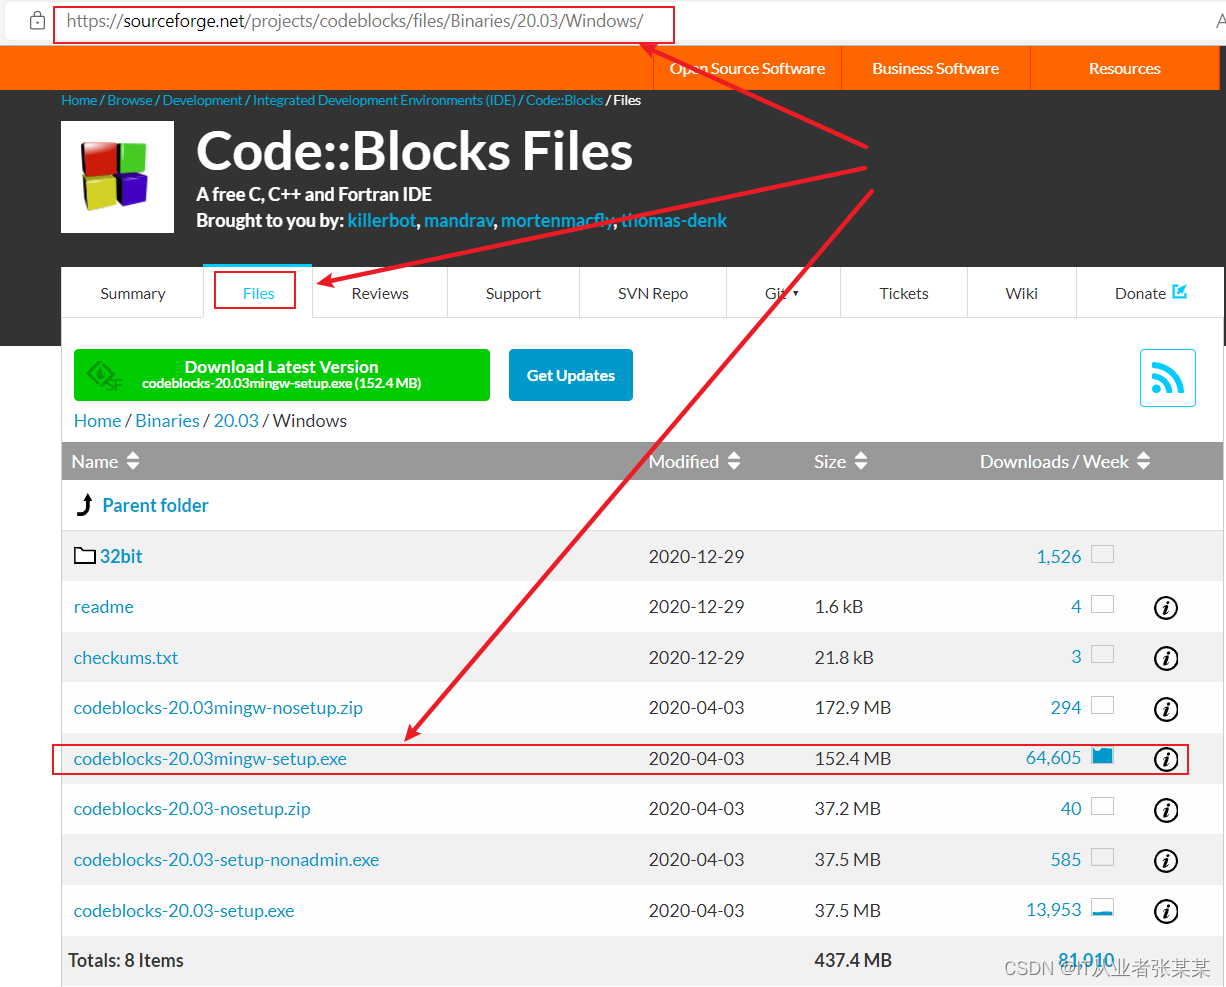 关于不同的版本:
codeblocks-20.03mingw-nosetup.zip 2020-04-03 172.9 MB 294
codeblocks-20.03mingw-setup.exe 2020-04-03 152.4 MB 64,605
codeblocks-20.03-nosetup.zip 2020-04-03 37.2 MB 40
codeblocks-20.03-setup-nonadmin.exe 2020-04-03 37.5 MB 585
codeblocks-20.03-setup.exe 2020-04-03 37.5 MB 13953解释如下:
We offer different flavours of the Windows installer, explained hereby: Installers: - codeblocks-20.03-setup.exe -> Default installer WITHOUT compiler. - codeblocks-20.03-setup-nonadmin.exe -> Default installer WITHOUT compiler but runnable as non-admin, too. (But will lack th ability to e.g. create shortcuts for all users etc...) - codeblocks-20.03mingw-setup.exe -> Default installer WITH G++/GCC and GFortran compiler Packages - codeblocks-20.03-nosetup.zip -> Default package WITHOUT installer -> Same content as codeblocks-20.03-setup.exe after installation. (Allows no customisation, use "as-is" if allergic to installers...) - codeblocks-20.03mingw-nosetup.zip -> Default package WITH G++/GCC and GFortran compiler but WITHOUT installer -> Same content as codeblocks-20.03mingw-setup.exe after installation. (Allows no customisation, use "as-is" if allergic to installers...) 32 bit Windows - While we strongly recommend to install the 64 bit version, we also offer 32 bit versions esp. for older Windows versions. - If needed, check the installers/archives in the sub-folder "32bit". - If a compiler is included, we recommend also using the 32 bit compiler. - Please respect that we provide only very limited support for these. The installers/packages with compiler include the GNU compiler suite and GNU debugger (GDB) from MinGW-W64 project (x86_64-posix-seh-rev0, version 8.1.0). Info to all installations: -> To make Code::Blocks portable, create an empty "default.conf" file in the installation directory! IF UNSURE, USE "codeblocks-20.03mingw-setup.exe"!- 1
- 2
- 3
- 4
- 5
- 6
- 7
- 8
- 9
- 10
- 11
- 12
- 13
- 14
- 15
- 16
- 17
- 18
- 19
- 20
- 21
- 22
- 23
- 24
- 25
- 26
- 27
- 28
- 29
- 30
- 31
- 32
- 33
- 34
- 35
- 36
- 37
上面的最后一句写道如果不确定,就选择
codeblocks-20.03mingw-setup.exe
codeblocks-20.03mingw-setup.exe是自带MinGW的版本。
本文也选择这个版本,如果下载速度较慢,本文提供了一个国内百度网盘的版本
国内下载地址:
链接: https://pan.baidu.com/s/1DpyCREMuLY-vaqjOhoDDBw?pwd=vjad
提取码: vjad 复制这段内容后打开百度网盘手机App,操作更方便哦
–来自百度网盘超级会员v8的分享1.2 codeblocks-20.03mingw-setup.exe 安装
1.2.1 下载后的路径为:
D:\C++\codeblocks-20.03mingw-setup.exe
如下图:

1.2.2 安装并创建工程
- 双击codeblocks-20.03mingw-setup.exe包:
- 欢迎页面 进入欢迎页面,点击Next:

4. 用户许可 选择 I Agree
5. 选择需要安装的组件,选择Next都选择,选择Next

- 选择安装位置,点击Install
本文选择默认的安装位置,可以自定义位置
 选择Install后进行安装。

- 安装完毕,选择立即运行
安装完毕,弹出是否立即运行,选择立即运行

- 选择编译器
这一步会发现,没有在本地发现GCC编译器,这里选择随CodeBlocks安装的MinGW.

- codeblocks工具界面

- 创建一个C++项目
创建一个C++项目,选择File–>New–>Project
Create a new project

在弹出的窗口中,选择Console Application(控制台应用程序)
 选择C++:

- 设置项目名称为所在位置:
 第一行: Project title : 创建的项目文件名称
第二行:Folder to create project in:文件所在位置
第三行:第一行对应生成的文件名
第四行:第二行对应生成文件具体位置- 选择编译器
上一步骤完成后,选择Next
 选择Finsh后,工程创建介绍,如下

-
其他操作
点开Sources左边的+号–>可双击展开的main.cpp文件–>在右侧的main.cpp编辑区,可通过ctrl+滚轮的方式缩放文字:
 各个界面的作用如下:
常用的功能如下:
左边为项目文件区,该地方存储了你打开的项目,可以在这里方便地浏览你的项目结构。
中间为代码编辑区,在此处编写代码。
顶部,从左到右三个分别被圈起来的工具栏为:文件操作区、编译运行区、Debug工具区

-
编译并运行
每次编辑完代码后,需要单击绿色三角运行,运行前会提示需要先编译,点击是Y即可:
 点击是Y后,弹出如下结果:

-
在工程下创建新文件
选择新建文件–>选择Empty File:
 选择把新文件添加到当前的工程下:

选择文件名,选择保存:

保存后,会在工程下,创建一个新的文件:

注:
.c文件和.cpp文件的内容相同
对于.c文件,gcc编译后的func的.type为func;而对于.cpp文件gcc编译后的func的.type为_Z4funcv, 则编译器会根据文件后缀名对函数或变量名对某些修正,一个是C的编译方式,一个是C++的编译方式。gcc -S Untitled3.cpp- 1
g++无论是对.c文件还是.cpp文件都是按C++的方式编译的,这是和gcc是有区别的。gcc会根据文件后缀名来确定编译方式,而g++只有C++的编译方式
g++ -S Untitled3.cpp- 1
- 编译并运行
首先一个工程下,只能由一个main()函数,先修改main.cpp中的main()为main()。
然后在Untitled3.cpp中添加如下代码,代码的含义为检查当前g++支持的C++标准:
#includeint main(){ #if __cplusplus==201402L std::cout << "C++14" << std::endl; #elif __cplusplus==201103L std::cout << "C++11" << std::endl; #else std::cout << "C++" << std::endl; #endif return 0; } - 1
- 2
- 3
- 4
- 5
- 6
- 7
- 8
- 9
- 10
- 11
- 12
- 13
修改后,选择编译:
 再次选择运行,输出为:

-
相关阅读:
聚观早报 | 脸书泄露数据被罚20亿;iPhone15将全系支持灵动岛
贪心算法(二) | 重叠区间问题 | leecode刷题笔记
webassembly003 ggml GGML Tensor Library part-4 实现在浏览器端训练神经网络
ssl证书申请流程
12030.LMK03000时钟合成器
蓝标传媒PHP面试题(带答案)
生鲜店怎么做微信小程序
面向任务对话系统(TOD)综述
Selenium自动化测试之学会元素定位
欠拟合与过拟合
- 原文地址:https://blog.csdn.net/m0_38139250/article/details/127128422