-
SpringCloud之服务发现
1.服务提供者接口
- 以获取一个订单接口为例,order服务对user服务进行远程调用获取user基本信息
- user服务提供的接口如下:
package com.acx.controller; import com.acx.pojo.vo.ActorInfoVO; import org.springframework.web.bind.annotation.GetMapping; import org.springframework.web.bind.annotation.PathVariable; import org.springframework.web.bind.annotation.RequestMapping; import org.springframework.web.bind.annotation.RestController; @RestController @RequestMapping("user") public class UserController { @GetMapping("getUser/{id}") public ActorInfoVO getActor(@PathVariable("id") int id) { if ((id % 2) == 1) { ActorInfoVO actorInfoVO = new ActorInfoVO(); actorInfoVO.setAge(34); actorInfoVO.setGender("男"); actorInfoVO.setHead("http:localhost:8080/head/"); actorInfoVO.setNickname("别名:杀马特"); actorInfoVO.setUsername("张三"); return actorInfoVO; } return null; } }2.RestTemplate
2.1.配置RestTemplate实例
package com.acx.config; import org.springframework.cloud.client.loadbalancer.LoadBalanced; import org.springframework.context.annotation.Bean; import org.springframework.context.annotation.Configuration; import org.springframework.web.client.RestTemplate; @Configuration public class RestTemplateConfig { @Bean public RestTemplate restTemplate(){ return new RestTemplate(); } }2.2.远程调用业务接口
package com.acx.controller;

import com.acx.pojo.vo.ActorInfoVO;
import com.acx.pojo.vo.OrderInfoVO;
import org.slf4j.Logger;
import org.slf4j.LoggerFactory;
import org.springframework.beans.factory.annotation.Autowired;
import org.springframework.web.bind.annotation.GetMapping;
import org.springframework.web.bind.annotation.RequestMapping;
import org.springframework.web.bind.annotation.RestController;
import org.springframework.web.client.RestTemplate;

@RestController
@RequestMapping("order")
public class OrderController {

    private static final Logger logger = LoggerFactory.getLogger(OrderController.class);

    @Autowired
    private RestTemplate restTemplate;

    @GetMapping("getOne")
    public OrderInfoVO getOne() {
        logger.info("开始查询订单");
        OrderInfoVO orderInfoVO = new OrderInfoVO();
        orderInfoVO.setOrderName("订单123");
        orderInfoVO.setOrderSn("046b399937ad4271bcd5ed275f2b4682");
        orderInfoVO.setProductName("商品123");
        orderInfoVO.setProductNum(23);
        int userId = 1;
        String getUserUrl = "http://127.0.0.1:8083/user/getUser/" + userId;
        //服务发现
        ActorInfoVO actor = restTemplate.getForObject(getUserUrl, ActorInfoVO.class);
        orderInfoVO.setUser(actor);
        return orderInfoVO;
    }

}
2.3.前端调用获取订单接口
- http://localhost:8081/order/getOne
{
	"orderSn": "046b399937ad4271bcd5ed275f2b4682",
	"orderName": "订单123",
	"productNum": 23,
	"productName": "商品123",
	"user": {
		"username": "张三",
		"nickname": "别名:杀马特",
		"head": "http:localhost:8080/head/",
		"age": 34,
		"gender": "男"
	}
}
3.RestTemplate优化
- 前面我们order服务远程调用user接口时使用的是http://127.0.0.1:8083这种硬编码的方式进行调用的。
- 硬编码远程调用会存在不灵活的问题,比如user服务部署了多个节点,如user8083、user8084、user8085。如果仍然使用http://127.0.0.1:8083的方式来进行远程调用,则请求就只会命中到user8083这个服务器上面。
- 解决方案:将http://127.0.0.1:8083替换成http://user-service/ 并且配置远程调用负载均衡策略
3.1.RestTemplate实例加上@LoadBalanced标签配置
@Configuration
public class RestTemplateConfig {

    @Bean
    @LoadBalanced //开启ribbon负载均衡策略
    public RestTemplate restTemplate(){
        return new RestTemplate();
    }

}
3.2.更改order服务远程调用接口
package com.acx.controller;

import com.acx.pojo.vo.ActorInfoVO;
import com.acx.pojo.vo.OrderInfoVO;
import org.slf4j.Logger;
import org.slf4j.LoggerFactory;
import org.springframework.beans.factory.annotation.Autowired;
import org.springframework.web.bind.annotation.GetMapping;
import org.springframework.web.bind.annotation.RequestMapping;
import org.springframework.web.bind.annotation.RestController;
import org.springframework.web.client.RestTemplate;

@RestController
@RequestMapping("order")
public class OrderController {

    private static final Logger logger = LoggerFactory.getLogger(OrderController.class);

    @Autowired
    private RestTemplate restTemplate;

    @GetMapping("getOne")
    public OrderInfoVO getOne() {
        logger.info("开始查询订单");
        OrderInfoVO orderInfoVO = new OrderInfoVO();
        orderInfoVO.setOrderName("订单123");
        orderInfoVO.setOrderSn("046b399937ad4271bcd5ed275f2b4682");
        orderInfoVO.setProductName("商品123");
        orderInfoVO.setProductNum(23);
        int userId = 1;
//        String getUserUrl = "http://127.0.0.1:8083/user/getUser/" + userId;
        String getUserUrl = "http://user-service/user/getUser/" + userId;
        //服务发现
        ActorInfoVO actor = restTemplate.getForObject(getUserUrl, ActorInfoVO.class);
        orderInfoVO.setUser(actor);
        return orderInfoVO;
    }

}
3.3.user服务开启多实例测试
- 使用idea开始多个user服务实例以后,如user8083、user8084、user8085,然后我们多请求几次order接口,发现order接口调用user服务器的请求均匀的路由到了每个节点之上。测试请自己实现。
3.4.微服务调用流程
- 远程调用发起方会向eureka注册中心拉取当前注册服务列表,然后根据服务名找到目标服务的所有服务节点
- 找到目标服务所有节点以后,服务发起方会通过ribbon负载均衡策略选择具体调用哪一个目标服务节点。

4.Ribbon负载均衡
4.1.Ribbon核心类:LoadBalancerInterceptor
- 最重要的是loadBalancer.execute方法
public class LoadBalancerInterceptor implements ClientHttpRequestInterceptor {

	private LoadBalancerClient loadBalancer;

	private LoadBalancerRequestFactory requestFactory;

	public LoadBalancerInterceptor(LoadBalancerClient loadBalancer,
			LoadBalancerRequestFactory requestFactory) {
		this.loadBalancer = loadBalancer;
		this.requestFactory = requestFactory;
	}

	public LoadBalancerInterceptor(LoadBalancerClient loadBalancer) {
		// for backwards compatibility
		this(loadBalancer, new LoadBalancerRequestFactory(loadBalancer));
	}

	@Override
	public ClientHttpResponse intercept(final HttpRequest request, final byte[] body,
			final ClientHttpRequestExecution execution) throws IOException {
		final URI originalUri = request.getURI();
		String serviceName = originalUri.getHost();
		Assert.state(serviceName != null,
				"Request URI does not contain a valid hostname: " + originalUri);
		//执行负载均衡核心方法
        return this.loadBalancer.execute(serviceName,
				this.requestFactory.createRequest(request, body, execution));
	}

}
4.2. LoadBalancerClient.execute方法
- 最核心的方法就是:getServer方法,实际上就是调用的ILoadBalancer.chooseServer方法,而执行这个方法实际上是执行其子类BaseLoadBalancer.chooseServer方法。
public <T> T execute(String serviceId, LoadBalancerRequest<T> request) throws IOException {
        return this.execute(serviceId, (LoadBalancerRequest)request, (Object)null);
    }

    public <T> T execute(String serviceId, LoadBalancerRequest<T> request, Object hint) throws IOException {
        ILoadBalancer loadBalancer = this.getLoadBalancer(serviceId);
        //根据服务名称获取具体的服务节点对象
        Server server = this.getServer(loadBalancer, hint);
        if (server == null) {
            throw new IllegalStateException("No instances available for " + serviceId);
        } else {
            RibbonLoadBalancerClient.RibbonServer ribbonServer = new RibbonLoadBalancerClient.RibbonServer(serviceId, server, this.isSecure(server, serviceId), this.serverIntrospector(serviceId).getMetadata(server));
            return this.execute(serviceId, (ServiceInstance)ribbonServer, (LoadBalancerRequest)request);
        }
    }

    protected Server getServer(ILoadBalancer loadBalancer, Object hint) {
        return loadBalancer == null ? null : loadBalancer.chooseServer(hint != null ? hint : "default");
    }
4.3.BaseLoadBalancer.chooseServer方法
- 最重要的方法就是rule.choose(key)方法,即IRule类,这里springboot默认给的是轮询RoundRobinRule。
- 备注:在更高版本的spring cloud和springboot里面,ribbon默认的负载均衡策略是ZoneAvoidanceRule。即使用Zone对服务器分类,这个Zone可以理解为一个机房/区域,会先选择一个Zone,然后对这个Zone内的服务器进行轮询。
 protected IRule rule = DEFAULT_RULE;
 private final static IRule DEFAULT_RULE = new RoundRobinRule(); //轮询

public Server chooseServer(Object key) {
        if (counter == null) {
            counter = createCounter();
        }
        counter.increment();
        if (rule == null) {
            return null;
        } else {
            try {
                //通过路由规则选择节点
                return rule.choose(key);
            } catch (Exception e) {
                logger.warn("LoadBalancer [{}]:  Error choosing server for key {}", name, key, e);
                return null;
            }
        }
    }
4.4.IRule类
- 它有一下几个子类:
ZoneAvoidanceRule: 按区域轮询策略
RoundRobinRule: 轮询
RandomRule: 随机轮询
RetryRule: 重试轮询
4.5.配置负载均衡策略
- 因为我们现在使用的这个版本的springboot和springcloud的负载均衡策略默认就是轮询的,如果我们想配置其余的负载均衡策略,也可以自定义配置文件就行了
- 全局配置:即调用者调用服务A、B、C等提供者接口都采用此负载均衡策略
//方式一 @Bean public IRule retryRule(){ return new RetryRule(); }ribbon: # 方式二 NFLoadBalancerRuleClassName: com.netflix.loadbalancer.RetryRule- 局部配置:即调用者服务给单独的服务配置负载均衡的策略,如下只对user-service服务有效:
userservice:
  ribbon:
    NFLoadBalancerRuleClassName: com.netflix.loadbalancer.RetryRule
4.6.Ribbon饥饿加载
- Ribbon默认采用的是懒加载,即第一次访问时才会去创建LoadBalancerClient对象,第一次请求时间会很长
- 饥饿加载:项目启动时就会创建LoadBalancerClient对象
- 开启饥饿加载:
ribbon: eager-load: enable: true # 开启饥饿加载 clients: - user-service # 指明主要饥饿加载的服务5.OpenFeign
5.1.为什么要用OpenFeign替换RestTemplate
OpenFeign是一种声明式的HTTP客户端,而RestTemplate具有代码可读性差、调用参数复杂难维护等缺点。故选择OpenFeign更适合我们的微服务远程调用场景。
5.2.OpenFeign实践
步骤一:Order服务调用方引入OpenFeign的依赖
<dependency> <groupId>org.springframework.cloudgroupId> <artifactId>spring-cloud-starter-openfeignartifactId> dependency>步骤二:在启动类上加上@EnableFeignClients标签开启Feign功能
package com.acx; import org.springframework.boot.SpringApplication; import org.springframework.boot.autoconfigure.SpringBootApplication; import org.springframework.cloud.openfeign.EnableFeignClients; @SpringBootApplication @EnableFeignClients public class OrderApplication { public static void main(String[] args) { SpringApplication.run(OrderApplication.class, args); } }步骤三:编写Feign客户端接口代码:使用@FeignClient()指明调用那个服务,接口按照spring mvc写就行。
package com.acx.client; import com.acx.pojo.vo.ActorInfoVO; import org.springframework.cloud.openfeign.FeignClient; import org.springframework.web.bind.annotation.GetMapping; import org.springframework.web.bind.annotation.PathVariable; @FeignClient("USER-SERVICE") public interface UserClient { @GetMapping("/user/getUser/{id}") ActorInfoVO getUser(@PathVariable("id") int id); }最后:在业务代码里面使用Feign接口进行User服务调用
package com.acx.controller;

import com.acx.client.UserClient;
import com.acx.pojo.vo.ActorInfoVO;
import com.acx.pojo.vo.OrderInfoVO;
import org.slf4j.Logger;
import org.slf4j.LoggerFactory;
import org.springframework.beans.factory.annotation.Autowired;
import org.springframework.web.bind.annotation.GetMapping;
import org.springframework.web.bind.annotation.RequestMapping;
import org.springframework.web.bind.annotation.RestController;
import org.springframework.web.client.RestTemplate;

@RestController
@RequestMapping("order")
public class OrderController {

    private static final Logger logger = LoggerFactory.getLogger(OrderController.class);

    @Autowired
    private RestTemplate restTemplate;

    @Autowired
    private UserClient userClient;

    @GetMapping("getOne")
    public OrderInfoVO getOne() {
        logger.info("开始查询订单");
        OrderInfoVO orderInfoVO = new OrderInfoVO();
        orderInfoVO.setOrderName("订单123");
        orderInfoVO.setOrderSn("046b399937ad4271bcd5ed275f2b4682");
        orderInfoVO.setProductName("商品123");
        orderInfoVO.setProductNum(23);
        int userId = 1;
//        String getUserUrl = "http://127.0.0.1:8083/user/getUser/" + userId;
//        String getUserUrl = "http://user-service/user/getUser/" + userId;
        //服务发现
//        ActorInfoVO actor = restTemplate.getForObject(getUserUrl, ActorInfoVO.class);
        ActorInfoVO actor = userClient.getUser(userId);
        orderInfoVO.setUser(actor);
        return orderInfoVO;
    }

}
5.3.Feign的自定义配置
主要的可配置项
配置项 说明 Level:日志级别 有4中级别:NONE(不输出远程调用日志) BASIC(只输出请求URL和响应状态码及请求 时间) HEADERS(将BASIC信息和请求头信息输出), FULL(输出完成的请求) Decoder:响应结果解析器 默认使用SpringDecoder解码器,会调用Spring MVC 中的消息转换器HttpMessageConverter进行解码。 Encoder:请求参数编码器 默认使用SpringEncoder编码器,它会调用Spring MVC 中的消息转换器( HttpMessageConverter)进行编码Contract:契约配置 OpenFeign中默认使用的是springmvc的注解 Retryer:失败重试机制 默认没有重试机制,可以使用Ribbon配置重置机制 文件方式配置
- 以设置level等级为例:一般采用basic或者none即可,这样日志少,OpenFeign的性能就越高
- 配置全局生效:即所有被调用的服务都生效
feign: client: config: default: # 全局 loggerLevel: FULL- 配置局部生效:
feign:
  client:
    config:
      userservice: # 局部生效 userservice
        loggerLevel: FULL
代码方式配置
- 编写配置代码
package com.acx.config; import feign.Logger; import org.springframework.context.annotation.Bean; import org.springframework.context.annotation.Configuration; @Configuration public class FeignConfig { @Bean public Logger.Level feignLevel() { return Logger.Level.FULL; } }- 配置全局生效:@EnableFeignClients更换默认配置;这样配置是全局生效的,即不管Order服务调用那个服务的接口,日志打印规则都按照FeignConfig配置的打印。
package com.acx; import com.acx.config.FeignConfig; import org.springframework.boot.SpringApplication; import org.springframework.boot.autoconfigure.SpringBootApplication; import org.springframework.cloud.openfeign.EnableFeignClients; @SpringBootApplication @EnableFeignClients(defaultConfiguration = FeignConfig.class) public class OrderApplication { public static void main(String[] args) { SpringApplication.run(OrderApplication.class, args); } }- 配置局部生效:如下@FeignClient标签里面配置user-service和feign配置类,这样这个日志配置就只对调用user-service接口时生效。
package com.acx.client;

import com.acx.config.FeignConfig;
import com.acx.pojo.vo.ActorInfoVO;
import org.springframework.cloud.openfeign.FeignClient;
import org.springframework.web.bind.annotation.GetMapping;
import org.springframework.web.bind.annotation.PathVariable;

@FeignClient(value = "USER-SERVICE",configuration = FeignConfig.class)
public interface UserClient {

    @GetMapping("/user/getUser/{id}")
    ActorInfoVO getUser(@PathVariable("id") int id);

}
5.4.Feign的性能优化
Feign的底层HTTP客户端选型:
URLConnection:feign默认集成的HTTP客户端,JDK自带,不支持连接池,性能不好
Apache HttpClient:支持连接池
OKHttp:支持连接池
Feign性能优化:
-
思路:使用支持连接池的客户端替换URLConnection
-
Order服务引入依赖:这个jar包包括了Apache HttpClient和OKHttp两大客户端,选择一种即可
<dependency> <groupId>io.github.openfeigngroupId> <artifactId>feign-httpclientartifactId> dependency>- 编写Apache HttpClient配置
feign: httpclient: enabled: true # 开启feign对Apache HttpClient的支持 max-connections: 200 # 最大的连接数 max-connections-per-route: 50 # 每个路径的最大连接数- 编写OKHttp配置
feign:
  okhttp:
    enabled: true # 开启feign对Apache HttpClient的支持
5.5.Feign的最佳实践
方式一(耦合):服务提供者定义一个API接口,写一个Feign接口和Controller接口都集成此API接口,然后服务消费者引入服务提供者的依赖来调用Feign客户端。
缺点:服务提供方和服务消费方紧耦合了。参数列表中的注解映射并不会被集成,所以我们再Controller接口里面还要再次声明方法、参数列表、注解。故此方式不推荐使用。
方式二(抽取):将 FeignClient 抽取为独立模块,并且把接口有关的 POJO、默认的 Feign 配置都放到这个模块中,提供给所有消费者使用。
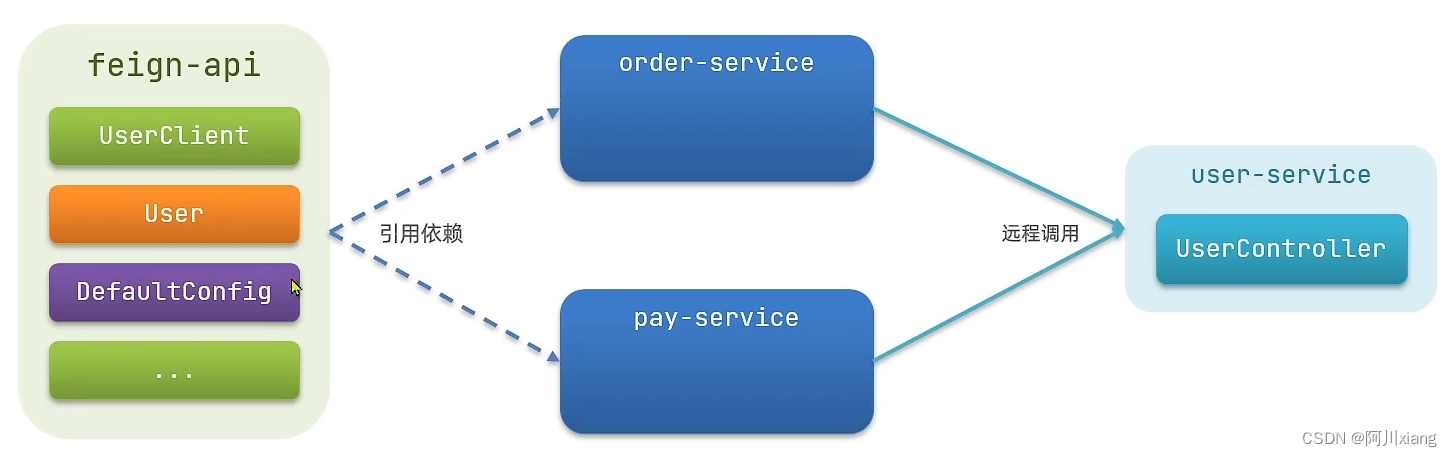
步骤一:新建feign-api包,并将前面的UserClient转移到这个包中,pom.xml配置如下:
<project xmlns="http://maven.apache.org/POM/4.0.0" xmlns:xsi="http://www.w3.org/2001/XMLSchema-instance" xsi:schemaLocation="http://maven.apache.org/POM/4.0.0 http://maven.apache.org/xsd/maven-4.0.0.xsd"> <parent> <artifactId>cloud-demoartifactId> <groupId>com.acxgroupId> <version>1.0.0version> parent> <modelVersion>4.0.0modelVersion> <groupId>com.acxgroupId> <artifactId>feign-apiartifactId> <version>1.0.0version> <dependencies> <dependency> <groupId>com.acxgroupId> <artifactId>cloud-commonartifactId> <version>1.0.0version> dependency> <dependency> <groupId>org.springframework.cloudgroupId> <artifactId>spring-cloud-starter-openfeignartifactId> dependency> <dependency> <groupId>io.github.openfeigngroupId> <artifactId>feign-httpclientartifactId> dependency> dependencies> project>步骤二:Order项目引入feign-api包进行微服务调用
<project xmlns="http://maven.apache.org/POM/4.0.0"
         xmlns:xsi="http://www.w3.org/2001/XMLSchema-instance"
         xsi:schemaLocation="http://maven.apache.org/POM/4.0.0 http://maven.apache.org/xsd/maven-4.0.0.xsd">
    <parent>
        <artifactId>cloud-demoartifactId>
        <groupId>com.acxgroupId>
        <version>1.0.0version>
    parent>
    <modelVersion>4.0.0modelVersion>

    <groupId>com.acxgroupId>
    <artifactId>order-serviceartifactId>
    <version>1.0.0version>
    <packaging>jarpackaging>

    <dependencies>
        <dependency>
            <groupId>com.acxgroupId>
            <artifactId>cloud-commonartifactId>
            <version>1.0.0version>
        dependency>
        <dependency>
            <groupId>com.acxgroupId>
            <artifactId>feign-apiartifactId>
            <version>1.0.0version>
        dependency>
        <dependency>
            <groupId>org.springframework.cloudgroupId>
            <artifactId>spring-cloud-starter-netflix-eureka-clientartifactId>
        dependency>
    dependencies>
project>
5.6.FeignClient接口扫描报错
- 当我们写的FeignClient接口不在SpringBootApplication的扫描包范围内时,一般有两种解决方案:
- 方案1(全局生效):在@EnableFeignClients指明basePackages为FeignClient接口所在的包,这样就能够扫描到了。此种方式全局生效的,即不管是调用哪个微服务都按照这个配置进行FeignClient接口扫描。
package com.acx; import com.acx.config.FeignConfig; import org.springframework.boot.SpringApplication; import org.springframework.boot.autoconfigure.SpringBootApplication; import org.springframework.cloud.openfeign.EnableFeignClients; @SpringBootApplication @EnableFeignClients(defaultConfiguration = FeignConfig.class,basePackages = "com.acx.client") public class OrderApplication { public static void main(String[] args) { SpringApplication.run(OrderApplication.class, args); } }- 方案2(局部生效): 在@EnableFeignClients指明具体的FeignClient字节码(clients)。这样就能扫描到UserClient接口了,但是这个不是全局的,只对UserClient包扫描不到生效。
package com.acx; import com.acx.client.UserClient; import com.acx.config.FeignConfig; import org.springframework.boot.SpringApplication; import org.springframework.boot.autoconfigure.SpringBootApplication; import org.springframework.cloud.openfeign.EnableFeignClients; @SpringBootApplication @EnableFeignClients(defaultConfiguration = FeignConfig.class,clients = {UserClient.class}) public class OrderApplication { public static void main(String[] args) { SpringApplication.run(OrderApplication.class, args); } } -
相关阅读:
爬虫Python
java毕业设计大学生综合素质测评系统Mybatis+系统+数据库+调试部署
clickhouse安装部署
拖拽表单设计器易操作、好灵活,创造高效办公!
Web 应用分析
算法通关村第八关|白银|二叉树的深度和高度问题【持续更新】
Docker入门——安装部署(openEuler)、镜像加速
《C++ Primer》第7章 类(一)
YOLOv8检测香蕉
Java Web 7 JavaScript 7.5 BOM
- 原文地址:https://blog.csdn.net/weixin_43054590/article/details/127097945