什么是SCSS
Sass: Sass Basics (sass-lang.com)
SCSS 是 CSS 的预处理器,它比常规 CSS 更强大。
- 可以嵌套选择器,更好维护、管理代码。
- 可以将各种值存储到变量中,方便复用。
- 可以使用 Mixins 混合重复代码,方便复用。
scss导入html
方法一 VSCODE 插件

方法二 手动编译
npm install -g sass

sass input.scss output.css ::单次编译
sass --watch scss/index.scss css/index.css ::多次编译

"stylesheet" href="css/index.css"> ::写在HTML里
可能遇到的问题
Refused to apply style from 'http://127.0.0.1:5500/CSS媒体查询/css/style.css' because its MIME type ('text/html') is not a supported stylesheet MIME type, and strict MIME checking is enabled.
解决方法: 404 Not Found,提供的文件地址有误。
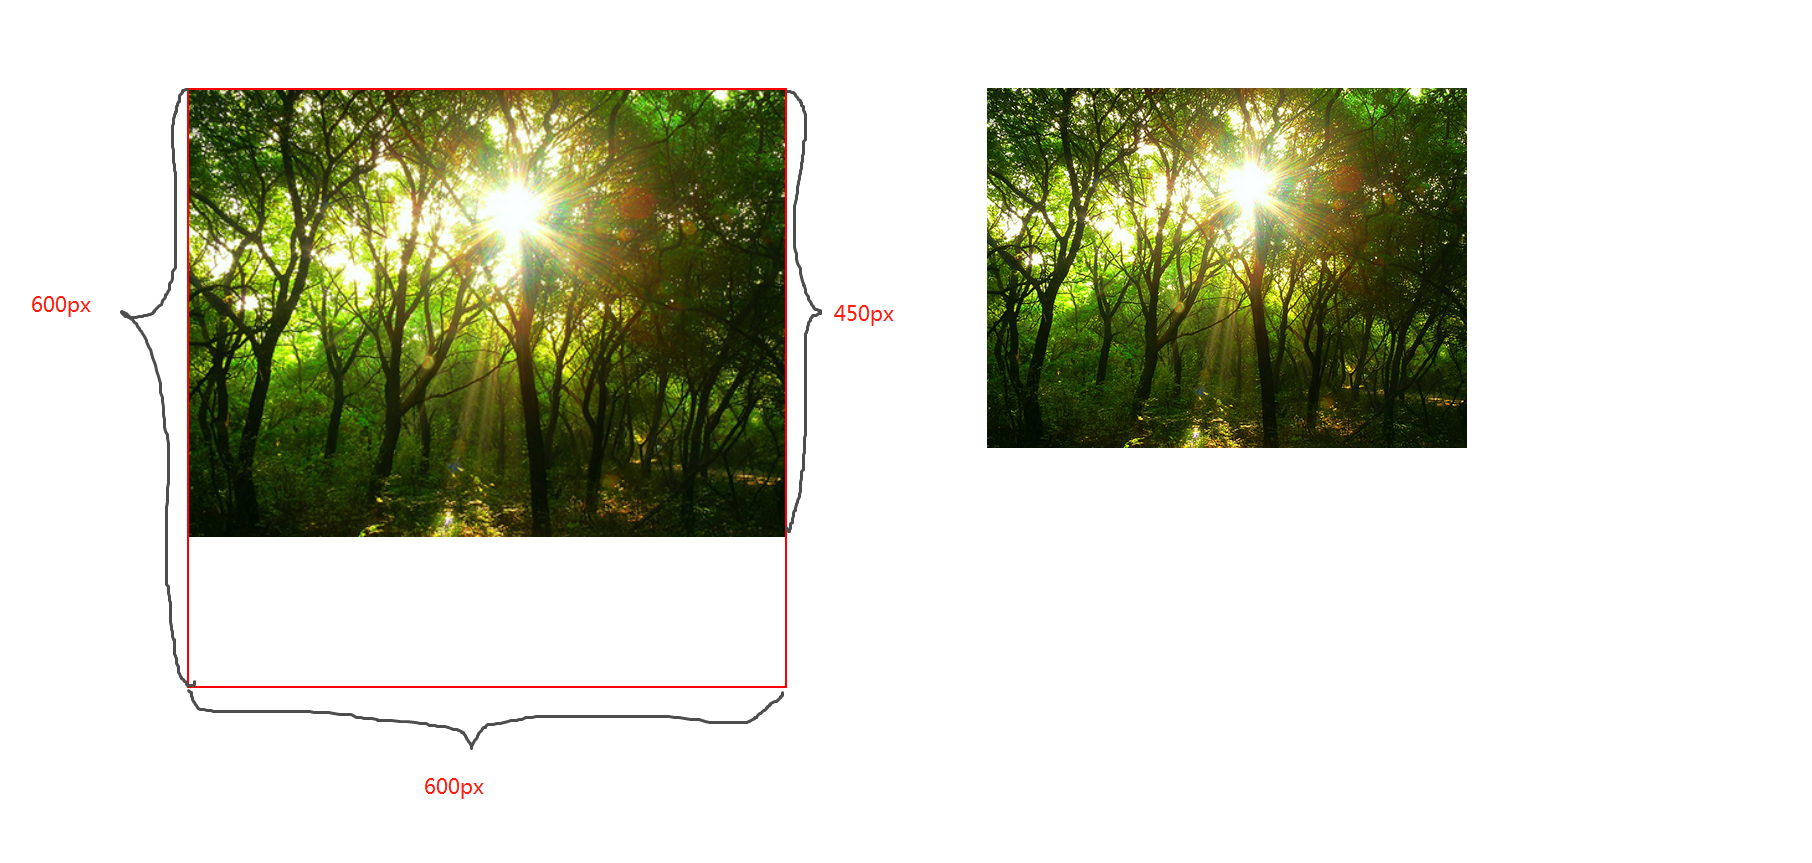
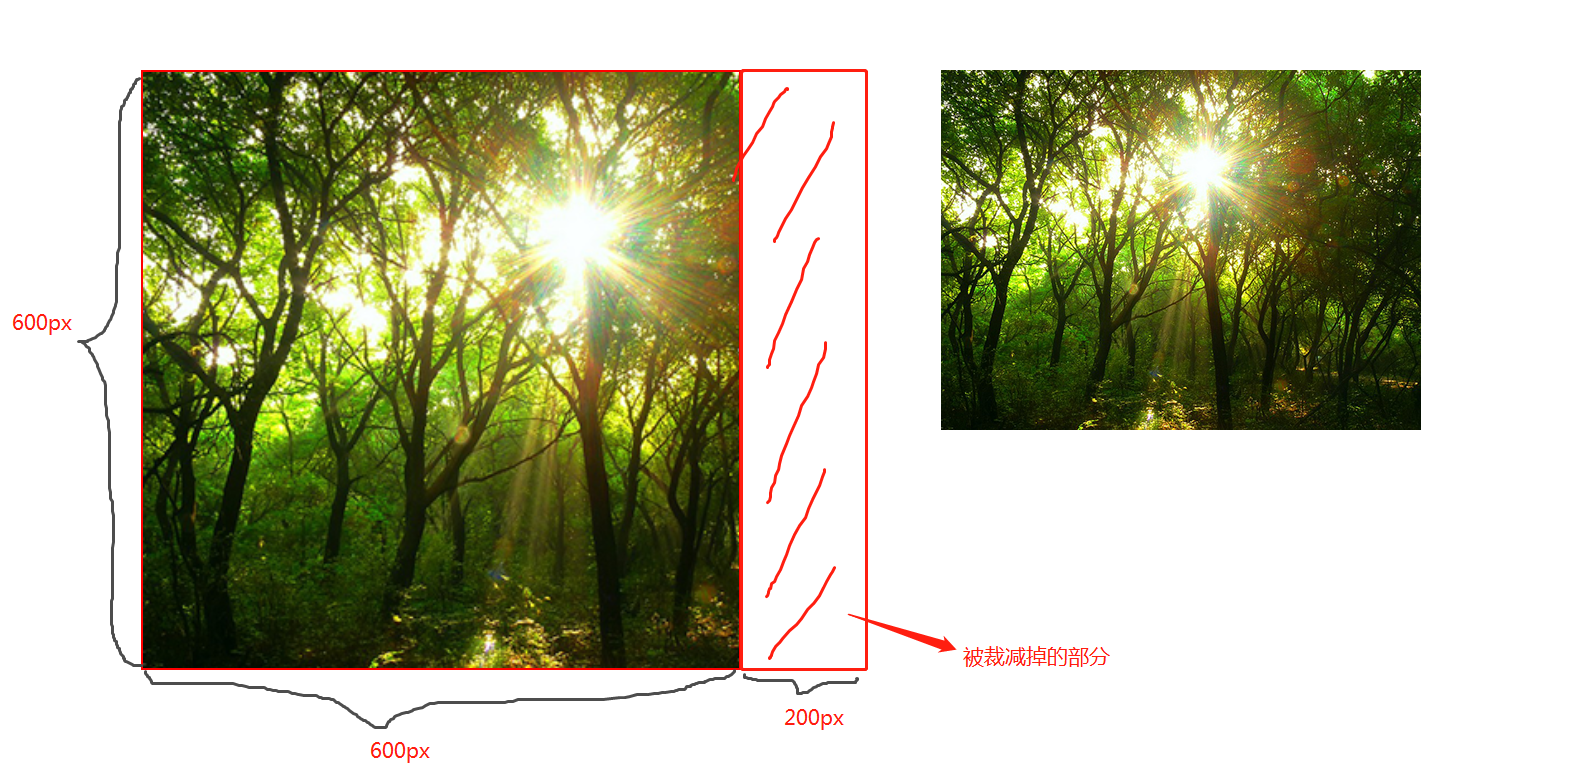
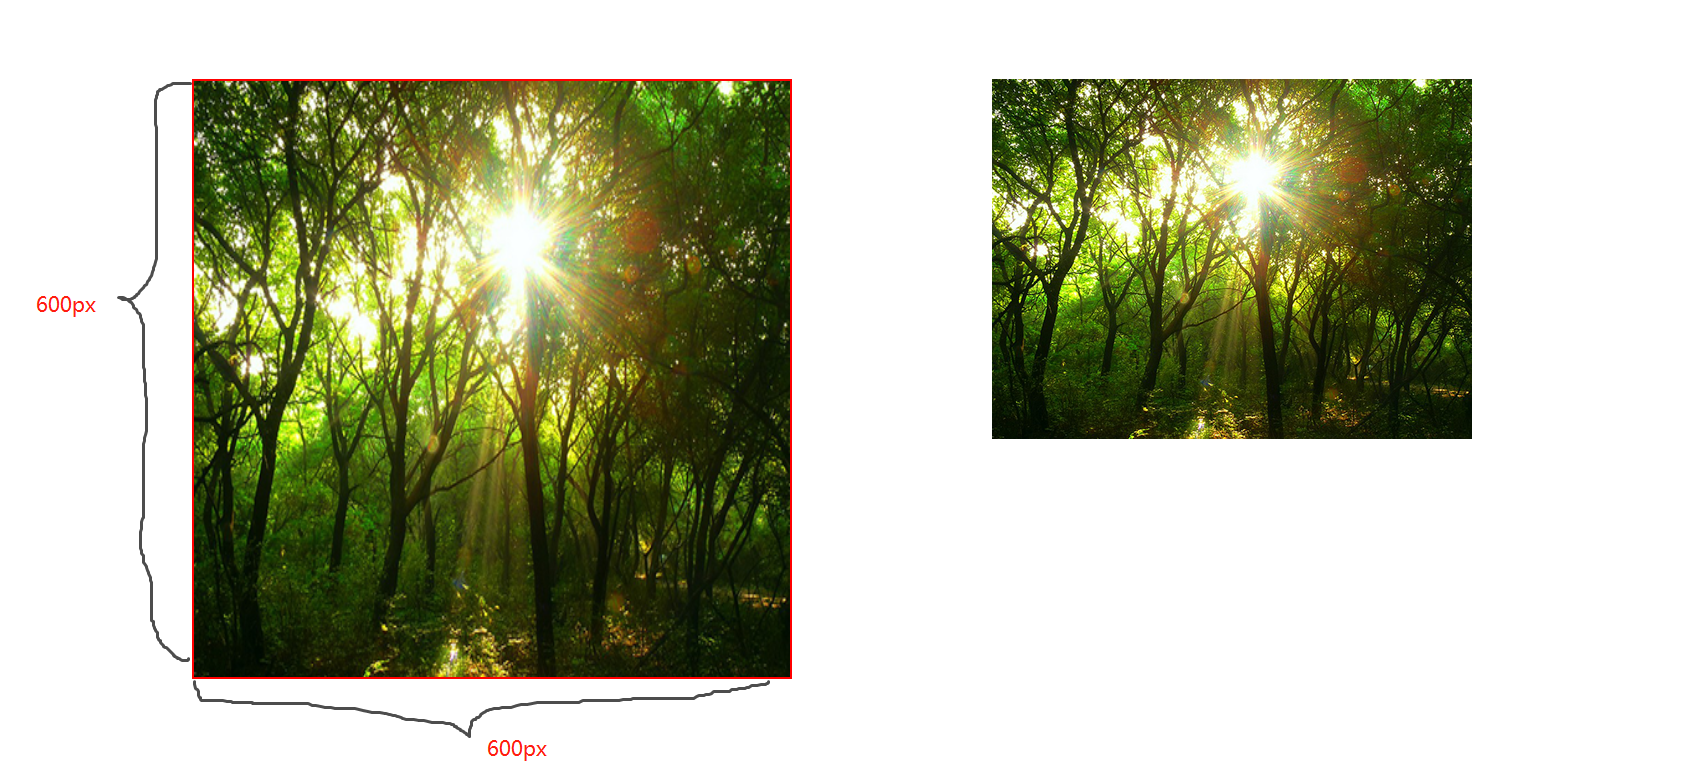
CSS属性 background-size
contain;
图片宽高比不变,缩放至图片自身能完全显示出来,所以容器会有留白区域
cover;
图片宽高比不变,铺满整个容器的宽高,而图片多出的部分则会被截掉
100%;
图片宽高比改变,缩放至和div宽高一致的尺寸。
CSS媒体查询
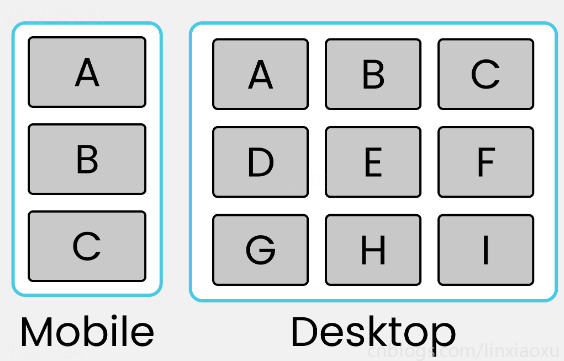
CSS媒体查询允许您创建从桌面到移动设备的所有屏幕尺寸的响应式网站。
语法
定义
@media screen and (max-width: 768px){
  .container{
   // 你的代码
  }
}
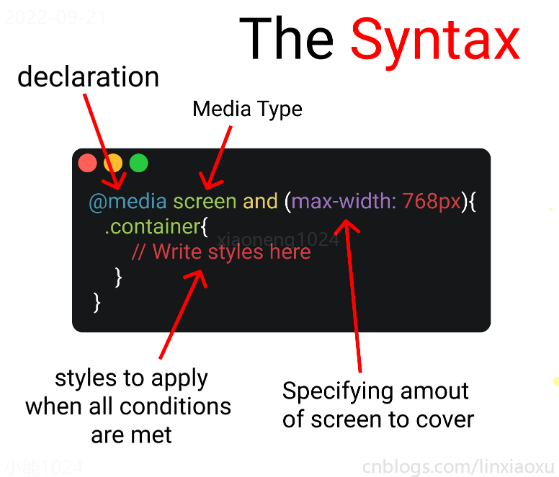
- 媒体查询声明, @media
- 媒体查询类型, screen
- 覆盖的屏幕范围, max-width: 768px
- 更改样式, Write styles here
深入
媒体查询声明
媒体查询以@media声明开头。目的是告诉浏览器我们已指定媒体查询。
媒体查询类型
- all 所有媒体设备
- print 打印设备
- screen 电脑、平板、手机屏幕
- speech 屏幕阅读器
@media screen
为什么要加and
在肯德基买东西,你想要炸鸡和汉堡,这是两个需求条件。
现在你已经确定了一个条件,即 screen 媒体查询类型。你要指定其他条件,比如想要规定在某一个屏幕范围内,那么就可以用 and 来连接。
@media screen and (max-width : 768px) {
  .container{
     // 在screen媒体类型,屏幕宽度<=768px时这部分代码将被触发
  }
}
跳过查询类型
你可以只用 min-width & max-width 来跳过媒体查询类型。
@media (min-width : 480px) and (max-width : 768px) {
  .container{
     // 在屏幕宽度为 480px 和 768px 之间这部分代码将被触发
  }
}
多个条件需求
当条件大于等于三个时,可以用 comma 连接。
@media screen, (min-width : 480px) and (max-width : 768px) {
  .container{
     // 在screen媒体类型,屏幕宽度为 480px 和 768px 之间这部分代码将被触发
  }
}
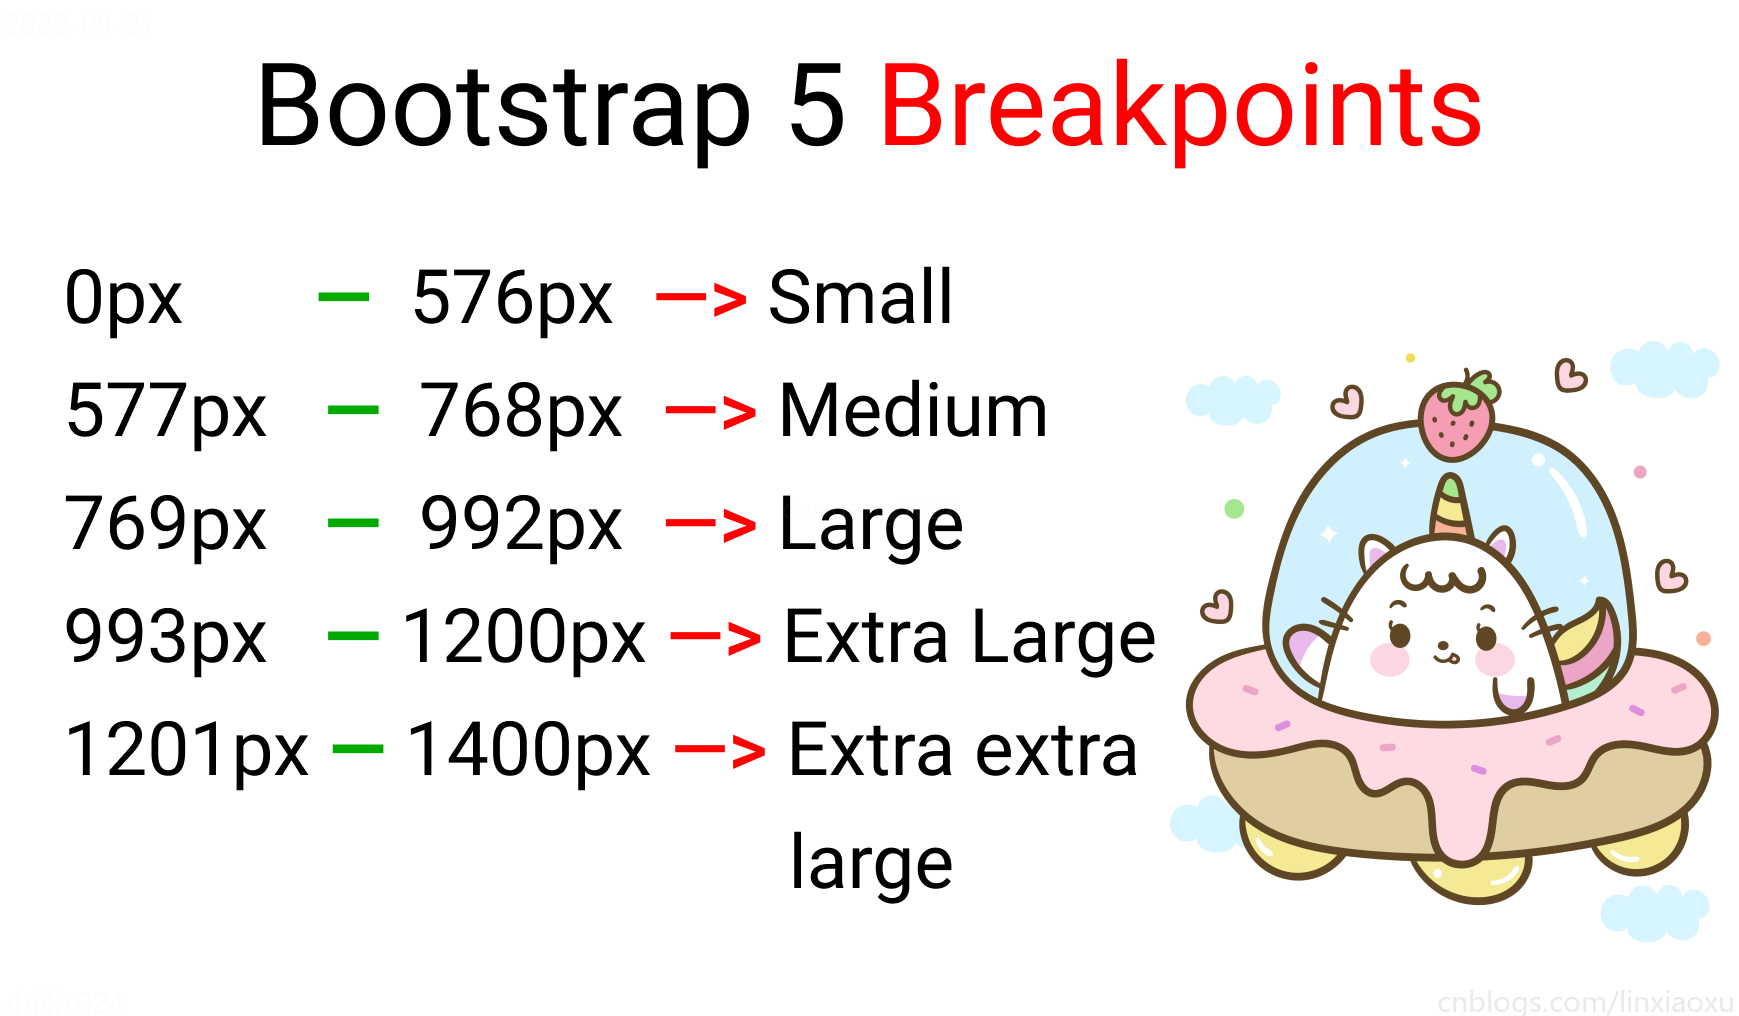
屏幕断点
屏幕断点(screen break-point)用于规定一个范围内的屏幕宽度所属类别,目前没有标准的屏幕断点。
学习使用、案例代码下载
学习使用①初入响应式
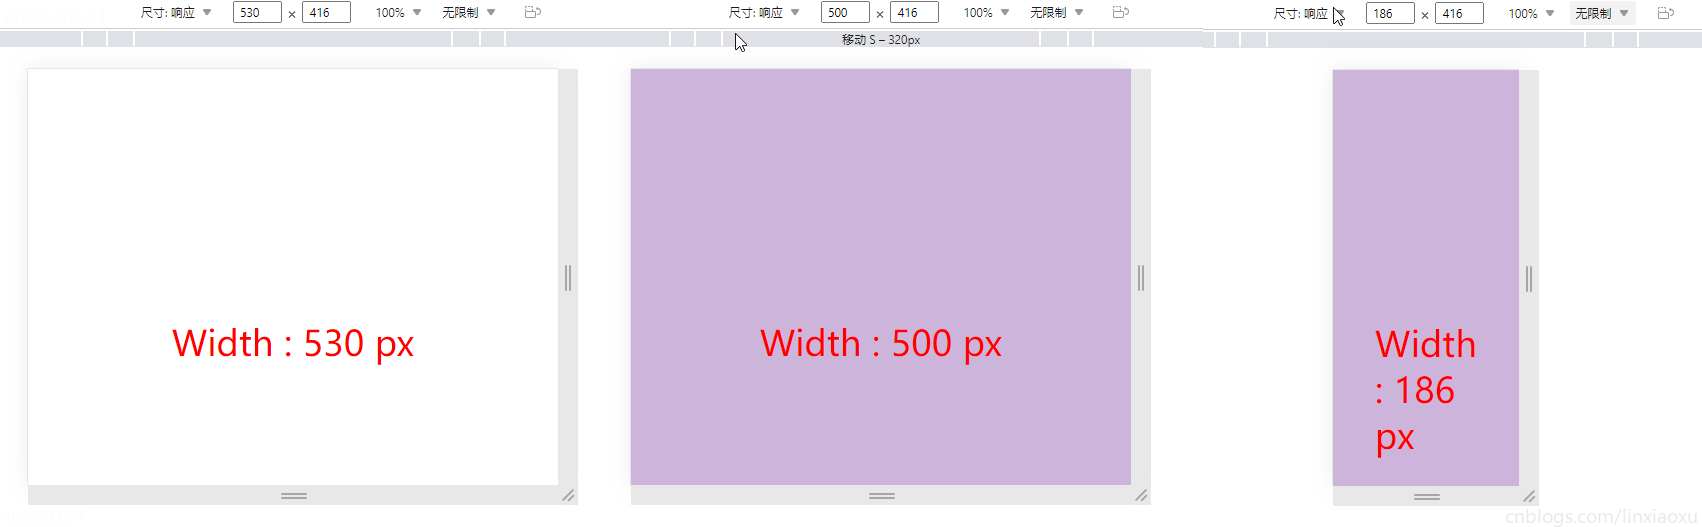
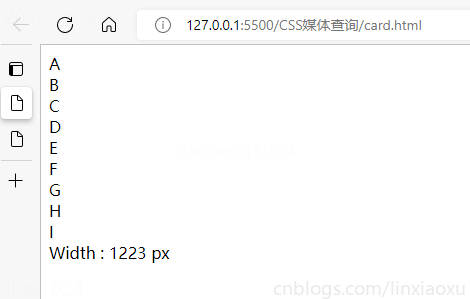
让我们试着写一个响应式页面 。新建main.js、media.html、style.scss,即时编译并watch style.scss。
main.js
// 当改变窗口大小、窗口加载时触发 screen
window.onresize = screen;
window.onload = screen;

// 一个函数获取当前屏幕宽度并将内容设置在ID为size的元素上

function screen() {
  Width = window.innerWidth;
  document.getElementById("size").innerHTML
   = "Width : " + Width + " px"
}
media.html
首先我们先建立一个media.html。然后导入刚刚写的main.js。导入style.css,是scss即时编译的css文件。
html>
<html lang="en">
<head>
<title>title>
<meta charset="UTF-8">
<meta name="viewport" content="width=device-width, initial-scale=1">
<link href="./style.css" rel="stylesheet">
<script type="text/javascript" src="./main.js">script>
head>
<body>
<div class="container">
<div id="size">
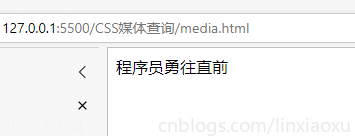
程序员勇往直前,当导入main.js后,这句话会被替换掉
div>
div>
body>
html>
保存颜色变量
SCSS创建四个变量分别保存十六进制RGB
$color-1 : #cdb4db ; // 手机端
$color-2 : #fff1e6 ; // 平板端
$color-3 : #52b788 ; // 笔记本端
$color-4 : #bee1e6 ; // 台式大屏
居中container元素
.container {

  display: grid;
  place-items: center;

  background-color: $color-1;
  height: 100vh;
}
place-items 是 align-items 、 justify-items 的简写。
max-width 媒体查询
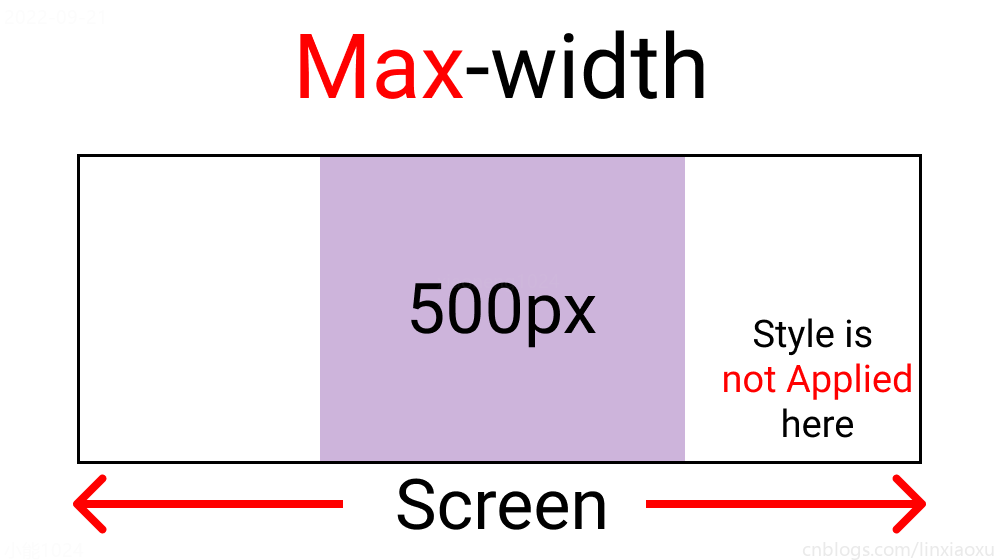
@media screen and (max-width : 500px) {
  .container {
    background-color: $color-1;
  }
}
😄当前完整scss代码
$color-1 : #cdb4db; // 手机端
$color-2 : #fff1e6; // 平板端
$color-3 : #52b788; // 笔记本端
$color-4 : #bee1e6; // 台式大屏

* {
  margin: 0px;
  padding: 0px;
  box-sizing: border-box;

  body {
    font-size: 35px;
    font-family: sans-serif;
  }
}

.container {
  //元素居中

  display: grid;
  place-items: center;

  background-color: $color-1;
  height: 100vh;
}

#size {
  position: absolute;

  top: 60%;
  left: 50%;

  transform: translateX(-50%);

  color: red;
  font-size: 35px;
}

.text {
  // 还没添加内容
}

.container {
  background-color: white;
  height: 100vh;
  display: grid;
  place-items: center;
}


@media screen and (max-width : 500px) {
  .container {
    background-color: $color-1;
  }
}
min-width 媒体查询
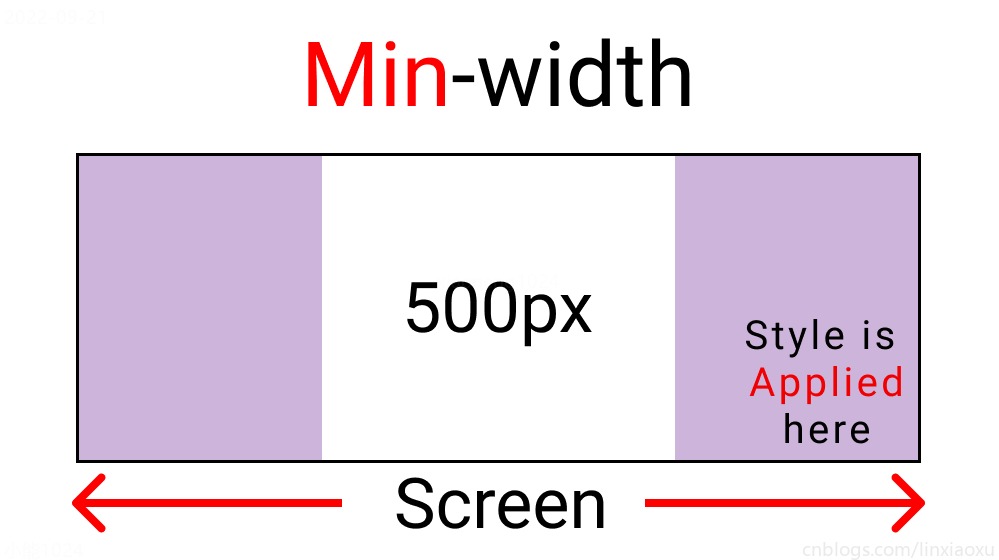
@media screen and (min-width : 500px){
  .container{
    background-color: $color-1;
  }
}
与max-width相反。宽度>=500px时代码生效。
屏幕断点
根据四种类型,我们将有四个媒体查询。
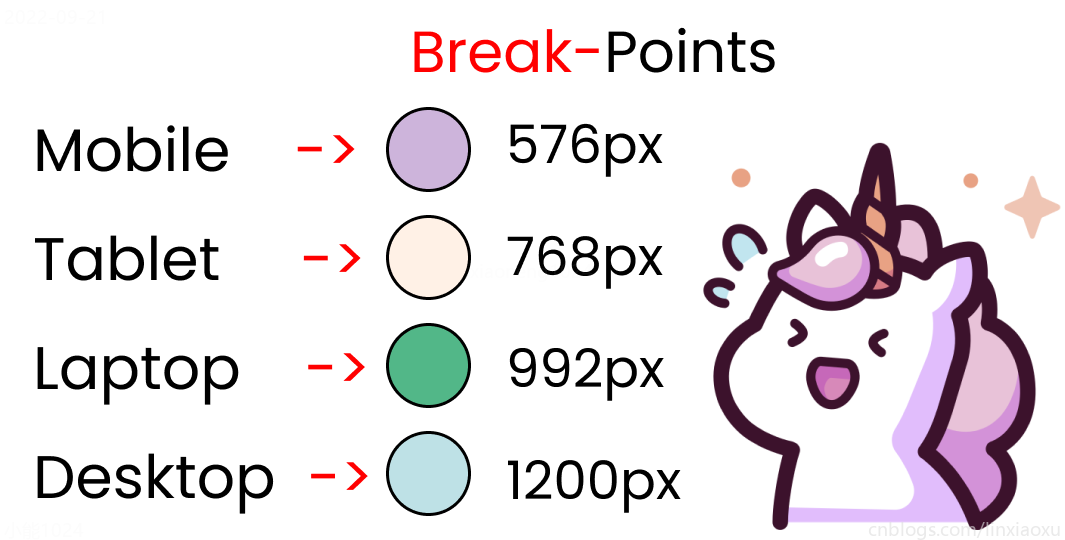
给scss添加新的变量
$mobile : 576px;
$tablet : 768px;
$laptop : 992px;
$desktop : 1200px;
添加一系列媒体查询
在添加媒体查询时,需要遵循正确的数据,从最大宽度到最小宽度。
@media screen and (max-width: $desktop){
  .container{
    background-color: $color-4;
  }
}
@media screen and (max-width: $laptop){
  .container{
    background-color: $color-3;
  }
}
@media screen and (max-width: $tablet){
  .container{
    background-color: $color-2;
  }
}
@media screen and (max-width : $mobile){
  .container{
    background-color: $color-1;
  }
}
现在改变屏幕宽度将显示不同的背景颜色。
学习使用②响应式个人介绍
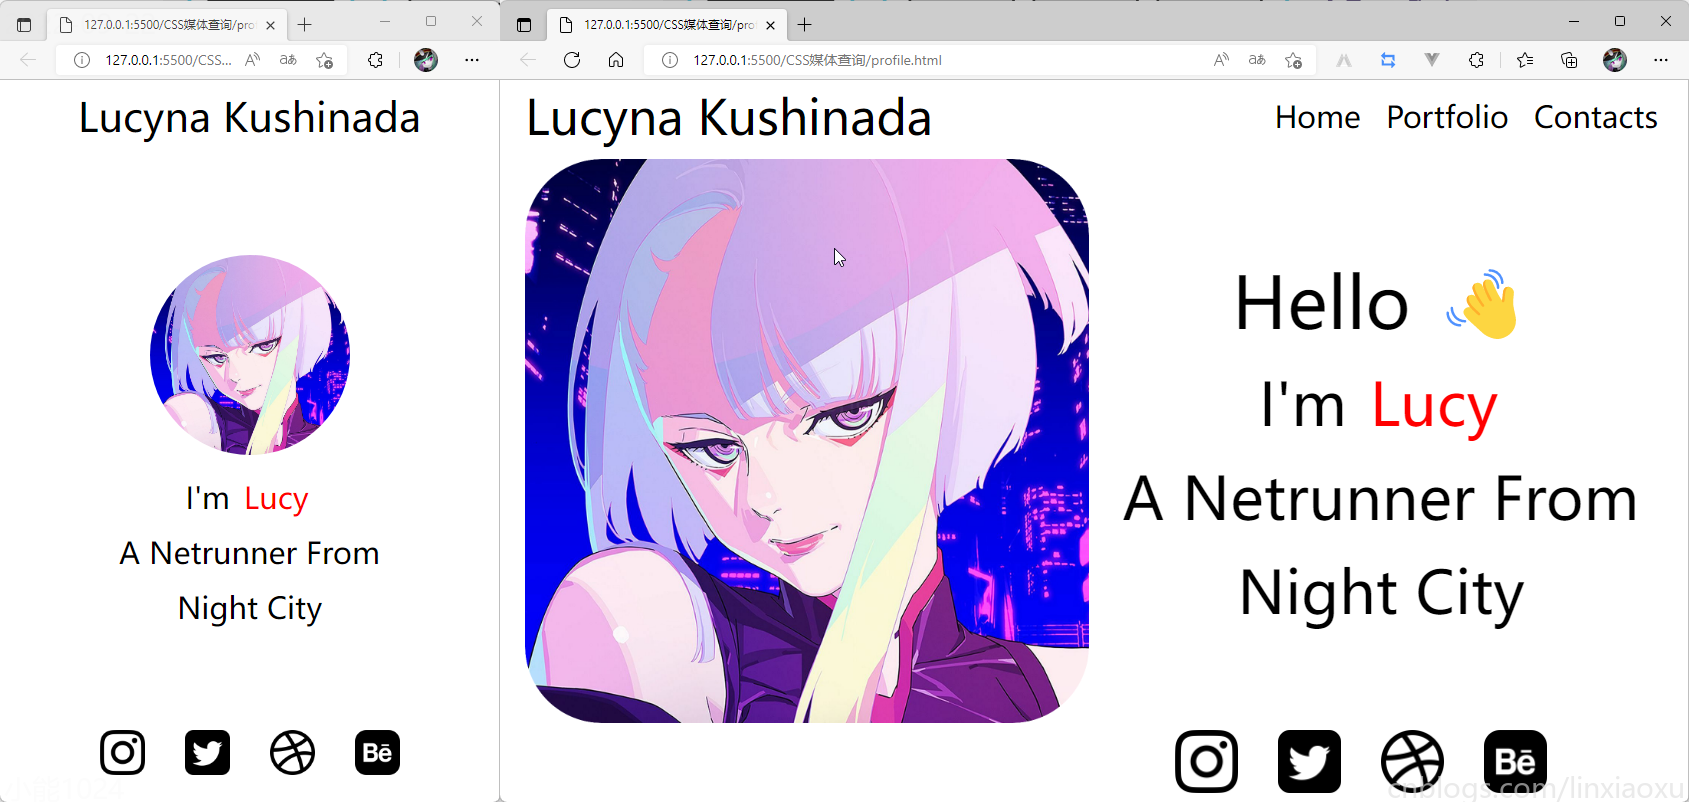
profile.html
html>
<html lang="en">
<head>
<title>title>
<meta charset="UTF-8">
<meta name="viewport" content="width=device-width, initial-scale=1">
head>
<body>
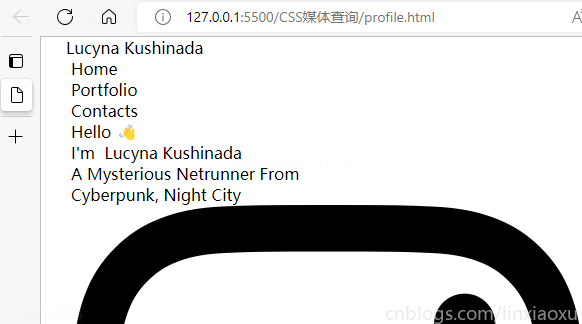
<div class="container">
<div class="header">div>
<div class="header__logo">Lucyna Kushinadadiv>
<div class="header__menu">
<div class="header__menu-1"> Home div>
<div class="header__menu-2"> Portfolio div>
<div class="header__menu-3"> Contacts div>
div>
<div class="main">
<div class="main">
<div class="main__image">div>
<div class="main__text">
<div class="main__text-1">Hello 👋div>
<div class="main__text-2">I'm <span>Lucyspan>div>
<div class="main__text-3">A Netrunner Fromdiv>
<div class="main__text-4">Night Citydiv>
div>
div>
div>
<div class="footer">
<div class="footer__instagram">
<img src="./images/instagram.png" alt="">
div>
<div class="footer__twitter">
<img src="./images/twitter-sign.png" alt="">
div>
<div class="footer__dribbble">
<img src="./images/dribbble-logo.png" alt="">
div>
<div class="footer__behance">
<img src="./images/behance.png" alt="">
div>
div>
div>
body>
html>
profile.scss
scss需要编译成css再导入到html中,我们先修改全局默认样式。
* {
  margin: 0px 5px;

  padding: 0px;
  box-sizing: border-box;

  body {
    font-family: sans-serif;
  }
}
如果你不会Flexbox属性请看 我的Vue之旅、01 深入Flexbox布局完全指南 - 小能日记
先把所有样式类与子级结构写好。嵌套在样式类中的&__logo是.header__logo的快捷方式
.header{
  &__logo{}
  &__menu{}
}

.main{
  &__image{}
  &__text{}
}

.footer{
  [class ^="footer__"]{}
}
然后添加样式,.container采用flex布局,按列布局。.header__menu也采用flex布局的方式。
.container{
  height: 100vh;
  display: flex;
  flex-direction: column;
}

.header{
  display: flex;
  flex-direction: row;
  border: 2px solid red;
  height: 10%;

  &__logo{}

  &__menu{
    display: flex;
    flex-direction: row;
  }
}

.main{
  border: 2px solid black;
  height: 80%;
}

.footer{
  border: 2px solid green;
  height: 10%;
}
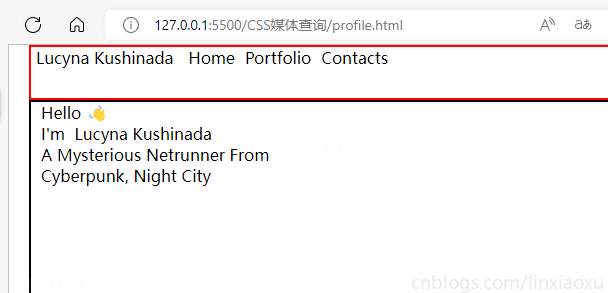
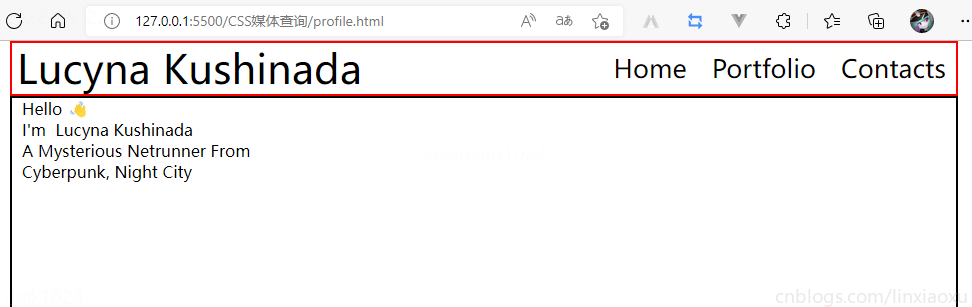
我们修改 .header
.header {
  display: flex;
  flex-direction: row;
  border: 2px solid red;
  height: 10%;
  // 元素垂直居中
  align-items: center;
  // 元素均匀分布
  justify-content: space-between;
  &__logo {
    font-size: 4vw;
  }

  &__menu {
    display: flex;
    flex-direction: row;
    font-size: 2.5vw;
    // 让各个元素产生一定间隔距离
    gap: 15px;
  }
}
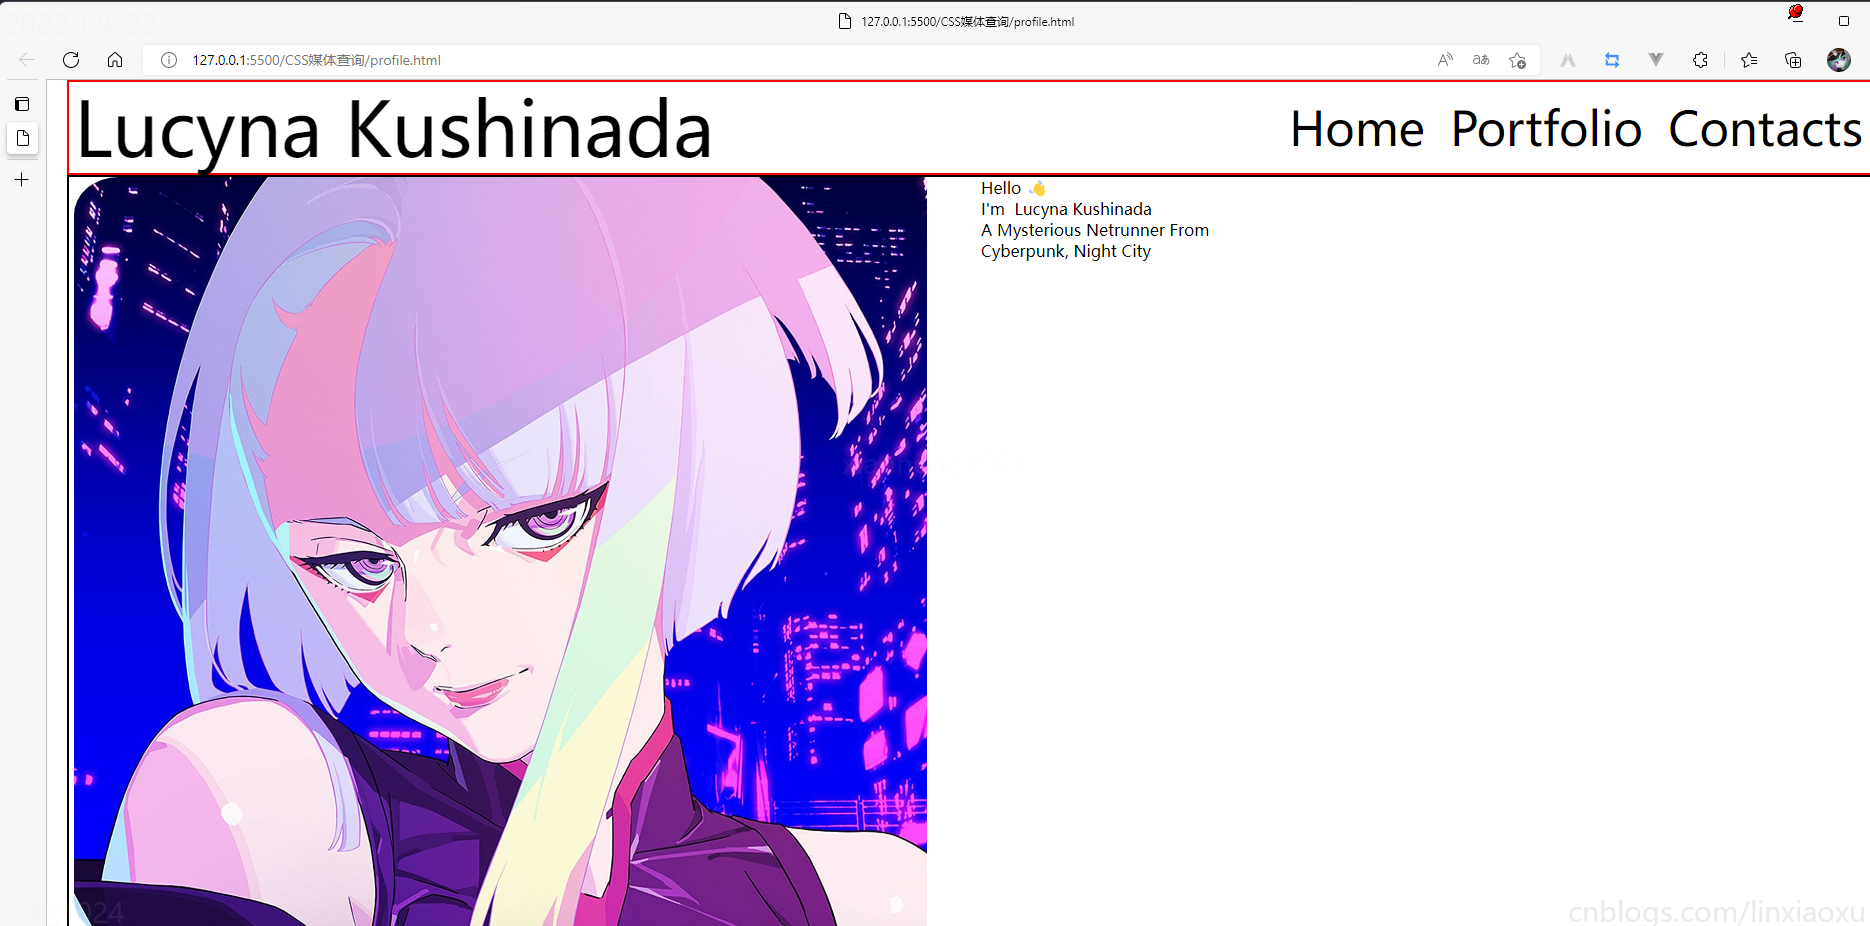
再修改 .main
.main {
  // 图片和文字块排版会采用行形式
  display: flex;
  flex-direction: row;

  border: 2px solid black;
  height: 80%;

  &__image {
    // 添加图片
    background-image: url("./images/Portrait.jpg");
    // 宽度为main宽度的50%
    width: 50%;
    // 缩放至图片自身能完全显示出来,足够大的容器会有留白区域
    background-size: contain;
    // 不重复平铺图片
    background-repeat: no-repeat;
    background-position: left center;
  }

  &__text {
    // 宽度为main宽度的50%
    width: 50%;
  }
}
给文字加样式
  &__text {
    // 宽度为main一半宽度
    width: 50%;
    // 让每行字按列排列
    display: flex;
    flex-direction: column;

    // 居中
    justify-content: center;
    align-items: center;

    gap: 15px;

    &-1 {
      font-size: 10vw;
    }

    &-2,
    &-3,
    &-4 {
      font-size: 5vw;
    }
  }

  span {
    color: red;
  }
}
接下来给图片添加样式
.footer{
  // 类匹配器,能够选择一个类的集合,如style class 为footer__1、footer__2
  [class^="footer__"] {
    img {
      width: 5.3vw;
    }
  }
}

.footer{
  display: flex;
  flex-direction: row;

  align-items: center;
  justify-content: flex-end;
  gap: 20px;

  margin-right: 10%;
}
我们还需要添加媒体查询
@media (max-width: 650px) {
  .header {

    justify-content: center;

    &__logo {
      font-size: 40px;
    }

    // 隐藏menu
    &__menu {
      display: none;
    }
  }

  .main {
    flex-direction: column;
    justify-content: center;
    align-items: center;

    &__image {
      // 图片大小
      height: 200px;
      width: 200px;
      background-size: 100%;

      // 圆形图片
      border-radius: 100%;
      background-position: center;
      margin-bottom: 5%;
    }

    // 修改字体样式
    &__text {
      width: 100%;

      &-1 {
        // 让hello不显示
        display: none;
      }

      &-2,
      &-3,
      &-4 {
        font-size: 30px;
      }
    }
  }

  .footer {
    // 元素按中心对齐
    justify-content: center;
    margin: 0px;

    // gap: 20px;  注意这个没有改,默认还是生效的
    [class^="footer__"] {

      // 重新修改图片大小适应移动端
      img {
        width: 45px;
        height: 45px;
      }
    }
  }
}
😄当前完整scss代码
* {
  margin: 0px 5px;

  padding: 0px;
  box-sizing: border-box;

  body {
    font-family: sans-serif;
  }
}

.container {
  height: 100vh;
  display: flex;
  flex-direction: column;
}

.header {
  display: flex;
  flex-direction: row;
  height: 10%;

  // 元素垂直居中
  align-items: center;
  // 元素均匀分布
  justify-content: space-between;

  &__logo {
    font-size: 4vw;
  }

  &__menu {
    display: flex;
    flex-direction: row;

    font-size: 2.5vw;
    // 让各个元素产生一定间隔距离
    gap: 15px;
  }
}

.main {
  // 图片和文字块排版会采用行形式
  display: flex;
  flex-direction: row;

  height: 80%;

  &__image {
    // 添加图片
    background-image: url("./images/Portrait.png");
    // 宽度为main宽度的50%
    width: 50%;
    // 缩放至图片自身能完全显示出来,足够大的容器会有留白区域
    background-size: contain;
    // 不重复平铺图片
    background-repeat: no-repeat;
    background-position: left center;
  }

  &__text {
    // 宽度为main一半宽度
    width: 50%;
    // 让每行字按列排列
    display: flex;
    flex-direction: column;

    // 居中
    justify-content: center;
    align-items: center;

    gap: 15px;

    &-1 {
      font-size: 6vw;
    }

    &-2,
    &-3,
    &-4 {
      font-size: 5vw;
    }
  }

  span {
    color: red;
  }
}

.footer {
  [class^="footer__"] {
    img {
      width: 5.3vw;
    }
  }
}

.footer {
  display: flex;
  flex-direction: row;

  align-items: center;
  justify-content: flex-end;
  gap: 20px;

  margin-right: 10%;

  [class^="footer__"] {
    img {
      width: 5.3vw;
    }
  }
}

@media (max-width: 650px) {
  .header {

    justify-content: center;

    &__logo {
      font-size: 40px;
    }

    // 隐藏menu
    &__menu {
      display: none;
    }
  }

  .main {
    flex-direction: column;
    justify-content: center;
    align-items: center;

    &__image {
      // 图片大小
      height: 200px;
      width: 200px;
      background-size: 100%;

      // 圆形图片
      border-radius: 100%;
      background-position: center;
      margin-bottom: 5%;
    }

    // 修改字体样式
    &__text {
      width: 100%;

      &-1 {
        // 让hello不显示
        display: none;
      }

      &-2,
      &-3,
      &-4 {
        font-size: 30px;
      }
    }
  }

  .footer {
    // 元素按中心对齐
    justify-content: center;
    margin: 0px;

    // gap: 20px;  注意这个没有改,默认还是生效的
    [class^="footer__"] {

      // 重新修改图片大小适应移动端
      img {
        width: 45px;
        height: 45px;
      }
    }
  }
}
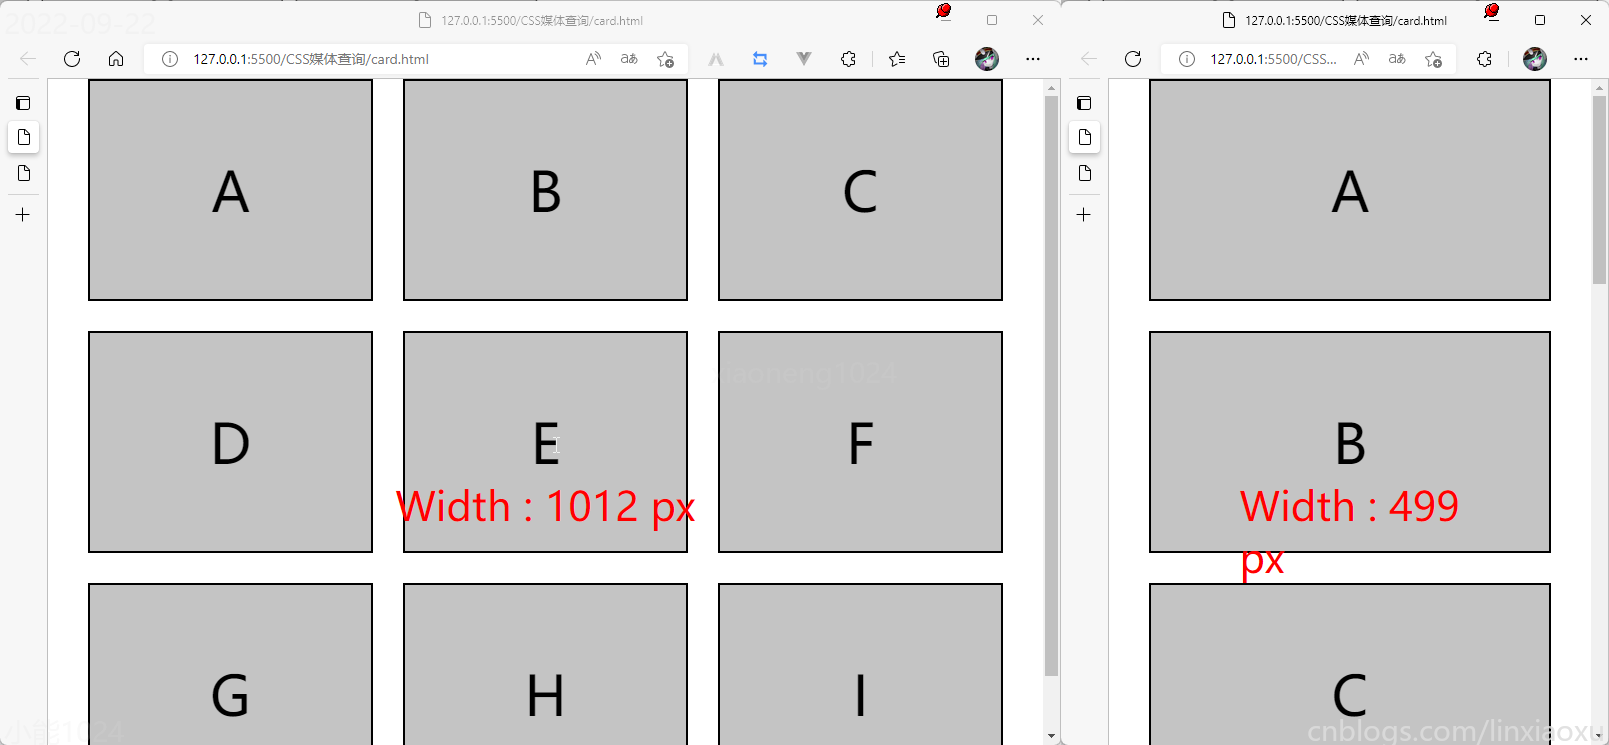
学习使用③卡片布局
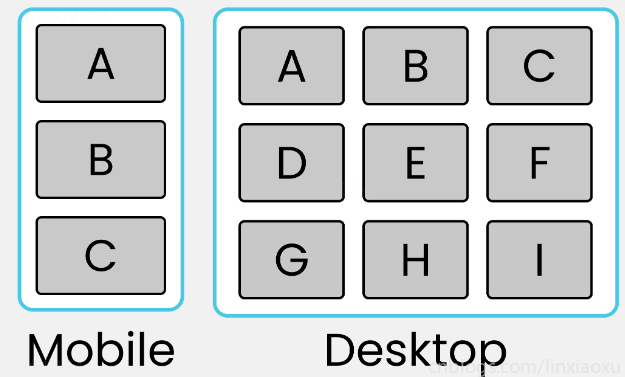
我们会用到第一个例子中的 main.js 函数来显示窗口宽度。
card.html
html>
<html lang="en">

<head>
  <title>title>
  <meta charset="UTF-8">
  <meta name="viewport" content="width=device-width, initial-scale=1">
  <link href="css/style.css" rel="stylesheet">
  <script type="text/javascript" src="./main.js">script>
head>

<body>
  <div class="container">
    <div class="row-1">
      <div class="box-1">Adiv>
      <div class="box-2">Bdiv>
      <div class="box-3">Cdiv>
    div>

    <div class="row-2">
      <div class="box-4">Ddiv>
      <div class="box-5">Ediv>
      <div class="box-6">Fdiv>
    div>

    <div class="row-3">
      <div class="box-7">Gdiv>
      <div class="box-8">Hdiv>
      <div class="box-9">Idiv>
    div>
  div>
  <div id="size">div>
body>

html>
card.scss
* {
  margin: 0px;
  padding: 0px 10px;
  box-sizing: border-box;

  body {
    font-family: sans-serif;
    font-size: 55px;
  }
}

#size {
  position: absolute;
  // 设置为绝对定位
  top: 60%;
  left: 50%;
  // 水平居中
  transform: translateX(-50%);
  color: red;
  font-size: 40px;
}

.container {
  display: flex;
  flex-direction: column;
  height: 100vh;

  gap: 30px;
}

[class ^="row-"] {
  display: flex;
  flex-direction: row;
  gap: 30px;
}

[class ^="box-"] {

  background-color: #c4c4c4;
  border: 2px solid black;

  width: (100%)/3;
  // 设置为当前视窗大小的三分之一
  height: (100vh)/3;

  // 元素居中
  display: grid;
  place-items: center;
}

@media (max-width: 650px) {

  [class ^="row-"] {
    flex-direction: column;
  }

  [class ^="box-"] {
    width: 100%;
  }
}
__EOF__
