-
GraphicsMagick之实践出真知
本文首发于个人网站
介绍
GraphicsMagick 是个图片处理库,是从ImageMagick 5.5.2分支出来的,但是现在他变得更稳定和更轻、更快一些
GraphicsMagick 号称图像处理领域的瑞士军刀。 短小精悍的代码却提供了一个鲁棒、高效的工具和库集合,来处理图像的读取、写入和操作,支持超过88种图像格式,包括重要的DPX、GIF、JPEG、JPEG-2000、PNG、PDF、PNM和TIFF。 通过使用 OpenMP 可是利用多线程进行图片处理,增强了通过扩展 CPU 提高处理能力。GraphicsMagick可以再绝大多数的平台上使用,Linux、Mac、Windows都没有问题。
GraphicsMagick 支持大图片的处理,并且已经做过GB级别的图像处理实验。GraphicsMagick 能够动态的生成图片,特别适用于互联网的应用。可以用来处理调整尺寸、旋转、加亮、颜色调整、增加特效等方面。GaphicsMagick 不仅支持命令行的模式,同时也支持C、C++、Perl、PHP、Tcl、Ruby等的调用。
安装
虽然在上篇文章中已经提到过如何安装 GraphicsMagick,这里还要再啰嗦一遍,因为这里有个小坑,希望对大家有所帮助。
Mac 上安装 GraphicsMagick 有两种方式,brew 命令一键式安装虽然简单,但是它默认会加一些配置信息,导致我们没法使用 GraphicsMagick 的 OpenMP 功能,所以我们最好还是手动编译安装。
brew安装
Mac 可以使用 brew 命令:
brew install libpng brew install libjpeg #通过 brew 安装 GraphicsMagick(libpng 等依赖包会一并下载) brew install graphicsmagick // 删除命令 brew uninstall graphicsmagick brew cleanup -s- 1
- 2
- 3
- 4
- 5
- 6
- 7
- 8
查看 GraphicsMagick 的版本以及安装路径:
% gm -version GraphicsMagick 1.3.38 2022-03-26 Q16 http://www.GraphicsMagick.org/ ...... Configured using the command: ./configure '--prefix=/usr/local/Cellar/graphicsmagick/1.3.38_1' '--disable-dependency-tracking' '--disable-openmp' '--disable-static' '--enable-shared' '--with-modules' '--with-quantum-depth=16' '--without-lzma' '--without-x' '--without-gslib' '--with-gs-font-dir=/usr/local/share/ghostscript/fonts' '--without-wmf' 'CC=clang' 'CXX=clang++' 'PKG_CONFIG_PATH=/usr/local/opt/libpng/lib/pkgconfig:/usr/local/opt/freetype/lib/pkgconfig:/usr/local/opt/jpeg-turbo/lib/pkgconfig:/usr/local/opt/jasper/lib/pkgconfig:/usr/local/opt/libtiff/lib/pkgconfig:/usr/local/opt/little-cms2/lib/pkgconfig:/usr/local/opt/webp/lib/pkgconfig' 'PKG_CONFIG_LIBDIR=/usr/lib/pkgconfig:/usr/local/Homebrew/Library/Homebrew/os/mac/pkgconfig/11' .....- 1
- 2
- 3
- 4
- 5
- 6
由上可知,brew 命令默认执行 ./configure 命令时,包含了“–disable-openmp”指令,该指令意味着完全禁用 OpenMP(自动多线程循环),会降低 GraphicsMagick 处理图片的性能。关于这点会在下文详细介绍。
手动编译安装
mkdir /usr/local/tools tar -xvf GraphicsMagick-1.3.37.tar.gz -C /hresh/tool/ # 进入GraphicsMagick安装目录 ./configure --prefix=/hresh/tool/GraphicsMagick-1.3.37 --enable-shared --enable-openmp-slow make && make install- 1
- 2
- 3
- 4
- 5
- 6
- 7
- 8
在 .bash_profile 文件中设置环境变量:
export GMAGICK_HOME="/hresh/tool/GraphicsMagick-1.3.37" export PATH="$GMAGICK_HOME/bin:$PATH" export LD_LIBRARY_PATH="$GMAGICK_HOME/lib/" export OMP_NUM_THREADS=6- 1
- 2
- 3
- 4
OMP_NUM_THREADS 环境变量,表示GM可使用的线程数。必须设置OMP_NUM_THREADS 环境变量才可以真正使用起多线程(openmp)。
查看 GraphicsMagick 的版本以及安装路径:
% gm -version GraphicsMagick 1.3.37 20201226 Q16 http://www.GraphicsMagick.org/ Configured using the command: ./configure '--prefix=/hresh/tool/GraphicsMagick-1.3.37' '--enable-shared' '--enable-openmp-slow'- 1
- 2
- 3
- 4
- 5
删除 GraphicsMagick
make distclean make uninstall- 1
- 2
OOM问题
我们在之前一篇文章中介绍过如何通过 Im4Java 给图片添加图片水印,代码如下所示:
public static void addImgWatermark(String srcImagePath, String destImagePath, String waterImgPath) throws Exception { // 原始图片信息 BufferedImage targetImg = ImageIO.read(new File(srcImagePath)); // 水印图片 BufferedImage watermarkImage = ImageIO.read(new File(waterImgPath)); int w = targetImg.getWidth(); int h = targetImg.getHeight(); IMOperation op = new IMOperation(); // 水印图片位置 op.geometry(watermarkImage.getWidth(), watermarkImage.getHeight(), w - watermarkImage.getWidth() - 300, h - watermarkImage.getHeight() - 100); // 水印透明度 op.dissolve(90); // 水印 op.addImage(waterImgPath); // 原图 op.addImage(srcImagePath); // 目标 op.addImage(destImagePath); ImageCommand cmd = getImageCommand(CommandType.imageWaterMark); cmd.run(op); }- 1
- 2
- 3
- 4
- 5
- 6
- 7
- 8
- 9
- 10
- 11
- 12
- 13
- 14
- 15
- 16
- 17
- 18
- 19
- 20
- 21
- 22
- 23
当时只考虑基本功能实现了,并未注意细节问题,经同事提醒,发现 ImageIO.read()这种方式来获取原图片的宽高信息,会将整个图片流读取到内存,浪费了大量的空间并且还增加了 OOM 风险。
通过BufferedImage获取宽高
测试代码如下:
public static void addImgWatermark(String srcImagePath, String destImagePath, String waterImgPath) { System.out.println(Thread.currentThread().getName() + "开始生成图片水印。。。。。。。"); try { // 原始图片信息 BufferedImage targetImg = ImageIO.read(new File(srcImagePath)); // 水印图片 BufferedImage watermarkImage = ImageIO.read(new File(waterImgPath)); int w = targetImg.getWidth(); int h = targetImg.getHeight(); int watermarkImageWidth = watermarkImage.getWidth(); int watermarkImageHeight = watermarkImage.getHeight(); IMOperation op2 = new IMOperation(); // 水印图片位置 op2.geometry(watermarkImageWidth, watermarkImageHeight, w - watermarkImageWidth - 300, h - watermarkImageHeight - 100); // 水印透明度 op2.dissolve(90); // 水印 op2.addImage(waterImgPath); // 原图 op2.addImage(srcImagePath); // 目标 op2.addImage(destImagePath); ImageCommand cmd2 = getImageCommand(CommandType.imageWaterMark); cmd2.run(op2); } catch (Exception e) { e.printStackTrace(); } System.out.println(Thread.currentThread().getName() + "成功生成图片水印。。。。。。。。。。"); } public static void main(String[] args) throws Exception { ExecutorService executorService = new ThreadPoolExecutor(20, 25, 30, TimeUnit.SECONDS, new LinkedBlockingDeque<>(5), Executors.defaultThreadFactory(), new ThreadPoolExecutor.AbortPolicy()); try { for (int i = 1; i <= 17; i++) { executorService.execute(new ImageThread2()); } } catch (Exception e) { e.printStackTrace(); } finally { executorService.shutdown(); } } class ImageThread2 implements Runnable { @Override public void run() { String projectPath = System.getProperty("user.dir"); // 图片大小为7.9M String srcImgPath = projectPath + "/src/main/resources/static/sky.png"; String waterImgPath = projectPath + "/src/main/resources/static/icon.png"; String path = projectPath + "/src/main/resources/static/out/concurrency/im4_image.jpg"; Im4JavaUtil.addImgWatermark(srcImgPath, path, waterImgPath); } }- 1
- 2
- 3
- 4
- 5
- 6
- 7
- 8
- 9
- 10
- 11
- 12
- 13
- 14
- 15
- 16
- 17
- 18
- 19
- 20
- 21
- 22
- 23
- 24
- 25
- 26
- 27
- 28
- 29
- 30
- 31
- 32
- 33
- 34
- 35
- 36
- 37
- 38
- 39
- 40
- 41
- 42
- 43
- 44
- 45
- 46
- 47
- 48
- 49
- 50
- 51
- 52
- 53
- 54
- 55
- 56
- 57
- 58
- 59
- 60
- 61
- 62
- 63
- 64
控制台输出结果为:

可以看出,并发情况下 ImageIO.read()会引发 OOM 异常,这是为什么呢?
BufferedImage 对象中最重要的两个组件为 Raster 和 ColorModel,分别用于存储图像的像素数据与颜色数据。
Raster 表示像素矩形数组的类,封装存储样本值的 DataBuffer,以及描述如何在 DataBuffer 中定位给定样本值的 SampleModel。我们获取图片的宽高,就是从 raster 对象中拿到的。
每次生成 BufferedImage 对象,都要读取图片数据流到内存中,即生成 Raster 对象,最终导致 JVM 内存空间不足,引发 OOM 异常。
除了从源码层面分析外,还可以分析 GC 结果,首先在执行上述代码时配置如下 JVM 参数:
-XX:+PrintGCDetails -XX:+PrintGCTimeStamps- 1
在控制台可以看到不停的打印 GC 日志,截取一部分 GC 结果如下:
Heap PSYoungGen total 282624K, used 138032K [0x000000076ab00000, 0x000000077c180000, 0x00000007c0000000) eden space 280576K, 48% used [0x000000076ab00000,0x00000007730be518,0x000000077bd00000) from space 2048K, 52% used [0x000000077bf00000,0x000000077c00dec8,0x000000077c100000) to space 2048K, 0% used [0x000000077bd00000,0x000000077bd00000,0x000000077bf00000) ParOldGen total 2796544K, used 2717164K [0x00000006c0000000, 0x000000076ab00000, 0x000000076ab00000) object space 2796544K, 97% used [0x00000006c0000000,0x0000000765d7b378,0x000000076ab00000) Metaspace used 6753K, capacity 6890K, committed 7040K, reserved 1056768K class space used 749K, capacity 803K, committed 896K, reserved 1048576K- 1
- 2
- 3
- 4
- 5
- 6
- 7
- 8
- 9
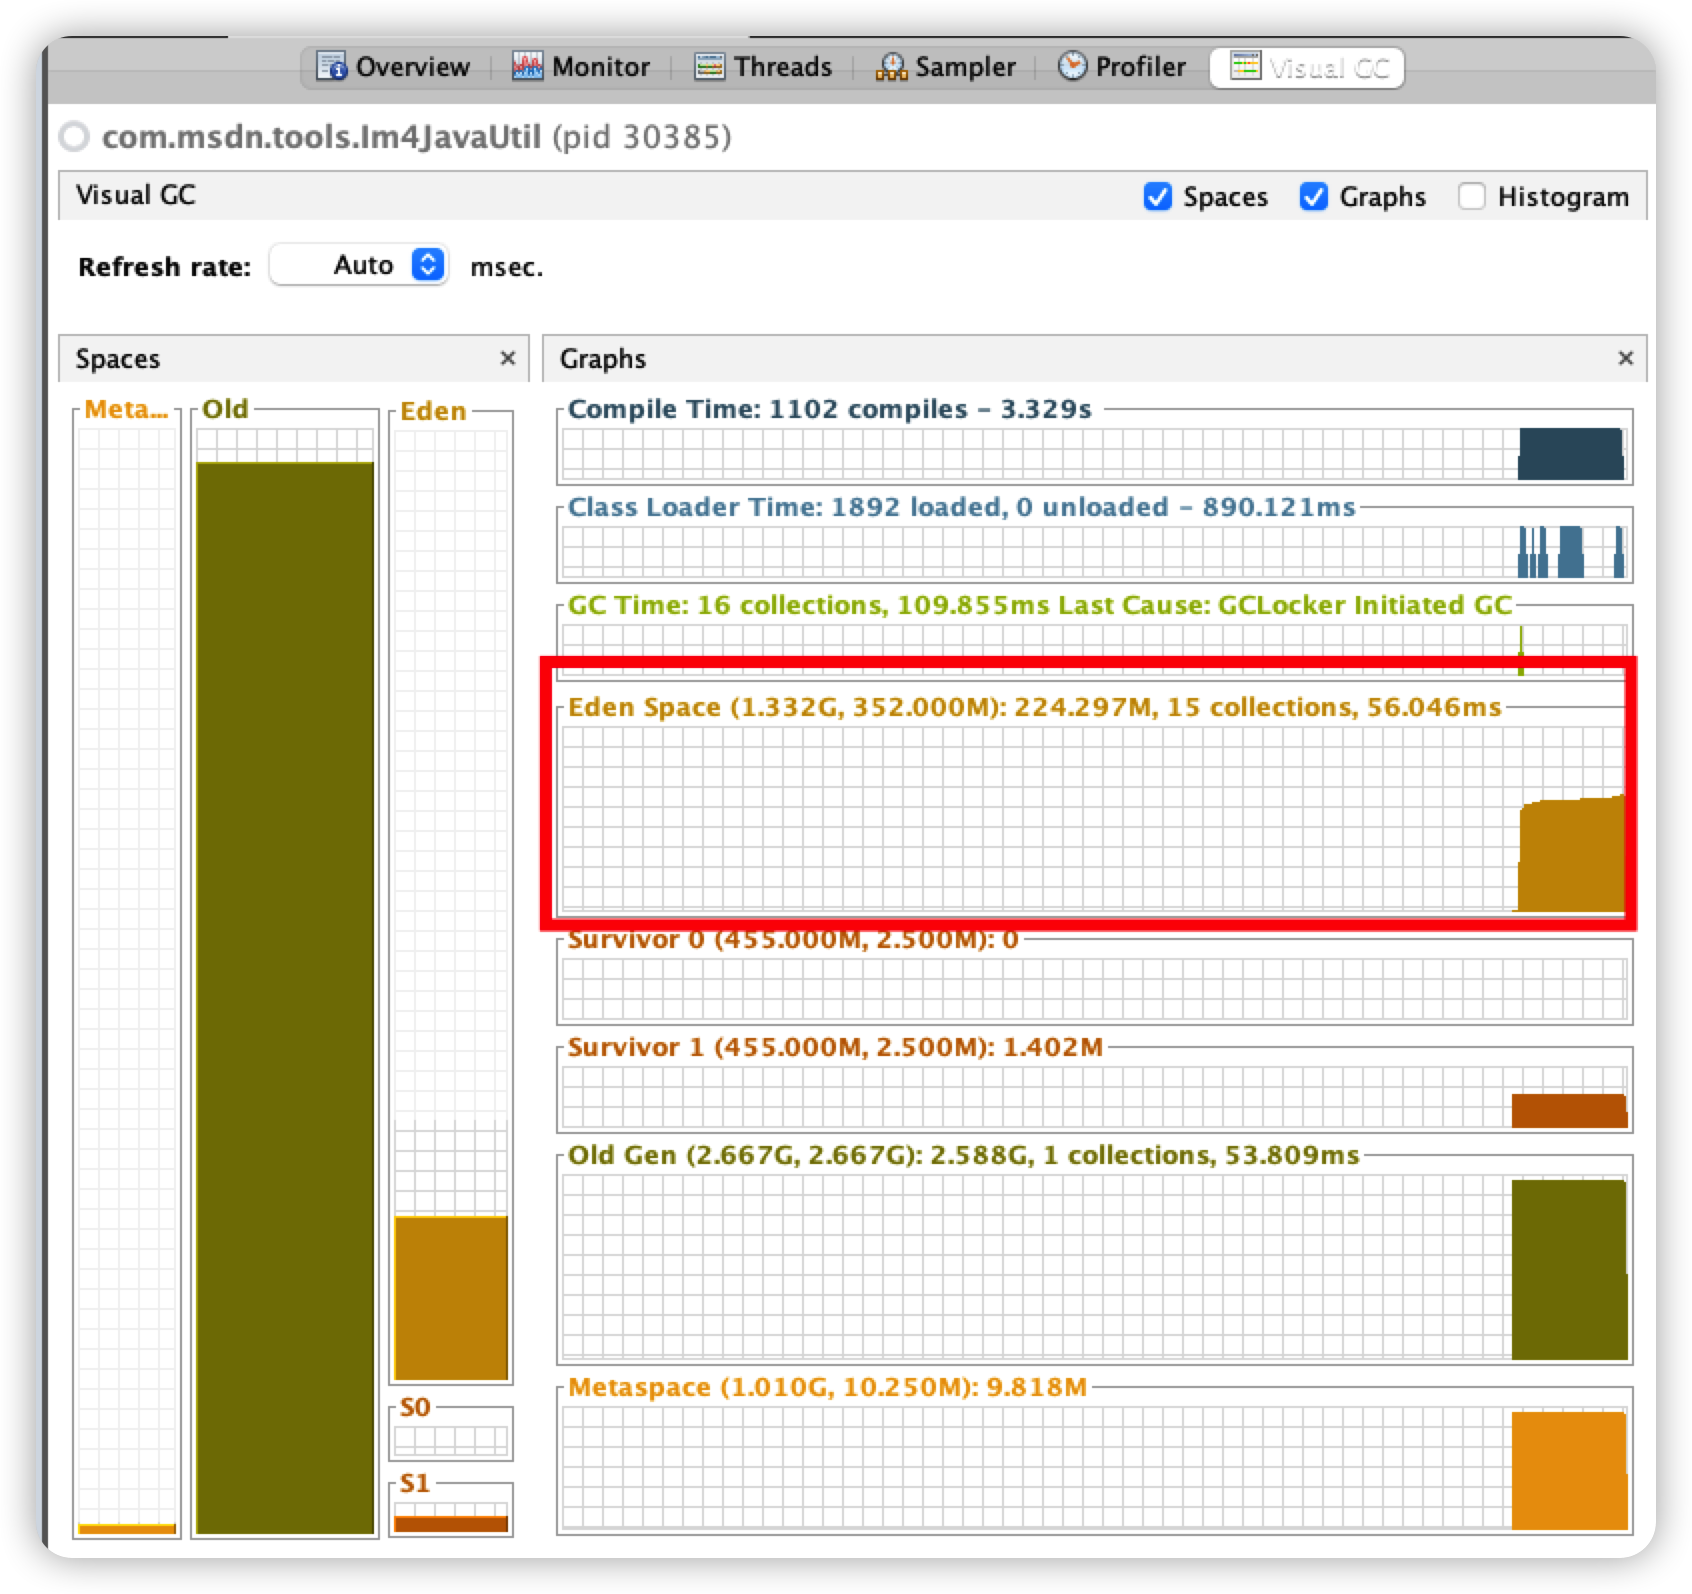
可以看到老年代内存占用比例极高,由此推荐因内存来不及回收,最终引发内存溢出。
此外我们还可以通过 VisualVM 工具的 “VisualGC” 插件直观的看到内存的占用情况,如下图所示:
通过ImageReader获取宽高
针对上述问题,我们可以替换掉 ImageIO.read()方法,代码修改如下:
int[] targetImgSize = getImgSize(srcImagePath); int w = targetImgSize[0]; int h = targetImgSize[1]; int[] imgSize = getImgSize(waterImgPath); int watermarkImageWidth = imgSize[0]; int watermarkImageHeight = imgSize[1]; public static int[] getImgSize(String filePath) throws Exception { int[] size = new int[2]; try (ImageInputStream in = ImageIO.createImageInputStream(new File(filePath))) { Iterator<ImageReader> readers = ImageIO.getImageReaders(in); if (readers.hasNext()) { ImageReader reader = readers.next(); try { reader.setInput(in); int width = reader.getWidth(0); int height = reader.getHeight(0); size[0] = width; size[1] = height; } finally { reader.dispose(); } } } return size; }- 1
- 2
- 3
- 4
- 5
- 6
- 7
- 8
- 9
- 10
- 11
- 12
- 13
- 14
- 15
- 16
- 17
- 18
- 19
- 20
- 21
- 22
- 23
- 24
- 25
- 26
- 27
- 28
开启同样多的线程,执行代码不会再抛出 OOM 异常,GC 日志如下:
Heap PSYoungGen total 76288K, used 29601K [0x000000076ab00000, 0x0000000770000000, 0x00000007c0000000) eden space 65536K, 37% used [0x000000076ab00000,0x000000076c3326d8,0x000000076eb00000) from space 10752K, 44% used [0x000000076eb00000,0x000000076efb5e60,0x000000076f580000) to space 10752K, 0% used [0x000000076f580000,0x000000076f580000,0x0000000770000000) ParOldGen total 175104K, used 8K [0x00000006c0000000, 0x00000006cab00000, 0x000000076ab00000) object space 175104K, 0% used [0x00000006c0000000,0x00000006c0002000,0x00000006cab00000) Metaspace used 6326K, capacity 6552K, committed 6784K, reserved 1056768K class space used 714K, capacity 790K, committed 896K, reserved 1048576K- 1
- 2
- 3
- 4
- 5
- 6
- 7
- 8
- 9
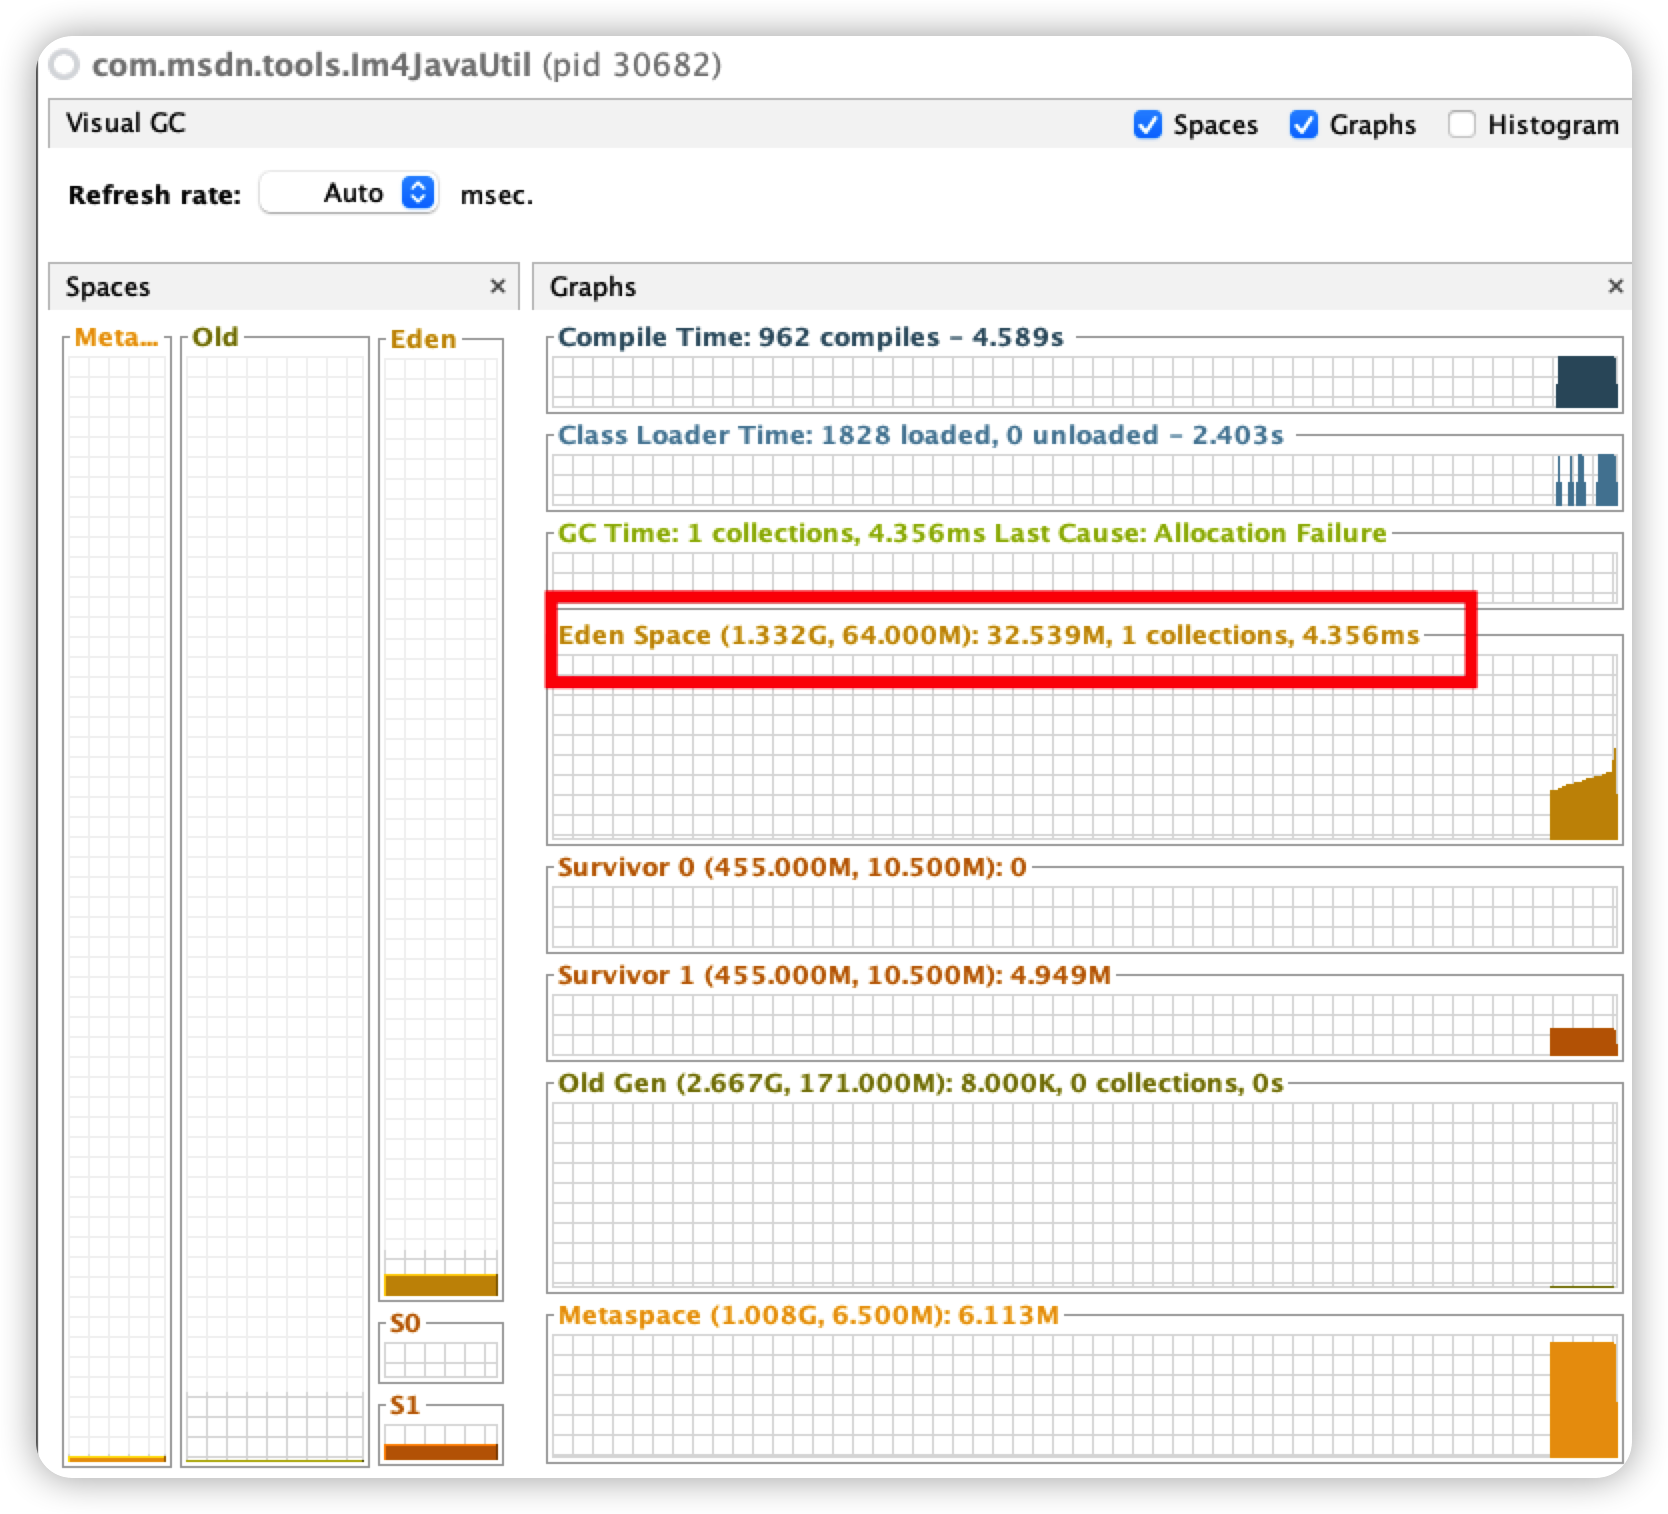
内存占用直观图如下:
ImageReader性能更佳的原因
我们对比一下获取图片宽高的代码区别:
//通过BufferedImage获取图片宽高 BufferedImage targetImg = ImageIO.read(new File(srcImagePath)); BufferedImage watermarkImage = ImageIO.read(new File(waterImgPath)); int w = targetImg.getWidth(); int h = targetImg.getHeight(); int watermarkImageWidth = watermarkImage.getWidth(); int watermarkImageHeight = watermarkImage.getHeight(); // 通过ImageReader获取图片宽高 int[] targetImgSize = getImgSize(srcImagePath); int w = targetImgSize[0]; int h = targetImgSize[1]; int[] imgSize = getImgSize(waterImgPath); int watermarkImageWidth = imgSize[0]; int watermarkImageHeight = imgSize[1]; public static int[] getImgSize(String filePath) throws Exception { int[] size = new int[2]; try (ImageInputStream in = ImageIO.createImageInputStream(new File(filePath))) { Iterator<ImageReader> readers = ImageIO.getImageReaders(in); if (readers.hasNext()) { ImageReader reader = readers.next(); try { reader.setInput(in); int width = reader.getWidth(0); int height = reader.getHeight(0); size[0] = width; size[1] = height; } finally { reader.dispose(); } } } return size; }- 1
- 2
- 3
- 4
- 5
- 6
- 7
- 8
- 9
- 10
- 11
- 12
- 13
- 14
- 15
- 16
- 17
- 18
- 19
- 20
- 21
- 22
- 23
- 24
- 25
- 26
- 27
- 28
- 29
- 30
- 31
- 32
- 33
- 34
- 35
- 36
想要搞清楚 BufferedImage 和 ImageReader 的差异,还是深入源码探究一番。
关于 BufferedImage 对象的创建,核心代码如下所示:
// ImageIO public static BufferedImage read(File input) throws IOException { if (input == null) { throw new IllegalArgumentException("input == null!"); } if (!input.canRead()) { throw new IIOException("Can't read input file!"); } ImageInputStream stream = createImageInputStream(input); if (stream == null) { throw new IIOException("Can't create an ImageInputStream!"); } BufferedImage bi = read(stream); if (bi == null) { stream.close(); } return bi; } public static BufferedImage read(ImageInputStream stream) throws IOException { if (stream == null) { throw new IllegalArgumentException("stream == null!"); } Iterator iter = getImageReaders(stream); if (!iter.hasNext()) { return null; } ImageReader reader = (ImageReader)iter.next(); ImageReadParam param = reader.getDefaultReadParam(); reader.setInput(stream, true, true); BufferedImage bi; try { bi = reader.read(0, param); } finally { reader.dispose(); stream.close(); } return bi; } // com.sun.imageio.plugins.png.PNGImageReader public BufferedImage read(int imageIndex, ImageReadParam param) throws IIOException { if (imageIndex != 0) { throw new IndexOutOfBoundsException("imageIndex != 0!"); } readImage(param); return theImage; } private void readImage(ImageReadParam param) throws IIOException { readMetadata(); // 这里拿到的宽高,后续 int width = metadata.IHDR_width; int height = metadata.IHDR_height; // Init default values sourceXSubsampling = 1; sourceYSubsampling = 1; sourceMinProgressivePass = 0; sourceMaxProgressivePass = 6; sourceBands = null; destinationBands = null; destinationOffset = new Point(0, 0); ...... // 接下来准备生成 BufferedImage 对象,即theImage } // 通过readHeader()获取图片宽高 private void readMetadata() throws IIOException { if (gotMetadata) { return; } readHeader(); ...... } // javax.imageio.ImageTypeSpecifier // 在该方法中创建BufferedImage对象 public BufferedImage createBufferedImage(int width, int height) { try { SampleModel sampleModel = getSampleModel(width, height); WritableRaster raster = Raster.createWritableRaster(sampleModel, new Point(0, 0)); return new BufferedImage(colorModel, raster, colorModel.isAlphaPremultiplied(), new Hashtable()); } catch (NegativeArraySizeException e) { // Exception most likely thrown from a DataBuffer constructor throw new IllegalArgumentException ("Array size > Integer.MAX_VALUE!"); } }- 1
- 2
- 3
- 4
- 5
- 6
- 7
- 8
- 9
- 10
- 11
- 12
- 13
- 14
- 15
- 16
- 17
- 18
- 19
- 20
- 21
- 22
- 23
- 24
- 25
- 26
- 27
- 28
- 29
- 30
- 31
- 32
- 33
- 34
- 35
- 36
- 37
- 38
- 39
- 40
- 41
- 42
- 43
- 44
- 45
- 46
- 47
- 48
- 49
- 50
- 51
- 52
- 53
- 54
- 55
- 56
- 57
- 58
- 59
- 60
- 61
- 62
- 63
- 64
- 65
- 66
- 67
- 68
- 69
- 70
- 71
- 72
- 73
- 74
- 75
- 76
- 77
- 78
- 79
- 80
- 81
- 82
- 83
- 84
- 85
- 86
- 87
- 88
- 89
- 90
- 91
- 92
- 93
- 94
- 95
- 96
- 97
- 98
- 99
- 100
- 101
- 102
- 103
- 104
看完上述代码,有没有发现 ImageIO 文件中的 read()方法和我们写的 getImgSize()方法很相似,当获取到 ImageReader 对象后,我们的代码就直接获取图片宽高了,没有其他多余的操作。相关源码如下:
// com.sun.imageio.plugins.png.PNGImageReader public int getWidth(int imageIndex) throws IIOException { if (imageIndex != 0) { throw new IndexOutOfBoundsException("imageIndex != 0!"); } readHeader(); return metadata.IHDR_width; }- 1
- 2
- 3
- 4
- 5
- 6
- 7
- 8
- 9
- 10
对比两者的调用链路,可以发现通过 ImageReader 获取图片宽高的方式链路更短;除此之外,内存占用更少,所以更不容易产生内存问题。
OpenMP
一开始在 Mac 上尝试测试 OpenMP,反复鼓捣后还是失败了,归根结底是因为本机默认不支持 OpenMP,感兴趣的朋友可以参考在 macOS 平台上安装 OpenMP 库,试一试能否在 Mac 上测试 OpenMP。
所以这里我们基于阿里云的服务器进行测试,服务器只有 2核。
测试
gm benchmark [ 选项... ] 命令- 1
benchmark 为一个或多个循环和/或指定的执行时间执行任意gm实用程序命令(例如convert ),并报告许多执行指标。对于使用 OpenMP 的构建,提供了一种模式以使用越来越多的线程执行基准测试,并提供加速和多线程执行效率的报告。如果基准测试用于执行没有任何附加基准测试选项的命令,则该命令运行一次。
本次测试使用如下命令:
gm benchmark -iterations 100 -stepthreads 1 +原命令语句- 1
-iterations 100 次数
-stepthreads 1 线程增长步长,1表示每次加1个线程,一直加到 OMP_NUM_THREADS 环境变量的值 ,必须设置 OMP_NUM_THREADS环境变量才可以真正使用起多线程(openmp)。
禁用OpenMP
进入 GraphicsMagick 安装目录,执行如下命令:
./configure --prefix=/hresh/tool/GraphicsMagick-1.3.37 --enable-shared --disable-openmp make make install- 1
- 2
- 3
然后进入图片所在目录,执行下述命令:
# gm benchmark -iterations 100 -stepthreads 1 convert -resize 100x100 -quality 90 +profile "*" mountain-landscape.jpg 123.jpg Results: 1 threads 100 iter 52.41s user 52.747874s total 1.896 iter/s 1.908 iter/cpu 1.00 speedup 1.000 karp-flatt- 1
- 2
结果中各参数含义如下:
- threads- 使用的线程数。
- iter - 执行的命令迭代次数。
- user - 消耗的总用户时间。
- total - 消耗的总时间。
- iter/s - 每秒的命令迭代次数。
- iter/cpu - 每次迭代消耗的 CPU 时间。
- speedup - 与一个线程相比的加速。
- karp-flatt - 加速效率的 Karp-Flatt 度量。
根据结果可知,处理一张图片耗时 524ms。
启用OpenMP
重新执行编译命令:
./configure --prefix=/hresh/tool/GraphicsMagick-1.3.37 --enable-shared --enable-openmp-slow make make install- 1
- 2
- 3
然后进入图片所在目录,执行下述命令:
# export OMP_NUM_THREADS=2 # gm benchmark -iterations 100 -stepthreads 1 convert -resize 100x100 -quality 90 +profile "*" mountain-landscape.jpg 123.jpg Results: 1 threads 100 iter 47.84s user 48.102332s total 2.079 iter/s 2.090 iter/cpu 1.00 speedup 1.000 karp-flatt Results: 2 threads 100 iter 48.95s user 36.630871s total 2.730 iter/s 2.043 iter/cpu 1.31 speedup 0.523 karp-flatt- 1
- 2
- 3
- 4
根据结果可知,线程1处理一张图片耗时 478ms,线程2处理一张图片耗时 489ms。
OpenMP 作为 GraphicsMagick 的特色功能之一,为了获取最佳性能,可以将 OMP_NUM_THREADS 设置为等于可用 CPU 内核的数量,如果服务器具有多个内核且运行多个程序,将 OMP_NUM_THREADS 设置为比内核数小一点,以确保最佳的整体系统性能。另外 CPU 使用率会随着线程数的增加而增加,所以要根据实际情况进行调配参数。
GraphicsMagick与Graphics2D
解决掉上面存在的 OOM 问题后,突然冒出一个想法:比较一下 GraphicsMagick 与 Graphics2D 在多线程环境下生成图片水印谁更占优势?
前提:针对同一张图片添加图片水印,都使用 ImageIO.read。
GraphicsMagick 代码
public static void addImgWatermark(String srcImagePath, String destImagePath, String waterImgPath) { System.out.println(Thread.currentThread().getName() + "开始生成图片水印。。。。。。。"); try { // 原始图片信息 BufferedImage targetImg = ImageIO.read(new File(srcImagePath)); // 水印图片 BufferedImage watermarkImage = ImageIO.read(new File(waterImgPath)); int w = targetImg.getWidth(); int h = targetImg.getHeight(); int watermarkImageWidth = watermarkImage.getWidth(); int watermarkImageHeight = watermarkImage.getHeight(); IMOperation op2 = new IMOperation(); // 水印图片位置 op2.geometry(watermarkImageWidth, watermarkImageHeight, w - watermarkImageWidth - 300, h - watermarkImageHeight - 100); // 水印透明度 op2.dissolve(90); // 水印 op2.addImage(waterImgPath); // 原图 op2.addImage(srcImagePath); // 目标 op2.addImage(destImagePath); ImageCommand cmd2 = getImageCommand(CommandType.imageWaterMark); cmd2.run(op2); } catch (Exception e) { e.printStackTrace(); } System.out.println(Thread.currentThread().getName() + "成功生成图片水印。。。。。。。。。。"); } public static void main(String[] args) throws Exception { ExecutorService executorService = new ThreadPoolExecutor(20, 25, 30, TimeUnit.SECONDS, new LinkedBlockingDeque<>(5), Executors.defaultThreadFactory(), new ThreadPoolExecutor.AbortPolicy()); try { for (int i = 1; i <= 16; i++) { executorService.execute(new ImageThread2()); } } catch (Exception e) { e.printStackTrace(); } finally { executorService.shutdown(); } } class ImageThread2 implements Runnable { @Override public void run() { String projectPath = System.getProperty("user.dir"); // 图片大小为7.9M String srcImgPath = projectPath + "/src/main/resources/static/sky.png"; String waterImgPath = projectPath + "/src/main/resources/static/icon.png"; String path = projectPath + "/src/main/resources/static/out/concurrency/im4_image.jpg"; Im4JavaUtil.addImgWatermark(srcImgPath, path, waterImgPath); } }- 1
- 2
- 3
- 4
- 5
- 6
- 7
- 8
- 9
- 10
- 11
- 12
- 13
- 14
- 15
- 16
- 17
- 18
- 19
- 20
- 21
- 22
- 23
- 24
- 25
- 26
- 27
- 28
- 29
- 30
- 31
- 32
- 33
- 34
- 35
- 36
- 37
- 38
- 39
- 40
- 41
- 42
- 43
- 44
- 45
- 46
- 47
- 48
- 49
- 50
- 51
- 52
- 53
- 54
- 55
- 56
- 57
- 58
- 59
- 60
- 61
- 62
- 63
- 64
经过测试得出如下结果:GraphicsMagick 添加图片水印操作最多同时开启 16个线程。
Graphics2D 代码
public static void graphics2DDrawImg(String srcImgPath, String waterImgPath, String outPath) { System.out.println(Thread.currentThread().getName() + "开始生成图片水印。。。。。。。"); try { BufferedImage targetImg = ImageIO.read(new File(srcImgPath)); int imgWidth = targetImg.getWidth(); int imgHeight = targetImg.getHeight(); BufferedImage bufferedImage = new BufferedImage(imgWidth, imgHeight, BufferedImage.TYPE_INT_BGR); Graphics2D g = bufferedImage.createGraphics(); g.drawImage(targetImg, 0, 0, imgWidth, imgHeight, null); g.setColor(Color.BLACK); int imgLeftMargin = ICON_LEFT_MARGINS[0]; int imgTopMargin = 1000; BufferedImage icon = ImageIO.read(new File(waterImgPath)); g.drawImage(icon, imgLeftMargin, imgTopMargin, icon.getWidth(), icon.getHeight(), null); FileOutputStream outImgStream = new FileOutputStream(outPath); ImageIO.write(bufferedImage, "jpg", outImgStream); g.dispose(); outImgStream.close(); } catch (IOException e) { e.getStackTrace(); } System.out.println(Thread.currentThread().getName() + "成功生成图片水印。。。。。。。。。。"); } public static void main(String[] args) throws Exception { ExecutorService executorService = new ThreadPoolExecutor(20, 25, 30, TimeUnit.SECONDS, new LinkedBlockingDeque<>(5), Executors.defaultThreadFactory(), new ThreadPoolExecutor.AbortPolicy()); try { for (int i = 1; i <= 8; i++) { executorService.execute(new ImageThread()); } } catch (Exception e) { e.printStackTrace(); } finally { executorService.shutdown(); } } class ImageThread implements Runnable { @Override public void run() { String projectPath = System.getProperty("user.dir"); String srcImgPath = projectPath + "/src/main/resources/static/sky.png"; String waterImgPath = projectPath + "/src/main/resources/static/icon.png"; String path = projectPath + "/src/main/resources/static/out/concurrency/g2d_image.jpg"; Graphics2DUtil.graphics2DDrawImg(srcImgPath, waterImgPath, path); } }- 1
- 2
- 3
- 4
- 5
- 6
- 7
- 8
- 9
- 10
- 11
- 12
- 13
- 14
- 15
- 16
- 17
- 18
- 19
- 20
- 21
- 22
- 23
- 24
- 25
- 26
- 27
- 28
- 29
- 30
- 31
- 32
- 33
- 34
- 35
- 36
- 37
- 38
- 39
- 40
- 41
- 42
- 43
- 44
- 45
- 46
- 47
- 48
- 49
- 50
- 51
- 52
- 53
- 54
- 55
- 56
- 57
- 58
测试结果显示,Graphics2D 添加图片水印操作最多开启 7个线程。抛出 OOM 异常时截图如下:

综合来看,Graphics2D 是 Java 自带的图像处理工具类,处理图像时,与内存交互的操作比较频繁,加之会受到 JVM 的内存限制,所以更容易产生 OOM 异常。而 GraphicsMagick 进行图片处理时是直接读取图片到物理内存,不受 JVM 管理,所以更加安全一些。
总结
目前市面上成熟的图像处理库:GraphicsMagick 和 OpenCV。上述两款图像处理库都可以做到跨平台,在多种编译器上执行,都可以很容易实现多进程模式,充分发挥多核 CPU 的优势。GraphicsMagick 是前段时间才接触使用,OpenCV 在学习 Python 时了解过,在 Python 中应用比较广泛。
目前我使用的是 Java 语言,而 JDK 自带的一套图片处理库——Graphics2D,它的特点是稳定简单,但是对图片处理来说,性能确实不好!不过 Java 方面也提供了类似 JNI 方式支持 GraphicsMagick+im4java 处理图像。但是要原生态支持 opencv 就比较繁琐了,要用 JNI 方式调用大量动态或静态库,存在如下两个问题:一个性能问题,二是如果出现内存问题也不好控制。
当然选用某一技术时要结合实际需要,性能好的不一定最好,合适自己的才是最好。就拿我遇到的项目来说,基本没有高并发的图片处理场景,加之使用 Graphics2D 实现起来比较简单,所以最终选择 Graphics2D,而非 GraphicsMagick+im4java。
最后感谢同事的指点,让我对 GraphicsMagick 有了更新的认识,因此才有了这篇文章,希望后续能与大家有更多技术上的交流。
参考文献
-
相关阅读:
52、ElasticSearch 简单查询
Java 集合的常用操作(ArrayList, LinkedList, HashSet, HashMap)
【算法练习Day12】树的递归遍历&&非递归遍历
opencv_c++学习(二十五)
对象转json,json添加转义符
MySQL——五、库表操作(上篇)
平平淡淡、坚守初心、砥砺前行
Axure RP美容美妆医美行业上门服务交互原型图模板源文件
Arduino程序设计(十三)触摸按键实验(TTP223)
java计算机毕业设计基于安卓Android的校园快药APP-药店管理app(源码+系统+mysql数据库+Lw文档)
- 原文地址:https://blog.csdn.net/Herishwater/article/details/126964948
