-
数字图像1-opencv c++基本操作
数字图像1-opencv c++基本操作
实验题目: 实验1:图像基本操作
实验1.1:图像加载、显示
实验过程中遇到和解决的问题:
int Show_img() { //读取图片 Mat src_img = imread(src_path, IMREAD_COLOR); //确认图片不空 if (src_img.empty()) { cout << "The image is empty!\n"; return EXIT_FAILURE; } //定义显示窗口(可省略, 这里可以设置窗口尺寸) namedWindow(src_win, WINDOW_AUTOSIZE); //显示图片 imshow(src_win, src_img); //保持窗口始终存在 waitKey(0); return 0; }- 1
- 2
- 3
- 4
- 5
- 6
- 7
- 8
- 9
- 10
- 11
- 12
- 13
- 14
- 15
- 16
-
路径不存在或者图片名称输入错误导致程序异常退出, 这时候添加图像的
.empty()处理这种报错, 有助于程序正常运行 -
imread(path,mode)mode可以选择多种, 用于显示灰度图,RGB图和RGBA图等, 后文显示RGBA图出现问题, 应该使用mode=IMREAD_UNCHANGED. -
waitkey(0)用于窗口的停留检测操纵, 使窗口停止. -
namedWindow(window_name,mode)mode用于显示窗口尺寸, 选择WINDOW_AUTOSIZE适应图片, 和可以选择矩形等
结果分析与体会:
bmp:

jpg:
png
都正常显示.
实验1.2:图像通道分离
实验过程中遇到和解决的问题:
void getChannel(const uchar* input, int width, int height, int inStep, int inChannels, uchar*& output, int outStep, int channelToGet) { //输出uchar数组 先设为较大的数组 防止溢出 uchar ans[N] = {0}; int poi = 0;//src_img对应的input指针指向访问位置 int cnt = 0;//ans中指针 用于指向存储位置 //图像交叉存储方式下访问每个像素的固定channel for (int y = 0; y < height; y++) { //考虑图像对齐填充下 每次找到a row的第一个位置 poi = channelToGet+y*inStep; //cout <- 1
- 2
- 3
- 4
- 5
- 6
- 7
- 8
- 9
- 10
- 11
- 12
- 13
- 14
- 15
- 16
- 17
- 18
- 19
- 20
- 21
- 22
- 23
- 24
- 25
- 26
-
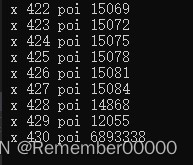
uchar ans[N] 注意N不能使用图像width和height设定特定大小的数组, 因此要提前设定开辟固定大小的数组
注意数组不能太小, 否则会发生溢出, 而且溢出的报错不一定是在访问数组的时候报错, 我这里是在poi+到一定数值后报的错, 就导致找bug找了很长时间. 假设500x500都要开辟5e5大小的数组.
数值溢出异常:
-
poi指针先找到每一行的其实位置, 是为了应对交叉存储下的填充无用数值被读写
-
关于uchar和Mat的转换
//Mat转为uchar* const uchar* input = src_img.data; uchar* output=NULL; int outStep=0; getChannel(input, src_img.cols, src_img.rows, src_img.step, src_img.channels(), output, outStep, 2); //uchar*转为Mat Mat des_img(src_img.rows, src_img.cols, CV_8UC1, output);- 1
- 2
- 3
- 4
- 5
- 6
- 7
注意uchar是指向数组第一个位置的指针, 而且构造Mat允许指针
-
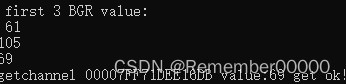
通道分离数值验证:
结果分析与体会:

通过RGB三个通道分离, 从左上, 右上, 左下,右下分别对应着原图, 分离通道BGR, 从绿色头发和红色头发, 可以看出明显的偏白(数值大)和偏黑(数值小), 表示通道提取正确.
实验1.3:图像合成
实验过程中遇到和解决的问题:
提取Alpha
void getAlpha(Mat& img) { //创建大小相同的Mat Mat ans = Mat::zeros(img.size(), CV_8UC1); //每个像素提取第四通道 for (int x = 0; x < img.cols; x++) { for (int y = 0; y < img.rows; y++) { ans.at<uchar>(y, x) = img.at<Vec4b>(y, x)[3]; } } imshow("alpha", ans); waitKey(0); return; }- 1
- 2
- 3
- 4
- 5
- 6
- 7
- 8
- 9
- 10
- 11
- 12
- 13
- 首先图像读取imread中要用四channel方式读取.
- 读取每个像素的第四通道, 使用
img.at这种方式. 使用Vec3b则没有第四通道并且会造成图片访问异常.(y, x)[3]
Alpha混合 更换背景
void changeBackground(Mat& src_img) { //读取背景图片 string bg_path = "D:\\CV\\IP_data\\background.jpg"; Mat bg_img = imread(bg_path); //背景混合图片 Mat ans_img = Mat::zeros(src_img.size(), src_img.type()); cout << ans_img.channels() << "\n"; //对于任意大小背景的图片 更换为目标图片的尺寸 resize(bg_img, bg_img, src_img.size()); imshow("bg_img", bg_img); waitKey(0); cout << "bg_img.size:" << bg_img.size() << "ans_img.size:" << ans_img.size() << "\n"; int cal_val = 0; for (int x = 0; x < src_img.cols; x++) { for (int y = 0; y < src_img.rows; y++) { int alpha = src_img.at<Vec4b>(y, x)[3]; for (int ch = 0; ch < 3; ch++) { //alpha混合公式 cal_val = src_img.at<Vec4b>(y, x)[ch] * (float(alpha) / 255.0) + bg_img.at<Vec3b>(y, x)[ch] * ((255.0 - float(alpha)) / 255.0); //防止数据溢出 等效于saturate_cast if (cal_val > 255) cal_val = 255; ans_img.at<Vec4b>(y, x)[ch] = cal_val; } } } //namedWindow("after",) imshow("after", ans_img); waitKey(0); return; }- 1
- 2
- 3
- 4
- 5
- 6
- 7
- 8
- 9
- 10
- 11
- 12
- 13
- 14
- 15
- 16
- 17
- 18
- 19
- 20
- 21
- 22
- 23
- 24
- 25
- 26
- 27
- 28
- 29
- 30
- 31
-
对于任意大小的背景需要处理背景大小, 使用
resize函数处理成前景大小 -
混合公式为:
color = (A.rgb * A.a) + (B.rgb * (1 - A.a)) -
error问题主要在细节上, 含有alpha的图像不能使用Vec3b访问, 会根本访问不出来.
-
防止数据溢出等效于函数
saturate_cast
结果分析与体会:
alpha通道显示:
[外链图片转存失败,源站可能有防盗链机制,建议将图片保存下来直接上传(img-kx91yrOv-1663552229430)(%E5%B1%B1%E4%B8%9C%E5%A4%A7%E5%AD%A6%E6%95%B0%E5%AD%97%E5%9B%BE%E5%83%8F%E5%A4%84%E7%90%86%E5%AE%9E%E9%AA%8C%E6%8A%A5%E5%91%8A1.assets/Snipaste_2022-09-18_23-21-22.jpg)]
alpha表示不透明度, 可以看到笔筒的不同位置有不同的透明度, 实体小玩具基本是完全不透明和完全透明.
alpha混合


- 可以看到笔筒的某些位置是悲情和前景的融合, 某些位置是单纯的前景, 可见通过alpha混合能够得到相对比较好的混合结果.
代码
#include#include #include #include "opencv2/core.hpp" #include "opencv2/features2d.hpp" //#include "opencv2/nonfree/nonfree.hpp" //#include"opencv2/legacy/legacy.hpp" #include "opencv2/highgui.hpp" using namespace cv; using namespace std; const char* src_win = "Source Image"; const string src_path = "D:\\CV\\IP_data\\a.png"; //const string src_path = "D:\\CV\\IP_data\\bean.bmp"; //const string src_path = "D:\\CV\\IP_data\\ex3.png"; const int N = 5e5; Mat src_img; int Show_img() { //读取图片 Mat src_img = imread(src_path, IMREAD_COLOR); //确认图片不空 if (src_img.empty()) { cout << "The image is empty!\n"; return EXIT_FAILURE; } //定义显示窗口(可省略, 这里可以设置窗口尺寸) namedWindow(src_win, WINDOW_AUTOSIZE); //显示图片 imshow(src_win, src_img); //保持窗口始终存在 waitKey(0); return 0; } void getChannel(const uchar* input, int width, int height, int inStep, int inChannels, uchar*& output, int outStep, int channelToGet) { //输出uchar数组 先设为较大的数组 防止溢出 uchar ans[N] = {0}; int poi = 0;//src_img对应的input指针指向访问位置 int cnt = 0;//ans中指针 用于指向存储位置 //图像交叉存储方式下访问每个像素的固定channel for (int y = 0; y < height; y++) { //考虑图像对齐填充下 每次找到a row的第一个位置 poi = channelToGet+y*inStep; //cout < - 1
- 2
- 3
- 4
- 5
- 6
- 7
- 8
- 9
- 10
- 11
- 12
- 13
- 14
- 15
- 16
- 17
- 18
- 19
- 20
- 21
- 22
- 23
- 24
- 25
- 26
- 27
- 28
- 29
- 30
- 31
- 32
- 33
- 34
- 35
- 36
- 37
- 38
- 39
- 40
- 41
- 42
- 43
- 44
- 45
- 46
- 47
- 48
- 49
- 50
- 51
- 52
- 53
- 54
- 55
- 56
- 57
- 58
- 59
- 60
- 61
- 62
- 63
- 64
- 65
- 66
- 67
- 68
- 69
- 70
- 71
- 72
- 73
- 74
- 75
- 76
- 77
- 78
- 79
- 80
- 81
- 82
- 83
- 84
- 85
- 86
- 87
- 88
- 89
- 90
- 91
- 92
- 93
- 94
- 95
- 96
- 97
- 98
- 99
- 100
- 101
- 102
- 103
- 104
- 105
- 106
- 107
- 108
- 109
- 110
- 111
- 112
- 113
- 114
- 115
- 116
- 117
- 118
- 119
- 120
- 121
- 122
- 123
- 124
- 125
- 126
- 127
- 128
- 129
- 130
- 131
- 132
- 133
-
相关阅读:
Matlab程序结构
Docker启动失败报错Failed to start Docker Application Container Engine解决方案
Shell综合应用案例,归档文件、发送消息
CVPR2022 | 重新审视池化:你的感受野不是最理想的
vite不能选配方案?vite-creater强势来袭!
查找算法 —— 斐波拉契查找法
CorelDRAWX4的C++插件开发(四十)纯C++插件开发(4)继承插件结构体IVGAppPlugin和自动化接口IDispatch
经验,真的是你的核心竞争力吗?
PyTorch ConvTranspose2d 的定义与计算过程
公司要招个程序员,34岁以上两年一跳的不要,开出工资以为看错了
- 原文地址:https://blog.csdn.net/qq_48034566/article/details/126927709
