-
【uniapp】微信小程序canvas签名旋转生成图片
用uniapp开发微信小程序过程中,遇到有审批签名的需求,签名的代码网上还是比较多的,插件市场上大神们比比皆是不再赘述,但遇到一个小细节导致同事有被难倒,无奈咨询于我,细节就是如何把绘制的canvas旋转个角度再生成图片。
如果只为结论,下面都可以不用看了:旋转图片让后端做,是最快的最方便的(毕竟java有现成工具类),如果真有这种实际业务就交给他们吧不用不好意思,而且后端能做的更多,比如通过色差工具不允许保存空面板等。
但是,套用钱老——“后端能搞的,前端为啥不能搞,前端难道比人家矮一截?”的精神(某些方面实际不止矮一截【狗头】),我们还是要通过研究和实现来增加我们自身的职业自信的,前端已经不是以前的“切图仔”啦。
那么如何解决呢?且看下面的思路。
先描述下具体的背景:
1.审批签名需要用户在一张空白画布上通过手指触碰屏幕并滑动的方式“写字”,完成后保存成一张图片,达到电子签名的目的。
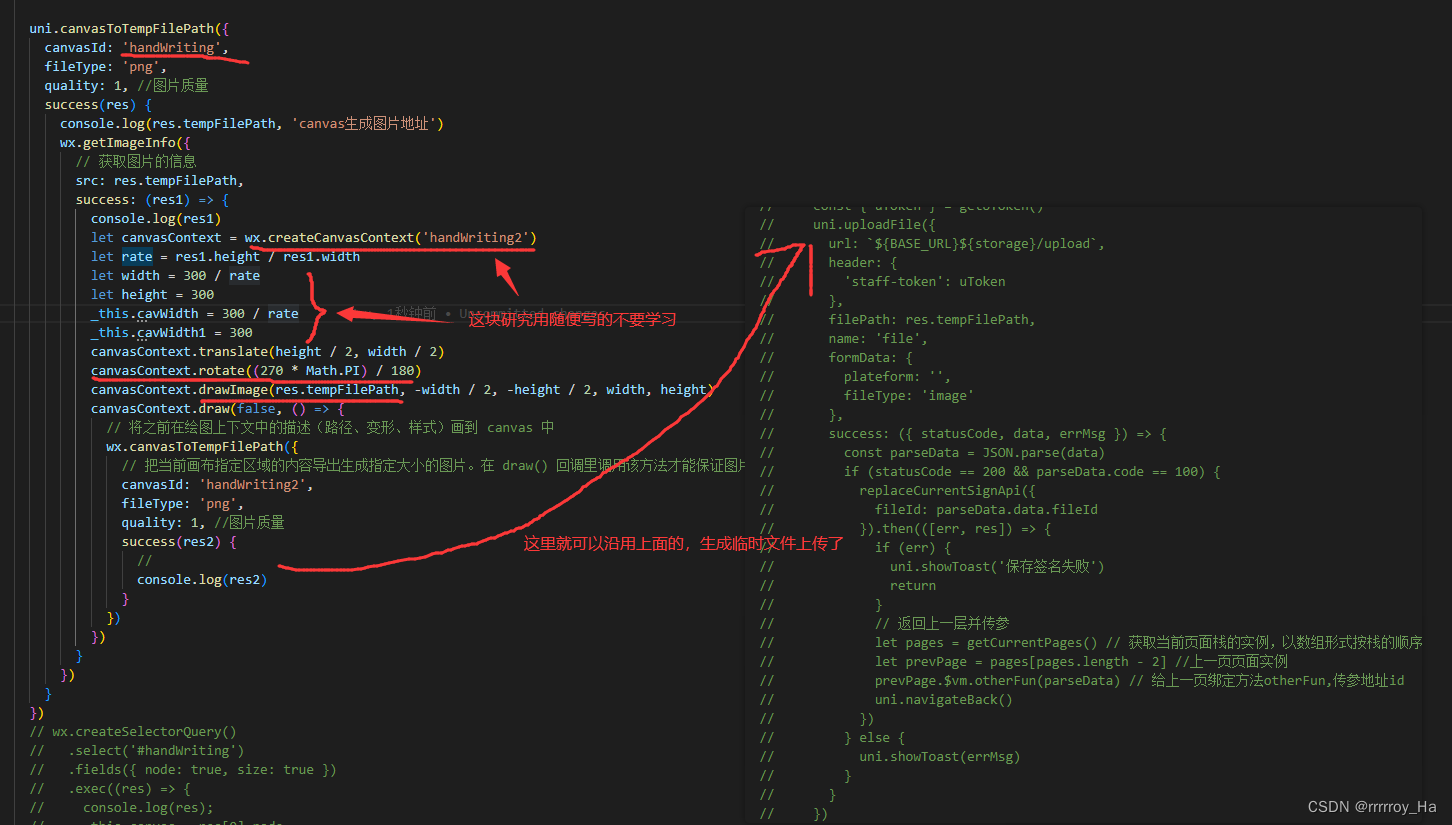
2.在页面中放置一个canvas标签,设置滑动事件,点击保存时调用uni.canvasToTempFilePath生成临时图片地址,再通过uni.uploadFile上传到后台,就此即可将用户手写的内容生成图片并保存在服务器了。
但是!一般的签名是需要用户横屏手写的,但对手机来说实际是竖着写的,保存的图片也是按手机(竖长型)的样子来的,在pc端展示的话需要用css旋转才行,但若有后台生成pdf此类需求的话,那就不好去旋转图片了,为了一劳永逸还得从生成的源头控制才行。
解决思路1:在保存的事件中去旋转canvas
canvas的上下文是提供旋转函数的canvasContext.rotate,但在实际过程中旋转没效果,而且假若成功,对用户体验也不好,放弃。
解决思路2:再添加一个“隐藏”的canvas,当画好后,在保存事件中动态将签名canvas的内容旋转复制到“隐藏”的canvas中,再将后者的内容生成图片上传,便能曲线实现我们的需求。
这个思路也是官方提供的,详见 canvas绘制好怎么旋转? | 微信开放社区
用代码说话
- <view>
- <NaviBar title="签署" :autoBack="true" />
- <view class="wrapper">
- <view class="handBtn">
- <button @click="retDraw" class="delBtn">清除button>
- <button @click="saveCanvasAsImg" class="saveBtn">取消button>
- <button @click="subCanvas" class="subBtn">确认button>
- view>
- <view class="handCenter">
- <canvas class="handWriting" :disable-scroll="true" @touchstart="uploadScaleStart" @touchmove="uploadScaleMove" canvas-id="handWriting" />
- <canvas style="position: absolute" :style="{ width: cavWidth, height: cavWidth1 }" canvas-id="handWriting2">canvas>
- view>
- view>
- view>
- <script>
- import { BASE_URL } from '@/common/config.js'
- import { getUToken } from '@/store'
- import { storage } from '@/api/api'
- import { replaceCurrentSignApi } from '@/api/flow.js'
- export default {
- name: 'Signature',
- data() {
- return {
- canvasName: 'handWriting',
- ctx: '',
- startX: null,
- startY: null,
- canvasWidth: 0,
- canvasHeight: 0,
- selectColor: 'black',
- lineColor: '#1A1A1A', // 颜色
- canvas: null,
- cavWidth: 2000,
- cavWidth1: 2000,
- lineSize: 5 // 笔记倍数
- }
- },
- onLoad() {
- this.ctx = uni.createCanvasContext('handWriting', this)
- this.$nextTick(() => {
- uni
- .createSelectorQuery()
- .select('.handCenter')
- .boundingClientRect((rect) => {
- this.canvasWidth = rect.width
- this.canvasHeight = rect.height
- /* 将canvas背景设置为 白底,不设置 导出的canvas的背景为透明 */
- this.setCanvasBg('#fff')
- })
- .exec()
- })
- },
- methods: {
- // 笔迹开始
- uploadScaleStart(e) {
- this.startX = e.changedTouches[0].x
- this.startY = e.changedTouches[0].y
- //设置画笔参数
- //画笔颜色
- this.ctx.setStrokeStyle(this.lineColor)
- //设置线条粗细
- this.ctx.setLineWidth(this.lineSize)
- //设置线条的结束端点样式
- this.ctx.setLineCap('round') //'butt'、'round'、'square'
- //开始画笔
- this.ctx.beginPath()
- },
- // 笔迹移动
- uploadScaleMove(e) {
- //取点
- let temX = e.changedTouches[0].x
- let temY = e.changedTouches[0].y
- //画线条
- this.ctx.moveTo(this.startX, this.startY)
- this.ctx.lineTo(temX, temY)
- this.ctx.stroke()
- this.startX = temX
- this.startY = temY
- this.ctx.draw(true)
- },
- /**
- * 重写
- */
- retDraw() {
- this.ctx.clearRect(0, 0, 700, 730)
- this.ctx.draw()
- //设置canvas背景
- this.setCanvasBg('#fff')
- },
- /**
- * @param {Object} str
- * @param {Object} color
- * 选择颜色
- */
- selectColorEvent(str, color) {
- this.selectColor = str
- this.lineColor = color
- },
- // 确认
- subCanvas() {
- // uni.canvasToTempFilePath({
- // canvasId: 'handWriting',
- // fileType: 'png',
- // quality: 1, //图片质量
- // success(res) {
- // // console.log(res.tempFilePath, 'canvas生成图片地址');
- // const { uToken } = getUToken()
- // uni.uploadFile({
- // url: `${BASE_URL}${storage}/upload`,
- // header: {
- // 'staff-token': uToken
- // },
- // filePath: res.tempFilePath,
- // name: 'file',
- // formData: {
- // plateform: '',
- // fileType: 'image'
- // },
- // success: ({ statusCode, data, errMsg }) => {
- // const parseData = JSON.parse(data)
- // if (statusCode == 200 && parseData.code == 100) {
- // replaceCurrentSignApi({
- // fileId: parseData.data.fileId
- // }).then(([err, res]) => {
- // if (err) {
- // uni.showToast('保存签名失败')
- // return
- // }
- // // 返回上一层并传参
- // let pages = getCurrentPages() // 获取当前页面栈的实例,以数组形式按栈的顺序给出,第一个元素为首页,最后一个元素为当前页面。
- // let prevPage = pages[pages.length - 2] //上一页页面实例
- // prevPage.$vm.otherFun(parseData) // 给上一页绑定方法otherFun,传参地址id
- // uni.navigateBack()
- // })
- // } else {
- // uni.showToast(errMsg)
- // }
- // }
- // })
- // }
- // })
- const _this = this
- uni.canvasToTempFilePath({
- canvasId: 'handWriting',
- fileType: 'png',
- quality: 1, //图片质量
- success(res) {
- console.log(res.tempFilePath, 'canvas生成图片地址')
- wx.getImageInfo({
- // 获取图片的信息
- src: res.tempFilePath,
- success: (res1) => {
- console.log(res1)
- // 将canvas1的内容复制到canvas2中
- let canvasContext = wx.createCanvasContext('handWriting2')
- let rate = res1.height / res1.width
- let width = 300 / rate
- let height = 300
- _this.cavWidth = 300 / rate
- _this.cavWidth1 = 300
- canvasContext.translate(height / 2, width / 2)
- canvasContext.rotate((270 * Math.PI) / 180)
- canvasContext.drawImage(res.tempFilePath, -width / 2, -height / 2, width, height)
- canvasContext.draw(false, () => {
- // 将之前在绘图上下文中的描述(路径、变形、样式)画到 canvas 中
- wx.canvasToTempFilePath({
- // 把当前画布指定区域的内容导出生成指定大小的图片。在 draw() 回调里调用该方法才能保证图片导出成功。
- canvasId: 'handWriting2',
- fileType: 'png',
- quality: 1, //图片质量
- success(res2) {
- // 调用uni.uploadFile上传图片即可
- console.log(res2)
- }
- })
- })
- }
- })
- }
- })
- // wx.createSelectorQuery()
- // .select('#handWriting')
- // .fields({ node: true, size: true })
- // .exec((res) => {
- // console.log(res);
- // _this.canvas = res[0].node
- // // const rotateCtx = rotateCanvas.getContext('2d')
- // })
- },
- //旋转图片,生成新canvas实例
- rotate(cb) {
- const that = this
- wx.createSelectorQuery()
- .select('#handWriting2')
- .fields({ node: true, size: true })
- .exec((res) => {
- const rotateCanvas = res[0].node
- const rotateCtx = rotateCanvas.getContext('2d')
- //this.ctxW-->所绘制canvas的width
- //this.ctxH -->所绘制canvas的height
- rotateCanvas.width = this.ctxH
- rotateCanvas.height = this.ctxW
- wx.canvasToTempFilePath({
- canvas: that.canvas,
- success(res) {
- const img = rotateCanvas.createImage()
- img.src = res.tempFilePath
- img.onload = function () {
- rotateCtx.translate(rotateCanvas.width / 2, rotateCanvas.height / 2)
- rotateCtx.rotate((270 * Math.PI) / 180)
- rotateCtx.drawImage(img, -rotateCanvas.height / 2, -rotateCanvas.width / 2)
- rotateCtx.scale(that.pixelRatio, that.pixelRatio)
- cb(rotateCanvas)
- }
- },
- fail(err) {
- console.log(err)
- }
- })
- })
- },
- //取消
- saveCanvasAsImg() {
- this.retDraw()
- uni.navigateBack()
- },
- //设置canvas背景色 不设置 导出的canvas的背景为透明
- //@params:字符串 color
- setCanvasBg(color) {
- /* 将canvas背景设置为 白底,不设置 导出的canvas的背景为透明 */
- //rect() 参数说明 矩形路径左上角的横坐标,左上角的纵坐标, 矩形路径的宽度, 矩形路径的高度
- //这里是 canvasHeight - 4 是因为下边盖住边框了,所以手动减了写
- this.ctx.rect(0, 0, this.canvasWidth, this.canvasHeight - 4)
- // ctx.setFillStyle('red')
- this.ctx.setFillStyle(color)
- this.ctx.fill() //设置填充
- this.ctx.draw() //开画
- },
- toJSON() {}
- }
- }
- page {
- background: #fbfbfb;
- height: auto;
- overflow: hidden;
- }
- .wrapper {
- position: relative;
- width: 100%;
- height: 85vh;
- margin: 20rpx 0;
- overflow: auto;
- display: flex;
- align-content: center;
- flex-direction: row;
- justify-content: center;
- font-size: 28rpx;
- }
- .handWriting {
- background: #fff;
- width: 100%;
- height: 85vh;
- }
- .handCenter {
- border-left: 2rpx solid #e9e9e9;
- flex: 5;
- overflow: hidden;
- box-sizing: border-box;
- }
- .handBtn button {
- font-size: 28rpx;
- }
- .handBtn {
- height: 85vh;
- display: inline-flex;
- flex-direction: column;
- justify-content: space-between;
- align-content: space-between;
- flex: 1;
- }
- .delBtn {
- width: 200rpx;
- position: absolute;
- bottom: 350rpx;
- left: -35rpx;
- transform: rotate(90deg);
- color: #666;
- }
- .subBtn {
- width: 200rpx;
- position: absolute;
- bottom: 52rpx;
- left: -35rpx;
- display: inline-flex;
- transform: rotate(90deg);
- background: #29cea0;
- color: #fff;
- margin-bottom: 60rpx;
- text-align: center;
- justify-content: center;
- }
- /*Peach - 新增 - 保存*/
- .saveBtn {
- width: 200rpx;
- position: absolute;
- bottom: 590rpx;
- left: -35rpx;
- transform: rotate(90deg);
- color: #666;
- }
- style>
代码重点:

看看具体效果吧:

随便画一个,只有点击保存,再去同步第二个canvas,此时是没点确定的状态。


点击确认,可以看到内容就生成好啦。

这样,就能前端实现canvas的旋转上传啦。
后续:
实际测试过程中,会有画布大小的兼容性问题,具体表现为,在代码里设置的画布背景是白色,在某些屏宽(宽高比比iphone7还大)的iphone上,生成的图片可能会存在右侧一竖列区域(如果没做旋转处理实际上是图片的底部区域)是透明的情况,用图片指示一下。

可能是由于ctx.clearRect,ctx.rect填充区域同事给写死,或是填充高度和画布高度不一致?,或canvas自己问题,建议在这里就不要动态的获取canvas宽高去动态填充指定范围的颜色了,暴力一点,直接填充2000大小区域,类似于this.ctx.clearRect(0, 0, 2000, 2000),this.ctx.rect(0, 0, 2000, 2000),省时省力哈哈。
参考资料(资料2仅提供思路,没实现出来):
-
相关阅读:
比尔·盖茨晒48年前简历:“没你们的好看”
介绍numpy数组
芯科科技推出新的8位MCU系列产品,扩展其强大的MCU平台
ArcGIS10.1软件安装教程
HBuilderX 通过 Android 11+ 调试执行重新运行时同步资源失败解决方法
MySql(随记)
【Spring】Day19
笙默考试管理系统-MyExamTest----codemirror(28)
我又学会了使用Range实现网络文件下载的断点续传
转转图书对基于Drools引擎的DMN实践
- 原文地址:https://blog.csdn.net/rrrrroy_Ha/article/details/126864111
