-
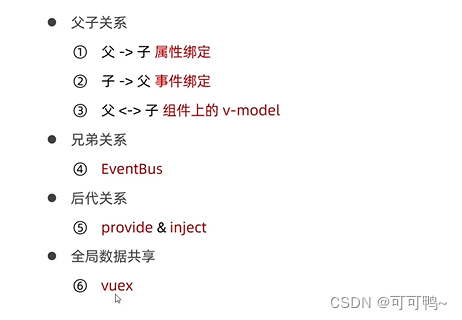
Vite+Vue3EventBus,provide数据共享
一、EventBus 简单使用
安装
npm i mitt@2.1.0 -S- 1
eventbus.js- 1
import mitt from 'mitt' const bus = mitt(); export default bus;- 1
- 2
- 3
接收方
<template> <div class="container"> <VSwiper></VSwiper> <h3> {{ num }} </h3> </div> </template> <script> import bus from "./EventBus/eventbus"; export default { name: "MyApp", components: { }, data() { return { num: 0, }; }, created() { bus.on("countChange", (count) => { this.num = count; }); }, }; </script> <style lang="less" scoped></style>- 1
- 2
- 3
- 4
- 5
- 6
- 7
- 8
- 9
- 10
- 11
- 12
- 13
- 14
- 15
- 16
- 17
- 18
- 19
- 20
- 21
- 22
- 23
- 24
- 25
- 26
- 27
- 28
- 29
发送方
<template> <div> <h3>发送方数据{{count}}</h3> <button type="button" class="btn btn-primary" @click="add">+1</button> </div> </template> <script> import bus from '../EventBus/eventbus' export default { name:"VSwiper", data(){ return{ count:0 } }, methods: { add(){ this.count +=1; bus.emit("countChange",this.count) } } } </script>- 1
- 2
- 3
- 4
- 5
- 6
- 7
- 8
- 9
- 10
- 11
- 12
- 13
- 14
- 15
- 16
- 17
- 18
- 19
- 20
- 21
- 22
- 23
- 24

provide
父组件provide(){ return{ color:"red" } },- 1
- 2
- 3
- 4
- 5
<template> <div class="container"> <VSwiper></VSwiper> <Hello></Hello> <h3> {{ num }} </h3> </div> </template> <script> import Hello from './components/HelloWorld.vue' import bus from "./EventBus/eventbus"; export default { name: "MyApp", components: { Hello }, data() { return { num: 0, }; }, provide(){ return{ color:"red" } }, created() { bus.on("countChange", (count) => { this.num = count; }); }, }; </script> <style lang="less" scoped></style>- 1
- 2
- 3
- 4
- 5
- 6
- 7
- 8
- 9
- 10
- 11
- 12
- 13
- 14
- 15
- 16
- 17
- 18
- 19
- 20
- 21
- 22
- 23
- 24
- 25
- 26
- 27
- 28
- 29
- 30
- 31
- 32
- 33
- 34
- 35
- 36
- 37
子组件
inject: ["color"],- 1
jjtemplate> <div> <h3>发送方数据{{ count }}</h3> {{ color }} <button type="button" class="btn btn-primary" @click="add">+1</button> </div> </template> <script> import bus from "../EventBus/eventbus"; export default { name: "VSwiper", inject: ["color"], data() { return { count: 0, }; }, methods: { add() { this.count += 1; bus.emit("countChange", this.count); }, }, }; </script>- 1
- 2
- 3
- 4
- 5
- 6
- 7
- 8
- 9
- 10
- 11
- 12
- 13
- 14
- 15
- 16
- 17
- 18
- 19
- 20
- 21
- 22
- 23
- 24
- 25
- 26

二、provide响应式数据
import {computed} from 'vue' methods: { changeColor(){ this.color = 'blue' }- 1
- 2
- 3
- 4
- 5
<template> <div class="container"> <VSwiper></VSwiper> <button type="button" class="btn btn-primary" @click="changeColor">color</button> <h3> {{ num }} </h3> </div> </template> <script> import bus from "./EventBus/eventbus"; import {computed} from 'vue' export default { name: "MyApp", components: { }, data() { return { num: 0, color:'red' }; }, provide(){ //默认不是响应式的 return{ color:computed(()=>this.color) } }, created() { bus.on("countChange", (count) => { this.num = count; }); }, methods: { changeColor(){ this.color = 'blue' } } }; </script> <style lang="less" scoped></style>- 1
- 2
- 3
- 4
- 5
- 6
- 7
- 8
- 9
- 10
- 11
- 12
- 13
- 14
- 15
- 16
- 17
- 18
- 19
- 20
- 21
- 22
- 23
- 24
- 25
- 26
- 27
- 28
- 29
- 30
- 31
- 32
- 33
- 34
- 35
- 36
- 37
- 38
- 39
- 40
- 41
- 42
- 43
- 44
大范围修改数据vuex
vuex三、todolist案例
创建一个vite项目
npm init vite-app item_vite- 1
npm i less less-loader -D- 1
导入
bootstrap.css- 1
全局挂载
import { createApp } from 'vue' import App from './App.vue' import './css/base.css' import Swiper from './components/swiper.vue' import './assets/css/bootstrap.css' //createApp函数 创建SPA实例 const app = createApp(App); app.component(Swiper.name,Swiper) //调用mount app.mount('#app')- 1
- 2
- 3
- 4
- 5
- 6
- 7
- 8
- 9
- 10
TodoInput.vue
知识点1.v-for渲染 key唯一
2.控件进行v-model绑定
3. v-if v-else使用
4.props规定数据类型默认值<template> <div class="listContainer"> <ul class="list-group"> <li class="list-group-item list-li" v-for="item in list" :key="item.id"> <label class="checkbox-inline" :class="item.done ? 'del' : '' "> <input type="checkbox" id="inlineCheckbox1" value="option1" v-model="item.done"/> {{ item.task }} </label> <span class="badge succcess badge-pill" v-if="item.done">完成</span> <span class="badge warning badge-pill" v-else>未完成</span> </li> </ul> </div> </template> <script> export default { props: { list: { type: Array, required: true, default: [], }, }, name: "TodoList", data() { return {}; }, }; </script> <style scoped> .succcess { background-color: rgb(35, 153, 63); width: 50px; } .warning { width: 50px; background-color: #f2c230; } .listContainer { width: 400px; } .list-li { display: flex; justify-content: space-between; } .del{ text-decoration: line-through; color: grey; font-style: italic; } </style>- 1
- 2
- 3
- 4
- 5
- 6
- 7
- 8
- 9
- 10
- 11
- 12
- 13
- 14
- 15
- 16
- 17
- 18
- 19
- 20
- 21
- 22
- 23
- 24
- 25
- 26
- 27
- 28
- 29
- 30
- 31
- 32
- 33
- 34
- 35
- 36
- 37
- 38
- 39
- 40
- 41
- 42
- 43
- 44
- 45
- 46
- 47
- 48
- 49
- 50
- 51
- 52
TodoInput.vue
知识点1.阻止表单默认事件
2.v-model.trim去空格
3.子传父<template> <div> <form class="form-inline" @submit.prevent="onFromSubmit"> <div class="form-group"> <label class="sr-only" for="exampleInputAmount" >Amount (in dollars)</label > <div class="input-group"> <div class="input-group-addon">任务</div> <input type="text" class="form-control" placeholder="情输入要添加的任务" v-model.trim="taskname" /> </div> </div> <button type="submit" class="btn btn-default">添加任务</button> </form> </div> </template> <script> export default { name: "TodoInput", emits:["add"], data() { return { taskname: "", }; }, methods: { onFromSubmit() { if(!this.taskname) return alert('任务不能为空'); this.$emit("add",this.taskname) this.taskname = '' }, }, }; </script> <style lang="less" scoped></style>- 1
- 2
- 3
- 4
- 5
- 6
- 7
- 8
- 9
- 10
- 11
- 12
- 13
- 14
- 15
- 16
- 17
- 18
- 19
- 20
- 21
- 22
- 23
- 24
- 25
- 26
- 27
- 28
- 29
- 30
- 31
- 32
- 33
- 34
- 35
- 36
- 37
- 38
- 39
- 40
- 41
App.vue
知识点1.添加数组元素
2.计算属性
3.父传子<template> <div class="container"> <div class="task"> <TodoInput @add="onAddNewTask" class="top-con"></TodoInput> <TodoList :list="tasklist" class="todoList"></TodoList> <hr /> <TodoButton class="todoList" v-model:active="indexTodo"></TodoButton> </div> </div> </template> <script> import TodoList from "./components/TodoList.vue"; import TodoInput from "./components/TodoInput.vue"; import TodoButton from "./components/TodoBtn.vue"; export default { name: "MyApp", data() { return { todolist: [ { id: 1, task: "周一开会", done: false }, { id: 2, task: "周二聚会", done: true }, { id: 3, task: "周二演讲", done: false }, ], nextId: 4, indexTodo: 0, }; }, methods: { onAddNewTask(v) { console.log(v); this.todolist.push({ id: this.nextId, task: v, done: false }); this.nextId++; }, }, components: { TodoList, TodoInput, TodoButton, }, computed: { tasklist() { switch (this.indexTodo) { case 0: return this.todolist; case 1: return this.todolist.filter((x) => x.done === true); case 2: return this.todolist.filter((x) => x.done !== true); } }, }, }; </script> <style lang="less" scoped> h2 { i { color: red; font-size: 17px; } } .task { border-radius: 12px; padding-top: 50px; width: 500px; height: 600px; margin: 0 auto; background-color: rgb(245, 198, 239); } .container { padding: 0; margin: 0 auto; } .todoList { margin: 0 auto; } .top-con { margin-bottom: 30px; } </style>- 1
- 2
- 3
- 4
- 5
- 6
- 7
- 8
- 9
- 10
- 11
- 12
- 13
- 14
- 15
- 16
- 17
- 18
- 19
- 20
- 21
- 22
- 23
- 24
- 25
- 26
- 27
- 28
- 29
- 30
- 31
- 32
- 33
- 34
- 35
- 36
- 37
- 38
- 39
- 40
- 41
- 42
- 43
- 44
- 45
- 46
- 47
- 48
- 49
- 50
- 51
- 52
- 53
- 54
- 55
- 56
- 57
- 58
- 59
- 60
- 61
- 62
- 63
- 64
- 65
- 66
- 67
- 68
- 69
- 70
- 71
- 72
- 73
- 74
- 75
- 76
- 77
- 78
- 79
- 80
- 81
- 82
TodoBtn.vue
知识点1.动态绑定class属性
2.利用update动态改变父组件数值<template> <div class="btn-contatner"> <div class="btn-group" role="group" aria-label="..."> <button type="button" class="btn" :class="active === 0 ?'btn-primary':'btn-default'" @click="btnFn(0)">全部</button> <button type="button" class="btn" :class="active === 1 ?'btn-primary':'btn-default'" @click="btnFn(1)">已完成</button> <button type="button" class="btn btn-default" :class="active === 2 ?'btn-primary':'btn-default'" @click="btnFn(2)">未完成</button> </div> </div> </template> <script> export default { name:"TodoListBtn", props: { active:{ type:Number, required:true, default:0 } }, emits:["update:active"], methods:{ btnFn(index){ console.log(index) if(index === this.active){ return; }else{ this.$emit("update:active",index) } } } }; </script> <style lang="less" scoped> .btn-contatner{ margin-top: 30px; width: 400px; } </style>- 1
- 2
- 3
- 4
- 5
- 6
- 7
- 8
- 9
- 10
- 11
- 12
- 13
- 14
- 15
- 16
- 17
- 18
- 19
- 20
- 21
- 22
- 23
- 24
- 25
- 26
- 27
- 28
- 29
- 30
- 31
- 32
- 33
- 34
- 35
- 36
- 37
- 38
- 39
-
相关阅读:
60岁首席工程师被SpaceX边缘化,主管:我怕他退休或死了
Linux更新g++
ubuntu环境下基于cerbero构建GStreamer及使用VSCode进行调试
多云环境的风险发现
递归 函数
【python】Jenkins实现携带commit_log钉钉/企微机器人通知
学会多线程&高并发,敢于向大厂“开炮”
【LeetCode与《代码随想录》】链表篇:做题笔记与总结-JavaScript版
03、MongoDB -- MongoDB 权限的设计
最新冠军方案开源 | MOTRv2:YOLOX与MOTR合力打造最强多目标跟踪!(旷视&上交)...
- 原文地址:https://blog.csdn.net/qq_43547255/article/details/126872906

