一、图像分类概述
1. 什么是图像分类?
- 图像分类就是将不同的图像划分到不同类别,实现最小分类误差、最高精度。手写体识别就是一个经典的图像分类问题,它将输入图像分为0~9某个数字中,实际就是将输入图像分为10类。

2. 图像分类粒度
2.1 跨物种级图像分类:在不同物种层次上识别不同对象,如猫狗分类

2.2 子类细粒度图像分类:同一大类下,不同子类的分类。如不同的鸟分类,不同的狗分类

2.3 实例级图像分类:区分不同的个体。如人脸识别

3. 图像分类发展历程
- 图像分类任务从传统的方法到基于深度学习的方法,经历了几十年的发展

4. 图像分类问题的挑战
- 虽然图像分类大赛正确率已经接近极限,但在实际工程应用中,面临诸多挑战与难题:
- 类别不均衡
- 数据集小
- 巨大的类内差异
- 实际应用复杂情况:光照、遮挡、模糊、角度变化、干扰
二、常用数据集介绍
1. MNIST 数据集
- 手写数字的数据集,来自美国国家标准与技术研究所(National Institute of Standards and Technology, NIST),发布于1998年
- 样本来自250个不同人的手写数字,50%高中学生,50%是人口普查局的工作人员
- 数字从0~9,图片大小是28x28像素,训练数据集包含60000个样本,测试数据集包含10000个样本。数据集的标签是长度为10的一维数组,数组中每个元素索引号表示对应数字出现的概率。
- 下载地址:http://yann.lecun.com/exdb/mnist/

2. CIFAR10 数据集
- CIFAR10 数据集由Alex Krizhevsky、Vinod Nair和Geoffrey Hinton等人收集
- 包含6万张彩色图像,图像大小是32x32,共有10个类,每类有6000张图。其中,5万张图组成训练集合,训练集合中的每一类均等,都有5000张图;剩余1万张图作为测试集合,测试集合中的每一类也均等,各有1000张图
- 10个类别是:airplane、automobile、bird、cat、deer、dog、frog、horse、ship和truck
- 下载地址:http://www.cs.toronto.edu/~kriz/cifar.html

3. ImageNet 数据集
- ImageNet 数据集由李飞飞实验室发布于2009年
- 1400多万幅图片,涵盖2万多个类别的标注与超过百万的边界框标注,每一类类别大约有500 ~ 1000张图片
- ImageNet 竞赛使用的是 ImageNet 完整数据集的一个子类,包括1000类,其中大部分是动物。在深度学习任务中,我们经常会使用 ImageNet 预训练的模型
- 下载地址:http://www.image-net.org/

4. FDDB 人脸数据集
- 发布于2010年,是被广泛用于人脸检测方法评测的一个数据集
- 共2845张图像,包含有5171张人脸图像,大部分是自然条件下拍摄的名热
- 下载地址:http://vis-www.cs-umass.edu/fddb/index.html#download

5, WIDER Face 数据集
- 2015年由香港中文大学发布
- 32203张图像,共有393703张人脸图像,比FDDB数据集大10倍,而且在面部的尺寸、姿势、遮挡、表情、妆容和光照上都有很大的变化,自发布后广泛应用于评估性能比传统方法更强大的卷积神经网络
- 下载地址:http://mmlab.ie.cuhk.edu.hk/projects/WIDERFace/

三、图像分类的应用
- 交通违章识别

- 安检系统

- 人脸识别

- 生物种群数量统计

- 工业质检

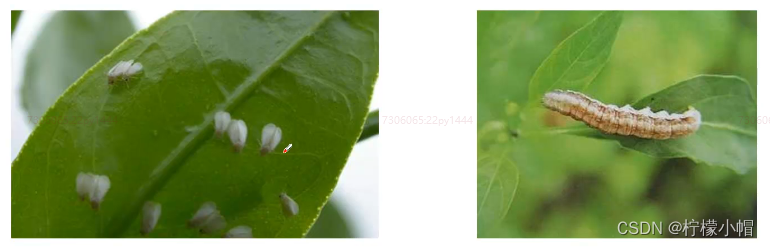
- 病虫害识别
- 医疗诊断

第十八章 利用CNN实现图像分类
思路及总体步骤
1. 数据集介绍
- 来源:爬虫从百度图片搜索结果爬取
- 内容:包含1036张水果图片,共5个类别(苹果288张、香蕉275张、葡萄216张、橙子276张、梨251张)
- 图像预处理时,将其中10%作为测试数据,90%作为训练数据
2. 总体步骤
- 数据预处理:建立分类文件,建立训练集、测试集
- 训练与模型评估
- 读取测试图片,进行预测
3. 数据预处理
- 图片位于5个目录,遍历每个目录,将其中90%写入训练集文件,10%写入测试集文件,文件中记录了图片的路径,用于数据读取器进行读取
- 生成2个文件:train.txt(训练集)、test.txt(测试集)
- 注意:
- 数据集路径是否正确
- 生成的训练集文件、测试集文件是否正确
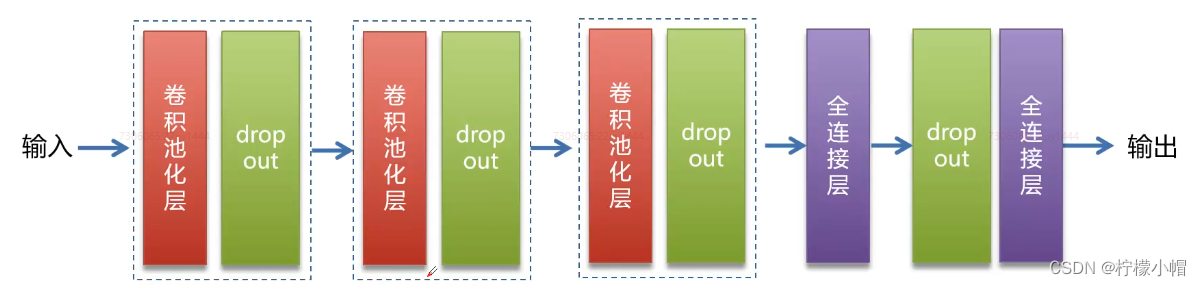
4. 模型结构
- 模型
5. 代码
import os
name_dict = {"apple": 0, "banana": 1, "grape": 2, "orange": 3, "pear": 4}
data_root_path = "data/fruits/"
test_file_path = data_root_path + "test.txt"
train_file_path = data_root_path + "train.txt"
name_data_list = {}
def save_train_test_file(path, name):
if name not in name_data_list:
img_list = []
img_list.append(path)
name_data_list[name] = img_list
else:
name_data_list[name].append(path)
dirs = os.listdir(data_root_path)
for d in dirs:
full_path = data_root_path + d
if os.path.isdir(full_path):
imgs = os.listdir(full_path)
for img in imgs:
save_train_test_file(full_path + "/" + img,
d)
else:
pass
with open(test_file_path, "w") as f:
pass
with open(train_file_path, "w") as f:
pass
for name, img_list in name_data_list.items():
i = 0
num = len(img_list)
print("%s: %d张" % (name, num))
for img in img_list:
if i % 10 == 0:
with open(test_file_path, "a") as f:
line = "%s\t%d\n" % (img, name_dict[name])
f.write(line)
else:
with open(train_file_path, "a") as f:
line = "%s\t%d\n" % (img, name_dict[name])
f.write(line)
i += 1
print("数据预处理完成.")
"""
grape: 216张
banana: 275张
apple: 288张
orange: 276张
pear: 251张
数据预处理完成.
"""
- 1
- 2
- 3
- 4
- 5
- 6
- 7
- 8
- 9
- 10
- 11
- 12
- 13
- 14
- 15
- 16
- 17
- 18
- 19
- 20
- 21
- 22
- 23
- 24
- 25
- 26
- 27
- 28
- 29
- 30
- 31
- 32
- 33
- 34
- 35
- 36
- 37
- 38
- 39
- 40
- 41
- 42
- 43
- 44
- 45
- 46
- 47
- 48
- 49
- 50
- 51
- 52
- 53
- 54
- 55
- 56
- 57
- 58
- 59
- 60
- 61
- 62
- 63
- 64
- 65
- 66
- 67
- 68
- 69
- 70
import paddle
import paddle.fluid as fluid
import numpy
import sys
import os
from multiprocessing import cpu_count
import time
import matplotlib.pyplot as plt
def train_mapper(sample):
"""
根据传入的一行文本样本数据,读取相应的图像数据并返回
:param sample: 元组 格式 图片路径 类别
:return: 返回图像数据、类别
"""
img, label = sample
if not os.path.exists(img):
print("图像不存在")
img = paddle.dataset.image.load_image(img)
img = paddle.dataset.image.simple_transform(im=img,
resize_size=100,
crop_size=100,
is_color=True,
is_train=True)
img = img.astype("float32") / 255.0
return img, label
def train_r(train_list, buffered_size=1024):
def reader():
with open(train_list, "r") as f:
lines = [line.strip() for line in f]
for line in lines:
img_path, lab = line.replace("\n", "").split("\t")
yield img_path, int(lab)
return paddle.reader.xmap_readers(train_mapper,
reader,
cpu_count(),
buffered_size)
BATCH_SIZE = 32
trainer_reader = train_r(train_list=train_file_path)
random_train_reader = paddle.reader.shuffle(reader=trainer_reader,
buf_size=1300)
batch_train_reader = paddle.batch(random_train_reader,
batch_size=BATCH_SIZE)
image = fluid.layers.data(name="image", shape=[3, 100, 100], dtype="float32")
label = fluid.layers.data(name="label", shape=[1], dtype="int64")
def convolution_neural_network(image, type_size):
"""
创建CNN
:param image: 图像处理
:param type_size: 分类数量
:return: 一组分类概率(预测结果)
"""
conv_pool_1 = fluid.nets.simple_img_conv_pool(input=image,
filter_size=3,
num_filters=32,
pool_size=2,
pool_stride=2,
act="relu")
drop = fluid.layers.dropout(x=conv_pool_1, dropout_prob=0.5)
conv_pool_2 = fluid.nets.simple_img_conv_pool(input=drop,
filter_size=3,
num_filters=64,
pool_size=2,
pool_stride=2,
act="relu")
drop = fluid.layers.dropout(x=conv_pool_2, dropout_prob=0.5)
conv_pool_3 = fluid.nets.simple_img_conv_pool(input=drop,
filter_size=3,
num_filters=64,
pool_size=2,
pool_stride=2,
act="relu")
drop = fluid.layers.dropout(x=conv_pool_3, dropout_prob=0.5)
fc = fluid.layers.fc(input=drop, size=512, act="relu")
drop = fluid.layers.dropout(x=fc, dropout_prob=0.5)
predict = fluid.layers.fc(input=drop,
size=type_size,
act="softmax")
return predict
predict = convolution_neural_network(image=image, type_size=5)
cost = fluid.layers.cross_entropy(input=predict,
label=label)
avg_cost = fluid.layers.mean(cost)
accuracy = fluid.layers.accuracy(input=predict,
label=label)
optimizer = fluid.optimizer.Adam(learning_rate=0.001)
optimizer.minimize(avg_cost)
place = fluid.CUDAPlace(0)
exe = fluid.Executor(place)
exe.run(fluid.default_startup_program())
feeder = fluid.DataFeeder(feed_list=[image, label],
place=place)
model_save_dir = "model/fruits/"
costs = []
accs = []
batches = []
times = 0
for pass_id in range(5):
train_cost = 0
for batch_id, data in enumerate(batch_train_reader()):
times += 1
train_cost, train_acc = exe.run(program=fluid.default_main_program(),
feed=feeder.feed(data),
fetch_list=[avg_cost, accuracy])
if batch_id % 20 == 0:
print("pass_id:%d, batch_id:%d, cost:%f, acc:%f" % (pass_id, batch_id, train_cost[0], train_acc[0]))
accs.append(train_acc[0])
costs.append(train_cost[0])
batches.append(times)
if not os.path.exists(model_save_dir):
os.makedirs(model_save_dir)
fluid.io.save_inference_model(dirname=model_save_dir,
feeded_var_names=["image"],
target_vars=[predict],
executor=exe)
print("模型保存成功。")
plt.figure("training")
plt.title("training", fontsize=24)
plt.xlabel("iter", fontsize=14)
plt.ylabel("cost/acc", fontsize=24)
plt.plot(batches, costs, color="red", label="Training Cost")
plt.plot(batches, accs, color="green", label="Training Acc")
plt.legend()
plt.grid()
plt.savefig("train.png")
plt.show()
"""
pass_id:0, batch_id:0, cost:1.723219, acc:0.062500
pass_id:0, batch_id:20, cost:1.591464, acc:0.312500
pass_id:1, batch_id:0, cost:1.618526, acc:0.125000
pass_id:1, batch_id:20, cost:1.312994, acc:0.281250
pass_id:2, batch_id:0, cost:1.113852, acc:0.562500
pass_id:2, batch_id:20, cost:0.746140, acc:0.718750
pass_id:3, batch_id:0, cost:0.562171, acc:0.843750
pass_id:3, batch_id:20, cost:0.711124, acc:0.781250
pass_id:4, batch_id:0, cost:0.747990, acc:0.750000
pass_id:4, batch_id:20, cost:0.511134, acc:0.875000
模型保存成功。
"""
- 1
- 2
- 3
- 4
- 5
- 6
- 7
- 8
- 9
- 10
- 11
- 12
- 13
- 14
- 15
- 16
- 17
- 18
- 19
- 20
- 21
- 22
- 23
- 24
- 25
- 26
- 27
- 28
- 29
- 30
- 31
- 32
- 33
- 34
- 35
- 36
- 37
- 38
- 39
- 40
- 41
- 42
- 43
- 44
- 45
- 46
- 47
- 48
- 49
- 50
- 51
- 52
- 53
- 54
- 55
- 56
- 57
- 58
- 59
- 60
- 61
- 62
- 63
- 64
- 65
- 66
- 67
- 68
- 69
- 70
- 71
- 72
- 73
- 74
- 75
- 76
- 77
- 78
- 79
- 80
- 81
- 82
- 83
- 84
- 85
- 86
- 87
- 88
- 89
- 90
- 91
- 92
- 93
- 94
- 95
- 96
- 97
- 98
- 99
- 100
- 101
- 102
- 103
- 104
- 105
- 106
- 107
- 108
- 109
- 110
- 111
- 112
- 113
- 114
- 115
- 116
- 117
- 118
- 119
- 120
- 121
- 122
- 123
- 124
- 125
- 126
- 127
- 128
- 129
- 130
- 131
- 132
- 133
- 134
- 135
- 136
- 137
- 138
- 139
- 140
- 141
- 142
- 143
- 144
- 145
- 146
- 147
- 148
- 149
- 150
- 151
- 152
- 153
- 154
- 155
- 156
- 157
- 158
- 159
- 160
- 161
- 162
- 163
- 164
- 165
- 166
- 167
- 168
- 169
- 170
- 171
- 172
- 173
- 174
- 175
- 176
- 177
- 178
- 179
- 180
- 181
- 182
- 183
- 184
- 185
- 186

from PIL import Image
place = fluid.CPUPlace()
infer_exe = fluid.Executor(place)
model_save_dir = "model/fruits/"
def load_img(path):
img = paddle.dataset.image.load_and_transform(path, 100, 100, False).astype("float32")
img = img / 255.0
return img
infer_imgs = []
test_img = "apple.png"
infer_imgs.append(load_img(test_img))
infer_imgs = numpy.array(infer_imgs)
infer_program, feed_target_names, fetch_targets = \
fluid.io.load_inference_model(model_save_dir, infer_exe)
results = infer_exe.run(infer_program,
feed={feed_target_names[0]: infer_imgs},
fetch_list=fetch_targets)
print(results)
result = numpy.argmax(results[0])
for k, v in name_dict.items():
if result == v:
print("预测结果:", k)
img = Image.open(test_img)
plt.imshow(img)
plt.show()
"""
[array([[9.9884272e-01, 1.1660696e-11, 1.1563993e-03, 3.6097964e-07,
4.6960804e-07]], dtype=float32)]
预测结果: apple
"""
- 1
- 2
- 3
- 4
- 5
- 6
- 7
- 8
- 9
- 10
- 11
- 12
- 13
- 14
- 15
- 16
- 17
- 18
- 19
- 20
- 21
- 22
- 23
- 24
- 25
- 26
- 27
- 28
- 29
- 30
- 31
- 32
- 33
- 34
- 35
- 36
- 37
- 38
- 39
- 40
- 41
- 42
- 43
- 44
- 45
- 46
- 47
- 48
import os
name_dict = {"apple": 0, "banana": 1, "grape": 2, "orange": 3, "pear": 4}
data_root_path = "data/fruits/"
test_file_path = data_root_path + "test.txt"
train_file_path = data_root_path + "train.txt"
name_data_list = {}
def save_train_test_file(path, name):
if name not in name_data_list:
img_list = []
img_list.append(path)
name_data_list[name] = img_list
else:
name_data_list[name].append(path)
dirs = os.listdir(data_root_path)
for d in dirs:
full_path = data_root_path + d
if os.path.isdir(full_path):
imgs = os.listdir(full_path)
for img in imgs:
save_train_test_file(full_path + "/" + img,
d)
else:
pass
with open(test_file_path, "w") as f:
pass
with open(train_file_path, "w") as f:
pass
for name, img_list in name_data_list.items():
i = 0
num = len(img_list)
print("%s: %d张" % (name, num))
for img in img_list:
if i % 10 == 0:
with open(test_file_path, "a") as f:
line = "%s\t%d\n" % (img, name_dict[name])
f.write(line)
else:
with open(train_file_path, "a") as f:
line = "%s\t%d\n" % (img, name_dict[name])
f.write(line)
i += 1
print("数据预处理完成.")
"""
grape: 216张
orange: 276张
apple: 288张
pear: 251张
banana: 275张
数据预处理完成.
"""
import paddle
import paddle.fluid as fluid
import numpy
import sys
import os
from multiprocessing import cpu_count
import time
import matplotlib.pyplot as plt
def train_mapper(sample):
"""
根据传入的一行文本样本数据,读取相应的图像数据并返回
:param sample: 元组 格式 图片路径 类别
:return: 返回图像数据、类别
"""
img, label = sample
if not os.path.exists(img):
print("图像不存在")
img = paddle.dataset.image.load_image(img)
img = paddle.dataset.image.simple_transform(im=img,
resize_size=128,
crop_size=128,
is_color=True,
is_train=True)
img = img.astype("float32") / 255.0
return img, label
def train_r(train_list, buffered_size=1024):
def reader():
with open(train_list, "r") as f:
lines = [line.strip() for line in f]
for line in lines:
img_path, lab = line.replace("\n", "").split("\t")
yield img_path, int(lab)
return paddle.reader.xmap_readers(train_mapper,
reader,
cpu_count(),
buffered_size)
def test_mapper(sample):
img, label = sample
img = paddle.dataset.image.load_image(img)
img = paddle.dataset.image.simple_transform(im=img,
resize_size=128,
crop_size=128,
is_color=True,
is_train=False)
img = img.astype("float32") / 255.0
return img, label
def test_r(test_list, buffered_size=1024):
def reader():
with open(test_list, "r") as f:
lines = [line.strip() for line in f]
for line in lines:
img_path, lab = line.split("\t")
yield img_path, int(lab)
return paddle.reader.xmap_readers(test_mapper,
reader,
cpu_count(),
buffered_size)
BATCH_SIZE = 32
trainer_reader = train_r(train_list=train_file_path)
random_train_reader = paddle.reader.shuffle(reader=trainer_reader,
buf_size=1300)
batch_train_reader = paddle.batch(random_train_reader,
batch_size=BATCH_SIZE)
tester_reader = test_r(test_list=test_file_path)
test_reader = paddle.batch(tester_reader, batch_size=BATCH_SIZE)
image = fluid.layers.data(name="image", shape=[3, 100, 100], dtype="float32")
label = fluid.layers.data(name="label", shape=[1], dtype="int64")
def convolution_neural_network(image, type_size):
"""
创建CNN
:param image: 图像处理
:param type_size: 分类数量
:return: 一组分类概率(预测结果)
"""
conv_pool_1 = fluid.nets.simple_img_conv_pool(input=image,
filter_size=3,
num_filters=32,
pool_size=2,
pool_stride=2,
act="relu")
drop = fluid.layers.dropout(x=conv_pool_1, dropout_prob=0.5)
conv_pool_2 = fluid.nets.simple_img_conv_pool(input=drop,
filter_size=3,
num_filters=64,
pool_size=2,
pool_stride=2,
act="relu")
drop = fluid.layers.dropout(x=conv_pool_2, dropout_prob=0.5)
conv_pool_3 = fluid.nets.simple_img_conv_pool(input=drop,
filter_size=3,
num_filters=64,
pool_size=2,
pool_stride=2,
act="relu")
drop = fluid.layers.dropout(x=conv_pool_3, dropout_prob=0.5)
fc = fluid.layers.fc(input=drop, size=512, act="relu")
drop = fluid.layers.dropout(x=fc, dropout_prob=0.5)
predict = fluid.layers.fc(input=drop,
size=type_size,
act="softmax")
return predict
predict = convolution_neural_network(image=image, type_size=5)
cost = fluid.layers.cross_entropy(input=predict,
label=label)
avg_cost = fluid.layers.mean(cost)
accuracy = fluid.layers.accuracy(input=predict,
label=label)
test_program = fluid.default_main_program().clone(for_test=True)
optimizer = fluid.optimizer.Adam(learning_rate=0.001)
optimizer.minimize(avg_cost)
place = fluid.CUDAPlace(0)
exe = fluid.Executor(place)
exe.run(fluid.default_startup_program())
feeder = fluid.DataFeeder(feed_list=[image, label],
place=place)
model_save_dir = "model/fruits/"
costs = []
accs = []
batches = []
times = 0
for pass_id in range(5):
train_cost = 0
for batch_id, data in enumerate(batch_train_reader()):
times += 1
train_cost, train_acc = exe.run(program=fluid.default_main_program(),
feed=feeder.feed(data),
fetch_list=[avg_cost, accuracy])
if batch_id % 20 == 0:
print("pass_id:%d, batch_id:%d, cost:%f, acc:%f" % (pass_id, batch_id, train_cost[0], train_acc[0]))
accs.append(train_acc[0])
costs.append(train_cost[0])
batches.append(times)
test_accs = []
test_costs = []
for batch_id, data in enumerate(test_reader()):
test_cost, test_acc = exe.run(program=test_program,
feed=feeder.feed(data),
fetch_list=[avg_cost, accuracy])
test_accs.append(test_acc[0])
test_costs.append(test_cost[0])
test_cost = sum(test_costs) / len(test_costs)
test_acc = (sum(test_accs) / len(test_accs))
print("Test:%d, Cost:%f, Acc:%f" % (pass_id, test_cost, test_acc))
if not os.path.exists(model_save_dir):
os.makedirs(model_save_dir)
fluid.io.save_inference_model(dirname=model_save_dir,
feeded_var_names=["image"],
target_vars=[predict],
executor=exe)
print("模型保存成功。")
plt.figure("training")
plt.title("training", fontsize=24)
plt.xlabel("iter", fontsize=14)
plt.ylabel("cost/acc", fontsize=24)
plt.plot(batches, costs, color="red", label="Training Cost")
plt.plot(batches, accs, color="green", label="Training Acc")
plt.legend()
plt.grid()
plt.savefig("train.png")
plt.show()
from PIL import Image
place = fluid.CPUPlace()
infer_exe = fluid.Executor(place)
model_save_dir = "model/fruits/"
def load_img(path):
img = paddle.dataset.image.load_and_transform(path, 100, 100, False).astype("float32")
img = img / 255.0
return img
infer_imgs = []
test_img = "data/apple_1.png"
infer_imgs.append(load_img(test_img))
infer_imgs = numpy.array(infer_imgs)
infer_program, feed_target_names, fetch_targets = \
fluid.io.load_inference_model(model_save_dir, infer_exe)
results = infer_exe.run(infer_program,
feed={feed_target_names[0]: infer_imgs},
fetch_list=fetch_targets)
print(results)
result = numpy.argmax(results[0])
for k, v in name_dict.items():
if result == v:
print("预测结果:", k)
img = Image.open(test_img)
plt.imshow(img)
plt.show()
- 1
- 2
- 3
- 4
- 5
- 6
- 7
- 8
- 9
- 10
- 11
- 12
- 13
- 14
- 15
- 16
- 17
- 18
- 19
- 20
- 21
- 22
- 23
- 24
- 25
- 26
- 27
- 28
- 29
- 30
- 31
- 32
- 33
- 34
- 35
- 36
- 37
- 38
- 39
- 40
- 41
- 42
- 43
- 44
- 45
- 46
- 47
- 48
- 49
- 50
- 51
- 52
- 53
- 54
- 55
- 56
- 57
- 58
- 59
- 60
- 61
- 62
- 63
- 64
- 65
- 66
- 67
- 68
- 69
- 70
- 71
- 72
- 73
- 74
- 75
- 76
- 77
- 78
- 79
- 80
- 81
- 82
- 83
- 84
- 85
- 86
- 87
- 88
- 89
- 90
- 91
- 92
- 93
- 94
- 95
- 96
- 97
- 98
- 99
- 100
- 101
- 102
- 103
- 104
- 105
- 106
- 107
- 108
- 109
- 110
- 111
- 112
- 113
- 114
- 115
- 116
- 117
- 118
- 119
- 120
- 121
- 122
- 123
- 124
- 125
- 126
- 127
- 128
- 129
- 130
- 131
- 132
- 133
- 134
- 135
- 136
- 137
- 138
- 139
- 140
- 141
- 142
- 143
- 144
- 145
- 146
- 147
- 148
- 149
- 150
- 151
- 152
- 153
- 154
- 155
- 156
- 157
- 158
- 159
- 160
- 161
- 162
- 163
- 164
- 165
- 166
- 167
- 168
- 169
- 170
- 171
- 172
- 173
- 174
- 175
- 176
- 177
- 178
- 179
- 180
- 181
- 182
- 183
- 184
- 185
- 186
- 187
- 188
- 189
- 190
- 191
- 192
- 193
- 194
- 195
- 196
- 197
- 198
- 199
- 200
- 201
- 202
- 203
- 204
- 205
- 206
- 207
- 208
- 209
- 210
- 211
- 212
- 213
- 214
- 215
- 216
- 217
- 218
- 219
- 220
- 221
- 222
- 223
- 224
- 225
- 226
- 227
- 228
- 229
- 230
- 231
- 232
- 233
- 234
- 235
- 236
- 237
- 238
- 239
- 240
- 241
- 242
- 243
- 244
- 245
- 246
- 247
- 248
- 249
- 250
- 251
- 252
- 253
- 254
- 255
- 256
- 257
- 258
- 259
- 260
- 261
- 262
- 263
- 264
- 265
- 266
- 267
- 268
- 269
- 270
- 271
- 272
- 273
- 274
- 275
- 276
- 277
- 278
- 279
- 280
- 281
- 282
- 283
- 284
- 285
- 286
- 287
- 288
- 289
- 290
- 291
- 292
- 293
- 294
- 295
- 296
- 297
- 298
- 299
- 300
- 301
- 302
- 303
- 304
- 305
- 306
- 307
- 308
- 309
- 310
- 311
- 312
- 313
- 314
- 315
- 316
- 317
- 318
- 319
- 320
- 321
- 322
- 323
- 324
- 325
- 326
- 327
- 328
- 329
第十九章 图像分类优化手段
一、样本优化
- 增大样本数量
- 数据增强
- 形态变化:翻转、平移、随机修剪、尺度变换、旋转
- 色彩变化:色彩抖动(错位的位移对图像产生的一种特殊效果)、图像白化(将图像本身归一化成 Gaussian(0,1) 分布)
- 加入噪声:噪声扰动
二、参数优化
- 欠拟合
- 增加训练次数、增大图像大小(增加特征)
- 变化学习率:学习率由固定调整为变化,例如由固定0.001调整为0.1,0.001,0.0005
- 过拟合
- 丢弃学习:按照一定比率丢弃神经元输出
- 权重衰减:通过为模型损失函数添加惩罚项使得训练的模型参数较小
- 批量正则化:在网络的每一层输入之前增加归一化处理,使输入的均值为0,标准差为1。目的是将数据限制在统一的分布下
三、模型优化
- 增加模型深度、复杂度
- 更换更复杂、精度更高的网络模型。如由简单CNN更换为VGG、GooLeNet、ResNet