-
【CSS动效实战(纯CSS与JS动效)】03 精美手风琴侧边栏完整示例教程 示例1
本节示例演示:

一、基本布局
一般来说,侧边栏的位置是在左侧,咱们为了更好的展现侧边栏的效果,并且在本节中不涉及过多的内容,我们只需要直接给一个 div 宽度为 15即可,接着再到这个 div 中编写对应的侧边栏。
给予一个 nav 样式,设置宽度为 15%,并且给予一些基础样式,使其呈现有一定的对比度:
DOCTYPE html> <html lang="en"> <head> <meta charset="UTF-8"> <meta http-equiv="X-UA-Compatible" content="IE=edge"> <meta name="viewport" content="width=device-width, initial-scale=1.0"> <title>accordion nav demo 1_bit CSS 动效课 title> <style> .nav { width: 20vw; background-color: white; mar gin: 4px; height: 100vh; } body { margin: 0; background-color: rgb(223, 224, 225); } style> head> <body> <div class="nav"> div> body> html>- 1
- 2
- 3
- 4
- 5
- 6
- 7
- 8
- 9
- 10
- 11
- 12
- 13
- 14
- 15
- 16
- 17
- 18
- 19
- 20
- 21
- 22
- 23
- 24
- 25
- 26
- 27
- 28
- 29
- 30
- 31
- 32
- 33
- 34
此时页面效果如下:

二、 手风琴侧边栏 LOGO 部分编写
有了基本布局后,开始着手编写侧边栏。
从这个侧边栏我们可以明显的知道,侧边栏顶部是 logo 区,或者你放其他的也行,logo 之下就是对应的菜单,那么侧边栏的内容就分为两块,一个上一个下,并且这一上一下的结果所属于一个侧边栏,那么此时肯定需要一个 div 包裹其他两个 div,此时 侧边栏代码编写如下:
<body> <div class="nav"> <div> <div>div> <div>div> div> div> body>- 1
- 2
- 3
- 4
- 5
- 6
- 7
- 8
- 9
- 10
- 11
此时我们编写一个类样式,咩咩咩为 accordion:
<style> .accordion { width: 100%; border-right: #424243 solid 2px; } style>- 1
- 2
- 3
- 4
- 5
- 6
并且包裹手风琴内容的div 要调用这个类样式:
<div class="accordion">- 1
- 2
在此我们只是给这个手风琴侧边栏定义了一个基础的边框和宽度,接下来创建 logo和 logo 下的 span 样式:
<style> .logo { border-bottom: #424243 solid 1px; display: flex; justify-content: center; } .logo span { color: white; padding: 2rem 2rem; font-size: 2rem; font-weight: bolder; } style>- 1
- 2
- 3
- 4
- 5
- 6
- 7
- 8
- 9
- 10
- 11
- 12
- 13
- 14
因为要对文字设置一定的大小,对文字使用 span 标签可以很好的进行控制;在 logo 样式中,还设置了当前 div 为 flex 样式,这样就可以很好的控制其中的内容是否居中等操作了,接着我们设置了 logo 的 span 样式,文本为白色,设置了padding 这样使其大小可以撑大,这样就不用设置该文本对于边缘的空隙了,接着设置了字体大小和加粗。此时的html 代码如下:
<body> <div class="nav"> <div class="accordion"> <div class="logo"> <span>ePageToolspan> div> <div>div> div> div> body>- 1
- 2
- 3
- 4
- 5
- 6
- 7
- 8
- 9
- 10
- 11
- 12
- 13
此时页面效果如下:

三、 菜单部分内容编写
接着完成了 logo 后开始编写下面的菜单内容,我们可以从之前的演示图看到,我们点击对应的菜单栏可以对其进行选中并且展开其内部的选项,那么这个功能需要一个 html 元素实现,那就是 radio ;在其选中一个类型内容后,将会展开对应的内部选项,这些选项需要一个 div 统一对其进行管理,那么在选项的 div 之下应该还需要创建一个 div,并且 div 中需要有选项内容:
<div> <div> <ul> <li><a href="#">使用a>li> <li><a href="#">自定义a>li> ul> div> div>- 1
- 2
- 3
- 4
- 5
- 6
- 7
- 8
- 9
在此使用了 ul 表示对应的选项内容,那么外部还需要显示该菜单的文本直接使用一个 label 表现即可:
<div> <label> 开始label> <div> <ul> <li><a href="#">使用a>li> <li><a href="#">自定义a>li> ul> div> div>- 1
- 2
- 3
- 4
- 5
- 6
- 7
- 8
- 9
- 10
之前说需要使用 radio 表示选中,那么此时在外部再加一个 input type 为 radio:
<div> <input type="radio"> <label> 开始label> <div> <ul> <li><a href="#">使用a>li> <li><a href="#">自定义a>li> ul> div> div>- 1
- 2
- 3
- 4
- 5
- 6
- 7
- 8
- 9
- 10
- 11
此时页面显示如下:

这明显就不是我们想要的样子,那么此时第一步,我们先把 radio 的选中圈圈取消,这个时候直接写 accordion 下的 input 直接为 none,这样就可以统一去掉所有 radio 的圈圈了:<style> .accordion input[type='radio'] { display: none; } style>- 1
- 2
- 3
- 4
- 5
以上样式表示 accordion 类下的 input 标签属性 type 值为 radio 的统一设置属性
display: none;,那么此时页面如下: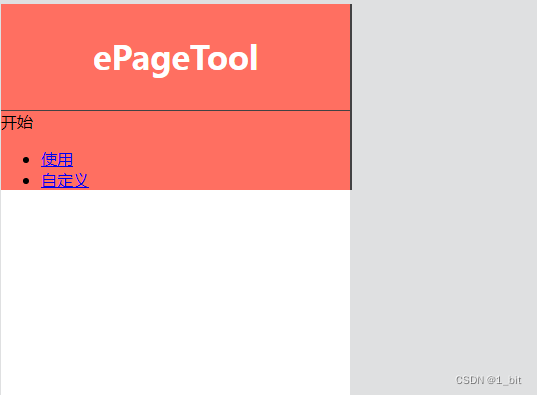
由于 radio 是单选项,我们需要对其设置一个单选项组,直接使用 name 表示即可,多个不同的 radio 使用同一个 name 就表示同一个组的 radio:<input name="menu" type="radio" >- 1
此时我们还需要做一件事,因为我们的 radio 的 display 已经是 none 了, 那么我们需要有一个东西代替这个恶radio,此时我们直接给予 label 一个 for:
<label for="start"> 开始label>- 1
这个 for 可以对应所关联的 radio,那么 radio 此时需要一个 id 对应这个 label 元素,我们只需要给予这个 radio 的 id 为 start 即可:
<input name="menu" type="radio" id="start" >- 1
此时 body 代码如下:
<body> <div class="nav"> <div class="accordion"> <div class="logo"> <span>ePageToolspan> div> <div> <input name="menu" type="radio" id="start"> <label for="start"> 开始label> <div> <ul> <li><a href="#">使用a>li> <li><a href="#">自定义a>li> ul> div> div> div> div> body>- 1
- 2
- 3
- 4
- 5
- 6
- 7
- 8
- 9
- 10
- 11
- 12
- 13
- 14
- 15
- 16
- 17
- 18
- 19
- 20
- 21
- 22
接着我们直接给予这个菜单一个 item 样式:
<div class="item">- 1
- 2
接着直接写两个 样式,item 样式不写都可以:
<style> .accordion>.item label { color: white; background-color: #ff6f61; display: block; padding: 1rem 2rem; border-bottom: #931313 solid 1px; transition: color 0.3s, background-color 0.3s; } .accordion>.item label:hover { background-color: #c30d0ddb; color: white; } style>- 1
- 2
- 3
- 4
- 5
- 6
- 7
- 8
- 9
- 10
- 11
- 12
- 13
- 14
- 15
首先
.accordion>.item label表示 accordion 样式下的 item 样式下的 label 标签样式,颜色为白,给予背景色,设置 display 为 block,并且给予对应的 padding,以及下边框(这样每个 item 之间有间隔看得清楚)颜色,还定义了一个 transition 动画,主要是颜色动画和背景色动画,随后给予了一个同样 label 的 hover 样式,设置背景色会有一定的变化,并且设置了 color 字体颜色为白色,这样整个 label 就会有颜色的改变,此时页面效果如下:
接着我们需要对这个菜单下的展开选项设置样式:

我们给予这个展开项的div 一个样式 content:<div class="content"> <ul> <li><a href="#">使用a>li> <li><a href="#">自定义a>li> ul> div>- 1
- 2
- 3
- 4
- 5
- 6
此时我们发现这个 ul 列有一定的距离:

这是因为这时ul 自带了padding 和 margin,我们需要消除,那么在 content 样式中,我们就需要给予 padding 、margin 为 0:<style> .content ul { margin: 0; padding: 0; } style>- 1
- 2
- 3
- 4
- 5
- 6
此时页面如下:

接着给a标签对应的样式:<style> .content ul a { width: 100%; display: inline-block; color: white; font-size: 1rem; text-decoration: none; padding: 1rem 3rem; border-bottom: 1px solid #394c7f; } style>- 1
- 2
- 3
- 4
- 5
- 6
- 7
- 8
- 9
- 10
- 11
设置标签 a 宽度为 100%,并且转换元素类型,给予字体 size、去掉下划线,给予 padding随后得到的效果如下:

我们此时发现下划线超格了,那么需要设置 overflow,直接在content 上设置overflow即可:
<style> .content ul { overflow: hidden; margin: 0; padding: 0; } style>- 1
- 2
- 3
- 4
- 5
- 6
- 7
此时页面将不会超格;接下来设置对应 a 标签的 hover 标签,这个标签我们需要有一定的动画效果,那么在 a 标签的样式中添加过渡动画,并且添加 position: relative,因为接下来添加的效果需要脱离文档流制作:
<style> .content ul a { width: 100%; display: inline-block; color: white; font-size: 1rem; text-decoration: none; padding: 1rem 3rem; border-bottom: 1px solid #394c7f; position: relative; transition: all 0.5s; } style>- 1
- 2
- 3
- 4
- 5
- 6
- 7
- 8
- 9
- 10
- 11
- 12
- 13
接着添加 hover 效果,这个效果只是其一,接下来还有其他效果:
<style> .content a:hover { display: block; background-color: #1e2546; } style>- 1
- 2
- 3
- 4
- 5
- 6
接下来给 a 标签添加 before,在 before 上制作对应的动画效果,当然,这里添加的是默认情况。当然是无效果状态,在这里只是默认的把 before 的透明度 opacity 调为 0 ,内容是空白,添加了一个过渡动画对其进行响应:
<style> .content a:before { content: ''; opacity: 0; transition: all 0.3s; } style>- 1
- 2
- 3
- 4
- 5
- 6
- 7
接着增加 before 的对应效果:
<style> .content a:hover:before { position: absolute; left: 0; top: 0; opacity: 1; border-top: 24px solid transparent; border-left: 11px solid #ff6f61; border-bottom: 24px solid transparent; } style>- 1
- 2
- 3
- 4
- 5
- 6
- 7
- 8
- 9
- 10
- 11
在以上效果中,增加 before 为
position: absolute;开始为期编写对应的样式,这个样式距离左边 0 个单位,距离顶部 0 个单位,透明度 opacity 为 1 表示课件,最关键的是以下样式:<style> border-top: 24px solid transparent; border-left: 11px solid #ff6f61; border-bottom: 24px solid transparent; style>- 1
- 2
- 3
- 4
- 5
我们之间设置显示的效果给大家看,该代码改成:
<style> border-top: 24px solid #ff6161; border-left: 24px solid #ffdf61; border-right: 24px solid #616eff; border-bottom: 24px solid #71ff61; style>- 1
- 2
- 3
- 4
- 5
- 6
这 4 个代码分别表示 border-top 为红、橙、蓝、绿:

接着显示时如下效果:

这个时候若我们只想要左侧大小变小,例如 11:<style> border-top: 24px solid #ff6161; border-left: 11px solid #ffdf61; border-right: 24px solid #616eff; border-bottom: 24px solid #71ff61; style>- 1
- 2
- 3
- 4
- 5
- 6
效果如下:

那么此时 其它 颜色为 transparent 为透明。那么代码如下:<style> border-top: 24px solid transparent; border-left: 11px solid #ffdf61; border-right: 24px solid transparent; border-bottom: 24px solid transparent; style>- 1
- 2
- 3
- 4
- 5
- 6
效果如下:

很明显我们的右侧代码没有存在必要,那么直接不写就可以了,也就是删掉这一条:border-right: 24px solid transparent;,并且其它 border 不同大小可以影响其结果,大家自行实验即可,接下来我们添加第二个 item:<div class="item"> <input name="menu" type="radio" id="gradient"> <label for="gradient"> 渐变label> <div class="content"> <ul> <li><a href="#">线性渐变a>li> <li><a href="#">径向渐变a>li> ul> div> div>- 1
- 2
- 3
- 4
- 5
- 6
- 7
- 8
- 9
- 10
并且在 content ul 样式中为其设置高度为 0,这样内容就不会全部展开了:
<style> .content ul { max-height: 0; overflow: hidden; margin: 0; padding: 0; } style>- 1
- 2
- 3
- 4
- 5
- 6
- 7
- 8
此时效果如下,点击后展开不了内容:

那此时如何点击后展开内容呢?
我们只需要对 input 的效果监听是否 checked 即可:
<style> .accordion input:checked~.content ul { max-height: auto; transition: all 0.2s; background-color: #273057; } style>- 1
- 2
- 3
- 4
- 5
- 6
- 7
此时 .
accordion input:checked~.content ul的意思是为所有相同父元素中位于.accordion input:checked 之后的所有 content 下的 ul 元素设置CSS,其中 波浪线 之前表示 什么什么之后,content ul 表示设置结果对象,作用范围是当前响应对象的所有相同父元素的对象。那么此时直接设置了 ul 的高度为 auto,那么就可以展开了。若自己试验后可以看到此时感觉响应效果不好,没有添加动画,那么此时只需要在 content ul 中设置动画即可:
<style> .content ul { max-height: 0; overflow: hidden; margin: 0; padding: 0; transition: all 0.4s; } style>- 1
- 2
- 3
- 4
- 5
- 6
- 7
- 8
- 9
效果如下:
此时完整代码如下:
DOCTYPE html> <html lang="en"> <head> <meta charset="UTF-8"> <meta http-equiv="X-UA-Compatible" content="IE=edge"> <meta name="viewport" content="width=device-width, initial-scale=1.0"> <title>accordion nav demo 1_bit CSS 动效课 title> <style> .nav { width: 20vw; background-color: white; margin: 4px; height: 100vh; } body { margin: 0; background-color: rgb(223, 224, 225); } .accordion { width: 100%; border-right: #424243 solid 2px; background-color: #ff6f61; } .logo { border-bottom: #424243 solid 1px; display: flex; justify-content: center; } .logo span { color: white; padding: 2rem 2rem; font-size: 2rem; font-weight: bolder; } .accordion input[type='radio'] { display: none; } .accordion>.item label { color: white; background-color: #ff6f61; display: block; padding: 1rem 2rem; border-bottom: #931313 solid 1px; transition: color 0.3s, background-color 0.3s; } .accordion>.item label:hover { background-color: #c30d0ddb; color: white; } .content ul { max-height: 0; overflow: hidden; margin: 0; padding: 0; transition: all 0.4s; } .content ul a { width: 100%; display: inline-block; color: white; font-size: 1rem; text-decoration: none; padding: 1rem 3rem; border-bottom: 1px solid #394c7f; position: relative; transition: all 0.5s; } .content a:hover { background-color: #1e2546; } .content a:before { content: ''; opacity: 0; transition: all 0.3s; } .content a:hover:before { position: absolute; left: 0; top: 0; opacity: 1; border-top: 1.5rem solid transparent; border-left: 11px solid #ffdf61; border-bottom: 1.5rem solid transparent; } .accordion input:checked~.content ul { max-height: 20rem; transition: all 0.2s; background-color: #273057; } style> head> <body> <div class="nav"> <div class="accordion"> <div class="logo"> <span>ePageToolspan> div> <div class="item"> <input name="menu" type="radio" id="start"> <label for="start"> 开始label> <div class="content"> <ul> <li><a href="#">使用a>li> <li><a href="#">自定义a>li> ul> div> div> <div class="item"> <input name="menu" type="radio" id="gradient"> <label for="gradient"> 渐变label> <div class="content"> <ul> <li><a href="#">线性渐变a>li> <li><a href="#">径向渐变a>li> ul> div> div> div> div> body> html>- 1
- 2
- 3
- 4
- 5
- 6
- 7
- 8
- 9
- 10
- 11
- 12
- 13
- 14
- 15
- 16
- 17
- 18
- 19
- 20
- 21
- 22
- 23
- 24
- 25
- 26
- 27
- 28
- 29
- 30
- 31
- 32
- 33
- 34
- 35
- 36
- 37
- 38
- 39
- 40
- 41
- 42
- 43
- 44
- 45
- 46
- 47
- 48
- 49
- 50
- 51
- 52
- 53
- 54
- 55
- 56
- 57
- 58
- 59
- 60
- 61
- 62
- 63
- 64
- 65
- 66
- 67
- 68
- 69
- 70
- 71
- 72
- 73
- 74
- 75
- 76
- 77
- 78
- 79
- 80
- 81
- 82
- 83
- 84
- 85
- 86
- 87
- 88
- 89
- 90
- 91
- 92
- 93
- 94
- 95
- 96
- 97
- 98
- 99
- 100
- 101
- 102
- 103
- 104
- 105
- 106
- 107
- 108
- 109
- 110
- 111
- 112
- 113
- 114
- 115
- 116
- 117
- 118
- 119
- 120
- 121
- 122
- 123
- 124
- 125
- 126
- 127
- 128
- 129
- 130
- 131
- 132
- 133
- 134
- 135
- 136
- 137
- 138
- 139
- 140
-
相关阅读:
HTML5期末大作业:HTM+CSS+JS仿安徽开放大学官网(web前端网页制作课作业)
C++11(一)新的标准
【Python 千题 —— 基础篇】分解数据
delphi技术专题---获取网卡物理地址之NetBios网络编程接口LANA介绍
【开题报告】疫苗在线预约小程序的设计与实现
软件工程导论---极限编程
如何安装Ambari_大数据培训
二维码智慧门牌管理系统升级技术解决方案
Facebook的魅力魔法:探访数字社交的奇妙世界
十年架构五年生活-04第一个工作转折点
- 原文地址:https://blog.csdn.net/A757291228/article/details/124770492
