-
【UCB操作系统CS162项目】Lab0:项目上手 (Getting Real)
前言
Stanford 的 CS144 计网完成后让我们继续挑战一项更难的课程项目:UCB 操作系统 CS162 的 Pintos,这个也是多个 CS 顶校都在用的项目。老规矩讲课部分因为本科基本都学过就略过了。
继续安利 CS自学指南,和博主同届甚至就住在楼下的大佬的自学网站,汇总了很多国内外高校 CS 相关的高质量公开课。
项目内容为理解一个微型操作系统 Pintos 的原理并为其添加几方面的重要功能,有自动化测试样例。可以跟着北大操作系统实验班整理的文档做:PintosBook
我的实现(更新至Lab 2):Altair-Alpha/pintos
准备工作
环境配置
跟着实验手册的 Environment Setup 做即可,博主用的是 Docker 部署,未出现问题。开发环境 VSCode + 开两个 PoweShell 窗口一个运行一个调试就很舒服了。
预备知识
- C 语言基础。
- 大体过一遍实验手册的 Getting Started 和 Appendix 部分,如果有整块没接触过的知识可以补一补。每个 Lab 中会提示需要详细阅读的部分。
- 如果没有学过汇编,可以读 PCASM 这本书,不需要记住所有汇编指令的具体细节,大概能看懂程序意思即可。
- GDB 调试。本课程是一次非常好的学习和锻炼调试程序的机会,本节 Lab 0 主要就是一个利用调试观察系统启动流程的热身,请仔细阅读手册中的 Debugging 部分,也可以参考 C 语言中文网上的 GDB 调试教程 。
Task 1: Booting Pintos
成功启动 Pintos 即可。下面游戏正式开始。
Task 2: Debugging
Exercise 2.1
- What is the first instruction that gets executed?
- At which physical address is this instruction located?
按照 Debugging 部分说明运行 GDB 绑定 Pintos 后得到以下输出,即机器启动运行的第一条指令:
[f000:fff0] 0xffff0: ljmp $0x3630,$0xf000e05b- 1
该指令为 ljmp(长转移),位于
0xffff0,属于 BIOS 区内,是硬编码的第一条指令位置。Exercise 2.2
在
0x7c00处设置断点并运行到该位置,此时控制权已由 BIOS 移交给 Bootloader,运行的指令与loader.S文件相对应。- How does the bootloader read disk sectors? In particular, what BIOS interrupt is used?
第 55 行,指令为
call read_sector,调用的函数位于 230 行:
读取硬盘扇区需要借助 BIOS 提供的功能,具体来说就如题面所述是触发一个 BIOS 中断,该指令位于 242 行(图中红框),维基百科 BIOS interrupt call 条目下有完整的中断表可供查询:
结合 240 行对
AH = 0x42的设置可知使用的是 Extended Read Sectors 功能。- How does the bootloader decide whether it successfully finds the Pintos kernel?
继续向下看,目前我们已经读取了第一个磁盘扇区的内容,该扇区应该为主引导记录(Master Boot Record, MBR)扇区,包含了磁盘的分区信息,其特征是以
0x55AA标志位结束(位于0x01FE - 0x01FF,即 510,511 字节处)。67 行进行该检查,如果不相等,说明当前磁盘未正常分区,跳过并读取下一个磁盘。接下来跳转到 MBR 中第一个分区记录的位置(offset=446),如果读取结果为 0,说明当前分区未使用,使si+=16读取下一个分区记录,如果达到结束位置(510)仍未找到有效分区,则跳转至下一个磁盘。然后根据注释使用了值0x20来检查是否为 Pintos Kernel,这里我没有在文档中找到相应说明。最后,检查分区记录中第一个字节的值,该值如果为0x80则标识着当前分区是 Bootable 的。

至此,如果所有检查均通过,则可以确信已经找到了 Pintos Kernel。- What happens when the bootloader could not find the Pintos kernel?
接续上一个问题的分析,如果所有分区、所有磁盘均尝试读取后都没有找到 Pintos Kernel 并执行 86 行跳转到
load_kernel函数,则最终会落入:

输出Not found后,会触发另一个 BIOS 中断0x18,该中断的作用即 Bootloader 向 BIOS 报告因未找到可引导磁盘导致启动失败。
- At what point and how exactly does the bootloader transfer control to the Pintos kernel?
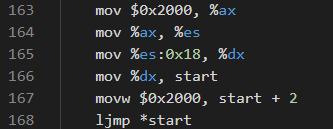
找到 Pintos Kernel 后,Bootloader 从磁盘逐个读取扇区内容,并放在从
0x20000开始的内存空间。Kernel 以 ELF 格式存储,如文档所述,Kernel 的入口位置非固定编码,而是被保存在其 ELF Header 中的一个指针。该指针位于0x18,于是第 165 行指令读取该指针放在寄存器dx中,又在 166 行将其转存在一个内存位置start中(注释中解释了这样做的原因),最终在 168 行执行ljmp实际跳转。
至此,Bootloader 的使命完成,控制权移交给 Pintos Kernel 的入口。该入口就是
start.S文件中的汇编代码。这部分代码完成了内存识别、页表建立、GDT 处理以及从 16-bit real mode 到 32-bit protected mode 的转换等工作,对应文档中Core Guide / Loading / Low-Level Kernel Initialization部分,这里就不再展开了。最终在 180 行执行call pintos_init,该函数位于init.c中,进入 C 语言代码。Exercise 2.3
此部分主要练习 GDB 使用,为后续 Lab 打基础。追踪的目标为
init.c中的一个函数palloc_get_page()和一个全局变量uint32_t *init_page_dir。- At the entry of pintos_init(), what is the value of the expression
init_page_dir[pd_no(ptov(0))]in hexadecimal format?
在
pintos_init起始处设置断点,并计算该表达式,结果为 0。
- When palloc_get_page() is called for the first time,
- what does the call stack look like?
- what is the return value in hexadecimal format?
- what is the value of expression
init_page_dir[pd_no(ptov(0))]in hexadecimal format?
b在palloc_get_page处设置断点,c运行至该位置,然后使用bt查看调用栈。使用finish/fin运行至函数结束并查看返回值是一个void *指针。使用p/x打印表达式 16 进制计算结果,仍为 0。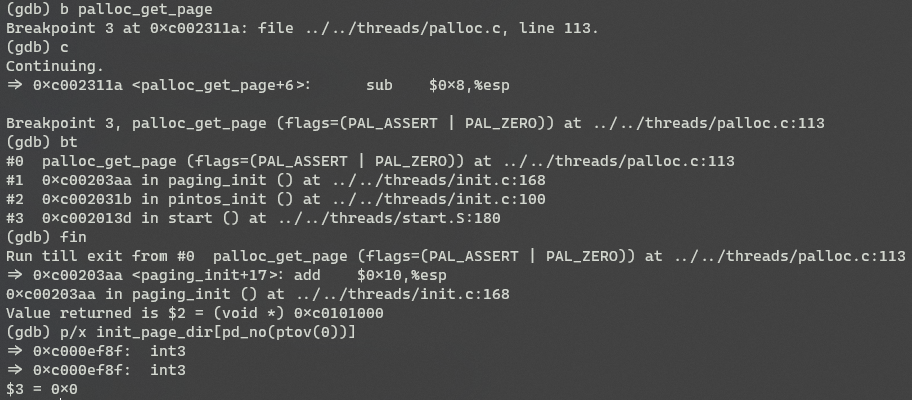
- When palloc_get_page() is called for the third time,
- what does the call stack look like?
- what is the return value in hexadecimal format?
- what is the value of expression init_page_dir[pd_no(ptov(0))] in hexadecimal format?
继续
c两次,重复上一步操作得到:
可以观察到,本次调用与第一次不同,不是在paging_init中而是在thread_start中被调用。返回的void *指针与第一次相差0x2000。表达式的值为0x102027。Task 3: Kernel Monitor
Exercise 3.1
在 Lab 0 的最后,我们可以上手在 Pintos 中写入一些自己的代码了。目前,如果在 Pintos 启动的命令行中没有参数,则启动后会自动结束。本节的任务是在这种情况下添加一个可交互的终端,要求如下:
Enhance threads/init.c to implement a tiny kernel monitor in Pintos.
Requirments:- It starts with a prompt PKUOS> and waits for user input.
- As the user types in a printable character, display the character.
- When a newline is entered, it parses the input and checks if it is whoami. If it is whoami, print your student id.
- Afterward, the monitor will print the command prompt PKUOS> again in the next line and repeat.
- If the user input is exit, the monitor will quit to allow the kernel to finish. For the other input, print invalid command. Handling special input such as backspace is not required.
- If you implement such an enhancement, mention this in your design document.
这里首先要注意,我们是在 Kernel 层级编写代码,所以标准 C 库函数是 不能使用 的,不过课程为我们预先写好了一些与 C 同名的库函数,位于
lib文件夹下,并且配置好了头文件搜索路径。代码实现(包含 Backspace 键处理):
int pintos_init (void) { ... if (*argv != NULL) { /* Run actions specified on kernel command line. */ run_actions (argv); } else { size_t cmd_maxlen = 10; char *buf = (char *)malloc(cmd_maxlen); // command line input buffer while (true) { printf("PKUOS>"); memset(buf, '\0', cmd_maxlen); size_t index = 0; while (1) { char c = input_getc(); if (c == 13) { // newline printf("\n"); break; } else if (c == 127) { // backspace if (index > 0) { buf[--index] = '\0'; printf("\b \b"); } continue; } if (index >= cmd_maxlen) { continue; } buf[index++] = c; if (c > 31) { // printable characters printf("%c", c); } } printf("cmd: %s\n", buf); if (!strcmp(buf, "whoami")) { printf("123456789\n"); } else if (!strcmp(buf, "exit")) { break; } else { printf("invalid command\n"); } } free(buf); printf("shell terminated.\n"); } ... }- 1
- 2
- 3
- 4
- 5
- 6
- 7
- 8
- 9
- 10
- 11
- 12
- 13
- 14
- 15
- 16
- 17
- 18
- 19
- 20
- 21
- 22
- 23
- 24
- 25
- 26
- 27
- 28
- 29
- 30
- 31
- 32
- 33
- 34
- 35
- 36
- 37
- 38
- 39
- 40
- 41
- 42
- 43
- 44
- 45
- 46
- 47
- 48
- 49
Lab 0 至此结束。
-
相关阅读:
2. java流中常见的操作符
2022,一个Java程序猿的装机配置
【第五部分 | JS WebAPI】3:DOM 节点操作
管理类联考——英语二——阅读篇——题材:教育
AB实验求置信区间和p值
开启Windows11 PC无线热点功能
【leetcode】【剑指offer Ⅱ】045. 二叉树最底层最左边的值
问题记录与思考
6、链表和数组,哪个实现队列更快?
web网页设计期末课程大作业——汉中印象旅游景点介绍网页设计与实现19页面HTML+CSS+JavaScript
- 原文地址:https://blog.csdn.net/Altair_alpha/article/details/126329170
