-
Spring的前置增强,后置增强,异常抛出增强、自定义增强
前言
根据b站up主的视频,进行编码总结。
就我自己的理解,切点表示的是在程序运行中,在何处切入想要执行的逻辑代码,即表示需要增强的部分,通常情况下,使用明确的类名和方法名称,或者正则表达式指定这些切入点。
整体的目录结构:
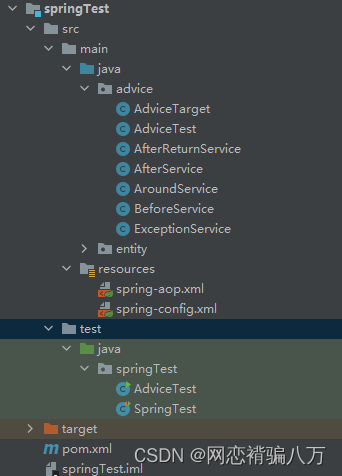
目录
2、在resources目录下创建一个spring-aop.xml文件
1、先创建一个maven项目,pom文件中引入相关的依赖
- <dependency>
- <groupId>junitgroupId>
- <artifactId>junitartifactId>
- <version>4.12version>
- <scope>testscope>
- dependency>
- <dependency>
- <groupId>org.springframeworkgroupId>
- <artifactId>spring-contextartifactId>
- <version>5.3.22version>
- dependency>
- <dependency>
- <groupId>org.aspectjgroupId>
- <artifactId>aspectjweaverartifactId>
- <version>1.9.2version>
- dependency>
2、在resources目录下创建一个spring-aop.xml文件
- "1.0" encoding="UTF-8"?>
- <beans xmlns="http://www.springframework.org/schema/beans"
- xmlns:xsi="http://www.w3.org/2001/XMLSchema-instance"
- xmlns:aop="http://www.springframework.org/schema/aop"
- xsi:schemaLocation="http://www.springframework.org/schema/beans
- http://www.springframework.org/schema/beans/spring-beans.xsd
- http://www.springframework.org/schema/aop
- http://www.springframework.org/schema/aop/spring-aop.xsd">
- <bean class="advice.AdviceTarget" id="adviceTarget"/>
- <bean class="advice.BeforeService" id="beforeService"/>
- <bean class="advice.AfterReturnService" id="afterReturnService"/>
- <bean class="advice.ExceptionService" id="exceptionService"/>
- <bean class="advice.AroundService" id="aroundService"/>
- <bean class="advice.AfterService" id="afterService"/>
- <bean class="advice.AdviceTest" id="adviceTest"/>
- <aop:config>
- <aop:pointcut id="point" expression="execution(* advice.AdviceTarget.*(..))"/>
- <aop:aspect ref="adviceTest">
- <aop:before method="test" pointcut-ref="point"/>
- aop:aspect>
- aop:config>
- beans>
要使用到的类都要在此xml文件中进行bean文件的配置(spring的任何从操作都离不开bean)
3、在java文件下创建advice包以及该包下相应的类
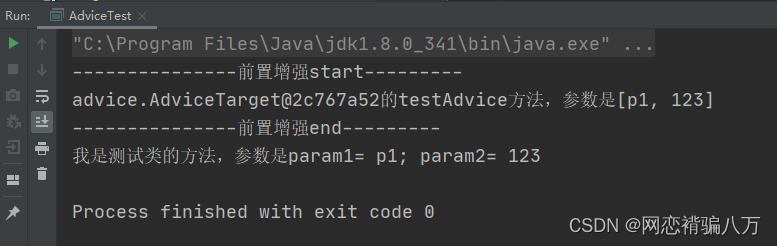
前置增强 BeforeService.java
- package advice;
- import org.springframework.aop.MethodBeforeAdvice;
- import java.lang.reflect.Method;
- import java.util.Arrays;
- /**
- * @Author 不要有情绪的 ljy
- * @Date 2022/9/7 17:33
- * @Description:
- */
- public class BeforeService implements MethodBeforeAdvice {
- public void before(Method method, Object[] args, Object target) throws Throwable {
- System.out.println("---------------前置增强start---------");
- System.out.println(target + "的" + method.getName() + "方法,参数是" + Arrays.toString(args));
- System.out.println("---------------前置增强end---------");
- }
- }
在test下的springTest包下编写测试类AdviceTest:
- package springTest;
- import advice.AdviceTarget;
- import org.springframework.context.support.ClassPathXmlApplicationContext;
- /**
- * @Author 不要有情绪的 ljy
- * @Date 2022/9/7 18:11
- * @Description:
- */
- public class AdviceTest {
- public static void main(String[] args) {
- ClassPathXmlApplicationContext context = new ClassPathXmlApplicationContext("spring-aop.xml");
- AdviceTarget target = context.getBean(AdviceTarget.class);
- target.testAdvice("p1", 123);
- // try {
- // target.testException();
- // } catch (Exception e) {
- // e.printStackTrace();
- // }
- }
- }
在spring-aop.xml文件中创建bean,并配置切点(当前为前置增强)
- <bean class="advice.AdviceTarget" id="adviceTarget"/>
- <bean class="advice.BeforeService" id="beforeService"/>
- <aop:config>
- <aop:pointcut id="point" expression="execution(* advice.AdviceTarget.*(..))"/>
- <aop:advisor advice-ref="beforeService" pointcut-ref="point"/>
- aop:config>
对以上配置文件进行解释,首先使用
标签声明两个类,然后配置切入点aop:pointcut,切入点为advice包下的AdviceTarget类下的所有方法,aop:advisor表示要切入的类。 运行结果:
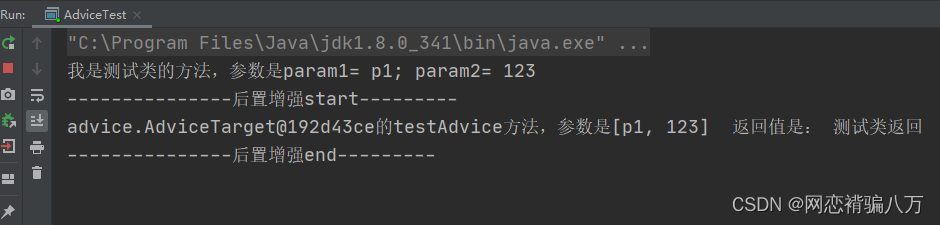
4、后置增强
- package advice;
- import org.springframework.aop.AfterReturningAdvice;
- import java.lang.reflect.Method;
- import java.util.Arrays;
- /**
- * @Author 不要有情绪的 ljy
- * @Date 2022/9/7 20:21
- * @Description: 后置增强必须是正常执行完的代码,如果程序执行报错,那么不会进行后置增强
- */
- public class AfterReturnService implements AfterReturningAdvice {
- public void afterReturning(Object returnValue, Method method, Object[] args, Object target) throws Throwable {
- System.out.println("---------------后置增强start---------");
- System.out.println(target + "的" + method.getName() + "方法,参数是" + Arrays.toString(args)+" 返回值是: "+returnValue);
- System.out.println("---------------后置增强end---------");
- }
- }
- <bean class="advice.AdviceTarget" id="adviceTarget"/>
- <bean class="advice.AfterReturnService" id="afterReturnService"/>
- <aop:config>
- <aop:pointcut id="point" expression="execution(* advice.AdviceTarget.*(..))"/>
- <aop:advisor advice-ref="afterReturnService" pointcut-ref="point"/>
- aop:config>
运行结果:
5、异常抛出增强
- package advice;
- import org.springframework.aop.ThrowsAdvice;
- import java.lang.reflect.Method;
- import java.util.Arrays;
- /**
- * @Author 不要有情绪的 ljy
- * @Date 2022/9/7 20:33
- * @Description: 异常抛出增强是为了解决后置增强抛出异常不能正常进行的问题
- * 那么异常抛出增强可用于数据库提交过程中的数据回滚,能够保证数据的一致性
- */
- public class ExceptionService implements ThrowsAdvice {
- public void afterThrowing(Method method, Object[] args, Object target, Exception e) {
- System.out.println("---------------异常抛出增强start---------");
- System.out.println(target + "的" + method.getName() + "异常信息是:" + e.getMessage());
- System.out.println("---------------异常抛出增强end---------");
- }
- }
- "1.0" encoding="UTF-8"?>
- <beans xmlns="http://www.springframework.org/schema/beans"
- xmlns:xsi="http://www.w3.org/2001/XMLSchema-instance"
- xmlns:aop="http://www.springframework.org/schema/aop"
- xsi:schemaLocation="http://www.springframework.org/schema/beans
- http://www.springframework.org/schema/beans/spring-beans.xsd
- http://www.springframework.org/schema/aop
- http://www.springframework.org/schema/aop/spring-aop.xsd">
- <bean class="advice.AdviceTarget" id="adviceTarget"/>
- <bean class="advice.BeforeService" id="beforeService"/>
- <bean class="advice.AfterReturnService" id="afterReturnService"/>
- <bean class="advice.ExceptionService" id="exceptionService"/>
- <bean class="advice.AroundService" id="aroundService"/>
- <bean class="advice.AfterService" id="afterService"/>
- <bean class="advice.AdviceTest" id="adviceTest"/>
- <aop:config>
- <aop:pointcut id="point" expression="execution(* advice.AdviceTarget.*(..))"/>
- <aop:advisor advice-ref="exceptionService" pointcut-ref="point"/>
- aop:config>
- beans>
这个时候就要打开测试异常的方法,
AdviceTest.java
- package springTest;
- import advice.AdviceTarget;
- import org.springframework.context.support.ClassPathXmlApplicationContext;
- /**
- * @Author 不要有情绪的 ljy
- * @Date 2022/9/7 18:11
- * @Description:
- */
- public class AdviceTest {
- public static void main(String[] args) {
- ClassPathXmlApplicationContext context = new ClassPathXmlApplicationContext("spring-aop.xml");
- AdviceTarget target = context.getBean(AdviceTarget.class);
- // target.testAdvice("p1", 123);
- try {
- target.testException();
- } catch (Exception e) {
- e.printStackTrace();
- }
- }
- }
运行结果:
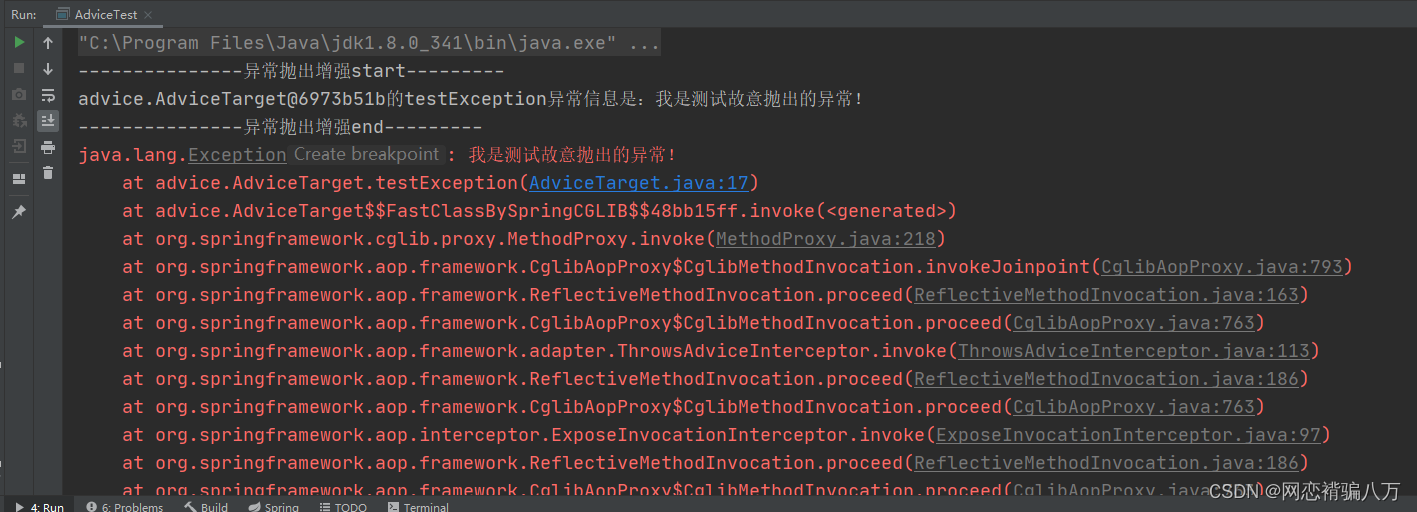
异常抛出增强是为了解决后置增强在执行过程中抛出异常,而不执行的情况,例如:在一个数据事务提交过程中,由于出现异常,导致数据不会滚,即后置增强不能正常运行,那么异常抛出增强就可以实现数据的回滚。
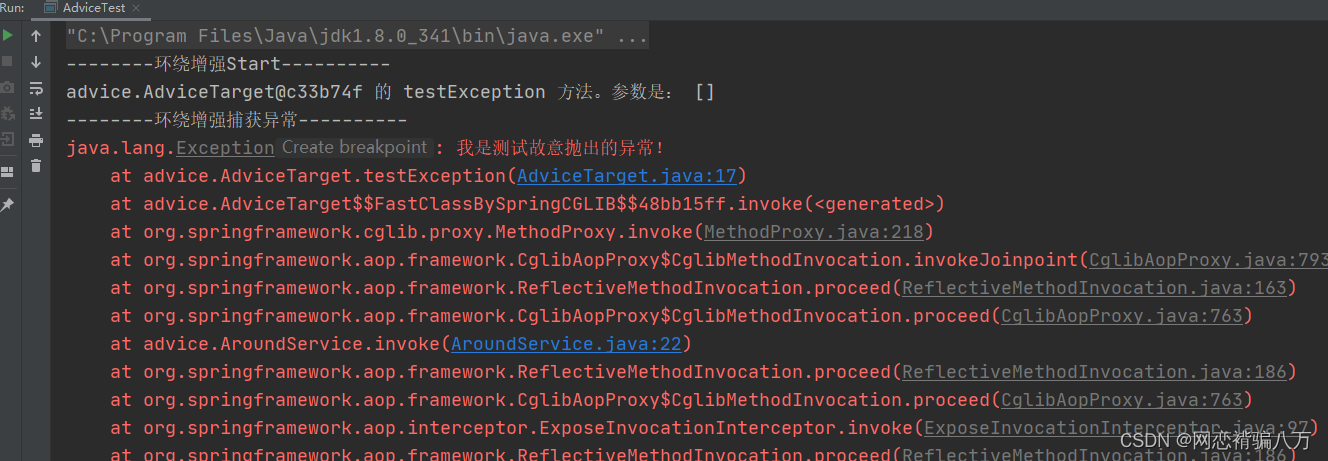
6、环绕增强
- package advice;
- import org.aopalliance.intercept.MethodInterceptor;
- import org.aopalliance.intercept.MethodInvocation;
- import java.lang.reflect.Method;
- import java.util.Arrays;
- /**
- * @Author 不要有情绪的 ljy
- * @Date 2022/9/8 9:21
- * @Description:
- */
- public class AroundService implements MethodInterceptor {
- public Object invoke(MethodInvocation invocation) throws Throwable {
- System.out.println("--------环绕增强Start----------");
- Object target = invocation.getThis(); //目标方法所在的类
- Method method = invocation.getMethod(); //被调用的目标方法
- Object[] args = invocation.getArguments(); //调用目标方法时的参数
- System.out.println(target + " 的 " + method.getName() + " 方法。参数是: " + Arrays.toString(args));
- try {
- Object returnVal = invocation.proceed(); //执行目标方法
- System.out.println("--------环绕增强End----------");
- return returnVal;
- } catch (Exception e) {
- System.out.println("--------环绕增强捕获异常----------");
- throw e;
- }
- }
- }
- "1.0" encoding="UTF-8"?>
- <beans xmlns="http://www.springframework.org/schema/beans"
- xmlns:xsi="http://www.w3.org/2001/XMLSchema-instance"
- xmlns:aop="http://www.springframework.org/schema/aop"
- xsi:schemaLocation="http://www.springframework.org/schema/beans
- http://www.springframework.org/schema/beans/spring-beans.xsd
- http://www.springframework.org/schema/aop
- http://www.springframework.org/schema/aop/spring-aop.xsd">
- <bean class="advice.AdviceTarget" id="adviceTarget"/>
- <bean class="advice.BeforeService" id="beforeService"/>
- <bean class="advice.AfterReturnService" id="afterReturnService"/>
- <bean class="advice.ExceptionService" id="exceptionService"/>
- <bean class="advice.AroundService" id="aroundService"/>
- <bean class="advice.AfterService" id="afterService"/>
- <bean class="advice.AdviceTest" id="adviceTest"/>
- <aop:config>
- <aop:pointcut id="point" expression="execution(* advice.AdviceTarget.*(..))"/>
- <aop:advisor advice-ref="aroundService" pointcut-ref="point"/>
- aop:config>
- beans>
带异常的执行结果:(不执行环绕增强end)
7、最终增强(即实现了后置增强和异常抛出增强)
- package advice;
- import org.springframework.aop.AfterReturningAdvice;
- import org.springframework.aop.ThrowsAdvice;
- import java.lang.reflect.Method;
- import java.util.Arrays;
- /**
- * @Author 不要有情绪的 ljy
- * @Date 2022/9/8 9:34
- * @Description:
- */
- public class AfterService implements AfterReturningAdvice, ThrowsAdvice {
- @Override
- public void afterReturning(Object returnValue, Method method, Object[] args, Object target) throws Throwable {
- System.out.println("---------------后置增强start---------");
- System.out.println(target + "的" + method.getName() + "方法,参数是" + Arrays.toString(args) + " 返回值是: " + returnValue);
- System.out.println("---------------后置增强end---------");
- }
- public void afterThrowing(Method method, Object[] args, Object target, Exception e) {
- System.out.println("---------------异常抛出增强start---------");
- System.out.println(target + "的" + method.getName() + "异常信息是:" + e.getMessage());
- System.out.println("---------------异常抛出增强end---------");
- }
- }
- "1.0" encoding="UTF-8"?>
- <beans xmlns="http://www.springframework.org/schema/beans"
- xmlns:xsi="http://www.w3.org/2001/XMLSchema-instance"
- xmlns:aop="http://www.springframework.org/schema/aop"
- xsi:schemaLocation="http://www.springframework.org/schema/beans
- http://www.springframework.org/schema/beans/spring-beans.xsd
- http://www.springframework.org/schema/aop
- http://www.springframework.org/schema/aop/spring-aop.xsd">
- <bean class="advice.AdviceTarget" id="adviceTarget"/>
- <bean class="advice.BeforeService" id="beforeService"/>
- <bean class="advice.AfterReturnService" id="afterReturnService"/>
- <bean class="advice.ExceptionService" id="exceptionService"/>
- <bean class="advice.AroundService" id="aroundService"/>
- <bean class="advice.AfterService" id="afterService"/>
- <bean class="advice.AdviceTest" id="adviceTest"/>
- <aop:config>
- <aop:pointcut id="point" expression="execution(* advice.AdviceTarget.*(..))"/>
- <aop:advisor advice-ref="afterService" pointcut-ref="point"/>
- aop:config>
- beans>
运行结果:

8、自定义增强
创建自定义类 AdviceTest.java
- package advice;
- /**
- * @Author 不要有情绪的 ljy
- * @Date 2022/9/8 9:50
- * @Description:
- */
- public class AdviceTest {
- public void test() {
- System.out.println("我是一个普通类!");
- }
- }
- "1.0" encoding="UTF-8"?>
- <beans xmlns="http://www.springframework.org/schema/beans"
- xmlns:xsi="http://www.w3.org/2001/XMLSchema-instance"
- xmlns:aop="http://www.springframework.org/schema/aop"
- xsi:schemaLocation="http://www.springframework.org/schema/beans
- http://www.springframework.org/schema/beans/spring-beans.xsd
- http://www.springframework.org/schema/aop
- http://www.springframework.org/schema/aop/spring-aop.xsd">
- <bean class="advice.AdviceTarget" id="adviceTarget"/>
- <bean class="advice.BeforeService" id="beforeService"/>
- <bean class="advice.AfterReturnService" id="afterReturnService"/>
- <bean class="advice.ExceptionService" id="exceptionService"/>
- <bean class="advice.AroundService" id="aroundService"/>
- <bean class="advice.AfterService" id="afterService"/>
- <bean class="advice.AdviceTest" id="adviceTest"/>
- <aop:config>
- <aop:pointcut id="point" expression="execution(* advice.AdviceTarget.*(..))"/>
- <aop:aspect ref="adviceTest">
- <aop:before method="test" pointcut-ref="point"/>
- aop:aspect>
- aop:config>
- beans>
对以上xml文件进行解释,定义了 AdviceTest 类里面的test()方法为切入方法
使用的测试方法不能是使用带异常的测试方法:
- package springTest;
- import advice.AdviceTarget;
- import org.springframework.context.support.ClassPathXmlApplicationContext;
- /**
- * @Author 不要有情绪的 ljy
- * @Date 2022/9/7 18:11
- * @Description:
- */
- public class AdviceTest {
- public static void main(String[] args) {
- ClassPathXmlApplicationContext context = new ClassPathXmlApplicationContext("spring-aop.xml");
- AdviceTarget target = context.getBean(AdviceTarget.class);
- target.testAdvice("p1", 123);
- // try {
- // target.testException();
- // } catch (Exception e) {
- // e.printStackTrace();
- // }
- }
- }
运行结果:

9、总结
以上就是springAOP的切入增强的方式,
为什么要存在切入增强?
切入增强是为了拦截某个切入点,然后在该切入点进行扩展现有行为。
要使用在什么样的场景?
1、用于日志打印
2、用于全局异常处理拦截
3、返回值统一处理
4、多数据源切换其目的是对业务逻辑的各个部分进行分拆,从而使得业务逻辑各部分之间的耦合度降低,提高程序的可重用性,同时提高了开发的效率。
万物明朗,可可爱爱!
愿你天天有个好心情,热爱每一段代码!
ଘ(੭ˊᵕˋ)੭ (开心) ଘ(੭ˊᵕˋ)੭ (开心)ଘ(੭ˊᵕˋ)੭ (开心)ଘ(੭ˊᵕˋ)੭ (开心)ଘ(੭ˊᵕˋ)੭ (开心)
------不写代码不会凸的小刘 -
相关阅读:
【Element UI】解决 el-dialog 弹框组件设置 custom-class 样式不生效问题
SpringBoot 中使用 RabbitTemplate
Linux的权限管理操作
跨域问题解决方案(三种)
什么是 SudoSwap,如何使用 NFT AMM 进行高效交易?
Nginx:反向代理(示意图+配置)
本地yum源-如学
中国这么多 Java 开发者,应该诞生出生态级应用开发框架
Redis的安装和配置
聚观早报 | 推特临时培训员工应对世界杯;世界杯足球内置传感器
- 原文地址:https://blog.csdn.net/qq_40834643/article/details/126759264
